
Now that you have created an NPC that talks to the player, it is time to allow the NPC to help the player. In this chapter, we will use the NPC as a shop owner, displaying items for the user to buy. Before we do this, the user is going to need some sort of currency to buy the items. We will cover the following topics in this chapter:
- Setting and getting gold instances
- Item data
- The shop screen framework
- The item button framework
- Linking the item data
While we move on to making a shopping interface, via the Shop button, we must first be able to pull the currency in order to pay for items in the shop. In a previous chapter, we discussed and made placeholders for gold, but we did not actually create gold values. In this game, we would like gold to be dropped by enemies at the end of battle. In this case, enemies will need some sort of gold data that we can add to the player's gold data (eventually, items will need this gold data that is tied to them as well). In Chapter 4, Pause Menu Framework, we created a pause menu that has a gold placeholder, and we will now add gold to this pause menu.
First, let's add a Gold property to FEnemyInfo.h. Navigate to Source | RPG | Data, open FEnemyInfo.h, and add a Gold property of an integer data type to your EnemyInfo table, as follows:
UPROPERTY( BlueprintReadOnly, EditAnywhere, Category = "EnemyInfo" )
  int32 Gold;
We now need to tie the Gold property with our standard GameCharacter properties so that we can update any instance of an enemy with the proper gold value. Next, you will open GameCharacter.h, which is located in RPG under Source, and add a public UProperty to the UCharacter class for gold similar to that in FEnemyInfo.h:
UPROPERTY(BlueprintReadWrite,EditAnywhere, Category = CharacterInfo)
  int32 Gold;
Then, head into GameCharacter.cpp to set the return value of the gold that is equal to the value set in EnemyInfo, so that each instance of this particular enemy will return the amount of gold set in the enemy's data table:
character->Gold = enemyInfo->Gold;
When you are finished, the enemy's character information in GameCharacter.cpp will look like this:
UGameCharacter* UGameCharacter::CreateGameCharacter(FEnemyInfo* enemyInfo, UObject* outer)
{
 UGameCharacter* character = NewObject<UGameCharacter>(outer);

 character->CharacterName = enemyInfo->EnemyName;
 character->ClassInfo = nullptr;

 character->MHP = enemyInfo->MHP;
 character->MMP = 0;
 character->HP = enemyInfo->MHP;
 character->MP = 0;

 character->ATK = enemyInfo->ATK;
 character->DEF = enemyInfo->DEF;
 character->LUCK = enemyInfo->Luck;
 character->Gold = enemyInfo->Gold;

 character->decisionMaker = new TestDecisionMaker();
 character->isPlayer = false;
 return character;
}
We now need to choose when to accumulate the gold, and in this case, we will accumulate the gold from combat. So, navigate to Source | RPG | Combat, open CombatEngine.h, and create a public gold variable that we will use to store all the gold won in the battle:
int32 GoldTotal;
When you have finished declaring the GoldTotal variable, the CombatEngine.h file will look like this:
#pragma once
#include "RPG.h"
#include "GameCharacter.h"


/**
 *
 */
enum class CombatPhase : uint8
{
 CPHASE_Decision,
 CPHASE_Action,
 CPHASE_Victory,
 CPHASE_GameOver,
};

class RPG_API CombatEngine
{
public:
 TArray<UGameCharacter*> combatantOrder;

 TArray<UGameCharacter*> playerParty;
 TArray<UGameCharacter*> enemyParty;

 CombatPhase phase;
 int32 GoldTotal;

protected:
 UGameCharacter* currentTickTarget;
 int tickTargetIndex;
 bool waitingForCharacter;

public:
 CombatEngine(TArray<UGameCharacter*> playerParty,
  TArray<UGameCharacter*> enemyParty);
 ~CombatEngine();

 bool Tick(float DeltaSeconds);

protected:
 void SetPhase(CombatPhase phase);
 void SelectNextCharacter();
};
The next step that we need to perform is telling the engine when to give the gold to the player. As mentioned earlier, we want players to win gold from enemies that can easily be integrated into our combat engine. Navigate to Source | RPG | Combat, and open CombatEngine.cpp. Let's first scroll down to the for loop that we created in Chapter 3, Exploration and Combat, to check for a victory. Just above this for loop, declare a new Gold integer, and set it to 0:
int32 Gold = 0;
This will assure that, if we don't have a victory and need to cycle through the for loop again, the gold gained in battle will reset to 0. Next, we need to accumulate the gold from every enemy killed; thus, within the for loop, we have Gold increment by each enemy's gold:
Gold += this->enemyParty[i]->Gold;
Your for loop will now look like this:
for( int i = 0; i < this->enemyParty.Num(); i++ )
{
  if( this->enemyParty[i]->HP <= 0 ) deadCount++;
  Gold += this->enemyParty[i]->Gold;
}
After the for loop, you will still have an if condition that checks whether the enemy party is dead; if the enemy party is dead, the combat phase will change to the victory phase. If the condition is true, it means that we won the battle; therefore, we should be rewarded with the gold from the for loop. Since the Gold variable that we want to add is in the GoldTotal variable, we simply set the local Gold variable to the new value of GoldTotal:
GoldTotal = Gold;
When you are finished, your if condition will now look like this:
if (deadCount == this->enemyParty.Num())
 {
  this->SetPhase(CombatPhase::CPHASE_Victory);
  GoldTotal = Gold;
  return false;
 }
Now that we have set enemies to drop gold after the player is victorious in battle, the next thing that we need to do is add gold to our game data; more specifically, it would be best to add it in RPGGameInstance.h, since an instance of the game will always be active. It would be unwise to add the gold data to a party member unless there is a specific party member who will always be in the game. So, let's open RPGGameInstance.h located in RPG under Source.
As a public property, add another integer to Game Data that we will call GameGold. Also, ensure that GameGold is read- and write-enabled because we want to be able to add and subtract gold; therefore editing of GameGold must be enabled:
UPROPERTY(EditAnywhere, BlueprintReadWrite, Category = "Game Data")
    int32 GameGold;
Now that we can create instances of GameGold, go to your RPGGameMode.cpp file where you originally set up the logic for the game over and victory conditions; in the victory condition, create a pointer to URPGGameInstance that we will call gameInstance, and set it equal to a cast to GetGameInstance:
URPGGameInstance* gameInstance = Cast<URPGGameInstance>(GetGameInstance());
We can now use gameInstance to add the total gold that we got from the battle to GameGold:
gameInstance->GameGold += this->currentCombatInstance->GoldTotal;
At this point, the value of GameGold that we are using as the player's gold will now be incremented by the gold won in the battle. The tick function in RPGGameMode.cpp will now look like this:
void ARPGGameMode::Tick( float DeltaTime )
{
  if( this->currentCombatInstance != nullptr )
  {
    bool combatOver = this->currentCombatInstance->Tick( DeltaTime );
    if( combatOver )
    {
      if( this->currentCombatInstance->phase == CombatPhase::CPHASE_GameOver )
      {
        UE_LOG( LogTemp, Log, TEXT( "Player loses combat, game over" ) );

        Cast<URPGGameInstance>( GetGameInstance() )->PrepareReset();

        UUserWidget* GameOverUIInstance = CreateWidget<UUserWidget>( GetGameInstance(), this->GameOverUIClass );
        GameOverUIInstance->AddToViewport();
      }
      else if( this->currentCombatInstance->phase == CombatPhase::CPHASE_Victory )
      {
        UE_LOG( LogTemp, Log, TEXT( "Player wins combat" ) );
        //add gold to total gold
        URPGGameInstance* gameInstance = Cast<URPGGameInstance>(GetGameInstance());
        gameInstance->GameGold += this->currentCombatInstance->GoldTotal;

        // enable player actor
        UGameplayStatics::GetPlayerController( GetWorld(), 0 )->SetActorTickEnabled( true );
      }

      for( int i = 0; i < this->currentCombatInstance->playerParty.Num(); i++ )
      {
        this->currentCombatInstance->playerParty[i]->decisionMaker = nullptr;
      }

      this->CombatUIInstance->RemoveFromViewport();
      this->CombatUIInstance = nullptr;

      delete( this->currentCombatInstance );
      this->currentCombatInstance = nullptr;
      this->enemyParty.Empty();
    }
  }
}
Now, you need to make sure that all your changes are saved and recompile your entire project (you may need to restart UE4).
We can now adjust the gold value of each enemy character that we have from the enemy's Data Table. In Content Browser, navigate to the Enemies Data Table located at Data under Content. In the Data Table, you will now see a Gold row. Add any value that you want to the Gold row, and save the Data Table:

Now that an enemy has a gold value, there is a real value that is bound to the Gold variable in EnemyInfo that gets added to GameGold if the player is victorious in battle. However, we need to display that gold; luckily, we still have a placeholder for the gold in our pause menu. Open the Pause_Main Widget Blueprint, and click on the Editable_Gold Text Block that we created in Chapter 4, Pause Menu Framework. In the Details panel, go to Content and create a binding for the Text Block, which will open the graph for Get Editable Gold Text:

The first thing that we need to do is get the game instance of RPGGameInstance by creating a Get Game Instance function located under Game and setting it as an object of Cast To RPGGameInstance:

We can then get the GameGold variable from RPGGameInstance, which is the variable that stores the current gold total for the game. It is located in Game Data under Variables. Link it to the As RPGGameInstance pin in Cast To RPGGameInstance:
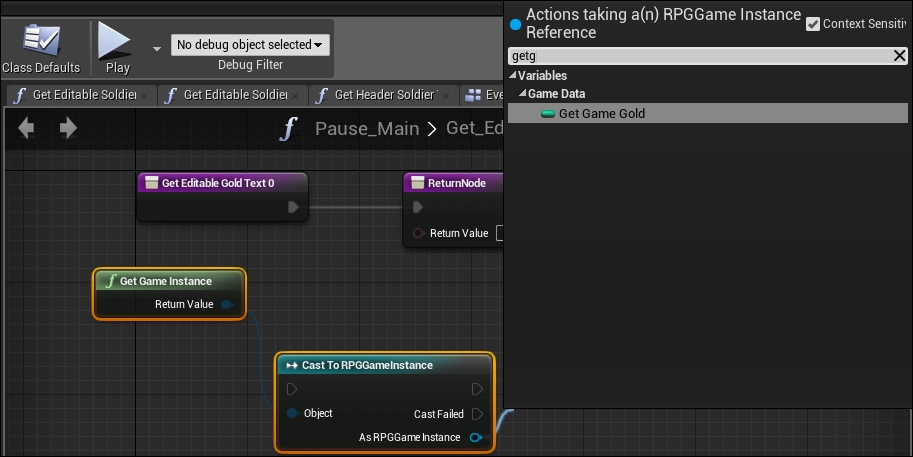
Lastly, link Game Gold to Return Value in ReturnNode and allow Get Editable Gold Text to trigger Cast To RPGGameInstance, which will trigger ReturnNode. Your Get Editable Gold Text binding will now look like this:

If you test this now, you will be able to get into battle, win gold from your enemies on victory, and now you will be able to see your gold accumulate in your pause menu. We can use these same variables to add to any menu system, including a shop.