
In this recipe, we'll build a small framework to generate optimized cube meshes, which can be used to create large-scale worlds. This framework will consist of an AppState object to handle user actions, a class called CubeWorld that will store the terrain data, and a class called CubeCell that will store the data for individual cells. In addition, there is a CubeUtil class that will help us to generate meshes.
This is an advanced recipe that requires an understanding the generation of a basic terrain, which can be found earlier in the chapter, and the building blocks of meshes and how to create custom meshes.
Before we begin, we will create a class called CubeUtil and populate it with some shaped data that we will need later. Since each of the cells is of a box shape, we can borrow some fields from the Box and AbstractBox classes and save some time in setting it up. Just copy the GEOMETRY_INDICES_DATA, GEOMETRY_NORMALS_DATA, and GEOMETRY_TEXTURE_DATA fields to the CubeUtil class.
At the bottom of the class, there is a method called doUpdateGeometryVertices that contains a float array. Copy this float array too and call its vertices. This array contains data for the 24 vertices needed to create a cube with normal. It in turn relies on references to eight original vertex positions. We can get these from the AbstractBox class and the computeVertices method. The Vector3f center referenced here can be replaced with Vector3f.ZERO. The xExtent, yExtent , and zExtent parameters can be replaced with 0.5f to get a square box with 1f sides.
We start by creating the object that contains the cell data. This will have the following seven steps:
- First, create a new class called
CubeCell. - It contains a
Meshfield callmesh, an array of six Booleans calledneighbors, and another Boolean calledrefresh. - In addition, there is enum called
Typewhere we can put names such asRock,Sand, andGrass. Then, add aTypefield calledtype. - Create a method called
hasNeighborthat takes an integer parameter as an input and return the corresponding Boolean from the array. - Then, add a method called
setNeighborthat takes both an integer parameter calleddirectionand a Boolean parameter calledneighboras the input. If the current Boolean at the position of the direction is not the same as that of the neighbor, store the neighbor at that location and setrefreshtotrue. - Add a method called
requestRefreshthat setsrefreshtotrue. - For a mesh, add a
getMeshmethod, and inside this, call a method calledCubeUtil.createMeshif the mesh is null or refresh it if it istrue. This will also setrefreshtofalseas follows:if(mesh == null || refresh){ mesh = CubeUtil.createMesh(this); refresh = false; } return mesh;
Now, let's return to the CubeUtil class where we add some helper methods to generate the world. This section has the following steps:
- First, add a
createMeshmethod that takes aCubeCellparameter as the input. This method will create a mesh for the cell, and here you'll use the data we set up in the Getting Ready section of this recipe. - First of all, place the vertex data in the mesh with the following line of code:
m.setBuffer(VertexBuffer.Type.Position, 3, BufferUtils.createFloatBuffer(vertices));
- Add indices to the sides of the mesh that are exposed and check the neighbors to see which ones these are. Then, add six indices (for two triangles) for each mesh to a list using
GEOMETRY_INDICES_DATA, as follows:List<Integer> indices = new ArrayList<Integer>(); for(intdir = 0; dir < 6; dir++){ if(!cube.hasNeighbor(dir)){ for(int j = 0; j < 6; j++){ indices.add(GEOMETRY_INDICES_DATA[dir * 6 + j]); } } } - To add these to the mesh, first convert them into an array. Then, set the array as the index buffer, as follows:
m.setBuffer(VertexBuffer.Type.Index, 1, BufferUtils.createIntBuffer(indexArray));
- For texture coords and vertex normals, simply use the data we have already set up as follows:
m.setBuffer(VertexBuffer.Type.TexCoord, 2, BufferUtils.createFloatBuffer(GEOMETRY_TEXTURE_DATA));
m.setBuffer(VertexBuffer.Type.Normal, 3, GEOMETRY_NORMALS_DATA);
- Now, return the mesh to the calling method.
- Add one more method called
generateBlockto theCubeUtilclass and create a 3D array ofCubeCelland return it. The principle for it is the same as the heightmap we created in the Using noise to generate a terrain recipe, except here we use three dimensions instead of two. The following code with generate aCubeCellclass in a 3D pattern:CubeCell[][][] terrainBlock = new CubeCell[size][size][size]; for(int y = 0; y < size; y++){ for(int z = 0; z < size; z++){ for(int x = 0; x < size; x++){ double value = fractalSum.value(x, y, z); if(value >= 0.0f){ terrainBlock[x][y][z] = new CubeCell(); } } } }
We can now look at how to tie these two classes together and start generating some cubes. This will be performed in the following steps:
- We turn our attention to the
CubeWorldclass that will hold the information about all our cubes. It has aNodefield calledworld, an integer file calledbatchSize, and array ofMaterialcalledmaterialsand, for this example, a singleCubeCell[][][]array calledterrainBlock. - After initializing the
worldNodeclass in the constructor, create a public method calledgenerate. Inside this, callCubeUtil.generateBlock(4, batchSize)and store it interrainBlock. - Then, call and create another method called
generateGeometrythat will put all theCubeCellclasses together into aNodeclass. - First, check whether the
worldNodeclass already has a node with a given name. If it does, detach it. In either case, create a newBatchNodefield with the same name we checked for. - Now, parse through the whole of the
terrainBlockarray and all the locations where there is aCubeCellclass; we will check 6 directions (either side of it). For each side, check whether there is a neighbor there; there will be one if the position is not null. In that case, callsetNeighboron the cell you're checking for and supply the direction of the current as follows:for(int y = 0; y < batchSize; y++){ repeat for x and z if(terrainBlock[x][y][z] != null){ for(inti = 0; i < 6; i++){ Vector3f coords = CubeUtil.directionToCoords(i); if(coords.y + y > -1 && coords.y + y < batchSize){ repeat for x and z if(terrainBlock[(int)coords.x + x][(int)coords.y y][(int)coords.z + z] != null){terrainBlock[x][y][z].setNeighbor(i, true); } else {terrainBlock[x][y][z].setNeighbor(i, false); } } } } } - The next step is to create geometries for the
CubeCellinstances. Do this by again parsing through theterrainBlockfield, and where the correspondingCubeCellis not null, create a newGeometryclass by calling theCubeCell'sgetMesh'method. Then, move it to the right position usingx,y, andzthat we're iterating over, and apply a material and attach it to the batch node as follows:Geometry g = new Geometry("Cube", terrainBlock[x][y][z].getMesh() ); g.setLocalTranslation(x, y, z); g.setMaterial(materials[0]); node.attachChild(g); - Finally, in the
generateGeometrymethod, callnode.updateModelBound()andnode.batch()to optimize it before attaching it toworldNode. - The basic of the generation process is now in place, and you can create a new class called
CubeWorldAppStatethat extendsAbstractAppState. In this case, add aCubeWorldfield calledcubeWorld. - Override the
initializemethod and declare a newcubeWorldinstance. - Then, load a new material based on the Lighting material's definition and supply it to
cubeWorld. After this, callcubeWorldand generate and attachworldNodethrough its getter method. - Also, add a light to see anything since we're using the Lighting material.
- Now, create an application where we attach this
Appstateinstance and we should see our block ofCubeCellin the world. It's static, however, and it's very common to want to change the world.
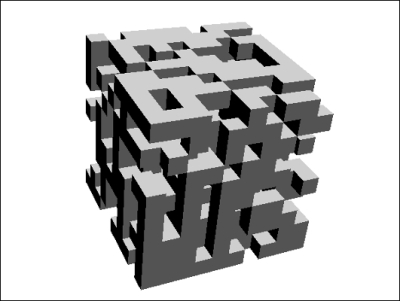
Let's see how we can add the functionality to pick up and place blocks. The following figure is of a resulting terrain block:
- Begin in
CubeWorldAppStateby implementingActionListenerto handle user input. Add aCubeCellfield calledtakenCubeto store aCubeCellfield that has been picked up. - Add mappings to
inputManagerto pick up and place aCubeCellfield. Use the left and right mouse button as shown in the following lines of code:inputManager.addMapping("take", new MouseButtonTrigger(MouseInput.BUTTON_LEFT)); inputManager.addMapping("put", new MouseButtonTrigger(MouseInput.BUTTON_RIGHT)); - Then, create a method called
modifyTerrainthat takes a Boolean calledpickupCubeas the input. - To control what is picked up or aimed at, use a pattern that we have established in the Firing in FPS recipe of Chapter 2, Cameras and Game Controls. Use a ray that originates from the camera and moves toward the camera's direction.
- Now, collide it with the
worldnodeclass ofcubeWorld. If it collides with something and the distance is lower than two (or some other arbitrary number) andpickupCubeis true, we will pick up a cube. Get theworldTranslationvector of the geometry that the ray has collided with. Then, call a method calledchangeTerrainincubeWorld. We'll create the method in a short while. Now, supply it with the coordinates of the geometry it collides with and the currently emptytakenCubefield as follows:if(coll != null && coll.getDistance() < 2f && pickupCube){ Vector3f geomCoords = coll.getGeometry().getWorldTranslation(); takenCube = cubeWorld.changeTerrain(geomCoords, takenCube); } - If instead, there is no collision or the collision is too far away, and at the same time
pickupCubeisfalseandtakenCubeis not null, try to placetakenCubein the world. Since we don't have a collision point, move some way along the direction of the camera and round it off to the nearest integer. Then, callcubeWorld.changeTerrainagain with the coordinates along withtakenCube, as follows:Vector3f geomCoords = cam.getLocation().add(cam.getDirection().mult(2f)); geomCoords.set(Math.round(geomCoords.x), Math.round(geomCoords.y), Math.round(geomCoords.z)); takenCube = cubeWorld.changeTerrain(geomCoords, takenCube);
- In the
onActionmethod, add the logic for the corresponding key press and callmodifyTerrain, supplying eithertrueif we're picking up orfalseif we're instead trying to place aCubeCellfield. - In the
CubeWorldclass, create thischangeTerrainmethod that takes aVector3fparameter calledcoordsand aCubeCellparameter calledblockToPlaceas the input. TheCoordsparameters represent the location of aCubeCellinstance. ThechangeTerrainmethod returns aCubeCellinstance. - The first thing we will do is define a
CubeCellfield calledchangedBlockwhere we store the incomingblockToPlace. - Then, do a check to make sure the supplied coordinate is within the bounds of the
terrainBlockarray and then check whetherchangedBlockis null. If it is, pick up theCubeCellinstance from this location and populatechangedBlockwith theCubeCellinstance. Then, set the location'sCubeCellto null as follows:if(changedBlock == null){ changedBlock = terrainBlock[x][y][z]; terrainBlock[x][y][z] = null; } - If instead the
CubeCellinstance at this location is null (we already know thatchangedBlockis not null), set theCubeCellinstance over here tochangedBlockandchangedBlockto null. Also, callrequestRefreshon theCubeCellinstance to force it to update the mesh, as follows:else if(terrainBlock[x][y][z] == null){ terrainBlock[x][y][z] = changedBlock; terrainBlock[x][y][z].requestRefresh(); changedBlock = null; } - Finally, if there has been a change made, call
generateGeometryand returnchangedBlockto the calling method.
This recipe is mostly about creating meshes that are as optimized as possible. Cubes are great building blocks, but each has 12 triangles, and rendering them all for hundreds or thousands will quickly slow down most systems. In the first part of the recipe, we implemented functionalities to create meshes that only had the exposed sides of the cube's generated triangles. We found this out by checking which of the positions next to the cube were occupied by other cubes.
Once all the cubes were generated, we added them to BatchNode and batched it to create one mesh for all the cubes. Even if the polygon count is the same, decreasing the number of objects greatly enhances the performance.
Having a single mesh means we can't change a single object in the mesh without regenerating the whole batch. If we plan to scale this up and generate a whole world, we need to keep the size of the batch to a size where we can regenerate it without creating slowdowns. Exploring a way to generate it on a separate thread might be a good next step.