
Policy configuration is the primary step performed prior to scanning. Policy configuration, in simple terms, means setting up Nessus with the most optimized configuration for scanning based on the target infrastructure.
The key parameters that can be configured while setting up a policy are as follows:
- Name of the policy
- Type of port scanning required
- Performance of scan in terms of maximum checks per scan in parallel and so on, which will decide on the scan time
- Option of entering credentials for the infrastructure being scanned locally
- Option to select the most appropriate plugins
- Advance preference option to provide different drop-down options to choose configuration to further fine tune the policy depending on the target; for example, database-compliance checks, Cisco IOS compliance checks, and so on
Nessus provides an option to upload a scan policy if you already have it from somewhere else. Similarly, the option to export and copy an existing policy is also available. If you have multiple Nessus systems, you may want to use export and upload options to have the same policies on all Nessus systems. You can also delete a policy if you are no longer using it.
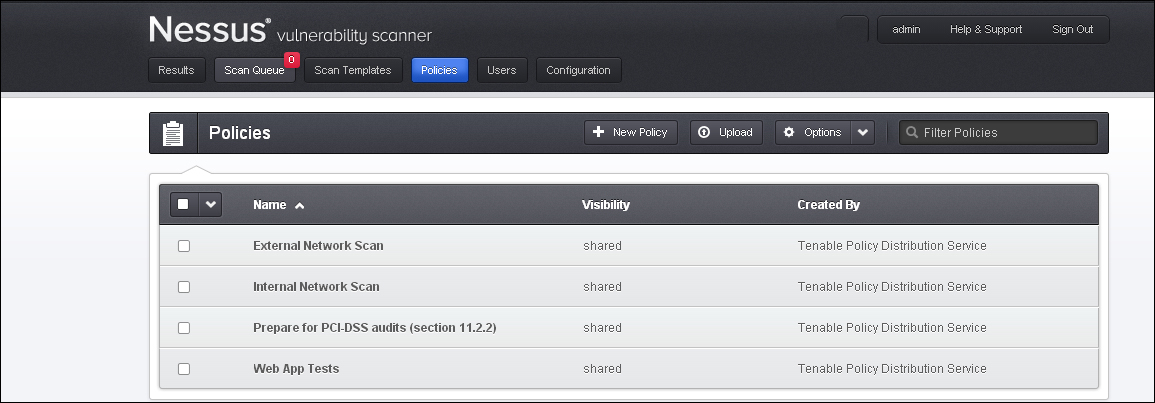
By default, there are four default policy templates that are preloaded in the Nessus scanner; these templates will enable the user to start scanning using these basic policies and to get an idea of how a typical policy configuration will look or to customize them as per our requirement.
The default policies are listed as follows:
- External network scan
- Internal network scan
- PCI DSS audit policy
- Web application testing policy
These policies are self-explanatory. If you want to scan an external network, use the external network scan policy; if you want to scan the internal network, use the internal network scan policy; if you want to conduct a scan for the PCI DSS purpose, use the PCI DSS audit policy, and lastly, if you want to scan an application for web-application-related vulnerabilities, such as cross-site request forgery, cross-site scripting, and SQL injections, use the web application testing policy.
It is recommended to use these default policies as base templates to create your own customized policies. You may want to copy the existing default policy and save it with a new name as per your scanning requirements.
The next section will familiarize you with the different options available while setting up a scan policy in Nessus. To start configuring a new scan policy, click on the + New Policy option under the policy tab. Under this tab, there are four policy setting options available, namely General Settings, Credentials, Plugins, and Preferences.
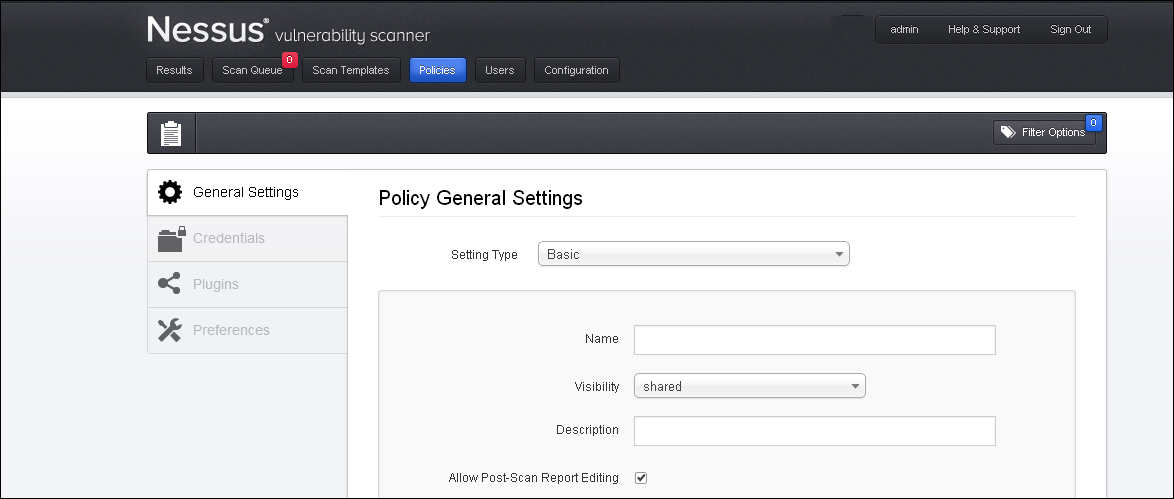
The General Settings tab enables the user to set general information, such as scan name, scan setting type, and description. The settings available under this setting are basic, port scanning, performance, and advanced.
The Basic setting includes the following options:
- Name: This option allows assigning a unique name to the policy
- Visibility: This option allows the policy to be shared with others or keep for private use; only administrative users are allowed to share the policy
- Description: This option provides an option to add a description to the policy for future reference; for example, the description of a policy configured for database scanning can be updated in a way for the user to recall and use the policy as per the purpose it was set for
- Allow Port- Scan Report Edit: This option allows you to delete the items in the report post port scanning; typically, this should be disabled while conducting the scan from the compliance perspective to showcase that the report was not tampered, as shown in the following screenshot:
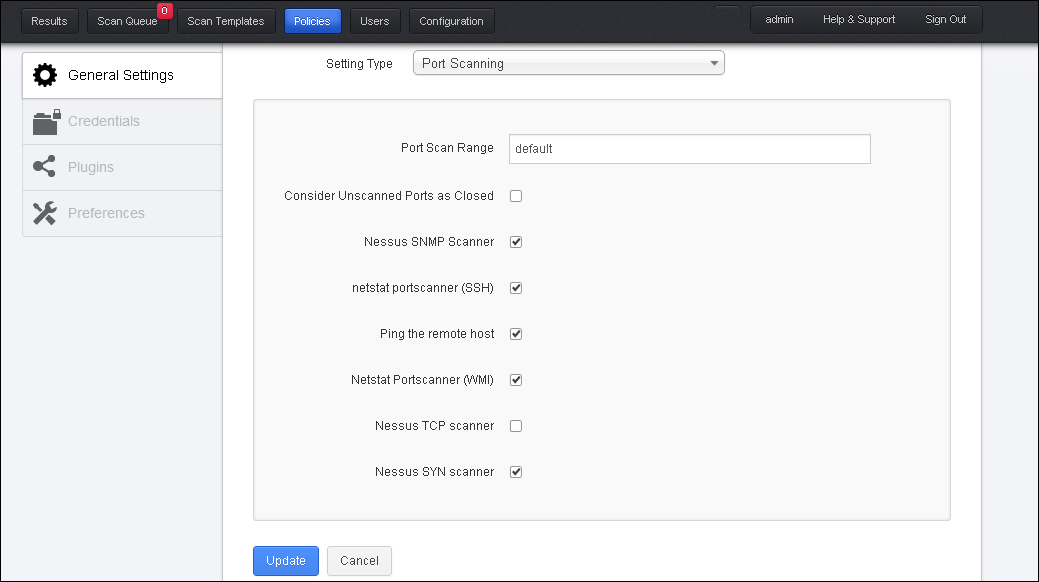
The Port Scanning setting includes the following options:
- Port Scan Range: It specifies the number of ports to be scanned. default indicates 4,790 common ports found in the Nessus-services file, ALL indicates all 65,365 ports. A specific port range can also be specified by using the
-symbol. Also, scanning different range of ports for TCP and UDP in the same policy can be done usingt:andu:followed by a port range. A different range of ports for TCP/UDP in the same policy can be specified using a comma sign; for example,T 90;1000,U:350-400. - Consider Unscanned Port as Closed: If this option is selected in the policy, Nessus will consider the port as closed if Nessus is not able to scan the port.
- Nessus SNMP Scanner: It allows Nessus to target the SNMP service while scanning; this is complimented by adding the SNMP setting in the policy's Preference section for better scan results.
- netstat portscanner (SSH): This option uses the
netstatcommand available over SSH connection to find open ports in a UNIX system. This command requires authentication credentials. - Ping the remote host: This option helps to find live systems by pinging the ports. Based on the ping response, Nessus will identify it as open.
- Netstat Port Scanner (WMI): This option uses the
netstatcommand available over the WMI connection to find open ports in a Windows system. This command requires authentication credentials. - Nessus TCP Scanner: This option is Nessus in-built option to find open TCP ports.
- Nessus SYN Scanner: This option uses Nessus in-built SYN scan feature to identify an open port.
The Performance setting includes the following options:
- Max Checks Per Host: This option enables Nessus to perform maximum number of checks that Nessus launched against a single target machine at one time.
- Max Hosts Per Scan: This option enables Nessus to scan maximum number of hosts Nessus will scan in parallel.
- Network Receive Timeout (seconds): This option shows the maximum time Nessus will wait for a host to respond. This value is set to 5 seconds as default and can also be superseded by the value mentioned in a particular plugin. This can be set to a higher value in case of slow connection.
- Max Simultaneous TCP Sessions Per Host: This option limits the maximum number of TCP sessions to a single target machine.
- Max Simultaneous TCP Sessions Per Scan: This option limits the maximum number of TCP sessions for the whole period of scanning, no matter how many target machines are scanned.
- Reduce Parallel Connections on Congestion: This option enables Nessus to reduce the number of packets being sent on the network to avoid choking the network bandwidth.
- Use Kernel Congestion Detection (Linux Only): This feature is available for Nessus scanners deployed on Linux. Once this option is enabled, Nessus will monitor CPU and other internal parameters and will modify the resource utilization accordingly.
The Advanced setting includes the following options:
- Safe checks: This option disables plugins, which might have an impact on the target machine. It is important to select this option to run a safe scan.
- Silent dependencies: This option, if checked, includes a list of dependencies not in the report.
- Log Scan Details to Server: This option logs additional information to the Nessus server log; this helps to evaluate a scan from the plugin's perspective, that is, it helps to determine whether a particular plugin was launched and used.
- Stop host scan on disconnect: If this option is enabled, Nessus will stop scanning the target machine, if it feels the target machine is not responding back to the packets being sent. This may happen due to some reason, such as the target machine being turned off or traffic to the target machines is blocked.
- Avoid sequential scans: A list of hosts under the scope of scanning can be fed to Nessus; if this option is chosen, Nessus will conduct the scan in a random manner instead of going sequentially.
- Designate hosts by their DNS name: This option enables the use of hostname in the report prepared post scanning instead of the IP address of the target machine.
Nessus offers a feature to perform credentialed or authenticated scans. With this option, Nessus is able to log in to the local system to find local system level vulnerabilities, such as missing patches and operating system settings. Typically, these vulnerabilities are not highlighted by Nessus in case of a noncredential scan over the network. In short, the credential scan option helps to find local vulnerabilities of the system after logging in to the system using the credential provided. A credential scan performs the same operations as the local user of the system; it depends on the level of access granted to the local user account used by Nessus.
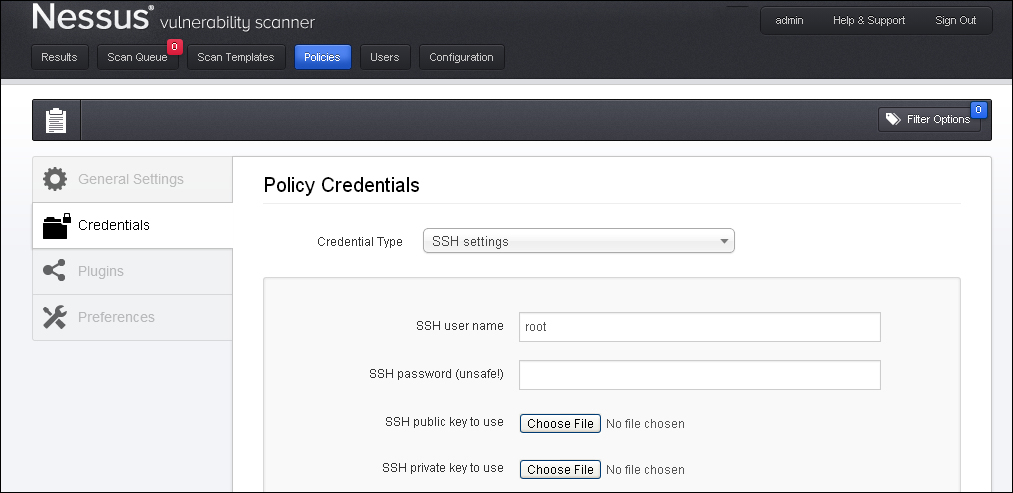
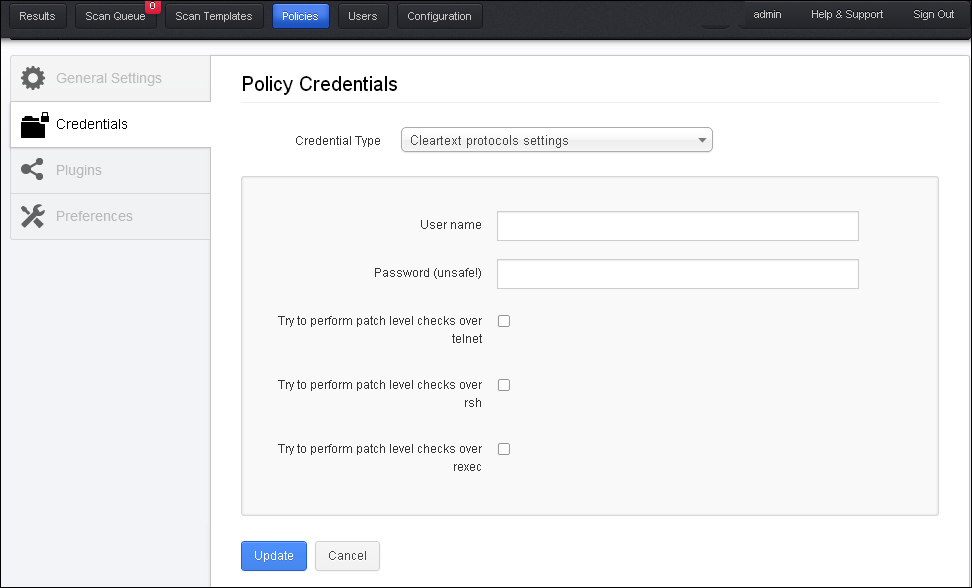
The following screenshot shows the option to configure a credential scan for Windows credentials, SSH settings, Kerberos configuration, and Cleartext protocol settings:
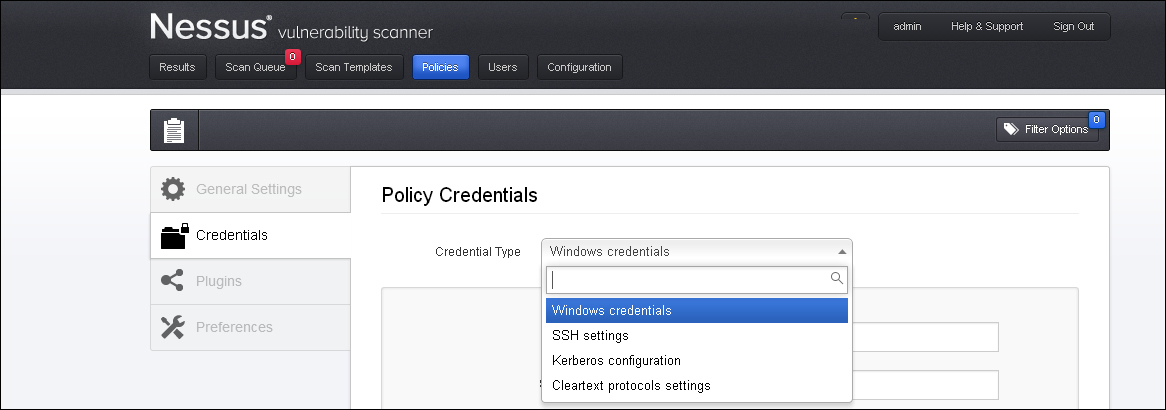
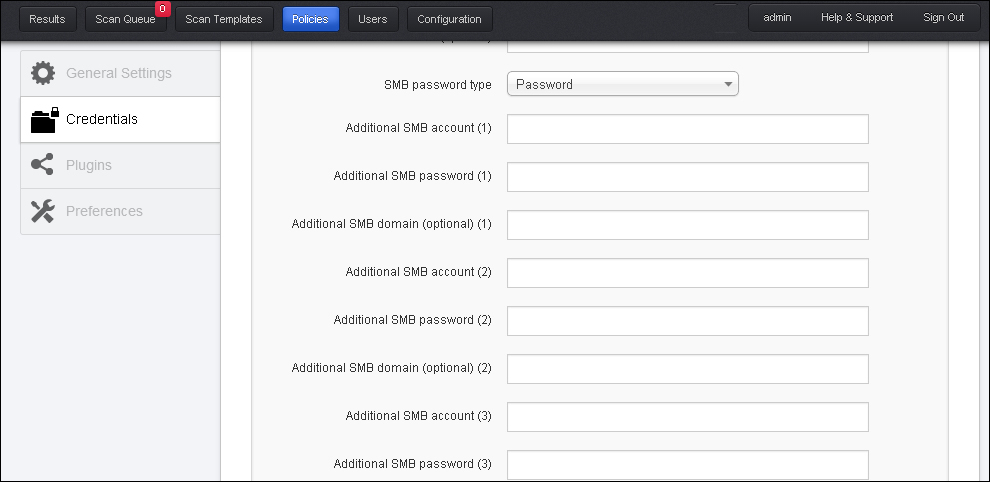
Under the Windows credential option, Nessus captured the Server Messaging Block (SMB) configuration details. SMB is a file sharing protocol, which will help Nessus to unearth local vulnerabilities in a Windows system. It is always recommended to use an account with administrative privileges for the best possible results of a credentialed scan.
The SMB domain field is optional and Nessus will be able to log in with domain credentials without this field. The username, password, and optional domain refer to an account that the target machine is aware of.
Even if credentials are not used, Nessus will attempt to log in to a Windows server with the following combinations:
- Administrator without a password
- A random username and password to test guest accounts
- No username or password to test null sessions
Nessus supports several different types of authentication methods for Windows-based systems. Each of these methods take a username, password, and domain name (sometimes optional for authentication). The setting option enables you to specify the use of NTLM or Kerberos option.
The SSH settings option from the drop-down menu allows you to enter credentials for scanning UNIX systems. Credentials are used to obtain local information from remote UNIX systems. The field for entering the SSH username for the account will perform the checks on the target UNIX system along with either the SSH password or the SSH public key, and private key pair. There is also a field for entering the passphrase for the SSH key, if it is required.
The most effective credentialed scans are those when the supplied credentials have root privileges. As many sites do not permit a remote login as root, Nessus users can invoke su, sudo, su+sudo, or dzdo with a separate password for an account that has been set up to have su or sudo privileges.
If an SSH known_hosts file is available and provided as part of the scan policy, Nessus will only attempt to log in to hosts in this file. The preferred SSH port can be set to direct Nessus to connect to SSH, if it is running on a port other than 22. If an account, other than root, is to be used for privilege escalation, it can be mentioned under the Elevate Privileges with option.
Best practices recommend using SSH keys for authentication rather than SSH passwords. This will assure that the same username and password used for auditing the SSH server are not used to attempt a log in to a system that may not be under your control.
The Kerberos configuration option allows you to specify credentials using Kerberos keys from a remote system.
Plugins are the files used by Nessus for vulnerability checks. These plugins are updated on a regular basis with the latest vulnerability checks as they become available.
The plugins are divided into product families to enable an accurate and effective grouping of similar plugins together. Thus, by choosing the appropriate plugins family, a large number of applicable/not applicable plugins can be enabled or disabled efficiently and with minimal clicks.
Also, Nessus releases new plugins as and when new vulnerabilities are released.
The following screenshot shows how the Policy Plugin Configurations window will look:
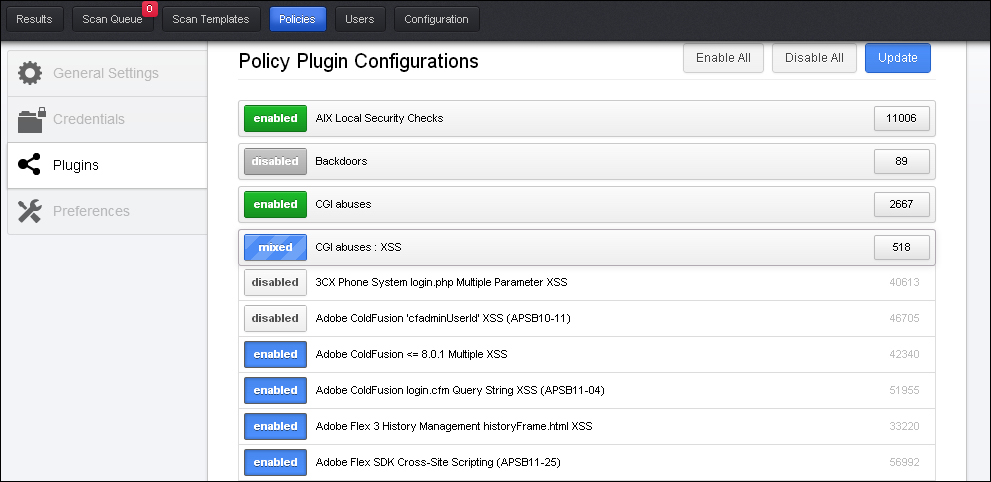
The following table represents the plugin color and their meaning. Basically, this represents the number of plugins enabled from a particular plugin family.
|
Color |
Meaning |
|---|---|
|
Green |
It represents that all the plugins in a family are enabled. |
|
Grey |
It represents that all the plugins in the family are disabled. |
|
Blue |
It represents a mixed selection where within a plugins family, some of the plugins are selected and some deselected. |
The details of plugins selected will also be represented in the report against the vulnerability found due to a particular plugin.
On top of the Plugins page, a filtering option is available. This option allows choosing plugins, which is enabled with a policy by applying filters.
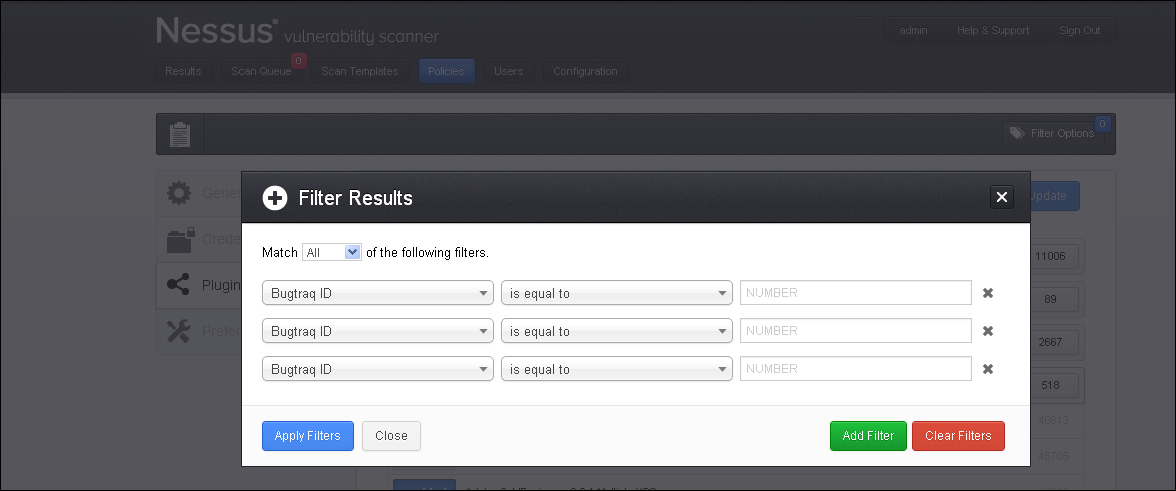
Filters can be added and removed by using the ADD Filter and CLEAR Filters button, respectively. Nessus also gives a Match option with Any and All. The Any option means that any one of the filter options specified is met. The All option means that the entire filter condition, which is mentioned should be specified.
By using filter options, the most optimized scanning plugins can be chosen. Also, it is recommended to first display all filters and apply the policy using the filtering option.
The details of the different plugin families and filtration criteria can be looked into in the Tenable documentation:
"The "Denial of Service" family contains some plugins that could cause outages on a network if the "Safe Checks" option is not enabled, but does contain some useful checks that will not cause any harm. The "Denial of Service" family can be used in conjunction with "Safe Checks" to ensure that any potentially dangerous plugins are not run. However, it is recommended that the "Denial of Service" family not be used on a production network."
Preferences are the deeper settings of a Nessus policy, which are dynamic in nature. Dynamic means the options in the drop-down menu to configure preference settings may vary depending on the plugins and feed license.
These settings can be chosen by the person creating the scan policy depending on the target system's requirement. For example, if you plan to scan a database then while creating the policy, select Database Settings from the Preferences drop-down menu. This particular setting allows you to key in database details with the database credentials to probe the database further. This will allow your Nessus scan to discover more vulnerability.
I recommend the Nessus website, http://www.tenable.com, for the latest settings and their explanations.