
One of the most interesting aspects for mobile development is interacting with device capabilities such as motion sensors, cameras, and location sensors. While these capabilities are new and fun to many developers, they can also bring a great deal of value to the users of our mobile apps. In this chapter, we will walk through adding location awareness to POIApp including the following topics:
- Setting application permissions
- Obtaining the current longitude and latitude
- Obtaining the address for a longitude and latitude
- Calculating the distance between two locations
- Displaying a POI within the map app
While working with location services on the Android platform, you will primarily work with an instance of LocationManager. The process is fairly straightforward as follows:
- Obtain a reference to an instance of
LocationManager. - Use the instance of
LocationManagerto request location change notifications, either ongoing or a single notification. - Process
OnLocationChange()callbacks.
Android devices generally provide two different means for determining a location: GPS and Network. When requesting location change notifications, you must specify the provider you wish to receive updates from. The Android platform defines a set of string constants for the following providers:
|
Provider Name |
Description |
|---|---|
|
|
This provider determines a location using satellites. Depending on conditions, this provider may take a while to return a location fix. This requires the |
|
|
This provider determines a location based on the availability of a cell tower and Wi-Fi access points. Its results are retrieved by means of a network lookup. |
|
|
This provider can be used to passively receive location updates when other applications or services request them without actually having to request for the locations yourself. It requires the |
You will notice specific permissions in the provider descriptions that must be set on an app to be used.
App permissions are specified in the AndroidManifest.xml file. To set the appropriate permissions, perform the following steps:
- Double-click on
Properties/AndroidManifest.xmlin the Solution pad. The file will be opened in the manifest editor. There are two tabs at the bottom of the screen, Application and Source, which can be used to toggle between viewing a form for editing the file or the raw XML as follows: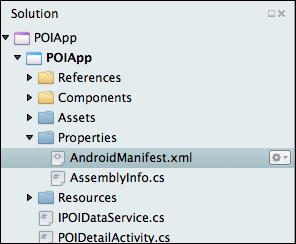
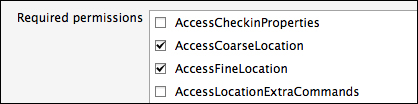
- In the Required permissions list, check AccessCoarseLocation, AccessFineLocation, and Internet. Select File | Save.
- Switch to the
SourceView to view the XML as follows: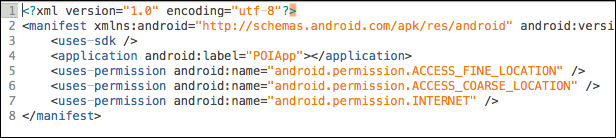
To use an emulator for development, this chapter will require the emulator to be configured with Google APIs so that the address lookup and navigation to map app works.
To install and configure Google APIs, perform the following steps:
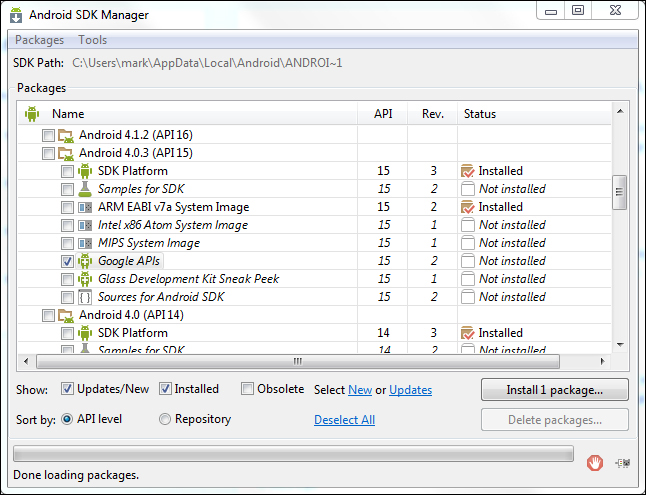
- From the main menu, select Tools | Open Android SDK Manager.
- Select the platform version you are using, check Google APIs, and click on Install 1 package…, as seen in the following screenshot:
- After the installation is complete, close the Android SDK Manager and from the main menu, select Tools | Open Android Emulator Manager.
- Select the emulator you want to configure and click on Edit.
- For Target, select the Google APIs entry for the API level you want to work with; for example, Google APIs (Google Inc.) – API Level 15 was used for the development of the book examples as follows:
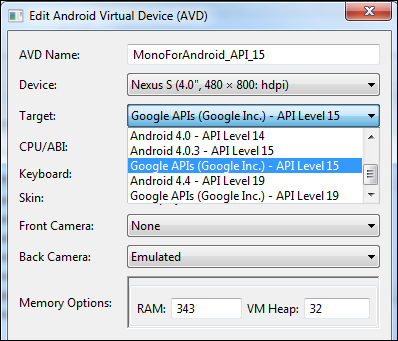
- Click on OK to save.
The LocationManager class is a system service that provides access to the location and bearing of a device, if the device supports these services. You do not explicitly create an instance of LocationManager; instead, you request an instance from a Context object using the GetSystemService() method. In most cases, the Context object is a subtype of Activity. The following code depicts declaring a reference of a LocationManager class and requesting an instance:
LocationManager _locMgr;
. . .
_locMgr = GetSystemService (Context.LocationService) as LocationManager;
The LocationManager class provides a series of overloaded methods that can be used to request location update notifications. If you simply need a single update, you can call RequestSingleUpdate(); to receive ongoing updates, call RequestLocationUpdate().
Prior to requesting location updates, you must identify the location provider that should be used. In our case, we simply want to use the most accurate provider available at the time. This can be accomplished by specifying the criteria for the desired provider using an instance of Android.Location.Criteria. The following code example shows how to specify the minimum criteria:
Criteria criteria = new Criteria();
criteria.Accuracy = Accuracy.NoRequirement;
criteria.PowerRequirement = Power.NoRequirement;
Now that we have the criteria, we are ready to request updates as follows:
_locMgr.RequestSingleUpdate (criteria, this, null);
You will notice that the second parameter to RequestSingleUpdate() must be an object that implements ILocationListener, which defines the following methods:
void OnLocationChanged (Location location);void OnProviderDisabled (string provider);void OnProviderEnabled (string provider);void OnStatusChanged (string provider, Availability status, Bundle extras);
For the most part, we will create blank stubs for all of the methods except OnLocationChanged(). While writing more sophisticated applications, it will be useful to provide implementations for some of the other methods. For example, you might call RequestLocationUpdate() to begin receiving updates and then receive a notification via OnProviderEnabled() that a preferred provider is now available, in which case you would want to stop updates and start them again using the preferred provider.
In POIApp, we have the following two different scenarios for requesting location updates:
- On the
POIListActivityclass, we need to calculate the distance to each listed POI. In this scenario, we want to request location change notifications on an ongoing basis and use the most current location to calculate the distance. - On
POIDetailActivity, we would like to request the current location when adding a new POI. In this scenario, we will want to request a single location change notification.
Now that we have some idea of how to add location services to an app, let's add location services to POIListActivity as follows:
- Declare a private instance of
LocationManagerand obtain a reference inOnCreate()as follows:LocationManager _locMgr; . . . protected override void OnCreate (Bundle bundle) { base.OnCreate (bundle); SetContentView (Resource.Layout.POIList); _locMgr = GetSystemService (Context.LocationService) as LocationManager; . . . - In
OnResume(), obtain the best location provider and callRequestLocationUpdates()to start receiving updates as follows:protected override void OnResume () { base.OnResume (); _adapter.NotifyDataSetChanged (); Criteria criteria = new Criteria (); criteria.Accuracy = Accuracy.NoRequirement; criteria.PowerRequirement = Power.NoRequirement; string provider = _locMgr.GetBestProvider (criteria, true); _locMgr.RequestLocationUpdates(provider, 20000, 100, this); } - Add a call to
RemoveUpdates()inOnPause(). This eliminates unnecessary processing of location changes when thePOIListActivityclass is not visible, as shown in the following code:protected override void OnPause () { base.OnPause (); _locMgr.RemoveUpdates (this); } - Specify that
POIListActivityimplementsAndroid.Locations.ILocationListenerand implement stub methods using theRefactor|Implementinterface. Remove any code placed in the stub methods, we will provide logic forOnLocationChange(). - Add a
CurrentLocationproperty toPOILIstViewAdapter. ThePOIListActivityclass will use this property to communicate location changes to the adapter:public Location CurrentLocation { get; set; } - Add a logic in
OnLocationChanged()to setCurrentLocationonPOIListViewAdapterwhen a location change is received and callNotifyDataSetChange()to cause theListViewto be refreshed as follows:public void OnLocationChanged (Location location) { _adapter.CurrentLocation = location; _adapter.NotifyDataSetChanged (); } - Add logic to the
GetView()method onPOIListViewAdapterto calculate the distance between theCurrentLocationand a POI's location properties and updatedistanceTextViewwith the results. The calculation should only be done ifCurrentLocationis notnulland theLatitudeandLongitudeproperties for the POI being added to theListVieware notnull. If any of these values arenull, simply place??in the distance field to indicate it cannot be calculated at this time as follows:if ((CurrentLocation != null) && (poi.Latitude.HasValue) && (poi.Longitude.HasValue)) { Location poiLocation = new Location (""); poiLocation.Latitude = poi.Latitude.Value; poiLocation.Longitude = poi.Longitude.Value; float distance = CurrentLocation.DistanceTo (poiLocation) * 0.000621371F; view.FindViewById<TextView> (Resource.Id.distanceTextView).Text = String.Format ("{0:0,0.00} miles", distance); } else { view.FindViewById<TextView> (Resource.Id.distanceTextView).Text = "??"; }
The steps for adding location services to POIDetailActivity will be very similar to the previous section, but will be slightly simpler.
Prior to adding the logic, we need to add a few buttons to our app; one for getting our location and one for navigating to the map, which we will cover later in this chapter. We can add these as a row of buttons at the bottom of POIDetail.axml, as depicted in the following screenshot:
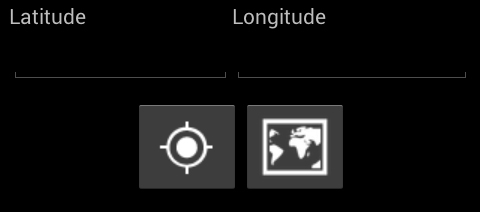
Using ImageButton allows a drawable class to be specified.
To add the ImageButton widgets, perform the following steps:
- Add a
LinearLayoutinstance to the bottom ofPOIDetail.axmljust below theTableLayoutused to arrange the latitude and longitude content. The orientation should be"horizontal". - On the
LinearLayoutinstance, the orientation should be horizontal, the content should be wrapped (both height and width), and it should be centered horizontally in the parent. The layout gravity can be used to center content horizontally within its parent. The top and bottom padding of10dpwill provide a good spacing for the buttons. - Add the two
ImageButtonwidgets,locationImageButtonandmapImageButton, within theLinearLayoutinstance. Images for these buttons can be found in thedrawablefolder in theassetslocation. - The following XML code shows the result:
. . .
</TableLayout>
<LinearLayout
  p1:orientation="horizontal"
  p1:layout_width="wrap_content"
  p1:layout_height="wrap_content"
  p1:layout_gravity="center_horizontal"
  p1:minWidth="25px"
  p1:minHeight="25px"
  p1:layout_marginTop="10dp"
  p1:layout_marginBottom="10dp">
  <ImageButton
    p1:src="@drawable/ic_locate"
    p1:layout_width="wrap_content"
    p1:layout_height="wrap_content"
    p1:id="@+id/locationImageButton" />
  <ImageButton
    p1:src="@drawable/ic_map"
    p1:layout_width="wrap_content"
    p1:layout_height="wrap_content"
    p1:id="@+id/mapImageButton" />
</LinearLayout>
Now that we have buttons on the UI, we can add the code to obtain the location as follows:
- Declare a private instance of
LocationManagerand obtain a reference inOnCreate()in the same way we did forPOIListViewin the previous section. - Add a
GetLocationClickedevent handler and hook it up to theImageButtonas follows:_locationImageButton = FindViewById<ImageButton> (Resource.Id.locationImageButton); _locationImageButton.Click += GetLocationClicked;
- Add a call to
RequestSingleUpdate()inGetLocationClicked(). TheRequestSingleUpdate()method allows for aCriteriaobject to be passed in so that we do not need a separate call toGetBestProvider()as follows:protected void GetLocationClicked(object sender, EventArgs e) { Criteria criteria = new Criteria(); criteria.Accuracy = Accuracy.NoRequirement; criteria.PowerRequirement = Power.NoRequirement; _locMgr.RequestSingleUpdate (criteria, this, null); } - Specify that
POIDetailActivityimplementsAndroid.Locations.ILocationListenerand implement stub methods using theRefactor|Implementinterface. Remove any code placed in the stub methods; we will provide a logic forOnLocationChange(). - Add a logic in
OnLocationChange()to update the location fields as follows:public void OnLocationChanged (Location location) { _latEditText.Text = location.Latitude.ToString(); _longEditText.Text = location.Longitude.ToString (); }
Run POIApp and test adding a new POI and getting the location. While running the app in the emulator, you will notice that apparently nothing happens when the location button is clicked. The app is actually waiting for a callback to OnLocationChanged() from the location manager; to trigger this callback, you must use the Android Device Monitor.
To trigger OnLocationChanged(), perform the following steps:
- Start ADM and select the emulator instance on the left-hand side.
- Click on the Emulator Control tab on the right-hand side. If the Emulator Control tab is not present, navigate to Window | Show View to display the tab. Notice that at the bottom of the panel, there is a nested tab titled Location Controls, as shown in the following screenshot:
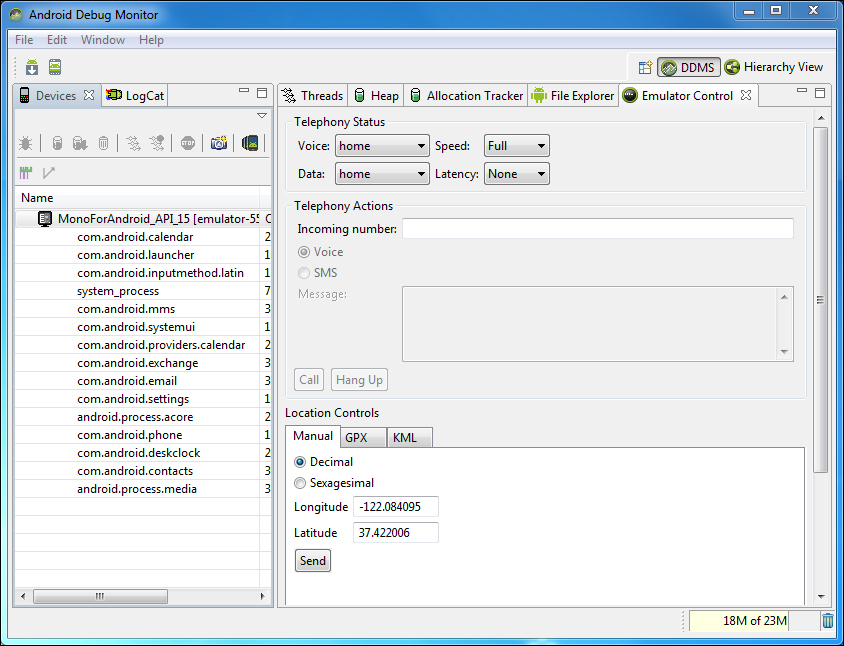
- Select the Manual tab, adjust Longitude and Latitude, if desired, and click on Send. This will cause the
OnLocationChanged()method to be fired onPOIDetailActivity.
Note the other two tabs under Location Controls, that is GPX and KML. These tabs can be used to load a series of location updates from a file and play them back to your app to test more sophisticated scenarios.
Another useful feature provided by the Android platform is called Geocoding. This is the process of obtaining the location in terms of latitude and longitude from a known address. Android also supports Reverse Geocoding, which is what you would expect from the name, obtaining an address from a known location.
The Android.Locations.Geocoder class is the class used to perform geocoding and reverse geocoding. It's a very straightforward process to use, as shown in the following steps:
- Create an instance of
Android.Locations.Geocoder. - Call
GetFromLocation()passing in the location you would like to find the address for. - Process the
IList<Address>collection returned. The collection of addresses returned fromGetFromLocation()vary in specifics; meaning, some are specific street addresses, some specify a city, country, and so on. The first address is always the most specific, so we will automatically choose it, using the following code:public void OnLocationChanged (Location location) { _latEditText.Text = location.Latitude.ToString(); _longEditText.Text = location.Longitude.ToString (); Geocoder geocdr = new Geocoder(this); IList<Address> addresses = geocdr.GetFromLocation (location.Latitude, location.Longitude, 5); if (addresses.Any()) { UpdateAddressFields (addresses.First ()); } }
You can see that we chose to call a method to format the address information. The FeatureName property may contain a title such as Golden Gate Bridge or Empire State Building. More times than not, FeatureName will simply contain the street number. The address contains a list of address lines, which we combine and place in _addrEditText, as follows:
protected void UpdateAddressFields(Address addr)
{
  if (String.IsNullOrEmpty(_nameEditText.Text))
    _nameEditText.Text = addr.FeatureName;

  If (String.IsNullOrEmpty(_addrEditText.Text)) {
    for (int i = 0; i < addr.MaxAddressLineIndex; i++) {
      if (!String.IsNullOrEmpty(_addrEditText.Text))

        _addrEditText.Text += System.Environment.NewLine;
        _addrEditText.Text += addr.GetAddressLine (i);
    }

  }
}
Now, run POIApp and test adding a new POI and getting the address for a location.
After using the get location button, you will notice that requests for location information take some amount of time to process; generally a few seconds or more. It would be best to keep users informed that processing is taking place so that they don't continually click on the button. The ProgressDialog class provides just the solution needed, which is a simple means of displaying a dialog with a spinning progress widget and text description of what process is taking place.
To add a progress dialog, perform the following steps:
- Add a private variable of type
ProgressDialogtoPOIDetailActivityas follows:ProgressDialog _progressDialog;
- At the top of
GetLocationClicked(), call the static methodProgressDialog.Show()saving the result in the private variable we just created. TheShow(),method accepts an activity, a title, and a message as parameters. This call causes the progress dialog to be presented to the user as follows:_progressDialog = ProgressDialog.Show (this, "", "Obtaining location...");
- At the bottom of
OnLocationChanged(), call theCancel()method on the progress dialog causing the dialog to be closed as follows:_progressDialog.Cancel ();
Now, run POIApp and test the new progress dialog.
In the previous section, we solved the problem of keeping the user informed while they wait for location updates, but we unknowingly created another problem. As you may recall from Chapter 1, The Anatomy of an Android App, we mentioned that by default Android destroys and recreates an activity when a configuration change such as a device orientation change occurs.
This is done to take advantage of a feature that Android provides, which allows you to specify different layouts to use based on device orientation. In our app, we have a single folder named layout, which holds all our layouts. If we wanted POIDetail.axml to have a different layout when the device is in landscape, we would simply create a new folder in Resources named layout-land and create our alternate layout in it using the same name, POIDetail.axml. When Android destroys and recreates our activity because the device was rotated to landscape, our call to SetContentView() would cause Android to first look in layout-land to see if a layout exists.
This is neat, but a fallout of this approach arises when an activity initiates any type of asynchronous processing such as requesting location updates. The problem is when a configuration change takes place and Android destroys the original activity; you no longer want asynchronous callbacks to come in for the original activity.
To observe the issue, run POIApp, press the get location button, and rotate the screen. In the emulator, press Ctrl + F11 or Ctrl + F12 to rotate the device. If you are in the debug mode, you should see an exception thrown when you try and cancel the progress dialog; this is due to the fact that Android has already removed the dialog from the view hierarchy when it destroyed the activity.
Android provides the following ways of dealing with this issue:
- Prevent the activity from being destroyed based on specifications made for the activity in the
AndroidManifest.xmlfile - Override virtual methods on
Activityto save and restore the state appropriately when configuration changes occur
To allow for saving and restoring of a state, Android provides OnSaveInstanceState() and OnRestoreInstanceState(). The OnSaveInstanceState() method is called as a part of the destruction of the activity due to configuration changes and allows you to save processing a state in the Bundle object that is passed in. The OnRestoreInstanceState() method is called after OnStart() when an activity is being reinitialized and receives the same Bundle object that OnSaveInstanceState() would have populated.
In our case, we simply want to cancel any pending location changes within OnSaveInsatnceState() and restart the process in OnRestoreInstanceState(), if we were indeed waiting for location updates when the configuration change occurred. Unfortunately, many asynchronous scenarios are far more complex than ours and are beyond what can be considered here.
To save and restore a state, perform the following steps:
- Create a private
boolthat will be used to indicate if we are waiting for location updates as follows:bool _obtainingLocation = false;
- Add a line of code at the top of
GetLocationClicked()to set this variable totrue, and at the bottom ofOnLocationChanged()to set this variable tofalse. - Override
OnSaveInstanceState()and save the value of the processing variable and cancel any location updates that might be pending as follows:protected override void OnSaveInstanceState (Bundle outState) { base.OnSaveInstanceState (outState); outState.PutBoolean("obtaininglocation", _obtainingLocation); // if we were waiting on location updates; cancel if (_obtainingLocation) { _locMgr.RemoveUpdates (this); } } - Override
OnRestoreInstanceState()and restore the value of the processing variable, and if the value istrue, restart the request for location update as follows:protected override void OnRestoreInstanceState (Bundle savedInstanceState) { base.OnRestoreInstanceState (savedInstanceState); _obtainingLocation = savedInstanceState.GetBoolean("obtaininglocation"); // if we were waiting on location updates; restart if (_obtainingLocation) GetLocationClicked (this, new EventArgs ()); }
Now, run POIApp and test the changes.
By now, you may be wondering if we have a similar problem in POIListActivity. But we do not because of our decision to turn on and off location updates in the OnResume() and OnPause() methods. These methods are called as part of the normal construction and destruction processes. As a result, there are no scenarios where an asynchronous callback will be called after the activity is destroyed. You will, however, notice that when you change the orientation of the device, the distance labels are changed to ?? due to the activity being reconstructed. This actually provides a good opportunity to demonstrate an alternate way of dealing with this issue; preventing the activity from being destroyed. Android allows for the specification of the configChanges attribute in the activity element of the AndroidManifest.xml file. Specifying configChanges tells Android that you will take care of reconfiguring the layout, if needed, and the activity class will not be destroyed. The following code example shows how to specify that orientation and the screen size changes for POIListActivity will be dealt manually by the app:
<activity
  android:name="poiapp.POIListActivity" android:configChanges="orientation|screenSize" android:label="POIs" >
. . .
</activity>
Xamarin.Android provides a more convenient way to specify how to prevent activity destruction using an attribute on the activity class. The following code example shows the use of the ConfigurationChanges attribute;
[Activity (Label = "POIs", MainLauncher = true, ConfigurationChanges = (Android.Content.PM.ConfigChanges.Orientation | Android.Content.PM.ConfigChanges.ScreenSize))]
public class POIListActivity : Activity, ILocationListener
{
  . . .
After placing the ConfigurationChanges attribute on POIListActivity, run POIApp and observe that once the distances have been calculated, they will not be lost during device orientation changes.