
In this chapter, we will walk through creating a detailed view for displaying, updating, and deleting POIs. The following topics will be covered:
- Creating the
POIDetaillayout and activity - Binding variables to user interface widgets
- Navigating between activities
- Passing data with the
Intentclass - Adding validation and using
EditText.Errorto display error messages - Displaying confirmation prompts
- Displaying toasts
We will start by creating a new layout:
- Select the
Resources/Layoutfolder in the Solution pad. - Right-click on Add and select New File.
- In the New File dialog, click on Android and select Android Layout, enter
POIDetailin the Name field, and select New.By default, layouts are created with
LinearLayoutas the top-level container. ThePOIDetailview will have a number of fields and will likely require scrolling on most devices. ThePOIListlayout gave us scrolling for free because we were usingListView; however, in the case ofPOIDetail, we will need to useScrollView. - With the
POIDetail.xamlfile opened in the Content view, select the top-level Linear Layout and press the Delete key. - In the Toolbox pad, locate the ScrollView widget and drag it onto the Content View.
- In the Toolbox pad, locate the LinearLayout (vertical) widget and drag it onto the Content View inside
ScrollView. - With
LinearLayoutselected, set Padding in the Layout section of the Properties pad to 5dp.
We are now ready to add field labels and edit controls to the layout. The following screenshot depicts the layout we are trying to achieve:
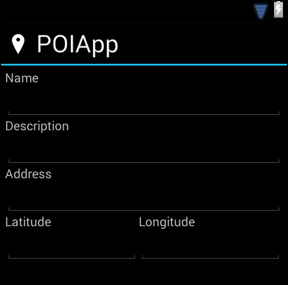
We will use simple TextView widgets to serve as labels and EditText widgets to serve as input controls. The EditText widget contains a number of properties that can be used to customize its behavior. One of these properties is named InputType, and it controls aspects such as which type of keyboard to use for inputs (Alpha, Numeric, and so on) and how many lines of text are allowed. The Toolbox pad presents a number of templates or preconfigured EditText widgets in the list under the group name Text Fields. The following screenshot depicts the list:

Add a series of TextView and EditText controls for the Name, Description, and Address fields. Name the EditText widgets according to the following table and use the corresponding Toolbox widget so that the appropriate editing characteristics are applied:
|
Name |
Widget toolbox name |
|---|---|
|
|
|
|
|
|
|
|
|
We are now ready to address the Latitude and Longitude fields, and we will employ a new layout manager, TableLayout. We would like to see these fields depicted in a table with two rows and two columns with the top row being used for the labels and the bottom row being used for the edit fields. In order to do so, perform the following steps:
- Locate
TableLayoutin the Toolbox pad, drag it onto the Content View below theaddrEditTextwidget and drop it. ATableLayoutwill be created with three rows and three columns. - Select one of the rows in
TableLayout, right-click on and select Delete Row. - Select one of the columns in the
TableLayout, right-click on and select Delete Column. - Select the first column, right-click on and select Stretch Column. Similarly, do it for the second column.
You should now have a TableLayout with a visible outline of two rows, each having two columns like what is depicted in the following screenshot:

We now need to add TextView widgets for the two labels in the first row and Number (decimal) widgets for the Latitude and Longitude edit controls, naming them latEditText and longEditText.
We have now completed the POIDetail.xaml layout, and the Content View you see should look the same as the previous diagram.
The EditText element provides a property named InputType that checks the behavior of the control when data is being entered. When the description and address widgets were added, we selected Multiline Text from the Toolbox pad. The following code shows that in this case the input type was automatically set:
<EditText
  p1:inputType="textMultiLine"
  p1:layout_width="fill_parent"
  p1:layout_height="wrap_content"
  p1:id="@+id/descrEditText" />
The InputType property can also be set or changed from within the Properties pad under the Widget tab in the Input Format section. What may not be obvious is that Input Type can combine values, which come in handy in our situation. The following table shows a reasonable set of values for Input Type; feel free to experiment:
|
Widget |
Input Type |
|---|---|
|
|
|
|
|
|
|
|
|
|
|
|
|
|
|
Now that we have the layout complete, we need a corresponding activity. To create POIDetailActivity, perform the following steps:
- With the
POIAppproject selected in the Solution pad, right-click on it and navigate to Add | New File. - From the New File dialog, click on Android and select Android Activity, enter
POIDetailActivityas Name, and click on New.
As you may recall from the last chapter, one of the first things that need to be done when an activity is created is to set the content, which is accomplished with a call to SetContentView(). Add the following line of code to the OnCreate() method of the new activity:
SetContentView (Resource.Layout.POIDetail);
As we learned in the previous chapter, we need to manually bind user interface widgets to internal program references in order to manipulate their content, assign event handlers, and so on. Declare a set of private variables for each of the input widgets we created in the layout. The following listing is from the source folder:
EditText _nameEditText;
EditText _descrEditText;
EditText _addrEditText;
EditText _latEditText;
EditText _longEditText;
ImageView _poiImageView;
A call to FindViewById<T> is required to bind each variable to its corresponding user interface widget. The following listing depicts what should be added to the OnCreate() method somewhere after the call to SetContentView().
SetContentView (Resource.Layout.POIDetail);

_nameEditText = FindViewById<EditText> (Resource.Id.nameEditText);
_descrEditText = FindViewById<EditText> (Resource.Id.descrEditText);
_addrEditText = FindViewById<EditText> (Resource.Id.addrEditText);
_latEditText = FindViewById<EditText> (Resource.Id.latEditText);
_longEditText = FindViewById<EditText> (Resource.Id.longEditText);
_poiImageView = FindViewById<ImageView> (Resource.Id.poiImageView);