
To import a JSON file into Elasticsearch, we will use the elasticdump package. It is a set of import and export tools used for Elasticsearch. It makes it easier to copy, move, and save indexes. To install elasticdump, we will require npm and Node.js as prerequisites.
In this section, npm along with Node.js will be installed. This section covers the installation of npm and Node.js on Ubuntu and Windows separately.
To install npm on Ubuntu, perform the following steps:
- Add the official Node.js PPA:
sudo curl --silent --location https://deb.nodesource.com/setup_0.12 | sudo bash -
As shown in the preceding screenshot, the command will add the official Node.js repository to the system and update the
aptpackage database to include all the latest files under the packages. At the end of the execution of this command, we will be prompted to install Node.js andnpm, as shown in the following screenshot:
- Install Node.js by entering this command in the terminal:
sudo apt-get install --yes nodejs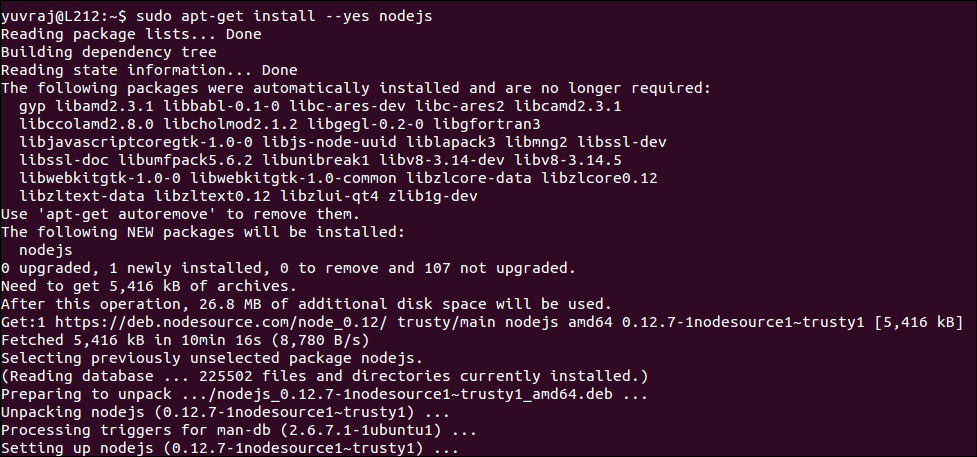
- To check whether Node.js has been installed successfully, type the following command in the terminal:
node –vUpon successful installation, it will display the version of Node.js.
- Now, to check whether
npmhas been installed successfully, type the following command in the terminal:npm –vUpon successful installation, it will show the version of
npm.
To install npm on Windows, follow these steps:
- Download the Windows Installer (
.msi) file by going to https://nodejs.org/en/download/. - Double-click on the downloaded file and keep clicking on Next to install the software.
- To validate the successful installation of Node.js, right-click and select GIT Bash.
In GIT Bash, enter this:
node –vUpon successful installation, you will be shown the version of Node.js.
- To validate the successful installation of
npm, right-click and select GIT Bash.In GIT Bash, enter the following line:
npm –vUpon successful installation, it will show the version of
npm.
In this section, elasticdump will be installed. It will be used to import a JSON file into Elasticsearch. It requires npm and Node.js installed. This section covers the installation on Ubuntu and Windows separately.
Perform these steps to install elasticdump on Ubuntu:
- Install
elasticdumpby typing the following command in the terminal:sudo npm install elasticdump -g
- Then run
elasticdumpby typing this command in the terminal:elasticdump - Import a sample data (JSON) file into Elasticsearch, which can be downloaded from https://github.com/guptayuvraj/Kibana_Essentials and is named
tweet.json. It will be imported into Elasticsearch using the following command in the terminal:elasticdump --bulk=true --input="/home/yuvraj/Desktop/tweet.json" --output=http://localhost:9200/
Here,
inputprovides the location of the file, as shown in the following screenshot:
As you can see, data is being imported to Elasticsearch from the
tweet.jsonfile, and the dump complete message is displayed when all the records are imported to Elasticsearch successfully.
To install elasticdump on Windows, perform the following steps:
- Install
elasticdumpby typing the following command in GIT Bash:npm install elasticdump -g
- Then run
elasticdumpby typing this command in GIT Bash:elasticdump - Import the sample data (JSON) file into Elasticsearch, which can be downloaded from https://github.com/guptayuvraj/Kibana_Essentials and is named
tweet.json. It will be imported to Elasticsearch using the following command in GIT Bash:elasticdump --bulk=true --input="C:UsersyguptaDesktop weet.json" --output=http://localhost:9200/
Here,
inputprovides the location of the file.
The preceding screenshot shows data being imported to Elasticsearch from the
tweet.jsonfile, and the dump complete message is displayed when all the records are imported to Elasticsearch successfully.To verify that the data has been imported to Elasticsearch, open
http://localhost:5601in your browser, and this is what you should see:
When Kibana is opened, you have to configure an index pattern. So, if data has been imported, you can enter the index name, which is mentioned in the tweet.json file as index: tweet. After the page loads, you can see to the left under Index Patterns the name of the index that has been imported (tweet).
Now mention the index name as tweet. It will then automatically detect the timestamped field and will provide you with an option to select the field. If there are multiple fields, then you can select them by clicking on Time-field name, which will provide a drop-down list of all fields available, as shown here:

Finally, click on Create to create the index in Kibana. After you have clicked on Create, it will display the various fields present in this index.