
The Settings page is one of the pages present in Kibana 4 that helps you customize and tweak the various settings provided in order to use Kibana efficiently. This page gives you a full overview of the different types of indices present wherein you can configure as many index patterns as you want, followed by the advanced settings in which, settings that are either undocumented, unsupported, or experimental can be tweaked, along with managing and editing saved objects such as Dashboards, Searches, and Visualizations.
The Settings page contains the following tabs:
- Indices
- Advanced
- Objects
- About
In this chapter, we will go through all of these tabs in brief. Let's explore these tabs and understand the settings provided for each of them.
The Indices tab is used to edit settings related to the index. Within this tab, you can configure/add an index pattern, set any index as default, and remove the index pattern. You can also view information related to every field and edit the field properties.
Indices is the default tab that opens whenever you start Kibana or click on the Settings page. As Elasticsearch uses an index to process data, it remains the most important component, without which we cannot analyze data, create visualizations, or build dashboards. Index is the heart of Elasticsearch and Kibana.
It displays the following information when opened:

By default, an index contains time-based events that are ticked. If your data does not contain any time-based event, then you can uncheck the checkbox in order to configure an index.
While configuring indices, you can use patterns such as * (asterisk), which matches zero or more characters.
For example, suppose you have indices such as kibana-, kibana-1, kibana-2, and kibana-10, each containing five documents in every index.
In this, you can use the * pattern and define the index pattern as kibana-*, which will read all the aforementioned indices and add them for use in Kibana. In Kibana, Indices tab will show a single index under the index pattern kibana-*, and under this index, all the matching indices documents will be shown; that is, the kibana-* index will contain 20 documents:

Note
Searching for indices using wildcard patterns is an inefficient way of searching. For example, if you are searching only for the last 15 minutes of data but are using the kibana-* index pattern in your query, you are forcing Elasticsearch to consult all the indices to check whether they contain any data.
You can also use the date format pattern to add indices that have the event times/timestamp attached to it.
For example, suppose you have indices such as kibana1-2015-08-12, kibana1-2015-07-27, and kibana1-2015-06-02.
To define the event times, tick the Use event times to create index names option. Upon clicking on it, you will see the following options to define:

In this, you can define Index pattern interval, which defines how frequently the index is created and can be chosen as Hourly, Daily, Weekly, Monthly, or Yearly.
Then, define the index pattern as [kibana1-]YYYY-MM-DD, which will read all the aforementioned indices and add them for use in Kibana:

It displays the added index pattern on the left, under Index Patterns, as shown in this screenshot:

For additional properties related to an index, click on the index to view the following options:

The default index pattern is used to automatically select an index for use in the Discover tab. The default index selected is used to view data in the Discover tab. Kibana puts a star just before the name of the index as listed in Index Patterns. The first index created is, by default, selected as the default index.
To change the default index pattern:
- Click on the index name that you want to set as default under Index Patterns.
-
Click on the favorite button
 to set it as the default index.
Kibana automatically retrieves the index along with the fields associated with the index from Elasticsearch. Reloading the index fields list provides the flexibility to include newly added fields in the index by reloading the index. Reloading the index resets the popularity counter for fields, which shows the fields that are most often used by the user.
To reload the index fields list:
- Click on the index name under Index Patterns for which you want to reload the field.
-
Click on the reload button
 to reload the field list.
This feature is used to remove an index pattern added to Kibana.
To remove an index pattern:
- Click on the index name that you want to delete under Index Patterns.
-
Click on the delete button
 to remove the index pattern.
After you click on the index name along with additional properties as explained earlier, more customizations are provided for editing each field property. Let's explore the information provided by the fields:
- Name: This displays the name of the field.
- Type: This displays the type of the field and whether it contains a date, number, string, or geo-point.
- Format: This displays the format of the type of field. For every field type, we can set the format. The supported formats for each field type are mentioned here:
Field type
Supported formats
StringURL and string
NumberURL, bytes, number, percentage, and string
DateURL, date, and string
Geo_pointString
BooleanURL and string
- Analyzed: This indicates whether the field is analyzed or not. The analyzed fields are tokenized into single words; that is, if a string contains multiple words, they are broken into single words. For example, if a string contains
United Kingdomand it is an analyzed field, then it will be tokenized asUnitedandKingdom. If the field is not analyzed, it will not be tokenized and will remain as a single word. - Indexed: This indicates whether the field is indexed or not.
To change the format of the field type, click on the pencil button ![]() under the heading of controls. Let's explore the various supported formats in detail:
under the heading of controls. Let's explore the various supported formats in detail:
- String: This is used to apply the following transformations to the field:
- Lower case: This converts the text in field to lowercase.
- Upper case: This converts the text in field to uppercase.
- Short dots: This replaces the content before the
.(dot) character with the first character.For example, change the format of the text field to string and transform into upper case.
After you have selected the transformation, click on the Update Fields button to reflect the changes. As you can see here, the result to the left was obtained using the default options, while the screenshot to the right was obtained after transforming to uppercase:

- URL: This is used to apply the following types to the field:
- Link: This is used to convert the text in the field into a URL.
- URL Template: This is used to add text/values to the link. It provides
{{value}}, which gives theurl-escapedvalues, and{{rawValue}}gives the values in raw form as its input. - Label Template: This is used to replace the URL with any text string.
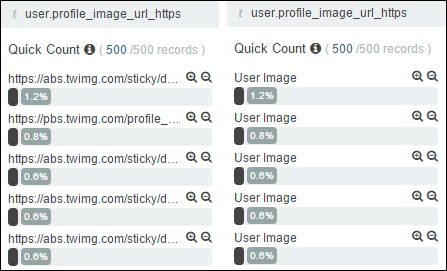
- Image: This is used to specify the image directory in which the images are located.
For example, let's change the format of the text field to URL and specify the type as
Image. Enter URL Template as{{rawValue}}(by default, if this is empty, it is set torawValue). Enter Label Template as User Image.As you can see here, the screenshot to the left was obtained using the Default options, while the screenshot to the right was obtained using the link options:
- Date: This is used to display the timestamp using the
moment.jsformat pattern. By default, the pattern is MMMM DD YYYY, HH:mm:ss.SSS.Here is an example, change the format of the text field to Date and input the pattern as DD-MMM-YYYY HH:mm:ss.SSS.
Again, the screenshot to the left was obtained using the Default options, while the screenshot to the right was obtained after changing the Default options:

- Number: This is used to display numbers using the numeral.js format pattern. By default, the pattern is
0,0.[000]. - Bytes: This is also used to display numbers using the
numeral.jsformat pattern. By default, the pattern is0,0.[000]b. - Percentage: This too is used to display numbers using the
numeral.jsformat pattern. By default, the pattern is0,0.[000]%.