
The Fields list contains a listing of all the fields contained in the documents that appear within a selected index. The Fields list appears just beneath the index name on the left-hand side of the Discover page. It is used for knowing which fields appear in the data on the basis of which analysis can be done. It contains popular fields, selected fields, and all the other types of fields. Fields are displayed under each category in alphabetical order.
This serves as an important metric that displays how many documents in the selected index will contain a specific field, what will be the top five values for the field, and the percentage breakdown of total documents containing the value.
Note
By default, document data contains 500 documents matching the search query as listed, although it can be modified by changing the discover:sampleSize option in advanced settings, which will be covered in Chapter 5, Exploring the Settings Page.
To see field data information, click on the name of the field in the Fields list. The field could be under any category, for example selected fields, popular fields, or other fields:

In the previous figure, by clicking on the created_at field, it is showing the top five values of the field, how many values of each specific field record exist in the current index, and the percentage breakdown of the fields in terms of total documents.
Filtering by field provides the flexibility of filtering the search results based on fields. Filter the search results in order to display documents matching the filter criterion. Filters can be added from the Fields list or document data.
There are two types of filters:
- Positive filter: This is denoted by a + (plus) symbol magnifier
 . It is used to display only those documents that contain the specific value for which it is being filtered.
- Negative filter: This is denoted by a - (minus) symbol magnifier
 . It is used to exclude all the documents containing that value in the specified field.
To add a filter using the Fields list, click on the field on the basis of which you want to Filter. Upon clicking the field it will show the top five field values, which were described previously in viewing field data information. To the right of the field values, there are two buttons corresponding to the positive filter and the negative filter:
-
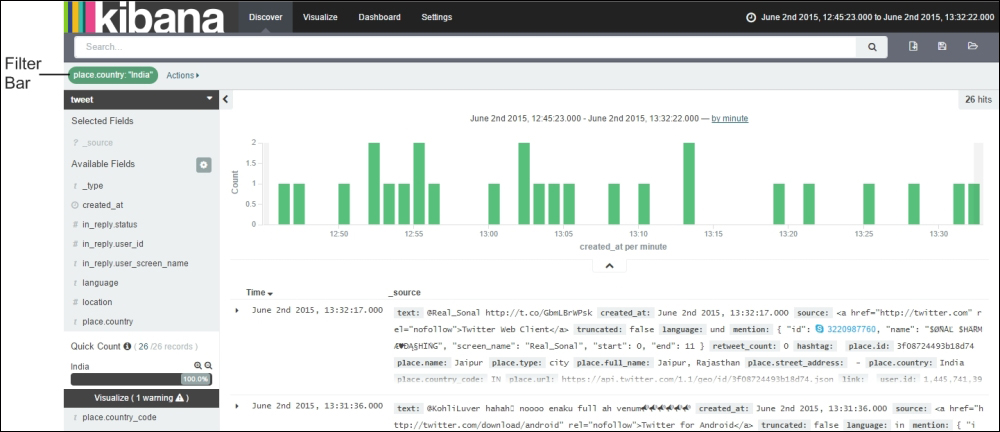
For adding a positive filter, click on the + (plus) symbol magnifier . For example, you need to find only those documents that contain India within the place.country field, then you would click on the place.country field and click on the positive filter symbol beside India. It will filter results based on matching the word India in the place.country field within all documents:
In the previous figure, the filter results show all the documents containing India within the place.country field. It also denotes 26 hits, meaning 26 matching documents containing India within the place.country field.
-
To add a negative filter, click on the - (minus) symbol magnifier . For example, you need to find only those documents that do not contain India within the place.country field, then you would click on the place.country field and click on the negative filter symbol beside India. It will exclude all the documents matching India in the place.country field and show the remaining documents as a filtered result:
In the previous figure, the filter results show all the documents that do not contain India within the place.country field. It also denotes 91,978 hits, namely (92,004-26), which show all the matching documents that do not contain India within the place.country field.

To add a filter using document data, initially expand a document within the document data table by clicking on the expand button characterized by the ![]() symbol, which is found in the extreme left at the start of a document, beside the document's first column (generally it is Time). After clicking the expand button beside every field value on the left and beside every field name on the right, there are two buttons corresponding to the positive filter and the negative filter as per their convention:
symbol, which is found in the extreme left at the start of a document, beside the document's first column (generally it is Time). After clicking the expand button beside every field value on the left and beside every field name on the right, there are two buttons corresponding to the positive filter and the negative filter as per their convention:
-
To add a positive filter, click on the + (plus) symbol magnifier
-
To add a Negative Filter, click on the - (minus) symbol magnifier

In the previous figure, you can see the filter options available in document data through which you can apply a positive filter or a negative filter to a specified field.
Note
There will not be any filtering options provided in the fields that are not indexed in all the documents. To find the fields that are not indexes, using indices we can see information in advanced settings, which will be covered in Chapter 5, Exploring the Settings Page.
After adding a filter, there are additional functionalities of filters that can be used to play around with filters easily. To view additional functionalities, click on the Actions link beside the added filter beneath the search bar, or hover over the filter added:

This is used to enable the filter. After enabling the filter it will show the result that matches the filter only. Enabled filters are displayed in green. It is similar to a positive filter.
This is a newly added functionality in Kibana. It is used to pin a filter. After pinning a filter, it will persist across various Kibana pages. If you pin the filter in the Discover page then even if you move to the Visualize page or Dashboard page, the filter would be there. It is very useful as it reduces the effort of adding filters in different pages.
This is used to invert the filter. After inverting the filter, it will show the results that do not match the filter. After enabling the filter, it shows 91,978 results (92004-26). Inverted Filters are displayed in red. It is similar to a negative filter: