In the previous chapter, we looked at data analytics, where we covered reports and dashboards.
In this chapter, we will cover in detail how, with the use of the workflow rules and approval process features within the Salesforce CRM application, you can automate and streamline the key business processes for your organization.
This chapter will focus on how you can configure actions for workflow rules and approval processes to automate, improve quality, and generate high-value processes within your organization.
The topics covered are as follows:
- Workflow rules
- The approval process
- Workflow actions
- The workflow queue
- The approval wizard
- Approvals in Chatter
- The process visualizer
- Visual Workflow
The workflow rules and approval process features within the Salesforce CRM application allow you to automate and streamline the key business processes for your organization.
Workflow rules can be used to capture key business processes and events to generate automated actions. They allow you to configure various types of actions to be fired based on the field or fields of the record that meet predefined conditions. In essence, a workflow rule sets workflow actions into motion when its predefined conditions are met. You can configure workflow actions to execute immediately whenever a record meets the conditions specified in the workflow rule, or you can set time-dependent features that execute the workflow actions on a specific day.
Approval processes are a structured set of steps used to facilitate formal sign-off on data records. They can range from simple, single steps to complex, sophisticated routing to provide automated processing that your organization can use to approve records in Salesforce CRM. Along with the steps that must be taken, the approval process also specifies who must approve these steps. Approval steps can either be specified for all records included in the process, or they can be restricted to records that have certain attributes. Approval processes also specify the actions that are to be taken when a record is first submitted, approved, rejected, or recalled.
Workflow rules and approval processes provide benefits such as improving the quality and consistency of data, increasing data integrity, improving efficiency and productivity, lowering costs, and reducing risks.
Workflow rules and approval processes allow you to automate these types of actions: e-mail alerts, tasks, field updates, and outbound messages.
E-mail alerts can be sent to one or more recipients. For example, e-mail alert actions can be used to automatically send an account owner an e-mail whenever updates are made to one of their accounts by another user.
Tasks can be assigned to users or record owners. For example, task actions can be used to automatically assign follow-up tasks to a marketing executive whenever a new lead is entered in the system.
Field updates can be used to modify the value of a field on a record. For example, a field update action can be used to automatically update an opportunity field called Next Step when it reaches a certain sales stage.
Outbound messages can be used to send a secure configurable API message (in an XML format) to a designated listener. For example, outbound messages can be used to automatically invoke a new account creation process. This could be, say, whenever a new account is entered in the Salesforce CRM application by triggering an outbound API message to an external financial system.
Workflow rules in Salesforce CRM can be combined to help manage an entire process. For example, when a lead is entered through your website using the Web to lead (covered later), workflow rules can be used to automatically send a responding e-mail to the lead contact and also to someone within your organization. Here, a workflow rule can be set to create a task for one of your salespersons to telephone the lead contact along with a reminder e-mail alert to be sent after a specified number of days since the lead record has been entered.
If the salesperson changes the lead status, then a date field could be updated automatically with the date on which the lead was contacted.
Up until now, we have looked at the similarity of workflow rules and approval processes. However, there are some key differences. Workflow rules consist of a single step and a single result, whereas approval processes consist of multiple steps and different results depending upon whether the record is approved or rejected. Workflow rules trigger automatically, and when triggered the rules are not visible to the user. Approval processes, on the other hand, contain multiple steps, each requiring a specific I approve or reject user action by the specified approver(s).
In practice, the first step to create workflow rules and approval processes is to define and map out the process and for each step in the process, detail the objects, the criteria, the users, and the actions required.
Workflow and approval actions consist of e-mail alerts, tasks, field updates, and outbound messages that can be triggered either by a workflow rule or by an approval process.
- E-mail alert: This is an action that can be generated by both workflow and approval actions using an e-mail template that is sent to specified recipients that can be either Salesforce CRM application users or external e-mail recipients.
- Field update: This is an action that can be activated by the use of both workflow and approval actions, which specifies the field for update and the new value for it. The field's update action depends on the data type of the field, where you can choose to apply a specific value, clear the field, or calculate a value according to a criteria or a derived formula that you can a specify.
- Tasks: These are workflow and approval actions that are triggered by workflow rules or approval processes, and they allow the assignment of tasks to a user that you can specify. You would also specify Subject, Status, Priority, and Due Date of the task. Tasks appear on the user's calendar and can be accessed by the My Tasks section of the Home tab or on the specific day for the task within the Day View section on the user's calendar. Tasks can be assigned on their own, but you can also combine them with an e-mail alert to inform the user.
- Outbound message: In Salesforce CRM, This an action that can be activated by both workflows and approvals that send information to a web URL endpoint—all of which you specify. The outbound message contains the data in specified fields in what is known as a SOAP message to the endpoint. As it requires the development of a receiving web service, this action is not covered in this book.
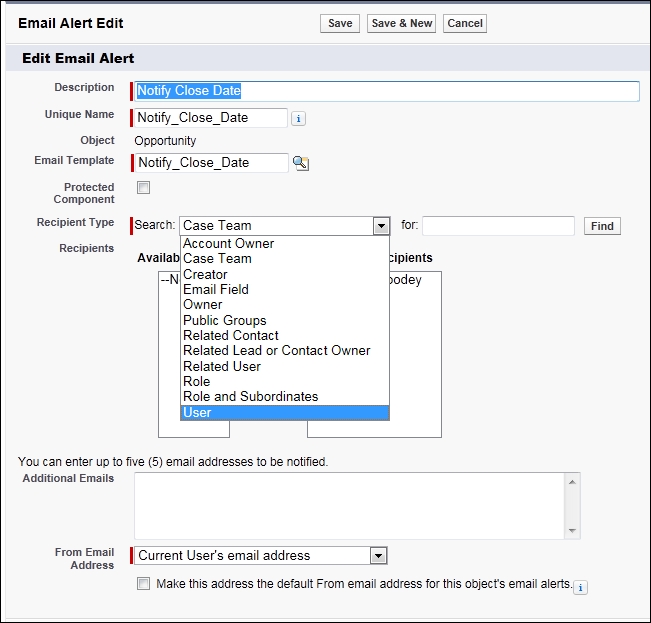
To configure e-mail alerts, navigate to Setup | Create | Workflow & Approvals | Email Alerts, and then click on the New Email Alert button.
Within the Email Alert Edit page, the following settings are presented:
To set the details for the e-mail alert, carry out the following steps:
- Enter a description for the e-mail alert.
- Enter a unique name for the e-mail alert.
Note
A unique name for the e-mail alert is required and used by the API and managed packages. The name is autopopulated when you enter the preceding field called Description. There are restrictions on permitted characters, so the unique name must begin with a letter and use only alphanumeric characters and underscores. Also, the unique name cannot end with an underscore or have two consecutive underscores.
- Choose an e-mail template.
Note
The Protected Component checkbox is used to mark the alert as protected. This option can be ignored as it is a setting used by developers who are building applications with the "managed release" package functionality. If you install a managed package, there are restrictions on what can be edited by nondevelopers. This is discussed later in the book.
- Now, select who should receive this e-mail alert from the available options:
Select the recipients who should receive this e-mail alert in the Available Recipients list and click on Add.
Optionally, enter to and from e-mail addresses, and then finally, click on Save.
Here, you can do the following:
- Enter up to five additional recipient e-mail addresses (which might or might not be users in Salesforce)
- Set From Email Address to either the current user's e-mail address or to the default workflow user's e-mail address
- Finally, to begin using the e-mail alert, associate it with either a workflow rule or an approval process
Tip
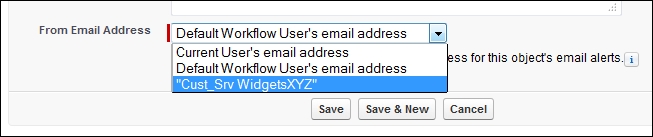
Setting From Email Address also allows you to use a standard global e-mail address for your organization, such as [email protected], instead of the default From field, which is the e-mail address of the user who updates the record. Only verified, organization-wide e-mail addresses will appear in the From Email Address picklist options.
There is a daily limit of 1,000 e-mail alerts per standard Salesforce license for workflows and approvals.
There is also an overall daily limit of 2,000,000 e-mail alerts for your entire organization, and when the daily limits are reached, a warning e-mail is sent out by the Salesforce CRM application to the default workflow user where one is set. If there is no default workflow user set, then the warning e-mail goes out to a system administrator.
By setting up organization-wide e-mail addresses, your users can share a set of common e-mail aliases. Here, you can define a list of organization-wide e-mail addresses for each user profile.
When sending e-mails from Salesforce, users with these profiles can then choose a different From address than the e-mail address that they have defined on their user record, and any e-mail responses are then returned to the organization-wide address.
To set up the list of organization-wide e-mail addresses, navigate to Setup | Email Administration | Organization-Wide Addresses.
From the Organization-Wide Email Addresses page, you can set the display name, the e-mail address, and the profiles that are permitted to use that address, as shown in the following screenshot:

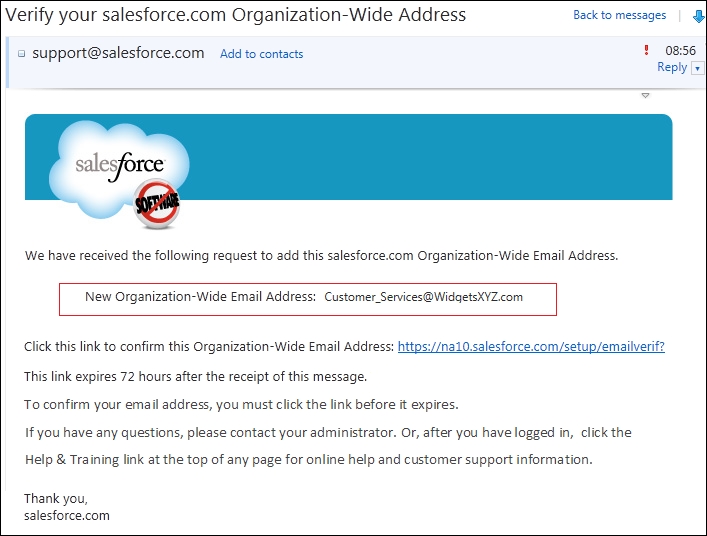
When the organization-wide e-mail address is saved or changed, Salesforce will send an e-mail to the address specified in the e-mail address field to verify that the e-mail address is valid, as shown next:
Now, the verified organization-wide e-mail addresses will appear in the From Email Address picklist options when configuring e-mail alerts, as shown next:
To configure tasks, navigate to Setup | Create | Workflow & Approvals | Tasks, and then click on the New Task button.
From the Step 1: Select object page, select the object type for the record from the select object picklist and click on Next.
Within the Step 2: Configure Task page, the following settings are presented:
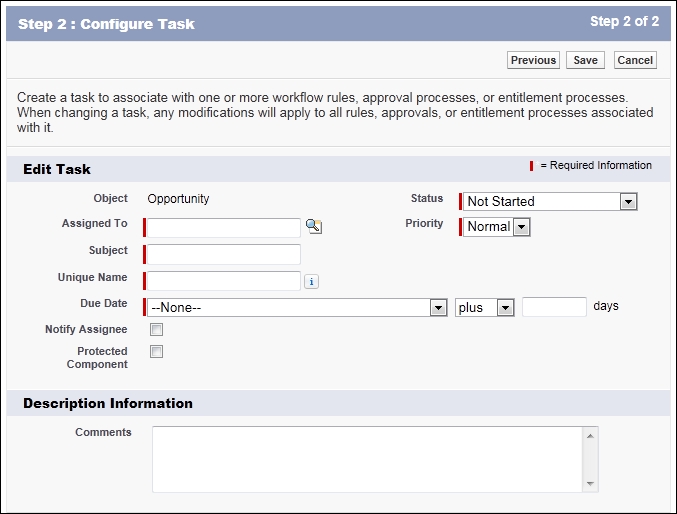
To set the details for the task, carry out the following steps:
- You must select an individual or individuals for whom you can set the required Assigned To field. Here, the options when you click on the lookup dialog for the Assigned To setting allows for the selection of either User, Role, or Record Owner.
Note
If the assignee of a workflow task is a role, and that particular role has multiple users, the record owner is then assigned the task. This is done regardless of the type of role that the record owner has, which can cause some confusion.
This is because tasks cannot be assigned to more than one user, and hence, best practice dictates that you do not assign tasks to roles even though the option exists.
- Enter a subject and a unique name for the task.
Note
A unique name for the task is required and used by the API and any managed packages. The name is autopopulated when you move from the preceding field called Subject. There are restrictions on permitted characters, so the unique name must begin with a letter and use only alphanumeric characters and underscores. Also, the unique name cannot end with an underscore or have two consecutive underscores.
- Choose a due date, status, and priority where due dates appear in the time zone of the assignee.
- Set the Notify Assignee checkbox to also send an e-mail notification when the task is assigned.
- Optionally, enter any comments for the description information that is included with the task and then click on Save.
- Finally, to set the task into action, associate it with the required workflow rule or approval process.
To configure field updates, navigate to Setup | Create | Workflow & Approvals | Field Updates, and then click on the New Field Update button.
Within the Field Update Edit page, perform the following steps:
- Enter a name and a unique name for the field update.
Note
Both the name and a unique name for the field update are required. The unique name is used by the API and managed packages. The name is autopopulated when you exit the preceding Name field. There are restrictions on permitted characters in that the unique name must begin with a letter and use only alphanumeric characters and underscores. Also, the unique name cannot end with an underscore or have two consecutive underscores.
- Now optionally, enter a description for the field to update and then choose the object type to present the field to be updated, as shown here for the Opportunity object:
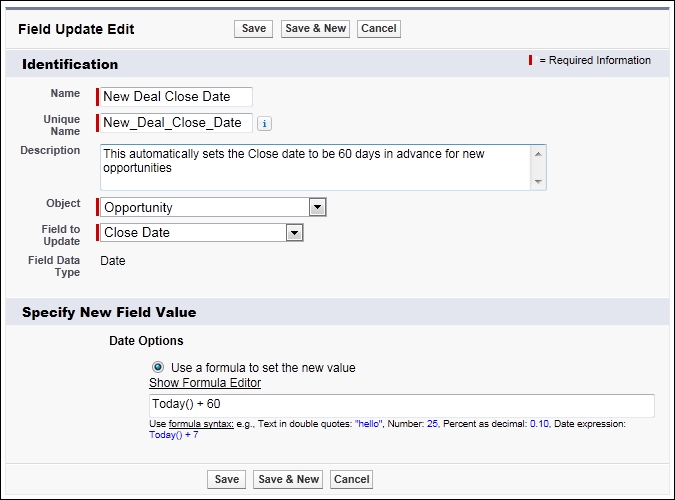
Upon choosing the object and field to update, a new section called Specify New Field Value appears where you can set the logic of the desired field update. Here, the available options depend on the type of field you are updating with the following options.
For checkboxes, choose True to select the checkbox and False to deselect it, as shown:
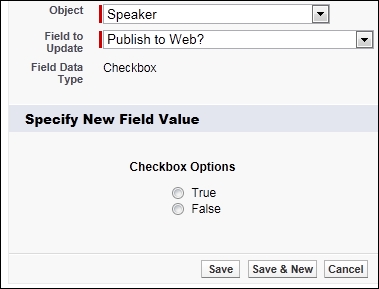
This is useful for automating the setting of status flags for records whenever a certain business process is complete. In the previous example, the field update for the Publish to Web? field allows the automatic setting of the checkbox option to be set True, say, so that the record can be published.
For record owners, choose the user to whom the record should be assigned, as shown in the following screenshot:
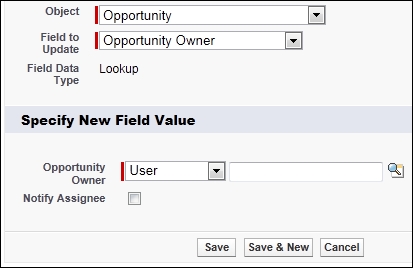
This is useful in order to automate the changing of the record owner for records whenever a certain business process is complete. For example, you could automate the field update of the record owner from, say, a marketing executive to an account manager if a lead matches certain criteria.
When selecting the user for the record owner field update, you must use the user lookup icon and select a specific active user. You cannot, therefore, automatically derive the new owner from any given criteria.
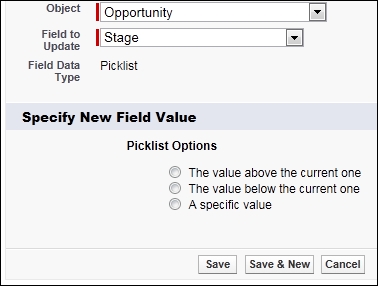
For picklist fields, you can either select a specific value from the picklist, or you can select the value above or below the current value, as shown in the following screenshot. The above or below selection is based on the sorting order that is set in the picklist field definition.
For all other data types, you can set the following Text Options:

Follow these steps to finish the field update configuration:
- Choose A blank value (null) if you want to remove any existing value and leave the field blank.
- Choose Use a formula to set the new value to calculate the value based on the formula logic.
- Now, click on Save to complete the configuration of the field update.
- Finally, to set the field update into action, associate it with the required workflow rule or approval process.
An outbound message in Salesforce CRM is an action that can be activated by both workflows and approvals that sends information to a web URL endpoint that you specify.
The outbound message contains the data using the specified fields in what is known as a SOAP message to the endpoint URL. Once the endpoint receives the message data, it consumes the information from the message and processes it.
As it requires the development of a receiving web-service endpoint, setting up this action is beyond the scope of this book.