To create an approval process, follow these steps:
When you click on the Create New Approval Process button to start creating an approval process, you are presented with these two options in which you can build the process: Use Jump Start Wizard or Use Standard Setup Wizard. The upcoming sections outline the differences between these two mechanisms.
The Jump Start Wizard option is provided as a quick way to create simple approval processes that have a single step. To simplify the settings, the Salesforce CRM application automatically determines some default options for you with this option.
The Standard Setup Wizard option enables the creation of complex approval processes and is used where multiple processing steps are required. This option provides the mechanisms to define your process and then uses a setup wizard to define each step within that process.
To create an approval process, navigate to Setup | Create | Workflow & Approvals | Approval Processes.
Choose the object for the new approval process, click on it, and then select Use Standard Setup Wizard, where we have selected Opportunity, as shown next:

To set the details for the approval process, do this in the Step 1. Enter Name and Description page (where this is step 1 of 6): enter Process Name, a Unique Name, and optionally, Description, and then click on Next
To specify the entry criteria, which is an optional step in the Step 2. Specify Entry Criteria page and is used to determine the records that enter the approval process, you can either choose from the formula logic or you can select certain fields, operators, and values to specify when the desired criteria are met. This is shown in the following screenshot, which is presented as step 2 of 6:
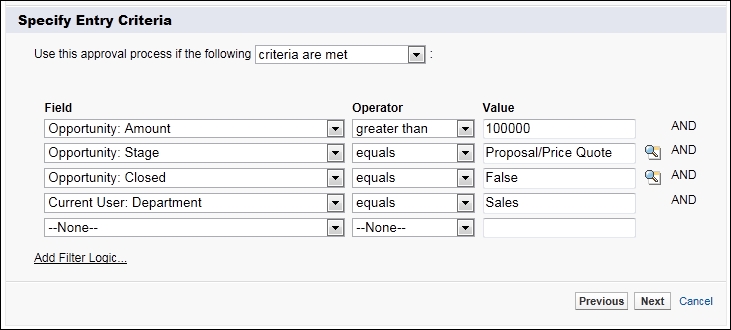
In Step 2. Specify Entry Criteria, either enter the filter criteria for records that are to be included by this approval process or leave all the filters blank to have all records submitted within the approval process.
Tip
Restrict the approval process for specific users
If only specific users are involved in this approval process, you can specify it here. For example, if only the sales team is to submit opportunity reviews, enter this filter criteria: Current User: Department Equals Sales.
As shown in the preceding screenshot, in the fourth entry criteria row, Field is Current User: Department, Operator is equals, and Value is Sales.
Click on Next to set the Specify Approver Field and Record Editability options.
In this step (step 3 of 6), you would specify who the users for the approval steps in Salesforce CRM are. Here, a user field can be used to automatically route approval requests, and this field can be the Manager field on an individual's user record or you can create a custom hierarchical (User to User) field on the User object.
In Step 3. Specify Approver Field and Record Editability Properties, using the Next Automated Approver Determined By picklist, select a user field if you want the Salesforce CRM application to automatically assign approval requests to an approver based on the value in the user field. For example, you might want to automatically send approval requests to a user's manager, as specified in the user's Manager field, as shown next:
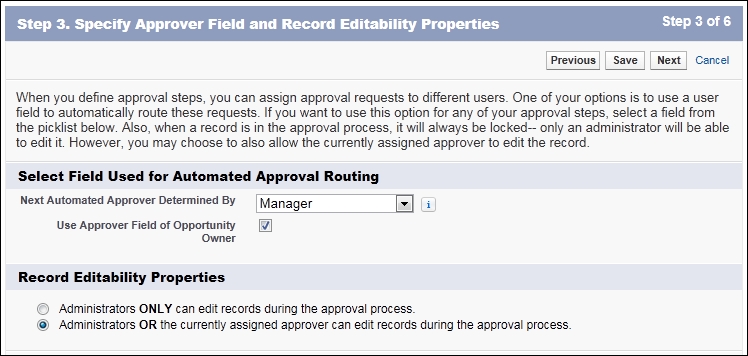
To allow users to manually choose another user who will approve any approval requests, leave the Next Automated Approver Determined By field blank:
- By selecting the Use Approver Field of Record Owner checkbox, you can set the approval process to use the standard Manager field or a custom field on the record owner's user record instead of the submitting user's record.
- Select the appropriate Record Editability Properties and click on Next.
- When an approval process assigns an approval request to a user, Salesforce.com automatically sends the user an approval request e-mail. This e-mail contains a web link that the user can click on to access the approval page within the Salesforce CRM application, which lets the user approve or reject the request and also enter comments.
Tip
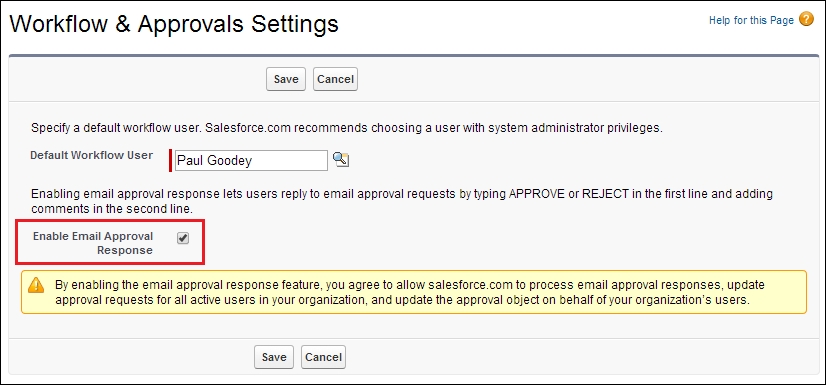
Enable email approval response
By enabling the e-mail approval response, the user can alternatively reply to the e-mail by typing
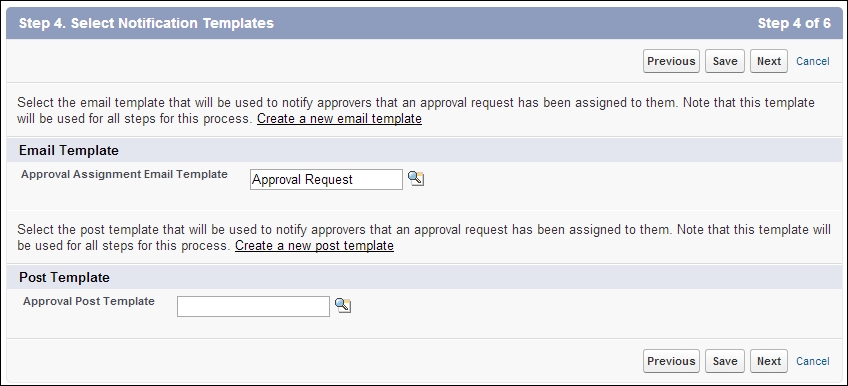
approve,approved,yes,reject,rejected, ornoin the first line of the e-mail body, and then add comments in the second line. This option makes it easy to approve or reject approval requests, and is especially useful for users who access approval requests using a mobile device. - In Step 4. Select Notification Templates, you can choose a custom e-mail template that can be used when notifying an approver that an approval request has been assigned to them, as shown next for the example Approval Request template. Alternatively, by leaving this field blank, a simple default e-mail template is used. In addition, if Approvals in Chatter has been enabled, you can also choose Approval Post Template, as shown in the following screenshot:
By enabling the e-mail approval response, the user can alternatively reply to the e-mail by typing approve, approved, yes, reject, rejected, or no in the first line of the e-mail body. To enable Email Approval Response, navigate to to Setup | Create | Workflow & Approvals | Settings. Now, check the Enable Email Approval Response checkbox, as shown in the following screenshot:
Within the Step 5. Select Fields to Display on Approval Page Layout page, the option to configure the approval request page layout can be carried out as shown in the following example:

The approval page is where an approver approves or rejects a request, and it is in Step 5. Select Fields to Display on Approval Page Layout of configuring the approval process where you can carry out the following:
- Select and sort the fields you want to display on the approval request page.
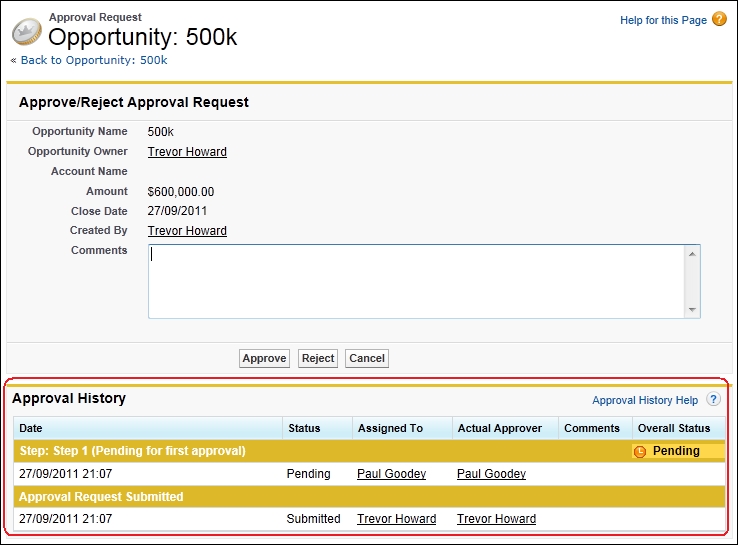
- Select Display approval history information in addition to the field selected previously to include the Approval History related list that displays the Date, Status, Assigned To, Actual Approver, Comments, and Overall Status columns on the resulting approval request page, as shown in the following screenshot:
- To specify how approvers can access an approval page, select either Allow approvers to access the approval page only from within the application. (Recommended) or Allow approvers to access the approval page from within the salesforce.com application, or externally from a wireless-enabled mobile device, and then click on Next (as shown previously in the step 5 screenshot).
- Now, specify Initial Submitters, as shown in the following screenshot:
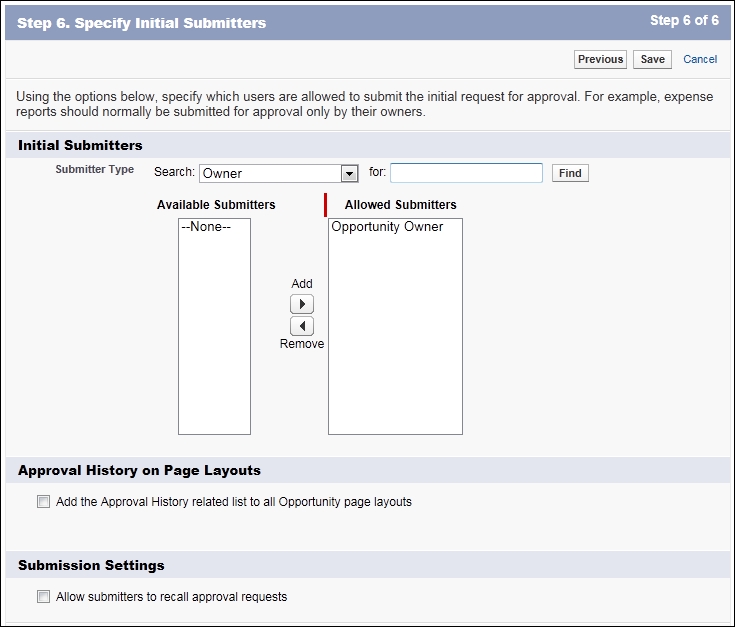
- Specify which users are allowed to submit records for approval.
- Optionally, select Add the Approval History related list to all [object name] page layouts (as shown for the Opportunity object-related approval). This will automatically update all the page layouts for this object and include a related list that allows users to view and submit approval requests.
- Optionally, select Allow submitters to recall approval requests to give submitters the option to withdraw their approval requests.
When the Allow submitters to recall approval requests option is selected, the Recall Approval Request button in the Approval History related list is visible to the users who have submitted the record, as well as to you as the system administrator.
When a user clicks on Recall Approval Request, the pending approval request for the record is withdrawn and the recall action is run.
This option is required for scenarios where changes occur to the record while waiting for the approval signoff. For example, an opportunity might be set to lost or the amount might be lowered below the approval threshold after having submitted it for approval.
Now, click on Save, then click on Next, and then finally, click on the Activate button next to the process.
Approval steps in Salesforce CRM set the flow of the record approval process that associates the participating users at each chain of approval. For each approval step, we set who can approve requests for the records, what the record must contain to meet the criteria, and why the record should be allowed to be approved (in the case of a delegated approver).
In addition, the very first approval step in a process also specifies the action required whenever the record fails to reach that step. Later steps then require you to set the action to be taken whenever an approver rejects the request.
To create an approval step, navigate to Setup | Create | Workflow & Approvals | Approval Processes and select the name of the approval process, and then carry out the following:
- Click on the New Approval Step button from the Approval Steps related list section
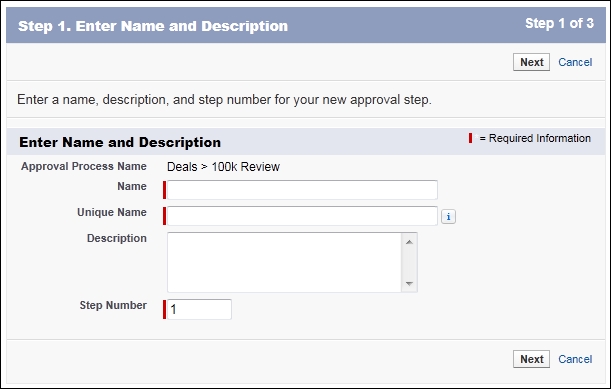
- Enter the Name, a Unique Name, and an optional Description fields for the approval step
- Enter a step number that positions the step in relation to any other step in the approval process, as shown next, and click on Next:
On this page, specify that either all records should enter this step or only records with certain attributes should enter this step, as shown in the following screenshot:
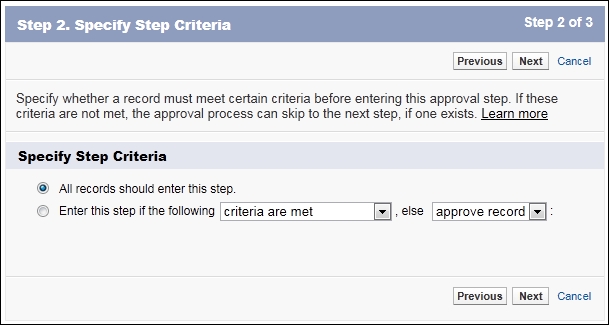
If you specified the filter criteria or entered a formula, you can choose what should happen to records that do not meet the criteria or if the formula returns False, where the options are:
- Approve record: This automatically approves the request and performs all final approval actions.
- Reject record: This automatically rejects the request and performs all final rejection actions. This option is only available for the first step in the approval process.
Now, click on Next to display the Step 3. Select Assigned Approver page, where you specify the user who should approve records that enter this step and optionally, choose whether the approver's delegate is also allowed to approve these requests, as shown next:
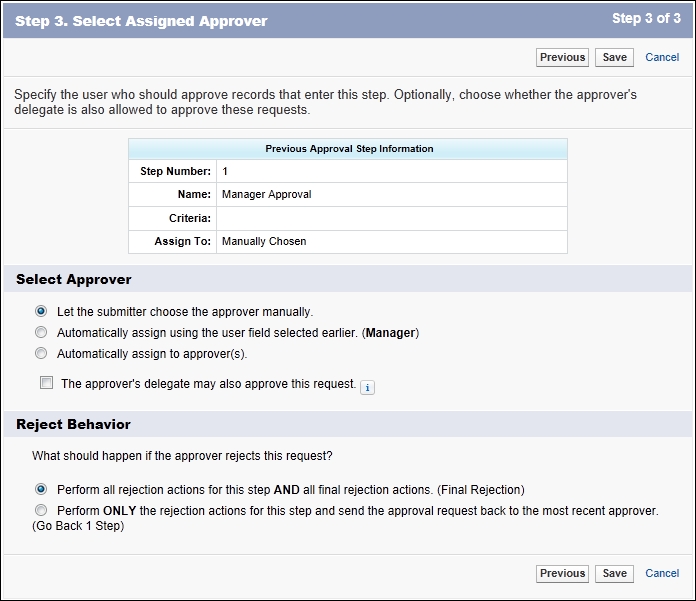
The options are:
- Let the submitter choose the approver manually, which prompts the user to manually select the next approver
- Automatically assign using the user field selected earlier, which assigns the approval request to the user in the custom field that is displayed next to this option (where this custom field was selected during the earlier configuration of the approval process, which, in the preceding screenshot, is Manager)
- Automatically assign to approver(s), which allows you to assign the approval request to one or more users or related users, as shown next:
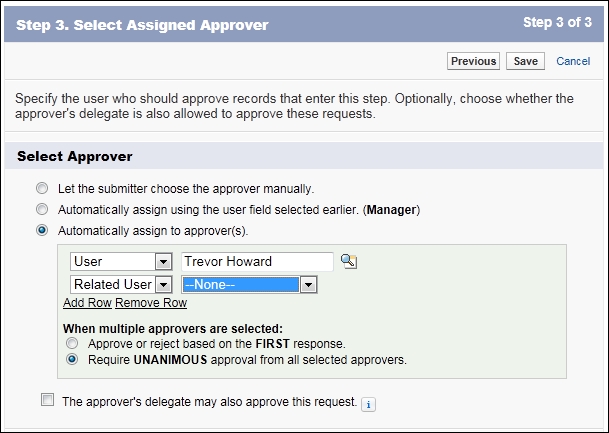
If you specify multiple approvers in the Automatically assign to approver(s) option, choose one of the following options:
- Approve or reject based on the FIRST response, whereby the first response to the approval request determines whether the record is approved or rejected.
- Require UNANIMOUS approval from all selected approvers, whereby the record is only approved if all of the approvers approve the request. If any of the approvers reject the request, then the approval request is rejected.
Also on this page is the option to specify The approver's delegate may also approve this request, where the delegate user is set in the Delegated Approver field on the assigned approver's user page.
If this is not the first step in the approval process, you must specify what will happen if the approver rejects a request in this step, as shown in the following example, where the options are as follows:
- Perform all rejection actions for this step and all final rejection actions (Final Rejection).
- Perform only the rejection actions for this step and send the approval request back to the most recent approver (go back one step).
Now, click on Save and specify any workflow action you want to set within this step using the following options:
- Yes, I'd like to create a new approval action for this step now
- Yes, I'd like to create a new rejection action for this step now
- No, I'll do this later. Take me to the approval process detail page to review what I've just created
Finally, click on Go! to complete the approval process.
Although you will need to plan for the successful implementation of approval processes, it is highly likely that they will need to change over time. This could be due to a change of business processing or the refinement of the process within the Salesforce CRM application.
It is, therefore, a good idea to create analytics to help measure and verify that the approval process is operating successfully. You could, for example, produce reports and dashboards to measure how long approvals take through the process and identify any areas of the process that are not working as expected and refine them accordingly.
The process visualizer provides a read-only representation of your saved approval processes. It can be accessed by clicking on the View Diagram button from within the saved approval process, as shown in the following screenshot:
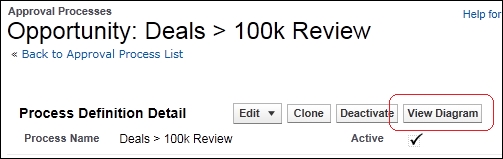
The following screenshot is displayed for the simple two-step approval process to review opportunity deals that are greater than 100 K:
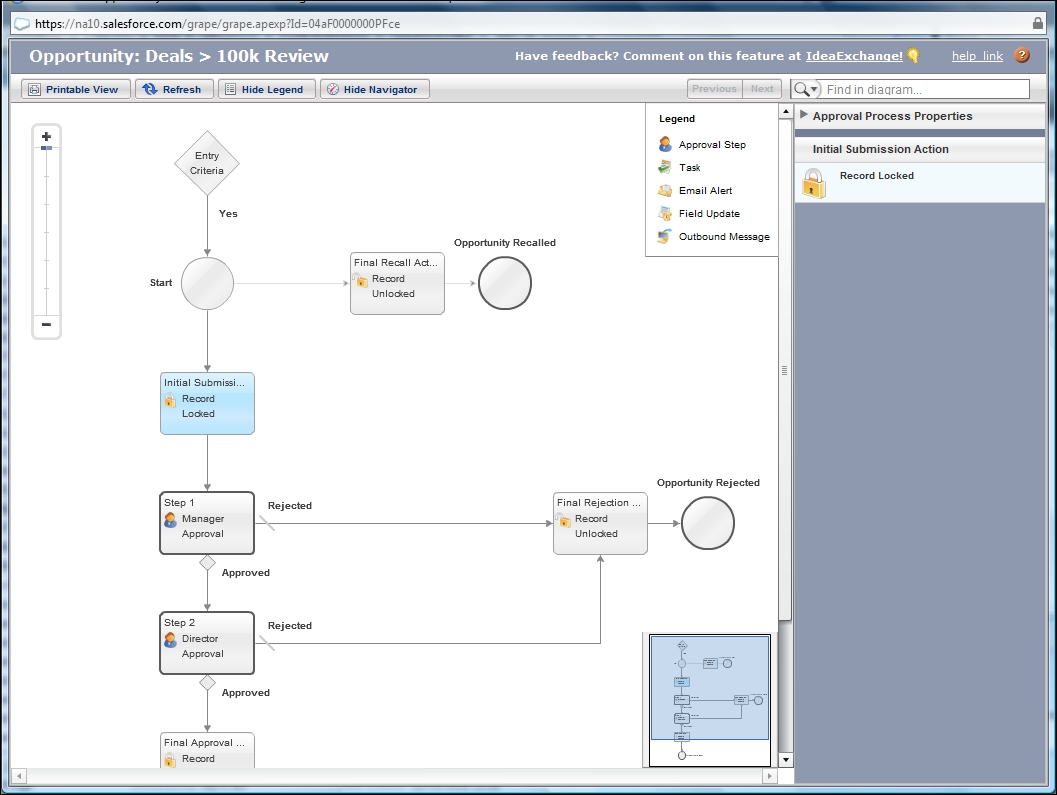
With the process visualizer, you can also print an annotated version of the approval process, where numbers appearing on the diagram correspond to details in a table that are included in the printable view.
Having the process set out diagrammatically can help in the understanding of:
- The steps necessary for a record to be approved
- The designated approvers for each step
- The criteria used to trigger the approval process
- The specific actions taken when a record is approved, rejected, recalled, or first submitted for approval
In summary, approval processes can be a powerful tool to monitor an internal process that must be completed prior to moving forward with the business activities. They also provide great visibility into the timeliness of business process. Here, you can use approvals to capture the length of time it takes to get expenses, say, approved, which can then help put measures to improve organizational processes in place.