In the previous chapter, we looked at user authentication and how user login access is authorized by the Salesforce application. We were introduced to the concept of a user being assigned a profile that could be set to control certain permissions. The user profile login permissions we looked at were restrictions on login hours and IP addresses, which allow you to control when and from where users log in to the Salesforce application.
In this chapter, we will look at how users can be managed in more detail and understand how some of the key profile settings are used within the Salesforce CRM application.
We will start to look into the ways in which a user's profile controls access to objects and also governs what features are available to that user.
Generally speaking, objects represent database tables that contain your organization's information and are discussed in detail in Chapter 3, Configuration in Salesforce CRM. For example, one of the key objects in the Salesforce CRM application represents account information.
Along with profiles, this chapter also begins to look at the concept of record sharing and provides a high-level look at sharing features within Salesforce. It also describes how these features control access to records for users.
The term record describes a particular occurrence of an object. A specific record could be American Express or Google, which is represented by an account object in our preceding example. We will now look at the following:
- An introduction to record ownership, profiles, and sharing
- Managing users in Salesforce
Before looking at the features available to manage users, we start with a brief introduction to the concepts of record ownership, profiles, and sharing in Salesforce CRM.
The record owner terminology is reflected throughout Salesforce and, for each and every data record, there can be one and only one record owner.
Only users that are active in Salesforce can have records assigned to them.
When a user is marked inactive in Salesforce CRM, he or she no longer has access to the application. However, any records that this inactive user owns remain in the application and continue to show the inactive user as the record owner.
The record owner setting generally determines whether access to that record is available to other users within the organization and is enabled using either profile or sharing settings.
Profiles, sharing, and the optional role hierarchy setting work together and should be considered as a whole when setting up record ownership and data access for users. An overview of the relationship between users, profiles, and sharing settings can be pictured as follows:
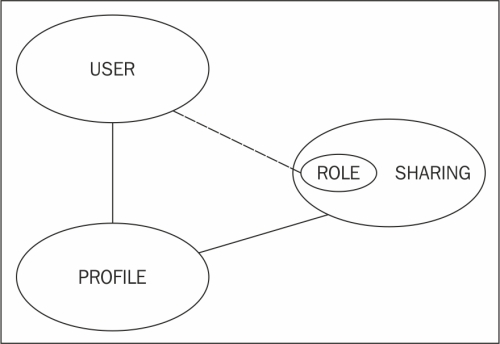
All users in Salesforce must be assigned a profile. The profile is a control mechanism used to determine which functions the user can perform, which types of data they can access, and which operations they can carry out on that data.
All users are associated with sharing mechanisms in Salesforce; this determines the actual records the user can access. Controlling the level of record access can be achieved using options ranging from default sharing, which is set at the organization level, to role hierarchy and beyond using advanced sharing mechanisms. A user does not have to be assigned to a role in Salesforce.
The sharing rules are briefly outlined as follows and covered in far more detail later in this book.
Some of the key controls of profiles are to identify the type of license specified for the user, any login hours or IP address restrictions, and control access to objects. If the appropriate object-level permission is not set on the user's profile, the user will be unable to access the records of that object type in the application.
Profiles never override your organization's sharing model or role hierarchy. For example, a profile might be set to allow a user access to create, edit, and delete leads. However, a user with this profile cannot edit or delete other users' leads if your organization's lead sharing model is read-only.
In Chapter 3, Configuration in Salesforce CRM we will look in detail at the features that the profile controls, including tabs, object-level security, field-level security, Apex/Visualforce page accessibility, console layout, application selections, and administrative and general user permissions.
There are two types of profile in Salesforce:
- Standard
- Custom
Here, each standard or custom profile belongs to exactly one user license type.
Standard profiles and custom profiles are similar in nature. The difference is that, for standard profiles, these types of settings cannot be applied: administrative permissions, general user permissions, object-level permissions, and, notably, the Password Never Expires setting, which means you are not required to change your password after a certain amount of time (this is part of the password policies that are described later). Hence, you must either create a custom profile or use a permission set (described later in this chapter) if you want to enable any of these features.
There are a number of standard profile types, such as:
- Contract manager
- Marketing user
- Solution manager
- Standard user
- System administrator
The marketing user profile is generally used to manage campaigns, import leads, and manage public documents. Users with this profile have access to the same functions as standard user profiles.
The solution manager profile is generally used to publish and review solutions. Users with this profile have access to the same functions as standard user profiles.
The standard user profile is used to create and edit the main types of records. This profile also allows users to run reports and view the organization's setup. Notably, this profile can view, but not manage, campaigns. This profile can create, but cannot review, solutions.
The system administrator profile is used to configure and customize the application. Users with this profile have access to all functionalities that do not require any additional licenses. For example, system administrators cannot manage campaigns unless they also have a marketing user license.
Note
Standard profiles have their uses, but it is wise to limit their usage to cloning them to create custom profiles, as Salesforce their been known to change the settings for standard profiles when a new release is rolled out, which can result in an undesired outcome for any user assigned with that profile.
Sharing settings control the default access for each object across the organization. Sharing rules per object can grant access beyond the default sharing settings; they cannot restrict access. The default sharing settings are as follows:
- Controlled by Parent
- Private
- Public Read Only
- Public Read/Write
- Public Read/Write/Transfer
- Public Full Access
- Grant Access Using Hierarchies
When the Grant Access Using Hierarchies setting is enabled, the role of the record owner determines visibility throughout the organization. Users in higher roles in the hierarchy will have full access (view/edit/delete) to all records owned by those at a lower level in the role hierarchy.
If Grant Access Using Hierarchies is not enabled, all roles are treated equally regardless of the hierarchy.
Roles are the principal elements in sharing rules. Users can be grouped into roles based on their need to access data according to how they fit into the role hierarchy. Creating a role for every user's job title is not required.
Roles are accessed throughout the application and are particularly important for reporting. For instance, if you have two departments, Operations and Sales, you can run comparative reports for both roles.
Roles generally report to another role and are used to maintain the role hierarchy. They are a one-to-many hierarchical relationship with the hierarchy, allowing managers to see the data of the users who report to them. Users at any given role level are always able to view, edit, and report on all data owned by or shared with users below them in the hierarchy.
Role hierarchies do not need to specifically match your organization chart. Instead, each role in the hierarchy should represent a level of data access required by users.
Permission sets allow you to further control access to the system for the users in your organization. They can be considered as a method to fine-tune the permissions for selected individuals and enable access in a way similar to the setting up of profiles.
While an individual user can have only one profile, you can assign multiple permissions and permission sets to users. For example, you can create a permission called Convert Leads that provides the facility to convert and transfer the leads and assign them to a user who has a profile, which does not provide lead conversion. You can create a permission called Edit Contacts and assign it to a user who has a profile that does not provide contact editing. You can also group these permissions into a permission set to create specific profile-like permissions without actually having to create or clone complete profiles, which is often unnecessary.
Permission sets are an ideal mechanism to apply system access for your users without affecting all other users who have the same profile and without having to create one-off profiles, which sometimes lead to an increase in the amount of maintenance.
A common use for permission sets is to grant additional permissions, in addition to the settings listed in a profile, to individuals without changing their profile, for example, to provide more rights than their profile currently allows.
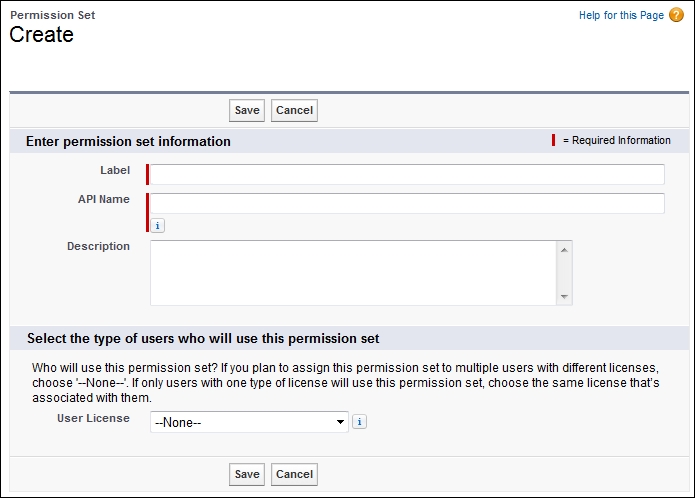
To create a permission set, navigate to Setup | Manage Users | Permission Sets. Click on New. Enter a label, API name, and description.
Note
If you plan to assign the permission set to all users who have the same type of user license, a best practice is to associate that user license with the permission set. However, if you plan to assign the permission set to users who currently have different licenses (or might have different licenses in the future), it is probably best to create an organization-wide permission set.
To continue creating the permission set (as outlined previously), either select a user license or select the --None-- option (to create an organization-wide permission set). Finally, click on Save.