So at this point, we should have a project set up and ready to go. I hope you have even tried to run it. It should have just shown a black screen, it's not a game yet!
Let's start by breaking this game down into its components so that we can implement them in a set of smaller steps. This won't be quite how it happens in real life as sometimes the game's rules might not have been set in stone and so there would be a chance things would change. However, since we know the game we want to make and the rules are set, let's do it!
The main character in our game is Flappee Bee, which tries to bumble its way through the flowers.
Let's pretend that we don't have the art on hand to start rendering old Flappee to the screen. Instead, let's use our ShapeRenderer to get things started so we can get the game playable.
First, let's create a class that will look after Flappee; it will contain properties that only apply to Flappee, along with the logic to manipulate the character. So, let's create that class called Flappee. Next, we will populate it with the following code:
public class Flappee {

  private static final float COLLISION_RADIUS = 24f;
  private final Circle collisionCircle;

  private float x = 0;
  private float y = 0;

  public Flappee() {
    collisionCircle = new Circle(x,y, COLLISION_RADIUS);
  }

  public void drawDebug(ShapeRenderer shapeRenderer) {
    shapeRenderer.circle(collisionCircle.x, collisionCircle.y, collisionCircle.radius);
  }
}
Now, we'll discuss what we have added here; first, we have defined a collision area for Flappee, in this instance, it is a circle.
Why did I pick a circle? I am sure you must be wondering. Well, for me, it is the one that best represents a real life bee—particularly the Bumble Bee. Now, I suppose you are wondering why I am using a radius of 24? Before I answer that, I will just quickly explain that the constructor I am using for the Circle class takes three properties: x, y, and the radius. As we don't know where Flappee will bee (read be)—I think I will be restricted to one pun per book at this rate—we can just set the x and y coordinates of the circle to be the default of (0,0). As for the radius, well being the author of this book, I know what is going to happen later and what the size of the art asset is that will use. So, for now the radius is arbitrary, but it won't be the same later. Trust me on this one.
Finally, we created a render method where we can pass ShapeRenderer in and draw our circle.
Now, we have Flappee; let's add him to the GameScreen class:
private Flappee flappee = new Flappee();
Then, update the render() method to draw Flappee:
public void render(float delta) {
  /* Other code omitted for brevity */
  shapeRenderer.setProjectionMatrix(camera.projection);
  shapeRenderer.setTransformMatrix(camera.view);
  shapeRenderer.begin(ShapeRenderer.ShapeType.Line);
  flappee.drawDebug(shapeRenderer);
  shapeRenderer.end();
}
Now, let's fire up the desktop:run task in this project and see what we get!
Oh! Before you do, we should update our DesktopLauncher class so we can specify a sensible screen size; 240 x 320 should suffice:
public class DesktopLauncher {
public static void main (String[] arg) {
LwjglApplicationConfiguration config = new LwjglApplicationConfiguration();
config.height = 320;
config.width = 240;
new LwjglApplication(new FlappeeBeeGame(), config);
}
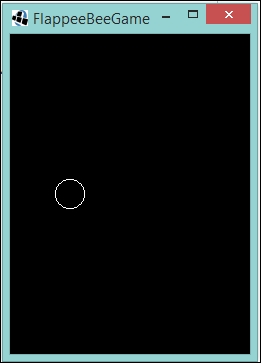
}Let's take a look at the following screenshot:
Well, that wasn't what we were expecting, was it?
Hands up who thought that the x and y coordinates were going to be at the bottom left of the circle and not the center? Now, hands up who read the JavaDoc and knew this was going to happen?
Well, to be honest, this doesn't affect us that much going forward. We will just have to remember this when it comes to rendering the texture over the top as we will need to offset the texture to compensate for this.
The next question we need to answer is, "where do we place Flappee on the screen?" Well, let's think about the gameplay here: the player taps the screen, the character flies up on tap, and down on no tap, and obstacles come along from the right. As what is commonly found in software development, there are several different ways to solve this problem. You can have the character fly through the world with the obstacles being static, or you can have the obstacles moving horizontally through the world and the character being static (in the horizontal plane at least).
Considering that we will want to randomly generate obstacles, I will say we go with the latter of these two ideas.
This means that Flappee will consistently be in the same x coordinate in the world space but the y coordinate will vary depending on the input. So, let's place him in an appropriate place.
Firstly, let's update our Flappee class so we can manipulate his starting position:
public void setPosition(float x, float y) {
  this.x = x;
  this.y = y;
  updateCollisionCircle();
  }

  private void updateCollisionCircle() {
    collisionCircle.setX(x);
    collisionCircle.setY(y);
  }
What we are doing here is applying the given x and y values to the class members, and then updating our circle to match that position.
Next, add a method call to the GameScreen class:
  public void show() {
    /** Code omitted for brevity **/
    flappee.setPosition(WORLD_WIDTH / 4, WORLD_HEIGHT / 2);
  }
Here, we set the position to be precisely a quarter of the width of our world area and half of the world height.
Let's run our project again and see what we get!:
Much better! I can see this game coming together already! No? You don't? Ah OK, let's start making Flappee move.
Our next step will be moving the character in an up and down motion. As we know, if there isn't any input, then Flappee will just fall down from its flight, and if we are true to the original, then it should be a pretty steep dive too!
We will need to add a couple of properties to our Flappee class to take the dive into consideration. We will need to know not only the speed that Flappee is subjected to, but also how quickly that speed should change, that is, the acceleration. Add the following code to our Flappee class:
  private static final float DIVE_ACCEL = 0.30F;
  private float ySpeed = 0;
So, here we have the acceleration DIVE_ACCEL, which is going to be the rate of change and ySpeed, which we will use to keep track of the speed—in this case on vertically.
Next, let's add an update() method that can be called:
  public void update() {
    ySpeed -= DIVE_ACCEL;
    setPosition(x, y + ySpeed);
  }
Here, we have our speed being updated and then applied to Flappee's position.
Finally, add a call to the GameScreen class:
public void render(float delta) {
  /* Code omitted for brevity */
  update(delta);
}

private void update(float delta) {
  flappee.update();
}
If you run the project now, you will see our white circle drop just out of view.
Our next task is to have Flappee fly up in response to some input from the player. What we will do is use the space bar for this task.
First, let's add the acceleration required for flying up in the Flappee class:
private static final float FLY_ACCEL = 5F;
I would like to point out that the values I used for the acceleration came from trial and error. Feel free, once we are done here, to go through and try different values!
Next, we need to create a method that will cause the manipulation upon input:
  public void flyUp() {
    ySpeed = FLY_ACCEL;
    setPosition(x, y + ySpeed);
  }
Here, we cancel any current speed and set it to our flying up acceleration, then we update Flappee's position.
Finally, in our GameScreen class, we need to add some input detection and call the flyUp() method. Let's update our update() method with the following:
  private void update(float delta) {
    flappee.update();
    if (Gdx.input.isKeyPressed(Input.Keys.SPACE)) flappee.flyUp();
  }
By pressing the spacebar, we call our flyUp() method.
Run the project and you can now try this out. Just watch out, Flappee will fly off the screen if you aren't careful!
In fact, let's sneak that code in now, as it will be useful later on!
Create the following method in our GameScreen class and add a call to the update method:
  private void blockFlappeeLeavingTheWorld() {
    flappee.setPosition(flappee.getX(), MathUtils.clamp(flappee.getY(), 0, WORLD_HEIGHT));
  }
  private void update(float delta) {
    flappee.update();
    if (Gdx.input.isKeyPressed(Input.Keys.SPACE)) flappee.flyUp();
    blockFlappeeLeavingTheWorld();
  }
Here, we use a handy method called clamp() from the LibGDX MathUtils class. This allows us to bound a value between a lower and an upper limit. This class has several useful methods, feel free to check out the JavaDoc on the LibGDX at http://libgdx.badlogicgames.com/nightlies/docs/api/com/badlogic/gdx/math/MathUtils.html for more information.
Now, our little circle won't go off screen.
With Flappee going up and down, we now need to introduce some obstacles for him to avoid. From an artistic perspective, this is going to take the form of a flower, but in terms of our collision detection and shape rendering, it will take the form of something along the lines of a lollipop. However, you might be thinking there are two obstacles that come at once, one from the ceiling and one from the floor, and that's perfectly fine. All we will need to do is invert one to get the other. Let's start working on the one on the floor.
First, let's create a class that is going to be looking after this obstacle. Let's call it Flower; the make up of this class is going to be similar to the Flappee class, in that there will be collision areas, a way to set the position, a way to update the collision areas, and, of course, a debug render method. The following is the code listing for the Flower class:
public class Flower {

  private static final float COLLISION_RECTANGLE_WIDTH = 13f;
  private static final float COLLISION_RECTANGLE_HEIGHT = 447f;
  private static final float COLLISION_CIRCLE_RADIUS = 33f;
  private final Circle collisionCircle;
  private final Rectangle collisionRectangle;

  private float x = 0;
  private float y = 0;

  public Flower() {
    this.collisionRectangle = new Rectangle(x, y, COLLISION_RECTANGLE_WIDTH, COLLISION_RECTANGLE_HEIGHT);
    this.collisionCircle = new Circle(x + collisionRectangle.width / 2, y + collisionRectangle.height, COLLISION_CIRCLE_RADIUS);
  }

  public void setPosition(float x) {
    this.x = x;
    updateCollisionCircle();
    updateCollisionRectangle();
  }

  private void updateCollisionCircle() {
    collisionCircle.setX(x + collisionRectangle.width / 2);
  }

  private void updateCollisionRectangle() {
    collisionRectangle.setX(x);
  }

  public void drawDebug(ShapeRenderer shapeRenderer) {
    shapeRenderer.circle(collisionCircle.x, collisionCircle.y, collisionCircle.radius);
    shapeRenderer.rect(collisionRectangle.x, collisionRectangle.y, collisionRectangle.width, collisionRectangle.height);
  }
}
I am not going to go into too much detail of the class till now, as it is fairly self-explanatory and is similar to the Flappee class. The one thing I would like to point out is the positioning of the circle:
private void updateCollisionCircle() {
  collisionCircle.setX(x + collisionRectangle.width / 2);
  collisionCircle.setY(y + collisionRectangle.height);
}
As you can see from the preceding code snippet, we position the circle relative to the rectangle. This is done so that when it is placed on the screen, the circle will be at the top of the rectangle and centrally aligned.
If we quickly add the Flower class to the GameScreen class and draw it out, we get the following:
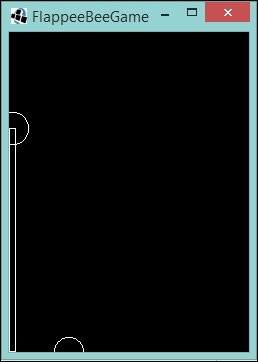
As you can see from the image, we get the shape we are looking, just positioned in a place where we don't want it. You might be wondering at this stage, "why is it so tall?" Well, if you recall, in the original game, the heights varied according to the obstacles. This is going to be pretty much the limit that we will allow the bottom obstacle to come up to.
Next, we need to start making it scroll across the screen.
Moving the obstacle is really just an act of updating the x position of the flower.
First, let's add a constant to define the speed at which we want our obstacle to move across the screen:
private static final float MAX_SPEED_PER_SECOND = 100F;
Then, let's create an update() method for the Flower class:
public void update(float delta) {
  setPosition(x - (MAX_SPEED_PER_SECOND * delta));
}
So, what we are saying here is that we want our flower to move across the screen at 100 world units a second. We achieve this by multiplying the given constant with a delta value we get from LibGDX. This delta value is the time since the last render of the screen, and given that we are running at 60 frames a second, it should be around the value of 0.016667.
Next, let's update our GameScreen class to allow for creating, updating, and removing our obstacles, or flowers, as they move across the screen.
First, we need to hold all the references we have to the Flower class, and we can do this using one of LibGDX's data types, the Array class:
private Array<Flower> flowers = new Array<Flower>();
Next, we are going to create a method to create our flowers for us, which is as follows:
private void createNewFlower() {
  Flower newFlower = new Flower();
  newFlower.setPosition(WORLD_WIDTH + Flower.WIDTH);
  flowers.add(newFlower);
}
Here, we have the Flower class being instantiated and then set to a position that is the WORLD_WIDTH value with the addition of the width of the flower, which in this case, is in the Flower class:
public static final float WIDTH = COLLISION_CIRCLE_RADIUS * 2;
We then add it to the array. We now need to decide a way to check whether we need to create a new Flower instance. There are two situations we need to consider when we need to create a new Flower instance. The first instance being that there aren't any flowers at all and the second if the last added Flower instance has crossed a certain threshold. This will allow us to have a consistent gap between our obstacles. We can do this with the following method:
private void checkIfNewFlowerIsNeeded() {
  if (flowers.size == 0) {
    createNewFlower();
  } else {
    Flower flower = flowers.peek();
    if (flower.getX() < WORLD_WIDTH - GAP_BETWEEN_FLOWERS) {
      createNewFlower();
    }
  }
}
So, as you can see, we are satisfying both criteria. If the array is empty, this means there are no obstacles - this will of course be the case at the start of the game. Otherwise if there are items in the array then we can go ahead and handle the obstacles. We do this by using the peek() method (this looks at the last added object) and we test the x position of the obstacle, if the position is less then our constant value—GAP_BETWEEN_FLOWERS—away from the right end edge of the world we add another obstacle to the array.
The GAP_BETWEEN_FLOWERS value in this case is:
private static final float GAP_BETWEEN_FLOWERS = 200F;
The number might sound arbitrary, but again, this is just from trial and error of what feels right; feel free to change this number to see a different effect!
The final part, before we get to the code to update our obstacles, is to check whether we want to remove the first one in the array, as this is the one that will be the furthest left. We do this as follows:
private void removeFlowersIfPassed() {
  if (flowers.size > 0) {
    Flower firstFlower = flowers.first();
    if (firstFlower.getX() < -Flower.WIDTH) {
      flowers.removeValue(firstFlower, true);
    }
  }
}
We check whether the array contains obstacles; if it does, get the first obstacle in the array and test the x position. Now, you might be wondering why we are using—FLOWER_WIDTH here as our comparison and not just 0, the left hand edge of the screen. If we set it to 0, then the flower will just disappear from view and would look a bit unconventional, as you would expect the flower to drift off to the left of and move out of your view. Additionally, -Flower.WIDTH is just shorthand for 0 – Flower.WIDTH.
Now, we have all the tools for our army of flower obstacles. We just need to package them together and have the obstacles rendered! The following code is in the GameScreen class:
private void update(float delta) {
  /* Code omitted for brevity */
  updateFlowers(delta);
}
private void updateFlowers(float delta) {
  for (Flower flower : flowers) {
    flower.update(delta);
  }
  checkIfNewFlowerIsNeeded();
  removeFlowersIfPassed();
}
private void drawDebug() {
  /* Code omitted for brevity */
  for (Flower flower : flowers) {
    flower.drawDebug(shapeRenderer);
  }
  /* Code omitted for brevity */
}
With all that in place, if we now run the project, you should hopefully see something similar to the following screenshot:

With the obstacles scrolling across the screen, if you start pressing the spacebar, you can almost make a game out of this.
Let's now turn our attention to varying the height of these obstacles. This is easily done by specifying a y value upon the creation of our flowers.
First, let's define our constant for the height offset in the Flower class:
private static final float HEIGHT_OFFSET = -400f;
Now in our constructor, let's set our y value:
public Flower() {
  this.y = MathUtils.random(HEIGHT_OFFSET);
  /** Code omitted for brevity **/
}
What we are saying here is that we want our y value to be a negative number between 0 and 400. This means our flower can either stand at 447 world units high or be as low down as 47. Again, I chose this number after some trial and error, feel free to play around and try something different.
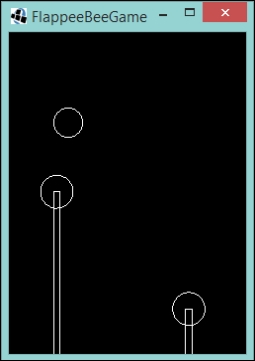
Hopefully, you now get something similar when you play the game!
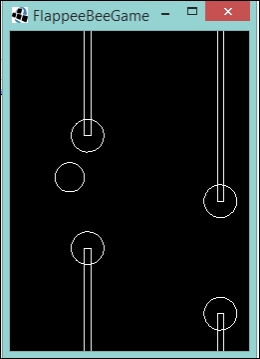
The last task to do with our obstacles is to have an upside down obstacle coming from the ceiling. This can be tackled in multiple ways but we can use a simple approach of just reflecting the collision areas in the Flower class. We can start by adding the new collision areas, as shown in the following code:
private static final float DISTANCE_BETWEEN_FLOOR_AND_CEILING = 225F;
private final Circle floorCollisionCircle;
private final Rectangle floorCollisionRectangle;
private final Circle ceilingCollisionCircle;
private final Rectangle ceilingCollisionRectangle;
public Flower() {
  this.y = MathUtils.random(HEIGHT_OFFSET);
  this.floorCollisionRectangle = new Rectangle(x, y, COLLISION_RECTANGLE_WIDTH, COLLISION_RECTANGLE_HEIGHT);
  this.floorCollisionCircle = new Circle(x + floorCollisionRectangle.width / 2, y + floorCollisionRectangle.height, COLLISION_CIRCLE_RADIUS);

  this.ceilingCollisionRectangle = new Rectangle(x, floorCollisionCircle.y + DISTANCE_BETWEEN_FLOOR_AND_CEILING, COLLISION_RECTANGLE_WIDTH, COLLISION_RECTANGLE_HEIGHT);
  this.ceilingCollisionCircle = new Circle(x + ceilingCollisionRectangle.width / 2, ceilingCollisionRectangle.y, COLLISION_CIRCLE_RADIUS);
}
It should be noted here that I have changed the names of the existing collision zones to make it clear where they are.
So, here I added a constant—DISTANCE_BETWEEN_FLOOR_AND_CEILING. This will be the gap the player has to get Flappee through. Then, in the constructor, we create our new collision areas. This time, their positions are offset using the new constant and are relative to the position of the floor collision circle. The distance, again, is from trial and error.
We can now update the other methods in the Flower class to take these new collision areas into account:
private void updateCollisionCircle() {
  floorCollisionCircle.setX(x + floorCollisionRectangle.width / 2);
  ceilingCollisionCircle.setX(x + ceilingCollisionRectangle.width / 2);
}

private void updateCollisionRectangle() {
  floorCollisionRectangle.setX(x);
  ceilingCollisionRectangle.setX(x);
}

public void drawDebug(ShapeRenderer shapeRenderer) {
  shapeRenderer.circle(floorCollisionCircle.x, floorCollisionCircle.y, floorCollisionCircle.radius);
  shapeRenderer.rect(floorCollisionRectangle.x, floorCollisionRectangle.y, floorCollisionRectangle.width, floorCollisionRectangle.height);
  shapeRenderer.circle(ceilingCollisionCircle.x, ceilingCollisionCircle.y, ceilingCollisionCircle.radius);
  shapeRenderer.rect(ceilingCollisionRectangle.x, ceilingCollisionRectangle.y, ceilingCollisionRectangle.width, ceilingCollisionRectangle.height);
}
When running our project, we should now have what almost resembles a skeleton version of our target game!