
In the final topic of this chapter, we will address fonts and their usage. So far in our game, we have used the default font in LibGDX, which is Arial size 15. While this is good for getting started, it isn't something that you would necessarily want in your final game. As you can see so far, one of the limitations is that it is too small!
So what can we do? Well, we can use our own fonts of course.
Let's start off by picking your favorite font; I found a font from a free site. There are plenty around, just do an Internet search and find a font you wish to use.
What you might find is that the font is in what's called a True Type font and this is usually denoted by the filename having the extension .ttf—.LibGDX does provide extensions to the library that will allow us to load this. However, for this exercise, I would like to introduce you to another tool in the LibGDX armory that I have used a lot.
That tool is Hiero.
Hiero is a bitmap font packing tool. It saves in the Angel Code font format, which can be used by BitmapFont in LibGDX applications:
https://github.com/libgdx/libgdx/wiki/Hiero
Hiero is a great little tool that rasterizes TTF fonts and allows various effects to be applied, such as a drop, shadow, or an outline.
Let's dive in and start using it. You will find the Hiero class in the gdx-tools module under the com.badlogic.gdx.hiero package. You should be able to run the main() method of the Hiero class; if it asks for a module, select Desktop. It will then load and you will be presented with this screen:
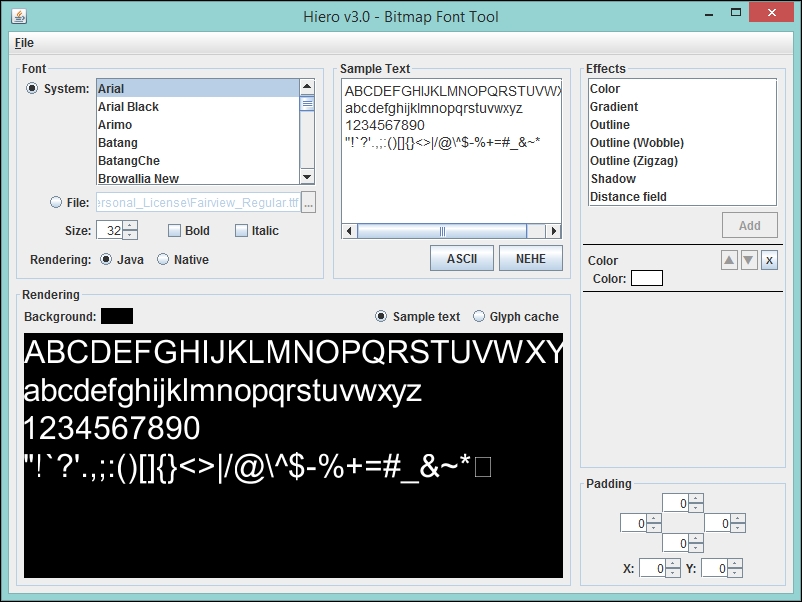
It is a fairly straightforward tool to use; you load the font you want, pick the desired size, specify the characters you wish to use, add an effect or two, and then save the output.
First, load your font or pick a system font. This should then appear in the Rendering box. We can keep size 32 for now, but we can revisit this if the font output is too small for our game.
Next, in the Sample Text screen, let's update this with the characters—or glyphs—we plan to use. Since we are going to use this to represent our score, we can update this to just contain 1234567890.
Now, select Glyph Cache; some additional options will appear, these control the texture output of Hiero. If you adjust the page width and page height, you will notice that the Rendering window will update. We should aim to select a size so all the characters fit in the Rendering window, with minimal wasted space. By doing this we will reduce the final texture size.
Finally, the fun part—we can now add some effects. I am going to add just a simple outline to my font, but you can go wild and try different combinations and see what you get. It's OK, I will wait for you.
Done? Excellent.
Now, we just have to export the font. Select Save from the file drop-down menu and save the font file to the assets directory of our game (it is in the code module, remember?), giving the file a name of score.fnt—without the quotes.
With that done, if you look in the assets directory, you will see that two files have appeared: score.fnt and score.png. If you open score.png, you will notice that it is what we saw in Hiero's rendering box. If you open the score.fnt file, you will notice that it is essentially a mapping of characters to position in the score.png image.
Excellent! We should now be ready to go and use our font over the LibGDX default. A quick way to do this is to update the GameScreen class by updating the BitmapFont creation to pass in the new font, as follows:
bitmapFont = new BitmapFont(Gdx.files.internal("score.fnt"));If you do what is given, then it will work. However, the quick thinkers among you will have realized that we just added another texture! Can't we get it from the texture atlas? Well, yes, you can!
If you run the texture packing process again, you will see that the font image is now in the texture atlas, which means we can change the code to the following:
bitmapFont = new BitmapFont(new BitmapFont.BitmapFontData(Gdx.files.internal("score.fnt"), false), textureAtlas.findRegion("score"), true);Awesome! However, we can take it even further. Remember the asset manager we introduced? Remember how it had that brilliant ability to keep track of assets we have loaded? Well, we can use it for our font!
In our LoadingScreen class, we can add the following code to the show() method:
    public void show() {
      // Code omitted for brevity
        BitmapFontLoader.BitmapFontParameter bitmapFontParameter = new BitmapFontLoader.BitmapFontParameter();
        bitmapFontParameter.atlasName = "flappee_bee_assets.atlas";
        flappeeBeeGame.getAssetManager().load("score.fnt", BitmapFont.class, bitmapFontParameter);
    }
In the preceding code, we created a parameter object that we can use to specify where in the texture atlas our font is coming from, among other things. We then tell the asset manager to load our font.
Then, in our GameScreen class, we can change our BitmapFont creation code to the following:
bitmapFont = flappeeBeeGame.getAssetManager().get("score.fnt");Perfect! Our game textures are all in one place and are centrally managed and we have less complex code to boot!
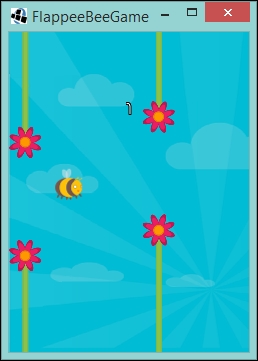
As you can see from the preceding screenshot, here is my font being rendered!
You may be wondering through all this why we didn't touch the Menu screen at all. Well, here is your chance to take what you have read in this chapter and apply it yourself!