
Right, now is the time to introduce the game we are going to make ourselves. We shall call it Nutty Birds. We will follow the same gameplay as Angry Birds. Except, instead of flinging the birds at pigs, we will bring back our friend Pete the Squirrel and he will be lobbing his acorns at the birds—pesky birds living in his tree, probably stealing his acorns.
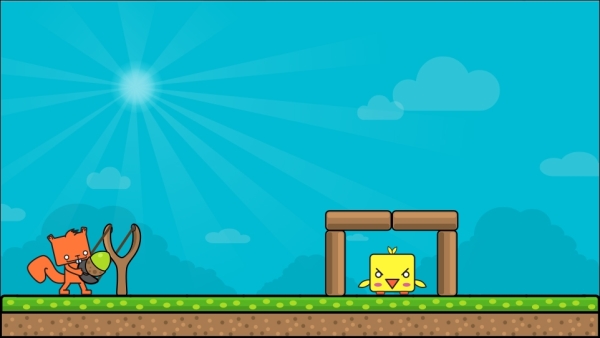
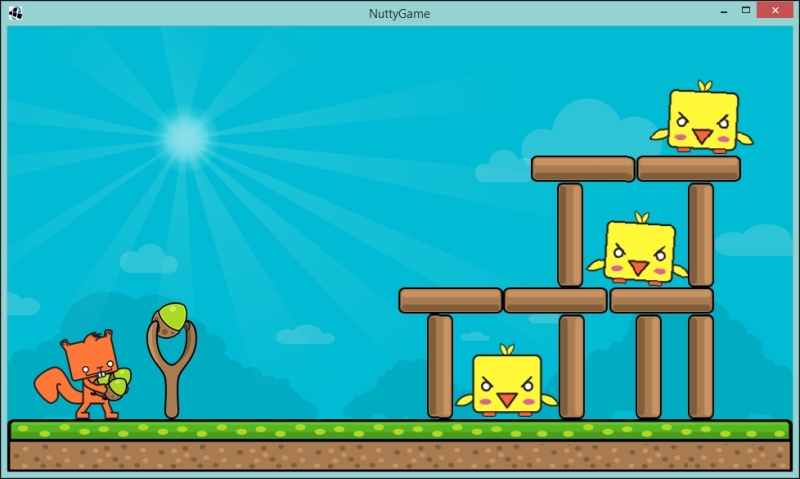
Here is a mock up of how the game will, hopefully, end up looking.
Pete will fling his acorn toward a simple fort. Perhaps this is level 1, where one of the naughty birds is hiding. As with Angry Birds, if the bird is hit with enough force, the pigs will disappear and the player will win the level.
First things first, let's get the level screen set up. To do this, we are going to use that awesome tiling tool called Tiled again. However, this time we are going to do two, yes two! things with it.
I am going to assume that you are up to speed with how Tiled works so I am not going to go into too much detail on the setup as I did before.
To get started, create a new tile map and set it to be 30 x 17 tiles big with a tile size of 32 x 32 pixels.
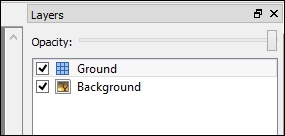
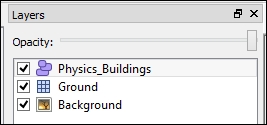
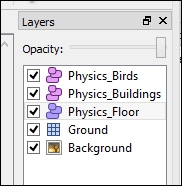
Then, on the Layers tab, rename the tiled layer to Ground, and then add a new layer, but this time choose the image layer! The image layer is, simply put, a layer that is represented by an image—perfect for our background. Call this layer Background and then make sure it is at the bottom of the list—since it is at the back. Your layers pane should look like this:
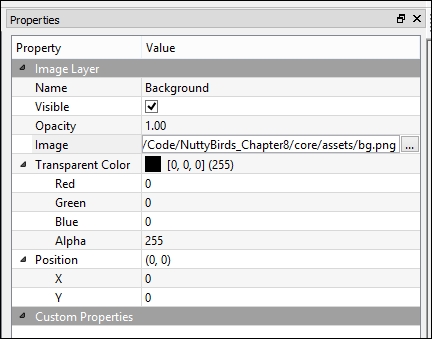
Next, with the Background layer highlighted. Click on Properties—at the bottom there—and you will see the properties of the image layer. One of the properties you will notice is Image; if you click on it, you will have the option to add an image. It should end up looking like this:
Note that your project location might/will/could/would/should be a different location to mine.
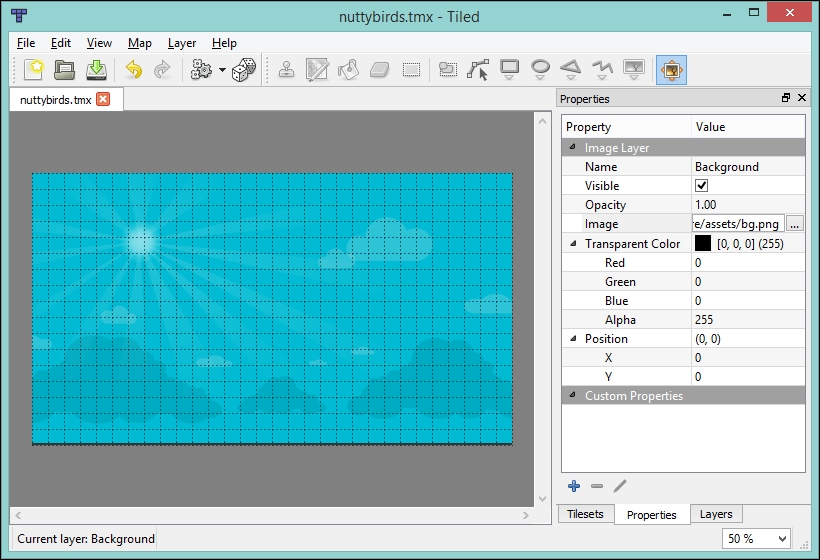
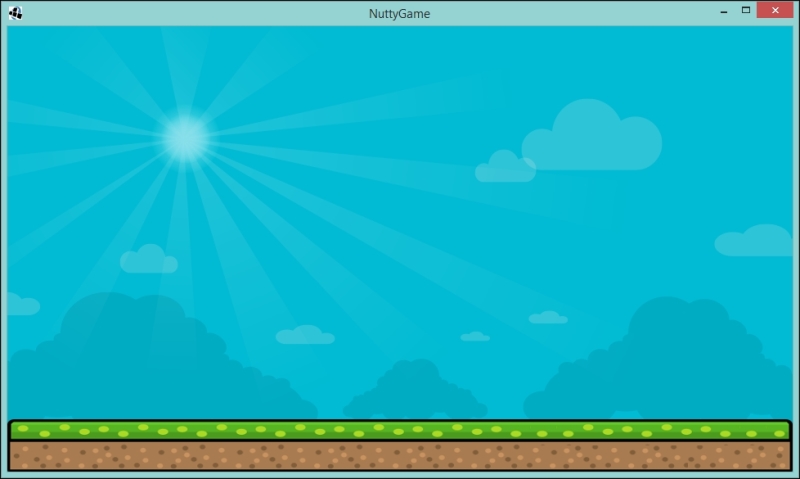
Hopefully, this will now have the background image appear in the main window, as shown in the following screenshot:
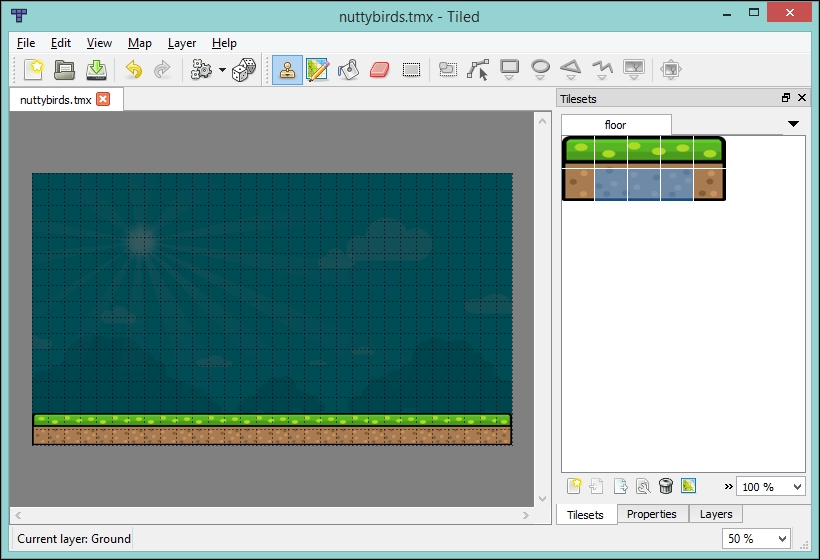
Continuing on, we need to add the tile set to the tiled layer so that we can add the floor. Head back to the Layers tab and select the Ground layer, and then click back onto the Tilesets tab and add the floor image to the tile set. Finally, grab the stamping tool and build a floor that is two-tiles high, as shown in the following screenshot:
That's the groundwork done. However, what we need to do is lay out the physics items; luckily this is something Tiled can help us achieve.
To have Tiled help us achieve easy placing of our physic bodies, we need to add a layer known as an Object Layer. This will allow us to draw shapes that we can then import into our game and build Box2D bodies from.
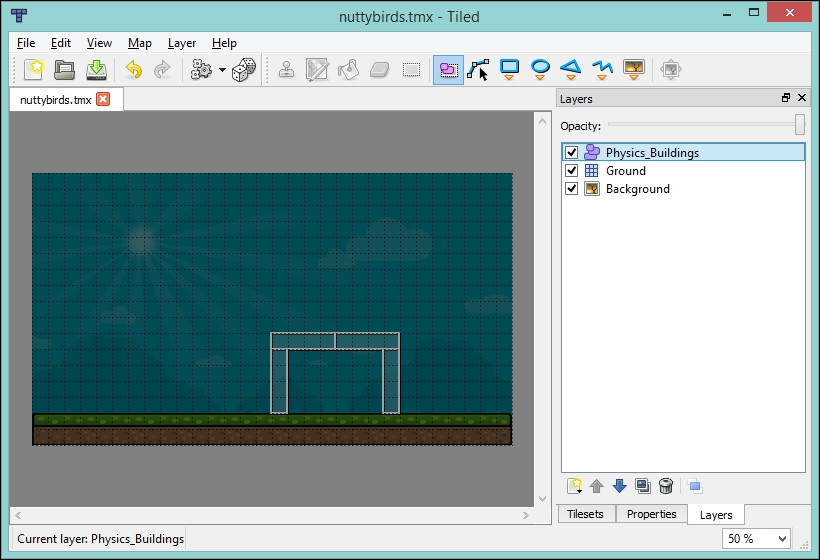
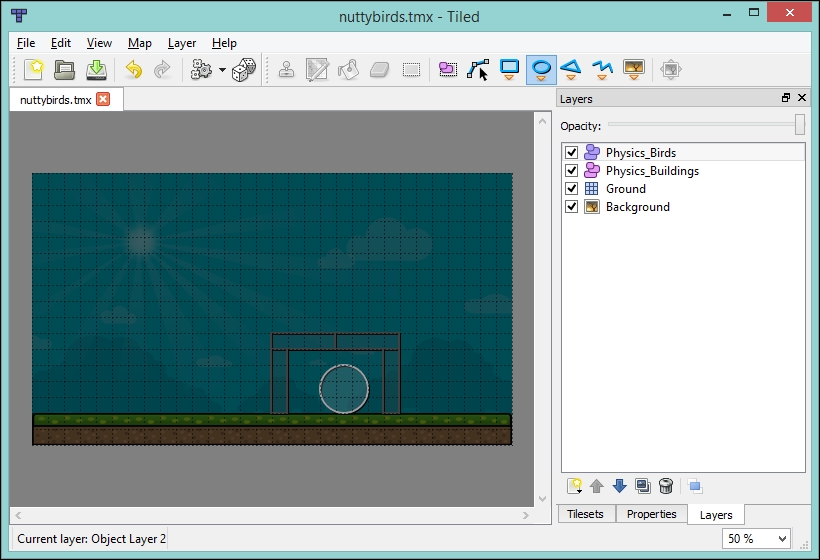
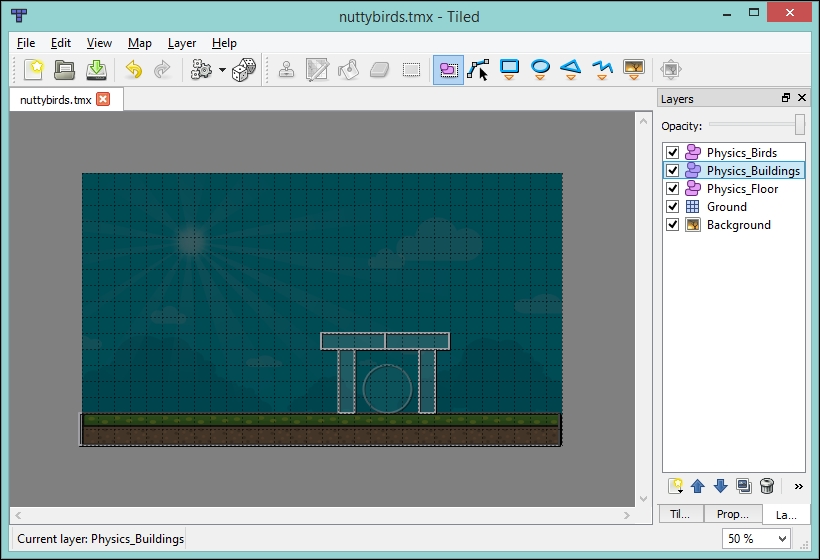
So, go back to your Layers tab and add a new object layer—call it Physics_Buildings and ensure it is at the top of the list, as shown in the following screenshot:
With that layer selected, we can use the shapes tools from the toolbar, as shown in the next screenshot:
With Square selected, we need to draw out four boxes similar to the positions I have them in the following screenshot. You should note that you will need to start from the top-left corner and drag to the bottom-right corner. To make this easier, we can also turn on Snap to Grid under the View menu.
Perfect, but this won't do much at the moment as we don't handle it yet in code. Our next step is to add another object layer—called Physics_Birds—so that we can place our naughty bird. The steps will be the same as earlier, but this time use the Circle tool for the bird. We will use a circle as we will want the bird to roll when it gets struck by the building parts.
Excellent! Looks like we can have a go now at importing it in to our game!
Now we need to actually write some code! Or rather, we must first delete some. Let's remove the body we created to show a quick example of Box2D in action.
Next, we need to add the code that handles the tile map. I am not going to go into too much detail here as this is something we have covered previously.
Firstly, remember to add the required loader to the AssetManager class in our game class:
public void create() {
  Box2D.init();
  assetManager.setLoader(TiledMap.class, new TmxMapLoader(new InternalFileHandleResolver()));
  setScreen(new LoadingScreen(this));
}
Next, update our LoadingScreen class to load our Tiled map:
public void show() {
  // Code omitted for brevity
  nuttyGame.getAssetManager().load("nuttybirds.tmx", TiledMap.class);
}
Finally, we need to update our GameScreen class with the code that will load and display our Tiled map.
Remember, we need to define the following:
private SpriteBatch batch;
private TiledMap tiledMap;
private OrthogonalTiledMapRenderer orthogonalTiledMapRenderer;
Then, instantiate them in the show() method:
tiledMap = nuttyGame.getAssetManager().get("nuttybirds.tmx");
orthogonalTiledMapRenderer = new OrthogonalTiledMapRenderer(tiledMap, batch);
orthogonalTiledMapRenderer.setView(camera);
Finally, update the draw() method to render the map:
private void draw() {
  batch.setProjectionMatrix(camera.projection);
  batch.setTransformMatrix(camera.view);
  orthogonalTiledMapRenderer.render();
}
Hopefully, with all this in place, when you run the project, you should get the following output:
This is just what we want. Next, we will import the object maps and create our Box2D bodies from the objects.
Our next task is to take the object layer for the building parts and generate bodies for them. We will create a new class TiledObjectBodyBuilder, and in here we will have a static method that we pass our TiledMap and World classes to:
public class TiledObjectBodyBuilder {
  private static final float PIXELS_PER_TILE = 32F;
  private static final float HALF = 0.5F;
  public static void buildBuildingBodies(TiledMap tiledMap, World world) {
    MapObjects objects = tiledMap.getLayers().get("Physics_Buildings").getObjects();
    for (MapObject object : objects) {
      PolygonShape rectangle = getRectangle((RectangleMapObject) object);
      BodyDef bd = new BodyDef();
      bd.type = BodyDef.BodyType.DynamicBody;
      Body body = world.createBody(bd);
      body.createFixture(rectangle, 1);
      rectangle.dispose();
    }
  }

  private static PolygonShape getRectangle(RectangleMapObject rectangleObject) {
    Rectangle rectangle = rectangleObject.getRectangle();
    PolygonShape polygon = new PolygonShape();
    Vector2 size = new Vector2(
      (rectangle.x + rectangle.width * HALF) / PIXELS_PER_TILE,
      (rectangle.y + rectangle.height * HALF) / PIXELS_PER_TILE
    );
    polygon.setAsBox(
      rectangle.width * HALF / PIXELS_PER_TILE,
      rectangle.height * HALF / PIXELS_PER_TILE,
      size,
      0.0f);
    return polygon;
  }
}
The preceding code listing is for the builder class. Let's go through this, break it down, and get an understanding of what we are doing here.
First we define how big our tiles are in pixels, which in this case is 32:
private static final float PIXELS_PER_TILE = 32F;
We then have a constant just to reduce the amount of magic numbers in the code.
Next we have the method that does all the hard work. Firstly, it obtains the layer that we require from the map and then the associated objects:
MapObjects objects = tiledMap.getLayers().get("Physics_Buildings").getObjects();Here we have an iterable class that contains all the objects in our layer.
Next, we iterate over those objects and we create a PolygonShape instance, similar to our previous example:
for (MapObject object : objects) {
  PolygonShape rectangle = getRectangle((RectangleMapObject) object);
  BodyDef bd = new BodyDef();
  bd.type = BodyDef.BodyType.DynamicBody;
  Body body = world.createBody(bd);
  body.createFixture(rectangle, 1);
  rectangle.dispose();
}
But here we are using the position and size of the object from the Tiled map to position our shapes in the Box2D world. We create the required fixture, so it enters the collision system of Box2D. Finally, we dispose off the shape and we are good to go.
Now that we have that handy class, let's add a call to it in our GameScreen class. We shall add the following code to the show() method:
TiledObjectBodyBuilder.buildBuildingBodies(tiledMap, world);
Excellent! Now run up the project and let's see what happens.
Ah ha! We have a problem here. You may or may not see anything; if you did, I bet it was really tiny and in the corner. Well, this is because we need to update our debug renderer for Box2D to work from a different camera as its meters are different from our world units.
To do this, let's add the following constants:
private static float UNITS_PER_METER = 32F;
private static float UNIT_WIDTH = WORLD_WIDTH / UNITS_PER_METER;
private static float UNIT_HEIGHT = WORLD_HEIGHT / UNITS_PER_METER;
Here we are creating a conversion to the world of Box2D from our world units. Again, we are using 32 because it is the size of our tiles.
Next, we need to define a new camera:
private OrthographicCamera box2dCam;
Instantiate it with our new constants. The following code is added to the show() method:
box2dCam = new OrthographicCamera(UNIT_WIDTH, UNIT_HEIGHT);
Then, in our update() method, we need to set the position and update the camera:
box2dCam.position.set(UNIT_WIDTH / 2, UNIT_HEIGHT / 2, 0);
box2dCam.update();
Finally, let's update the drawDebug() method to work with the new camera:
debugRenderer.render(world, box2dCam.combined);
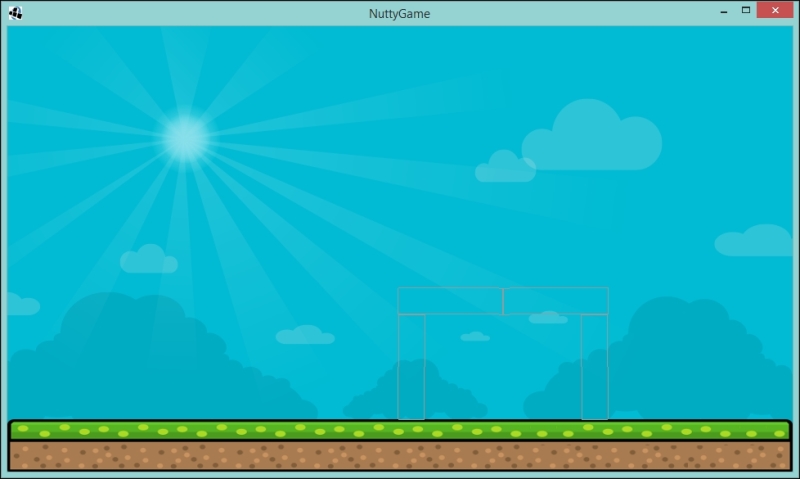
Perfect! Now, if we run the project, we should have the following:
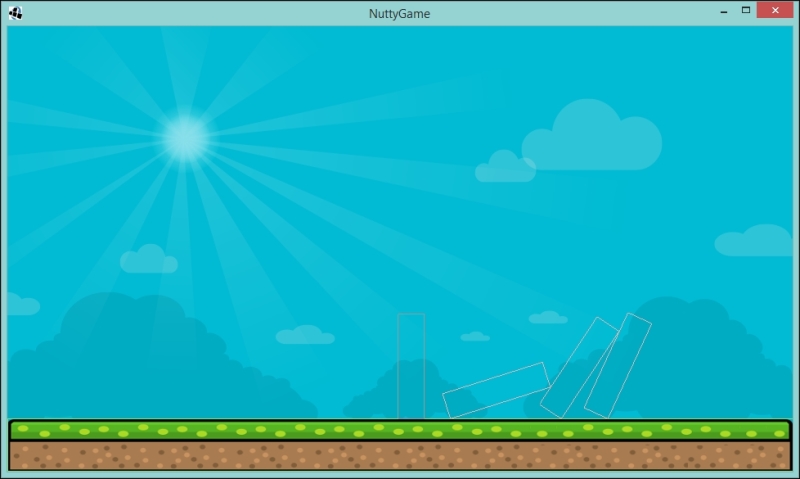
Oh no! Another problem! Even though they load correctly, we don't have a ground, so they just fall out of the screen and on to infinity! Looks like we should add a static body that will be our floor. Back to Tiled we go!
A world without floors.
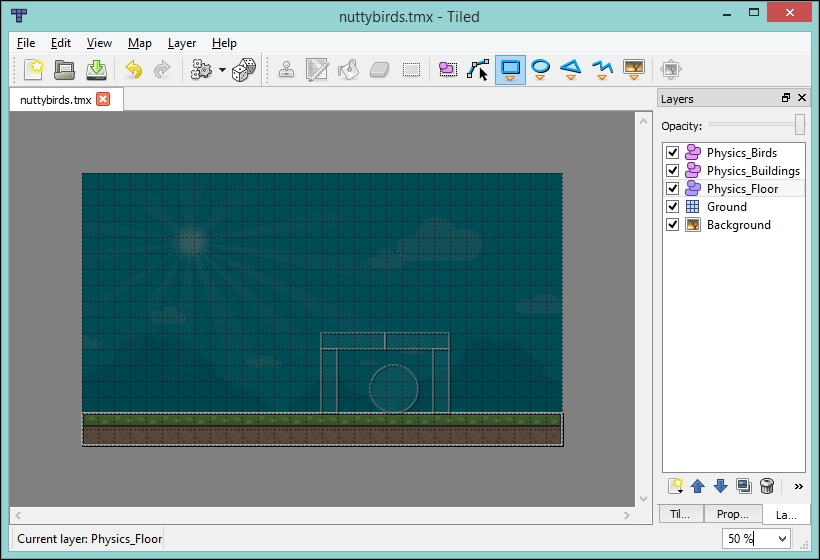
OK, this will be simple to fix, and, in fact, I bet you have already steamed ahead, created another layer in Tiled, called it Physics_Floor, and added a rectangle to be the floor!
No? OK not a problem, let's do it together.
Create a new object layer called Physics_Floor and position it such that it is between the buildings and ground layers, as shown in the following screenshot:
Next, using the Rectangle tool, create a rectangle that covers the bottom two tiles. So it will end up like this:
Excellent! Now back to the code to handle this floor. What we can do is create a new method in our builder class and have it exclusively handle floor components as follows:
public static void buildFloorBodies(TiledMap tiledMap, World world) {
  MapObjects objects = tiledMap.getLayers().get("Physics_Floor").getObjects();
  for (MapObject object : objects) {
    PolygonShape rectangle = getRectangle((RectangleMapObject) object);
    BodyDef bd = new BodyDef();
    bd.type = BodyDef.BodyType.StaticBody;
    Body body = world.createBody(bd);
    body.createFixture(rectangle, 1);
    rectangle.dispose();
  }
}
Now, update the GameScreen class to call this method, from within the show() method, just above our other build call:
TiledObjectBodyBuilder.buildFloorBodies(tiledMap, world);
Now let's go ahead with the project!
Yes!!!! Oh no, stop, wait, noooooooooooooooooo....
Did your build collapse like mine? Well, I guess it didn't fall off the screen.
Well, I suggest we fiddle with our building design! If we move the posts in a bit, it should all support itself, go back to Tiled, and have a go at moving your objects. This will be good practice when you come to making your own levels!
Here is what I came up with!
If you try that, you will find it supports itself!
Now, we just need to import the circle for the bird and we have that part complete—complete in the physics sense!
Yey, well done on making it this far. I hope you are having fun seeing the physics in action! I know I am.
Now, to import the enemy birds, we need to update our builder to support circle physics shapes. Let's start there, and add the following code to that class:
private static CircleShape getCircle(EllipseMapObject ellipseObject) {
  Ellipse ellipse = ellipseObject.getEllipse();
  CircleShape circleShape = new CircleShape();
  circleShape.setRadius(ellipse.width * HALF / PIXELS_PER_TILE);
  circleShape.setPosition(new Vector2((ellipse.x + ellipse.width * HALF) / PIXELS_PER_TILE, (ellipse.y + ellipse.height * HALF)/ PIXELS_PER_TILE));
  return circleShape;
}
In the Tiled world, it isn't a circle it is an ellipse, but since we want a circle in the Box2D world, we need to do some extra code work. Here, we take the ellipse object and create a circle shape.
Next, we need a method that will call this one and iterate over all the enemies that might be in that layer. The following is the code that needs to be added to the builder class:
public static void buildBirdBodies(TiledMap tiledMap, World world) {
  MapObjects objects = tiledMap.getLayers().get("Physics_Birds").getObjects();
  for (MapObject object : objects) {
    CircleShape circle = getCircle((EllipseMapObject) object);
    BodyDef bd = new BodyDef();
    bd.type = BodyDef.BodyType.DynamicBody;
    Body body = world.createBody(bd);
    body.createFixture(circle, 1);
    circle.dispose();
  }
}
You will notice it is very, very similar to the others.
Finally, add a call to this method in the show() method of the GameScreen class and we should be good to go!
TiledObjectBodyBuilder.buildBirdBodies(tiledMap, world);
Run that project and you will see the following:
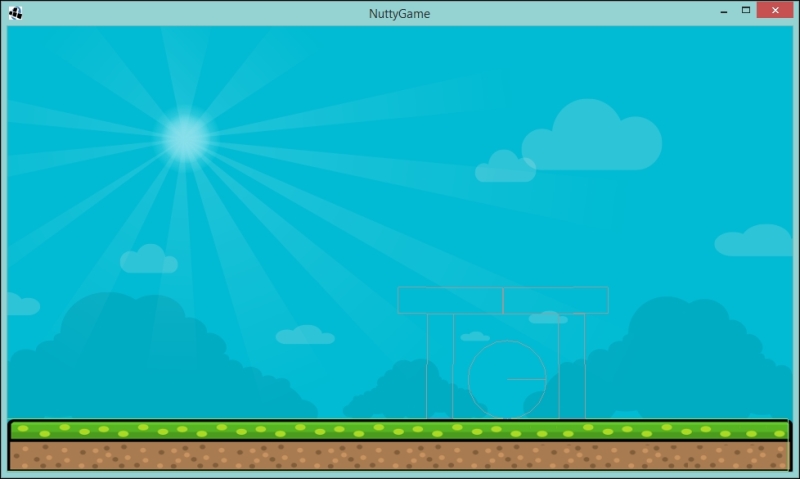
Excellent! In physics form, we have our enemy, that naughty acorn stealing bird, and the building protecting him.
Moving on, we will now need to handle the acorn and have it thrown in to the building, making it collapse!
Moving on, we need to now provide something that will hit the building and hopefully knock it down!
To do this, we will need another body. We will again use the circle shape and, just to start with, we will have it fire when you click on the screen.
Let's create a method called createBullet() in our GameScreen class. In this class, will create a circular body and give some initial velocity:
private void createBullet() {
  CircleShape circleShape = new CircleShape();
  circleShape.setRadius(0.5f);
  circleShape.setPosition(new Vector2(3,6));
  BodyDef bd = new BodyDef();
  bd.type = BodyDef.BodyType.DynamicBody;
  Body bullet = world.createBody(bd);
  bullet.createFixture(circleShape, 0);
  circleShape.dispose();
  bullet.setLinearVelocity(10,6);
}
As you can see from the preceding code, we create the shape first and position it 3m from the left and 6m from the bottom, we also set the radius to be 0.5m. Next, we create the body definition and then create the fixture. Finally, we set a velocity of 10m/s in the x plane so that it moves right, and 6m/s in the y plane so that it moves up.
Now, we just need to trigger it. To this we can set InputProcessor and call the method when a click is detected. This is using event-style input handling, as we are not polling the input like we did previously.
In our show() method, let's add the following code:
Gdx.input.setInputProcessor(new InputAdapter() {
  @Override
  public boolean touchDown(int screenX, int screenY, int pointer, int button) {
    createBullet();
    return true;
  }
});
Here we create an instance of an anonymous class called InputAdapter. This class has a few interesting methods, but for now we are only interested in the touchDown() method. In this method, we call our createBullet(). Finally, that is set on the Gdx.input class, effectively telling LibGDX that we want to handle this input.
Excellent! If we fire up the project now and start clicking on the screen. You should see lots of bullets flying toward and hopefully knocking down the building.
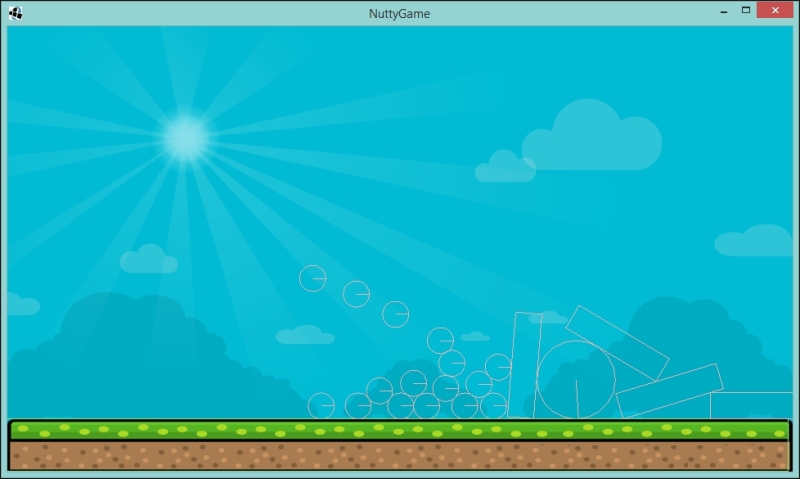
As you can see, I got a little carried away there! But hey it works! We almost have a game here.
To make it a game, we are going to need to detect any force that occurs on the enemies so that we can decide whether it was enough to defeat them.
One of the many great things about Box2D is its collision handling. Now, we can see all the collisions happen on screen and we can mentally work out what should happen; however, when it comes to a computer working this out, there aren't enough CPU cycles to go around; obviously, this depends on how many bodies are flying around the screen!
So, to save CPU cycles, Box2D does a couple of cool things. Firstly, it will check collisions based on a technique using Axis Aligned Bounding Box (AABB), where each object had a rectangular box over it, even if it is a circle! If these overlay, then it will dive deeper into where fixtures overlap and how to resolve them. This high-level collision detection is commonly known as the broad phase and is relatively cheap to calculate. In fact, we did something similar in the previous game.
Once it knows which fixtures potentially collide, Box2D can go on to the next phase called the narrow phase. In this phase, it will look at each contact in depth and calculate the best way to resolve this collision.
Thankfully, because Box2D takes care of all this for us, as you probably noticed when you were firing your bullets at the building, we don't need to go into great detail. The part we are interested in is the ContactListener class. This interface has various callbacks for the state of a collision. The following is the API:
public interface ContactListener {
  public void beginContact (Contact contact);
  public void endContact (Contact contact);
  public void preSolve (Contact contact, Manifold oldManifold);
  public void postSolve (Contact contact, ContactImpulse impulse);
}
It is pretty straightforward. The first two methods are for when the contact between two fixtures starts and ends, and the other two methods are for before and after the solver has done its work and repositioned the fixtures. We are only going to be interested in the beginContact() method. But please, feel free to read more about this in the Box2D documentation.
Back to the code! We want to create our own implementation of the ContactListener interface. Create this as an inner class in the GameScreen class for now, I called it NuttyContactListener.
Now for some code, in the beginContact() method, let's have the following:
if (contact.isTouching()) {
  Fixture attacker = contact.getFixtureA();
  Fixture defender = contact.getFixtureB();
  WorldManifold worldManifold = contact.getWorldManifold();
  if ("enemy".equals(defender.getUserData())) {
    Vector2 vel1 = attacker.getBody().getLinearVelocityFromWorldPoint(worldManifold.getPoints()[0]);
    Vector2 vel2 = defender.getBody().getLinearVelocityFromWorldPoint(worldManifold.getPoints()[0]);
    Vector2 impactVelocity = vel1.sub(vel2);
    if (Math.abs(impactVelocity.x) > 1 || Math.abs(impactVelocity.y) > 1) {
      toRemove.add(defender.getBody());
    }
  }
}
Ah ha! The first line is going to be a bit confusing—shouldn't they already be touching? Well, their AABBs are touching but the actual fixtures might not be. Think about the square and the circle shapes. So, with us deciding that the fixtures are definitely touching, we can extract the fixtures from the Contact class. We also extract something called WorldManifold. This essentially contains the line between two contacting fixtures; we will need this later. Next, we check to see if the second fixture, the defender, is the enemy. We do this by looking at the user data we will add to the fixture and seeing if it equates to the literal enemy string. If that is the case, we now need to work out how strong the contact was when they collided, and we do this by getting the velocities at those points and subtracting one from the other. Finally, if either the x or y component is over an arbitrary value, I picked 1 but you can choose whatever feels right in the game, too high and you might not defeat the enemy. We add the body to an array to remove at a later time. Box2D doesn't like you removing bodies from the world at the wrong time, since this can cause a fatal error and crash.
Phew! I hope that makes sense so far. You will probably have a couple of errors at the moment as we haven't defined our array. So let's add that to the GameScreen class:
private Array<Body> toRemove = new Array<>();
Now, we need a method to remove the bodies that we wish to destroy:
private void clearDeadBodies() {
  for (Body body : toRemove) {
    world.destroyBody(body);
  }
  toRemove.clear();
}
Then, add it to our update() method:
private void update(float delta) {
  clearDeadBodies();
  world.step(delta, 6, 2);
  box2dCam.position.set(UNIT_WIDTH / 2, UNIT_HEIGHT / 2, 0);
  box2dCam.update();
}
Excellent! Now, when the naughty birds are hit and hurt, they will be removed from the physics world.
Finally, we just need to set our contact listener. So, in the show() method, add the following line:
world.setContactListener(new NuttyContactListener());
Super! Oh! One other final thing, we need to set the user data for our enemy. Back to our TiledObjectBodyBuilder class we go, and in our buildBirdBodies() method, we need to update the createFixture() method call to assign a local reference we then use:
Fixture fixture = body.createFixture(circle, 1);
Now, we can add the following line before we dispose of our circle:
fixture.setUserData("enemy");Now, we should be good to go. If you run the project and start hurling those projectiles at the building, it should collapse and wipe out that circle!
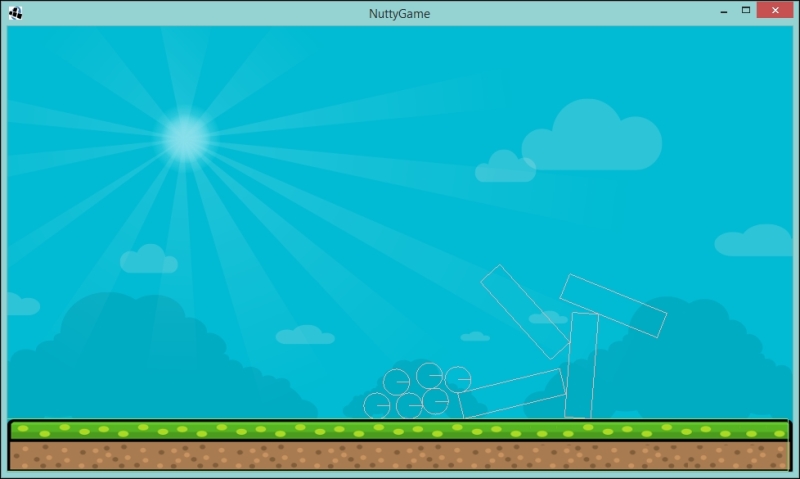
As you can see from the preceding screenshot, the circle is gone! Just what we wanted.
The last thing we need to do before we start adding more artwork is to handle the firing mechanism.
Right, now we are building what is essentially the catapult part. The way we are going to approach this is, we are going to define a point in the game world that will be our anchor point, and then we will have a point that is continually updated by the mouse cursor. From those two points, we will be able to derive an angle and how strongly to throw the acorn.
Let's start by first defining some variables that we will use. Once again in our GameScreen class, define the following:
private static final float MAX_STRENGTH = 15;
private static final float MAX_DISTANCE = 100;
private static final float UPPER_ANGLE = 3 * MathUtils.PI / 2f;
private static final float LOWER_ANGLE = MathUtils.PI / 2f;

private final Vector2 anchor = new Vector2(convertMetresToUnits(3), convertMetresToUnits(6));
private final Vector2 firingPosition = anchor.cpy();
private float distance;
private float angle;
Here we have a few constants that will define some boundaries for our catapult; remember, we are working in radians here. Next, we define our anchor point and a field to keep track of our firing position. Finally, we define two fields to look after the distance and angle of our catapult.
I have also added two methods that you will need, and which will allow us to convert from Box2D meters to our world units:
private float convertUnitsToMetres(float pixels) {
  return pixels / UNITS_PER_METER;
}

private float convertMetresToUnits(float metres) {
  return metres * UNITS_PER_METER;
}
These will come in handy when we start to put our art in.
Next up is a bit of mathematical work to help us calculate two things. Firstly, the angle between two points:
private float angleBetweenTwoPoints() {
  float angle = MathUtils.atan2(anchor.y - firingPosition.y, anchor.x - firingPosition.x);
  angle %= 2 * MathUtils.PI;
  if (angle < 0) angle += 2 * MathUtils .PI2;
  return angle;
}
Here we use the arctan method of the Java Math utils class with the difference in position between our two points, which are the anchor and the firing position. Then, we just bound the angle so that it will always appear between 0 and 2*Pi (0 to 360 degrees).
Our second method is for finding the distance between the two points:
private float distanceBetweenTwoPoints() {
  return (float) Math.sqrt(((anchor.x - firingPosition.x) * (anchor.x - firingPosition.x)) + ((anchor.y - firingPosition.y) * (anchor.y - firingPosition.y)));
}
Perhaps you can figure out which mathematical method is being used here.
With all this information at hand, we can tie it all together with a method that will take the location of the mouse and tell us the distance—which will be the power—and the angle. We will use the angle to distribute the power between the x and the y planes.
Add the following code to your GameScreen class:
private void calculateAngleAndDistanceForBullet(int screenX, int screenY) {
  firingPosition.set(screenX, screenY);
  viewport.unproject(firingPosition);
  distance = distanceBetweenTwoPoints();
  angle = angleBetweenTwoPoints();
  if (distance > MAX_DISTANCE) {
    distance = MAX_DISTANCE;
  }
  if (angle > LOWER_ANGLE) {
    if (angle > UPPER_ANGLE) {
      angle = 0;
    } else {
      angle = LOWER_ANGLE;
    }
  }
  firingPosition.set(anchor.x +  (distance * -MathUtils.cos(angle)), anchor.y +  (distance * -MathUtils.sin(angle)));
}
Let's see what we have here. Firstly, we take the screen coordinates and unproject them against our viewport. This converts them from the real-world to our game-world units. Next up, we call our two mathematical methods before setting some boundaries up so that we cap the distance at the maximum, and the same with the angle. Finally, we reset the position of the firing position variable as it might currently be outside the boundary.
The next step related to changes we have to make involves updating the input processor. We now no longer want to fire a bullet (or acorn) on touchDown(), so we can do away with that. Instead, we are going to trigger the bullet creation on touchUp() and call our distance and angle calculating method in the touchDragged() method. Go ahead and update the InputAdapter as follows:
Gdx.input.setInputProcessor(new InputAdapter() {
  @Override
  public boolean touchDragged(int screenX, int screenY, int pointer) {
    calculateAngleAndDistanceForBullet(screenX, screenY);
    return true;
  }

  @Override
  public boolean touchUp(int screenX, int screenY, int pointer, int button) {
    createBullet();
    firingPosition.set(anchor.cpy());
    return true;
  }
});
As a final touch, we reset the position of the firing point.
Now, with that in place, we should update our createBullet() method using the distance and the angle we provide. Here is how the code now looks:
private void createBullet() {
  CircleShape circleShape = new CircleShape();
  circleShape.setRadius(0.5f);
  circleShape.setPosition(new Vector2(convertUnitsToMetres(firingPosition.x), convertUnitsToMetres(firingPosition.y)));
  BodyDef bd = new BodyDef();
  bd.type = BodyDef.BodyType.DynamicBody;
  Body bullet = world.createBody(bd);
  bullet.createFixture(circleShape, 1);
  circleShape.dispose();
  float velX = Math.abs( (MAX_STRENGTH * -MathUtils.cos(angle) * (distance / 100f)));
  float velY = Math.abs( (MAX_STRENGTH * -MathUtils.sin(angle) * (distance / 100f)));
  bullet.setLinearVelocity(velX, velY);
}
A few things to note here. Firstly, we are now setting the initial position to be that of the firing point. Next, when we create the fixture, we give the bullet a density of 1; this will allow it to rotate and roll around on the static floor. Finally, we do some more mathematical gymnastics to calculate our x and y velocities. As you can see, they are the ratio of the angle and distance.
Our final step is to just get the debug shape renderer to display our two points and the line. I have updated the drawDebug() method as follows:
private void drawDebug() {
  debugRenderer.render(world, box2dCam.combined);
  shapeRenderer.setProjectionMatrix(camera.projection);
  shapeRenderer.setTransformMatrix(camera.view);
  shapeRenderer.begin(ShapeRenderer.ShapeType.Line);
  shapeRenderer.rect(anchor.x - 5, anchor.y - 5, 10, 10);
  shapeRenderer.rect(firingPosition.x - 5, firingPosition.y - 5, 10, 10);
  shapeRenderer.line(anchor.x, anchor.y, firingPosition.x, firingPosition.y);
  shapeRenderer.end();
}
We should be all set, run up the project, and let's see what happens.
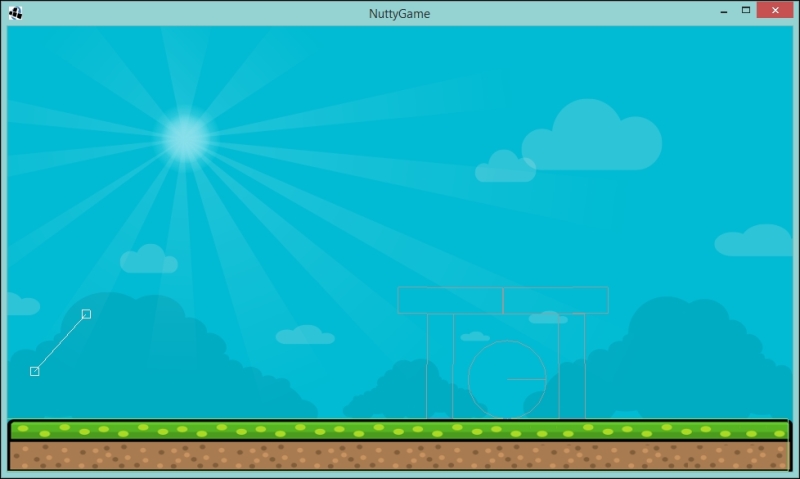
Hopefully, when you click and drag, you will have something similar to the preceding screenshot. When released, it should cause our projectile to fly through the air. Give it a go at different angles. You should notice you can't extend the line too far and it is bounded by the angles.
Our final step before we are finished here is to add the art assets in.
Here we are at the final part we are going to cover. You might be thinking "Well, we have covered this earlier in the book, I know how to add textures to a game. What could you possibly show me now?"
Well, my intrepid reader, having a texture follow the position of a Box2D isn't as straightforward as you would like to think it is. We have to make some changes to the code we use to build our scene.
So, first up, let's dive into some code and update our TiledObjectBodyBuilder class. We need to update this class because the problem we have is that we position the fixture relative to the body, and currently all our bodies are at 0,0 but our fixtures are placed where we would expect them to be. If we move our bodies to where the fixtures are but don't update the code, they will be positioned relative to that new position and thus not be where we want them to be.
With that in mind, first we should update the getRectangle() and getCircle() methods to remove the setting of the fixture position, as follows:
private static PolygonShape getRectangle(RectangleMapObject rectangleObject) {
  Rectangle rectangle = rectangleObject.getRectangle();
  PolygonShape polygon = new PolygonShape();
  polygon.setAsBox(rectangle.width * HALF / PIXELS_PER_TILE, rectangle.height * HALF / PIXELS_PER_TILE);
  return polygon;
}
private static CircleShape getCircle(EllipseMapObject ellipseObject) {
  Ellipse ellipse = ellipseObject.getEllipse();
  CircleShape circleShape = new CircleShape();
  circleShape.setRadius(ellipse.width * HALF / PIXELS_PER_TILE);
  return circleShape;
}
Next, we are going to add a little helper method to get the position of a rectangle from the RectangleMapObject class, suitable to be used with a Box2D body. The following is the code:
private static Vector2 getTransformForRectangle(Rectangle rectangle) {
  return new Vector2((rectangle.x + (rectangle.width * HALF)) / PIXELS_PER_TILE, (rectangle.y  + (rectangle.height * HALF)) / PIXELS_PER_TILE);
}
Nothing scary or new there. When setting the position of a body, we need to place it by the center point, hence the half width and half height.
Now we can update the rest of the class to use this new method and to place our bodies and not the fixtures.
The following code shows the three methods in all their glory:
public static void buildBirdBodies(TiledMap tiledMap, World world) {
  MapObjects objects = tiledMap.getLayers().get("Physics_Birds").getObjects();

  for (MapObject object : objects) {
    EllipseMapObject ellipseMapObject = (EllipseMapObject) object;
    CircleShape circle = getCircle(ellipseMapObject);
    BodyDef bd = new BodyDef();
    bd.type = BodyDef.BodyType.DynamicBody;
    Body body = world.createBody(bd);
    Fixture fixture = body.createFixture(circle, 1);
    fixture.setUserData("enemy");
    body.setUserData("enemy");

    Ellipse ellipse = ellipseMapObject.getEllipse();
    body.setTransform(new Vector2((ellipse.x + ellipse.width * HALF) / PIXELS_PER_TILE, (ellipse.y + ellipse.height * HALF) / PIXELS_PER_TILE), 0);
    circle.dispose();
  }
}

public static void buildBuildingBodies(TiledMap tiledMap, World world) {
  MapObjects objects = tiledMap.getLayers().get("Physics_Buildings").getObjects();

  for (MapObject object : objects) {
    RectangleMapObject rectangleMapObject = (RectangleMapObject) object;
    PolygonShape rectangle = getRectangle(rectangleMapObject);
    BodyDef bd = new BodyDef();
    bd.type = BodyDef.BodyType.DynamicBody;
    Body body = world.createBody(bd);

    if (rectangleMapObject.getRectangle().width > rectangleMapObject.getRectangle().height) {
      body.setUserData("horizontal");
    } else {
      body.setUserData("vertical");
    }

    body.createFixture(rectangle, 1);
    body.setTransform(getTransformForRectangle(rectangleMapObject.getRectangle()), 0);
    rectangle.dispose();
  }
}

public static void buildFloorBodies(TiledMap tiledMap, World world) {
  MapObjects objects = tiledMap.getLayers().get("Physics_Floor").getObjects();

  for (MapObject object : objects) {
    RectangleMapObject rectangleMapObject = (RectangleMapObject) object;
    PolygonShape rectangle = getRectangle(rectangleMapObject);
    BodyDef bd = new BodyDef();
    bd.type = BodyDef.BodyType.StaticBody;
    Body body = world.createBody(bd);
    body.setUserData("floor");
    body.createFixture(rectangle, 1);
    body.setTransform(getTransformForRectangle(rectangleMapObject.getRectangle()), 0);
    rectangle.dispose();
  }
}
As you can see, we are using the setTransform() method of our bodies; this means we can now position textures relative to that.
Hopefully, you will have spotted the other tiny addition in the preceding code. By setting the user data of each body to have a name, we can query the world for bodies later on and decide which textures to use.
Before we use our textures, we must make sure we load them. In our LoadingScreen class, we shall now update our show() method to add the additional textures:
public void show() {
  // Code omitted for brevity
  nuttyGame.getAssetManager().load("obstacleVertical.png", Texture.class);
  nuttyGame.getAssetManager().load("obstacleHorizontal.png", Texture.class);
  nuttyGame.getAssetManager().load("bird.png", Texture.class);
  nuttyGame.getAssetManager().load("slingshot.png", Texture.class);
  nuttyGame.getAssetManager().load("squirrel.png", Texture.class);
  nuttyGame.getAssetManager().load("acorn.png", Texture.class);
}
They are all the textures we are going to use, so now we can start creating our textures.
Before we do I just want to introduce you to a class called Sprite. The Sprite class is an awesome class as it can not only hold our texture but also allows us to perform rotations and scaling on it. This will be needed as our acorns will roll along the ground and the building parts collapse and so on. So with that in mind, we are going to create our textures using this Sprite class.
For the creation of building parts and the enemies, I have created another class called SpriteGenerator. This class will inspect a body for user data and create a sprite that correctly corresponds to it.
The following is the code listing for the class:
public class SpriteGenerator {
  public static Sprite generateSpriteForBody(AssetManager assetManager, Body body) {
    if ("horizontal".equals(body.getUserData())) {
      return createSprite(assetManager, "obstacleHorizontal.png");
    }
    if ("vertical".equals(body.getUserData())) {
      return createSprite(assetManager, "obstacleVertical.png");
    }
    if ("enemy".equals(body.getUserData())) {
      return createSprite(assetManager, "bird.png");
    }
    return null;
  }
  private static Sprite createSprite(AssetManager assetManager, String textureName) {
    Sprite sprite = new Sprite(assetManager.get(textureName, Texture.class));
    sprite.setOrigin(sprite.getWidth() / 2, sprite.getHeight() / 2);
    return sprite;
  }
}
As you can see, it only contains two methods, only one of which is the API. Hopefully, this should be straightforward for you to work out what is going on. Depending on the user data, we create a sprite with the texture that matches up. You will notice in the createSprite() method that we also set the origin; the reason for this is because the rotation ability of a sprite is based around that origin point. So, we simply set that to be the center of the texture.
Right, back to our GameScreen class, here we are now going to tie everything together. Firstly, let's define some new fields that we will be using for our textures:
private ObjectMap<Body, Sprite> sprites = new ObjectMap<>();;
private Sprite slingshot;
private Sprite squirrel;
private Sprite staticAcorn;
Firstly, we have a map that will provide us with the ability to look up sprites by the body that reflects them in the Box2D world. Then, we have three sprites that will be static parts of the game. The staticAcorn sprite, in case you are wondering, will be the acorn that sits in the slingshot and moves with the cursor before the acorn body is created and fired.
Now, we need to instantiate all these sprites and generate some sprites for the bodies. Let's update the show() method with the following additional code:
Array<Body> bodies = new Array<>();
world.getBodies(bodies);
for (Body body : bodies) {
  Sprite sprite = SpriteGenerator.generateSpriteForBody(nuttyGame.getAssetManager(), body);
  if (sprite != null) sprites.put(body, sprite);
}

slingshot = new Sprite(nuttyGame.getAssetManager().get("slingshot.png", Texture.class));
slingshot.setPosition(170, 64);
squirrel = new Sprite(nuttyGame.getAssetManager().get("squirrel.png", Texture.class));
squirrel.setPosition(32, 64);
staticAcorn = new Sprite(nuttyGame.getAssetManager().get("acorn.png", Texture.class));
Here we have our SpriteGenerator class coming into play. We first of all query the world for all the bodies, and we then iterate over them and pass them and the AssetManager class to our generating class. If the body requires a sprite, it will be returned and we add it to the map.
I would like to say at this point that you could collect the bodies when you create them, but there is another way to do this, you could also create the sprite when you create the body and set it as its user data—that's fine too! The beauty of software development is that there isn't a right answer, there are usually several of them.
Finally, we create our static sprites and set their positions.
Before we run up this project and see where we are, we need to do just a couple more things.
Firstly, we are going to need a way to update the sprite positions every time the world is updated; otherwise they will never move!
So, we need to create a method called updateSpritePositions() and add it to our GameScreen class. Here it is:
private void updateSpritePositions() {
  for (Body body : sprites.keys()) {
    Sprite sprite = sprites.get(body);
    sprite.setPosition(
      convertMetresToUnits(body.getPosition().x) - sprite.getWidth() / 2f,
      convertMetresToUnits(body.getPosition().y) - sprite.getHeight() / 2f);
    sprite.setRotation(MathUtils.radiansToDegrees * body.getAngle());
  }
  staticAcorn.setPosition(firingPosition.x - staticAcorn.getWidth() / 2f, firingPosition.y - staticAcorn.getHeight() / 2f);
}
As you can see, it is fairly simple. We iterate over our map of bodies and sprites and update the sprite's position and rotation with that of the bodies. Finally, we update our static acorn to make the position of the firing position variable.
Now, we just add that to our update() method as follows:
private void update(float delta) {
  clearDeadBodies();
  world.step(delta, 6, 2);
  box2dCam.position.set(UNIT_WIDTH / 2, UNIT_HEIGHT / 2, 0);
  box2dCam.update();
  updateSpritePositions();
}
Finally, we should update our clearDeadBodies() method to remove the sprite that represents our enemy from the sprite map, so it will then disappear from view when the enemy is defeated:
private void clearDeadBodies() {
  for (Body body : toRemove) {
    sprites.remove(body);
    world.destroyBody(body);
  }
  toRemove.clear();
}
Next, we need to update our createBullet() method so that our acorn image is added to the map and will be rendered:
private void createBullet() {
  // Code ommitted for brevity
  Sprite sprite = new Sprite(nuttyGame.getAssetManager().get("acorn.png", Texture.class));
  sprite.setOrigin(sprite.getWidth() / 2, sprite.getHeight() / 2);
  sprites.put(bullet, sprite);
  // Code ommitted for brevity
}
Ensure you place the following code above the dispose() call:
circleShape.dispose();
With the update cycle sorted and our acorns set to be rendered, we now need to update our draw() method so that everything is rendered correctly. Here is how the draw() method should look:
private void draw() {
  batch.setProjectionMatrix(camera.projection);
  batch.setTransformMatrix(camera.view);
  orthogonalTiledMapRenderer.render();
  batch.begin();
  for (Sprite sprite : sprites.values()) {
    sprite.draw(batch);
  }
  squirrel.draw(batch);
  staticAcorn.draw(batch);
  slingshot.draw(batch);
  batch.end();
}
Now, the absolute last thing to do! Comment out the drawDebug() call in our render() method so that we don't have the wire frames everywhere!
Ah but wait! Our sneaky artist has moved the location of the slingshot. We need to update our anchor position.
Let's use this as a test to see if you have been paying attention. See if you can work out what the position of the anchor should now be.
If you don't want to, here is what it should be set to now:
private final Vector2 anchor = new Vector2(convertMetresToUnits(6.125f), convertMetresToUnits(5.75f));
Right, readers, this is the part we have all been waiting for. I know you have been itching to launch the game with the art and see it in all its glory. For those who have done that already, well done on being inquisitive to see the game in its various stages. For the rest, are you ready?
3...
2...
1...
Launch the project!
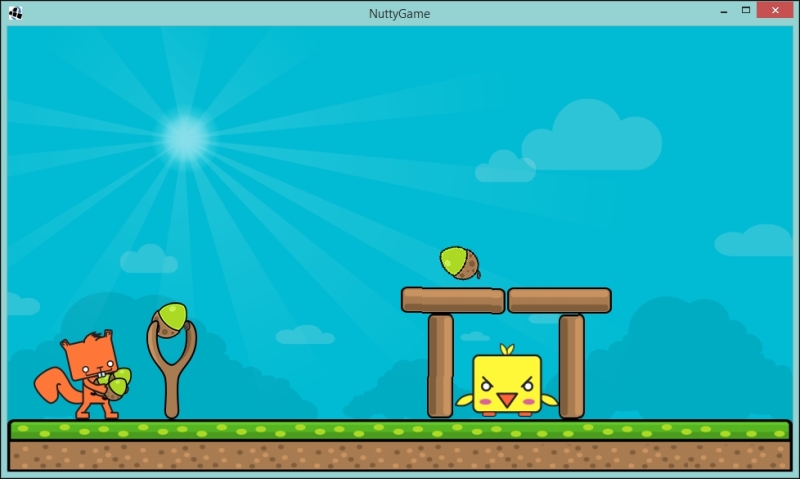
Yey, doesn't it look wonderful! How many shots do you have to fire before you defeat that naughty bird?
You should all be very proud of what you have just accomplished there. Whilst we don't have a score, menu screen, and a game state, you have already done these before in the previous games! Now is your chance to go back and take what we have and add it here. You now have all the tools to make a good-quality game with LibGDX.
Not only that, because of how we have made this game, you can go ahead and experiment with designing different levels in Tiled and see what works and doesn't.
I had a quick play with coming up with different ideas and playing with the strength of the acorn. So much fun making a game, don't you agree?