
Right, we need a LibGDX project that has Box2D support. The question is, how do we go ahead and create that? Well, the eagle-eyed among you will have noticed that Box2D was a selectable option in the project setup application we used previously and in fact it will have been already preselected!

The preceding partial screenshot of the setup application shows what you see when you rerun the application.
Set up the application like we have done so previously, but with Box2D ticked, and then we are good to go!
Next, before we dive into Box2D, let's reuse some code from our previous projects.
Firstly, we should update our NuttyGame class so it extends the Game class. This isn't something new, just look at our previous games!
Next, we can bring across our LoadingScreen class and create a simple GameScreen class. Don't worry about screen sizes for now, we will come to them later.
Hopefully, your game class will look like this:
public class NuttyGame extends Game {
  private final AssetManager assetManager = new AssetManager();

  @Override
  public void create() {
    setScreen(new LoadingScreen(this));
  }

  public AssetManager getAssetManager() {
    return assetManager;
  }
}Just before we jump into writing some code to make our new game, we should really cover the basics of Box2D so that we can get an understanding of what we are trying to achieve here.
Essentially, Box2D is a physics library and an extremely popular one at that.
It has its own website and I suggest you check it out. You can check it out at http://www.box2d.org, if you wish to get even more technical with its use—since we are just going to have a taster to start off with.
You might be wondering why am I directing you to their website when we are using LibGDX; well, as I mentioned before, LibGDX provides a thin Java wrapper to the native C++ library, so the API is going to be the same. Aren't those guys awesome?
For a more LibGDX-style approach, you can check out their awesome wiki. You should have guessed I was going to bring that up, right? They have a nice introduction to its use as well. You can find it at https://github.com/libgdx/libgdx/wiki/Box2d.
However, what we will do now is cover some Box2D terminology.
Box2D contains several different objects that can be used to simulate real-world physics. What I will do now is highlight the important ones. Like before, you can check the documentation to enhance your understanding. In fact, it is from the core concepts section that I have taken the following.
A rigid body is a chunk of matter so strong that the distance between any two bits of matter on the chunk is constant. You should think about this as a hard object, such as a diamond.
A fixture maps a shape to a body and adds real-world material properties such as friction, restitution, and density. This also allows the shape to be recognized in the collision system.
Every 2D body has three degrees of movement, essentially your x and y coordinates and one for rotation. A constraint allows you remove these, much like pinning a body to a wall, and it becomes like a pendulum.
This is a special type of constraint that is used to prevent rigid bodies from penetrating one another, and it also simulates friction and restitution. You should note that Box2D will create these for us.
This is a type of constraint that is used to hold two or more bodies together. There are several different kinds/types of joint in the Box2D world.
This is an all-encompassing place where all the bodies, fixtures, and constraints interact together.
The world has one of these; they are used to advance time and resolve contact and joint constraints:
- Continuous collision
- The solver advances bodies in time using discrete time steps
Right, those were the concepts; hopefully, that is enough to get us going!
The final thing to discuss before writing some code will be units.
Box2D works in a meters-kilogram-second (MKS) world. This means we shouldn't work in a pixel-based environment. But that's OK as we haven't since the early part of this book. Think of the Viewport class, for example. Now we need to think of everything in terms of meters, kilograms, and seconds. Considering the tuning that has gone into Box2D, they recommend moving shapes in the range of 0.1 to 10 meters. So, as they say in their documentation at http://box2d.org/manual.pdf 1.7 Units:
"Box2D has been tuned to work well with moving shapes between 0.1 and 10 meters. So this means objects between soup cans and buses in size should work well. Static shapes may be up to 50 meters long without trouble."
Just to back up the idea of not mapping 1 pixel to 1 meter, if you had a 64x 64-pixel sprite, that would translate to a 64 x 64 meter Box2D representation!
Oh! One last final, absolutely final thing. We will be working in radians not degrees!
Excellent! Now we can dive into code and start creating a world. Once we have a world, we can look at populating it.
Firstly, we need to tell LibGDX to load the native libraries for Box2D. This is done with a simple static initialization call. Let's update the create method in our game class to do this:
public void create() {
  Box2D.init();
  setScreen(new LoadingScreen(this));
}
Good stuff! Now we are ready to create a world. If we didn't do this, we might run into some strange class-loading issues.
Next, let's create the world! We will need to define the following fields in our GameScreen class:
private static final float WORLD_WIDTH = 960;
private static final float WORLD_HEIGHT = 544;
private static final float UNITS_PER_METER = 16F;
private World world;
private Box2DDebugRenderer debugRenderer;
private Body body;
We have defined a world, debug renderer, and body. This body will just be used for a quick example before moving on. The units per meter will convert from our game world to the LibGDX world. This value will always vary depending on how you set your games up.
In our show() method, we need to instantiate our objects:
public void show() {
  world = new World(new Vector2(0, -10F), true);
  debugRenderer = new Box2DDebugRenderer();
  body = createBody();
  body.setTransform(100, 120, 0);
  camera = new OrthographicCamera();
  viewport = new FitViewport(WORLD_WIDTH, WORLD_HEIGHT, camera);
  viewport.apply(true);
  shapeRenderer = new ShapeRenderer();
}
Here we have created our world. We have defined some gravity, the Vector2 class, and we have zero impact in a horizontal plane but we have defined -10 on the vertical plane. This is to mimic real-world gravity—OK it should be 9.81m/s, but let's just keep it simple. We then create our debug renderer, and then create a body. Once we have this body, we set its position on screen. The Boolean flag defines whether we want to simulate inactive bodies, if we end up with too many bodes we can set this to False to improve performance.
To create a body, we will use the following code snippet:
private Body createBody() {
  BodyDef def = new BodyDef();
  def.type = BodyDef.BodyType.DynamicBody;
  Body box = world.createBody(def);
  PolygonShape poly = new PolygonShape();
  poly.setAsBox(60/UNITS_PER_METER, 60/UNITS_PER_METER);
  box.createFixture(poly, 1);
  poly.dispose();
  return box;
}
Here we first define the body definition; in this case it is going to be a dynamic rigid body, as it is going to move!
We then use the World object to create the body from the definition. Next we define the collision fixture. In this case, we are using PolygonShape that we are setting to a square. We create the fixture and then dispose of the shape. Finally, we return the body back.
Now, we need to tell the world to step through and update, otherwise nothing will happen:
private void update(float delta) {
  world.step(delta, 6, 2);
  body.setAwake(true);
}
Here we step through with the delta value as our time step—delta being the time between frames, and then we provide the velocity iterations and position iterations. You might be wondering why they are 6 and 2. Well, those who visited the LibGDX wiki will notice that these are the numbers they used, so we will just go with that for now. For more information on what effect those numbers have on the game, I suggest reading up on the Box2D documentation.
Our final step is to get the debug renderer to draw out what we have, which is a simple one line of code, in our drawDebug() method. Let's add the following:
debugRenderer.render(world, camera.combined);
With that all in place, if you run up the project, you should get the following:
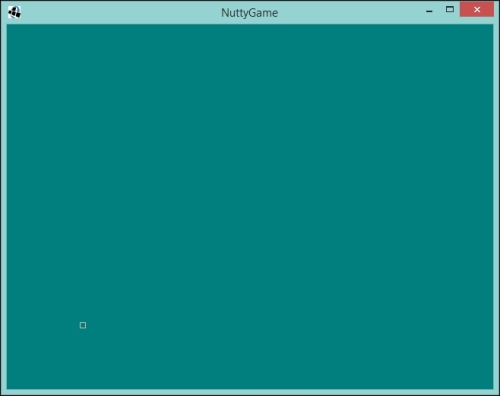
But not only that, the box should be falling down. If you leave it running, it will eventually disappear off the screen.
Yey! You have done your first Box2D coding. I know, I know, it isn't much. But it is a start!