
To create automatic doors, follow these steps:
- Select your Door Frame game object, and add an Animator component to it. To do so, click on the Add Component button in the Inspector and choose Animator. Make sure to add the component to the Door Frame instead of the Door (the parent instead of the child). Set the Update Mode of the Animator component to Animate Physics.
- With the Door Frame game object selected, go to Window | Animation to open the Animation View.
- Create a new Animation Clip and call it Closed; this will be our animation for the closed door. To create a new clip, click on the drop-down list below the playback buttons and choose the Create New Clip option.
- Click on the Add Property button and find your Door object in the list (a child of the Door Frame game object).
- Unfold the Door game object foldout and find the Transform section. Unfold it and click on the plus icon near the Position property, as shown in the following screenshot:

- Two key frames will be added for the Door game object's local position. We are not going to adjust them (assuming that the Door is in the closed position).
- Add another Animation Clip and name it Door Opening.
- Click on the Add Property button, choose your door game object, and add the Transform | Position key the same way as in step 5.
- Move the second key frame to around the 3 second mark.
- Select the Door game object (the child of the Door Frame).
- Move it up to the open position. Make sure the record button is active (in the upper-left corner of the Animation View). If you play the animation, it should move the Door game object up.
- Select the last frame of the Door Opening animation (in the Animation View). Go to the Inspector and copy the Door's Transform component. To do so, click on the small gear icon in the upper right corner of the component and choose the Copy Component option.
- Create a new Animation Clip and name it Opened. Add the key frames to the Door child object the same way as in step 5. If your Door object moved, select it, click on the gear icon near the Transform component in the Inspector, and choose Paste Component Values. That will paste our copied Transform properties from the last frame of the Door Opening animation.
- Make sure both frames in the animation have the same position.
- Create one more Animation Clip (the last one) and name it Door Closing.
- Make the animation of the Door game object slide down from open to closed positions. Remember that you can copy the Door's Transform component from appropriate animation frames and paste them in the animation you are working on.
- Preview all the animations with the Animation View. You can switch between animations using the drop-down list below the playback buttons.
- If you are happy with your animations, close the Animation View. Select your Door Frame game object and find its Animator component in the Inspector.
- Click on the Controller field, which will show you the automatically created Animator Controller in the Project View. Double-click to open it.
- Create a bool parameter and call it Open.
- Create a loop of transitions between the animation states: Closed | Door Opening | Open | Door Closing | Closed. See the following screenshot:

- Select the Closed | Door Opening transition. Add a condition to it, choose the Open parameter, and set the condition to true. Disable the Has Exit Time option in the transition.
- Select the Opened | Door Closing transition. Add a condition to it, choose the Open parameter, and set the condition to false. Disable the Has Exit Time option in the transition.
- Leave the Door Opening | Opened and Door Closing | Closed transitions without a condition. Make sure the Has Exit Time option is enabled in both those transitions.
- Close the Animator Controller.
- Select the Door Frame game object in the scene's Hierarchy.
- Add a Cube child object to the Door Frame game object. To do so, right-click on the Door Frame game object and choose Create | 3D Object | Cube. This will be our trigger.
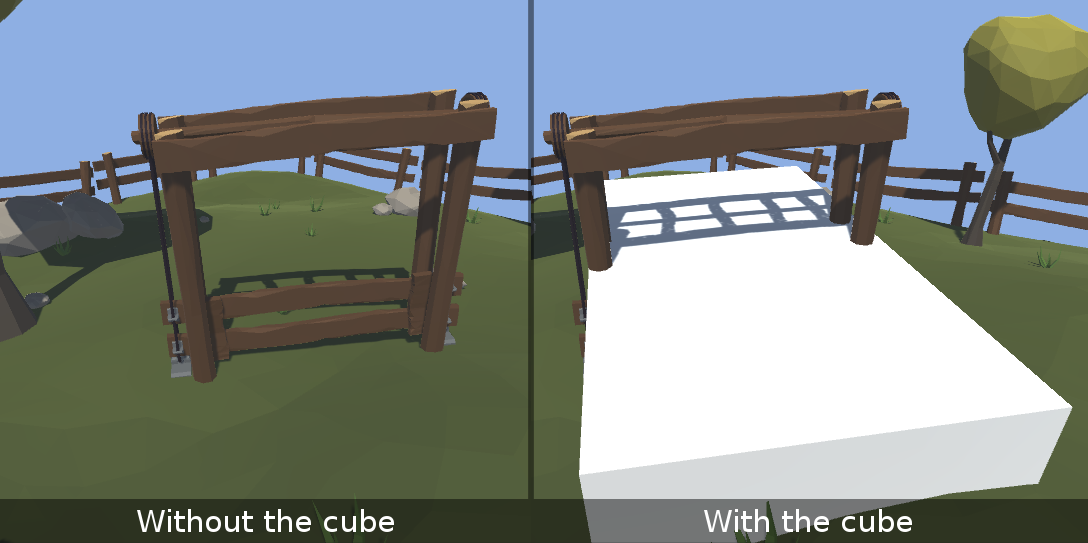
- Select the Cube and scale it so that it stands out on both sides of the Door Frame. See the following screenshot for reference:
- Remove the Mesh Renderer and Mesh Filter components from the Cube. To do so, click on the small gear icon in the upper-right corner of the given component and choose the Remove Component option. That will leave only the Transform and Box Collider components on the Cube.
- Enable the Is Trigger checkbox on the Cube's Box Collider component.
- Rename the Cube game object to Trigger.
- Select the Door Frame game object and add a Mesh Collider component to it.
- Select the Door game object and add a Box Collider component (or a Mesh Collider set to Convex) and a Rigidbody component. Enable the Is Kinematic option in the Rigidbody component.
- Create a new C# script and name it AutomaticDoors.cs. Open it and write the following code:
      using UnityEngine;
      using System.Collections;

     public class AutomaticDoor : MonoBehaviour
     {

          /*The anim variable is used to store the reference
         to the Animator component*/

          private Animator anim;

         void Start ()
         {
            /*We assign the Animator component of the parent object
              because this script is attached to the trigger, which
              is the child object of our animated doors*/

              anim = transform.parent.GetComponent<Animator> ();
          }
        /* This function is called when a Rigidbody intersects with
       the collider attached to our game object for the first time.
       Our collider has to be set to trigger. The Collider other
       parameter stores information about the object which collided
       with our trigger (entered the trigger).*/

          void OnTriggerEnter (Collider other)
          {

              //We check the tag of the object entering the trigger
              if (other.gameObject.CompareTag ("Player")) {

                  /*If the tag equals "Player", we set the
                         bool parameter "Open" to true in our
                  Animator Controller - that plays the open
                  animation and opens the doors*/

                   anim.SetBool ("Open", true);
              }

          }

     /* This function is called when a Rigidbody exists the trigger
        (stops colliding with our trigger collider).*/

         void OnTriggerExit (Collider other)
          {

             /*Again, we check if the object was the player*/
              if (other.gameObject.CompareTag ("Player")) {

                 /*If it's true, we set the bool parameter "Open"
                 to false in our Animator Controller. That plays
                 the close animation and closes the doors.*/

                  anim.SetBool ("Open", false);
             }
         }
     }
- Assign the script to your Trigger game object and make sure your character has a Rigidbody component and the Player tag.
- Play the game and approach the door; it should open. It should close when you exit the trigger.