
The other big topic we want to cover in this chapter is the possibility of a .NET application "talking" to other installed applications in our system. This talking means instantiating these applications and interchanging data between them or asking the other applications to perform tasks we should program ourselves.
Initially (in versions previous to C# 4.0), this technology was exclusively COM-based. The trick was done via Interop using some DLLs called Type Libraries (TLB) or Object Libraries (OLB). The programmer should then use (reference) these libraries and instantiate their internal objects, which represent the internal components of the application to communicate with.
This was possible using a Runtime Callable Wrapper (RCW) whose operational schema is explained in the following figure:

Let's see how communication was made between the COM and .NET worlds. You have to keep in mind that COM is not a managed environment, and it executes instructions native to the Windows operating system. The RCW component was responsible for this and acted as a proxy between both execution contexts.
No optional parameters were available for a C# programmer in this model. So, you had to pass as many parameters as the method defined, using the System.Reflection.Missing.Value type, besides other difficulties present in the way Reflection was used to find out which members were present and usable, plus other related paraphernalia.
This is code that illustrates such a situation in early versions. It assumes that a reference has been made to the corresponding TLB of Microsoft Word, which exposed an object called ApplicationClass to allow Word instantiation:
public void OpenWordDoc()
{
  ApplicationClass WordApp = new ApplicationClass();
  WordApp.Visible = true;
  object missing = System.Reflection.Missing.Value;
  object readOnly = false;
  object isVisible = true;
  object fileName = Path.Combine(
    AppDomain.CurrentDomain.BaseDirectory, @"......Document.doc");
  Microsoft.Office.Interop.Word.Document theDoc = WordApp.Documents.Open(
      ref fileName, ref missing, ref readOnly, ref missing,
      ref missing, ref missing, ref missing, ref missing,
      ref missing, ref missing, ref missing, ref isVisible,
      ref missing, ref missing, ref missing, ref missing);
  theDoc.Activate();
}
Note how all the arguments that the Open method defines, had to be passed as missing for this case. As you see, this is a pretty clumsy way to open a document and access its members (actually, when using this Interop feature, operating from Visual Basic .NET was much easier and simple some time ago.).
As technologies evolved, type libraries were replaced with something called PIAs (Primary Interop Assemblies), which play the same role as the RCWs but allow programmability in an easier manner.
So, the way to communicate with external (interoperable) applications becomes possible through those libraries that take care of the required marshalling of data types between two worlds which are—at first—not so easy to connect, especially for those programmers not skilled enough to use the COM platform.
The following schema shows this communication architecture:

Let's start from the beginning, only using the latest versions to see how we operate today.
To obtain (and see in action) an instance of an interoperable application, the first step is to reference the corresponding PIA that will serve as the proxy. This is available in the References option of any .NET application, only not in the default DLL's tab but in the Extensions tab.
Note that you will see a bunch of DLLs available, and—in many cases—you'll observe duplications. You have to pay attention to the version number, which will vary depending on the Office version installed on your machine.
Besides, you might find duplications of even the same versions in different locations in your box. This is due to the fact that the installation of Office allows the user to manually include these PIAs during the process or it might be due to the previous installation of older Office versions:

If you check the COM option of Reference Manager, you will also discover the presence of some entries with the word Excel inside. They might vary in your machine, but usually, they point to the corresponding executable being referenced (Excel.exe, in the next screenshot).
However, if you mark this option as well and accept the selection, you won't see a reference to Excel.exe in the list of your Project's references. Instead, you'll see a library whose name is the same as what it was in the previous case (when I referenced the PIA) but one that really points to a DLL in the GAC called Microsoft.Office.Interop.Excel, followed by a GUID number: the reference is "redirected" to point to the most suitable library:

The object model that Excel offers to the programmer recalls exactly that of its user interface. There's an Application object, which represents the entire application, and each Workbook object is represented by its corresponding object in the model. Each one contains a collection of the Worksheet objects. Once the starting point is ready, the Range object enables you to operate with individual (or groups of) cells.
To start with, let's call an Excel instance in the modern, easier way, and show it with a new Excel book. In this sample, in order to interchange information between our application and Excel or Word later on, I'm using a basic Windows Forms application, which will launch Excel using the following code.
Somewhere in our Windows Form, we define this:
using Excel = Microsoft.Office.Interop.Excel;
using Word = Microsoft.Office.Interop.Word;
...
private void Form1_Load(object sender, EventArgs e)
{
  OpenExcel();
}
public void OpenExcel()
{
  var excel = new Excel.Application();
  excel.Visible = true;
  excel.Workbooks.Add();
  excel.get_Range("A1").Value2 = "Initial Data";
  excel.get_Range("B1").Value2 = "Demo data 1";
  excel.get_Range("C1").Value2 = "Demo data 2";
  excel.get_Range("D1").Value2 = "Demo data 3";
}
This, indeed, launches Excel and passes this information to the four cells referenced in the code, as we can see in the output. Note the initial declarations to reference Excel and Word in our code. With this alias, it becomes easier to reference any object in the proxy and the code becomes less verbose. Since we call OpenExcel when the document is loaded, both applications will be opened, the second one being Excel presenting our data:

This is nothing amazing or unexpected, but we see that it's fairly easy to call other applications with Interop and pass data to them. Anyway, some peculiarities of Office Interop (also common to other applications) are evident here.
To start with, you have to declare the excel object as Visible. That's because by default, Office Interop applications don't show up. This is very useful when you just want a functionality to happen and recover the results in your application without the target app bothering the final user.
Obviously, we're using some objects you might not be familiar with, since they belong to the target application: Range represents a range of cells within the current Worksheet, the get_Range method recovers a Set/Get reference to the required cells we pass as an argument. Note, we can indicate the range required in the string we passed to this method or use an enumeration, such as in get_Range(c1, c2).
Alternatively, we can also create a Range object using a syntax like this:
// an alternative way to get a range object
var oSheet = excel.Sheets[1]; // Index starts by 1
var oRange = (Excel.Range)oSheet.Range[oSheet.Cells[1, 2],
  oSheet.Cells[4, 3]];
oRange.Value2 = "Same value";
Observe that in this case, we declare a Sheet object recovered from the available collection of sheets that Excel creates in the initial workbook. With this object and using an array-like syntax, we select the initial and ending cells to include in our range (by default, all of them are accessible).
Also, note that when we define a rectangle with our cells, several columns are collected, so the resulting modification ends up with the following output:

Most likely, we will have to format the contents we pass to an Excel sheet. This implies another way to operate (which is very coherent; let's underline that).
Most of these objects are defined separately and then applied to the corresponding object to be targeted. In the case of formatting, keep in mind that the format should be applied to cells that hold some value (it might well be that you opened an existing workbook object).
So, we're going to create another method in our Form to call Excel and create a style that we can apply to our cells. Something like this would be enough for now:
public Excel.Style FormatCells()
{
  Excel.Style style = excel.ActiveWorkbook.Styles.Add("myStyle");
  //Creation of an style to format the cells
  style.Font.Name = "Segoe UI";
  style.Font.Size = 14;
  style.Font.Color = ColorTranslator.ToOle(Color.White);
  style.Interior.Color = ColorTranslator.ToOle(Color.Silver);
  style.HorizontalAlignment = Excel.XlHAlign.xlHAlignRight;
  return style;
}
Note that some objects always make a reference to the current (active in that moment) element, such as ActiveWorkBook or an alternative ActiveSheet. We also can count on an ActiveCell object that operates on a given range previously selected.
Finally, we call oRange.Columns.AutoFit() in order to make every column as wide as the maximum length inside it. With this definition, we can call FormatCells whenever we need the style to be applied on any range. In this case, operating over the second range defined, the output shows the correct formatting applied:

Another interesting option is the ability to insert external images inside the area of our selection. This can even be performed using any content available on the clipboard. In this case, the code is quite straightforward:
// Load an image to Clipboard and paste it
Clipboard.SetImage(new Bitmap("Packt.jpg"));
excel.get_Range("A6").Select();
oSheet.Paste();
The output shows the Packt logo located in the selected cell:

We're assuming that a picture with the Packt Publishing logo is available at the current (execution) path. Of course, we could save it in a resource file and recover it in some other fashion. For example, we can recover the front page image of this book from its corresponding link on the Packt Publishing site at https://www.packtpub.com/sites/default/files/B05245_MockupCover_Normal_.jpg using this code:
public Bitmap LoadImageFromSite()
{
  // Change your URL to point to any other image...
  var urlImg = @"https://www.packtpub.com/sites/default/files/B05245_MockupCover_Nor	mal_.jpg";
  WebRequest request = WebRequest.Create(urlImg);
  WebResponse response = request.GetResponse();
  Stream responseStream = response.GetResponseStream();
  return new Bitmap(responseStream);
}
Here, we need the help of the WebRequest/WebResponse objects that belong to the System.Net namespace as well as the Stream class, which you find as part of the System.IO namespace. As you can imagine, in the Windows Forms code, we change the previous code for:
Clipboard.SetImage(LoadImageFromSite());
The resulting output shows this book's front page located at cell A6 (remember that it's important to select the destination target before you do this):

In this manner, we have a bunch of possible additions to build Excel sheets, including external content, which, of course, doesn't have to be graphical and admits other types of content (even video).
When we deal with graphics in Excel, usually what we really want is to instruct Excel to build a business chart from some data. Once that is done, we can save it as an image file or recover it and present it in our application (often not showing Excel's user interface in any manner).
To get an Excel chart object up and running, we have to add a chart to the WorkBook's chart collection in a manner similar to what we did with the WorkBook itself. To generate a given type of chart, a useful object is the ChartWizard object, which receives configuration parameters that allow us to indicate one from the many types of charts available and the text of Title required for our chart. So, we might end up with something like this:
chart.ChartWizard(Source: range.CurrentRegion,
  Title: "Memory Usage of Office Applications");
chart.ChartType = Excel.XlChartType.xl3DArea;
chart.ChartStyle = 14;
chart.ChartArea.Copy();
Tip
The explanation of the different types of charts and styles can be found in the MSDN documentation and exceeds the coverage of this book (it is available at https://msdn.microsoft.com/en-us/library/microsoft.office.tools.excel.aspx).
Note that we finally copy the generated graphic to the clipboard in order to use the same technique as earlier, although you can use some other approaches to get the image as well.
To get some straightforward data to build the image, I've started from an old Microsoft demo, which recovers processes from the memory but changes the target to only processes related to Microsoft Office applications and reduces the code to a minimum:
public void DrawChart()
{
  var processes = Process.GetProcesses()
    .OrderBy(p => p.WorkingSet64);
  int i = 2;
  foreach (var p in processes)
  {
    if (p.ProcessName == "WINWORD" ||
      p.ProcessName == "OUTLOOK" ||
      p.ProcessName == "EXCEL")
    {
      excel.get_Range("A" + i).Value2 = p.ProcessName;
      excel.get_Range("B" + i).Value2 = p.WorkingSet64;
      i++;
    }
  }

  Excel.Range range = excel.get_Range("A1");
  Excel.Chart chart = (Excel.Chart)excel.ActiveWorkbook.Charts.Add(
    After: excel.ActiveSheet);

  chart.ChartWizard(Source: range.CurrentRegion,
    Title: "Memory Usage of Office Applications");
  chart.ChartType = Excel.XlChartType.xl3DArea;
  chart.ChartStyle = 14;
  //chart.CopyPicture(Excel.XlPictureAppearance.xlScreen,
  //    Excel.XlCopyPictureFormat.xlBitmap,
  //    Excel.XlPictureAppearance.xlScreen);
  chart.ChartArea.Copy();
}
In another event handler linked to a button (the entire demo is available, as always, with the companion code for this chapter), we launch the process in this way:
private void btnGenerateGraph_Click(object sender, EventArgs e)
{
  DrawChart();
  if (Clipboard.ContainsImage())
  {
    pbChart.SizeMode = PictureBoxSizeMode.StretchImage;
    pbChart.Image = Clipboard.GetImage();
  }
  else
  {
    MessageBox.Show("Clipboard is empty");
  }
}
We're assuming that a PictureBox control is present in the form with the name pbChart. However, before showing the results, note that if the user interacts with Excel, we need to manually close and destroy the resources created by the application; so, in the form_closing event, we're including this sample code:
private void frmInteropExcel_FormClosing(object sender, FormClosingEventArgs e)
{
  excel.ActiveWorkbook.Saved = true;
  excel.UserControl = false;
  excel.Quit();
}
Besides, we have created an Excel object at the beginning (declared in the form's scope and instantiated in the Initialize event), so the excel variable is available alongside all methods in the form. When executing, we get both applications running (I keep Excel visible for demoing purposes):

When pressing the Generate GraphChart button, we have a duplicate output showing the generated graphic in ActiveWorkBook along with the picture shown within the PictureBox control in the Form:

Other common usages of Excel Interop include the automation of graphic reports, the generation of bulk e-mails, and automatic generation of business documents (invoices, receipts, and so on).
The other big star in Office Automation solutions is Microsoft Word. Just like Excel, it exposes a very complete Object Model (OM), updated to expose the new features accompanying every release, and it's fully programmable in the same fashion as what we've been doing with Excel.
Naturally, Word's OM, or just WOM, is radically different from Excel and includes all the characteristics a programmer would need to automate practically any task. Actually, the user interface objects (as it happens with Excel) are faithfully represented, and that includes the ability to invoke dialog boxes that launch certain processes (such as spellcheck) or any other typical configuration feature of the editor.
As with Excel, automation takes place using a PIA (Microsoft.Office.Interop.Word.dll), and the initialization process is quite similar:
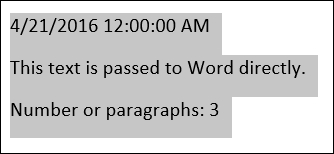
Word.Application word = new Word.Application();
private void btnOpenWord_Click(object sender, EventArgs e)
{
  word.Visible = true;
  word.Documents.Add();

  var theDate = DateTime.Today.ToString(CultureInfo.CreateSpecificCulture("en-US"));
  word.Selection.InsertAfter(theDate + Environment.NewLine);
  word.Selection.InsertAfter("This text is passed to Word directly." + Environment.NewLine);
  word.Selection.InsertAfter("Number or paragraphs: " +
    word.ActiveDocument.Paragraphs.Count.ToString());
}
Provided that we have a button (btnOpenWord), we instantiate a Word object at initialization time; so, when the user clicks, we just have to make Word visible and use the Selection object (which, in case there's nothing selected yet, refers to the caret).
From this point, Selection offers several methods to insert text (InsertDatetime, InsertAfter, InsertBefore, InsertParagraph, Text, and so on). Note how the resulting process writes to Word and the whole text inserted remains selected:
As always, it's important to release objects used during runtime. So, we code the following in the form_closing event:
private void fmInteropWord_FormClosing(object sender, FormClosingEventArgs e)
{
  try
  {
    word.ActiveDocument.Saved = true;
    word.Quit();
  }
  catch (Exception)
  {
    MessageBox.Show("Word already closed or not present");
  }
}
The manipulation of images is even easier, since we can reference any external image with a few lines of code. To load the same image as in the Excel demos, we would use the following:
private void btnInsertImage_Click(object sender, EventArgs e)
{
  var filePath = Environment.CurrentDirectory;
  word.Selection.InsertAfter(Environment.NewLine + "Logo PACKT: ");
  var numChars = word.Selection.Characters.Count;
  word.Selection.InlineShapes.AddPicture(filePath + "\Packt.jpg",
    Range: word.ActiveDocument.Range(numChars));
}
It's important to specify here the position of the image because otherwise, the whole selection would be replaced by the AddPicture method. This is why we add a fourth parameter (Range), which allows us to indicate where the image should go.
Also, observe how we can always know every aspect of the document's elements (the number of characters and collections of Rows, Columns, Shapes, Tables, Paragraphs, and so on). In addition, since we can now use named parameters, we just have to pass the required ones:

Formatting can also be achieved very easily by selecting a Range object and configuring it to the required values (we created a special button for this named btnFormat; so, in the Click event, we code the following:
private void btnFormat_Click(object sender, EventArgs e)
{
  Word.Range firstPara = word.ActiveDocument.Paragraphs[1].Range;
  firstPara.Font.Size = 21;
  firstPara.Font.Name = "Century Gothic";
  firstPara.ParagraphFormat.Alignment =
    Word.WdParagraphAlignment.wdAlignParagraphCenter;
}
With the previous text in our document, once the click event is invoked, we'll get the output shown in this capture:

Another very common use of Word relates to its ability to operate with text and return such text to the caller function. This is especially useful in checking spelling and other internal engines, such as grammar revision.
The technique consists of passing the required text to Word, selecting it, and launching the Spell & Grammar dialog box to operate on it. Once the text is revised, we can return the corrected text to the calling application. Let's see how this works in a sample. We have a button labeled Spell Check (named btnSpellCheck), which launches the process of spelling correction using this code:
private void btnSpellCheck_Click(object sender, EventArgs e)
{
  if (word.Documents.Count >= 1)
    rtbSpellingText.Text +=
      Environment.NewLine + Environment.NewLine +
    SpellCheck(rtbSpellingText.Text);
  else
    MessageBox.Show("Please, use the Open Word option first");
}

private string SpellCheck(string text)
{
  var corrected = string.Empty;
  var doc = word.ActiveDocument;
  if (!string.IsNullOrEmpty(text))
  {
    doc.Words.Last.InsertAfter(Environment.NewLine + text);
    var corRange = doc.Paragraphs.Last.Range;
    corRange.CheckSpelling();
    corrected = corRange.Text;
  }
  return corrected;
}
The output consists of three elements: our .NET application, Word, and the Spell & Grammar dialog box, which is launched when we call the CheckSpelling method, as shown in the following screenshot:

When the process is over, the corrected results are returned to the caller function, where we update the RichTextBox control used to hold the text. Note that you can keep Word invisible and the only functionality available in the user interface would be your application and the Spell & Grammar dialog box.
Also, note that we check the presence of an opened document, which should otherwise generate a runtime exception. After the process, our RichTextBox control will contain the corrected text, as expected:

Besides this utility, practically any other Office-related functionality is available via automation in a similar manner. However, this is not the only way we can use and extend the Office functionality by means of .NET applications. Actually, one of the most successful options relies on Add-In constructions or Office apps.
On the official page of Office 2013 (the version we're using here, although this sample works perfectly well in the 2016 version), Office Apps are defined in this way:
Apps for Office enable users to run the same solutions across applications, platforms, and devices, and provide an improved experience within Office applications by integrating rich content and services from the web.
The key architecture is explained a bit further, pointing out that these apps run within supported Office 2013 applications by using the power of the web and standard web technologies such as HTML5, XML, CSS3, JavaScript, and REST APIs. This is very important for a number of reasons.
First, the use of standard technologies allows us to incorporate any previous or already created, functional content we might have. If it works on the Web, it'll work on one of these apps (although automation via JavaScript APIs does not cover all possibilities that PIAs offer). However, on the other hand, APIs exposed by JavaScript 5/6 make a number of new programming options available to developers (Web Workers, Web Sockets, and so on).
If this is not enough, consider the huge amount of JavaScript and CSS frameworks available today: jQuery, BootStrap, Angular, among others. We can use all of them in these applications. Overall, we're talking about a webpage that is hosted inside an Office client application (Excel, Word, PowerPoint, and Project are available options).
Note that these apps can run in desktop clients, Office Online, mobile browsers, and on premises and in the cloud as well. Options of deployment include the Office Store or on-site catalogs.
Let's see how this works, by using the default template that Visual Studio 2015 offers and analyzing and customizing these contents for an initial, working demo.
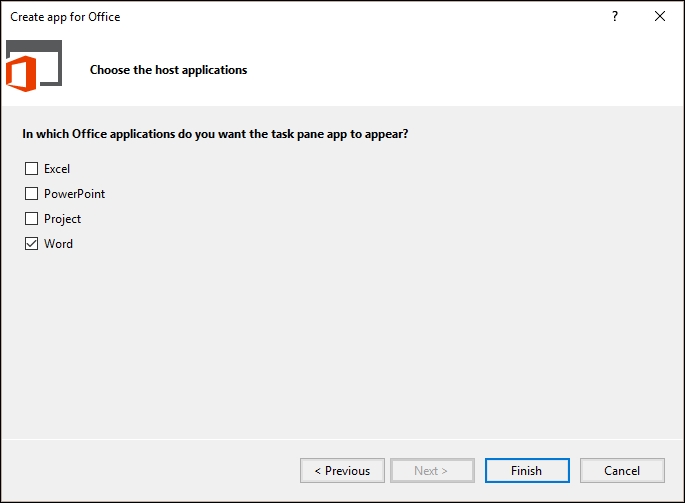
So, let's create a new project and select the Visual C#-Office/SharePoint-Apps tree element: we're offered three choices. If you select the Apps for Office option, a selection box will be shown (I'll use Task pane here, but you also have Content and Mail):

Tip
Other templates for many different types of apps are at your disposal on the site available at http://dev.office.com/code-samples#?filters=office%20add-ins.
In this demo, I opt for Word as a destination Office application, although by default, all checkboxes are marked:
If you review the resulting files, you'll notice that these apps are basically composed of two parts: a manifest file, which configures the app's behavior, and a web page, which references all required resources: jQuery, style sheets, JavaScript initialization files, a web.config file, and so on.
If you open the manifest file, you'll see that Visual Studio offers a configuration file editor, where you can indicate every functional aspect. A note within the Activation tab of that window reminds us of the possible targets where this app will possibly work:

Actually, this template already works once compiled, and it operates over a block of selected text, passing it back to the Task pane, which will appear to the right of a new Word document, showing the Home.html page. This page, in turn, loads the Home.js and app.js files, which take care of initialization. Other .css files are added for formatting purposes as well.
Besides this, there's a very important piece of JavaScript that is referenced via CDN, office.js. This is the library in charge of the traffic between the two worlds present here: the Office programming model and the HTML5/CSS3/JS world.
There's a graphic schema on the page at https://technet.microsoft.com/en-us/library/jj219429.aspx, which offers a visual look at the scenario at runtime:

To run the test, launch the application from Visual Studio, and when Word appears, type some text and select it. Optionally, you can try the lorem trick (you might know it already): simply type =lorem(n) in the document, where n is the number of lorem paragraphs you want to generate, and lorem text will automatically get appended to the current text of the document.
Once we do that and select a fragment, the button labeled Get data from selection will recover the selected text and present it at the bottom of the Task pane. You should see something similar to what is shown in the following screenshot:

Note that this time, there's no reference to Interop libraries. This is a big architectural change, and it's undertaken by the Office JavaScript Object Model—not as exhaustive as the ones in PIAs libraries but wide enough to provide us with a lot of useful options.
Let's add a very simple method to show how we can operate in the opposite direction: inserting text into the document from the Task pane.
First, we need to add a new element to the Task pane user interface. A simple button will suffice for our purposes, so we'll add a new button next to the already existing get-data-from-selection button: one that I'll call insert-data-from-Task-Pane in the Home.html file:
<button id="insert-data-from-Task-Pane">Insert data from TaskPane</button>
The next step is programming the button's click event handler in a manner similar to what the template demo does, only simplifying the code to the maximum here. Thus, inside the Home.js file and next to the initialization of the other button, we will add a similar function:
$('#insert-data-from-Task-Pane').click(insertDataFromTaskPane);And, the body of insertDataFromTaskPane, contains the following code:
function insertDataFromTaskPane() {
  Office.context.document.setSelectedDataAsync(
    'Text inserted from the Task Pane' +
    '
Callaback function notifies status',
    function (result) {
      app.showNotification('Feedback:', result.status);
    }
  );
}
Note that no dialog boxes are allowed on a Task pane; so we notify the user about the success or error of the process, calling showNotification on the app object, which sends data to the Task pane notification area, previously configured in the initialization process.
Consequently, we're moving in both directions here: from the Task pane to the Word document, inserting a couple of lines and notifying how things worked out in the opposite direction. Observe that the setSelectedDataAsync method provides us with a mechanism to insert data into the document in a manner similar to what we did previously with insertAfter methods of the PIAs object model.
Finally, remember that in the JavaScript world it's usual to assign a callback function as the last argument of many function calls in order to allow feedback on the resulting method or add an extra functionality once execution is finished. The argument recovered in the function declaration (the result object) contains properties that include relevant information, such as the status of the operation.
There's plenty of information about programming this type of application in the MSDN documentation, in which you'll be able to see new types of applications of this sort, especially applications that allow the construction of Add-ins for Office 365.
Just for the sake of completeness, let's show the results of the previous code in this screenshot:
