
As you zoom in and pan down to the surface of the sample app, you'll note that the Earth has no elevation relief. To remedy this, you will need a surface model of the surface of the Earth. A surface model has x and y coordinates just like other layers, but it also has z values for elevation. The z values are typically in meters or feet. At first, we'll use an online service, and then we'll use a file source for offline content.
As with the other services we've been using, Esri also has some services ready for us to use; but in order to do that, we need to update our model:
- Open
Model.csand add the followingprivatemember:private string elevationLayerUri = "http://elevation3d.arcgis.com/arcgis/rest/services/WorldElevation3D/Terrain3D/ImageServer";
- Also, add the following property:
public string ElevationLayerUri { get { return this.elevationLayerUri; } set { if (value != this.elevationLayerUri) { this.elevationLayerUri = value; } } } - Open
MainViewModel.csand add the following property:public string ElevationUri { get { return myModel.ElevationLayerUri; } set { this.myModel.ElevationLayerUri = value; RaisePropertyChanged("ElevationUri"); } } - In
ConfigService, change the line that reads the JSON file to readconfig_scene.json. - In the constructor of
MainViewModel, where the layers are added to theMessengercode, add the following lines before the other layers:Uri uriElevation = new Uri(this.ElevationUri); ServiceElevationSource elevSource = new ServiceElevationSource(uriElevation); elevSource.IsEnabled = true; this.sceneView.Scene.Surface.Add(elevSource); - Update the
Zoommethod to the following code:public async void Zoom() { { // define a new camera over Everest var camera = new Camera(28.1, 86.9253, 8000, 180, 73.0); var viewPoint = new Viewpoint(camera, new Envelope(27.9, 86.7, 28.1, 87.3, SpatialReferences.Wgs84), 126.0); var animationDuration = new TimeSpan(0, 0, 2); await this.sceneView.SetViewAsync(viewPoint, animationDuration, true); } - In
MainWindow.xaml, change the button's name toZoom to Everest. - Run the app and click on Zoom to Everest.
That's how easy it is to add a surface model to your scene. Note that in step 4, we set up the elevation source, enabled it, and then added it to the scene's surface. We now have terrain relief for the entire planet. Then, we updated the Zoom method to position the camera to look at Everest. For more information on creating and publishing this kind of service, navigate to http://server.arcgis.com/en/server/latest/publish-services/windows/publishing-image-services.htm.
It's also possible to set an elevation source using local files. ArcGIS Runtime supports the following elevation file formats:
- The ARC Standard Raster Product (ASRP) or UTM/UPS Standard Raster Product (USRP) format
- Controlled Image Base 1, 5, and 10 (http://www.aviation.dla.mil/rmf/products_digital.htm#4)
- Digital Terrain Elevation Data 0, 1, and 2 (https://en.wikipedia.org/wiki/DTED)
- GeoPackage (http://www.geopackage.org/)
- GeoTIFF (http://trac.osgeo.org/geotiff/)
- HFA
- HRE (http://www.asprs.org/a/publications/proceedings/sanantonio09/Heady.pdf)
- The Erdas Imagine (IMG) format
- JPEG (https://en.wikipedia.org/wiki/JPEG)
- JPEG 2000 (https://en.wikipedia.org/wiki/JPEG_2000)
- NITF (https://en.wikipedia.org/wiki/National_Imagery_Transmission_Format)
- PNG (https://en.wikipedia.org/wiki/Portable_Network_Graphics)
- RPF (http://earth-info.nga.mil/publications/specs/printed/89038/89038_CADRG.pdf)
- The Shuttle Radar Topography Mission (SRTM) data 1 and 2 (http://www2.jpl.nasa.gov/srtm/)
Let's use some elevation data that comes from the SRTM data:
- Comment out the following lines:
Uri uriElevation = new Uri(this.ElevationUri); ServiceElevationSource elevSource = new ServiceElevationSource(uriElevation); elevSource.IsEnabled = true; this.sceneView.Scene.Surface.Add(elevSource); - Replace them with these lines of code:
FilenameCollection fileCollection = new FilenameCollection();
fileCollection.Add(@"C:ArcGISRuntimeBookDataSRTM
27_e086_3arc_v2.dt1");
fileCollection.Add(@"C:ArcGISRuntimeBookDataSRTM
27_e087_3arc_v2.dt1");
fileCollection.Add(@"C:ArcGISRuntimeBookDataSRTM
28_e086_3arc_v2.dt1");
fileCollection.Add(@"C:ArcGISRuntimeBookDataSRTM
28_e087_3arc_v2.dt1");

FileElevationSource fileElevSource = new FileElevationSource();
fileElevSource.Filenames = fileCollection;
fileElevSource.IsEnabled = true;
fileElevSource.ID = "Elevation Source";
this.sceneView.Scene.Surface.Add(fileElevSource);
- Run the app again and click on Zoom to Everest. The only difference you'll note is that the resolution is lower. The online service has a range of resolutions from 1,000 m to 3 m but the SRTM is 30 m resolution.
It should be noted that in a production-level app, you'd want to make a service factory that reads these files from disk, and then load them into your model.
Now that we've seen some ways of viewing elevation sources and layers in 3D, let's discuss some other properties of the SceneView control:
IsShadowsEnabled: This property determines whether or not shadows appear in the scene.ElevationExaggeration: Using a factor, such as 1.5, this property determines the exaggeration of the surface model. The higher the number the more the scene is exaggerated.LightPoint: This property determines the position of the Sun using the x, y, and z values. It's recommended to use theSetSunTimemethod to make the light appear more realistic for the time of day.AmbientLight: This property sets the color of the ambient light in the scene when shadows are enabled.
It's one thing to see a basemap with a surface model, but what we really want to do is add content to the scene to add context. Let's make another change to our sample app:
- Once again, change the
Zoommethod to the following code:public async void Zoom() { // define a new camera over San Francisco var camera = new Camera(37.7833, -122.4167, 330.0, 45, 73.0); // create a ViewPoint with the camera, a target geometry // (Envelope), and rotation (same as camera heading) var viewPoint = new Viewpoint(camera, new Envelope(37, -122, 38, -123, SpatialReferences.Wgs84), 126.0); var animationDuration = new TimeSpan(0, 0, 2); await this.sceneView.SetViewAsync(viewPoint, animationDuration, true); } - Comment out the
USAlayer for now. - Change the name of the button in the XAML code to
Zoom to San Francisco. - Add the following code near the end of the anonymous method of
Messenger:Uri sanFranciscoUri = new Uri("http://scene.arcgis.com/arcgis/rest/services/Hosted/Buildings_San_Francisco/SceneServer/layers/0"); SceneLayer sceneLayer = new SceneLayer(sanFranciscoUri); sceneLayer.InitializeAsync(); this.sceneView.Scene.Layers.Add(sceneLayer); - Run the app and click on Zoom to San Francisco. You will be zoomed to this great city with the 3D textured buildings. Note that
SceneLayeris specific to 3D and it won't work inMap.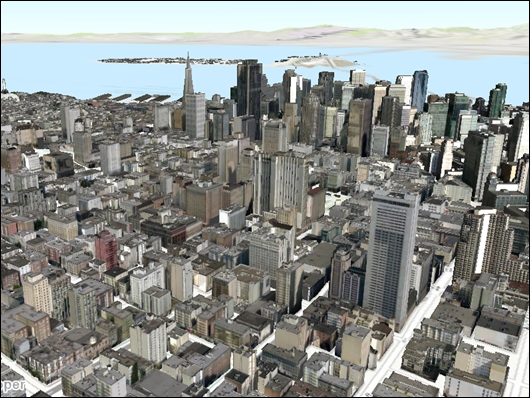
You can find other cities at http://scene.arcgis.com/arcgis/rest/services/Hosted. Any of the cities that have SceneServer beside their name will have some 3D content. As in the preceding example, make sure to add Layers/0 at the end of the service name.
We've now created a
SceneView with a Scene property, added some basemaps, and the 3D cities, but we need to also talk about some of the properties of how these layers can be added. If you add GraphicsLayer to the Scene property, you also need to tell the layer how to place itself on the Earth. This is accomplished with LayerSceneProperties. You have three options:
Draped: In this option, graphics will be drawn directly on the surface. The z values of the graphic are equal to the z value of the surface model.Absolute: With this option, the z values of the graphic are used independently of the surface model. If you want to show the altitude of an airplane, you would set the layer to useAbsolute.Relative: Using this option means that the z value of the graphic would be added to the z value of the surface model. A good example of this would be the height of a power line above the terrain.
Here is an example of setting LayerSceneProperties:
var graphicsLayer = new GraphicsLayer();
graphicsLayer.ID = "DrapedGraphics";
graphicsLayer.SceneProperties.SurfacePlacement =
    SurfacePlacement.Draped;
MySceneView.Scene.Layers.Add(graphicsLayer);
With this code snippet, GraphicsLayer is instantiated, named, and SurfacePlacement is set to Draped. Any graphic added to this layer will appear on the surface.