
In earlier chapters, we discussed overlays in a limited manner. But now, it's time to go a little deeper into the subject. Overlays allow you to add .NET FrameworkElement to a collection called OverlayItemsCollection. For example, the following code can be used to add TextBlock over San Francisco:
var tb = new TextBlock();
tb.Foreground = new SolidColorBrush(Colors.Red);
tb.FontWeight = FontWeights.Bold;
tb.Background = new SolidColorBrush(Colors.White);
tb.Height = 20;
tb.Text = "San Francisco";

var geoPoint = new Esri.ArcGISRuntime.Geometry.MapPoint(-122.44,
    37.8, Esri.ArcGISRuntime.Geometry.SpatialReferences.Wgs84);

this.mapView.Overlays.Items.Add(tb);
    Esri.ArcGISRuntime.Controls.MapView.SetViewOverlayAnchor(tb,
    geoPoint);
See here:
Addition of text block
A TextBlock component such as this adds a little context to the map, but you can go way beyond that because you can add pretty much anything into the Overlays collection. Typically, however, overlays are added to the map to emphasize something, but they should be used sparingly because they consume memory quickly and therefore reduce performance. Regardless, they allow you to also display attribute information for features too, so that a user can click on a feature and see the field values, as in the following screenshot:
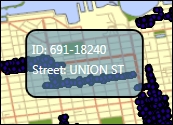
In this case, the user has clicked on a parking meter and the ID and street name appear over it.
Now that you understand the basics of overlays, it's time to take a deeper dive into the subject so that we can create them for lots of layers. When adding overlays to your FeatureLayer classes, you have a couple of options: static or dynamic XAML.
Static XAML is used to create XAML at design time to add overlays. They are simple to use, as shown here:
<esri:MapView.Overlays>
<esri:OverlayItemsControl>
<Border x:Name="mapTip" Background="White" BorderBrush="Black"
BorderThickness="2"
Padding="4" Margin="4"
HorizontalAlignment="Left"
VerticalAlignment="Top"
Visibility="Collapsed"
esri:ViewBase.ViewOverlayAnchor="{Binding Geometry}">
<StackPanel>
<TextBlock Text="{Binding
Attributes[facname]}" FontWeight="Bold" />
<TextBlock Text="{Binding
Attributes[capacity],
StringFormat='Capacity: {0}'}" />
</StackPanel>
</Border>
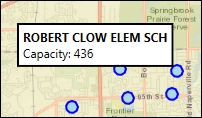
</esri:OverlayItemsControl>A FeatureLayer tag could then be added, either with XAML or with a code such as this:
<esri:FeatureLayer.FeatureTable>
    <esri:ServiceFeatureTable
    ServiceUri="http://sampleserver6.arcgisonline.com/arcgis/rest/services/NapervilleShelters/FeatureServer/0"
        OutFields="*" />
</esri:FeatureLayer.FeatureTable>
In this code, the overlays are defined with .NET FrameworkElements (the TextBlock tags inside the StackPanel tags, which are in turn inside a Border tag). Then, FeatureLayer is created. When the user clicks on a feature, it shows a map tip like this:
Static XAML is fine with trivial apps; however, if you want to provide the user with the ability to add layers from disk or from the Web, or you have a configuration store that allows users to add, edit, or delete layers, then the app won't know what fields it needs to display, as shown in the preceding example with a hardcoded layer and field names. Another approach to generating XAML is to generate it dynamically at runtime.
Let's modify the app we've been using in this chapter that works with San Francisco data so that you can click on a meter and display the meter ID and street name. First, we'll use static XAML, and then we'll refactor the code to use dynamic XAML:
- In
MainWindow.xaml, add the following XAML code after the closing</Map>tag:<esri:MapView.Overlays> <!-- OverlayItemsControl for the MapView. --> <esri:OverlayItemsControl x:Name="overlayItemsControl"> <Border CornerRadius="10" BorderBrush="Black" Margin="0,0,25,25" Visibility="Hidden" BorderThickness="2" Background="#995C90B2" > <StackPanel Orientation="Vertical" Margin="5,10,18,15"> <StackPanel Orientation="Horizontal"> <TextBlock Text="ID: " FontWeight="Normal" Height="20" Foreground="White"/> <TextBlock Text="{Binding [POST_ID]}" FontWeight="Normal" Foreground="White" Height="20"/> </StackPanel> <StackPanel Orientation="Horizontal"> <TextBlock Text="Street: " FontWeight="Normal" Height="20" Foreground="White"/> <TextBlock Text="{Binding [STREETNAME]}" FontWeight="Normal" Foreground="White" Height="20"/> </StackPanel> </StackPanel> </Border> </esri:OverlayItemsControl> </esri:MapView.Overlays> - In
MapViewBehavior.cs, add ausingstatement toEsri.ArcGISRuntime.Layers, and then add a newMapViewTappedevent handler to theOnAttachedmethod, like this:AssociatedObject.MapViewTapped += AssociatedObject_MapViewTapped;
- In
AssociatedObject_MapViewTapped, add the following code:MapView mapView = sender as MapView; OverlayItemsControl overlays = mapView.Overlays; OverlayItemsCollection collection = overlays.Items; System.Windows.Controls.Border overlayControl = (System.Windows.Controls.Border)collection[0]; // get the location tapped on the map var mapPoint = e.Location; // Get possible features and if none found, move to next layer FeatureLayer featureLayer = (FeatureLayer)mapView.Map.Layers[1]; // Get possible features and if none found, move to next layer var foundFeatures = await featureLayer.HitTestAsync(mapView, new Rect(e.Position, new Size(10, 10)), 1); if (foundFeatures.Count() == 0) return; var feature = await featureLayer.FeatureTable.QueryAsync(foundFeatures[0]); overlayControl.DataContext = feature.Attributes; Esri.ArcGISRuntime.Controls.MapView.SetViewOverlayAnchor( overlayControl, mapPoint); overlayControl.Visibility = Visibility.Visible;; - Run the app, and then click on any parking meter. You will see something like the following screenshot:

What we've done here is follow the principles of MVVM by placing the MapViewTapped event handler in the custom MapView behavior, while at the same time, we've added useful information to the map. The user can now click on a parking meter and find out details. We only added a couple of fields to illustrate the concept, but now let's go over the tapped event handler.
When the user clicks on the map, MapViewTapped is fired. As we've previously seen, MapView comes along and we simply cast it from sender to MapView. Then, we get the overlays in Map that were defined in the XAML code. After this, we get the collection that makes up the overlay, which in this case is a single border. From there, we get the location that the user clicks on and cast it to MapPoint. Next, we get the second layer in the map, and then perform HitTest, which returns the features found in the area we clicked. The HitTestAsync method uses a Rect parameter as a tolerance parameter. After the feature is found, we query FeatureLayer asynchronously and return a single feature. We only want one feature so that we can bind its attributes to the overlay, which in this case is a border with .NET FrameworkElements inside it. The feature's attributes are bound to the border's data context. After that, we set the overlays anchor position, which is MapPoint where we clicked. Finally, we set the border's visibility to Visible so that it shows itself.
Now that we've implemented map tips using static XAML, let's refactor this code to use dynamic XAML so that the overlays are created at runtime:
- In the project that we've been working on, there is a method in
MainViewModel.csthat looks like this:private async void CreateFeatureLayers() { var gdb = await Geodatabase.OpenAsync(this.GDB); Envelope extent = null; foreach (var table in gdb.FeatureTables) { var flayer = new FeatureLayer() { ID = table.Name, DisplayName = "Parking Meters", FeatureTable = table }; if (!Geometry.IsNullOrEmpty(table.ServiceInfo.Extent)) { if (Geometry.IsNullOrEmpty(extent)) extent = table.ServiceInfo.Extent; else extent = extent.Union(table.ServiceInfo.Extent); } this.mapView.Map.Layers.Add(flayer); } await this.mapView.SetViewAsync(extent.Expand(1.10)); } - Let's add the following code after the
FeatureLayerclass, or you can just copy it from theChapter6project that came with this book:OverlayItemsControl overlays = this.mapView.Overlays; OverlayItemsCollection collection = overlays.Items; System.Text.StringBuilder sb = new System.Text.StringBuilder(@"<Border CornerRadius=""10"" xmlns=""http://schemas.microsoft.com/winfx/2006/xaml/presentation"" BorderBrush=""Black"" Margin=""0,0,25,25"" Visibility=""Hidden"" BorderThickness=""2"" Background=""#995C90B2"" >"); sb.Append(@" <StackPanel Orientation=""Vertical"" Margin=""5,10,18,15"">"); sb.Append(@" <StackPanel Orientation=""Horizontal"">"); sb.Append(@" <TextBlock Text=""ID: "" FontWeight=""Normal"" Height=""20"" Foreground=""White""/>"); sb.Append(@" <TextBlock Text=""{Binding [POST_ID]}"" FontWeight=""Normal"" "); sb.Append(@" Foreground=""White"" Height=""20""/>"); sb.Append(@" </StackPanel>"); sb.Append(@" <StackPanel Orientation=""Horizontal"">"); sb.Append(@" <TextBlock Text=""Street: "" FontWeight=""Normal"" Height=""20"" Foreground=""White""/>"); sb.Append(@" <TextBlock Text=""{Binding [STREETNAME]}"" FontWeight=""Normal"" "); sb.Append(@" Foreground=""White"" Height=""20""/>"); sb.Append(@" </StackPanel>"); sb.Append(@" </StackPanel>"); sb.Append(@" </Border>"); System.Windows.FrameworkElement element = (System.Windows.FrameworkElement)System.Windows.Markup.XamlReader.Parse(sb.ToString()); collection.Add(element); - In
MainWindow.xaml, comment out the overlays code. This includes everything from<esri:MapView.Overlays>to</esri:MapView.Overlays>. - Run the app. It should work just like it did earlier. Click on a parking meter and it shows a map tip.
In the code, we got a reference to the overlays, which at first will have nothing in it. Then, we get the items in the overlay and pass it to OverlayItemsCollection. After that, we create StringBuilder, and then populate it with the exact same XAML code we used earlier, except this time we added a reference to the XAML namespace. This allows our overlays to understand that this is an XAML markup; otherwise, it's just a string of XML. The other difference is that we had to escape all of the string representations of the XAML code by adding double quotes where there were single quotes. After the XAML code was created, we converted StringBuilder to a string and passed it to XamlReader, which translated our string to a .NET FrameworkElement. Lastly, we added the element to OverlayItemsCollection.
What's the difference? Well, instead of defining the XAML code in MainWindow.xaml, we defined it in code, but more importantly, this XAML code was created at runtime instead of design time. But, think bigger about what you could do with this. We could have read this from a configuration file instead of hardcoding the field names in the XAML code. This way, our XAML code would be truly dynamic. We could even change the XAML code to be not only based on a configuration file, but also based on the type of user or the scale, or anything. There are many possibilities with this approach, and hopefully, this will give you some ideas to make your apps even more interesting.