
If you search for MVVM in your favorite search engine, you will find that several MVVM libraries are available. Microsoft originally developed one library called Prism. Since then, several other libraries have come along, such as Unity, Caliburn, Micro, and MVVM Light. It is highly recommended that you evaluate all of them to find one that suits your team and project. In this book, we're going to use MVVM Light because, as the name implies, it's a lightweight version of the full implementation of the MVVM pattern. It also can be applied to Windows Store and Windows Phone.
Let's rebuild the app again, but this time with MVVM Light. Create a new ArcGIS Runtime app as you've done before. In the following steps, the app is called Chapter2a:
- Using NuGet, install MVVM Light in your new project. Right-click on the project and click on Manage NuGet Packages. In the search box in the upper-right corner of the window, type
mvvmlight, as shown here: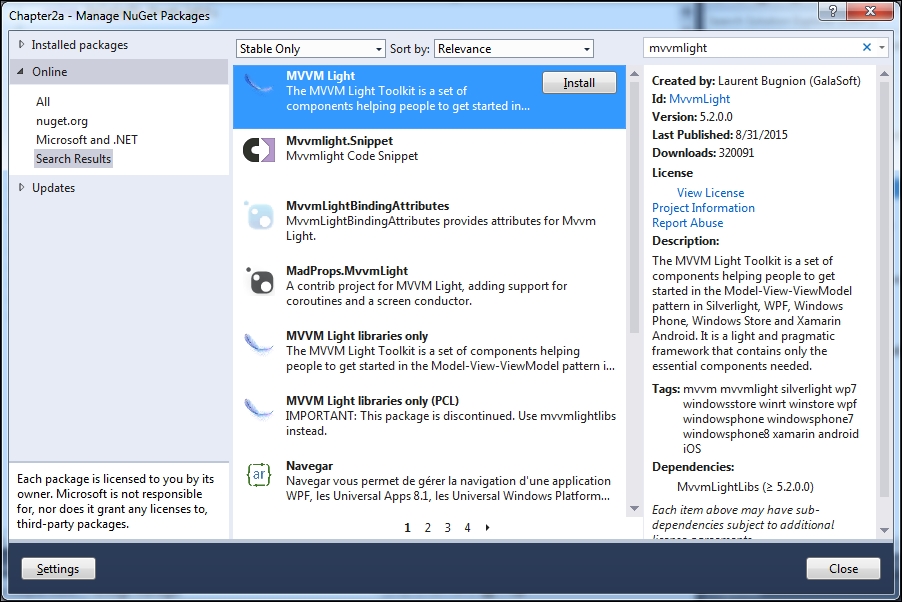
- Click on MVVM Light, and then click on Install. All of the necessary references will be added. Note that we are using Version 5.2. Click on Close.
- Create a new directory in your project and call it
ViewModels. - Add an MVVM Light
ViewModelclass to your project. Right-click on theViewModelsdirectory and add a new item, and then find MvvmViewModel (WPF). It will be namedMainViewModel.csin these examples, as shown here: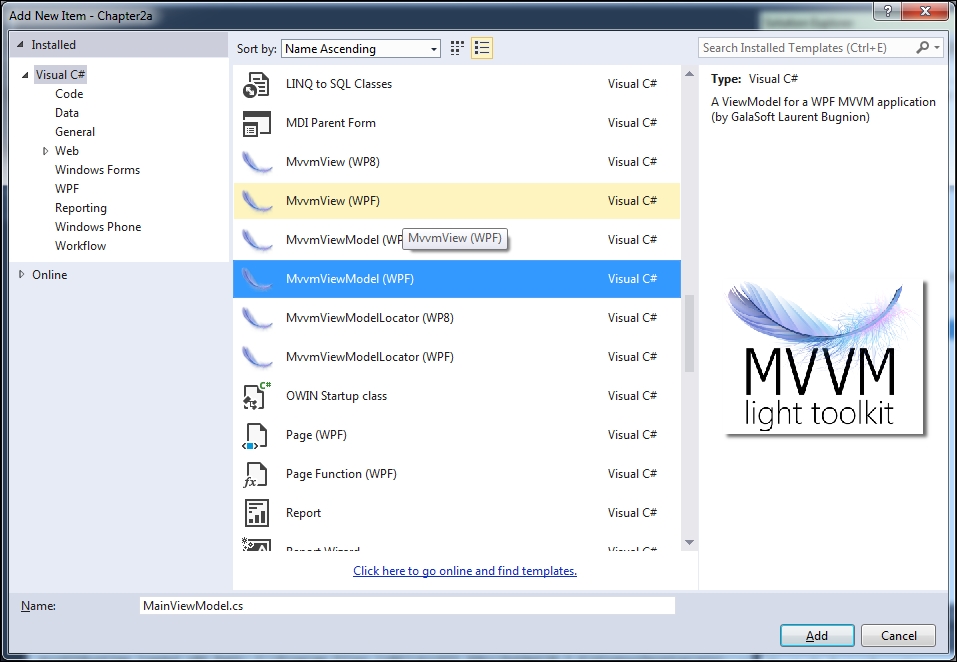
- Right-click on the
ViewModelsdirectory and add a new item. Click on MvvmViewModelLocator (WPF). It will be namedViewModelLocatorhere:
A ViewModelLocator class simply allows MVVM Light to find your ViewModel classes and execute them for you. This is called Inversion of Control (IoC). IoC is a powerful technique that helps you manage and find ViewModels. Open ViewModelLocator. The first thing you will see is an example of how to use it as an application resource, and how to use it as a DataContext class in the View class. In the constructor, you'll note ServiceLocator.SetLocatorProvider…. This is a Microsoft class that lets your ViewModel classes be instantiated without any concern about the implementation of how this is done. After this, you will note that these lines are commented out:
////if (ViewModelBase.IsInDesignModeStatic)
////{
////    // Create design time view services and models
////    SimpleIoc.Default.Register<IDataService, DesignDataService>();
////}
////else
////{
////    // Create run time view services and models
////    SimpleIoc.Default.Register<IDataService, DataService>();
////}
This step is an important part of MVVM Light. It allows you set up your project with mock data so that you can view your XAML code in Microsoft Blend, and so you won't get errors in design mode. The other option is to load data from a data service. We're going to skip this step because we're building a custom mapping app.
The next code segment is a property that your View class will use to set the DataContext class in the View class:
public MainViewModel MainViewModel
{
    get
    {
        return ServiceLocator.Current.GetInstance<MainViewModel>();
    }
}
This get statement simply returns an instance of the ViewModel class called MainViewModel so that you don't have to instantiate it yourself. Lastly, there is a Cleanup method that allows you to clean up resources.
Now that you've been briefly introduced to IoC and ServiceLocator, let's put this into action and make the View class use this ViewModel class. Note that the MainWindow file is in the View class that will consume the MainViewModel item:
- Copy these lines to
App.xaml:<Application.Resources> <vm:ViewModelLocator x:Key="Locator" d:IsDataSource="True" /> </Application.Resources> - In
MainWindow.xaml, set theDataContextclass of theGridtag as shown here:<Grid DataContext="{Binding Source={StaticResource Locator}, Path=MainViewModel}"> - Run the app. You will note that nothing has really changed, but everything is now set up to start coding our app.
Let's complete this new app by implementing the properties and commands needed to have a fully functioning app. This time, however, we're going to simplify the app, so we can focus on the most important aspects of the things happening here.
- Create a new folder and name it
Models. Copy theModel.csfile from the previous example to your new project and place it in theModelsfolder. Make sure to change the namespace toChapter2a.Models. - In
MainViewModel, make the following changes. Make sure you have theusingstatements shown here:using System.Collections.Generic; using GalaSoft.MvvmLight; using GalaSoft.MvvmLight.CommandWpf; using Chapter2a.Models; using Esri.ArcGISRuntime.Tasks.Query;
- Add the following
privatemembers:private Model myModel = null; private IReadOnlyList<FindItem> listResults; public RelayCommand SearchRelayCommand { get; private set; }The
SearchRelayCommandclass is an MVVM Light feature which allows you to invoke a method from the View class. All that's necessary is that you define the command as we just did. - Change the constructor to the following code:
public MainViewModel()
{
    if (IsInDesignMode)
    {
        // Code runs in Blend --> create design time data.
    }
    else
    {
        // Code runs "for real"
        this.myModel = new Model();
        this.SearchRelayCommand = new RelayCommand(Search);
    }
}
Note that we've instantiated
RelayCommandand set it to thepublicproperty we created in the previous step. Also, note that we passed inSearch, which is the method we're going to create next. - Add the method shown in the following code:
public async void Search() { var url = "http://sampleserver6.arcgisonline.com/arcgis/rest/services/USA/MapServer"; var findTask = new FindTask(new System.Uri(url)); var findParameters = new FindParameters(); findParameters.LayerIDs.Add(0); // Cities findParameters.LayerIDs.Add(3); // Counties findParameters.LayerIDs.Add(2); // States findParameters.SearchFields.Add("name"); findParameters.SearchFields.Add("areaname"); findParameters.SearchFields.Add("state_name"); findParameters.ReturnGeometry = true; //findParameters.SpatialReference = MyMapView.SpatialReference; findParameters.SearchText = this.SearchText; findParameters.Contains = true; FindResult findResult = await findTask.ExecuteAsync(findParameters); var foundCities = 0; var foundCounties = 0; var foundStates = 0; // Loop thru results; count the matches found in each layer foreach (FindItem findItem in findResult.Results) { switch (findItem.LayerID) { case 0: // Cities foundCities++; break; case 3: // Counties foundCounties++; break; case 2: // States foundStates++; break; } } // Report the number of matches for each layer var msg = string.Format("Found {0} cities, {1} counties, and {2} states containing '" + this.SearchText + "' in a Name attribute", foundCities, foundCounties, foundStates); // Bind the results to a DataGrid control on the page IReadOnlyList<FindItem> temp = findResult.Results; ObservableCollection<FindItem> obsCollection = new ObservableCollection<FindItem>(); foreach (FindItem item in temp) { obsCollection.Add(item); } this.GridDataResults = obsCollection; System.Diagnostics.Debug.WriteLine(msg); } - Note that the
SpatialReferenceclass has been commented out for now, and that the method is modified withasync. Also, note that we've replacedSearchTextBox.Textwiththis.SearchText. More important than anything else, we've removed theButton_Clickevent fromWindowto theViewModelclass, which greatly reduced the code-behind file. Also, we've taken the results fromfindResultand placed them inObservableCollectionso that theDataGridcontrol can bind to it via aViewModelproperty. Lastly, note that theMessageBoxcomponent has been removed. We'll return toMessageBoxissues later. We'll run this app in a few steps, so make sure to look at the Output window to see the results. - Lastly, add the following four properties to this
ViewModelclass:public ObservableCollection<FindItem> GridDataResults { get { return this.listResults; } set { this.listResults = value; RaisePropertyChanged("GridDataResults"); } } public string SearchText { get { return this.myModel.SearchText; } set { this.myModel.SearchText = value; RaisePropertyChanged("SearchText"); } } public string BasemapUri { get { return myModel.BasemapLayerUri; } set { this.myModel.BasemapLayerUri = value; RaisePropertyChanged("BasemapUri"); } } public string USAUri { get { return myModel.USALayerUri; } set { this.myModel.USALayerUri = value; RaisePropertyChanged("USAUri"); } }
Note that we didn't have to write any boilerplate code as we did earlier. We didn't have to add any references, such as System.ComponentModel and System.Runtime.CompilerServices, and we didn't have to add INotifyPropertyChanged to our ViewModel class. This has been taken care of for us by MVVM Light because the ViewModel class inherits from ViewModelBase, which takes care of everything for us. Also, take a look at the constructor in MainViewModel and you'll also note that there is code for running your app in design mode or "for real". As you continue to use MVVM Light, even more benefits will become apparent.
Now, let's make the View class call a method on the ViewModel class via the Find button:
- Delete the
Gridcontrol in the XAML code and replace it with all of this code:<Window x:Class="Chapter2a.MainWindow" xmlns="http://schemas.microsoft.com/winfx/2006/xaml/presentation" xmlns:x="http://schemas.microsoft.com/winfx/2006/xaml" xmlns:esri="http://schemas.esri.com/arcgis/runtime/2013" xmlns:d="http://schemas.microsoft.com/expression/blend/2008" xmlns:locator="clr-namespace:Chapter2a.ViewModels" Height="600" Width="800"> <Grid DataContext="{Binding Source={StaticResource Locator}, Path=MainViewModel}"> <Grid.RowDefinitions> <RowDefinition Height="*" /> <RowDefinition Height="Auto" /> </Grid.RowDefinitions> <esri:MapView x:Name="MyMapView" Grid.Row="0" LayerLoaded="MyMapView_LayerLoaded"> <esri:Map> <esri:ArcGISTiledMapServiceLayer ID="Basemap" ServiceUri="{Binding MainViewModel.BasemapUri, Source={StaticResource Locator}}"/> <esri:ArcGISDynamicMapServiceLayer ID="USA" ServiceUri="{Binding MainViewModel.USAUri, Source={StaticResource Locator}}"/> </esri:Map> </esri:MapView> <TextBlock Name="Search" Background="#77000000" HorizontalAlignment="Center" VerticalAlignment="Top" Padding="5" Foreground="White" > <Run>Search for </Run> <TextBox Name="SearchTextBox" Text="{Binding SearchText}"></TextBox> <Run> in the Cities, Counties or States layer. </Run> <Button Content="Find" Width="30" Command="{Binding SearchRelayCommand}" > </Button> </TextBlock> <DataGrid Name="MyDataGrid" ItemsSource="{Binding Path=GridDataResults, Mode=TwoWay, UpdateSourceTrigger=PropertyChanged}" AutoGenerateColumns="True" Grid.Row="2" Height="200" ></DataGrid> </Grid> </Window>First, note the syntax of the layers that are being bound to
Locatorvia a static resource, and nowBindingis set toMainViewModel.BasemapUri. This is necessary because these elements aren't inGridhierarchy; they are inLocator. As a result, we had to refer to the property ofLocatorcalledMainViewModel, which has a property calledBasemapUri. Also, note that the button now uses a command so that when you click on it, it no longer goes to the button's event handler in the code-behind file; it now calls a command calledSearchRelayCommand, which is a way to call a method in theViewModelclass. Pretty nice, right? - Run the app. Most things are pretty much the same. Click on Find and observe that the
DataGridcontrol is updated but the message goes to the Visual Studio Output window. You will see the same kind of results, however. If you need help, refer to the sample code provided in the project namedChapter2a.
If we had done this without MVVM Light, we would have had to add another reference to System.Windows.Interactivity and this code inside the button, to make the button work:
<Button Content="Find" Width="30" >
    <i:Interaction.Triggers>
        <i:EventTrigger EventName="Click">
            <i:InvokeCommandAction Command="{Binding
            SearchRelayCommand}"/>
        </i:EventTrigger>
    </i:Interaction.Triggers>
</Button>
Interaction is an advanced feature of WPF and MVVM, so using MVVM Light makes this feature easier to use and maintain.
With that said, the major difference now is that we've satisfied SoC by using binding and commands, which separates the View, ViewModel, and Model classes. You could have three people working on their own respective parts. The visual designer could work on the View concept, and other developers could work on the Model and ViewModel concepts.
Now that we've enhanced the app with MVVM Light, there are still some things missing that will be required in a production-level application. If you noted earlier, the line in the Search method that sets the SpatialReference class was commented out because the ViewModel class doesn't have a reference to the map's spatial reference. The spatial reference tells the map about the projection or coordinate system that it should use. While this wasn't a problem in this particular example, it will be a problem in other situations. There are a few approaches to take to resolve this problem:
- You can pass the
SpatialReferenceID with each command. That would certainly work, but you'll end up having to pass that every time for every command. - You can add the map as an application-level resource, and then refer to it in your
ViewModelclasses, as in this code:this.map = App.Current.Resources["theMap"] as Map;
This solution would work too and it fits well with the intent of MVVM, for the most part.
- Another option is to add a custom behavior to
Windowso that when the Window page opens, it passesMapViewto yourViewModelclass. This also satisfies the notion of SoC and it leaves the XAML code in Windows (orUserControl) so that it's easy to view it in design mode.
The big takeaway here is that there are many ways to deal with this problem. We're going to go with the first option for now because it is easy to illustrate by way of passing the SpatialReference ID as a command parameter. In the next chapter, we'll tackle behaviors. Let's make a few changes to the XAML code and the ViewModel class:
- In
ViewModel.csin theChapter2aproject, add ausingstatement toEsri.ArcGISRuntime.Geometry, and then changeRelayCommandto use an integer. The reason for this is that we simply want to pass the map'sSpatialReferenceID from theViewclass to theViewModelclass. Every spatial reference has a unique ID. Look at this line:public RelayCommand SearchRelayCommand { get; private set; } - Change the preceding line to this:
public RelayCommand<int> SearchRelayCommand { get; private set; } - Now, have a look at this line:
this.SearchRelayCommand = new RelayCommand(Search);
- Again, change the preceding line to this:
this.SearchRelayCommand = new RelayCommand<int>(Search);
- Now, modify this line:
public async void Search()
- The preceding line is to be modified to this line:
public async void Search(int wkid)
- As you will recall in the last section, we commented out this line of code:
//findParameters.SpatialReference = MyMapView.SpatialReference;
- Go ahead and remove the line, and add these lines in its place:
SpatialReference sr = new SpatialReference(wkid); findParameters.SpatialReference = sr; - Open up
MainWindow.xamlso that we can pass the map'sSpatialReferenceID as acommandparameter and theSearchmethod can use it. Now, look at the following line:<Button Content="Find" Width="30" Command="{Binding SearchRelayCommand}" > </Button> - Change the preceding line to this line:
<Button Content="Find" Width="30" Command="{Binding SearchRelayCommand}" CommandParameter="{Binding Path=SpatialReference.Wkid, ElementName=MyMapView}" > </Button> - Run the app and click on Find. Nothing will be changed, but if you put a
breakpoint in theSearchmethod and inspect thewkid, you'll see that it has an ID value of102100. This is theSpatialReferenceID of a Mercator projection, which just happens to be the projection of the basemap. This works because we've told the XAML code to pass theSpatialReferenceID fromMapView(ID isMyMapView) using acommandparameter.
You have now successfully passed in the information that the Search method really needs to operate correctly by passing information from the View class to the ViewModel class. More importantly, this doesn't break SoC. We could have passed MapView to the Search method but that would have put a UI control, in this case ArcGIS Runtime, in our ViewModel class and we don't want that.
As you saw in the previous section, we instantiated the Model class directly in the ViewModel class. This was fine for a simple app, but for a production-level app, you are going to want to create services that take care of this for you because in MVVM there is supposed to be SoC between the View and ViewModel classes and between the ViewModel and Model classes. This is especially true with an ArcGIS Runtime app, because we could have data from both online and offline services. So far, we've been using online services to illustrate the basic application design. But, what if you had dozens of layers and you need to perhaps change out the URLs or the paths to local data? We need a simple solution that we can build on. Also, before we continue, we should go ahead and decide the ways we want to store our configuration.
There are many ways to tackle this problem:
- Create a file and store our configuration there
- Create a web service and store our configuration there
- Use both the preceding options
Using the first option is fine, but if your users will need to access the app from multiple devices, this means they would have two or more configurations. If you go with the second option, this means you would need constant Internet access, which goes against the grain when it comes to native apps, because they usually need to work offline at some point. Using the third option seems to be ideal.
If there's Internet access, use the latest configuration on the Web. If you get disconnected, use the latest local configuration. If you make a change while offline, prompt the user when they go back online to upload the latest changes. Once again, these are all design decisions that need to be well thought out.
For this section, we're going to keep it simple and use the first option. We're going to store the URLs for our layers in a simple file and have the ViewModel class call a service, which loads them in the Model class for us from a JSON file. That way, we can change the app and it should work just like it does with hardcoded values.
To accomplish this, we need a way to read JSON. For this exercise, we're going to use a third-party JSON library:
- Make a new project. In the following example, it's going to be called
Chapter2b. - Using NuGet, add the MVVM Light libraries.
- Using NuGet, add the ArcGIS Runtime SDK for .NET v10.2.7.
- Using NuGet, add
NewtonSoft.Json, as shown in the following screenshot: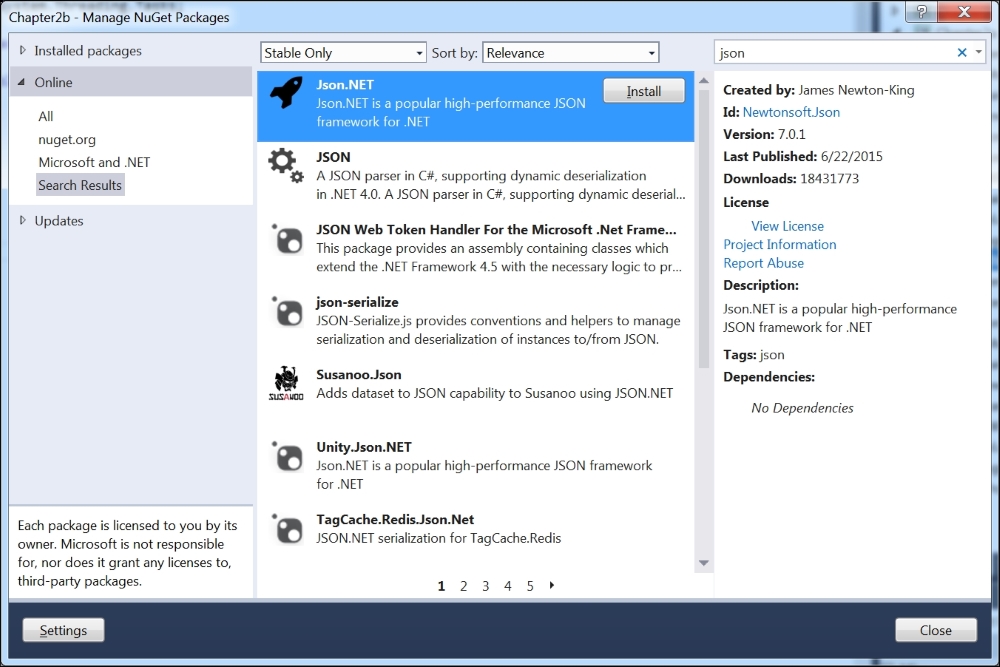
- Copy
Model.csfrom the previous project. Be sure to update the namespace in this file toChapter2b.Models. - When you use NuGet to add the MVVM Light libraries, it will create the
MainViewModel.csandViewModelLocator.csfiles for you, so just copy the contents of the previousMainViewModel.csfile to the new one. However, theMainViewModelproperty needs to be renamed fromMaintoMainViewModel, as shown here:public MainViewModel MainViewModel { get { return ServiceLocator.Current.GetInstance<MainViewModel>(); } } - Copy the contents from the
MainWindow.xamlfile to the new one. Update the references at the top of the XAML file. For example, change them fromChapter2atoChapter2b. - Make sure your
App.xamlfile looks like this:<Application x:Class="Chapter2b.App" xmlns="http://schemas.microsoft.com/winfx/2006/xaml/presentation" xmlns:x="http://schemas.microsoft.com/winfx/2006/xaml" StartupUri="MainWindow.xaml" Startup="Application_Startup" xmlns:d="http://schemas.microsoft.com/expression/blend/2008" xmlns:vm="clr-namespace:Chapter2b.ViewModels" d1p1:Ignorable="d" xmlns:d1p1="http://schemas.openxmlformats.org/markup-compatibility/2006"> <Application.Resources> <ResourceDictionary> <vm:ViewModelLocator x:Key="Locator" d:IsDataSource="True" /> </ResourceDictionary> </Application.Resources> </Application> - Add a new folder to the project. Name it
Services. - Add a new generic class. Name it
ConfigService.csand make it look like the following code:using System; using System.Collections.Generic; using System.Linq; using System.Text; using System.Threading.Tasks; using System.IO; using Newtonsoft.Json; using Chapter2b.Models; namespace Chapter2b.Services { public class ConfigService { public Model LoadJSON() { string modelContent = File.ReadAllText(@"C: C:ArcGISRuntimeBookJSONconfig.json"); return JsonConvert.DeserializeObject<Model>(modelContent); } } } - In
MainViewModel.cs, add a reference toChapter2b.Services, and then change the constructor to the following code:public MainViewModel() { if (IsInDesignMode) { // Code runs in Blend --> create design time data. } else { // Code runs "for real" ConfigService config = new ConfigService(); this.myModel = config.LoadJSON(); this.SearchRelayCommand = new RelayCommand<int>(Search); } } - Open the JSON file located at
C:ArcGISRuntimeBookJSONconfig.jsonand note that its contents look like this:{"SearchText":"Lancaster", "BasemapLayerUri":"http://services.arcgisonline.com/ArcGIS/rest/services/World_Topo_Map/MapServer", "USALayerUri":"http://sampleserver6.arcgisonline.com/arcgis/rest/services/USA/MapServer"} - Run the app. Once again, nothing much has changed; but this time, we've used a service to load our data from a configuration file, so now our app can be configured. Refer to the sample project called
Chapter2bprovided with this book for the complete app.
In a production-level app, this design could be greatly improved on by creating a separate configuration tool that users use to configure the app before it is started. Or, you could make this app have all the configuration options built into it.
We're almost done with our basic app. As you will recall, earlier we commented out the MessageBox component. The reason we did that was because a MessageBox component is a UI component, which means it shouldn't be in the ViewModel class. How do we resolve this? Well, luckily MVVM Light comes to the rescue with the
Messenger service. The Messenger service does as its name implies: it allows you to send messages in the form of a service pattern. Making a few minor changes to our app allows us to maintain SoC while showing the user a MessageBox component. Here are the steps:
- In the
ViewModelLocatorclass, add ausingstatement toGalaSoft.MvvmLight.MessagingandSystem.Windows. - In the constructor of
ViewModelLocator, add the following line at the end of the constructor:Messenger.Default.Register<NotificationMessage>(this, NotifyUserMethod);
- Add a method to
ViewModelLocator, as shown in this code:private void NotifyUserMethod(NotificationMessage message) { MessageBox.Show(message.Notification); } - Back in the
MainViewModelinstance, add ausingstatement toGalaSoft.MvvLight.Messaging, and then add the following line to the end of theSearchmethod:Messenger.Default.Send<NotificationMessage>(new NotificationMessage(msg));
- You can remove this line:
System.Diagnostics.Debug.WriteLine(msg);
- While you're at it, go ahead and remove this line in the
Searchmethod:var url = "http://sampleserver6.arcgisonline.com/arcgis/rest/services/USA/MapServer";
- Then, have a look at this line:
var findTask = new FindTask(new System.Uri(url));
- Replace the preceding line with this one:
var findTask = new FindTask(new System.Uri(this.USAUri));
As we've placed our code in a service, and then made it a property on our
ViewModelclass, there's no sense in having a hardcoded URL in theSearchmethod. - Run the app again and click on the Find button again. You will see the
MessageBoxdialog. Once again, the app behaves the same as it has before, except this time theMessageBoxdialog has been completely removed from theViewModelclass and is handled by the MVVM Light message service. When theSearchmethod is done with its task, it sends a message toNotifyUserMethod.
These steps have obviously been pretty basic examples, but they illustrate many of the principles of MVVM. There is a lot more to MVVM and MVVM Light, and hopefully this has provided you with the impetus to learn more about it, so you can make your apps meet all of the goals laid out at the beginning of this chapter. You are encouraged to look into messaging, because it's a powerful technique for sending messages between different parts of your app. For example, if you have multiple ViewModel classes, messaging is indispensable because you can send messages between them.
Now that we've written an app using the MVVM pattern, it's time to test this app. The problem is that we really haven't explained many details about many of the code samples we tried. This needs to change so that you have a better understanding of maps, scenes, layers, geocoding, and so on. Because of this, we're going to push testing to Chapter 12, Configuration, Licensing, and Deploying. By then, you will have a much better understanding of these core concepts and much more.