
Now that we've surveyed the API and SDK of ArcGIS Runtime, it's time to turn our attention to testing our app, while at the same time making sure that it is performant. Test and performance tend to go together because as you test your app you'll discover performance problems. In this chapter, we'll discuss testing and performance so that you will gain a solid understand of the concepts and techniques required to address these two important subjects. We will first learn about unit testing in general, and then learn how to do unit testing with MVVM via MVVM Light. We will also learn how to make sure our app runs as quickly as possible, both from the server side and the client side. In summary, the following topics will be addressed:
- General unit testing
- Using testing with ArcGIS Runtime
- Using testing with MVVM Light
- Test-driven development
- Unit testing with Windows Store
- Service-side performance
- Client-side performance
Testing your apps is critical to the success of your apps' acceptance by users. Even if 99 percent of your app works perfectly, it only takes one error to kill your apps' success. Not only does it leave a bad taste in your users' mouths, it can also cost you a lot of money to fix the bugs after the app has been released. One very beneficial strategy for resolving errors before they arise is to test your app using a variety of techniques.
There are many testing techniques you will need to employ in order to make your app as bulletproof as possible:
- Installation testing: This testing ensures that the app installs on customers' hardware. As ArcGIS Runtime supports many platforms, this could involve testing on the Windows devices, iOS devices, Android devices, and so on.
- Compatibility testing: This testing ensures that the app is compatible with the OS and other software.
- Regression testing: This testing is done after a major change in the code.
- Acceptance testing: This testing involves whether the user accepts that the app has been developed as agreed.
- Software performance testing: This testing ensures that the app performs as expected.
- Development testing: This testing is done by the development team, which involves having the developer test their classes at the atomic level (methods and properties).
- Security testing: This testing involves making sure that the app protects sensitive data and prevents hackers from intruding in the system.
This book was written for developers, so we are going to focus on the most fundamental unit of testing. That is, we're going to focus on unit testing the methods and properties of our classes. Later on, we'll address what you need to know when it comes to performance, so you can test your apps to ensure that they run as quickly as possible.
Unit testing is a methodology of testing the individual methods and properties of your classes using automated tools built into Visual Studio. In order to unit test, you will need a testing harness, and thankfully, Visual Studio provides a means to test your classes' methods and properties in an automated fashion.
See the following image:
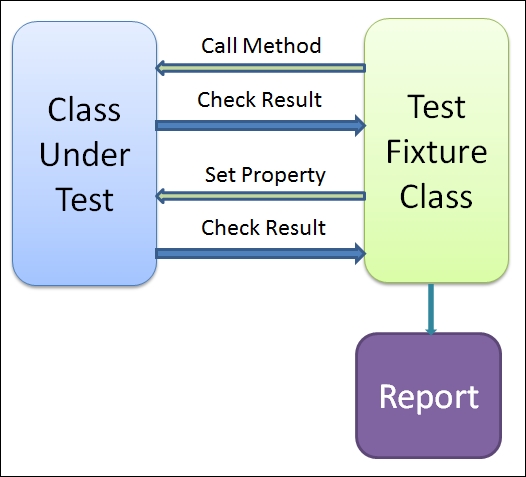
In this diagram, there is a Test fixture Class block that calls on your class to test it. The test fixture class is first instantiated with whatever it needs, you then call the method or property, and then then the results are returned. You use the returned results to ensure that the method or property worked as expected. Visual Studio will then present the results of the test in the form of a simple report.
Now that we conceptually understand what unit testing is, let's try this out with a simple app in Visual Studio:
- Open Visual Studio and create a new project. Click on Test and then Unit Test Project, as shown here:
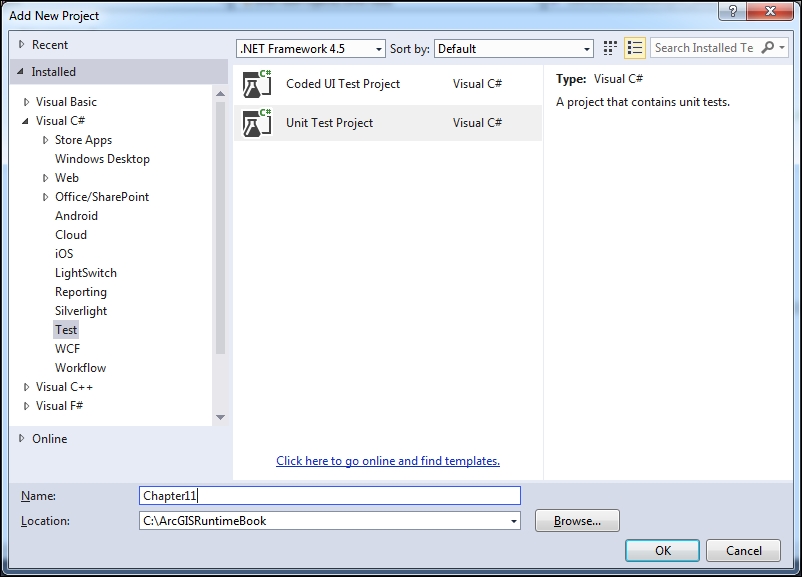
- Give the project a name and click on OK. The following class will be created:
using System;
using Microsoft.VisualStudio.TestTools.UnitTesting;

namespace Chapter11
{
    [TestClass]
    public class UnitTest1
    {
        [TestMethod]
        public void TestMethod1()
        {
        }
    }
}
This is the test fixture class. We will now use this class to test some generic ArcGIS Runtime code so that we can learn about unit testing.
- Rename the method called
TestMethod1, and name itGeteRedlineCountAsync_CountFeatures_FiveFeaturesFound.
That's a rather long name, but there's a good reason for naming it that. When conducting unit testing, the basic idea is that eventually you will have lots of methods in your app and you want to give them unique names, because as the number of unit tests grows, you'll need unique names to help you find the correct test. Another thing to note about this name is that it follows the pattern of Arrange/Act/Assert. The basic idea is that you Arrange the method by initializing the method with whatever it needs to execute. Then, you execute the method (Act). Lastly, you test the outcome of the unit test (Assert). Let's put this to use with a simple test:
- Add a reference to
Esri.ArcGISRuntimeandWindowsBase. - Add the following
usingstatements at the top of your test class:using System.Threading.Tasks; using Esri.ArcGISRuntime.Controls; using Esri.ArcGISRuntime.Data; using Esri.ArcGISRuntime.Layers; using Esri.ArcGISRuntime.Tasks.Query;
- In the new method named
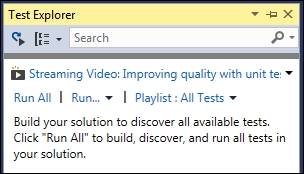
GetRedlineCountAsync_CountFeatures_FiveFeaturesFound, add the following code:[TestClass] public async Task GeteRedlineCountAsync_CountFeatures_FiveFeaturesFound() { QueryCountResult results = null; Map map = null; var table = new ServiceFeatureTable( new Uri("http://sampleserver6.arcgisonline.com/arcgis/rest/services/Water_Network/FeatureServer/2")); await table.InitializeAsync(); map = new Map(); map.Layers.Add(new FeatureLayer(table) { ID = "test" }); var queryTask = new QueryTask(new Uri(table.ServiceUri)); results = await queryTask.ExecuteCountAsync(new Query("1=1")); Assert.AreEqual(5, results.Count); } - From the main menu in Visual Studio, navigate to Test | Windows | Test Explorer. A window will appear. See here:
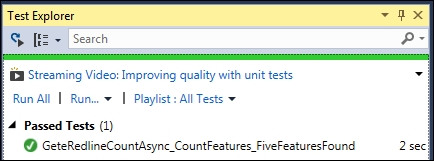
- Click on Run All in the Test Explorer window. If everything went OK, you will see results similar to the following screenshot:
Although this was a rather contrived example, it illustrates unit testing. Let's review exactly how this worked. The first thing you probably noted is that there are the .NET attributes added before the class name and method: [TestClass] and [TestMethod]. If you look at this project's type, you'll note that it is a class library, but by using these attributes, we are telling Visual Studio that this is a test library, which allows us to run this unit test. Other than that minor difference, it's just like any other class library. We just need to assign the [TestClass] attribute in front the class name, and [TestMethod] before any method we want to use.
The next thing to note is how we set up this test method. We first created QueryCountResult to hold the results of ExecuteCountAsync. We then created a Map variable, opened ServiceFeatureTable to an online service, initialized it, created a map instance, added the layer to the map, and then queried it using an expression ("1=1") that would return all the features in the layer. In unit testing parlance, we arranged, acted, and asserted all with a single test method. We could have arranged the test outside the test method, but for now we did everything within the test method.
The Assert.AreEqual call is the part that we really wanted to test. It is a simple static class that allows us to assert that something is true or false. In this case, we are asserting that this feature service has five records in it. We may want to actually test for this if our app depends on data residing in this online service. Furthermore, there are other kinds of assertion that you can make with Visual Studio, such as Assert.IsTrue, Assert.AreSame, and Assert.IsNotNull. You can use all of these assertions to fully exercise your methods so that you can ensure they work properly before you use them in your app.
However, it's recommended that you use one Assert instance per method, so that your tests only do one thing. This will aid you in finding bugs, especially as the number of tests grows.
Lastly, when we ran the test from the Test Explorer window, it lets us know that the test succeeded with a green check mark beside the unit test name, and it lets us know this under the heading Passed Tests.
The example app for this section of the book is available with the sample code that came with this book; it's called Chapter11.
With this information, we can now build more complex tests, such as testing that a method on our ViewModel works correctly.
Unit testing with MVVM Light takes a little more work. In this section, we're going to discuss what we need to do first, and then implement a simple solution for the project we built in Chapter 4, From 2D to 3D. In that chapter, we built a 3D app that allowed the user to search for a city, county, or state using a search string. Don't worry about the 3D part, because this equally applies to a 2D app too. Do the following steps:
- Create a unit test project, as you did in the previous section. In this section, the project will be named
Chaper11a. - Add references to the following
Esri.ArcGISRuntimenamespace and MVVM Light libraries only,PresentationCore,PresentationFramework,System.Xaml, andWindowsBase:using System; using System.Threading.Tasks; using System.Windows; using Microsoft.VisualStudio.TestTools.UnitTesting; using System.Collections.ObjectModel; using System.Threading; using Esri.ArcGISRuntime.Controls; using Esri.ArcGISRuntime.Data; using Esri.ArcGISRuntime.Layers; using Esri.ArcGISRuntime.Tasks.Query; using GalaSoft.MvvmLight.Messaging; using Chapter4a.ViewModels;
Note that we added the required references, and a reference to the Chapter4a project. This is accomplished by adding a project reference like so:
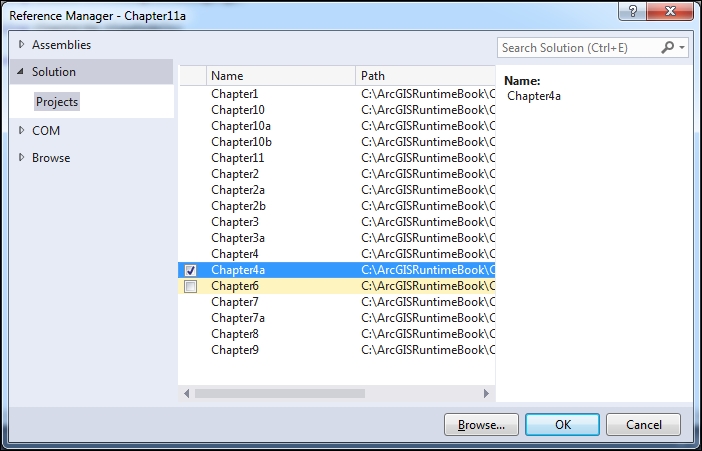
Note that you navigate to Solution | Projects, and then click on Chapter4a.
One of the limitations of MVVM Light is that it doesn't allow you to run a RelayCommand method asynchronously. This is especially problematic for unit testing because you want to be able to automate your tests. We could run them and wait for them to complete using Thread.Sleep or Task.Delay, but neither of those options are very good solutions. They simply make your unit tests run far longer than they should. Also, we could refactor the source code to run synchronously, but we want it to run asynchronously as it was written. What we want to do is run the Search method in this project asynchronously. Unfortunately, MVVM Light's RelayCommand method doesn't allow this. The good news is that we can write our own asynchronous RelayCommand method and this will allow us to unit test this app with very little modification.
This book comes with an asynchronous RelayCommand method that we will now use. The next thing we need to do is refactor our code so that we can run this new asynchronous RelayCommand method. In the project named Project4a, you'll find a file called RelayCommandAsync.cs:
- In
MainViewModel.cs, add ausingstatement toMvvmHelper. - Change the type of
SearchRelayCommandtoRelayCommandAsync. - In the constructor, change this line:
this.SearchRelayCommand = new RelayCommand<int>(Search);
- Change it to this:
this.SearchRelayCommand = new RelayCommandAsync<int>(Search);
- Add the using statement of
System.Threading.TaskstoMainViewModel.cs. - Change the return type of the Search method from
voidto the following code:public async Task Search(int wkid)
This is necessary in order for the method to run asynchronously. Also, using
Taskas the return type is Microsoft's recommended approach. - Rebuild your project if you're following this step by step.
- Now that we have the references set up and an asynchronous
RelayCommandmethod, let's add the unit testing code. All of the test class is included here so that you can see everything that needs to be entered:namespace Chapter11a { [TestClass] public class UnitTest1 { private ViewModelLocator locator = null; [TestMethod] public void public async Task GetSearchCount_CountFeatures_NineFeatureFound() { // instantiate the locator so that our view model is // created locator = new ViewModelLocator(); // get the MainViewModel MainViewModel mainViewModel = locator.MainViewModel; // create a MapView MapView mapView = new MapView(); // send the MapView to the MainViewModel Messenger.Default.Send<MapView>(mapView); // Arrange // search string mainViewModel.SearchText = "Lancaster"; // search using the search text and SR ID // run the search async var task = mainViewModel.SearchRelayCommand.ExecuteAsync(4326); task.Wait(); // wait // Assert Assert.IsNotNull(mainViewModel, "Null mainViewModel"); Assert.IsNotNull(mainViewModel.GridDataResults, "Null GridDataResults"); Assert.AreEqual(9, mainViewModel.GridDataResults.Count); } } } - From the Text Explorer window, right-click on the unit test called GetSearchCount… and click on Run Selected Test. After a brief period of time, you should see a message box appear. Click on OK. Then, you will see that the test passed.
The first thing we have going on is the test method first instantiates ViewModelLocator. In essence, this is what happens in all of the other apps we've created. The ViewModelLocator method is instantiated and that provides our app with a reference to MainViewModel. The next thing we do is create an instance of MapView. In the apps we've been using, we did this through a custom behavior, but in this example we're mocking this process in order to fool our ViewModel class into thinking it has MapView. Then, we send MapView via Messenger to the listener, which in this case is MainViewModel.
After we've set things up (Arrange), we now set up a property on the ViewModel class with the search string. We then call the asynchronous SearchRelayCommand method and pass in the spatial reference we used in that project. We then wait for it to complete with Task.Wait(). After it completes, we first assert that the ViewModel class isn't null, assert that the property called GridDataResults isn't null, and that the Count property on GridDataResults isn't null, and finally we assert that there are nine features returned by the Search method. Since this is the number of features in this layer, it returns true and our test passes.
With all that said, you now have a means to unit test a Windows app. What's more is that you've learned about an important limitation of MVVM Light, but you now know how to resolve this with future apps that you write for Windows. You also saw that we needed to refactor our code to handle the asynchronous RelayCommand methods and we changed our method to return
Task, which is the recommended approach. For more details on Microsoft best practices with regards to asynchronous programming, see here:
https://msdn.microsoft.com/en-us/magazine/jj991977.aspx
Lastly, this simple app displays a message box when it is complete. In a professional app, we would not use this approach. We'd display the message in a message window or as a popup that only displays for a few seconds, similar to Toast in Android. Otherwise, the message box would prevent our unit test from being automated.
This brings up an important point. We should test our apps as part of the development so that these kinds of problem are addressed early in the design.