
Now that we've learned how to search for data in layers and related tables, we need to turn our attention to searching by using an address or the name of a place. With ArcGIS Runtime, it's possible to search using an address, such as 123 Main Street, via a process called geocoding. Geocoding is a common feature in modern mapping technologies, so it's important to master the concepts and techniques involved. In this chapter, we'll cover the process of geocoding, and then we'll learn about routing, which determines the shortest route between two locations (address, place, or coordinates). In this chapter, we'll cover the following topics:
- Online geocoding
- Offline geocoding
- Finding places
- Online routing
- Offline routing
Geocoding is the process of taking an address and translating it into coordinates. 10 Main Street, San Francisco, CA 94105 is actually at latitude/longitude 37.792687, -122.396289. An address is composed of the following parts:
|
Components |
Description |
|---|---|
|
Left house number range |
This range is includes a low number and high number for the left side of the street, such as 100 to 198. |
|
Right house number range |
This range includes a low number and high number for the right side of the street. |
|
Prefix direction |
This component is a directory indicator, such as E, W, N, S. For example, W. Maple St. |
|
Prefix type |
This component is the type of street that precedes the name, such as Avenue C. |
|
Street name |
This component is the name of the street, such as Main or Peach. |
|
Street type |
This component is the type of street that follows the name. |
|
Suffix direction |
This component is a direction that follows the street name, such as NE in Baker St. NE. |
|
City name |
This component is a city name, such as New York. |
|
State |
This component is the state name or abbreviation, such as NC. |
|
zip code |
This component is the postal code used by the United States Postal Service, such as 84123. |
Geocoding in ArcGIS Runtime will take the address and determine the coordinate of that address using an algorithm and underlying street data. Streets, of course, are linear features that have a set of attributes such as street range, street name, city, and state. The important part of this is the street range. A street will typically have a range for the right side and left side:
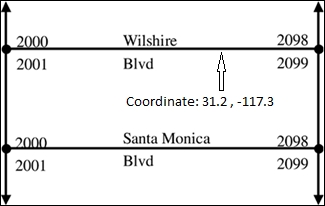
Each street will have the range, street name, city, state, and a ZIP code (postal code). Finding a street using just the street name, city, state, and ZIP code is really no different than what you learned in the previous chapter. It's just an attribute query. The algorithmic part of this process is to determine where the address number sits in the address range. If the range is 100 to 200 and the address is 150, the algorithm will place the point at the middle point of the line.
It's important to understand that the data source is the key component that is necessary to make geocoding possible. However, to make the algorithm as efficient as possible, an abstraction of the data is created. It's called a locator. The locator's role is to allow you to set the address style used in the underlying street network. A locator style lets the locator know what kind of addressing scheme to use. Here are some example locator styles: dual ranges on both sides of the street, a single range, single house, zip 5-digit, and Gazetter. The reason for this is that the geocoding engine needs to know what kind of addresses you intend to use. The locator style is specified when you create the locator using ArcGIS Desktop or Pro. For more information, navigate to https://desktop.arcgis.com/en/arcmap/10.3/guide-books/geocoding/understanding-address-locator-styles.htm. These styles determine the geocoding properties and parameters that determine how the address is parsed, and contain a snapshot of the address attributes in the street data, and the criteria for performing the geocoding operation. Once a user passes in an address, the geocoding engine parses the address into its constituent parts, determines candidate addresses, and then determines the coordinates. The process for creating a locator is explained in the ArcGIS help section located at https://desktop.arcgis.com/en/desktop/latest/guide-books/geocoding/creating-an-address-locator.htm.
The locator can be published as a service either via ArcGIS Online, on-premises in ArcGIS Server, or placed locally on a device as a *.loc file. Esri has published several locators for the U.S. and Europe. You can also purchase street data from a wide variety of street data vendors and build your own locator. This is a vital option for organizations that need to protect the privacy of their customers, such as for patients in the healthcare industry.
Once you've built the locator, you're now ready to geocode, but let's first explain a little more about how the process works. The first thing to do is to pass in an address. The more information you provide, the higher the probability the address will be found. In many cases, you will pass in an address and the geocoding engine will let you know that it has found the candidate addresses. It just depends on the preciseness of the entered address and the quality of the underlying street data. For example, if a street has a name of Smith Street with a range of 100 to 8,000, but you entered 8020, the geocoding engine can only provide a candidate address such as 7999 Smith Street or 8000 Smith Street. You will then need to present these candidate addresses to the user so that they can choose which one they really want. In effect, you're also letting the user know that the address is an error either by the user or in the underlying street data.
It's also important to know that each candidate address will receive a score from 0 to 100. The higher the score, the more likely that it is the correct one to use. In your code, you can sort the address candidates by their score. The locator can also be set up to reject candidates below a certain score. By default, ArcGIS Desktop rejects candidate addresses with a score below 80, so you are guaranteed to have good candidate addresses for the user to review. You can apply the same logic to your app.
The address-matching process actually provides you with even more information about the address you've entered when you attempt to geocode an address. The information returned about the candidate address includes the following values:
|
Values |
Description |
|---|---|
|
|
This value gives a value between 0 and 100, which indicates the accuracy of the match. |
|
|
This value gives the complete address returned by the geocoding engine. |
|
|
This value gives the match level for a geocoding request. For example, if the passed-in address only matches the city, a value called |
|
|
This value gives the side of the street on which the address was matched. This depends on the direction the street was digitized. There are three possible values: |
|
|
This value gives the distance in meters from the candidate to the location along the street. |
|
|
If two or more address candidates receive the same |
With this information, you can write your code to decide whether or not to present the candidate address to the user and how to show the address on the map.
While learning about geocoding, it's important to understand some useful terms:
In the sections that follow, we will use these terms interchangeably where appropriate.
As we discussed in the previous chapter, tasks are a very important concept to understand and utilize in order to work with ArcGIS Runtime. Fortunately, what you learned in that chapter applies to this chapter too. To perform geocoding, we will explore the classes located in Esri.ArcGISRuntime.Tasks.Geocoding. To geocode an address, you will need to use a LocatorTask class. The LocatorTask class is an abstract class for OnlineLocatorTask and LocalLocatorTask, as shown in the following diagram:

The general process for geocoding one or more addresses is as follows:
- Create a locator task (
OnlineLocatorTaskorLocalLocatorTask) using either an online service or a locator file on the device. - If you are looking for a place such as the Coliseum in Rome, instead of using an address, you'll just pass in the name using
OnlineLocatorFindParameters. Using place names will be discussed shortly. - Execute the task asynchronously using the input parameters of an address or
OnlineLocatorFindParameters. - Handle the results. This could be in the form of just showing the location or presenting the user with a list of candidate addresses to choose from.
To geocode an address using an online service, we will simply use the following code:
// specify the geocoding service
var uri = new Uri("http://geocode.arcgis.com/arcgis/rest/services/World/GeocodeServer");
var locatorTask = new Esri.ArcGISRuntime.Tasks.Geocoding.OnlineLocatorTask(uri);
var info = await locatorTask.GetInfoAsync();

// create the name of the single address input field
var singleAddressFieldName = info.SingleLineAddressField.FieldName;

// create a dictionary to contain the address info
var address = new Dictionary<string, string>();
// add address components to the dictionary using the correct input field names (a single address line in this example)
address.Add(singleAddressFieldName, "10 Main Street, San Francisco, CA 94105");

// create a list of output fields to include with the candidates
var candidateFields = new List<string> { "Score", "Addr_type", "Match_addr", "Side" };

// start the geocode task: pass in the address, out candidate fields, out spatial reference, and an empty cancellation token
var task = locatorTask.GeocodeAsync(address, candidateFields,
    this.mapView.SpatialReference, new
    System.Threading.CancellationToken());

IList<LocatorGeocodeResult> results = null;
try
{
    // await the results of the task
    results = await task;

    // if at least one candidate was found, get its location (point)
    if (results.Count > 0)
    {
        var firstMatch = results[0];
        var matchLocation = firstMatch.Location as MapPoint;
        // ... code here to display point on the map ...
    }
}
catch (Exception ex)
{
    var msg = "Exception from geocode: " + ex.Message;

}
The first thing to note about this code is the name of the geocoding service. It's called World and we know it's a geocoding service, because at the end of the URL is the word GeocodeServer. The next item of interest is GetInfoAsync, which returns information about the geocoding service, such as the address fields, candidate fields, and spatial reference of the service. All of these properties provide us with details that allow us to work with the service. GetInfoAsync works with online and offline locators.
As we want to geocode a single address, we need to get the SingleLineAddressField parameter so that we can pass in a single address. After that, we create a dictionary that will allow us to add the SingleLineAddressField parameter with a single address such as 10 Main Street, San Francisco, CA 94105. After this step, we also need to create a list of output field names. We will use those names to inspect the returned address matches. The next step involves calling GeocodeAsync with the address, candidate fields, MapView's spatial references, and a cancellation token. Once this task completes, it will return a result of type LocatorGeocodeResult. We then try to get the results. If a result is returned, we get the first matching address. Lastly, we get the location and cast it to a MapPoint class so that we can then add it to the map.
If you look at this code in the Visual Studio debugger, you'll note that it returns the first result with the highest score. For this particular address, the score was 100. As mentioned earlier, ArcGIS Desktop uses a score of 80 (default) to decide whether to accept or reject the matching address. You can get the score yourself, and then add a little more logic to render the point on the map or not, based on the score.
You can find other online locators at http://sampleserver1.arcgisonline.com/ArcGIS/rest/services/Locators.
The LocatorTask class can also reverse-geocode a MapPoint class using ReverseGeocodeAsync. For example, you could have the user click on a street and have it report back with the address.
If you wanted to geocode a batch of addresses, it would be easy enough to add more items to the dictionary in the preceding code and iterate over each one of them. This could be accomplished by allowing the user to upload a spreadsheet, or a CSV file, or whatever. Another alternative is to allow the user to drag and drop a CSV file onto the map, just like with ArcGIS Online.
Offline geocoding works very similarly to online geocoding except you must include the locator file with your app and place it on the device. Then, instead of using OnlineLocatorTask, you'll use LocalLocatorTask, like this:
var locatorTask = new LocalLocatorTask(@"C:ArcGISRuntimeBookDataSanFranciscoLocatorSanFranciscoLocator.loc");
var info = await locatorTask.GetInfoAsync();
This locator is included with the sample data provided in this book.
The OnlineLocatorTask class provides one capability that LocalLocatorTask doesn't provide. You can use OnlineLocatorTask to search for places. For example, you can just enter a name, such as Eiffel for the Eiffel Tower in Paris, or Mount Everest, and the service will take you to this place. The OnlineLocatorTask class provides a method called FindAsync that allows you to use the following information:
- Street addresses
- Points of interest by name and category
- Administrative place names, such as cities, counties, states, provinces, and country names
- Postal codes
To use the FindAsync method, create a LocatorFindParameters class. This class allows you to specify which fields to return and the spatial reference, limit the number of candidates with MaxLocations, restrict the search area to a particular country with SourceCountry, limit the geographic extent with SearchExtent, and so on.
Let's look at an example:
// create a locator to search the ArcGIS Online World geocode service
var uri = new Uri("http://geocode.arcgis.com/arcgis/rest/services/World/GeocodeServer");
var token = String.Empty;
var locator = new Esri.ArcGISRuntime.Tasks.Geocoding.OnlineLocatorTask(uri, token);

// get the locator's spatial reference
var info = await locator.GetInfoAsync();
var locatorSpatialRef = info.SpatialReference;

// create find parameters; search locations for "coffee"
var findParams = new OnlineLocatorFindParameters("coffee");

// set the output spatial reference to match the map's
findParams.OutSpatialReference = this.mapView.SpatialReference;

// restrict the search to the current map extent
var searchExtent =.GeometryEngine.Project(this.mapView.Extent, locatorSpatialRef);
findParams.SearchExtent = (Envelope)searchExtent;

// prioritize matches within 7.5 kilometers of the center of the current map extent
var centerOfMap = this.mapView.Extent.GetCenter();
var centerOfMapLatLong = (MapPoint)GeometryEngine.Project(centerOfMap, locatorSpatialRef);
findParams.Location = centerOfMapLatLong; // distance to candidates will be measured from here
findParams.Distance = 7500; // meters

// return a maximum of 7 candidates
findParams.MaxLocations = 7;

// return phone number, url, and distance attributes with the candidates
var candidateFields = new List<string> { "Phone", "URL", "distance" };
findParams.OutFields = candidateFields;

try
{
    // execute a find on the locator using the parameters defined above
    var task = locator.FindAsync(findParams, new
        CancellationToken());
    IList<LocatorFindResult>
        results = await task;
    foreach (var candidate in results)
    {
        // get information about each candidate
        var candidateFeature = candidate.Feature;
        var name = candidate.Name;
        var phone = candidateFeature.Attributes["Phone"].ToString();
        var url = candidateFeature.Attributes["URL"].ToString();

        // get distance in miles from the center of the map
        var distMeters = 0.0;
        double.TryParse(candidateFeature.Attributes["distance"].ToString(), out distMeters);
        var distMiles = distMeters * 0.00062137; // convert from meters to miles

        // get location (geometry)
        var matchLocation = candidateFeature.Geometry as MapPoint;

        // ... code here to display point graphics and info ...
    }
}
catch (Exception ex)
{
    var msg = "Exception from geocode: " + ex.Message;
}
. 
Let's review this code. First, we open the OnlineLocatorTask class, but this time we pass in an empty token. Then, the OnlineLocatorTask class is instantiated as we've seen before, but this time we create OnlineLocatorFindParameters and pass in the word "coffee". We then provide the spatial reference for OnlineLocatorFindParameters. After that, we project the extent to the locator's spatial reference so that we can search for coffee shops within a radius of 7.5 km from the center of the map. We also tell OnlineLocatorFindParameters to limit its results to just seven candidates. We then specify the phone number, URL, and distance from the map's center. Next, we specify the output fields with OutFields. Then, we try to execute FindAsync. For each result returned, we get the candidates and return the field values we specified earlier. If the distance is within the search tolerance of 7.5 km, we can do something with the results, such as draw them on the map. We could even create an overlay dynamically and populate it with the URL so that users could click on the URL and take them to the coffee shop's website. The coffee symbols in the preceding screenshot were created using PictureMarkerSymbol.