In designing the Lightning Components for the FormulaForce sample application contained in this book, I wanted to try to demonstrate some key integration points within the Salesforce UIs, while also ensuring the use cases fit with the application domain.
I focused on Lightning Experience and Salesforce1 Mobile. It is also good practice to think platform-first, before embarking on any extensive development. I started with the following use cases and then devised a set of components to deliver the functionality.
- Race Overview: while the standalone Lightning Application we looked at earlier was a good means to get started with the components, it's not a Salesforce integrated solution. What I wanted to do was integrate the Lightning Experience Home Page, through the Lightning App Builder customization tool. Not only to show the overall standings (leaderboard), but to allow users to filter information through the race calendar to show the results from each completed race.
- Race Calendar accessibility: The race calendar is a key piece of information users will likely want at hand when using other parts of the application. The Lightning Experience Utility Bar (or footer) is specific to your application and contain components you want to be always accessible.
- Race Setup assistance: There is a junction object between Race records and Drivers called Contestants. This can make setting up a race overly complex from a user experience perspective. As such I wanted to leverage Lightning Component Actions to provide a custom UI to add drivers to a race.
- Race Results overview. Race results are the combined result of information from the Contestants, Driver, Team and Car objects. I wanted to provide an easy and contextual way of viewing the race results from the Home Page and Race Record Page through the Lightning App Builder customization tool.
Let's take a closer look at the components that I came up with.
The following screenshot shows the top most portion of the c:RaceStandings component:
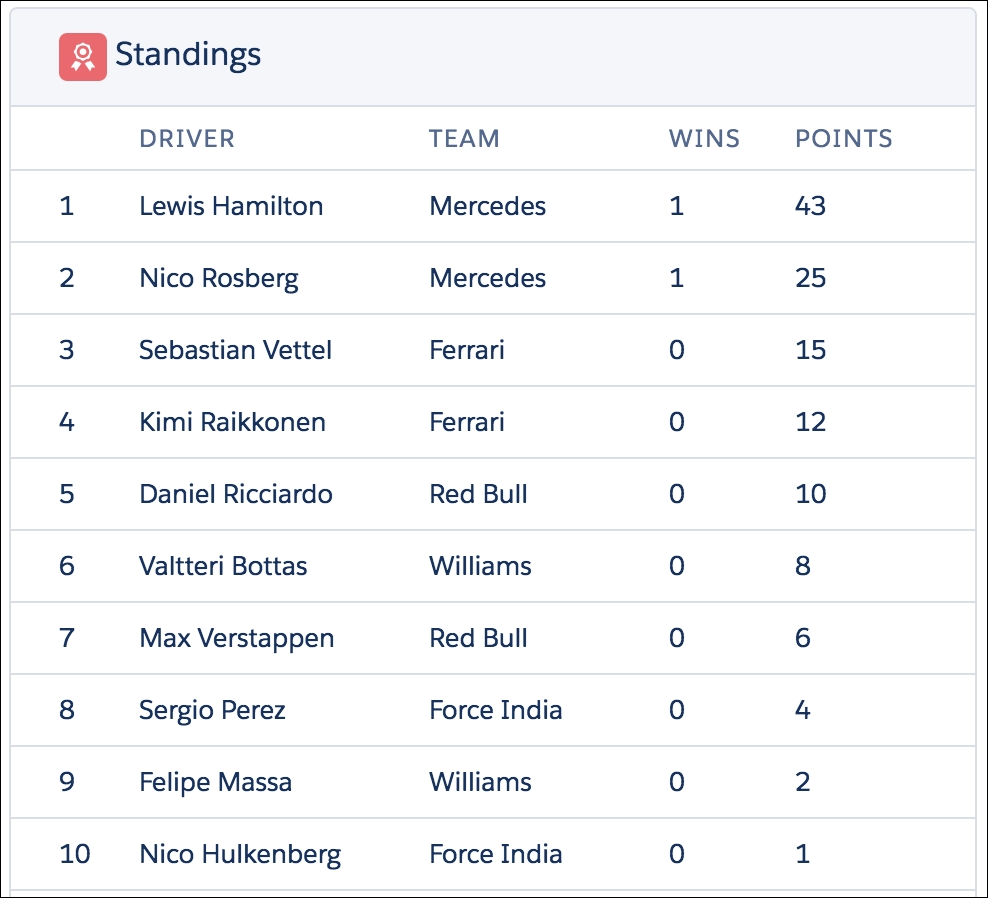
The following component markup is a simplified HTML <table> styled using SLDS:
<aura:component controller="RaceStandingsComponentController" implements="flexipage:availableForAllPageTypes" access="global">
<!-- Attributes -->
<aura:attribute name="standings" type="Object[]"access="private"/>
<!-- Event handlers -->
<aura:handler name="init" value="{!this}" action="{!c.onInit}"/>
<!-- Component markup -->
<lightning:card>
<aura:set attribute="title">
<lightning:icon iconName="standard:reward" size="small"/>
Standings
</aura:set>
<table class="slds-table slds-table—borderedslds-table--cell-buffer">
<thead><tr class="slds-text-title--caps"><th scope="col"></th><th scope="col">Driver</th><th scope="col">Team</th><th scope="col">Wins</th><th scope="col">Points</th></tr>
</thead>
<tbody>
<aura:iterationitems="{!v.standings}" var="standing">
<tr>
<th scope="row" data-label="Position">{!standing.Position}</th>
<td data-label="Driver">{!standing.Driver}</td>
<td data-label="Team">{!standing.Team}</td>
<td data-label="Wins">{!standing.Wins}</td>
<td data-label="Points">{!standing.Points}</td>
</tr>
</aura:iteration>
</tbody>
</table>
</lightning:card>
</aura:component>Other notable aspects of the RaceStandings component are:
- It implements the
flexipage:availableForAllPageTypesinterface that permits the component to be dropped on to the Lightning Experience Home page or any other page edited by the Lightning App Builder. - The
aura:iterationis similar to the Visualforceapex:repeatcomponent, in that it will iterate over a bound list and repeat the markup defined within. - It uses two Base Lightning Components,
lightning:cardandlightning:icon, SLDS styling is implemented by these components. - The client controller function
onInitcalls a helper function that makes a call to the Apex Controller to load the information from the server. The response updates the standings attribute which in turn causes the framework to refresh the HTML table with the records:getStandings :function(component, event ) { var action = component.get("c.getStandings"); action.setCallback(this, function(response) { if(response.getState() === 'SUCCESS') { component.set("v.standings",response.getReturnValue()); } }); $A.enqueueAction(action); } - The Apex Controller method uses the
ContestantsSelectorclass. In the following example the members of the Selector classContestantsSelector.Standingdo not support the@AuraEnabledattribute, so this class was not used directly in the response. The alternativeRaceStandingclass, allows the response to the client to be more focused on the needs of the client code:public with sharing class RaceStandingsComponentController { @AuraEnabled public static List<RaceStanding> getStandings() { List<RaceStanding>raceStandings = new List<RaceStanding>(); for(ContestantsSelector.Standing standing : newContestantsSelector().selectStandingsForCurrentSeason()) { RaceStandingraceStanding = newRaceStanding(); raceStanding.Position = standing.Position; raceStanding.Driver = standing.Driver; raceStanding.Team = standing.Team; raceStanding.Wins = standing.Wins; raceStanding.Points = standing.Points; raceStandings.add(raceStanding); } return raceStandings; } public class RaceStanding { @AuraEnabled public Integer Position; @AuraEnabled public String Driver; @AuraEnabled public String Team; @AuraEnabled public Integer Wins; @AuraEnabled public Integer Points; } }
The following shows the topmost portion of the c:RaceCalendar component:
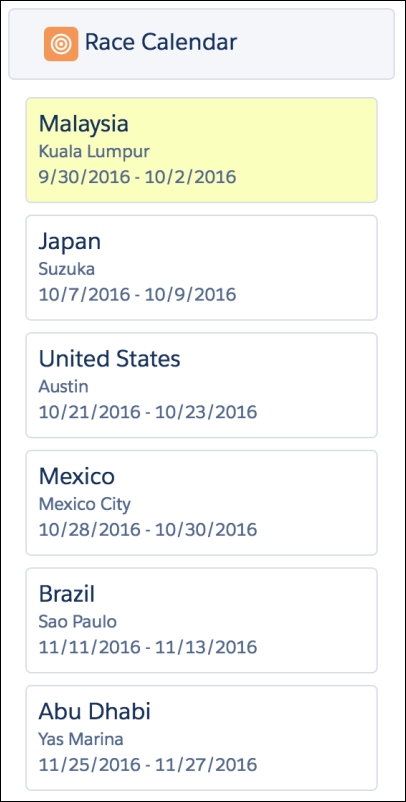
When the user clicks on a race, the selected race is highlighted and a component application event c:RaceSelected is fired. This event will later be received by the c:RaceResults component. This event is defined as follows:
<aura:event type="APPLICATION" description="Fired when the user selects a race" access="global">
  <aura:attribute name="raceId" type="string"/>
  <aura:attribute name="raceName" type="string"/>
</aura:event>
The following component markup uses a HTML unordered list <ul>. The list and items are styled using SLDS to show a list of tiles as specified by the SLDS design guidelines:
<aura:component controller="RaceCalendarComponentController" implements="flexipage:availableForAllPageTypes" access="global">
<!-- Attributes -->
<aura:attribute name="calendar" type="Object" access="private"/>
<!-- Event handlers -->
<aura:handler name="init" value="{!this}" action="{!c.onInit}"/>
<!-- Component markup -->
<lightning:card>
<aura:set attribute="title">
<lightning:icon iconName="standard:campaign" size="small"/> Race Calendar
</aura:set>
</lightning:card>
<div class="slds-p-around--small"><ul class="slds-has-dividers--around-space">
<aura:iteration items="{!v.calendar.Remaining}" var="race"><li class="{!'slds-item ' + (race.Selected ? 'selectedRace' : '')}" onclick="{!c.onRaceClicked}" data-raceid="{!race.Id}" data-racename="{!race.Name}">
<div class="slds-tile slds-tile--board">
<h4 class="slds-text-heading--small">{!race.Name}</h4>
<div class="slds-tile__detailslds-text-body--small">
<p>{!race.Location}</p>
<p>{!race.RaceDate}</p>
</div>
</div>
</li>
</aura:iteration>
<li class="slds-p-around--small">
<div class="slds-text-heading--small">Completed races</div>
</li>
<aura:iteration items="{!v.calendar.Completed}" var="race">
<li class="{!'slds-item ' + (race.Selected ? 'selectedRace' : '')}" onclick="{!c.onRaceClicked}" data-raceid="{!race.Id}" data-racename="{!race.Name}">
<div class="slds-tile slds-tile--board">
<h4 class="slds-text-heading--small">{!race.Name}</h4>
<div class="slds-tile__detailslds-text-body--small">
<p>{!race.Location}</p>
<p>{!race.RaceDate}</p>
</div>
</div>
</li>
</aura:iteration>
</ul>
</div>
</aura:component>Other new and notable aspects of this component are as following:
- The CSS class for the
<li>elements is driven by an expression that evaluates the value of theSelectedproperty from the race binding. This indicates which race is currently selected by the user. - HTML5 data attributes
data-raceidanddata-racenameare used to assign useful information to the<li>elements. This information can later be referenced by the following controller code. - The
onclickattribute on the<li>elements calls thec.onRaceClickedmethod. The helperselectRacefunction is invoked and uses the HTML5 data attributes to determine the Salesforce record Id for the race the user clicked on. A utility method updates theSelectedproperty on items held in thecalendarattribute. This update in turn causes theclassattribute on the<li>elements to be refreshed and thus the selected race item shown. Finally thec:RaceSelectedevent is fired so that other components can respond accordingly:selectRace :function(component, event ) { // Establish the selected race via HTML5 data attributes var selectedRaceId = event.currentTarget.dataset.raceid; var selectedRaceName =event.currentTarget.dataset.racename; // Mark the race as selected and deselect any selected var calendar = component.get('v.calendar'), this.updateSelectedRace(calendar.Remaining,selectedRaceId); this.updateSelectedRace(calendar.Completed,selectedRaceId);3 component.set("v.calendar", calendar); // Fire the RaceSelected event varcompEvent = $A.get("e.c:RaceSelected"); compEvent.setParams({"raceId" :selectedRaceId } ); compEvent.setParams({"raceName" :selectedRaceName } ); compEvent.fire(); } - The Apex Controller method (not shown) to load the race calendar splits and correctly orders the races into two lists (based on whether or not the race has been completed already) which are then sent to the component. This reduces the amount of JavaScript needed in the controller and helper files.
The following shows the topmost portion of the c:RaceResults component:
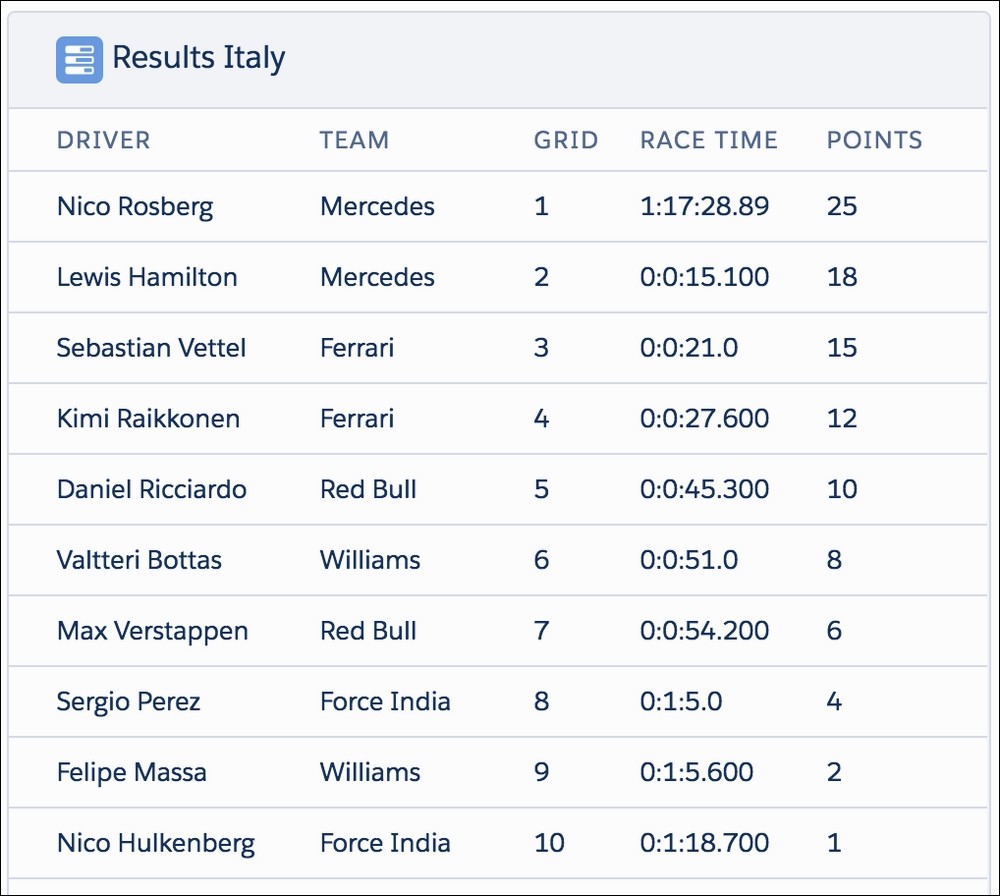
The c:RaceResults component follows a similar implementation approach to the c:RaceStandings component, so the full source code is not shown here. You can review the full code through the sample code associated with this chapter:
<aura:component controller="RaceResultsComponentController" implements="force:hasRecordId,flexipage:availableForAllPageTypes"  access="global">
<!-- Attributes -->
<aura:attribute name="recordName" type="String" access="private"/>
<aura:attribute name="results" type="Object[]" access="private"/>
<!--  Event handlers -->
<aura:handler name="init" value="{!this}" action="{!c.onInit}"/>
<aura:handler event="c:RaceSelected"action="{!c.handleRaceSelectedEvent}"/>
The following code fragments from the component are notable:
- The
flexipage:availableForRecordHomeinterface, states the component is available for dropping on Record pages via Lightning App Builder. - The
flexipage:availableForAllPageTypesinterface, states the component is available for dropping on the Home page via Lightning App Builder. - The
force:hasRecordIdinterface, lets the container, Lightning Experience or Salesforce1 know that the component wants to know the record ID. This is placed by the container in therecordIdattribute (added by the interface), when the component is placed on a Record page. - The
c.onInitmethod checks the value of therecordIdattribute; if it is not null it will load the applicable race results and display them. Since the component can be dropped on the home page this can be null in that context:onInit :function(component, event, helper) { // If we have a recordId context load the race results varrecordId = component.get('v.recordId'), if(recordId!=null) { helper.getRaceResults(component, event); } } - The
c.handleRaceSelectedis called when thec:RaceSelectevent is fired. The method extracts theraceIdandraceNamefrom the event parameters and refreshes the race results. This approach allows the component to exist on both the Record and Home pages and still be contextual:handleRaceSelectedEvent :function(component, event, helper) { // Update race record Id and Name attributes from Event component.set('v.recordId', event.getParam('raceId')); component.set('v.recordName',event.getParam('raceName')); // Retrieve race results helper.getRaceResults(component, event); }
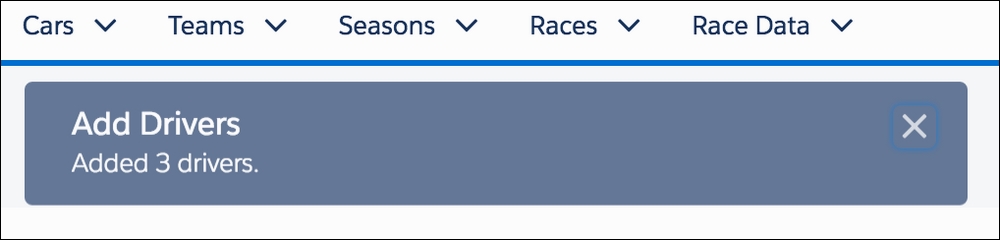
The following shows the c:RaceSetup component:
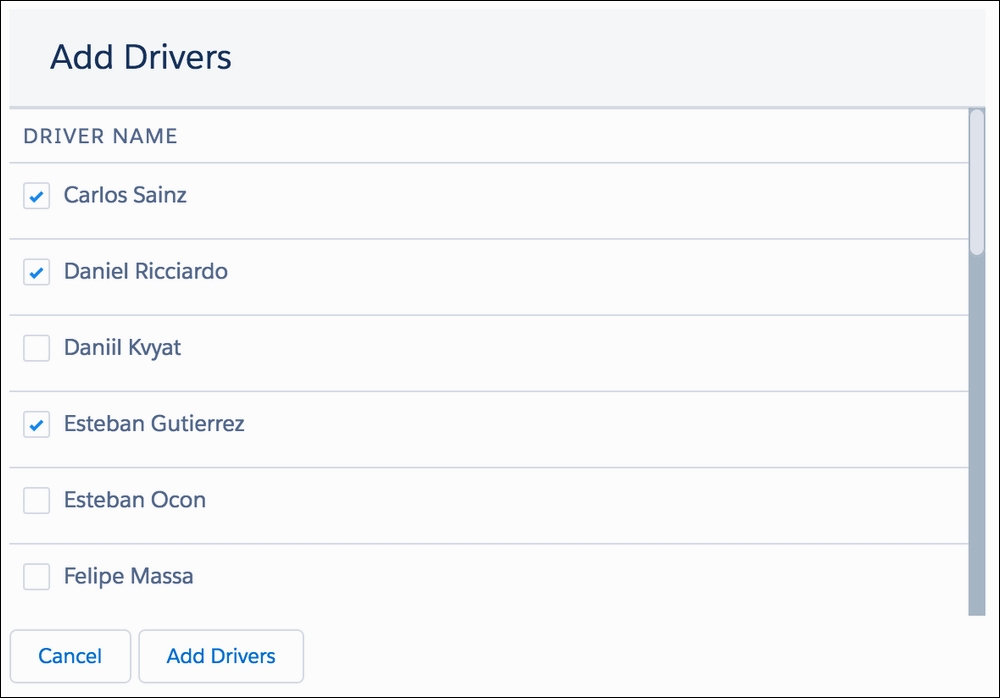
This component leverages a HTML table to display a table with a list of drivers. The lightning:input component is used to bind checkboxes to the list items. The full markup is not shown; the following code fragments are notable:
<aura:componentcontroller="RaceSetupComponentController"implements="force:lightningQuickActionWithoutHeader,force:hasRecordId" access="global">

<lightning:inputvalue="{!driver.Selected}" type="checkbox"
  checked="{!driver.Selected}" label="{!driver.Name}" />
<lightning:button label="Cancel" onclick="{!c.onCancel}"/>
<lightning:button label="Add Drivers"onclick="{!c.onAddDrivers}"/>
The following code fragments from the component are notable:
- The
force:lightnignQuickActionWithoutHeaderis used to indicate that this component can be used when creating an Action on an object definition. When the user invokes the action the component will show in a popup without the default header and cancel button, which is the preference here since the component is rendering its own buttons. Otherwise the component would have implementedforce:lightningQuickAction. - The
c.onCancelfunction sends theforce:closeQuickActionevent to instruct the container to close the popup by executing the following code:$A.get("e.force:closeQuickAction").fire(); - The
c.onAddDriversfunction calls a helper function. The helper function passes back the list of drivers to the server. The list contains the selected drivers. The Lightning framework automatically keeps thecheckedstatus of thelightning:inputcomponent in sync with the bound.Selectedproperty on the items in the list. The Apex Controller calls theRaceService.addDriversmethod. After a successful response the client controller code fires theforce:showToastevent (shown as following) to display a notification and theforce:closeQuickActionevent to close the popup:addDrivers :function(component, event ) {var action = component.get("c.addDrivers"); action.setParam('raceId', component.get('v.recordId')); action.setParam('driversToAdd',component.get('v.drivers')); action.setCallback(this, function(response) {if(response.getState() === 'SUCCESS') { // Refresh the view to show the recently added drivers $A.get('e.force:refreshView').fire(); // Display Toast message to confirm drivers var resultsToast = $A.get("e.force:showToast"); resultsToast.setParams({"title": "Add Drivers", "message": "Added " + response.getReturnValue() + " drivers." }); resultsToast.fire(); // Close the action panel $A.get("e.force:closeQuickAction").fire(); }); $A.enqueueAction(action); }