
Access management is one of the biggest elements of AWS security. It governs how, when, who, and what can access your resources at any given time. In this chapter, we will dive deep into each element of access management security that you will need to be aware of and master for the AWS security specialty certification.
You must be able to confidently implement and manage access controls across a range of different authentication mechanisms and understand all principles of permissions-based access policies. You also need to be aware of some of the specific services and features in place that are specifically designed to enrich and enhance the access control method selected.
Within this chapter, we shall be focusing on the following topics:
- Understanding Identity and Access Management (IAM)
- Provisioning users, groups, and roles in IAM
- Configuring Multi-Factor Authentication (MFA)
Technical requirements
To perform the tasks mentioned within this chapter, you will need to have the correct permissions to allow you to perform a number of different actions within the IAM service, including the creation and management of users, groups, and roles, in addition to configuring MFA. The permissions given in the IAMFullAccess policy will be sufficient to carry out all the actions in this chapter.
Understanding Identity and Access Management (IAM)
IAM is probably going to be one of the very first security services that you will use when setting up an AWS account. It contains the details and credentials of your root user account, which was set up during the creation of your account and also has full admin privileges to your entire AWS account by default. The power and privilege of this root user make it vulnerable as a credential compromise would put your entire AWS account and all of its resources at risk.
Due to this risk, it’s best practice to not use this account for daily administration and operations. Instead, you should create another user account with relevant privileges, enabling you to control your resources within your account. It’s also against best practice to configure access keys for the root account; limiting access methods for this user is essential due to the unlimited permissions that it has. To understand the use cases for access keys, we will explore them in detail in this chapter. You should definitely configure MFA for the root user, as it provides an additional step for authenticating to your AWS account in addition to the password. Again, we will be looking into MFA in great detail later in the chapter.
Now we have highlighted the security privileges of a root account, and why it is important for us to keep it secure, let's look at users, groups, and roles to help us configure and implement accounts that we can use for daily operational tasks.
Provisioning users, groups, and roles in IAM
You need to understand the differences between users, groups, and roles and their overall purpose within access control. This will help you architect and implement the most appropriate and effective access control for users and identities.
Creating users
Users within IAM are objects defined as identities that have the ability to log in and authenticate using defined credentials in the form of an associated password. Additional authentication may also be used in the form of MFA. Once authenticated, the user can then access resources as defined by their associated set of permissions.
With this basic understanding of what a user is, let's create our first one:
- From within the AWS Management Console, select IAM.
- Select Users from the menu and select Add user:

- Enter a username, which will be the login name of the user. It can only contain alphanumeric characters, or any of the following: _+=,.@-.
- If required, you can add more than one user at a time by selecting the Add another user option.
- At the bottom of the Add user window, you can see that you have options for an AWS Access type. You can select either of the following:
- Programmatic access: This will issue access keys for the user, enabling that identity to authenticate to access AWS resources programmatically using the AWS CLI, SDK, or other development tools.
- AWS Management Console access: This will issue a password for that identity to authenticate to access AWS resources using the Management Console. If you select this option, the following will be displayed:

Here, you must choose an IAM autogenerated password or enter a custom password defined by you. You can also select whether the user should be forced to create a new password the next time this new user logs in. I would recommend this option for additional security.
- Once you have selected the required option for Access type – Programmatic access, AWS Management Console access, or both if required, click on the Next: Permissions button, which will display the following permissions screen:

You then have three options, as shown in the preceding screenshot:
-
- Add user to group: This is a best practice, adding a new user to a group that already has a defined set of permissions attached to it. Adding users to a group reduces the amount of administration required when access control changes are needed. For example, assume you have a team of 30 people all performing the same job who require the same access. If you configured permissions associated with the individual user accounts, that’s 30 permission policies. Now, if a change of access was required for the whole team, to perhaps support a new resource in a solution, you would have to update 30 different policies, one for each user. However, if you created a group for the team and added all 30 users to that group, you would simply need one set permission policy associated with the group. Any changes required would then mean just updating the single policy attached to the group.
- Copy permissions from existing user: If you did have a requirement of associating permissions directly with a user account and you needed to repeat the same set of permissions for a new user, then this option would be used. It allows you to select an existing user to copy permissions from. However, do be sure you understand exactly what permission that existing user has to ensure you do not grant overly permissive access for this new user.
- Attach existing policies directly: This option again allows you to attach permission policies to a user directly, and if required to do so, this will present a list of both managed and custom policies for you to select. We will discuss more on policies (both managed and custom) in the next chapter, Chapter 4, Working with Access Policies.
- Once you have selected the appropriate option, click on the Next: Tags button.
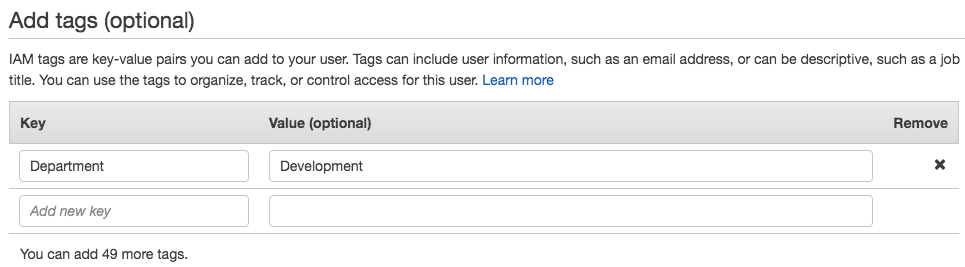
- Here, you can enter any key/value pair tags that you want to associate with the user, for example, a Key of Department and a Value of Development, or a Key of Cost Center and a Value of 41123:
- When you have completed your tags configuration, select the Next: Review button:
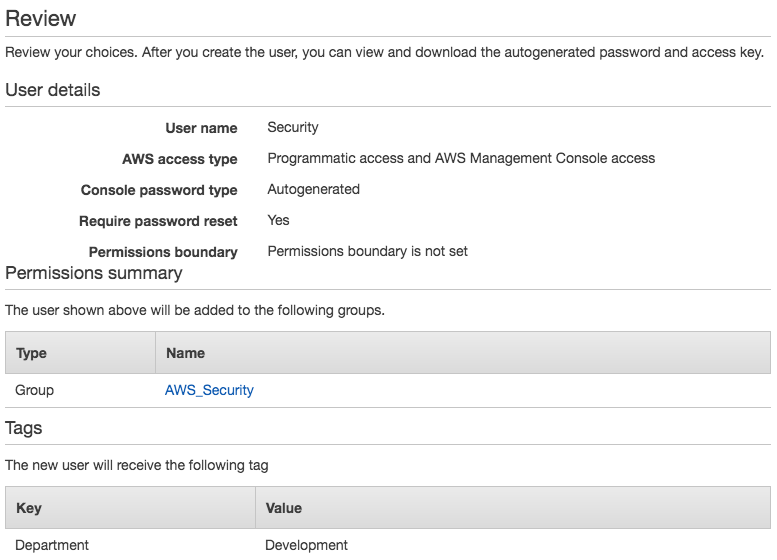
- This Review screen will allow you to verify the options you have selected up to this point during the creation of the user. When you have confirmed all details are correct, select the Create user button. This will then create the user and display a screen as shown here, with credential details:

- Using the Send email option, we can send the details of how to log in to your account, including a link to the management console for your account.
- Download.csv will download the programmatic access key details, including both the Access key ID and Secret access key.
With that, we have successfully created our first user. Users allow us to plan permissions for individuals in our organization. However, we can also associate permissions with a set of accounts, which we will explore next with groups.
Creating groups
Groups within IAM are objects that are associated with a set of permissions allowing any users that are members of that group to inherit the permissions of the group. The group itself does not have any credentials associated with it and so you are unable to authenticate to AWS using group details; it is simply an object within IAM containing users.
In order to create a group, follow these steps:
- From within the AWS Management Console, select IAM.
- Select Groups from the menu.
- Now select Create Group. You will arrive at the following screen:

- Enter a Group Name, which can have a maximum of 128 characters and can contain only alphanumeric characters and/or the following: +=,.@-_. In this example, we have entered AWS_Security as the name. Once your name is entered, select Next Step.
- As shown in the following screenshot, you can attach a policy and these policies contain permissions to access resources. We have selected the AmazonS3FullAccess policy in this screenshot:

- Once you have added your policies, select Next Step. The final review screen is then shown to confirm your configuration based on the previous steps.
- When you are happy with the configuration, select Create group:

You will now be able to see the new group in the list of groups within the IAM dashboard.
Creating roles
Similar to users, roles are also identities. They have an associated set of permissions that allows them to access AWS resources. However, they are not associated with users or groups. Instead, a role can be assumed by other identities and resources such as users in your AWS account, by a user in a different AWS account, by a federated user, or another AWS service such as EC2. When the role is assumed by one of these methods, the identity will inherit the associated permissions of the role. It’s important to understand that the roles themselves do not have static credentials; instead, they are dynamically created when the role is assumed.
There are a number of different types of roles available, which are as follows:
- Service roles
- User roles
- Web identity federated roles
- SAML 2.0 federated roles
We will discuss each of these roles and learn how to create them in the following subsections.
Service roles
These service roles allow other AWS services to perform actions on our behalf. As you work within AWS and begin to utilize and configure various services, there will be requirements whereby the service will create service roles in order to perform specific steps and functions. For example, during the configuration of AWS Elastic Beanstalk, a service role will be created allowing Elastic Beanstalk to use other AWS services on your behalf. This role will have all of the required permissions to allow the service to carry out the necessary tasks that it needs to. It’s important to understand that service roles exist only in the account in which they were created and can’t be used for cross-account access.
These service roles are often created during the configuration of the service itself, but it’s also possible to create service roles within IAM. Let's see how to do it:
- From within the AWS Management Console, select IAM.
- Select Roles on the menu and select Create Role.
- Select the AWS service option as the trusted entity.
- As you can see from the screenshot, there are a number of supported AWS services that can use service roles. Select the service you would like to configure the role for, for example, AWS Lambda:

- After selecting the service, select Next: Permissions. You can add permissions to the role by filtering on the policies that exist. Alternatively, you can also create a new policy at this point by selecting Create policy. For this example, I have filtered on S3 and selected the AmazonS3FullAccess policy:

- On this same screen, you also have an option to set a permission boundary, which allows you to restrict the maximum permissions granted to the role:

- Once you have configured and selected your permissions for the role, click Next: Tags.
- Add any tags required for the role and click Next: Review:

- The Review page will then be displayed allowing you to confirm the configuration you have specified throughout the previous screens. You must also specify a name for the role. When you are happy with the configuration and you have added your role name, select Create role:

- The role is now created. If you select the role from within the role list you can find metadata information for that role, such as the ARN, in addition to trusted relationships. As we created this role as a service role for Lambda, we can see that, under Trusted entities, we have the Lambda service listed. This restricts this role to only be used by Lambda when configured to do so:

As we can see, a role contains two different policies. One contains the permissions of the role itself, which allows the identity using the role to access resources. The second policy contains the trust relationship and this is used to govern who or what can assume the policy. In the next chapter, Chapter 4, Working with Access Policies, I will discuss how you can change parameters within this trust relationship policy to specify specific principals.
You may have noticed when selecting a trusted entity during the role creation that EC2 was listed first. Using EC2 roles are key when deploying and running applications on your EC2 instances that may need access to other AWS resources. One way of managing this access would be to hardcode user credentials, such as access keys, into the application, which would then allow access. However, this would be a security risk if a malicious user was able to gain unauthorized access to the instance as they could gain access to those credentials. Instead, it is a best practice to associate the EC2 instance with a role. This enables a dynamic set of credentials to be used for the instance and then applications running on that instance can inherit the permissions of the associated role. This removes the need to store credentials on any instance, which again is a security risk.
When you create a service role for EC2 via the console, two components are created: the role itself and also an instance profile, both with the same name. The instance profile is essentially a container for your role and it's used to pass data to the EC2 instance from the role itself. If you use the EC2 console to create your instance and use the drop-down list of roles to associate with the instance, the list actually displays a list of instance profiles and not the role (however, they are of the same name).
If you were to configure the roles for EC2 via the command line, then you would have to create the role and the instance profile as two separate actions, and by doing so, you can have it create a different name for the instance profile than that of the role.
User roles
Next, we have roles that can be assumed by a user in either the same or a different AWS account. When a user assumes a role, their current set of permissions associated with their user identity is temporarily replaced with the permissions associated with the role. To assume a role, the identity needs to have the relevant permissions to do so; without these configured permissions, accessing the role is not possible. These permissions can be associated with a group or with the user identity themselves.
The role can be assumed either through the Management Console or programmatically via the AWS Command-Line Interface (CLI). If the user switches to the role from within the Management Console, then the identity can only do so for 1 hour. If the role was assumed programmatically using the assume-role command on the CLI or the AssumeRole API operation, then the role can be assumed for a minimum of 15 minutes or up to 1 hour by using the duration-seconds parameter on the CLI or the DurationSeconds API.
In order to create a role to be assumed by the user, follow these steps:
- From within the AWS Management Console, select IAM.
- Select Roles from the menu and select Create role.
- Select Another AWS account as the trusted entity.
- You must then enter the AWS account that can use this role. If you want a user within the same account, then enter your AWS account number. Alternatively, if it should be used by another user in another account to perform cross-account access, then you must enter the AWS account number of that account (cross-account access will be explained in the next chapter, Chapter 4, Working with Access Policies). For this demonstration, we will add the AWS account number of the same account:

- Next, you have a couple of options to choose from. If you are going to allow a third party access to your resources via this role, then you should check the relevant checkbox, which allows you to enter an optional external identifier. This means, when assuming this role, the exact identifier will also have to be entered, adding an additional layer of security. Besides this, you also have an option to include MFA to be used when assuming the role. Again, this is an additional layer of authentication for the role.
- When you have selected the relevant configuration and added your trusted account, click on Next: Permissions.
- Much like in the previous example, when creating our service role, you will then be asked to add the relevant permissions. In this example, I have selected the AmazonS3FullAccess policy. When you have added your policies to the role, select Next: Tags.
- Add your tags and then click Next: Review.
- Add a role name and then click Create Role.
Your role has now been created and can be found within the list of roles.
So, we have now covered service roles, which allow other AWS services to perform actions on our behalf, and user roles that can be assumed by a user to temporarily replace their permissions with those associated with the role. Next, let's look at web identity federated roles.
Web identity federated roles
This option allows users who have been granted federated access to your AWS resources through a web identity provider to assume these roles instead of via a user that has been created within IAM.
Federated access simply means that the user has been authenticated by an external source, and in the case of web identity federation, this could be via well-known identity providers (IdPs) such as Amazon, Google, Facebook, or even Amazon Cognito (which will be discussed later in this chapter). Federation allows a Single Sign-On (SSO) approach.
Before creating a role for a web identity, there are a number of prerequisites that need to be completed:
- You will need to either gain an Application ID or Audience from the IdP, depending on which option you select, by signing up as a developer with the IdP.
- Once you have received the information (application ID or audience), you will then need to set up an OpenID Connect IdP within IAM.
- Finally, you will need to ensure you have both the permission policy and the trusted identity policy configured.
Once you have this information, you can complete your role setup by following a similar process to the previous examples, including the assigning of permissions (using the policy created in step 3, tagging, review, and role creation).
SAML 2.0 federated roles
The final option when creating a new role is the SAML 2.0 federation option, which allows you to create roles that have been federated through your own internal corporate directory.
This differs from web identity in the fact that the external authentication system is your own corporate directory of users, for example, your own Microsoft Active Directory (MSAD). Using the Lightweight Directory Access Protocol (LDAP), you can query MSAD as your authentication into your AWS account, again providing an SSO approach to your AWS environment.
Users authenticated in this way can then assume SAML 2.0 federation roles, allowing them to adopt permissions required to perform the required actions and tasks within your AWS account.
Again, there are a couple of prerequisites for using this option:
- Create a SAML provider within IAM.
- Ensure you have your policies configured, again both a permission policy and a trusted identity policy.
Once you have fulfilled the prerequisites, you can complete your role setup by referring to the following screenshot and executing the steps that follow:

- Select your newly created SAML provider.
- Decide whether you need to allow only programmatic access or both programmatic and AWS Management Console access.
- The Attribute and Value fields are only used if you selected the Allow programmatic access only option from the previous step. They can be used to restrict the role's access to users from the IdP whose SAML response includes the attribute/value that is defined by the IdP selected.
- Optionally, you can also include conditions that will exist in the trust policy relating to SAML attributes. More information on conditional values will be discussed in Chapter 4, Working with Access Policies.
You should now have an understanding of users, groups, and roles within IAM. The knowledge that you've acquired here will not only help you in access management but will also be used to configure various other AWS security services discussed in this book. I now want to dive into an access control mechanism that can help you to enforce stronger authentication methods for your users.
Configuring Multi-Factor Authentication (MFA)
In addition to a password that is required for users to authenticate to AWS, it is recommended to implement MFA to add a second layer of authentication. This is best practice for your AWS root account and any other user accounts that have elevated privileges.
By using MFA, you are required to enter a randomly generated 6-digit number once you have entered your password when using the Management Console. This 6-digit number changes very frequently, making it difficult to compromise. It is very easy to set up MFA for a user so let me run through it:
- From within the IAM dashboard of the AWS Management Console, select Users and then the user requiring MFA.
- Click on the Security Credential tab and you will notice under Sign-in Credentials that it states Not assigned for your MFA device:
![]()
- Click on Manage. Here, you can then select your chosen device for using MFA. I will use Google Authenticator, which is a simple app I have on my phone. So, in this example, we have selected Virtual MFA device. Once done, click Continue:

- Using the Google Authenticator app, we scan the QR code and enter the first 6 digits that appear within the app for our user and add those digits into the entry of MFA code 1. We must then wait for the numbers to change and add those consecutive digits into the MFA code 2 field:

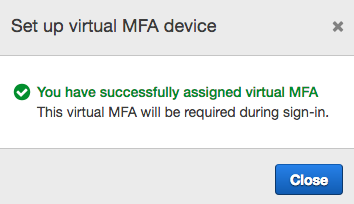
- At this point, we will get a message stating that we have successfully assigned a virtual MFA device for that user:
- The following screenshot shows how the screen appears when logging in as the user once the username and password have been entered:

MFA can also be used in other areas of AWS, for example, policies. You can configure your policies to only allow a user to perform an action if they have done so via MFA within the conditional parameters. The following example policy shows a trust policy relating to a role that checks to make sure that the user Stuart has authenticated via MFA. If Stuart did not use MFA, then access is not permitted:
{
 "Version": "2012-10-17",
 "Statement": {
   "Effect": "Allow",
   "Principal": {"AWS": "arn:aws:iam::356903128354:user/Stuart"},
   "Action": "sts:AssumeRole",
   "Condition": {"Bool": {"aws:MultiFactorAuthPresent": "true"}}
 }
}
As you can see, MFA is very easy to configure and set up and provides a great way of strengthening authentication to your AWS account and resources. MFA provides a great way of enhancing the security posture within your access control policies.
Summary
This chapter covered some of the key, essential components when managing access to your resources, including users, groups, roles, and MFA. With an understanding of these components within IAM, you are now able to successfully and securely control access and boost your security. The policies that underpin the permissions that are assigned to the identity objects help tie together the authentication and authorization functions of your access control mechanisms.
In the next chapter, we will be focusing on these policies, and how to implement and change them to suit your security needs.
Questions
As we conclude, here is a list of questions for you to test your knowledge regarding this chapter's material. You will find the answers in the Assessments section of the Appendix:
- Which type of role allows other AWS services to perform actions on our behalf?
- True or false: Adding users to an IAM group is considered best practice.
- True or false: Rules can only be assumed by other services within AWS.
- What does MFA stand for (which acts as an authentication control mechanism)?
Further reading
The AWS Identity and Access Management Documentation can be found at: https://docs.aws.amazon.com/iam/index.html#lang/en_us.