
In this chapter, we will create and run two more Android projects. The purpose of these exercises is to explore more deeply Android Studio and the structure of Android projects.
When we build our apps ready for deployment, the code and the resource files need to be packed away in the APK file—just so. Therefore, all the layout files and other resources, which we will be looking at soon, need to be in the correct structures.
Fortunately, Android Studio handles this for us when we create a project from a template. However, we still need to know how to find and amend these files, how to add our own and sometimes remove the files created by Android Studio, and how the resource files are interlinked—sometimes with each other and sometimes with the Java code (auto-generated Java code as well as our own).
Along with understanding the composition of our projects, it will also be beneficial to make sure we get the most from the emulator.
Tip
Emulators are particularly useful when you want to make sure that your app will work on hardware that you don't own. Also, learning about some of the latest features (as we will in this book) often needs the latest handset, and an emulator is the cost-effective way of following along with all the mini-apps without buying the latest phone.
In this chapter, we will do the following:
- Explore the file and folder structure of the Empty Activity project template
- See the difference between the Empty Activity and the Basic Activity templates
- Find out how to get the most from the emulator
This chapter will leave us in a good position to build and deploy multiple different layouts in the next chapter.
To get started, look at this annotated diagram of Android Studio, and then we will reacquaint ourselves with the parts we have already seen and look more deeply too, finding out about the parts that we have not discussed yet:
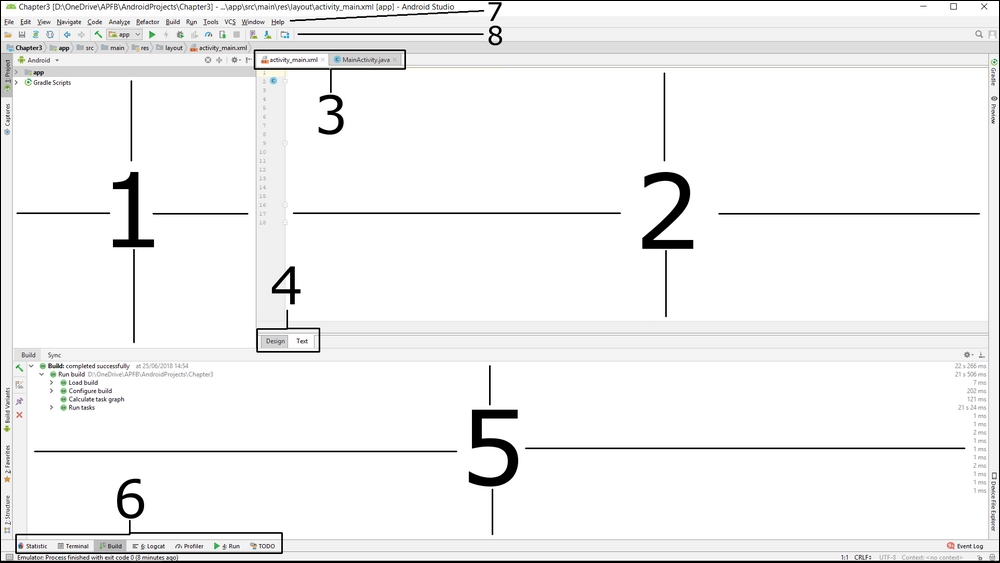
I thought it would be useful to formally point out and name the various parts of the Android Studio user interface so that I can refer to them by name rather than describing their location and showing images all the time. So, let's run through them from number 1:
- This is the Project window and will be the focus of much of this chapter. It enables us to explore the folders, code, and resources of the project, and is also referred to as the Project Explorer. Double-click a file here to open the file and add a new tab to area 3 on the diagram. The structure of the files and folders here closely resembles the structure that will eventually end up in the finished APK.
- This is the Editor window. As we have already seen, the editor window takes a few different forms depending on what it is we are editing. If we are editing Java, then we can see our code neatly formatted and ready for editing; if we are designing a UI, then it offers us either a visual editing view or a text/XML code view. You can also view and edit graphics and other files in this window.
- These tabs let us switch between the different files in our project. The Editor window will display the file we select here. We can add another tab to this section by double-clicking on it in the Project window.
- This allows us to switch between Design and Text (code) view on the file currently being edited.
- This window varies depending upon the option selected in part 6 of the diagram. Typically, in this book, we will switch between the Build window, to see that our project has been compiled and launched without errors, and the Logcat window, to view the debugging output and any errors or crash reports from our apps.
- This area of the UI is used to switch the different displays described in part 5.
Now we know how to unambiguously refer to the various parts of the UI, let's turn our attention to the Project/Project Explorer window.