
Welcome to the first of four major apps we will implement in this book. When we do these projects, we will do them more professionally than we do the smaller apps. We will use Android naming conventions, string resources, and proper encapsulation.
Sometimes, these things are overkill when trying to learn a new Android/Java topic, but they are useful and important to start using as soon as possible in real projects. They become like second nature, and the quality of our apps will benefit from it.
In Chapter 3, Exploring Android Studio and the Project Structure, we talked about using String resources instead of hardcoding text in our layout files. There were a few benefits to doing things this way, but it was also slightly long-winded.
As this is our first real-world project, it would be a good time to do things the right way so that we can get experience of doing so. If you want a quick refresher on the benefits of String resources, go back to Chapter 3, Exploring Android Studio and the Project Structure.
Naming conventions are the conventions or rules used for naming the variables, methods, and classes in our code. Throughout this book, we have loosely applied the Android naming conventions. As this is our first real-world app, we will be slightly stricter in applying these naming conventions.
Most notably, when a variable is a member of a class, we will prefix the name with a lowercase m.
Tip
More information about Android naming conventions and code style is available here: https://source.android.com/source/code-style.html.
In general, throughout this book, we will be relaxed about naming conventions and String resources when learning new things or building mini-apps, but apply them fairly strictly when building the main apps.
The fully completed app, including all the code and resources, can be found in the Chapter 18/Note to self folder within the download bundle. As we are implementing this app over the next five chapters, it will probably be useful to see the part-completed, runnable app at the end of every chapter as well. The part completed runnable apps and all their associated code and resources can be found in their respective folders:
Chapter 14/Note to self
Chapter 16/Note to self
Chapter 17/Note to self
Chapter 18/Note to self
Note
There is no Note to Self code in Chapter 15, Arrays, ArrayList, Map and Random Numbers, because although we will learn about topics we use in Note to Self, we don't make the changes to it until Chapter 16, Adapters and Recyclers.
Be aware that each of these is a separate, runnable project, and each is contained within its own unique Java package. This is so that you can easily see the app running as it would be having completed a given chapter. When copying and pasting the code, be careful not to include the package name because it will likely be different from yours and cause the code not to compile.
If you are following along and intend to build Note to Self from start to finish, we will build a project simply called Note to self. There is still nothing stopping you, however, from dipping into the code files of the projects from each chapter to do a bit of copying and pasting at any time. Just don't copy the package directive from the top of a file and be aware that at a couple points in the instructions, you will be asked to remove/replace the occasional line of code from a previous chapter.
So, even if you are copying and pasting more than you are typing the code, make sure to read the instructions in full and look at the code in the book for extra comments that might be useful.
In each chapter, the code will be presented as if you have completed the last chapter in full, showing code from earlier chapters, where necessary, as context for our new code.
Each chapter will not be solely devoted to the Note to Self app. We will learn about other, usually related things, and build some smaller/simpler apps as well. So, when we come to the Note to Self implementation, we will be technically prepared for it.
The following features and screenshots are from the completed app. It will obviously look slightly different to this at the various stages of development. Where necessary, we will look at more images, either as a reminder, or to see the differences throughout the development process.
The completed app will allow the user to tap the floating button in the bottom-right corner of the app to open a dialog window to add a new note. Here is the screenshot that shows this feature being highlighted:
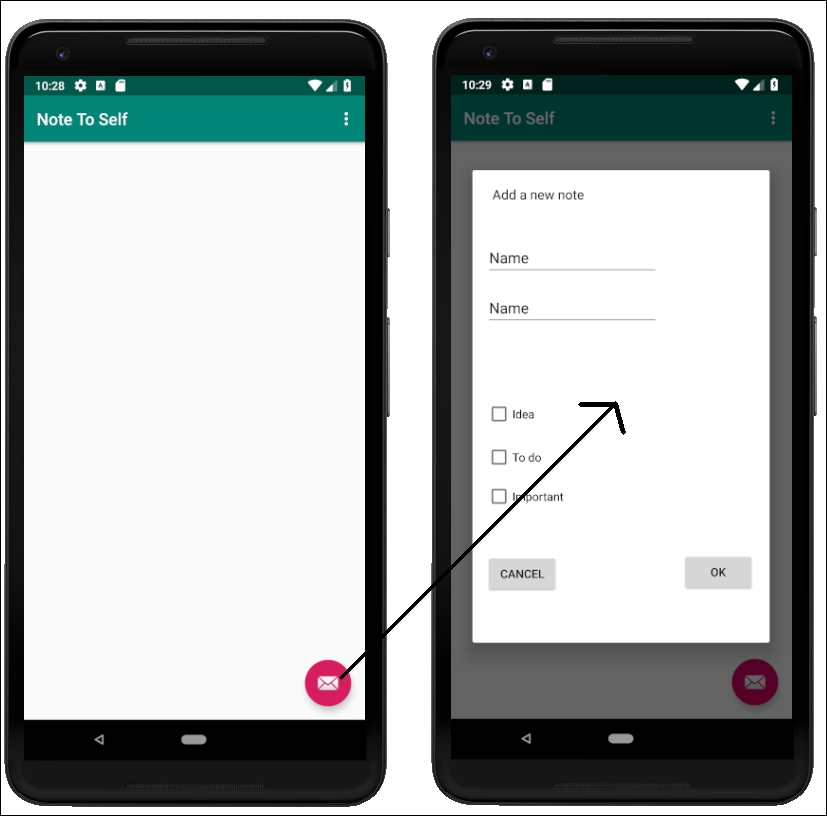
The screenshot on the left shows the button to tap, and the screenshot on the right shows the dialog window where the user can add a new note.
Eventually, as the user adds more notes, they will have a list of all the notes they have added on the main screen of the app, as shown in the following screenshot. The user can select whether the note is important, an idea, and/or a to do:

They will be able to scroll the list and tap on a note to see it shown in another dialog window dedicated to that note. Here is that dialog window showing a note:

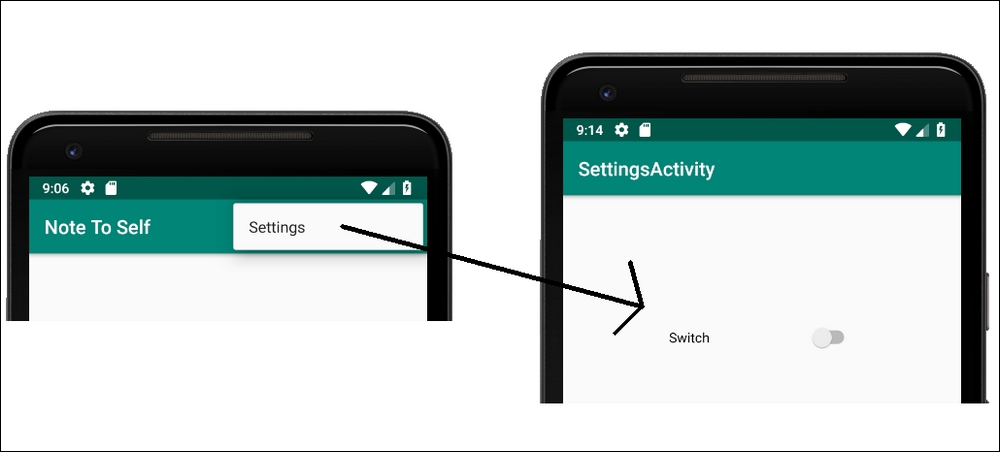
There will also be a simple (very simple) Settings screen that's accessible from the menu that will allow the user to configure whether the note list is formatted with a dividing line. Here is the settings menu option in action:
Now that we know exactly what we are going to build, we can go ahead and start to implement it.
Let's create our new project now. Call the project Note to Self. Use the Basic Activity template. Remember from Chapter 3, Exploring Android Studio and the Project Structure, that this template will generate a simple menu as well as a floating action button that are both used in this project. Leave the other settings at their defaults, including the options to generate a layout file, and make the app backward compatible.
Here, we will create all the String resources that we will refer to from our layout files instead of hardcoding the text property, as we have been doing up until now. Strictly speaking, this is a step that could be avoided. However, if you are looking to make in-depth Android apps sometime soon, you will benefit from learning to do things this way.
To get started, open the strings.xml file from the res/values folder in the project explorer. You will see the auto-generated resources. Add the following highlighted string resource. We will be using these in our app throughout the rest of the project. Add this code before the closing </resources> tag:
...
<resources>
    <string name="app_name">Note To Self</string>
    <string name="hello_world">Hello world!</string>
    <string name="action_settings">Settings</string>

    <string name="action_add">add</string>
    <string name="title_hint">Title</string>
    <string name="description_hint">Description</string>
    <string name="idea_text">Idea</string>
    <string name="important_text">Important</string>
    <string name="todo_text">To do</string>
    <string name="cancel_button">Cancel</string>
    <string name="ok_button">OK</string>

    <string name="settings_title">Settings</string>
    <string name="theme_title">Theme</string>
    <string name="theme_light">Light</string>
    <string name="theme_dark">Dark</string>

</resources>
Observe in the preceding code that each string resource has a name attribute that is unique and distinguishes it from all the others, as well as providing a meaningful and hopefully memorable clue as to the actual string value it represents. It is these name values that we will use to refer to the String that we want to use from within our layout files.
We will not need to revisit this file for the rest of the app.
This is the fundamental data structure of the app. It is a class we will write ourselves from scratch and has all the member variables we need to represent a single user note. In Chapter 15, Arrays, ArrayList, Map and Random Numbers, we will learn some new Java to see how we can let the user have dozens, hundreds, or even thousands of notes.
Create a new class by right-clicking on the folder with the name of your package, as usual, the one that contains the MainActivity.java file. Select New | Java class and name it Note. Left-click OK to create the class.
Add the following highlighted code to the new Note class:
public class Note {

    private String mTitle;
    private String mDescription;
    private boolean mIdea;
    private boolean mTodo;
    private boolean mImportant;

}
Notice that our member variable names are prefixed with m, as per the Android convention. Furthermore, we don't want any other class to access these variables directly, so they are all declared as private.
We will therefore need a getter and a setter method for each of our members. Add the following getter and setter methods to the Note class:
public String getTitle() {
   return mTitle;
}

public void setTitle(String mTitle) {
   this.mTitle = mTitle;
}

public String getDescription() {
   return mDescription;
}

public void setDescription(String mDescription) {
   this.mDescription = mDescription;
}

public boolean isIdea() {
   return mIdea;
}

public void setIdea(boolean mIdea) {
   this.mIdea = mIdea;
}

public boolean isTodo() {
   return mTodo;
}

public void setTodo(boolean mTodo) {
   this.mTodo = mTodo;
}

public boolean isImportant() {
   return mImportant;
}

public void setImportant(boolean mImportant) {
   this.mImportant = mImportant;
}
There is quite a lot of code in that previous list, but there is nothing complicated. Each of the methods has public access specified, so it can be used by any other class that has a reference to an object of type Note. Furthermore, for each variable, there is a method with the name get..., and a method with the name set.... The getters for the Boolean-type variables are named is.... This is a logical name if you think about it because the returned answer will be either true or false.
Each of the getters simply returns the value of the related variable, and each of the setters sets the value of the related variable to whatever value/parameter is passed in to the method.
Note
In fact, we should really enhance our setters a little by doing a bit of checking to make sure that the values passed in are within reasonable limits. For example, we might want to check on and enforce a maximum or minimum length for the String mTtile and String mDescription. We won't do so here, however, as this extraneousness will only serve to cloud the real learning objectives of this project.
Let's now design the layout of the two dialog windows.
Now, we will do something we have done many times before, but this time, for a new reason. As we know, we will have two dialog windows – one for the user to enter a new note, and one for the user to view a note of their choice.
We can design the layouts of these two dialog windows in the same way we have designed all our previous layouts. When we come to create the Java code for the FragmentDialog classes, we will then see how we incorporate these layouts.
First, let's add a layout for our "new note" dialog by following these steps:
- Right-click the
layoutfolder in the project explorer and select New | Layout resource file. Enterdialog_new_notein the File name: field and then start typingConstraifor the Root element: field. Notice that there is a drop-down list with multiple options that start with Constrai…. Select androidx.constraintlayout.widget.ConstraintLayout. Left-click OK to generate the new layout file that will have theConstraintLayouttype as its root element. - Refer to the target design in the following screenshot while following the rest of these instructions. I have photoshopped together the finished layout, including the constraints we will soon auto-generate, next to the layout, with the constraints hidden for a bit of extra clarity:

- Drag and drop a Plain Text (from the Text category) to the very top and left of the layout, and then add another Plain Text below it. Don't worry about any of the attributes for now.
- Drag and drop three CheckBox widgets from the Button category, one below the other. Look at the previous reference screenshot for guidance. Again, don't worry about any attributes for now.
- Drag and drop two Buttons onto the layout, the first directly below the last CheckBox from the previous step, and the second horizontally in line with the first Button, but hard over to the right of the layout.
- Tidy up the layout so that it resembles the reference screenshot as closely as possible, and then click the Infer Constraints button to fix the positions you have chosen.
- Now, we can set up all our
text,id,andhintproperties. You can do so by using the values from the following table. Remember, we are using our string resources for thetextandhintproperties:

|
Widget type |
Property |
Value to set to |
|---|---|---|
|
Plain Text (top) |
id |
|
|
Plain Text (top) |
hint |
|
|
Plain Text (bottom) |
id |
|
|
Plain Text (bottom) |
hint |
|
|
Plain Text (bottom) |
inputType |
|
|
CheckBox (top) |
id |
|
|
CheckBox (top) |
text |
|
|
CheckBox (middle) |
id |
|
|
CheckBox (middle) |
text |
|
|
CheckBox (bottom) |
id |
|
|
CheckBox (bottom) |
text |
|
|
Button (left) |
id |
|
|
Button (left) |
text |
|
|
Button (right) |
id |
|
|
Button (right) |
text |
|
We now have a nice neat layout ready for our Java code to display. Make sure to keep in mind the id of the different widgets because we will see them in action when we write our Java code. The important thing is that our layout looks nice and has an id for every relevant item so that we can get a reference to it.
Let's lay out our dialog box to "show note" to the user:
- Right-click the layout folder in the project explorer and select New | Layout resource file. Enter
dialog_show_notefor the File name: field and then start typingConstrai...for the Root element: field. Notice that there is a drop-down list with multiple options that start with Constrai…. Select androidx.constraintlayout.widget.ConstraintLayout. Left-click OK to generate the new layout file that will have theConstraintLayouttype as its root element. - Refer to the target design in the following screenshot, while following the rest of these instructions. I have photoshopped together the finished layout, including the constraints we will soon auto-generate next to the layout, with the constraints hidden for a bit of extra clarity:

- First of all, drag and drop three TextView widgets, vertically aligned across the top of the layout.
- Next, drag and drop another TextView widget just below the center of the three previous
TextView widgets. - Add another TextView widget just below the previous one, but over to the left.
- Now, add a Button horizontally and centrally, and near the bottom of the layout. This is what it should look like so far:

- Tidy up the layout so that it resembles the reference screenshot as closely as possible, and then click the Infer Constraints button to fix the positions you have chosen.
- Configure the attributes from the following table:
Widget type
Attribute
Value to set to
TextView (top-left)
id
textViewImportantTextView (top-left)
text
@string/important_textTextView (top-center)
id
textViewTodoTextView (top-center)
text
@string/todo_textTextView (top-right)
id
textViewIdeaTextView (top-right)
text
@string/idea_textTextView (center, second row)
id
txtTitleTextView (center, second row)
textSize
24spTextView (last one added)
id
txtDescriptionButton
id
btnOKButton
text
@string/ok_button
Now, we have a layout we can use for showing a note to the user. Notice that we get to reuse some string resources. The bigger our apps get, the more beneficial it is to do things this way.
Now that we have a design for both of our dialog windows ("show note" and "new note"), we can use what we know about the FragmentDialog class to implement a class to represent each of the dialog windows that the user can interact with.
We will start with the "new note" screen.
Create a new class by right-clicking the project folder that has all the .java files and choose New | Java class. Name the class DialogNewNote.
First, change the class declaration and extend DialogFragment. Also override the onCreateDialog method, which is where all the rest of the code in this class will go. Make your code the same as the following in order to achieve this:
public class DialogNewNote extends DialogFragment {

   @Override
   public Dialog onCreateDialog(Bundle savedInstanceState) {

         // All the rest of the code goes here

   }
}We temporarily have an error in the new class because we need a return statement, but we will get to that in just a moment.
In the next block of code, which we will add in a moment, first we declare and initialize an AlertDialog.Builder object as we have done before when creating dialog windows. This time, however, we will use this object much less than previously.
Next, we initialize a LayoutInflater object, which we will use to inflate our XML layout. "Inflate" simply means to turn our XML layout into a Java object. Once this has been done, we can then access all our widgets in the usual way. We can think of inflater.inflate replacing setContentView for our dialog. In the second line, we do just that with the inflate method.
Add the three lines of code we have just discussed:
AlertDialog.Builder builder =
   new AlertDialog.Builder(getActivity());

LayoutInflater inflater =
   getActivity().getLayoutInflater();

View dialogView =
   inflater.inflate(R.layout.dialog_new_note, null);
We now have a View object called dialogView that has all the UI from our dialog_new_note.xml layout file.
Immediately after the previous block, we will add the code that we will talk about in a moment.
This code will get a reference to each of the UI widgets in the usual way. Many of the objects in the forthcoming code are declared final because they will be used in an anonymous class and, as we learned previously, this is required. Remember that it is the reference that is final (cannot change); we can still change the objects on the heap to which they refer.
Add the following code just after the previous block of code:
final EditText editTitle = (EditText) dialogView.findViewById(R.id.editTitle);
final EditText editDescription = (EditText) dialogView.findViewById(R.id.editDescription);
final CheckBox checkBoxIdea = (CheckBox) dialogView.findViewById(R.id.checkBoxIdea);
final CheckBox checkBoxTodo = (CheckBox) dialogView.findViewById(R.id.checkBoxTodo);
final CheckBox checkBoxImportant = (CheckBox) dialogView.findViewById(R.id.checkBoxImportant);
Button btnCancel = (Button) dialogView.findViewById(R.id.btnCancel);
Button btnOK = (Button) dialogView.findViewById(R.id.btnOK);
In the next code block, we will set the message of the dialog using builder. Then, we will write an anonymous class to handle clicks on btnCancel. In the overridden onClick method, we will simply call dismiss(), which is a public method of DialogFragment, to close the dialog window. This is just what we need should the user click Cancel.
Add the following code that we have just discussed:
builder.setView(dialogView).setMessage("Add a new note");

// Handle the cancel button
btnCancel.setOnClickListener( new View.OnClickListener() {
   @Override
   public void onClick(View v) {
         dismiss();
   }
});
Now, we will add an anonymous class to handle what happens when the user clicks the OK button (btnOK).
First, we create a new Note called newNote. Then, we set each of the member variables from newNote to the appropriate content of the form.
After this, we do something new. We create a reference to MainActivity using the getActivity method and then use that reference to call the createNewNote method in MainActivity.
The argument sent in this method is our newly initialized newNote object. This has the effect of sending the user's new note back to MainActivity. We will see what we do with this later in this chapter.
Finally, we call dismiss to close the dialog window.
Add the code we have been discussing after the last block:
btnOK.setOnClickListener(new View.OnClickListener() {

   @Override
   public void onClick(View v) {

         // Create a new note
         Note newNote = new Note();

         // Set its variables to match the
         // user's entries on the form
         newNote.setTitle(editTitle.
                getText().toString());

         newNote.setDescription(editDescription.
                getText().toString());

         newNote.setIdea(checkBoxIdea.isChecked());
         newNote.setTodo(checkBoxTodo.isChecked());
         newNote.setImportant(checkBoxImportant.
                isChecked());

         // Get a reference to MainActivity
         MainActivity callingActivity = (
                MainActivity) getActivity();

         // Pass newNote back to MainActivity
         callingActivity.createNewNote(newNote);

         // Quit the dialog
         dismiss();
   }
});

return builder.create();
That's our first dialog done. We haven't wired it up to appear from MainActivity yet and we need to implement the createNewNote method too. We will do this right after we create the next dialog.
Create a new class by right-clicking the project folder that contains all the .java files and choose New | Java class. Name the class DialogShowNote.
First, change the class declaration, extend DialogFragment, and override the onCreateDialog method. As most of the code for this class goes in the onCreateDialog method, implement the signature and empty body, as shown next. We will revisit this in a minute.
Notice that we declare a member variable, mNote, of the Note type. Also add the sendNoteSelected method and its single line of code that initializes mNote. This method will be called by MainActivity and it will pass in the Note object the user has clicked on.
Add the code we have just discussed and then we can look at and code the details of onCreateDialog, as follows:
public class DialogShowNote extends DialogFragment {

    private Note mNote;

    @Override
    public Dialog onCreateDialog(Bundle savedInstanceState) {

        // All the other code goes here


    }


    // Receive a note from the MainActivity
    public void sendNoteSelected(Note noteSelected) {
        mNote = noteSelected;
    }

}Coming up next, as usual, we declare and initialize an instance of AlertDialog.Builder. Next, as we did for DialogNewNote, we declare and initialize a LayoutInflater and then use it to create a View object that has the layout for the dialog. In this case, it is the layout from dialog_show_note.xml.
Finally, in the following block of code, we get a reference to each of the UI widgets and set the text attributes on txtTitle and textDescription from the appropriate member variables of mNote, which was initialized in sendNoteSelected.
Add the code we have just discussed within the onCreateDialog method:
// All the other code goes here
AlertDialog.Builder builder =
      new AlertDialog.Builder(getActivity());

LayoutInflater inflater =
      getActivity().getLayoutInflater();

View dialogView =
      inflater.inflate(R.layout.dialog_show_note, null);

TextView txtTitle =
       (TextView) dialogView.findViewById(R.id.txtTitle);

TextView txtDescription =
       (TextView) dialogView.findViewById(R.id.txtDescription);

txtTitle.setText(mNote.getTitle());
txtDescription.setText(mNote.getDescription());

TextView txtImportant =
       (TextView) dialogView.findViewById(R.id.textViewImportant);

TextView txtTodo =
       (TextView) dialogView.findViewById(R.id.textViewTodo);

TextView txtIdea =
(TextView) dialogView.findViewById(R.id.textViewIdea);The following code is also in the onCreateDialog method. It checks whether the note being shown is "important" and then shows or hides the txtImportant TextView accordingly. We then do exactly the same for txtTodo and txtIdea.
Add the following code after the previous block of code, while still in the onCreateDialog method:
if (!mNote.isImportant()){
   txtImportant.setVisibility(View.GONE);
}

if (!mNote.isTodo()){
   txtTodo.setVisibility(View.GONE);
}

if (!mNote.isIdea()){
   txtIdea.setVisibility(View.GONE);
}
All we need to do now is dismiss (close) the dialog window when the user clicks the OK button. This is done with an anonymous class, as we have seen several times already. The onClick method simply calls the dismiss method that closes the dialog window.
Add the following code to the onCreateDialog method after the previous block of code:
Button btnOK = (Button) dialogView.findViewById(R.id.btnOK);

builder.setView(dialogView).setMessage("Your Note");

btnOK.setOnClickListener(new View.OnClickListener() {
   @Override
   public void onClick(View v) {
         dismiss();
   }
});

return builder.create();We now have two dialog windows ready to roll. We just have to add some code to MainActivity to finish the job.
Add a new temporary member variable just after the MainActivity declaration. This won't be in the final app – it is just so that we can test our dialog windows as soon as possible:
// Temporary code
Note mTempNote = new Note();
Now, add this method so that we can receive a new note from the DialogNewNote class:
public void createNewNote(Note n){
   // Temporary code
   mTempNote = n;
}
Now, to send a note to the DialogShowNote method, we need to add a button with the id button to the layout_main.xml layout file.
Just so that it is clear what this button is for, we will change its text attribute to Show Note, as follows:
- Drag a Button onto
layout_main.xmland configure itsidasbuttonandtextasShow Note. - Click the Infer Constraints button so that the button stays where you put it. The exact position of this button is not important at this stage.
Now, in the onCreate method, we will set up an anonymous class to handle clicks on our temporary button. The code in onClick will do the following:
- Create a new
DialogShowNoteinstance simply calleddialog. - Call the
sendNoteSelectedmethod ondialogto pass in as a parameter ourNoteobject,mTempNote. - Finally, it will call
show,which breathes life into our new dialog.
Add the code just described to onCreate:
// Temporary code
Button button = (Button) findViewById(R.id.button);
button.setOnClickListener(new View.OnClickListener() {
   @Override
   public void onClick(View v) {

         // Create a new DialogShowNote called dialog
         DialogShowNote dialog = new DialogShowNote();

         // Send the note via the sendNoteSelected method
         dialog.sendNoteSelected(mTempNote);

         // Create the dialog
         dialog.show(getSupportFragmentManager(), "123");
   }
});We can now summon our DialogShowNote dialog window at the click of a button. Run the app and click the SHOW NOTE button to see the DialogShowNote dialog with the dialog_show_note.xml layout, as demonstrated in the following screenshot:

Admittedly, this is not much to look at considering how much coding we have done in this chapter, but when we get the DialogNewNote working, we will see how MainActivity interacts and shares data between the two dialogs.
Let's make the DialogNewNote dialog useable.
This is going to be really easy. The floating action button was provided for us in the layout. By way of a reminder, this is the floating action button:

It is located in the activity_main.xml file. This is the XML code that positions and defines its appearance:
<com.google.android.material.floatingactionbutton
.FloatingActionButton

   android:id="@+id/fab"
   android:layout_width="wrap_content"
   android:layout_height="wrap_content"
   android:layout_gravity="bottom|end"
   android:layout_margin="@dimen/fab_margin"
   app:srcCompat="@android:drawable/ic_dialog_email" />
Android Studio has even provided an anonymous class to handle clicks on the floating action button. All we need to do is add some code to the onClick method of this already provided class and we can use the DialogNewNote class.
The floating action button is usually used for a core action of an app. For example, in an email app, it would probably be used to start a new email or, in a note-keeping app, it would probably be used to add a new note. So, let's do that now.
In MainActivity.java, find the auto-generated code provided by Android Studio in the MainActivity.java class in the onCreate method. Here it is in its entirety:
fab.setOnClickListener(new View.OnClickListener() {
   @Override
   public void onClick(View view) {
             Snackbar.make(view, "Replace with your own action",
                          Snackbar.LENGTH_LONG)
                          .setAction("Action", null).show();

   }
});
In the previous code, note the highlighted line and delete it. Now, add the following code in place of the deleted code:
DialogNewNote dialog = new DialogNewNote();
dialog.show(getSupportFragmentManager(), "");
The new code creates a new dialog window of the DialogNewNote variety and then shows it to the user.
We can now run the app. Tap the floating action button and add a note along the lines of the following screenshot:

Then, we can tap the Show Note button to see it in a dialog window, like in the following screenshot:

Be aware that if you add a second note, it will overwrite the first because we only have one Note object. We need to learn some more Java in order to solve this problem.