Chapter 5: Farm and Services Configuration
SharePoint's key to success is the services it provides. In this chapter, we'll learn how to make all the necessary performance tweaks, as well as how to configure the services related to logging, monitoring, and integrating services that support content, plus other application integrations. SharePoint, as a product, changes with every version, so expect to see some changes in terms of how these services are configured and supported.
Security will also be reviewed in this chapter: besides the services SharePoint provides, we need to look at the service accounts that support them. Application pool best practices and other areas that can be configured will also be covered; there has always been some speculation on the best practices surrounding these areas of security and application pools.
Knowing which services support which resources of the platform will also be mentioned in this chapter. We need to understand how to use our MinRoles as we add more servers to the farm, as well as what services those applications support. We also need to know how to make the best choices when adding these server roles and resources to the environment. To do this, we need to follow the design for the farm we finished and follow best practices.
The following topics will be covered in this chapter:
- Configuring SQL Server services
- Configuring SharePoint services
- Antivirus and security configurations
- Creating service applications
- SharePoint MinRole resources
- Understanding the Distributed Cache service
Let's get started!
Technical requirements
For you to understand this chapter and the knowledge provided, you will need the following:
- 2-3 years of experience using PowerShell and SharePoint
- 2-3 years of experience using SQL Server
- A good understanding of the SharePoint architecture
- The link to this book's GitHub repository: https://github.com/PacktPublishing/Implementing-Microsoft-SharePoint-2019
Configuring SQL Server services
In Chapter 4, Installation Concepts, we learned how to install HOSTs and VMs in order to support our environment before installing the main applications for our farm configuration on SQL Server 2017 and SharePoint Server 2019. Although we have done this, there is so much more to do, as we will see in this chapter and others to come. We still have some server configurations to finish and services to configure in the farm before we can create some web applications and test them.
SQL Server is the main component and the foundation of the SharePoint Server Farm. Without it, we cannot support SharePoint in any way. So, since this server supports all the data that will be used for configuration, services, content, and security, we really need to make sure that this part of our farm is performing up to par and has been configured to support the farm through growth, redundancy, and performance.
We have compiled a list of areas we want to change and/or update as part of our SQL Server configuration that help us create databases and improve their perform on existing databases. These changes must be made so that there's better support for SharePoint Farm. This is because SharePoint uses SQL Server as its central repository for configuration, services, and content. Please make the changes mentioned in the following subsections while ensuring they support the servers you have built as part of your farm.
SQL properties
Now that we have successfully installed SQL Server, we need to check its configuration. Start by right-clicking the server's name:

Figure 5.1 – SQL Activity Monitor
Selecting Properties in SQL Server Management Studio will present the property settings for the server:
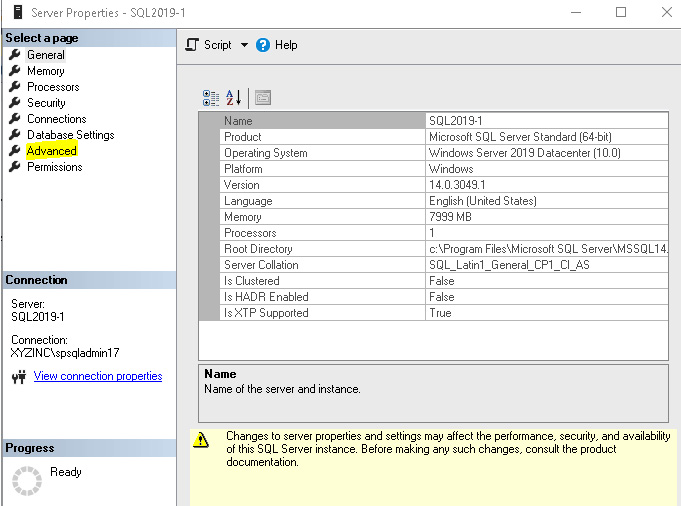
Figure 5.2 – SQL Server properties
These settings show how SQL Server has been configured. Note that some of these properties need to be changed for SQL Server to support SharePoint. We will look at these properties next.
SQL Server MAXDOP settings
As part of SQL Server's configuration, SharePoint is only supported when SQL Server is being used as the backend. It is also a best practice to set the MAX Degree of Parallelism (MAXDOP) on any SQL Server to 1. This setting is recommended by Microsoft for SQL servers that support SharePoint Server. As stated in prior chapters, Microsoft tests their products and tunes them to ensure they provide the best performance. Setting MAXDOP to 1 ensures that queries and calls from SharePoint are processed efficiently. This setting is required, and SharePoint will update the SQL configuration when you install the product. We must do this before we start our installation.
Use the following commands to change the value of SQL Server once it has been installed. In newer versions of SharePoint, this setting is set automatically, but if you see that it is not set to 1, please do so using the following SQL query:
sp_configure 'show advanced options', 1;
GO
RECONFIGURE WITH OVERRIDE;
GO
sp_configure 'max degree of parallelism', 1;
GO
RECONFIGURE WITH OVERRIDE;
GO
Within the configuration, please make sure that the following areas have been updated and set to support SharePoint Server 2016 and the performance of SQL Server:

Figure 5.3 – MAXDOP setting in Server Properties
Setting SQL file default locations
To ensure we remain consistent with the configuration that was explained in Chapter 2, Planning and Architecture, we need to make sure we define the general areas of our SQL configuration, as shown in the following screenshot. Typically, you will not use this standard configuration, especially if you're following my guidance of using LUNNS for each type of database SharePoint creates. This is typically done using a manual database creation process so that you can set the locations of the databases and logs. This configuration will give you better performance, and using separate drives gives you separation of those processes as well. As we mentioned previously, the following screenshot shows the general areas of your SQL configuration:

Figure 5.4 – Default locations
Set the default locations for the Data files (.mdf files) and Log files (.ldf files). These files need to be separated. Here, the best option is to split the files up by database type, as discussed in the SQL Server Preparation. The backup location should be set using the default setting for any Maintenance Plans you plan to use within SQL Server. If you are using a third-party application to manage your databases, this setting will not matter.
Instant file initialization
We need to make changes to the model database so that it has enough space to create templates for our newly created databases. These changes will help us create databases faster and bring a different level of performance to adding new clients that would like to have separation within content databases:
Alter Database [model] MODIFY FILE (NAME = modeldev, SIZE = 150mb, MAXSIZE = Unlimited
Once you have run this SQL command, you will see the following message, stating that you have successfully applied the setting:

Figure 5.5 – Commands completely successfully message
Now that we have updated the property for the model database, we will review our authentication method.
Reviewing our authentication method
When checking our properties, we will notice that we can set the authentication of SQL Server in two ways; that is, Windows Authentication mode or SQL Server and Windows Authentication mode:

Figure 5.6 – Selecting an authentication method in SQL Server
Windows Authentication mode should be the option that's highlighted. SQL Server mode should not be included in our configuration for SharePoint server since the product is fully integrated with Active Directory. Allowing connections with SQL Server will only bring about vulnerabilities in terms of security.
Our SQL configuration is now complete. If there are other integrations and settings you need to work on so that SQL Server supports SharePoint, please complete them now.
Configuring SharePoint Services
Configuring SharePoint Services is the first thing we must do before creating web applications that hold content for our users. In this section, we will start adding services to our farm and configuring areas for monitoring and logging. The following exercises will help us complete all the preparation we need to do to support the creation of web applications that serve our user's communities. This will allow them to start using the farm to share content and use the services provided.
There are different methods you can use to configure your SharePoint farm; that is, PowerShell, GUI, or AutoSPInstaller. Figure out what works best for you. In this book, we will be using a combination of PowerShell and GUI to show you how things are done from an illustrative perspective, though scripts that show you how to do this manually will also be provided. The reason we will be using both is so that those who may be new to SharePoint can follow along, especially if they are not very familiar with PowerShell.
So, let's get right to it!
Setting server logging locations
To help manage the disk space resources we have created for our servers, we must make sure that we point all growing files to a location that can handle the number of files that are generated by logging. The following areas will be moved to a new location within the server for growth purposes:
- IIS
- Diagnostic Logging
- Usage Logging
- Index (see Search configuration for details)
IIS is the service that runs SharePoint websites on the server and creates logs as part of the service. When you log into the IIS Manager, you will see the sites and application pools that are available and have been created, as shown in the following screenshot:

Figure 5.7 – IIS Application Pools window
The preceding screenshot shows what the application pools look like after a fresh install of SharePoint 2019. The SharePoint Web Services application pool should not be started, which is by design. When you select Sites, you will also see a list of sites that were created when you created your farm:

Figure 5.8 – IIS Default Web Site view
The preceding screenshot shows what you will see once you have performed a fresh installation of SharePoint on your first server. The first server will always include Central Administration as it is the key to setting up and configuring the rest of your SharePoint environment.
To get to the logging area of the IIS service, please click on the server's name and then select Logging from the list of available configuration areas in the middle of the screen:

Figure 5.9 – IIS Logging settings
Since we are SharePoint administrators, there is also a tool called ULS Viewer we can use that can help with reading logs and troubleshooting issues that may arise. Please use this tool to view logs as it brings added clarity, along with the functionality to manage logs, considering how large SharePoint logs tend to be.
While we're configuring logging, we want to make sure that all the logs are collected by Site, which is the default option. The Directory location needs to be changed here. As shown in the preceding screenshot, I have changed mine to reflect the second drive on my server. This should be done on every server in the farm, including SQL, to make sure you set the location to a drive that has the capacity to hold the log. After setting the location of the file, you can set your preferences in terms of Log Event Destination and Schedule. You can also customize the fields you would like to see in your logs since you may want to add more detail to your log captures.
Select the information you would like to collect, as well as the schedule, from the following configuration parameters:

Figure 5.10 – Log Event Destination and Log File Rollover settings
I have set Schedule to Daily so that I get a daily log of the site for troubleshooting if needed. The daily log file's size depends on the user traffic. So, the more users you have, the bigger these files become. Also, remember that these logs are kept by site. You can always change this if you like to place them in one server log file. However, this is not something I recommend.
If you click on the Select Fields button on the main screen, you will be brought to the following selection screen:

Figure 5.11 – Selecting IIS Logging Fields
In the Standard Fields section of the window, you can set which fields you would or wouldn't like to be displayed in your logs. If you would like to log more information, you can also use the Add Field option to include fields that may be missing based on your preference. Again, these fields help you troubleshoot issues that may arise during the farm's existence.
Next, we will learn how to create the state service and logging service. The state service serves as a shared service and is used by some components to store temporary data in SQL databases related to HTTP requests. InfoPath Forms Services requires the state service to be available for it to function correctly. The logging service is used to collect logs about the SharePoint environment for troubleshooting and finding issues within the farm.
Creating the state service
The state service is used as a connectivity service within SharePoint that supports publishing, searching crawl and query components, the Visio service, and various other services within SharePoint. This service is one of the first services I install because it is a foundation service you do not want to forget.
To create this service, you will need to use PowerShell:
$db = New-SPStateServiceDatabase -Name "XYZ State Service Application"
$sa = New-SPStateServiceApplication - Name "XYZ_State_Service" -Database $db
New-SPStateServiceApplicationProxy -Name "XYZ State Service Application Proxy" -ServiceApplication $sa
-Default Proxy Group
Always run PowerShell using the run as administrator option so that you are using your administrative privileges while running commands and scripts. If you do not, your process will fail.
Creating SharePoint logging services
Central Administration, as its name suggests, is an administrative website that controls all the servers that have been configured as part of the SharePoint farm. When you set logging locations within the Central Administration site, those locations need to be the same on all servers since the location is looked for on all servers associated with the farm. If you change any locations during the farm's existence, please remember to also make those changes and folder updates on all servers.
Let's install the logging services within SharePoint by performing the following steps:
- Navigate to the Central Administration link on your server, right-click it, and run as administrator. Then, click the Start button and right-click the SharePoint Central Administration icon and run as administrator. Never open this area without running as administrator. You can also set this up on your taskbar and run as administrator as well. You will see the following screen, which is your Central Administration site:
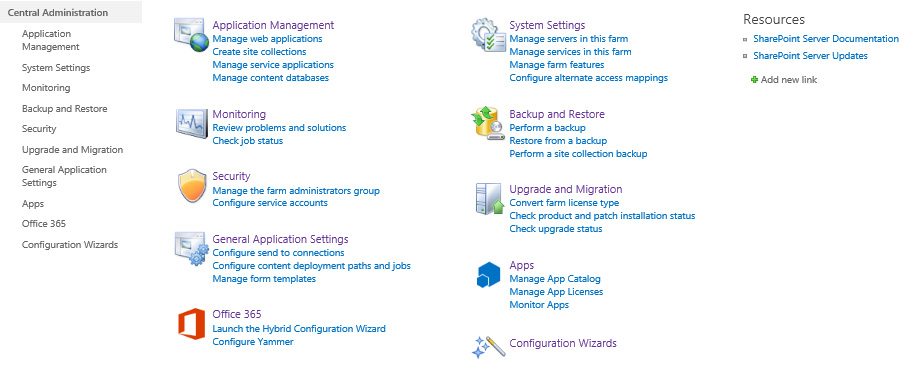
Figure 5.12 – Central Administration site
There are lots of areas within the site. However, we will only be working on a few of these in this book.
- We will start with the Monitoring area of this menu. Click on the Monitoring link in the Central Administration site:

Figure 5.13 – Monitoring configuration
A menu will appear for working with the monitoring aspects of the farm's configuration.
- Click on Configure diagnostic logging. In this area, we want to select All Categories and click the box next to the selection we want to hone in on during our log capture. Find out more about these categories and figure out the areas you are looking to target as part of your troubleshooting efforts:

Figure 5.14 – Diagnostic logging configuration – I
Clicking on All Categories will select all the areas within the server.
- If you have specific areas you would like to monitor, you can select them individually as well:

Figure 5.15 – Diagnostic logging configuration – II
- On the same screen, after selecting your categories, we need to set the event log. Since we have just installed SharePoint, there is no need for detailed logging because we are not troubleshooting. So, for Least critical event to report to the event log and Least critical event to report to the trace log, select None.
As far as Event Log Flood Protection goes, you can choose to use this to suppress repeating events. This is your call. It does help with limiting the number of events you pick up in the Windows event log, but some people like it so that they know that the event is present.
- Now, we need to set the path of our Trace Log. We need to set the location of the second drive so that these logs can grow and not jeopardize our operating system.
How many days do you want to keep your logs for? Again, this is your call. Set this setting based on the amount of days you may need to have these logs available. If you have lots of disk space, set the logs for longer periods.
Restrict the space on the trace logs using the next configuration tab. I have it set this to 1 GB. This is great for getting a good chunk of data but not having the system strain to open it on the server or transfer it to others.
- We will now configure usage logging. Click on Configure usage and health data collection under the Reporting section:
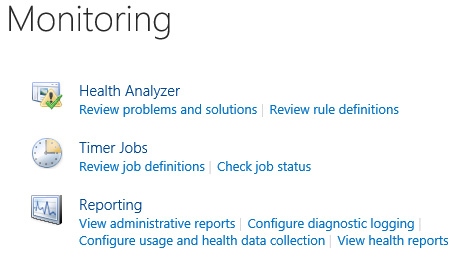
Figure 5.16 – Monitoring configuration page
- At the top of the configuration screen, please check the Enable usage data collection box:
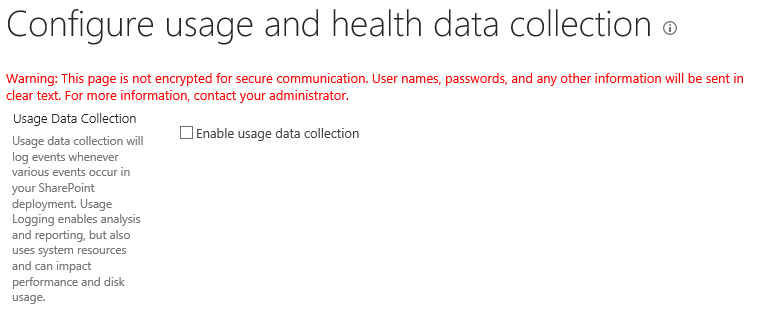
Figure 5.17 – Enable usage data collection box
- Choose all the events you would like to log:

Figure 5.18 – Event Selection
Most of these events should make sense to you, though some may not. Which ones you choose to log is up to you.
- Select a location where the log file will exist. We will house these files in the folder on the second drive for our servers:

Figure 5.19 – Selecting a log location
- Please connect to the SQL alias database and then add the name of the database you would like to use. Remember to use the correct naming convention for your databases so that they are uniform:

Figure 5.20 – Adding a database name
- Click OK to finish.
With that, we have finished setting up our server login locations. Next, we will move on and understand the antivirus and security configurations within SharePoint Server 2019. These will help protect our farm from viruses and vulnerabilities.
Antivirus and security configurations
Antivirus and security help protect content, as well as block content that could potentially be damaging or lead to issues due to files containing viruses. These files can also create vulnerabilities in a SharePoint farm. Some of the areas that we need to look at are related to antivirus and security that protect us from threats from uploaded files, as well as files that can be uploaded onto our sites. The main areas for concern here are as follows:
- Antivirus settings
- Web Part Security
- Blocked File Types
Let's look at these areas in detail.
Antivirus settings
The antivirus settings are configured in the farm, while Web Part Security and Blocked File Types are set at the web application level. These settings should be taken very seriously. Since antivirus is usually related only to the server and its protection, antivirus is typically overlooked and is missed out during the installation process. Another reason for this being missed out on is because almost every admin I have met thinks that having antivirus on all their PCs and servers secures their content from viruses. From my experience, there have been instances where I have seen infected files get into a SharePoint site.
We should always make sure we configure the farm so that it's not vulnerable to the many different types of attacks that can be performed, and also secure it from all types of vulnerabilities. All incidents are created by overlooking steps in the configuration process, and deeming them as minimal can cause incidents. These types of vulnerabilities can be brought on easily, especially when you're hosting a SharePoint environment where the user does not understand security and you do not have control of the users' desktop.
As shown in the following screenshot, antivirus can be set in a few different ways, but again, you must have a product that integrates fully with SharePoint for these settings to work:

Figure 5.21 – Antivirus settings
This is not only the virus scanning tool on the server, but it is an integrated component that works within sites so that files can be scanned.
The ideal configuration would be to install an antivirus scanner that works when integrated with SharePoint. This will allow your farm configuration to scan files when they're either uploaded or downloaded. Fortunately, there are a few top antivirus companies that offer this integration; previously, there was only Microsoft Forefront Server integration, which scanned files within SharePoint lists and libraries. To benefit from these features, you had to install and integrate this product.
SharePoint antivirus protection also occurs at the file level. Here, we need to make sure we not disrupt SharePoint and its file management process. For the following list of folders, we will need to make some exclusions. Configure all the SharePoint Server antivirus software so that the following folders and subfolders are excluded from antivirus scanning:
- Drive:Program FilesCommon FilesMicrosoft SharedWeb Server Extensions
If you do not want to exclude the whole Web Server Extensions folder from antivirus scanning, you can just exclude the following folders:
- Drive:Program FilesCommon FilesMicrosoft SharedWeb Server Extensions16
- Drive:Program FilesCommon FilesMicrosoft SharedWeb Server Extensions16Logs
- Drive:Program FilesMicrosoft Office Servers16.0DataOffice ServerApplications
- Drive:WindowsMicrosoft.NETFramework64v4.0.30319Temporary ASP.NET Files
- Drive:WindowsMicrosoft.NETFramework64v4.0.30319Config
- Drive: UsersServiceAccountAppDataLocalTempWebTempDir
Note: The WebTempDir folder is a replacement for the FrontPageTempDir folder.
- Drive:ProgramDataMicrosoftSharePoint
- Drive:Usersaccount that the search service is running asAppDataLocalTemp
Note: The search account creates a folder in the Gthrsvc_spsearch4 Temp folder, which must be periodically written to.
- Drive:WINDOWSSystem32LogFiles
- Drive:WindowsSyswow64LogFiles
Note that if you use a specific account for SharePoint services or application pools identities, you may also have to exclude the following folders:
- Drive:UsersServiceAccountAppDataLocalTemp
- Drive:UsersDefaultAppDataLocalTemp
- Any location where you decided to store the disk-based binary large object (BLOB) cache (for example, C:Blobcache).
- Drive:inetpubwwwrootwssVirtualDirectories and all the folders inside it
- Drive:inetpub empIIS Temporary Compressed Files
SQL Server's antivirus settings will need to be configured in the same way on each SQL Server that is being used within the environment. So, if you have three nodes, all three servers would need this configuration on all servers. The exclusions needed for these servers are listed here.
As a best practice and to avoid downtime, please configure your SQL Server antivirus software settings so that the following file locations are not scanned. Doing this will help improve the performance of the server. This will also alleviate any files being locked while the SQL Server service is working. If some of these file types become infected, the antivirus software will not be able to detect this:
- SQL Server data files (.mdf, .ndf, .ldf files)
- SQL Server backup files (.bak and .trn files)
- Full-text catalog files
- Trace files (.trc files)
- SQL audit files for SQL Server 2008 or later versions (.sqlaudit files)
- SQL query files (.sql files)
- The directory that holds Analysis Services data
- The directory that holds Analysis Services temporary files, which are used during Analysis Services processing
- Analysis Services backup files
- The directory that holds Analysis Services log files
- Directories for any Analysis Services partitions that are not stored in the default data directory
- Filestream data files (SQL 2008 and later versions)
- Remote Blob Storage files (SQL 2008 and later versions)
- The directory that holds Reporting Services temporary files and logs (RSTempFiles and LogFiles)
The following are the processes you must exclude from virus scanning:
- %ProgramFiles%Microsoft SQL Server<Version.><Instance Name>MSSQLBinnSQLServr.exe
- %ProgramFiles%Microsoft SQL Server<Version>.<Instance Name>Reporting ServicesReportServerBinReportingServicesService.exe
- %ProgramFiles%Microsoft SQL ServerMSAS13.<Instance Name>OLAPBinMSMDSrv.exe
Setting the antivirus on our server is very important and you will face issues if you do not set these areas correctly. There are many areas that need to be excluded, but it is worth configuring these areas so that they support your farm and its services. They will help the server run as it should without hindering performance and availability.
There are also other ways to protect data, including using security methods such as Data Compliance Protection in the cloud and Data Compliance Site Templates, both of which are available within SharePoint. You can find out more by researching these topics online. We will go over some of the aspects of these features later in this book.
Web Part Security
Web Part Security is the next area of concern we must tackle. We won't be configuring this at the moment since we do not have a web application for users yet. However, I am mentioning this here because this is part of how we set security within our sites. The following screenshot shows the available settings for Web Part Security:

Figure 5.22 – Security For Web Part Pages
Web Part Security can be set either in the menu under Security in the Central Administration site or via web application using the application management area within the Central Administration site. Both options work and are associated with a web application when you choose to configure this setting. The big settings to look at here are the ones that prevent users from creating web part connections within the web application, allowing user access to the Online Web Part Gallery, and allowing contributors to add or edit scriptable Web Parts.
These are choices you should make based on the content within your web application. Within production environments, I would not want any of these settings to be allowed. The last thing you want is a user to make changes to a site that can affect the way it performs, or what the site is actually doing from an application standpoint. For example, you could have connected web parts in an application so that they display filtered content in another web part, but now you have an issue because one of the users made a change to the web part connection. Avoid these scenarios by limiting these areas, especially in production environments.
Block File Types
Configuration settings help prevent certain document extensions from being uploaded to SharePoint sites. This is great because some viruses run within certain types of files, and we can prevent those files from being uploaded programmatically using these settings. As shown in the following screenshot, in the Blocked File Types area, we would type the names of each extension; for example, .docx:
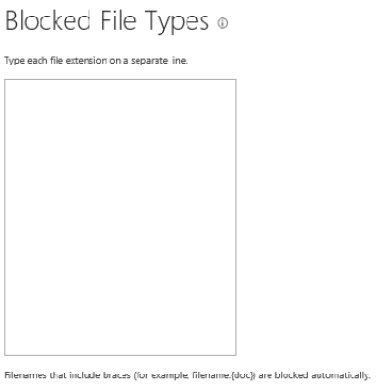
Figure 5.23 – Blocked File Types
We are only using .docx files as an example here; we never want to block Word files. The following is a list of best practices when it comes to extensions:

Figure 5.24 – Best practices for extensions
Blocked File Types are powerful, especially when you may not want certain types of content in your farm. This helps ensure that files with certain extensions stay out of our libraries and do not get uploaded to the farm. Keeping these settings in check can help us know what kind of data is in our farm, as well as what kind of data should not be in our farm.
Creating service applications
Starting services within our farm is the first big task we need to complete before we can create sites for the user community. We must understand what services are needed for the farm, but also whether more than one web application will be created for the farm. The reason we need this information and why it's important is because if we do want to support more than one web application, we need to know what services are required for each web application.
In this section, you will learn how to configure services and find out what services you really need. In our planning session in Chapter 2, Planning and Architecture, I mentioned that this was something we should have looked at while planning. The reason why we must review those areas at the planning stage is because during our assessment, we looked at our old farm. When looking at our old farm, we found out what services were already running and what services will support the farm going forward. So, we have already started our list.
Now, we need to understand what those new services are and how they will be configured to support the farm. If you have not thought about this already, please make sure you do so before starting this section. In Chapter 2, Planning and Architecture, we went through this in detail, so you should be ready to start. If not, you will need to understand the following:
- Do I have enough server resources to support the farm?
- Do I need to segregate some of the services within the farm?
- What department needs what services?
- Do I create services that support all or some of the associated web applications?
In this section, we will create a matrix of services that can be individually dispersed across these web applications or shared between them. Whatever the case, we want to make sure we are managing our services so that we support the server resources that have been allocated for the farm, as well as the users who need these services within their sites. If security is a concern, then this will also play into how many services we create and what web applications they will support.
The following screenshot is our first glance at our Services on Server since we just created our new farm:

Figure 5.25 – Services on Server
This shows that we are currently only running the Central Administration site. This is because we have only created the farm and the Central Administration site. Because this is the only service that is running on this server, we can start configuring our farm and adding more services to our first server.
Registering service accounts
Before we can create service applications or web applications, we need to register service accounts for our farm so that these accounts can configure these services. This is really important because if these accounts are not available, you will not be able to configure separation of duties between service accounts. The only account that will be available will be the farm account since it was registered during the farm creation process.
To do this via SharePoint's Central Administration site, perform the following steps:
- Start by opening the Security page:

Figure 5.26 – Central Administration – account management
- Click Configure managed accounts underneath General Security. Once you have filled in the form that appears, click OK:

Figure 5.27 – Register Managed Account page
Add the account to the User name area of the form. The account must be in the following format: domainusername. You can enable automatic password changes via SharePoint. I have used this in the past to update passwords for my service accounts and it worked like a charm. The only issue that occurs is when you may need to sign in using that account as part of troubleshooting. So, if you want to know your password for the account, just do this as part of your monthly maintenance process and document this password change if you don't want to use the randomly automated password updates.
- To do this using PowerShell, use the following commands:
$Password = "Ki90@T887"
$Account= "XYZWebAppPool"
$pass = convertto-securestring $Password -asplaintext -force
$cred = new-object management.automation.pscredential $Account ,$pass
$res = New-SPManagedAccount -Credential $cred
Make sure that you include a password that is up to your security standards. Remember that user accounts cannot be more than 20 characters in length; if they are, you will never see them added to the list of registered accounts. Now that we have added our accounts, we can use them in our service application and web application configurations.
Under the Configurable drop-down, you can view all the accounts that have been created and registered for use with the service applications you will be creating in this section:

Figure 5.28 – Adding registered accounts
Creating our services
The following is the list of services we will be creating in this section:
- Word Automation Services
- Visio Services
- Machine Translation Services
- Managed Metadata Services
- Claims to Windows Token Service
- Business Data Connectivity Service
- Secure Store Service
To ensure we do not include any redundant steps, let's explain the process of adding a service application.
You will find yourself going back to the main menu within the Central Administration Service Application menu to create a new service application once you've created one. Perform the following steps to create a service application. We will be using these steps for all our services since most require the same inputs for creation:
- From the Central Administration site, to get to the service application creation area, click on Application Management:

Figure 5.29 – Central Administration
- Under Application Management, click on Manage Service Applications:

Figure 5.30 – Application Management
- Upon clicking Service Applications, you will see a list of running service applications, as well as various ways to create and manage them within the farm:
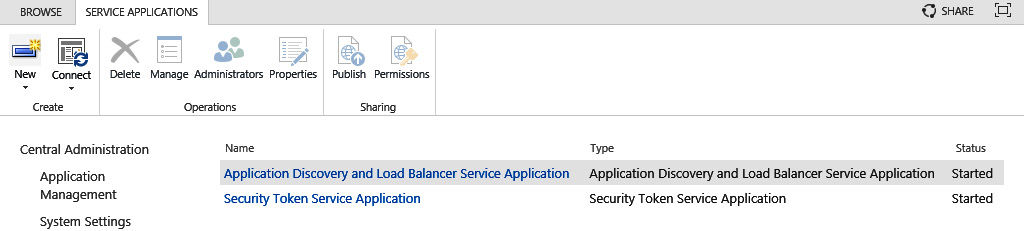
Figure 5.31 – Service Applications
This is the main area you will be working from to create your service applications. This is a redundant step, so please remember how to get to these areas if you are not familiar with the process. You can always come back to this section to refresh your memory.
- Upon clicking on the New button in the top-left corner, you will see a list of service applications that can be created:
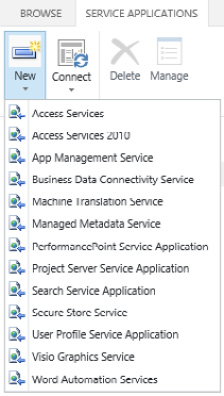
Figure 5.32 – Service Applications – creation selection menu
Next, we will look at Word Automation Services.
Word Automation Services
We will start with our first service: Word Automation Services. Word Automation Services is a technology that allows you to provide unattended, server-side conversion for documents that are supported by Microsoft Word. To start creating this service using the GUI, please click on that area within the menu.
Follow these steps to set this up:
- Create a name for your service. Remember your naming conventions for service applications. Choose a service account that will manage this service and click the checkbox shown in the following screenshot to add this service application to your list of proxies:
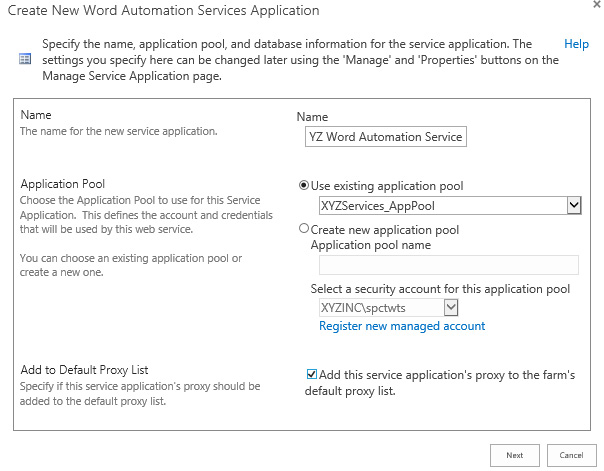
Figure 5.33 – Create New Word Automation Services Application page
- Provide the SQL Server name for the database server, which is our alias name, and the database name for the database that will be hosting the data for this service:
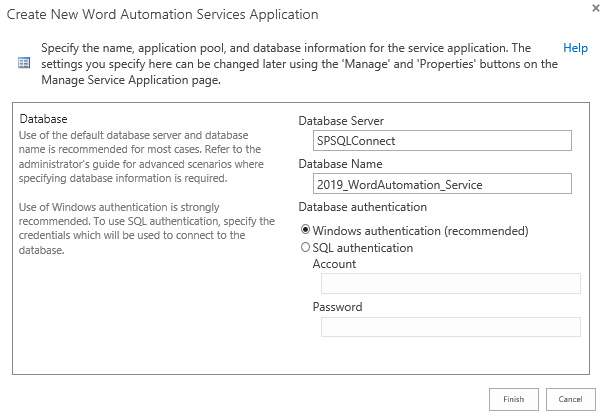
Figure 5.34 – Providing a name for our SQL Server
Please provide the Database Server name, which is your alias name, and a Database Name. You should use a naming convention that supports the service being documented.
Important Note
Naming conventions are very important. Remember that service applications can be related to the overall company, a department, or custom segments of your company. Name it so that you understand who this service belongs to. This also stands when you're naming databases. If the service and/or database is just going to be used overall for the farm, then name it similar to how I named it so that it supports a global aspect. Any specifics in your naming are welcome, but try not to make the database names too long.
We can also use PowerShell to create the service. To open the SharePoint Management Shell, type in SharePoint on your desktop; you will see it listed as an application. When using the SharePoint Management Shell, always click Run As Administrator. Right-click the application link and choose Run As Administrator:
Add-pssnapin Microsoft.SharePoint.PowerShell
New- New-SPServiceApplicationPool -Name "Word Conversion Services Application Pool" -Account <<service application account>>
Get- New-SPServiceApplicationPool -Identity <<application pool name>> | New-SPWordConversionServiceApplication -Name "Word Conversion Services"
Now, we can create our next application service: Visio Graphics Service.
Visio Graphics Services
This service enables you to load, display, and interact programmatically with Microsoft Visio documents on you SharePoint Server. Provide a name for your service and use the service's application pool or create your own, depending on your requirements. Check the checkbox shown in the following screenshot and click OK:

Figure 5.35 – Visio Graphics Service Application
You can also create this service using PowerShell:
New-SPVisioServiceApplication -Identity 'Visio Graphics Service Application' -ApplicationPool 'SharePoint Web Services Default' -CreateDefaultProxy
Note
The SharePoint Web Services Default Application Pool is an application pool that's created by SharePoint when the application is installed. This can be used to support new services you create, though you can create another service application pool to support these services. Please be aware that the Farm Account will run this application pool by default.
There are best practices you need to follow since we do not want to have an overwhelming amount of application pools. In some cases, you can use separate application pools to give individuality to the service you are creating. This would use a different service account other than the farm account to limit access to the service account being compromised. If you can, limit the pools to 10 as that is a best practice.
I have seen some bad configurations in my career. I had one local government client call me to come onsite to take a look at their configuration. The servers they had for the web tier were running out of memory. The client had 34 path-based web applications running with different applications pools and service accounts. This was the shortest call I had while working at Microsoft; I resolved the issue by adding memory and CPU to the servers. This is not a great configuration, but it worked. They could have used Host Named Site Collections but chose not to do so. The moral of the story is that best practices are there for a reason. Choose your path and understand the consequences that may result from your actions.
Business Connectivity Services
Now, will create our next service: Business Connectivity Services. Business Connectivity Services is used to help us connect to data that may be outside of SharePoint. This allows us to connect to SQL databases that are hosted on other servers, as well as on the cloud. To create a Business Connectivity Service, add a name for your service application. Enter your database's alias name as the Database Server name and provide a name for your service database, under Database Name. Then, click OK:

Figure 5.36 – Create New Business Data Connectivity Service Application
Important Note
In my examples, I placed the name of my main service at the end of all the names of my service databases. I did this to categorize them in the list of databases in SQL Server. This way, all my services databases will be in one area and all my content databases will be in another.
To create the service using PowerShell, use the following commands:
New-SPBusinessDataCatalogServiceApplication -ApplicationPool "SharePoint Web Services Default" -DatabaseName "NewBdcDB" -DatabaseServer "YourDomainSharePoint" -Name "YourServiceApp"
Now, we will create our next service: Machine Translation Services.
Machine Translation Services
The Machine Translation Service is used to provide automatic machine translation of files and sites. This service is provided on a cloud hosted machine by Microsoft and powers Office, Lync, Yammer, and Bing's translation features.
If you need this service application and are willing to make sure your users understand how this service works, please add a name for the service application. At this point, you can either create a new services application pool or use the same existing services application pool. Click OK once you have completed the form:

Figure 5.37 – Create New Machine Translation Service Application
You also have the option to create this service application using PowerShell:
New-SPTranslationServiceApplication -Name TranslationService -ApplicationPool 'SharePoint Web Services Default' -DatabaseServer Server1 -DatabaseName TranslationServiceDatabase
Now, we will create the Managed Metadata Service.
Managed Metadata Services
This service is used to define metadata that can be used to tag information within your content for search and navigation purposes. Follow these steps to create the service:
- Add a name for the Managed Metadata Service application, along with the SQL alias and Database Name you need for the service application:

Figure 5.38 – Create New Managed Metadata Service
- You can also use the same services application pool or create a new one for this service application. Click OK to create the service application:

Figure 5.39 – Application pool options
If you plan on having a dedicated site collection for the Content Type Hub, which distributes content types to web applications, you can set that URL here. However, since we do not have a web application yet, we will come back to this later and set it using PowerShell. You can also add this service application to the farm's default list if this is a default service for the farm.
To create this service using PowerShell, use the following code:
New-SPMetadataServiceApplication -Name "MetadataServiceAppName" -ApplicationPool "AppPoolName" -DatabaseName "MetadataDBName"
To create the Managed Metadata Service with a Content Type Hub, use the following code:
New-SPMetadataServiceApplication -Name "MetadataServiceAppName" -ApplicationPool "AppPoolName" -DatabaseName "MetadataDBName" -HubUri "https://sitename" -SyndicationErrorReportEnabled
Claims to Windows Token Service
SharePoint Server 2019 – in fact, all versions of the product – require Active Directory authentication. This authentication is required for users to access SharePoint resources and apps, and is also used so allow servers to access on-premises SharePoint resources in a farm. If a server has a trust relationship with other servers in the SharePoint farm, they will be able to access secured resources on another SharePoint server in the farm. This is called server-to-server authentication and is done using the STS and OAuth server-to-server protocol.
When outside data sources or application connectivity is needed outside the SharePoint farm, such as with SQL Reporting Services, we need the Claims to Windows Token Service (C2WTS) running as it is a required service in SharePoint for connectivity to occur between two applications. This service should run under its own domain identity and should have the following rights assigned:
- Act as part of the operating system
- Impersonate a client after authentication
- Log on as a service
There are other authentication methods available, such as Kerberos and SAML, that we will explain later in this book.
Starting this service can be done using a simple PowerShell command that can be used to start any service in SharePoint. We can use this command for all the services we have created once the service application has been created. Search and User Profiles have different processes that need to be followed.
This service, C2WTS, does not require us to create a service application. We only need to start the service. Open SharePoint Management Shell to run PowerShell commands:
Start-SPServiceInstance -Identity <ServiceGUID>
To stop a service, use the following command:
Stop-SPServiceInstance -Identity <ServiceGUID>
When you wish to find the ServiceGUID for the service you want to start, run the following command:
Get-SPServiceInstance
Now, we will create another service: Secure Store Service.
Secure Store Service
The Secure Store Service application provides a claims-aware authorization service. It also provides an encrypted database for storing credentials that is usually kept on another SQL Server for security. This service provides authorization to applications that are running within the SharePoint Server.
To create this service using PowerShell, use the following commands:
New-SPSecureStoreServiceApplication -ApplicationPool 'SharePoint Web Services Default' -AuditingEnabled:$false -DatabaseName 'Secure Store' -Name 'Secure Store Service Application'
Make sure that you only create the services you need. You do not have to follow my creation plan in this book. Creating services you don't need is not a good practice. Finalize the services you think you will need and create them.
Once these service applications have been added, it does not hurt to run PSconfig to solidify the farm and make sure all configurations are working as they should. You can do this using the Configuration Wizard, which can be found by typing in SharePoint on your desktop or by using PowerShell and running the following script:
PSConfig.exe -cmd upgrade -inplace b2b
Once you've done this, shut down/restart or reboot your servers, starting with SharePoint first and then SQL. Make sure SQL is running first before the SharePoint server so that you don't get any connectivity errors. Once completed, we can start adding servers to the farm. Always check your event logs once you've rebooted to see if there are any new errors.
Important Note
Running PSConfig.exe with no parameters does not upgrade or do any good to the farm's content. Without any parameters running, this command is useless. Make sure that you add parameters to apply upgrades when running a full upgrade command, not just the initial executable. When you add content to the farm, you will add more parameters to upgrade content and features.
SharePoint MinRole resources
We talked about MinRoles and their importance in Chapter 2, Planning and Architecture. Assigning MinRoles at this point in our configuration is essential as we have two big service applications we left out previously: User Profile Services and Search Services. I have different reasons for leaving these for last, all of which will be explained in Chapter 6, Finalizing the Farm – Going Live, but to summarize, User Profiles require a server resource in order to run efficiently, as do Search Services. In our configuration, Search requires two servers for redundancy. We can only provide these resources by adding the servers to the farm, which we will do now. Distributed caches will come into play now as well.
Once you have installed SharePoint on all the servers you've created, as we stated in Chapter 4, Installation Concepts, we need to start adding them to the farm. Various prerequisites must be met on all the servers, including performing updates that relate to the version the farm is running at currently. All server resources should have similar/the same configurations as other SharePoint servers, including CPU, RAM, and drive configurations (drive letters must be the same; configuring server resources by tier or MinRole is a best practice).
There are two different ways to add a new server to our farm:
- The first is to use the Configuration Wizard window, as shown in the following screenshot:

Figure 5.40 – Specify Server Role
- The other is to use PowerShell and add the servers using a stripped-down version of our farm configuration script, as shown in the following example:
Add-PSSnapin "Microsoft.SharePoint.PowerShell
#Configuration Settings
$DatabaseServer = "SQL Alias Name"
$ConfigDatabase = "Farm_Config"
$Passphrase = "57J7902KK9Srww$!#LiPQ"
$FarmAccountName = "MontegoSP_Farm"
$ServerRole="Application"
#"Custom","WebFrontEnd","Application","DistributedCache",
"SingleServerFarm","Search","ApplicationWithSearch",
"WebFrontEndWithDistributedCache"
Connect-SPConfigurationDatabase -DatabaseServer $DBServer -DatabaseName $DBName -PassPhrase $Passphrase -LocalServerRole $ServerRole
Write-Host "Installing SharePoint Resources..."
Initialize-SPResourceSecurity
Write-Host "Installing Farm Services ..."
Install-SPService
Write-Host "Installing SharePoint Features..."
Install-SPFeature -AllExistingFeatures
Write-Host "Installing Help..."
Install-SPHelpCollection -All
Write-Host "Installing Application Content..."
Install-SPApplicationContent
Write-Host "Joined the Server to Farm Successfully!"
Always remember to update the parameters of this script, as well as the Minrole or Server Role in your script, to make sure you choose the right server roles for your farm. In my farm, I will be adding the following roles:
- Two Application/Search Servers
- Two Web FrontEnd Servers with the Distributed Cache service
Once you've run the script and/or added the servers to the farm using either method, you will see the servers in the System Settings area of the Central Administration site, under Servers in the Farm.
Understanding the Distributed Cache service
The Distributed Cache service is used to improve performance by managing objects and data across MinRole configured servers, as well as servers included in your farm. From past engagements where I've reviewed a farm, I've seen that this service was either not set correctly or was non-existent because it had crashed. In one case, a site was down for many months due to this service and Microsoft Updates failing. It is a very important service, so you cannot leave this out when monitoring or planning a maintenance window that supports updates and/or changing the configuration of the service.
The Distributed Cache service is used to maintain a large amount of information on the server you have chosen to provide these services to in your farm. From a configuration standpoint, these servers can be standalone or used on a WFE tier server, where users interface with the farm at the site level. This service ensures that the information that is gathered for the services is readily available and is provided for the following services running in your farm:
- Authentication
- Newsfeeds, micro blogging, and conversations
- OneNote client access
- Security trimming (Search)
- Page load performance
This service provides caching functionalities that allow users to quickly retrieve data without any dependency on the database. All this information is stored in memory on the servers or MinRoles you have deemed Distributed Cache servers. Distributed Cache spans across these servers as a cache cluster so that each host can save data without duplicating or copying data from other servers running the service.
This service is very important, and in some cases, I have seen where this service was not recoverable. You want to be very careful when working with this service and monitor it as much as possible. Do not administer your AppFabric Caching Service from the services console. It is recommended that you leave this service as-is from your initial configuration. I have seen farms having to be rebuilt due to this service and its parameters being changed.
To check your Distributed Cache, run the following command using PowerShell:
Get-CacheHost
At the time of installation, 5% of the total physical memory will be assigned to the Distributed Cache service. This is known as the cache's size and can be altered if needed. Since we are setting up a farm, we must have at least one cache host running in the farm. If you have two or more servers that you want to run this service, just know that the size of each cache host is 5% of your physical memory. The maximum size you can make your cache is 16 GB per cache host, so you want to make sure you set aside memory for this service. You should have thought about this when you were planning. We also want to make sure we are aware that we can only have 16 servers running the Distributed Cache service in a farm.
We will learn more about this service and how to make our servers perform well in Chapter 9, Managing Performance and Troubleshooting.
Summary
This chapter was the meat of the installation process for SharePoint. Although there is more to come, this chapter laid the foundation for the farm. If we didn't cover these areas, we would not have a base installation to move forward with and, as pertaining to the server resources, have a complete server infrastructure that supports a SharePoint and SQL Server environment.
Be mindful of your settings when you're configuring the performance of SQL Server, especially the MAXDOP settings. If they are changed, the SharePoint environment will not run correctly and you will see performance hits on your SQL servers. This is because SharePoint is built for MAXDOP to be set to 1. Also, building redundancy into your SQL Server platform is also key to supporting the environment. As we mentioned previously, SQL is the key to the data that feeds SharePoint from a configuration, service, and content point of view. Without a fully performant SQL Server, great performance will not exist in your environment.
Make sure that you add servers as needed that support the SharePoint infrastructure that's required for your environment. Separating services as needed and adding user web frontends to support your user community is key to building a farm that can support many users and services. Scaling out your farm is easy to do, and there are many ways to isolate and combine traffic for all your services and user traffic.
We also learned that MinRoles are the key to this separation and service compliance. Never add a server where you do not know what the resource is being used for. If you use a custom MinRole, always make sure to configure it so that it only does what you need it to do and uses the resources it has to only run the services it needs to run. The reason we use MinRoles is so that we can control where services are processed and keep our resources free from running unnecessary processes.
As you can see, paying attention to small details and documenting your configuration is key to updating your farm. It also allows you to ensure you have covered all your requirements, which is the key to success. Configuration management plays a part in all this because you want to make sure the servers match how you want the service to perform. Again, SQL is a big part of SharePoint, and we cannot run SharePoint without it. However, if it's configured incorrectly, we will see performance issues. Follow the guidelines and best practices at hand to make sure you are building the best farm possible. Although this is a lot of work to document, it will pay off in the end.
Questions
You can find the answers on GitHub under Assessments at https://github.com/PacktPublishing/Implementing-Microsoft-SharePoint-2019/blob/master/Assessments.docx
- Why should we separate application pools for different services within our configuration?
- Antivirus exclusions don't need to be completed before installation. True or False?
- Which service application is optional to use a separate database server as a best practice?
- What setting is required on SQL Server to install SharePoint? What is the setting for that configuration?
- When setting up Blocked File Types, I can set these file types per site collection. True or False?
- If running psconfig, do I need to run the command using extended parameters? If so, when? Why?