Chapter 6: Finalizing the Farm – Going Live
Finalizing the farm to "go live" is the last step of the process of supporting the release of your new farm. Within this book, you will find two chapters about the "go live" aspects of your implementation. This is due to the amount of instruction needed to prepare you for your "go live" date. There are a few steps that we still need to complete related to installation, the configuration of services, and overall configuration, which we will cover in this chapter; but what you will also see in this chapter is that there are many areas that we still need to configure to complete the core system.
You will see, while dealing with those lingering configurations, that migration is not the last thing we need to do. There are other areas of preparedness that need to be addressed, as is the case with the setup of development and testing environments. We need to handle any custom configurations that may have been missed, out-of-the-box workflows and custom workflows, backup and restore solution integration, and any operating areas that we need to check, update, and pass on to others who will support the new farm and overall environment.
We will also talk a little about stress testing the environment and the overall testing of the new sites, as well as covering other integrations that need to be checked and installed to support sites as they were supported in the older environment (or schedule them for deployment in our new environment).
The checklist is vast, and we need to make sure that we are bringing a solid environment to the company before release. This chapter will follow that checklist and get you prepared for the release of your new SharePoint farm!
The following topics will be covered in this chapter:
- Finalizing services configuration
- Web application configuration
- Web application settings
- Site collection creation
- Site collection configuration and settings
- Cache service accounts
Technical requirements
To follow along with this chapter, the following requirements must be met:
- 3-5 years of SharePoint experience
- 3-5 years of project management experience
You can find the code files for this chapter on GitHub at https://github.com/PacktPublishing/Implementing-Microsoft-SharePoint-2019.
Finalizing loose ends
Did we forget something? I am sure we did. That's why I created this chapter to make sure we go back and retrace our steps and find things that may not have been communicated or documented. We want to make sure at this point that we have accounted for everything in our old environment, which includes services and content. This includes everything we noted in our planning and assessments. The last thing you want is a failed SharePoint farm implementation.
These next two chapters were created to finalize the configuration and make sure that we check all the loose ends to finalize our farm. There are a couple of areas that were left out of our service configuration chapter that we need to expand on, as well as web applications, site collections, and general settings for those areas, which we will get into in this chapter.
Here, as a precaution, it's a good idea to go back and assess your users and departments to make sure you have accounted for all developed solutions, out-of-the-box solutions, workflows, identified retired web parts, and anything that could be an area of concern for functionality and could be missed during this change. I can't stress this enough. The more you miss, the more you will pay for it after users start to work on the new farm.
You need to make sure you know what these users are doing in their site collections and sites. Don't sleep until you get all the answers. At the end of the day, this is what makes you, your department, and SharePoint look bad when you don't migrate everything or miss a functionality that users have been using for years and all of a sudden it's gone. If that functionality has changed, make sure you let the department know and give them a new way to make it work in SharePoint Server 2019.
Believe me, I have been caught with my pants down on a couple of migration projects. One time, there was a tool that I used, and I will not mention the name of this tool, but it malfunctioned as it was not adhering to the migration parameters I had chosen. If I chose to move only the top-level site and not subsites, it would just move all sites anyway. This actually made my contract go over hours because I had to go back and delete all the subsites that were not on the list to move. We will talk more about tools later in this chapter, and I will give my opinions and recommendations on tools and how they can play into your migration and help in other ways to support your infrastructure.
Another situation I was in a few years ago was not having got enough information from users and admins. After doing the migration and moving over to the new farm, there were two critical components missing from the new farm. One was a script used for identity management that worked with the User Profile service to clean up those users no longer working in the company, and another was a custom solution that was developed for a site but was not identified during the migration to the new farm. This caused a lot of problems during the post-implementation as some functionality was missing, and it was very stressful.
So, please be careful: your career and reputation can be shattered when you are not attentive to areas that make a difference in a successful migration. Everyone remembers the bad things, and even if it is one little thing, it will outweigh the good things.
Let's look at some things to remember during the final actions before releasing the farm to the community:
- Workflows keep items locked in lists and libraries if it's in progress on the source site.
- Migration tools will not move locked items or custom solutions.
- Release items by having the department finalize the workflow process or stop the workflow on the item.
- Make a list of those items in progress so the department can restart the workflow in the new environment.
- Workflows and solutions may have to be recreated, especially those coming from 2007 and 2010.
- Workflows and solutions created in Visual Studio from earlier versions will have to be updated to support SharePoint 2019's code structure.
- The workflow history does not migrate with the content database or migration tool – If needed, go to the workflow history list (For example, http://sharepoint/mysite/lists/Workflow%20History/AllItems.aspx) and make copies of the lists for your records and for the department. You can slice and dice with columns to get information sorted for printing or saving.
- Remember that the workflow history can be captured as part of the default list or a new history list and can be associated with the workflow.
- Make sure to check the settings of lists moved with tools, as all the required settings for advanced and versioning are not set. This can cause some issues with approval processes in the task list and in the list itself.
- Check your old servers for any PowerShell or custom code used to do any server-side functionality, such as backups, or as in my situation, user profile cleanup.
- Check the Global Assembly Cache (GAC) on the old server to make sure there are no custom solutions hiding there that do not show up in the farm solutions list.
There are other areas you can check that might not be included in my list of last-minute checks, but the best thing to do is communicate. Double-check with your admins and site collection admins before making any final migrations. We will talk about testing in this chapter, as well as the pre-migration tasks, test migrations, and final migrations that we need to implement. I will show you what these tasks are all about and how they are used to finalize the movement of content.
Search and the User Profile service
As you know, we have not installed Search or the User Profile service, and the reason is that we need to make sure we have servers added to the farm to support these two services. So, in Chapter 5, Farm and Services Configuration, we added servers to the farm, and these servers were created as MinRole services in the farm for the services we are about to deploy. We will add and distribute services for these two missing services across the server resources we added. These are the last two service creations and I saved them for last for a reason. These two services, although they have not changed much in any version of SharePoint, are the most involved in terms of configuration and should be the services that you configure last.
Search service creation
When implementing Search, we need to think about the availability of the service as well as the resources we must provide for services within the farm. As stated in our planning, we plan in this environment to have a redundant Search service running on two servers within the farm using a Search MinRole. This gives the service a redundant footprint in the farm and keeps the service up and running in case of the failure of one of the servers.
There could be situations where security comes into play, where you may need two Search service applications. This would separate the indexes and instead of relying on security trimming, you'd rely on a totally different index, service account, and application pool to separate the content from one web application to another. In our configuration, I really want to go through how to create a redundant Search application because this seems to be more of an issue in the field.
To get started with this implementation, we will need to use PowerShell, and as always, we right-click on the PowerShell icon to open and make sure to run as administrator. We also want to make sure our servers are in place to support the configuration for these services to run redundantly. As you can see in the following screenshot, both servers are available and ready to go:
Figure 6.1 – Search app servers
Implementing the Search service with redundancy again cannot be done within the GUI in Central Administration. There are also other restrictions in the GUI that will come up in the configuration, such as database names being grayed out for where you cannot update the names. If you are shooting for full naming and custom database names for all service databases, you will have to create this service application using PowerShell. So, let's open up the SharePoint 2019 shell command line and run the following script from a file location on our primary Search server. The script is shown here and is available on the GitHub site for this book:
Note
Download the script and instructions on the GitHub link at the top of the chapter. Please make sure to set the parameters in the script to fit your server names, index locations, and any other areas you need to customize for your environment.
Search successfully installed:
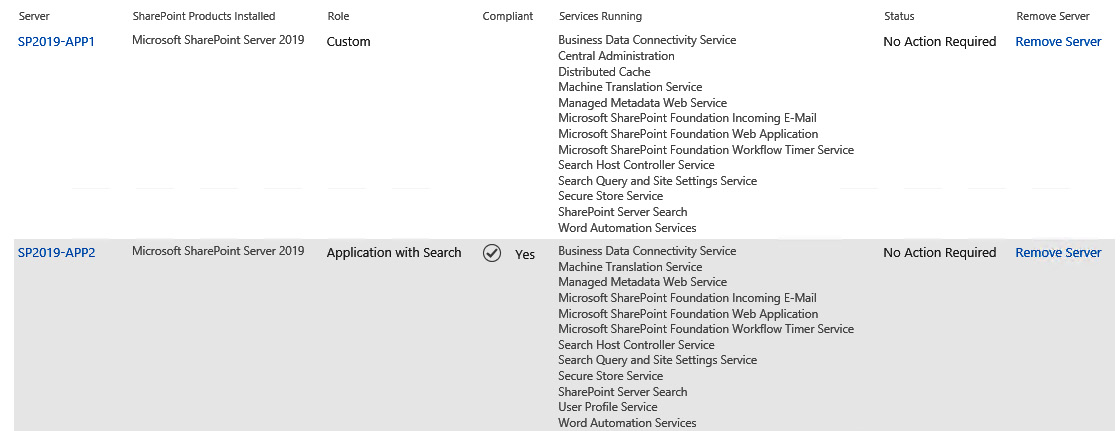
Figure 6.2 – Confirmation of Search being successfully installed
We have successfully installed the Search service! Once you have migrated your content or have your farm stabilized, start your Search crawl to start gathering content to present in the results. You can use continuous crawling, which will keep crawling content. You can also set a schedule for full or incremental crawls, which is ideal for some scenarios.
Search is configured – what now?
There are many things to know about the Search service, and we will get into some detail on Search later in the book from a user perspective, but at the server level, there are some best practices and things to understand about Search.
One of the key things to remember is that users use Search to find information. So, content must be crawled by connecting to content sources to crawl for the information to come up in the search results. The index you create is what the users will search against, so timing is everything, which is why there are a couple of ways to create crawling schedules. You can use continuous crawling or provide a schedule for full or incremental crawls.
Most companies I have worked for have used continuous crawling as their way to get information in the index, but this doesn't mean that the other crawling types are not useful. A full crawl is still useful because it processes and indexes all the items in a content source. It doesn't matter whether the previous crawl did that or not. This keeps your index clean and up to date.
Tip
Remember, it's always good to run a full crawl after you migrate content from another farm or source so that the information is indexed.
The incremental crawl only crawls items that have been newly created or modified since the last crawl. These crawls don't take a lot of time and usually are pretty quick, depending on how much new content has been added. These modifications would include the following updates:
- Content
- Metadata (remember the Managed Metadata service)
- Permissions
- Deletions from the content
The continuous crawl is sort of similar to the incremental crawl. The difference, though, is that the continuous crawl checks the SharePoint change logs about every 15 minutes. If there is an item in the change log, the crawler finds the content and processes the updates to the index. It's good to have a mixture of continuous crawl and incremental crawls, and this is because the continuous crawl does not fix any errors. Please create a schedule to run these as needed, but if you run an incremental every 4 hours, this would help to clean up any errors; use a full crawl as needed.
Users also have tools to make their search results as good as they can be by tagging content. It's best for users to tag their information so that content can be found easily. This leads to relevant search results, and there are tools for users to tune how content is found as well. They can also create silos of results based on content using the Search web part. This can help them to hone in on any content, such as content in a specific site or library, to provide the search results from that specific content only.
SharePoint 2019 Server provides the same modern search experience as Microsoft 365. You will see a big difference, as the search box is placed at the top of the SharePoint site in the header bar. The search experience in SharePoint 2019 is personal. The results for one user will most likely be different than another user's results in this new version of SharePoint. We talk more about it in Chapter 12, SharePoint Framework.
One Search consideration to be aware of is that if you actually get close to having 10 million items indexed, you may want to configure your server as I did in this book using cloning. This will help to spread the service over two servers, which will process items faster and bring better performance for your Search service. The Search service may benefit from being assigned as a MinRole service in some environments where you want to isolate the service to server resources for support as well.
Always keep your configuration of Search clean and separate for processing within the farm, along with where the use of those Search components will be located in a cloned configuration. In the Search configuration for my farm, you can see that I have redundancy on my app servers and redundancy on my web frontend servers. My web frontend servers in this configuration provide query processing and index partitions. My index partitions are updated from the application servers that run the crawl, which propagates over the network after every crawl to my web frontend servers. The results from the user queries are compiled on the web frontend from the index, so that the results from the search come back quickly because the user is on that server resource at the time of the search. This is to not have them go over the network to bring back the results. Make sure to make the crawler servers IIS configurations and HOST file understand that the website is local and there is no need to hit a WFE to crawl the website:
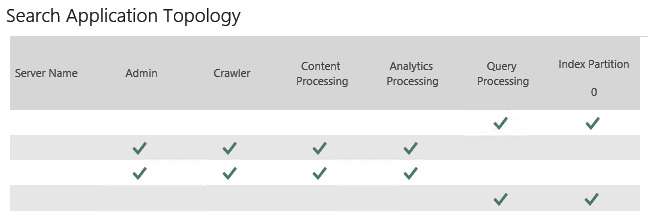
Figure 6.3 – The Search configuration page
Tip
Always configure your crawling server to crawl sites on the local server using the HOST file and not across the network to hit a web frontend to connect to the sites for crawling. The performance for this process will be very slow for crawling. Your users will be affected as well because of the crawl on the sites they use, and the propagation of the index will also be slowed down if the network is not able to push data from server to server quickly. Remember to check your network connections and configure them to be full duplex and not auto-negotiate.
Now that we have covered the Search service, we can work on setting up the User Profile service. User Profile requires that the Search configuration be completed because there are settings within User Profile that refer to a configured Search service.
Configuring the User Profile service
Before we get started with this configuration, we must make sure to determine which server this service will run on. We can use the first server we created in the farm or another if you have another one that is not running the Search service. These two services are some of the heavy-hitters in terms of resource consumption, so we want to make sure that they are separate in our farm configuration. The first thing we want to do is add our farm account to the local server that we plan to run the User Profile service from. Add the account to the local administrator's group on that server.
Important note
Make sure that you added the farm account to the local administrator's group of the server you choose to run this service! This is part of the configuration process, as you will see in the following steps. Make sure of this!
Once this is completed, you can start the following process:
- Under Service Applications, select Manage service applications:

Figure 6.4 – Application Management
- Click on New in SERVICE APPLICATIONS:
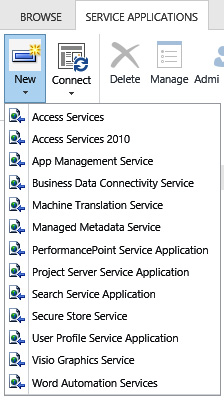
Figure 6.5 – The New button on the SERVICE APPLICATIONS page
Now you could do this the old way in Central Administration, but I ran into an error with User Profile Service Application using the UI. The error I encountered was a grayed-out screen for the social database. I could not name it or change the SQL Server name in the form. We will create the service using PowerShell; you should get used to using PowerShell. The reason why I added the GUI in this book is to give those who are beginners a way to understand what we are doing. Code sometimes looks foreign and I would rather that all were able to get something out of this book than to just add a bunch of scripts and have people be confused.
- So, in this case, we will use the following script to create our User Profile service. Please remember to right-click the PowerShell icon and choose to run as administrator.
- We must create the service application pool first to associate with the User Profile service. Make sure you have added the application pool service account as a managed account before moving forward:
$AppPoolAccount = "XYZINCspuserprofapp"
$AppPoolName = "UPS_App_Pool"
$AppPool = New-SPServiceApplicationPool -Name $AppPoolName -Account $AppPoolAccount
- Create the service application:
Add-PSSnapin Microsoft.SharePoint.PowerShell
$UPSName = "XYZ UPS Service Application"
$ApplicationPool = "UPS_App_Pool"
$ProfileDBName = "XYZ_UPS_Profile_Service"
$SocialDBName = "XYZ_UPS_Social_Service"
$SyncDBName = "XYZ_UPS_Sync_Service"
New-SPProfileServiceApplication -Name $UPSName -ApplicationPool $ApplicationPool -ProfileDBName $ProfileDBName -SocialDBName $SocialDBName -ProfileSyncDBName $SyncDBName
- As you can see in the following screenshot, when we run the PowerShell script, we get a new service application for the User Profile service:

Figure 6.6 – New service application confirmation in PowerShell
- Then we bind the service application with the proxy for the service:
New-SPProfileServiceApplicationProxy -Name 'XYZ UPS Application Proxy' -ServiceApplication "9b9c4c22-fb99-4f32-88ff-9f66d9f47eb2"-DefaultProxyGroup
- As you can see in the following screenshot, we now have a proxy for our User Profile service application:

Figure 6.7 – Proxy for the User Profile service application
Go to the Manage Services on Server link and start the service on the server you installed the service on during the PowerShell configuration process.
Now that we have created our User Profile service, we need to bring in individual identities or groups of users from Active Directory. Let's look at how we can do that in the next section.
Configuring your connection to Active Directory
Do you understand your Active Directory (AD) structure? Do you know where the users and groups are located that need access to your SharePoint environment? These are questions you need to ask yourself before you go any further. The last thing you want to do is pull identities into the farm that you do not need. Have a conversation with your AD admin and find out the locations of the users and groups needed so that you can choose those areas within the AD structure and bring in only the users and groups that are necessary. They could be in the cloud!
Now that you have that information, let's get started on connecting to AD!
Important Note
Please make sure you have accounted for a replication account to connect to AD, as this service account needs to be used as part of the connection settings in this configuration.
Let's look at the steps:
- Select Configure Synchronization Connections under the Synchronization section:
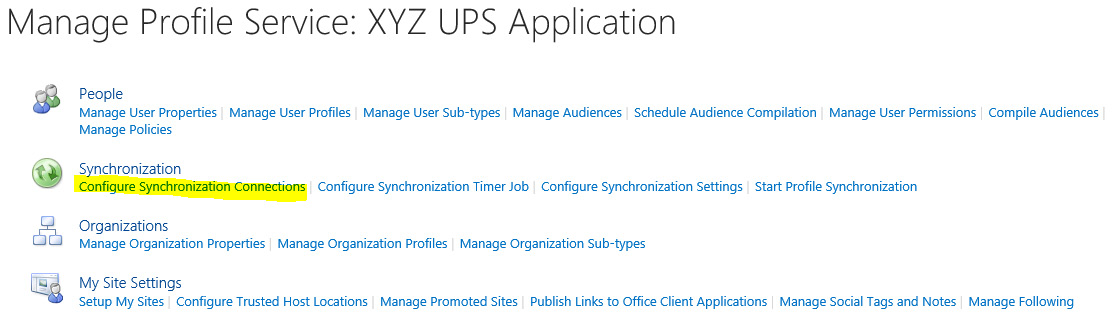
Figure 6.8 – Configure Synchronization Connections
- Click on Create New Connection:

Figure 6.9 – Synchronization Connections
- Fill out the form to update Connection Settings:

Figure 6.10 – Adding a new synchronization connection
- Start the synchronization using Start Profile Synchronization as shown in the following figure:

Figure 6.11 – Start Profile Synchronization
- Choose Start Full Synchronization:
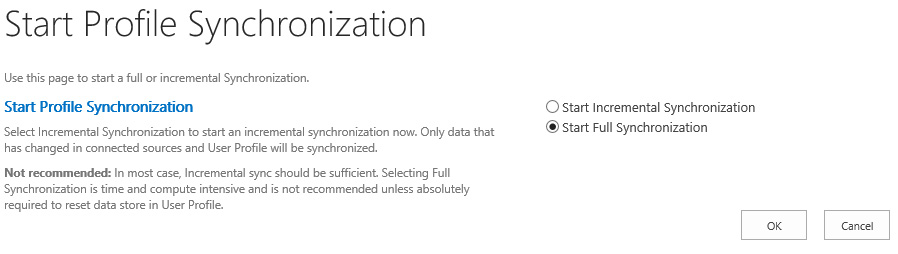
Figure 6.12 – Start Full Synchronization
We will run a full crawl using the search area of the central admin later when we have created our user web application and/or have migrated some content to a site.
Creating web applications and associations
In this section, we will go over the creation of web applications and how we associate services to those web applications. The need for two web applications is immediate. The two we need to create in this section are for the users and the MySite content, which we will talk about as well. MySite is not a mandatory site but it needs to be in place as part of the farm as it is necessary to user profiles, gathering user hierarchical information for use within workflows (such as an identity for a user's manager), and settings for configuration within the farm for search. If you would like an enterprise search web application, you can also do that as well, but it is not mandatory. The site template for that site collection is Enterprise Search Center under Enterprise:
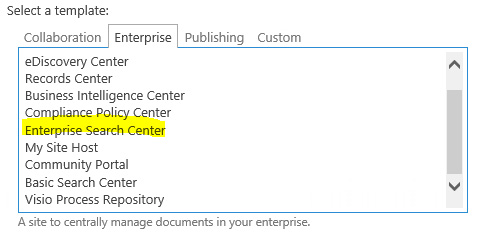
Figure 6.13 – Enterprise Search Center
There have always been special needs for each customer I have worked with, so there could be a need for more web applications. Follow and repeat the following steps to add more web applications as needed. During this process, we will need IP addresses and SSL certificates, which you have to use during the configuration of the site. Please have those ready as these are prerequisites for this section.
The association of services to web applications is something we need to discuss as well as what constitutes a web application that needs a separate service association. We will also look at server and service compliance for how we can keep our servers running efficiently using the MinRole topology we chose to configure our farms with. We will see how server/service compliance works and how it really helps us to manage resources more efficiently.
Web applications
Web applications define how content is accessed from the network in SharePoint through the web browser. If there is no web application, there is no content. So, in this section, we want to focus on how to create web applications and what needs to be brainstormed before you start creating. In a previous section, we did discuss web applications and the reasons for them (in our planning section), but again we need to make sure at this time that we really have thought everything through and also make any changes that necessary due to new developments as well.
When starting to think about web applications, make sure you have done the following:
- Captured all areas of content you would like to categorize on this URL level
- Handled the zoning of the web application and how it will be accessed
- Associated service applications
- Managed the service accounts and app pools that will run this web application
- Handled the isolation and security of the web application on a server resource
When looking at our company and the departments and functional areas we need to support, one of the reasons why we would split content into separate web applications within SharePoint is to secure it. Securing content within a web application, which is the top-level access point, can be an area of concern. Making this our focus for security gives us a clear security break from other app pool service accounts, users, and groups accessing the web application and service associations at this level. The key to this split at this level is to make sure that access is not given to someone by accident.
Keeping content separate also can be done for performance reasons and/or reasons to do with customization. Customized sites with coding bring a different level of processing and support to a web application. This also can be the case with web applications that host a lot of data, such as PowerPivot or Excel data and other reporting data. Such a web application would be more resource-intensive than other web applications with no coding that are used for normal, out-of-the-box functionality.
Another reason for separation would be to separate groups of content and use separate URLs within the company for departments within the organization. For example, we can have a subdomain such as hr.xyzinc.com to represent the human resources division and another subdomain of it.xyzinc.com to represent the information technology division. This will give a clear separation of sites and content for the company department structure. This type of configuration will make it hard to share information, but I have seen these configurations help in organizing and protecting sensitive information.
To create a web application, follow the steps given here:
- Go to the Central Administration site and click on Application Management:

Figure 6.14 – Central Administration
- Under Web Applications, click on Manage web applications:

Figure 6.15 – Application Management
- Click New in the top-left corner:

Figure 6.16 – The New button
- Complete the form presented to configure your web application. Name your web application, Port and use a host header if needed:

Figure 6.17 – Creating a new web application
- Input the URL and choose a new application pool name. Update the service account you will use for the application pool. Input a Database Server name and a database name for the content database supporting the initial creation of the web application:

Figure 6.18 – Inputting the database server name
- Complete this section using the values given in the following screenshot:

Figure 6.19 – Web application configuration values
Assigning service applications is a part of the web application. If you have separate service applications, you can create new services and assign them to the appropriate web application using Central Administration.
To create a web application using PowerShell, use the following command:
New-SPWebApplication -Name "XYZ Company Web Application" -Port 80 -HostHeader spweb.xyzinc.local -URL "https://spweb.xyzinc.local" -ApplicationPool "spweb_App_Pool" -ApplicationPoolAccount (Get-SPManagedAccount "xyzincwebsrvact")
Configuring host named site collections using PowerShell is very similar as there are few differences in the approach for this type of site hierarchy. The top-level site is a path-based site and the site collections below it are host named sites. You create those using the following PowerShell command:
New-SPSite 'http://portal.contoso.com' -HostHeaderWebApplication (Get-SPWebApplication 'Contoso Sites') -Name 'Portal' -Description 'Customer root' -OwnerAlias 'contosoadministrator' -language 1033 -Template 'STS#0'
There are some other configurations needed within the web application you have created. There are selections of features within the web application and within site collections that need to be set. We look at those web application features in the next section.
When you have finished creating web applications in your environment be sure to look at a load balancing strategy to support redundancy within the Web Tier. We talk about load balancers and those technologies in Chapter 7, Finalizing the Farm to Go Live - Part II. Also, make sure to define Site Quotas as part of your web application configurations and the site collection level to keep the size of your site collections in a best practice capacity.
Managing features
There are features that we can activate from Central Administration to turn on features related to the web application. As stated, we can separate services and features based on the need within the web application. For example, let's say video processing is not needed in the MySite web application based on company policy. Using these feature activation settings, I can make sure that that feature is deactivated at the web application level:
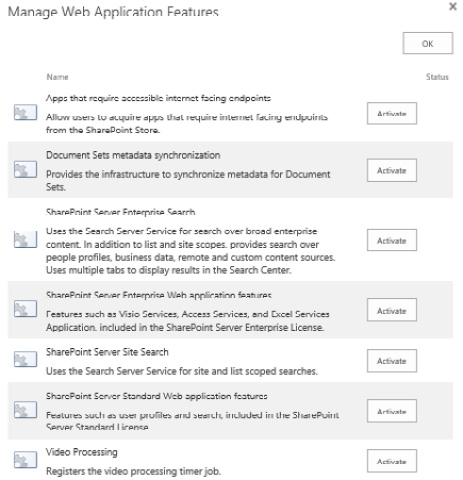
Figure 6.20 – Manage Web Application Features
This helps bring another level of feature separation to content and users for the sake of resources and company policies.
Here is how to turn on features using PowerShell:
Enable-SPFeature -identity "Video Processing" -URL http://spweb.xyzinc.local
Knowing the features you want to be enabled on the web application level is key. As you can see, there are some choices. Make sure to choose what level of features you want based on the URL or web application. Now that we have our main web application completed, let's move on to create a MySite web application that will create a host for personal sites used by users in the farm.
Creating a MySite web application
Let's create a MySite web application. In the field, I have noticed that a lot of admins and companies do not like MySites, which is understandable. They are nothing to be afraid of however, with SharePoint 2019 Server you can also integrate OneDrive using a hybrid connected farm. This will give us a place where users can share and store documents easily from a folder based interface similar to Shared Drives with better tools as they have the rights to manage their own files even externally.
The MySite is used to give the user a way of having what I call a SharePoint desktop. They can run applications within SharePoint against their content if they like but this has to be set up as features within the farm in central administration. Yes, they need to be planned for and storage is needed for each site collection, but if planned for properly, these sites help users keep their information centralized and not on a desktop where something might not get backed up or categorized properly. At least with MySites all the data is backed up as part of the overall SharePoint backup and a user can count on having their data restored if needed. You can also control the size of these site with Site Quotas. Please make a choice to use either OneDrive or MySites as you plan out personal files storage for your user community.
Let's look at the steps to create a MySite web application:
- Create a new web application and name it. Add a host header if needed:

Figure 6.21 – Create New Web Application
- Update the application pool and assign a service account for the web application:
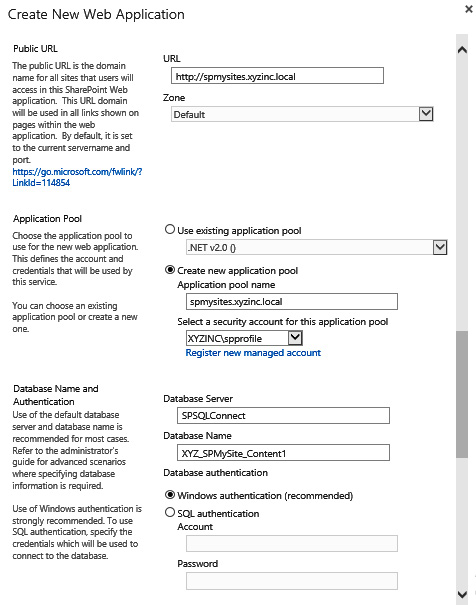
Figure 6.22 –Assign service accounts and a database name
- Update the Database Name field with the name of the database that will hold the site collection. Scrolling down, you will see the next section of the form:

Figure 6.23 – Service application connections
- Assign service applications as part of the web application. If you have separate service applications, we will go over how to create those later in the chapter.
- Add a default site collection under the MySite web application:
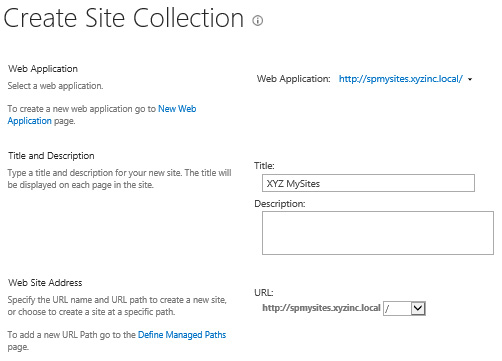
Figure 6.24 – Create Site Collection
- Choose My Site Host as a template:
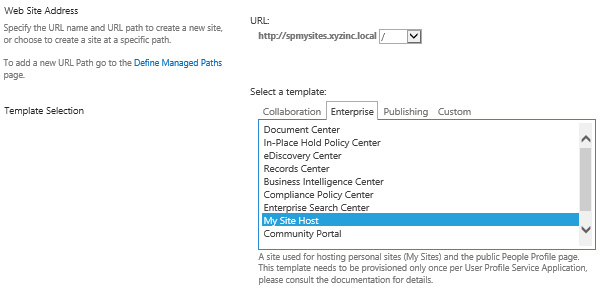
Figure 6.25 – The My Site Host template
- Add primary and secondary site collection administrators:
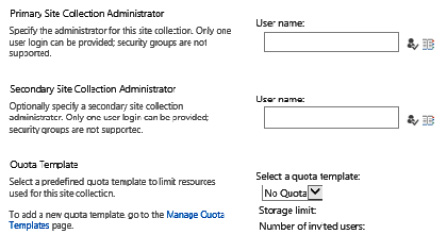
Figure 6.26 – Adding site collection administrators
- Select a quota template for this site collection.
Important Note
You can create quota templates at the beginning or end of your creation of a site collection. They can be applied to web applications using the tools within Central Administration under Application Management | Site Collection Quotas and Locks. Again, these can be created prior to the creation of site collections so they can be applied individually as well.
- Setting up quotas for your site collections is key to setting limits on your site collection growth. If you followed my recommendation of having individual site collections nested in content databases, then quotas will work well for you from a management perspective. Make sure to set the quotas as per Microsoft's best practices of 2-4 GB limits. If it is a record center site collection you are creating, then you can set this to be unlimited, due to the best practice being a limited number of resources accessing the data:

Figure 6.27 – Quota Templates
- If the quota is being set for MySites, you need to understand how much storage you have available to give all your users. The same storage limits will be used for every individual MySite based on individual site collections. We need to make sure to look at the number of users and the size of the site collections you are allowing them to create.
- MySites are handled differently once they are created. For example, if you created four content databases and created site collections using the MySite site collection template within those content databases, the sites would load balance themselves over the four databases you created. This makes separates the content well, meaning good performance for those databases.
If you need to do some creation based on departments or other criteria, you need to create these site collections by using PowerShell or by taking the database offline in the SharePoint Content Database utility. This will allow you to place the site collections in the databases you want.
Important Note
MySites should have a set quota due to situations where users may use a MySite to keep all their files. By setting a limit, users will understand how much storage space they have and will only keep relevant files in SharePoint and not keep every file on their desktop in the MySite. Quotas can be set for different types of site collections using the Application Management menu in Central Administration.
Quotas are very helpful for identifying the growth of content and creating plans around data size. This also helps when you have those plans identified and made into quota templates so that you can apply them quickly and easily.
Now let's look at self-service policies and how they work in the farm:

Figure 6.28 –Self-service Site Collection Management
Here is how you enable self-site creation using PowerShell:
$w = Get-SPWebApplication http://spweb.xyzinc.local $w.SelfServiceSiteCreationEnabled =$True $w.Update()
Setting the self-service site to On for MySites means that users will be able to create their own MySite from the SharePoint site. This only happens once, but this setting gives them that ability. We can also set it to Off and not have them create a site. This is where I see admins getting scared, but you do not have to use MySites in SharePoint; things only need to be configured so that the searching of profiles works in the environment.
Now that we have finished with the MySites web application settings, let's go back and finish up our User Profile service and MySites configuration using the following form:
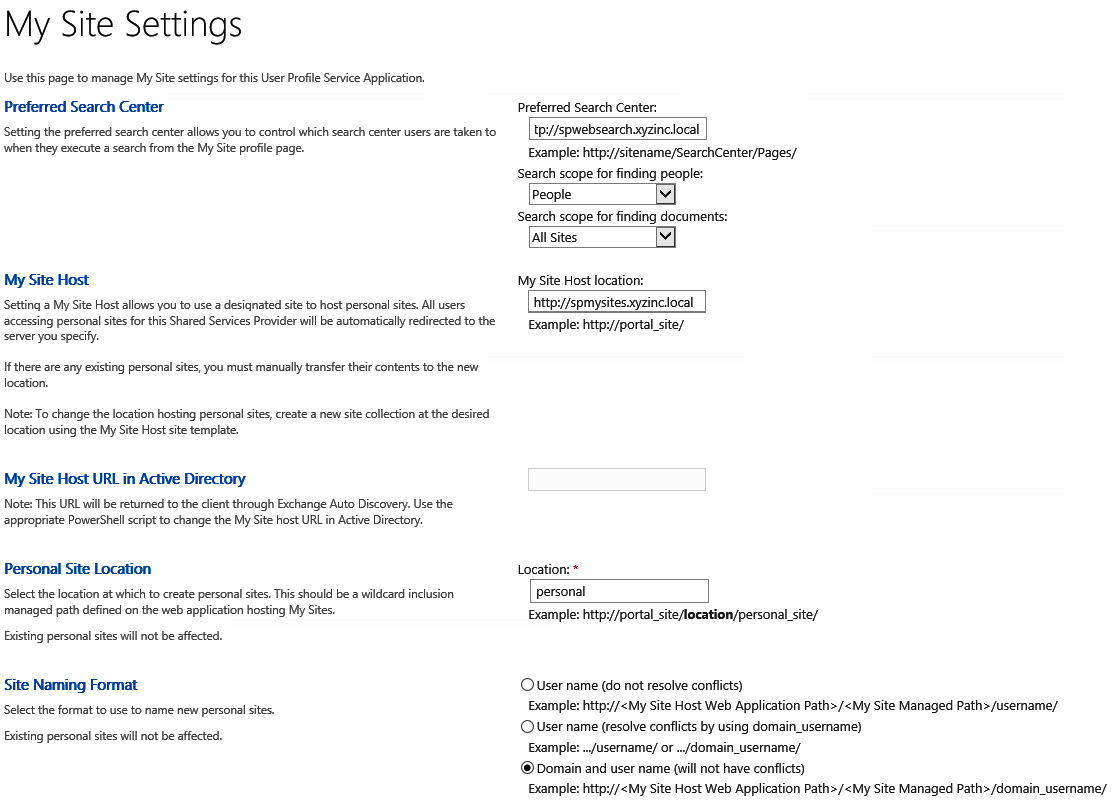
Figure 6.29 – My Site Settings
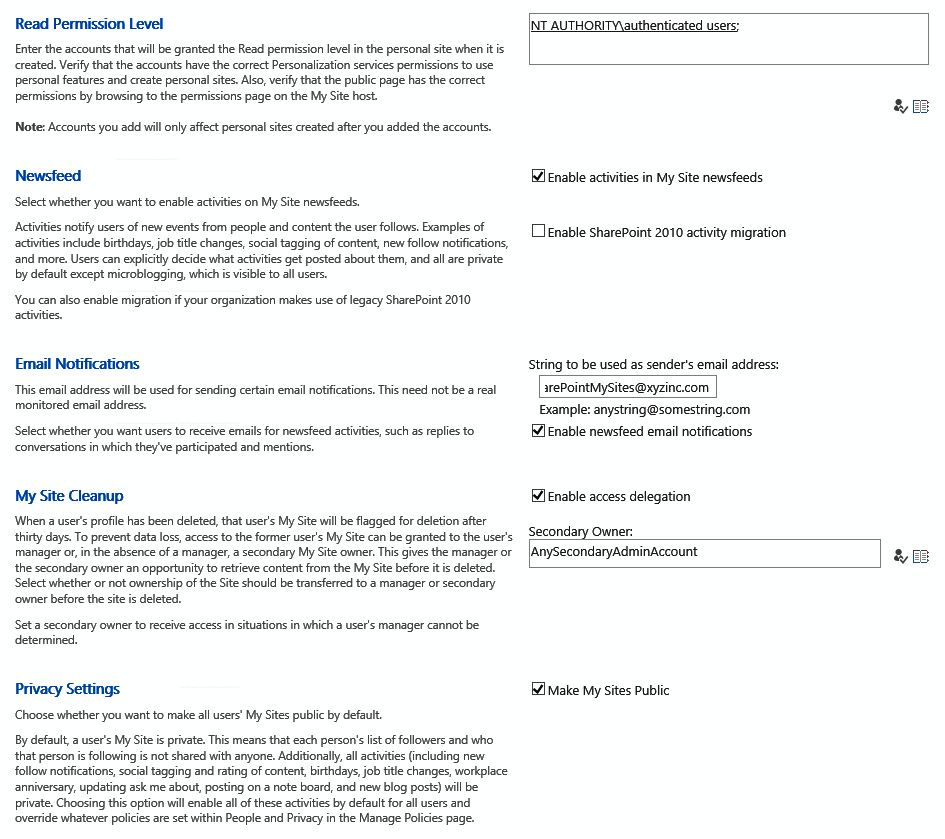
Figure 6.30 – My Site Settings (continued)
Input the information according to your requirements to finalize the MySite configuration, then click OK.
Now let's configure our managed paths, if there are any you need to configure as part of your web application. You can look at your old farm to make sure you understand how these paths need to be in place during migration processes so that the paths present in your prior environment match up with the content you are migrating:

Figure 6.31 – Define Managed Paths
Managed paths are paths set when you have areas of a web application that you want to set as a standard path within the URL. So, with MySite, you will want to set the path as /personal, or whatever it is that is also in the configuration for MySite. This path is assigned to all MySites within the farm, so the users understand where they are within the web application. It's hardcoded upon creation and will not change, and this means that no mistakes happen when we know where a site collection can be created for MySites outside of this hard-coded path.
This is how you create a managed path using PowerShell:
New-SPManagedPath -RelativeUrl "HR" -WebApplication http://spweb.xyzinc.local
$wa = Get-SPWebApplication http://spweb.xyzinc.local $wa.SelfServiceSiteCreationEnabled = $true $wa.Update()
Your web applications should be all set now:

Figure 6.32 – Web applications
Finally, we need to move our BlobCache location within our web application's default.aspx pages. This is to make sure that BlobCache does not get collected on the C drive where your OS lives. You can do this for all web applications configured to use Remote Blob Storage (RBS). To do that, follow these instructions (before this, make a copy of the file for safekeeping):
- Find your BlobCache location. In my case, this is E:SPLogsBlobCache:

Figure 6.33 – BlobCache
- Find inetpub, which is where your websites for SharePoint are running, and find the site you are looking for. Open the wwwroot folder:

Figure 6.34 – The wwwroot folder
- Open the wss folder:

Figure 6.35 – The wss folder
- Open the VirtualDirectories folder:

Figure 6.36 – The virtual directories folder
- Open the folder where your website is located, which in my case is spweb.xyzinc.local80:
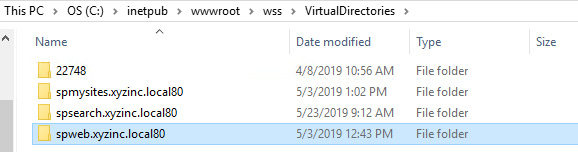
Figure 6.37 – The website location folder
- Choose web.config and right-click to open and select Open with:
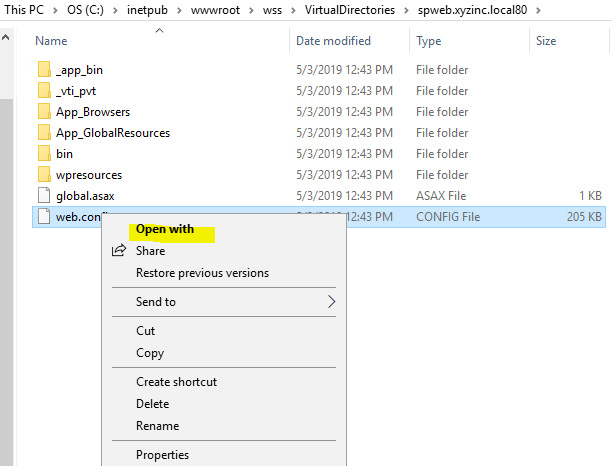
Figure 6.38 – The Open with option
- Choose Notepad:
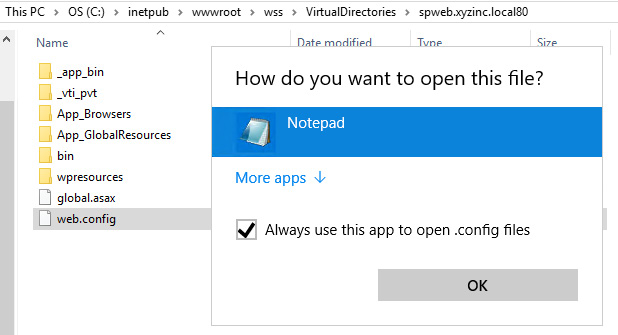
Figure 6.39 – Opening with Notepad
- Click Find and BlobCache:

Figure 6.40 – Finding BlobCache
- Edit the location and click Save :
Figure 6.41 – BlobCache location
All done! This must be completed for every server and every web application web.config!
Web Application General Settings
Each web application has a configuration for features and other areas to set the expectations of the content captured in the web application. Each web application has an area called Web Application General Settings. Let's look at the settings for the site collection configuration:
- Set the time zone for the web application and other parameters:
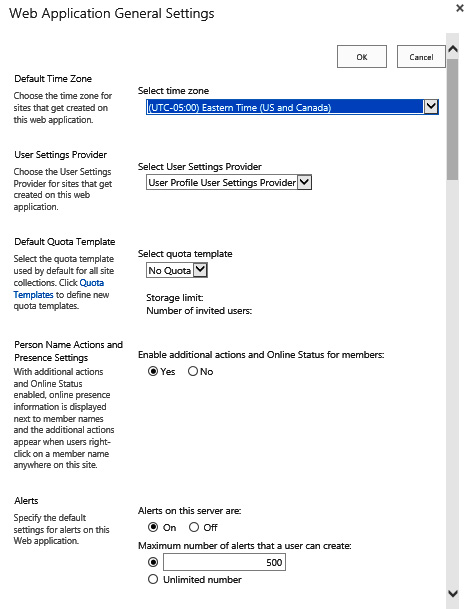
Figure 6.42 – Web Application General Settings
The user settings provider is the setting for the configured User Profile service provider, where you can have one or more User Profile service applications in your environment. This gives you an option to choose.
- Please set Browser File Handling to what you believe it needs to be in your environment. I have mostly used Permissive settings as this opens files within document libraries and does not download files to the desktop:

Figure 6.43 –Browser File Handling
- Choose the options carefully:

Figure 6.44 – Web Application General Settings
- Notice the default maximum upload size has changed. Make a change if necessary:

Figure 6.45 – Recycle bin, maximum upload size, and cookie settings
Important Note
Remember that you only have a certain amount of storage designated for this environment. Set the document upload size to a setting you know you can handle as the documents really add up at these larger sizes. Also, remember that Shredded Storage is used as well to make sure that documents are not duplicated and the subset that was changed is captured in versioning.
- The following is the PowerShell example for setting parameters within the general settings of a web application:
$siteURL = "http://spweb.xyzinc.local" | $webApp = Get-SPWebApplication $siteURL
$webApp.BrowserFileHandling = [Microsoft.SharePoint.SPBrowserFileHandling]::Permissive
There are many other parameters for this command using $webapp and the related area of focus to set parameters. The parameters for this command can be found on GitHub.
Zones
When setting up web applications in SharePoint, we have a couple of things to think about. One of them is zoning. Zoning helps us to define web application access from different URLs. Adding a URL to a zone gives the users in that zone a way to access the same content as the default zone but from another URL; for example, hr.xyzinc.local could be accessed through our internet zone using hr.xyzinc.com. Separate access pipelines could be used from a router or an ISA server perspective to have users access a site through a certain URL. This method also creates a separate IIS site as well, so you can configure the site as you would any individual site in IIS.
The different zones available to create these access points are as follows:
- Default
- Intranet
- Internet
- Extranet
- Custom
Use the zones within the configuration to determine what the URL for the alternate access mapping is being used for. This helps users to understand why URLs were created and also to put URLs in some type of category.
Alternate access mappings
Alternate access mappings also relate to zones and can be set up within SharePoint as a separate link to the content using a separate URL. This gives you many access URL points to the same content that can be supported by different zones in SharePoint.
The following figure shows the alternate access mapping that was created for the Central Administration site. The alternate access mapping URL is http:ca.xyzinc.local:

Figure 6.46 – Alternate Access Mappings
To set the alternate access mapping using PowerShell, use the following command:
Set-SPAlternateURL -Identity http://spweb.xyzinc.local -Zone "Internet"
There is another method you can use to create separate URLs, which is using extended web applications. Let's look at that method in the next section.
Extending a web application
When using the extended web application feature, we are basically creating a new IIS website that directs users to the same content that we are extending in a default zone web application. So, in short, we are duplicating the site with a new zone and URL. This extended site can be configured with a separate IP address in IIS as well because a new site is created within IIS that is separate from the default site. This is powerful because we are given the ability to have separate bindings related to this extended site in IIS. This also helps as an example for you to separate external traffic to a given site and even where this site resides on server resources. Pointing external traffic to that site, for example, it would be easy to direct traffic from external sources to this URL at that point.
The following figure shows how this would look. Two IIS websites are using the same content database:
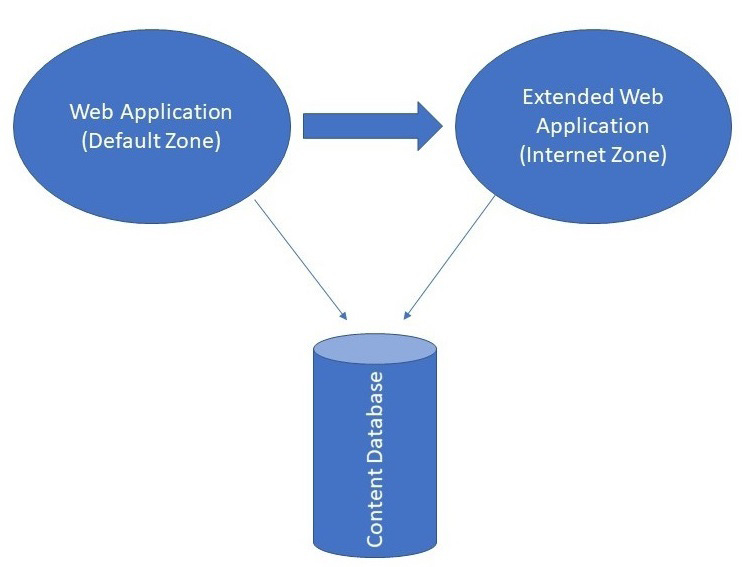
Figure 6.47 – A diagram of two web applications using the same content database
Let's look at the steps:
- Create your extended web application and name it:

Figure 6.48 – Extend Web Application to Another IIS Web Site
- Choose your authentication method and the zone that this extended web application should belong to:
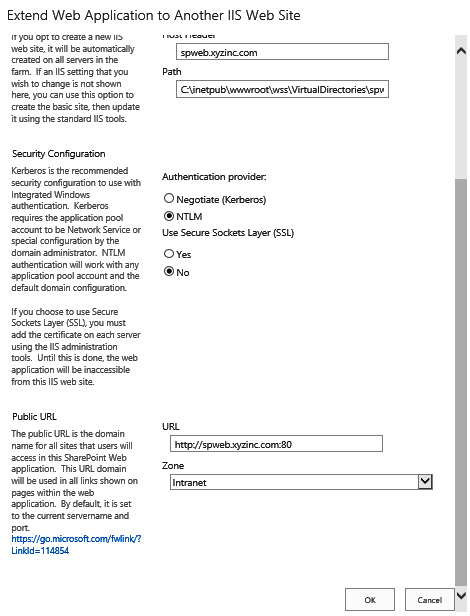
Figure 6.49 – Choose an authentication method
- To create an extended web application using PowerShell, use the following command:
Get-SPWebApplication -Identity https://spweb.xyzinc.com | New-SPWebApplicationExtension -Name XYZ SPWeb External Web Application -HostHeader spwebexternal.xyzinc.com -Zone Internet -URL https://spwebexternal.xyzinc.com -Port 443 -AuthenticationProvider NTLM
Now that we have finished configuring the web application, let's learn about service associations, which we discussed earlier in this chapter.
Associating services
Service association is very important, and this is a configuration that I do not see a lot of companies using even when they have a bunch of web applications running in a farm. Creating default services is great if you have one web application, but if you have many, we should use this configuration method to help isolate services. Some web application content may not use all the services configured in a farm. So, why should we associate services that they will not use?
Let's associate services in the following steps so that you can see how this can help you in managing your server resources and make better choices in configuring your environment. As you can see, there are two web applications in the following figure:

Figure 6.50 – Service Application Associations
Right now, there is only one configured proxy group, which needs to be changed based on our requirements. Let's look at the steps:
- Create your new service application to support your new web application:

Figure 6.51 – New Visio Graphics Service Application
- Choose the [custom] configuration in the dropdown for service application associations so that we can separate the services that support each web application:
![Figure 6.52 – The [custom] option](https://imgdetail.ebookreading.net/202109/9/9781789615371/9781789615371__9781789615371__files__image__Figure_6.52__B12062.jpg)
Figure 6.52 – The [custom] option
- Choosing [custom] now allows us to see that we have two separate service association configurations:

Figure 6.53 – Separate service association configurations
- Use the following command to do this using PowerShell:
Add-SPServiceApplicationProxyGroupMember -Identity < the service application proxy group > -Member <members to add to the service application proxy group>
Remember to always run PowerShell as administrator. This concludes the configuration for service application associations. Now let's move on to setting cache accounts for our farm.
Setting cache accounts
Cache accounts are very important accounts that serve the web application for duties such as storing properties about items within content in a SharePoint site. This reduces the load on the SQL server supporting the SharePoint farm, which also improves request latency. Items stored in the cache provide the items used by the publishing feature when it renders web pages. If you do not have these accounts, you will see weird things happening on the site, such as you not being able to log in anymore.
Please make sure to add these two accounts, one for super user and one for super reader, before migrating any content and letting users do any testing. These accounts do not need to be managed accounts – as you can see in the PowerShell script, passwords are nonexistent – so to avoid any issues, I personally keep these out of the managed accounts list. To add these accounts, you will need to use PowerShell.
Use this PowerShell command to set cache accounts for your web applications:
$wa = Get-SPWebApplication http://spweb.xyzinc.local $wa.Properties["portalsuperuseraccount"] = "i:o#.w|xyzincswritecache"$wa.Properties[:portalsuperreaderaccount"] = "i.o#.w|xyzincsreadcache"$wa.Update()
$wa = Get-SPWebApplication http://spweb.xyzinc.local $zp = $wa.ZonePolicies("Default")$policy = $zp.Add("i.o#.w|xyzincswritecache", "Portal Super User")$policyRole = $wa.PolicyRoles.GetSpecialRole(:FullControl")$policy.PolicyRoleBindings.Add($policyRole)$policy = $zp.Add("i:o#.w|xyzincsreadcache", "Portal Super Reader")$policyRole = $wa.PolicyRoles.GetSpecialRole("FullRead")$policy.PolicyRoleBindings.Add($policyRole)$wa.Update()
These settings are key to the performance of the farm. Without them, you could see a slowdown or no response at all. Make sure to complete this step before going live for the new sites in your new farm.
Summary
This chapter showed how SharePoint configuration is not as easy as people would believe. It does take some documentation, design, and thought to make it happen. We didn't even cover all that we need to do. Again, there are varying configurations and other integrations that could have happened here. Our aim in this book is to cover the basics and add some details to get you thinking about how you can make things work in your environment.
We covered a lot in this chapter, but the main point of this chapter was to make sure you have covered all your areas of focus. In the end, you do not want to release a product that is not complete. Make sure you have documented your backup and restore process and that you follow best practices for all your configurations. Double-check things and work with the departments to resolve any issues upfront and make sure to tell them about any foreseen issues beforehand. The more communication before going live, the better.
In the next chapter, we will talk about more final configurations and other integrations needed within the farm. Workflow Manager is a big part of the integrations needed to make this farm work successfully, give the farm some useful tools for the users to collaborate, and automate business processes.
Other topics covered will include authentication and more on migration. We have mentioned migration many times in this book, but in the next chapter, we will cover more on this topic to help you choose the best tool for you or use a content database and other methods that are available.
Questions
You can find the answers on GitHub under Assessments at https://github.com/PacktPublishing/Implementing-Microsoft-SharePoint-2019/blob/master/Assessments.docx
- When creating web applications for users, which web application zone must be created first before we can start extending web applications and adding alternate access mappings?
- Which method for migration could be used best if there were no custom solutions involved within the content?
- When crawling content, how does the crawler connect to the content?
- How many items must be available in the farm's search item count before we need to upgrade the Search service to a cloned service?
- When configuring the User Profile service, what account must be added to the administrators group of the server running the service?
- True or false: A MySite is a mandatory web application that needs to be created as part of the SharePoint farm.