Chapter 12: SharePoint Framework
The method of SharePoint development has gone through many iterations since SharePoint 2007. In SharePoint 2007, farm solutions were all the rage. Developers had free rein to create what they wanted – the custom solutions they needed with full integration with services running on the farm. However, this did not come without risk because farm solutions could in fact bring the entire farm to a halt. Next, in SharePoint 2010, we saw the rise of the sandbox solution, which still allowed developers to create customized solutions but limited the scope of the development and the impact on the site collection. Now, of course, we have SharePoint's client-side development, which includes add-in model script infusion and is now the newest of all the SharePoint frameworks.
Although we have seen some very much necessary changes throughout the versions of SharePoint over the years, there are some updates within SharePoint 2019 that put this platform on another level. As developers, there are tools and things we need to know to understand the framework in a platform so that we can go on to develop. In Chapter 10, SharePoint Advanced Reporting and Features, we saw the no-code developer tools available within the platform locally and most of them were accessed on-premises environments through gateways using hybrid configurations.
In this chapter, we will look at hardcore development and how it's changed for coders. We will take a quick look at the things that you need to know before you get started on working with SharePoint 2019 development. The topics covered in this chapter could be a book in itself but we just wanted to make sure to cover them as administrators need to know these areas, and if you are an aspiring developer, this may give you some information on how to get started on your quest to become a developer. It is a great time to start because things have changed.
The following topics will be covered in this chapter:
- Developer essentials
- Developer tools and languages
- Developer best practices
- SPFx
Technical requirements
To understand this chapter clearly, you must meet the following requirements:
- Be a beginner with some experience or an intermediate developer
You can find the code files present in this chapter on GitHub at https://github.com/PacktPublishing/Implementing-Microsoft-SharePoint-2019.
Developer essentials
Since SharePoint 2019 is a big change from all other versions of SharePoint, there are things you need to know to move forward as a developer. As stated, we have seen so many changes over the years, especially between 2007, 2010, and 2013. These versions brought big functionality changes, which then brought development changes and changes to out-of-the-box functionality.
The same goes for this version; as you will see in this chapter, SharePoint 2019 is bringing the cloud SharePoint Online service to an on-premises environment. Although it's not patched and updated to the standard of the server used in the cloud, we do see most features available for developers. Admins do not have the same configuration features in the on-premises servers that support SharePoint Online. These features will probably never surface in an on-premises build. If they do, these features would be a great addition to environments that need administrative support.
The good thing though is that developers get almost everything SharePoint Online has to offer in SharePoint 2019. Again, things have changed, so the things you need to know and the skills you need to have add to the learning curve. If you have not been keeping up, this can be detrimental to your job search as most SharePoint on-premises work is slowly fading. Do not make the mistake of keeping a job in SharePoint on-premises development and not aspiring to learn more about the new tools.
As developers, we need to have a certain skill set, especially when developing on the SharePoint platform as this is a niche environment. There are certain things you need to know, such as how to use and understand out-of-the-box features, lists, libraries, scripting, design, and other tools that all together will make you a great developer. Business knowledge is a big plus as your background can help you understand requirements when developing solutions.
One thing I have noticed over the years is that many developers do not understand out-of-the-box functionality. I have seen developers develop functionality that is already out of the box in a document library. This is not a great way to develop. It is best to use those out-of-the-box features and code around them using the API. Even some of the best developers you meet may not fit the skill set when working with SharePoint due to this need to know the area of SharePoint.
If you are new to SharePoint, focus on the functionality within the product first. Make sure to look at all the settings within sites, lists, and libraries. Look into features such as document sets, manage copy, versioning, and all the features available that support SharePoint to make sure you do not recreate something that is already available.
The important thing to know is the functional differences between on-premises and SharePoint Online, which are listed as follows:

Figure 12.1 – On-premises versus SharePoint Online
The list of areas you will need to really understand is as follows. Make sure you study them all in order to be a good developer. There is a lot to learn and we are going to try and cover as much as we can to help those who are new and those who are looking to update their skills. Companies are looking for developers that understand these areas of SharePoint. Here are the out-of-the-box features:
- Creating web pages
- Forms
- Workflows
- SQL databases
- Master pages
- SharePoint apps
- Page layouts
- User store
- Web parts or solutions
- SharePoint ribbon
- Workflow Manager
- InfoPath
- SharePoint Designer
- Power tools in Microsoft 365
- Visio
- Visual Studio
- PowerShell
As you can see, there is a lot here. SharePoint is vast and has a lot of twists and turns. You must really dive in to be a developer on this platform. It takes skill and years of learning on projects to really be a developer on this platform. With this knowledge of just the out-of-the-box features, you will also need to know how to code.
Let's look at the coding languages that support SharePoint:
- .NET: Our first coding language that is a basis of the product is .NET and is used with on-premises environments when you want to develop custom web parts. This coding language is very powerful, and it supports a wide variety of features and functionality, so it must be understood to program in SharePoint. .NET is a technology that supports Windows apps and web services. It provides a way to build and run those apps and services while providing a consistent object-oriented programming environment. The code is stored locally on the server and executed locally or can be executed remotely. The latest version of the framework is available, which is 5.0 or greater for new development, and is serviced with monthly security and reliability bug fixes. There are no plans to remove .NET Framework from the Microsoft platform.
- C#: Our next coding language is C#, which is also one that gives you the basis to build SharePoint solutions. This is a modern, object-oriented, and type-safe programming language. You may find similarities with other languages, such as C, C++, Java, and JavaScript, as the roots of these languages are very similar. Using both C# and .NET brings the vastest server-side library to build the most robust solutions. For more information, refer to the following links:
Introduction to C#: https://docs.microsoft.com/en-us/dotnet/csharp/getting-started/
Get started: https://docs.microsoft.com/en-us/dotnet/framework/get-started/
- JavaScript, the REST API, and jQuery: Our next coding language is JavaScript, the REST API, and jQuery. These tools can be used to develop custom web parts to alter and control design components on a page. The SharePoint Framework (SPFx) is the latest, which enables you to develop web parts for SharePoint and Teams clients. jQuery can also be used in conjunction with JavaScript with C# for web part development depending on the requirements.
- HTML5: Coding using this language is standard for all web pages now. This coding changes the way the page is designed, so you can create a unique design for a SharePoint site. Changing the master page using HTML5 will bring a different experience to SharePoint, allowing you to design in a way where you can brand it for your company uniquely instead of using the boxy, out-of-the-box layouts in SharePoint.
- CSS: The CSS coding framework is available on all websites and is easy to figure out. You can almost learn this online if you have a little time to spend. CSS provides the capabilities of giving your SharePoint site a facelift and make the site look more pleasing to the eye, which works with HTML to place images and other content on the page. To avoid the boxy style, look, and feel out of the box, learn both HTML5 and CSS and this will help you create a design that works for your customers.
Now, let's turn our attention to some of the helpful tools used in SharePoint development.
Helpful tools
Working with SharePoint, especially when in a development environment, you will need to know some administration basics. Understanding the tools and the different environments where the tools are supported is a big plus. Please make sure to learn more about Azure and Microsoft 365 as you could be working in a hybrid environment where the following tools will be useful:
- SharePoint PowerShell: The PowerShell module is provided directly by Microsoft and allows you to manage your Microsoft 365 and Azure environments. As part of SharePoint Server 2019, it is installed on the operating system and provides a great library for administrative tasks for on-premises environments.
Link to resources: https://docs.microsoft.com/en-us/powershell/module/sharepoint-online/?view=sharepoint-ps
- PnP: The PnP module, provided by the Pattern & Practices (PnP) community, is managed by Microsoft affiliates to help developers and administrators. It is available for many frameworks and is the latest library. There are libraries for SPFx, CSOM, C#-CSOM for SharePoint Online, and PnP for PowerShell. PnP also gives you a way to provision template features on any site with a predefined look and feel.
Link to resources: https://docs.microsoft.com/en-us/powershell/module/sharepoint-pnp/?view=sharepoint-ps
- Office 365 CLI: Using the CLI for Microsoft 365 can help manage your Microsoft 365 tenant and SPFx projects from any platform. The platforms supported are Windows, macOS, and Linux. Using the Bash, Cmder, or PowerShell CLIs and the CLI for Microsoft 365, you can manage various configuration settings of Microsoft 365. This tool also helps you manage SPFx and build automation scripts. The tool is provided partially by the PnP community in Microsoft.
Link to resources: https://pnp.github.io/office365-cli/
CLI blog: https://developer.microsoft.com/en-us/office/blogs/new-version-of-office-365-cli-040/
- Azure CLI: The Azure CLI can be used across many Azure services and is provided directly by Microsoft, which allows you to manage your Azure resources with an emphasis on automation. The Bash scripting and CLI help you get working fast with Azure. The Azure CLI offers the capability to load extensions provided by Microsoft. Extensions provide access to experimental commands and give you the ability to write your own CLI interfaces as well. It is available to install on Windows, macOS, and Linux environments.
Link to resources: https://docs.microsoft.com/en-us/cli/azure/?view=azure-cli-latest
Get started: https://docs.microsoft.com/en-us/cli/azure/get-started-with-azure-cli
List of managed services: https://docs.microsoft.com/en-us/cli/azure/azure-services-the-azure-cli-can-manage
- Azure Functions: This is a powerful way to develop ad hoc functions with serverless computer technology that accelerates and simplifies application development. Azure Functions can be invoked from Power Automate as well to perform operations and it also supports flexible scaling based on your workload volume. The tool can incorporate C# and PowerShell when needed. Use Visual Studio and Visual Studio Code on your local machine, which are integrated fully into the entire Azure platform.
Get started: https://azure.microsoft.com/en-us/services/functions/#get-started
Code and tools summary
As you can see, there is a vast amount of information here where all topics could be their own book. This can be frustrating for a newbie or an intermediate developer. The only advice we can give is to jump in with all your determination and win the battle. Try to find a quick way in; for example, start with JavaScript and then build from there. You can add on languages; as you can see, some complement each other and are similar in code structure.
We have not been able to really jump into these topics because of the limitations of the book, but in this section, we wanted to make sure to let you know of the possibilities of the tools available that you can use on-premises and in Microsoft 365. They are all somewhat needed in a hybrid model and some are dedicated to on-premises only, but the goal of this is to make you aware of those tools so that you can investigate and create rich experiences with SharePoint.
If you have some experience, there is still a lot to learn here and you can spend countless hours trying to figure out the best coding solution to start with. Our recommendation again is to start with JavaScript but if you're more experienced, you may already know this coding language. If that is the case, assess what is needed within your job and go for that language or look at some of the tools to see what really aligns with your company's needs. The more you can make yourself available, the more valuable you will be to your company.
If you are not actively developing in SharePoint already, make sure you leave behind all the things you learned previously on other platforms as this is a total start-from-scratch technology. Make sure to learn the basics first (out of the box) and then move on to coding so that you understand the platform. Navigate through a SharePoint site and look at the site settings to make sure you understand the functionality that is already there. We suggest learning JavaScript and PowerShell first because they will give you quick coding solutions that work well with SharePoint 2019 and SharePoint Online. This will bridge the gap from SharePoint on-premises to SharePoint Online to make you more marketable.
To learn more about other on-premises administrative tools that are not mentioned here specifically for SharePoint Server 2019, check out Chapter 9, Managing Performance and Troubleshooting. Please refer to that chapter to help you with identifying other administrative tools for on-premises environments.
Developer experience and teamwork
Earlier in this section, we mentioned your job experience as it really plays a big part in how you build a solution or make changes to support the end user experience. You must have a good work ethic to identify end users' problems and then find the right solution. This may take time and some testing, which may include a few different methods and skills, as we will mention in this chapter, but your job and personal experiences come into play because the more you can identify with the users' work, the better you will understand what they are aiming for.
Creating solutions for users, especially those that want a professional look and feel along with functionality, you really need to understand the end user experience. This helps guide the user within the solutions to use the functionality you develop. You need to make sure you think out your processes and make easy-to-use solutions. Again, the more you understand SharePoint and the out-of-the-box features, the better you will be at creating solutions.
When becoming a developer, always gravitate toward your strengths by looking for jobs that include the personal or job experiences you have. For example, if you were a security guard, learn how SharePoint and Microsoft 365 could help a company like that and see what type of solutions you would build for them to make the company more automated and work smarter. This is your strength, not your weakness.
The types of jobs available for developers that you will see all the time in job posts are the following:
- Full stack engineer: An engineer who can handle both frontend and backend work where they can create a fully functional web application.
- Frontend engineer: User interface developer, which includes visual elements such as layouts and aesthetics.
- Backend engineer: Uses APIs to integrate data systems, caches, and email systems and takes on underlying performance and logic in applications.
- Software engineer (TEST): Validates the quality of the application using automated tests, tools, and other methods to validate the product.
- DevOps engineer: Builds, deploys, integrates, and administers application infrastructure, database systems, and servers.
- Security engineer: Specializes in creating systems, methods, and procedures that test the security of a software system. Exploits and fixes flaws as they penetrate to discover vulnerabilities.
Finding an eagerness to learn really starts with your interests. Find a job you believe you will enjoy. If you love to design things and have an artsy-type background, you may want to stick with trying to aspire to be a frontend engineer. If you love data and working with reports, you may want to look at being a backend engineer. It's all in what you want but it's best to get into something that piques your interest; otherwise, you will end up dropping out of classes and be bored with the work to achieve these goals.
Once you achieve these goals, there are players in the development teams you need to know about. We will explain some other members that become important to your everyday work.
Team members
As we saw earlier when we talked about skill sets and teams, there is a position that helps in these types of situations where you need guidance on the direction of a solution. This is where the business analyst comes in and can help you determine requirements, and since they should have a SharePoint and coding background, they can help you identify those features you may need to research and/or customize to make the solution work. In Agile project management, as explained in the next section, this is a Product Owner. This is a necessary team member in heavily developed SharePoint environments. They interface with the users and meet with them to gather requirements. If you use Jira, you will see the stories these team members create, which are worked on as a team, but the initial stories will be entered by a business analyst.
You could also encounter a Scrum Master as Agile project management is really surging as the go-to project management tool. This project management style is, I have to say, very useful, especially with development. I was on a team that used this methodology and it really helps to keep track of what is going on within the teams associated with the product they support. Daily standup meetings come into play that are centered around stories, which are requirements broken down into stages considering the customers' needs and how we build out those solutions within the SharePoint platform. Please read more on Agile at the following link. I encountered the company Scaled Agile recently and like their approach to learning the craft:
Training users
This activity goes right along with requirements as the requirements need to be met so that the user can put two and two together when looking at what they told you and what you bring to them to demo. Your demo will determine whether you have hit the mark when it comes to the development of the solution and if not, they can let you know of any areas that may seem rough that they want to be done a little differently.
Once those areas are updated and tested and you have determined that the user has no other concerns or bugs, then you can have the users test the solution themselves in a test environment, which you would need to vet the changes for first through a tester prior to delivery to the test users. This way, the users have access to the product that was vetted by a separate member of your team or another team. Also, if you want to hold their hand before releasing the solution, you can do a training session with them to make sure they understand the solution.
Your business analyst, or Product Owner, in Agile project management controls the interactions between you and the customer along with the Scrum Master. They also need to be well versed in the product you are supporting as they could have been a developer in the past or worked with a particular software intensely for years. This team member is key because they make recommendations to the customer on the requirements and also create stories about those requirements for you, the developer. Again, this is a very key interaction between customer and developer.
As mentioned, Agile will play heavily in a development team if this project management style is being used within your company. The stories you receive have time limitations and you can help grade the length of developing those areas with the team using story points and using a process called Planning Poker. This helps the team look at what are called backlog stories to help determine what stories should be next in line, as well as determining how much time each will take to complete and who should be responsible for the work. Read more on Agile project management so that you will not be surprised in this environment.
For me, using Agile was a great learning experience and I will tell you that those standup meetings can be brutal if you do not have the work completed in a timely fashion. This method promotes healthy dialog, learning from peers, and an organized development process, and also uncovers those that are not performing. Team dynamics are very important and in the experiences I have had, you really needed to be sharp because, on this side of IT, you can get eaten up quickly. If you want to be a developer, you have to know the craft well, especially in this environment.
Documentation
Make sure to document bug fixes; we will get into more detail about developers' best practices later in this chapter. We want to make sure you understand the processes involved and what you are expected to do as a developer. Document any thing and everything is needed so that you can capture where code fails; plus, it helps you to grow as a developer.
Not every shop is the same and some shops use Agile to manage projects, where code will be pushed quickly by separating requirements into chunks. This helps the business analyst to support the users and the developer to understand the requirements for working together as a team. This will also require you to be in daily meetings where you update your team on your assigned tasks. These chunks of coding projects are called Sprints.
We will not get into this much in this book, but we wanted to point Agile out especially for developers because you will be held under a microscope. I was on a contract with this style of project management and it really helped me grow. Being put on display every day to show what you have accomplished face to face with your manager and teammates will keep you on task, but if you are not doing the work or do not understand it, everyone will see your limited skill set openly.
Jobs and certifications
Find jobs at the beginning stages, if you are a newbie, that you can handle easily before you move on to bigger and better ones. This even goes for seasoned professionals because you may not have used the platform or will be new to some of the new coding languages. Gain some experience and then start taking on jobs you cannot yet handle but can get through the interview process for.
Doing this will build your character and your knowledge, especially when working with other developers that can be mentors to you. We should say that this may be hard in some cases as when you work with great developers, they can be the most critical of you. So, you must be tough and withstand the pain and even insults to your skills so that you can grow and exceed their abilities in the future. You must have a thick skin, unfortunately.
If you do not have the ability or time to provide due diligence to learn the platform, you will fail. We can tell you that right away. It takes some time, determination, and bumps and bruises to learn this platform as a newbie for an admin or developer. Even with the changes we are seeing in SharePoint 2019 and SharePoint Online, you will find yourself learning new tools and languages even if you are a seasoned professional.
There are several certifications for SharePoint that you can find on Microsoft's site. These certifications also help you to be more marketable and display your eagerness to learn and provide credible skills needed by a company. You can learn more about certifications at the following link, but we did not want to list them because they change often, so please look at what is available at the time you're reading:
https://docs.microsoft.com/en-us/learn/certifications/browse/
Also, if you want to start to learn from authorized training, please check out the following link:
Where do you start? To get started with working on your skills, you need training and an environment to play in. Let's look at how to set up a development environment and what things we can use to help us get things in place to start our journey.
Setting up a development environment
Before you can start using the tools, look at some training, but you must also have an environment to use to set up SharePoint 2019 and install the tools on the server. When setting up your environment, refer to this book; you can use this book to set up your environment from an installation perspective. If you are using a laptop or desktop, there are several virtual software options available for you to use on those platforms. You can also purchase a used server on eBay, lease a server from a hosting company, or set up a server in the cloud using AWS or Azure (if you have the funds). Some cloud platforms offer free subscriptions for a period.
The SharePoint 2019 download is located on the Microsoft website and offers a free 90-day trial:
https://www.microsoft.com/en-us/download/details.aspx?id=57462
Again, if you are setting this environment up for a company you are supporting, ask them to give you an individual server. Make sure you are not setting up a server that supports many developers. The reason why is you can step on each other's toes, especially for reboots, and coding can overlap if you are not careful.
The environment should consist of the following server resources:
- 16 GB of RAM or more
- 500 GB of disk space or more
- Four cores of virtual processors or more
- A laptop or desktop compatible with the virtualization
- Licenses for SharePoint 2019 and any other integrated applications
The choices for virtual server host and other options are as follows:
- VirtualBox: This is a software platform used for personal usage environments, such as laptops, desktops, or even servers, but we do not recommend this platform for production environments: https://www.virtualbox.org/.
- VMware: The free version of VMware Player can be sufficient for testing, but for development, this solution can quickly become insufficient: https://www.vmware.com/products/workstation-player/workstation-player-evaluation.html.
- Hyper-V: This is the option used in this book to set up servers for installation. Microsoft provides this ability within the Microsoft operating system by configuring the server options: https://docs.microsoft.com/en-us/virtualization/hyper-v-on-windows/quick-start/enable-hyper-v.
- Parallels: This gives you the option to run Windows on macOS but is not free if you want to virtualize Windows environments. The pricing for the product is not bad and you pay by year. We have never used it, so we cannot give any reviews, but it's worth a try if you strictly use macOS: https://www.parallels.com/.
- Azure: This is a cloud infrastructure environment provided by Microsoft and provides 12 free months of service: https://azure.microsoft.com/en-us/free/search/?OCID=AID2100131_SEM_1aa5a26fbf5a139881e0fdf61ec56fb0:G:s&ef_id=1aa5a26 fbf5a139881e0fdf61ec56fb0:G:s&msclkid=1aa5a26fbf5a 139881e0fdf61ec56fb0.
- Microsoft Partner Program: Microsoft offers an Action Pack subscription for those who are looking to work with Microsoft products. This could be a small company or a newbie looking to start developing, but you gain access to licenses for their software products: https://partner.microsoft.com/en-US/.
- AWS: This is a cloud infrastructure environment provided by Amazon. The service has a free tier that can be used for development and testing: https://aws.amazon.com/.
- Rackspace: This is another cloud infrastructure environment that has awesome engineers who can support you with using SharePoint. You will not find this in a lot of other offerings: https://www.rackspace.com.
- Team Foundation Server: This is used to version code and publish code within an environment. It is also used to package code for testing and integrates with Visual Studio: https://www.microsoft.com/en-us/download/details.aspx?id=48260.
Let's take a look at the modern and classic SharePoint sites. This book does not thoroughly explore the SharePoint user interface; however, these two types of SharePoint sites are important to discuss because the differences could inform your development choices.
Modern or classic?
This will be our only topic that has to do with the user interface for SharePoint in the book really. The reason for this is very important because you must know what the differences between a classic and a modern site are. There are two experiences you can choose from within SharePoint 2019: one is modern and the other is classic. These experiences bring different functionality and aspects to the SharePoint Server 2019 site experience, which is different from all the other versions of SharePoint. SharePoint Server 2016 has some updates to the classic experience but was never designed like SharePoint 2019.
The reason why these are important is that there are two distinct ways you can create content in SharePoint 2019 sites. When we refer to classic, it is just like referring to what Windows Authentication was called in SharePoint 2007 and 2010. It is the native way of doing things from when a product was created, sort of like a legacy version of a component.
When we refer to modern, we are referring to the most up-to-date way to display content or interact with features within sites. This way of displaying content also brings a new way of using sites, lists, and libraries. Remember, this will take some thought and training before it is exposed to your user community.
Your users need to know about changes implemented like this because everything changes at this point. The classic lists and libraries look and feel goes away and links to areas we used in site actions along with how to navigate to certain actions will change. This could be a learning curve for your users, so you need to really make them aware of what you are doing before you do it.
If you like your classic experience, then stick with the classic, but if you want some cool updates to your sites, lists, libraries, and other areas where the cloud can be supported by SharePoint 2019 using modern features, then you should upgrade. This upgrade brings a new set of Microsoft 365 cloud power tools, which are only made available in this experience. So, if you are using an on-premises gateway, then this is the only way you will be able to take advantage of the tools in the cloud and use them on-premises.
As a developer, this is important because if you do not have access to power tools in the cloud and are asked to develop something on a classic site using those tools, you need to make the users who want this change aware of the changes you have to implement before you can even get started.
Let's see what the differences between the classic and modern experiences are and what they look like in SharePoint 2019.
The modern experience
The modern experience in SharePoint Online and SharePoint 2019 is designed to be mobile, flexible, and easier to use than the prior classic experience. Although SharePoint Server 2019 supports the modern experience, you will notice that it is supported in several areas but not all features within SharePoint 2019. We will not cover all of these new experiences but will cover some you will want to be aware of.
The following experiences are modern by default:
- The SharePoint start page
- Lists and libraries
- New team site and communication site home pages
- New pages
- Site contents
- Site usage
- Recycle bin
In the following screenshot, you can see how the classic feel gives a legacy display of a library:

Figure 12.2 – Classic library
The following screenshot shows what the modern library looks like:

Figure 12.3 – Modern library
You can see from this screenshot of a modern library how the list has changed from the classic list screenshot. Users will be confused right away with how to use this library due to the differences from the classic view.
The SharePoint start page
This page has changed drastically, and you can see from the following screenshots that we have a new way of displaying information on our main page. This is what the classic page looks like:

Figure 12.4 – Classic view
Here is what the modern page looks like:

Figure 12.5 – Modern view
There are many areas Microsoft has tackled in using modern templates, but there is still more to be done. As you can see, not everything is customizable using this type of site. We suspect with the change from SharePoint Designer and InfoPath coming soon, there will be no more classic sites and everything will be modern in the next couple of years.
Site usage analytics
This component has a new look. It's very easy to look at analytics and see popular content on the site using this tool:
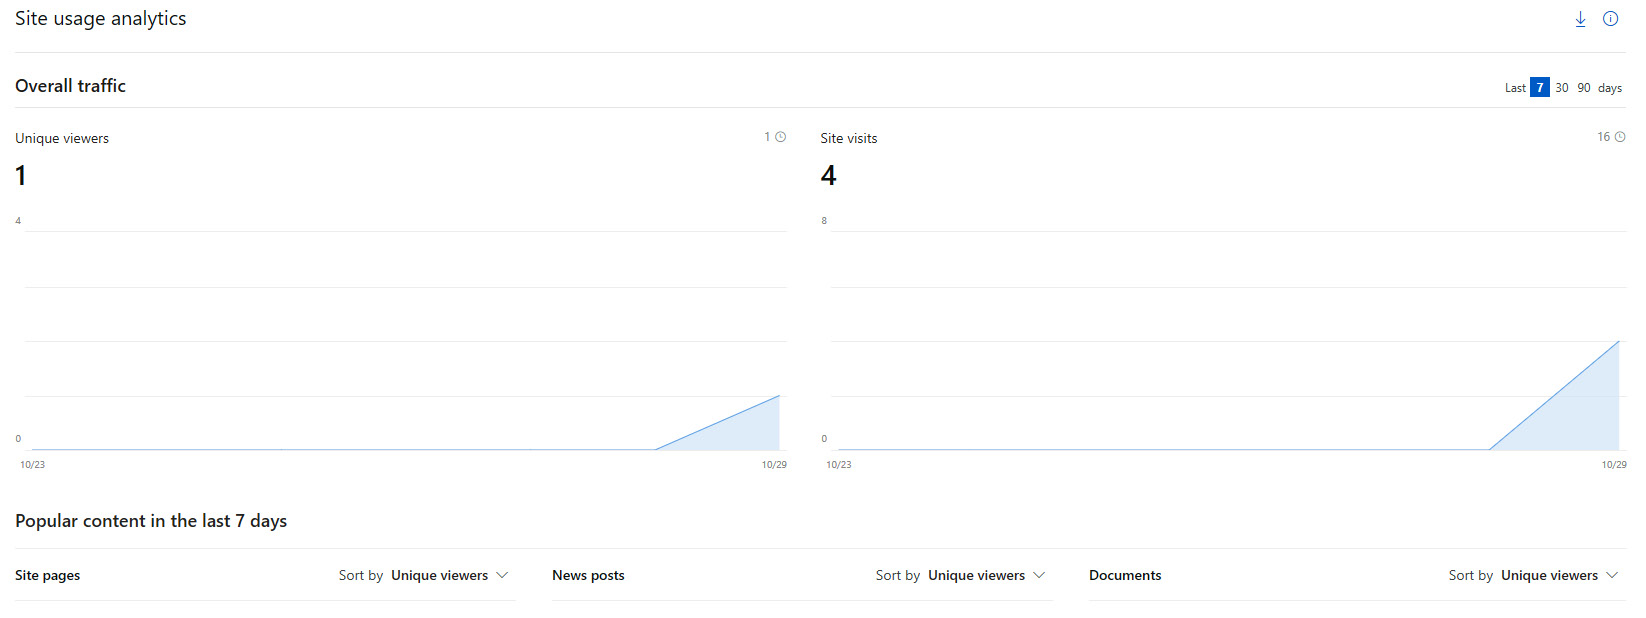
Figure 12.6 – Site analytics
Team sites and communication sites
There is also a new modern team site and an additional new communication site. Team sites got a facelift, as you can see from the SharePoint start page example. Communication sites are new, and they give you the ability to share news, reports, statuses, and other great information you can see in a visual format. Communication sites are like classic publishing sites but are simpler to create and do not need that legacy publishing site infrastructure (but boy do we remember that headache).
Search
Unfortunately, we haven't gone too much into search in this book but we wanted to mention this when it comes to modern sites. SharePoint Server 2019 comes with a modern search experience and you will be able to see results before typing in the search box. The results come in real time, so as you continue to type, the results update and change right on the page.
The modern search boxes can be found on the home page, communication sites, and modern team sites. There will be options to change where the results come from, such as a site you may have searched on but did not mean to search. Then, you have other options to refine your results. There is also a Show more results option that expands from the bottom of the search box and you can open the search results page and look at more details:

Figure 12.7 – Modern search experience
Other things for you to research are listed as follows, related to the modern experience:
- List column calculations and column formatting
- SPFx client-side web parts and extensions
- Webhooks
- Asset packaging – hosting your solution assets automatically from app catalog site collection
- Tenant scoped deployment – deploy your web parts across the farm just by installing them to the app catalog
- ALM APIs for add-on and SPFx solution management
What is not supported in modern sites are as follows:
- Site designs and site scripts
- Hub sites
- Custom modern themes – out-of-the-box modern themes are available for team sites and communication sites
- Site collection app catalog (potentially supported by RTM)
Supported browsers
SharePoint supports several web browsers that are most used, such as Internet Explorer, Mozilla Firefox, and Safari. However, some browsers may cause some functionality to be limited or available only through some alternative steps. At times, some of the functionalities may not be available for noncritical administrative tasks.
The following chart quickly summarizes some key points in user interface design:

Figure 12.8 – Design framework key points
There is so much to learn within this platform, and we have only touched the surface. This section aimed to help explain starting points and what you should be concentrating on as a developer. There are many applications to get used to and even if you are used to them, there are still changes in SharePoint 2019 that you need to address. In this next section, we will talk about SPFx and what it is, some history, what has changed, and how to get started.
SPFx overview
A brief history of SharePoint development follows. In the past, SharePoint development has consisted of the following methods: farm solutions, sandbox solutions, script injection using content editors and script editor web parts, and the SharePoint add-in/app model. The modern way to develop in SharePoint is through SPFx. Before we get into our examination of SPFx, let's go over the previous forms of SharePoint development:
- Farm solutions: Farm solutions were the original development method for SharePoint. They involved creating full-trust code and employing WSP. WSP is the file extension for the Windows SharePoint solution. This form of development allowed great creativity within SharePoint because developers could do pretty much whatever they wanted to do. Microsoft introduced full-trust farm solutions with SharePoint 2007. Developers were able to write fully customized server-side solutions using ASP.NET. Using SharePoint's API, developers could create solutions that integrated timer jobs and web parts. However, having the ability to write full-trust farm solutions using ASP.NET came with some obvious risks. Farm solutions are hosted in the IIS worker process (W3WP.exe), so the scope of possible impact is wide. Fully customized code can, and sometimes does, contain errors. A poorly created web part could bring down an entire SharePoint farm. For this reason, farm solutions are no longer allowed in SharePoint 2019 and SharePoint Online.
- Sandbox solutions: Sandbox solutions use SPUCWorkerProcess.exe. Code is contained in the SharePoint user code solution worker process. Sandbox solution code cannot affect the entire farm and its impact is contained to the site collection that the solution targets. Since the sandbox solution does not involve the IIS worker process and IIS application pool or IIS server, it does not have to be restarted. With the rollout of sandbox solutions in SharePoint 2010, site collection administrators were able to deploy solutions specific to their site collection without having high-level farm admin rights.
- Script injection: With the rollout of SharePoint 2013, Microsoft made the pivot to its preference for using the client-side framework for the development of custom master pages and branding. With this change, we began to see the move toward JavaScript injection. This method allows developers to write custom applications and push those scripts onto the page. Utilizing client-side development, users were able to add, modify, or remove elements from the SharePoint page.
- App model (add-ins): Starting with SharePoint 2013, Microsoft began to recommend that development within SharePoint use the app model. Within the app model, solutions are packaged in a .APP file. This file contains many files, including the SharePoint solution packages, any custom actions or customized app parts, web deployment packages, and more. As we stated in Chapter 7, Finalizing the Farm to Go Live – Part II, start to migrate your farm solutions to the add-in model to position yourself for migration to the cloud.
Please refer to the links in the Further reading section for more information on SPFx.
What is SPFx?
Now that we've explored the previously popular methods of SharePoint development, let's look at Microsoft's current development method, SPFx. SPFx is a Node.js and TypeScript development platform. One of the great benefits of SPFx is that it provides a faster browser experience. Another benefit is that SPFx is automatically responsive, so no matter the device, solutions will render in the appropriate aspect.
SPFx is used in the development of pages and web parts for SharePoint 2019 and SharePoint Online. In this chapter, we will give an overview of the latest SharePoint framework, as it relates to SharePoint 2019 in SharePoint online. We will briefly discuss how this framework is used in Microsoft Teams development as well. The Microsoft SharePoint framework is a client-side tool that gives developers what they need to extend SharePoint and create client-side solutions to best serve their customers' needs. See the following comparison chart, which gives a quick snapshot of the key differences between traditional SharePoint development and SPFx:
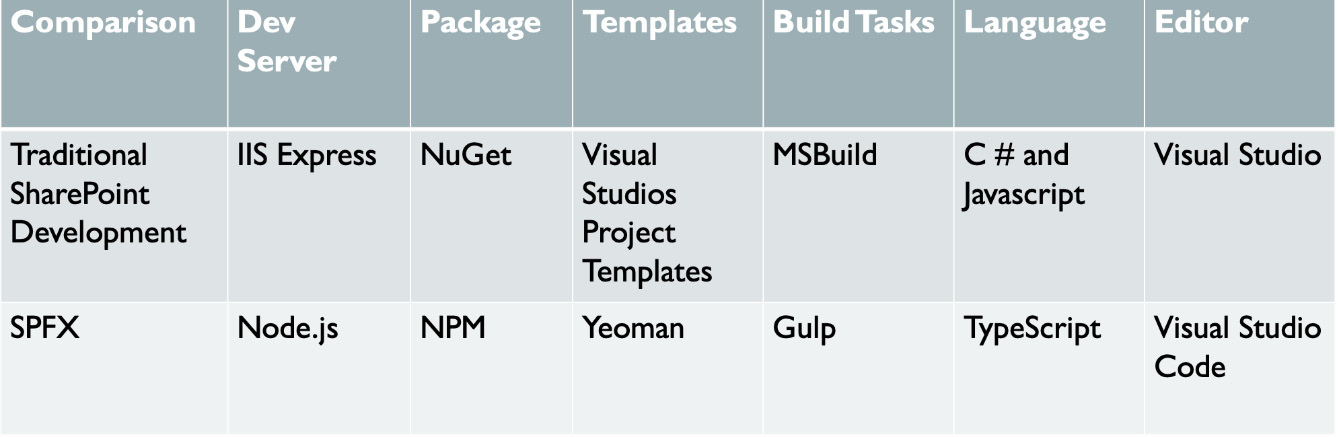
Figure 12.9 – Traditional SharePoint development versus SPFx
In this chapter, we will not do a deep dive into development methods and coding; however, Packt Publishing has a book that does a deep dive into SPFx. We will give details on how to set up your development environment and discuss some of the best practices to remember when developing solutions. The following are some of the key features of SPFx:
- SPFx client-side solutions can be used on all SharePoint sites, unless limited by the administrator.
- SPFx solutions can be created to extend the functionality of Microsoft Teams.
- Client-side web parts can be built using HTML or JavaScript.
- SPFx applies to both SharePoint Online and on-premises.
- SPFx is framework-agnostic, therefore you can use any JavaScript framework.
- The SharePoint client-side framework is supported both on-premises and online. Therefore, solutions created for the on-premises environment will migrate to SharePoint Online. This is important when road-mapping for the future state of your environment.
- Due to the use of common open source client-side development tools, developers that were not SharePoint developers before can now develop SharePoint solutions using SPFx.
- SPFx web parts can be added to classic and modern pages.
- SPFx can be used to create both client-based web parts and extensions that customize applications, commands set, and fields in lists or libraries.
Now that we have something of an understanding of what a developer can do, let's look at how we can create a server environment to support our new learning. We need to use the environment we created to try and develop on the platform. This will help us to understand how the developer tools are set up but, most importantly, give us a place to play with those tools once they are installed. If you are planning to take classes, this is the best way to get started as while learning, you can also do each lesson on your development servers. This will capture what you learned as well as giving you a way to enhance what you learned by making changes to those lessons within the class later after the class is over. So, let's dive into setting up our development environment!
Setting up a development environment to create SharePoint framework solutions
When setting up your development environment, you could use Visual Studio or a custom development environment to build your SharePoint framework solutions, and you can build these in Windows, macOS, or on the Linux platform. Please take the following listed steps to set up your development environment. Microsoft has recently moved from SPFx version 1.10 to version 1.11. As always, when following the instructions, check the documentation and make sure that you are installing the correct versions of development software. The following steps apply to SPFx 1.11.
The first thing that you need to do to set up a development environment is install Node.js. See the following chart for the Node.js version needed:

Figure 12.10 – Determine the version you need
Note
Node.js v9.x, v11.x, and v12.x are not supported in SPFx development.
You can check to see whether you already have Node.js by using the following steps:
- Open Command Prompt in PowerShell.
- Type Node-v in the command line.
- Press Enter.
If you have no version of Node.js installed or a version other than the currently supported v10.x.x for SharePoint 2019 and SharePoint Online, you must use the following steps to download the correct Node.js version.
Install Node.js
Let's look at the steps to install Node.js:
- Navigate to the following link: https://nodejs.org/en/download/releases/.
- Choose Node.js 10.x:
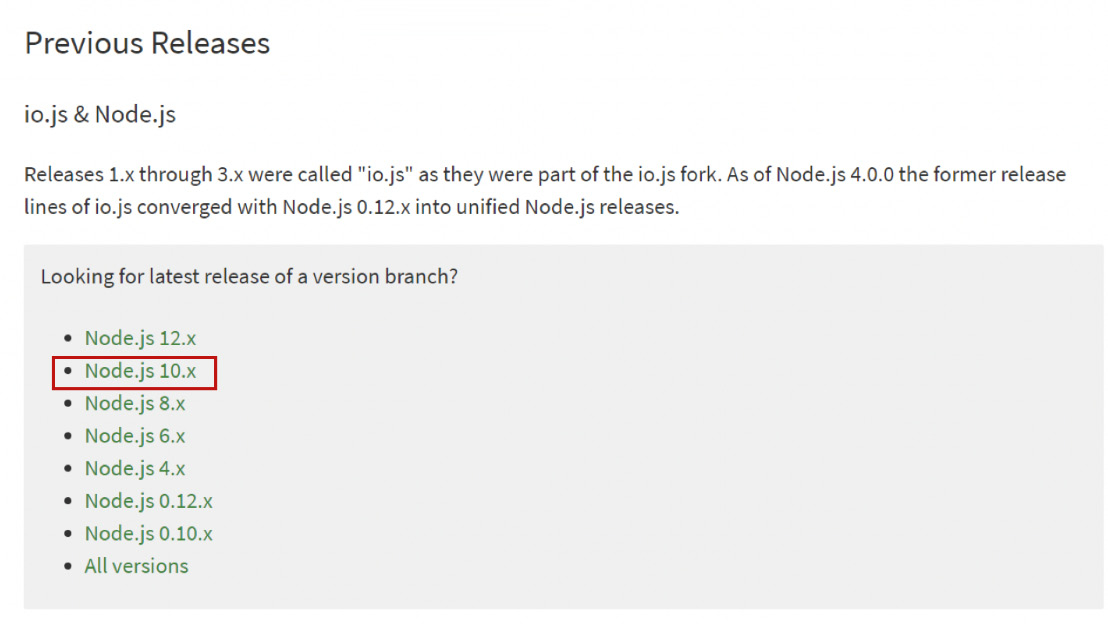
Figure 12.11 – Choosing the version you want to install
- You will see a list of Node.js versions. At the time of this book's creation, the supported version of Node.js is 10.22.1. If you are using Windows, choose either the 64-bit or 86-bit MSI version depending on your machine:
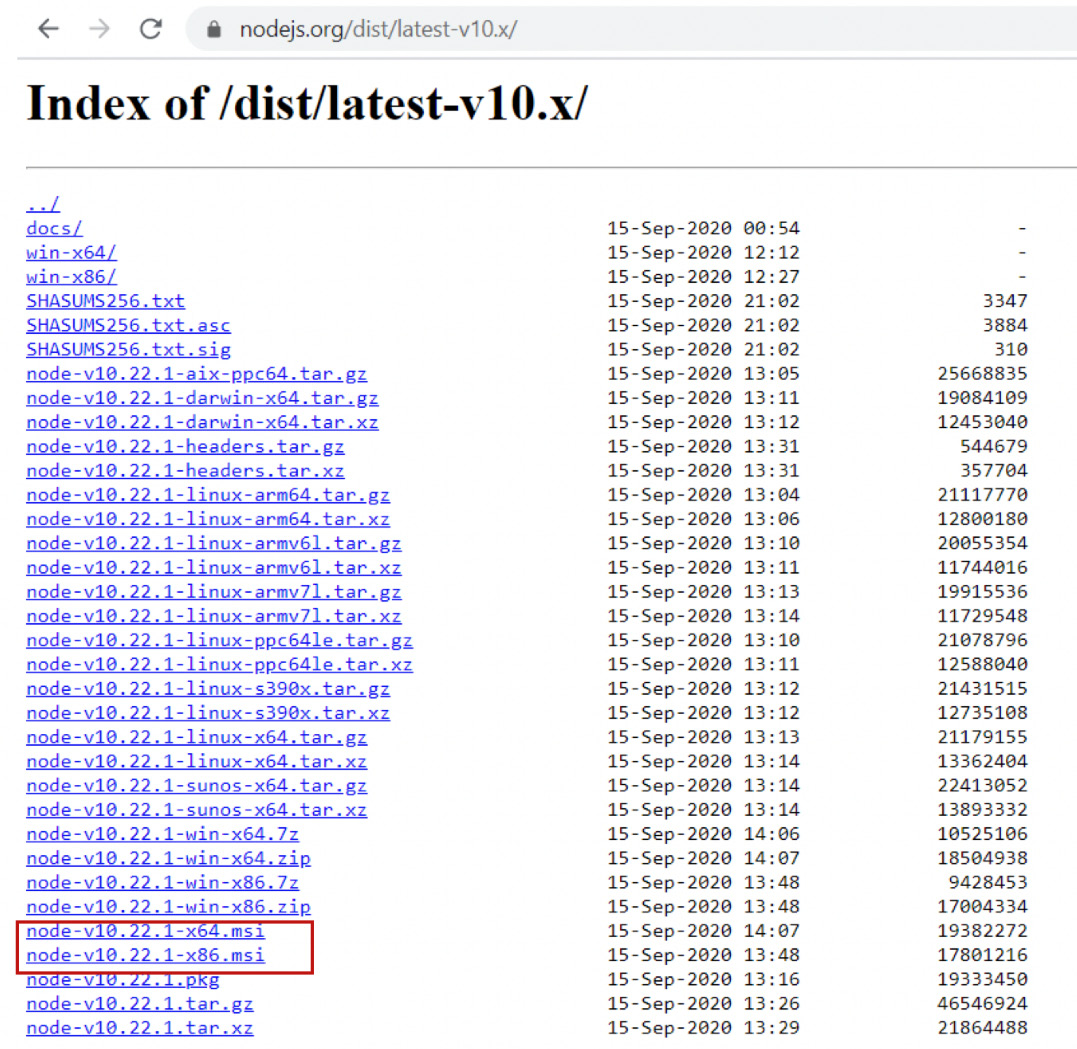
Figure 12.12 – Finding MSI files for installation
- My compatible version is x64. Double-click the link to download and double-click the package to install. Once the installation window opens, click Next:

Figure 12.13 – Install splash screen
- Read then accept the licensing agreement, and then click Next:

Figure 12.14 – Accepting the license agreement
- Choose the location for installation or go with the default:

Figure 12.15 – Choosing where to install Node.js
- Select Next:

Figure 12.16 – Choosing features
- Click the Install button to begin installation:

Figure 12.17 – Installation screen
- Allow the package to copy files to your machine:
Figure 12.18 – Install progress
- Click Finish:
Figure 12.19 – Finishing setup
- Verify that Node.js is installed on your computer by using the following command:
Node -v
And you will see the following as result:

Figure 12.20 – Node.js is ready
Now that we have installed Node.js, let's install a code editor.
Visual Studio setup
Whether you are using Visual Studio or a different product as your code editor, it is important that you have your structure and naming conventions determined. Please take the time up front to design a proper project structure and naming convention within your editor and stick with this throughout not only your current project but also future projects. Having a standardized naming convention will help you organize your projects and provide knowledge transfer when the time comes. There is nothing worse in the world of tech than having an application break and going to view the source code and not being able to make head nor tail of what you find in the code repository.
Installing Visual Studio Code
If you do not have a code editor installed already, you need to install one. In this book, we will use Visual Studio Code as our editor. There are other choices you can look into, such as Atom or WebStorm, so see which one of these works for you. To install Visual Studio Code, follow these steps:
- Navigate to the Visual Studio Code site located at https://code/visualstudio.com and click the Download for Windows button:

Figure 12.21 – Visual Studio download page
- Double-click the downloaded package to begin the installation. Accept the license agreement, then click Next:

Figure 12.22 – Accepting the license agreement
- Choose the location of the installation or keep the default:

Figure 12.23 – Choosing the location of the install
- Choose the location of the shortcut or keep the default:
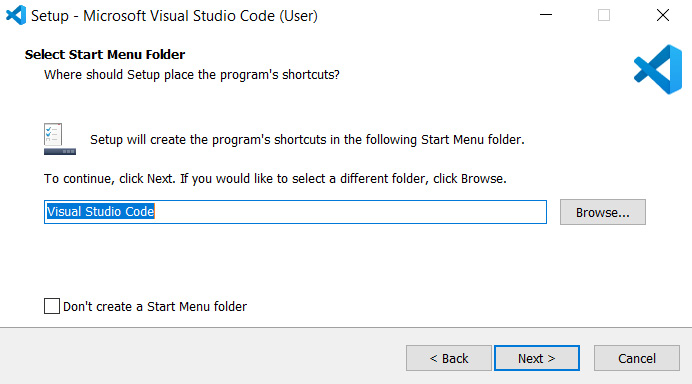
Figure 12.24 – Changing the start menu
- Select Install:
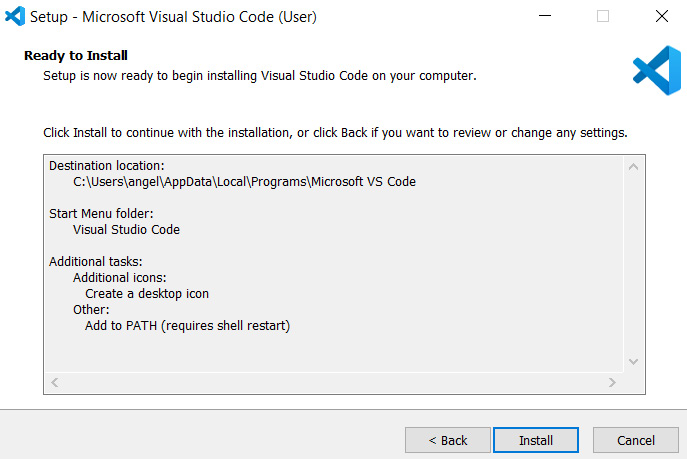
Figure 12.25 – Clicking to install
Visit the following link to learn more about packaging and deploying solutions in Visual Studio:
Now that we have set up Visual Studio Code, let's look at creating an app catalog within SharePoint to support deploying web parts.
Creating an app catalog
To deploy web parts in SharePoint, you must first create an app catalog site. This is the location where the developed web parts will live. From the app catalog, you can deploy solutions throughout your SharePoint environment. Follow these steps to create an app catalog:
- Navigate to SharePoint Central Administration.
From the landing page, click on the Apps heading and select Manage App Catalog:

Figure 12.26 – Manage App Catalog
- Select the web application where you want the app catalog.
- Select Create a new app catalog site and click OK:

Figure 12.27 – Create a new app catalog
- Add the details for the app catalog, including Title, URL, and the site collection admin details, and then click OK:
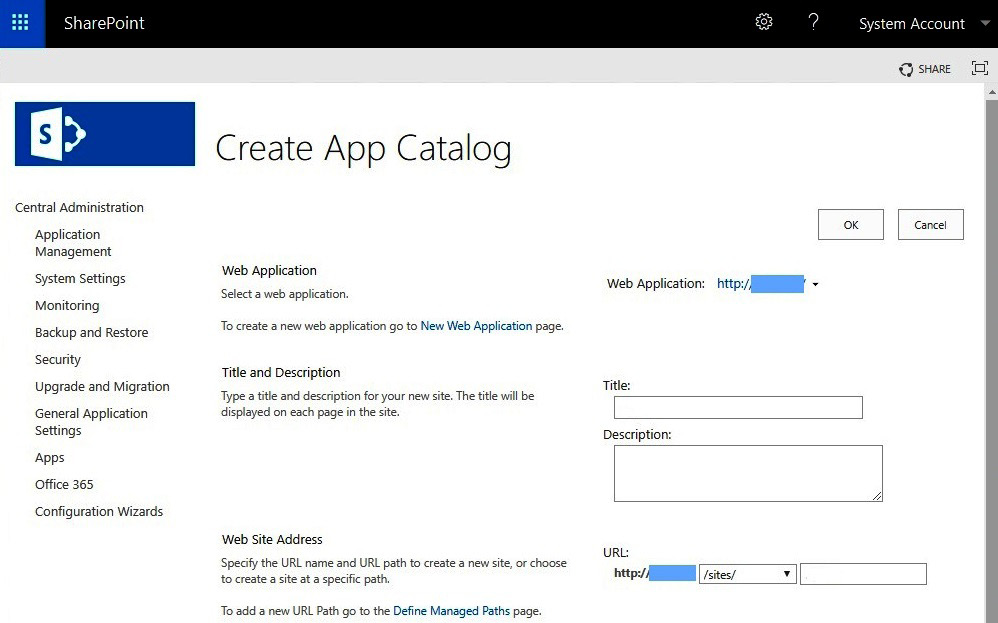
Figure 12.28 – Filling out the site collection details
Note.
The site collection creation may take a few moments. Once it is created, you will be able to install SharePoint framework solutions on the app catalog site.
More prerequisites for SPFx
Yeoman and Gulp are both prerequisites that must be installed for SPFx. Yeoman provides the project templates for your development work and Gulp is the task runner for SPFx.
To install Yeoman and Gulp globally, run the following command:
Npm install -g yo gulp
In addition to installing Yeoman and Gulp globally, you need to install the Yeoman SharePoint generator. The Yeoman SharePoint generator allows you to create client-side solutions using the correct toolchain and project structure. The generator gives you the common build tools that you will need, as well as the basic code, and supplies the "playground" websites for testing.
To install the Yeoman SharePoint generator, use the following command:
Npm i -g @microsoft/generator-sharepoint
To call the Yeoman SharePoint generator, use the following command:
Yo
Additionally, the command line can be used to scaffold projects instead of going through the interface prompts. You can use the following command to return a list of command-line options:
yo @microsoft/sharepoint --help
To learn more about scaffolding SharePoint development projects using the Yeoman generator, please visit the following link:
In the next section, let's go over the steps to upgrade an SPFx project to the latest version.
Upgrading existing SharePoint development projects from SPFx version 1.10 to version 1.11
Microsoft recently upgraded SPFx from version 1.10 to version 1.11. If you already have existing development packages created in version 1.10, you can take the following steps to upgrade your package to version 1.11:
- Navigate to the package.json file to locate all of the packages using SPFx version 1.10. You will need to use the package name in the console.
- To uninstall version 1.10, use the following:
npm uninstall @microsoft/{spfx-package-name}@1.10
- To install version 1.11, use the following:
npm install @microsoft/{spfx-package-name}@1.11 --save --save-exact
Make sure that you update the package solution with the developer information. This is a new addition with SPFx and if you do not update this, you will get an error during the Gulp package solution process.
Visit this link to learn more about the process to update the developer info:
https://docs.microsoft.com/en-us/sharepoint/dev/spfx/toolchain/sharepoint-framework-toolchain
New features of SPFx version 1.11 are as follows:
- Now supports SharePoint framework solutions via AppSource and Marketplace
- The ability to have your web parts exposed in Teams messages
- Additional developer information metadata fields
- The ability to preview images for a web part
Deprecated features in SPFx version 1.11 are as follows:
- No more support for system.js in the local workbench.
- Node.js v8 is no longer supported as discussed earlier; the accepted version is Node.js v10.xx.
- In this new version, Microsoft has removed the Knockout web framework option when creating web parts. Knockout can still be used but the default scaffolding is no longer available.
In the next section, we will discuss the SharePoint Framework toolchain. The vast array of open source development packages available will provide you with a head-start in developing client-side solutions. Be sure to visit the links included in the section to learn more.
The SharePoint Framework toolchain
The SharePoint Framework toolchain is a set of development tools and framework packages that allow the developer to build end-to-end client-side solutions and deploy these projects. Some SharePoint developers may have issues with this new approach to SharePoint development. However, developing via the modern web development toolchain is already very popular throughout the development industry and it is now the way of the future for SharePoint development:
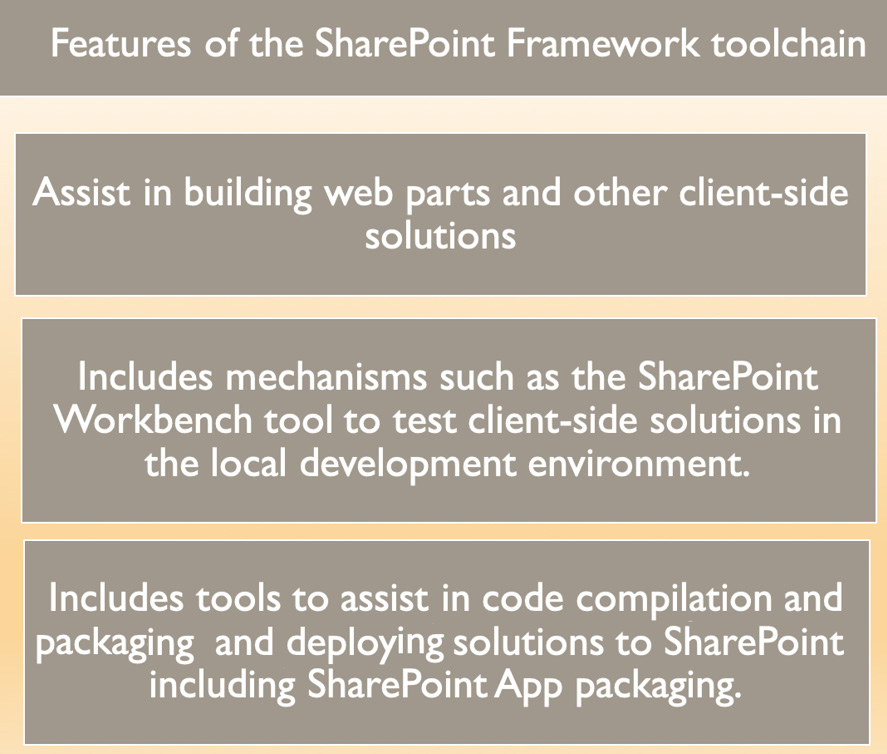
Figure 12.29 – SharePoint Framework features
Node.js changes coming soon
Microsoft now owns NPM, which was the largest software registry in the world. NPM is a package manager for JavaScript. NPM is popular primarily because of the open source Node.js. Microsoft has been betting on open source for the past few years and they have strengthened their position in the open source world by also purchasing GitHub, which is also widely used today. Since the purchase, they plan to integrate NPM with GitHub. Open an account today and get access to learn, see what's trending, access open source guides, and so much more:
In addition to being an open source online repository, NPM is also a command-line utility. You have seen many of the commands run in this chapter start with NPM; this is because NPM commands are used to install packages and manage versions and dependencies. If you run the npm install command from the root of your package, it will automatically install the dependencies associated with the package. This saves precious time in the development process and helps to minimize dependency errors in your project.
NPM has a large website that contains open source packages from all over the world and, as mentioned, is also now a part of GitHub. Packages from NPM can be adapted to fit your SPFx projects. The CLI is run from your terminal to interact with NPM. NPM also consists of a large registry of JavaScript and the metadata around it.
Visit the following link for NPM open source packages: https://www.npmjs.com/.
Next, we will walk through the steps to build your first client-side SPFX web part.
Develop a Client side WebPart
The following steps can be used to create a very simple web part. Of course, the options and complexity of building web parts are endless as your skill set grows. Although, in depth development is beyond the scope of this book, we wanted to show you a quick example to get you started. Follow these steps to begin:
- From the PowerShell Admin console create a project directory using the following command:
Md myfirstspfx-webpart
Which results in:

Figure 12.30: Create the project Directory
- Navigate to the newly created project directory via Powershell:
cd myfirstspfx-webpart
Which results in:

Figure 12.31: Navigating to the New Directory
- Run Yeoman SharePoint Generator
Yo @microsoft/sharepoint
Which gives us the following result:

Figure 12.32: Run Yeoman Generator
Answer the questions about the new webpart, including the solution name, target environment, and whether to allow deployment of this web part to all sites.
- Once you answer the final question, you will see the creation of the Webpart Scaffolding as shown in the following screen:

Figure 12.33: Scaffolding
- Once the scaffolding completes, you will see the below message of a successful Web Part creation:

Figure 12.34: Solution Creation Successful
- Since the client-side toolchain uses the HTTPS endpoint, you must install the developer Trust Certificate by using the following command:
gulp trust-dev-cert
- Run the following command to preview and build onto the new webpart:
gulp serve
- Your Web part preview will open in SharePoint Workbench.
Now that you have the information you need to set up your development environment and create your first SPFx web part, let us turn our attention to developer best practices so that you can create successful solutions and steer clear of any trouble.
Developer best practices
In this section, we will discuss developer best practices. Regardless of your deployment method or the system you are deploying to, it is important to keep in mind deployment best practices. Following best practices will get you much closer to realizing a successful deployment. Ignoring best practices will most definitely get you in a world of hurt eventually. First of all, every development rollout should have a plan; whether you are following the waterfall method where you follow your plan out from beginning to end or you are utilizing an Agile approach where you roll out shorter iterations and improve as you go, you must document your plan from the beginning all the way through to completion.
Requirement gathering
Requirement gathering can seem like the easy part of the development process – after all, you're only speaking with your customers and figuring out what they want and what they need in the development solution. However, this is the portion of development that can lead to a poor product or an upset customer who thought they were requesting one thing and you deliver another. The best way to avoid this is to make sure that you have the proper stakeholders in the room when you are gathering requirements. Make sure that the decision-makers are in the room and that those decision-makers, once you have gathered the full list of requirements, are willing to sign off on the finalized document.
In the statement of work or whatever agreement document it is that will cover this rollout, make sure that clauses are included to ensure that if requirements are changed by the customer, then the timeline and cost will have to be adjusted to accommodate these changes. The stakeholders need to know this from the beginning before you document the set of requirements. Let them know that changes can occur; however, changes will come at a cost, and that cost may be scrapping the entire development project and starting from the beginning.
Take a look at the following chart for a quick-glance view of some important requirement gathering techniques.
The following list is not an exhaustive list of requirement gathering techniques. However, these are the points that you must remember to cover when gathering requirements from clients. As you begin to gather more requirements for solutions, you can add additional techniques to the following list that have worked well for you:
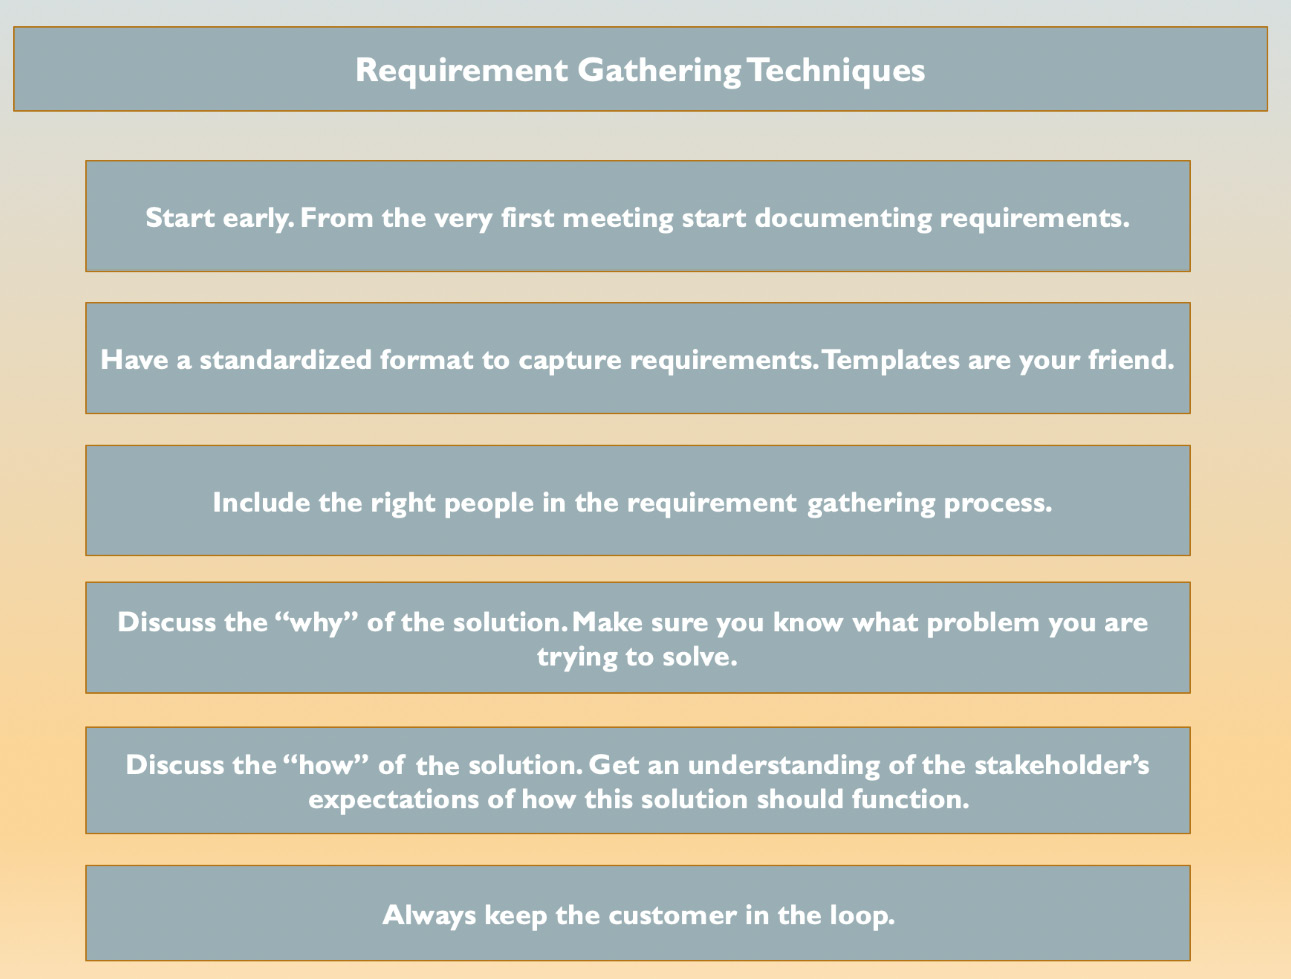
Figure 12.35 – Requirement gathering techniques
Many stakeholders and project teams will want to have the technical specifications for the development process in place before the actual development begins. This is one of the advantages of the waterfall method because you can build in your planning phase; you can build the creation of all of the technical specifications into the project plan before you ever develop your first piece of code for the project.
However, in the world of SharePoint, many of the stakeholders will not know exactly what they want until they see an actual representation of it. So, of course, if you follow this process and build out the development before your stakeholders get to try it, you risk finding out that what you developed was not what they needed. Communication gaps in development between project teams and stakeholders can often lead us down this road. Once you are so far down this road that the stakeholder can actually test the product that you have developed for them, you may find out that it is not indeed what they wanted and it may be too late – and oftentimes it is.
That is why we highly recommend the Agile approach to development. Agile does not mean development done on the fly; you still need a solid plan that outlines all of the stages. However, the iterative nature of Agile development will allow you to roll out the first stage, have your stakeholders test it and see whether you're going down the right path, and make corrections if necessary before you move on to the next stage. This method of development can lead to a successful deployment without the need for scrapping an entire project that did not meet the customers' needs.
Take a look at the following chart to see the stages of a development cycle.
Whether you are following a waterfall development approach or an Agile approach, the standard stages of development still apply. With an Agile approach, you will cycle through the development stages multiple times:

Figure 12.36 – Software development stages
The development cycle is very important to learn. In some organizations, you may see different variations of this or no development process at all. You also want to make sure you follow what works for you within this process to suit the specific processes that you encounter. Make sure you figure out where you can insert your own personal process cycle in there as well. Figure 12.31 gives you the basics, but remember to always modify it where you have to so that the development cycle works to support successful deployments.
Preproduction environments
The standard preproduction environments that you will be required to stand up and maintain for SharePoint development is the development environment and the User Acceptance Testing (UAT) environment. However, the development environment and UAT are the bare minima and these two environments often fail to offer enough testing of the new solution before deployment. It is recommended that in addition to the aforementioned environments, you stand up a System Integration Testing (SIT) or performance testing environment and a quality assurance environment:
- Development environment: The development environment is usually not an exact replica of the production environment. However, this environment should have all of the necessary elements for the developer to deploy and test the functionality of the newly created solution before deployment to the SIT environment.
- SIT: This is an extremely important step to ensure that the newly developed solution will seamlessly integrate into your existing platform. SIT is performed to test that all of the components of the SharePoint system perform to expectations after the deployment of a developed solution to catch any system issues that could occur before the solution is deployed in production. In some organizations, SIT is performed by the administrator of the SharePoint environment; in others, SIT is performed by the quality assurance team.
- UAT: UAT may be the most important stage to a successful deployment. Make sure that your UAT environment is in great condition as all of your environments should be. Have patches applied regularly and set up this environment to simulate the production environment as closely as possible. Test scripts should be created for all UATs.
If your organization is small, you may not have a quality assurance team; however, you can include other members of the technical team, including the capacity monitoring team. In most small shops, you would most likely do this testing yourself. This SIT should not be performed by the same person who developed the solution as this can lead to missed issues or reworking of code directly in SIT, which should never happen. The SIT environment should match your production environment. This is very important because if these environments do not match, production issues may not be caught before they reach production.
Most enterprise organizations have a quality assurance team; this team sits apart from your internal IT team and is tasked with rigorously testing solutions before they are deployed into production. Having a quality assurance environment is a bonus as this quality assurance team will maintain access to the environment and can easily test the developed solutions before deployment into production. However, some small companies will not have a separate quality assurance environment but that's OK; the quality assurance team can utilize the UAT environment for their testing.
The success or failure of your deployment depends on having good-quality test scripts that cover all of the functionality expected from the solution. Make sure that you understand how the business will utilize this solution, how they will access this solution, and how they perform their work day to day; these aspects should be covered in the test scripts. When creating test scripts, place yourself in the shoes of the business user and remember to write test scripts to cover the different roles of the users. Testing is an easy place to slack off. Do not get lazy here as it will cost you. Make sure all the functionality has been tested.
Testers
Choosing testers for the developed solution is extremely important. We've already discussed quality assurance performing testing on the solutions that you build; however, quality assurance will be testing the functionality of the solutions and possibly the logistics and ease of use from their perspective. However, members of the quality assurance team are typically very technologically savvy, and this may lead to an ease of use of the product that may not be experienced by the user.
You must have the user community involved in your testing. We caution you not to just hand over the test scripts, go away, and then come back for sign off. Testing your solution is not your users' primary job; they may be busy with other activities and not prioritize fully testing the solution. Users have been known to sign off on solutions that they have not thoroughly tested. This is why it is important to have the stakeholders engaged, as they are actually accountable for the success of this rollout. If the stakeholders are accountable, they are more likely to have a vested interest in the success of the solution. Choose your testers wisely and always get sign off from multiple stakeholders and their management.
Capacity planning
When you are developing and deploying solutions into an on-premises environment, you must consider the performance configuration of the platform before you start development.
Consider jobs running on the servers, search configurations that could drain capacity, and available storage on the platform for logs and data. Many times, developers create solutions in a silo, which can lead to overzealous development that does not take into account the actual limitations of the environment.
For instance, if a large number of users are going to be accessing a developed solution at the same time or the solution will lead to a heavy influx of documents to be stored in SharePoint, as in this example, this must be planned for with the capacity teams. If you are a one-person IT shop, then you must make sure that your environment is configured and revved up to handle the upswing in usage and storage.
List limits
When creating solutions, always keep in mind the SharePoint list limits and be sure that you are not designing a solution that will quickly breach those limitations. Use the following link to learn more about SharePoint limits: https://docs.microsoft.com/en-us/sharepoint/install/software-boundaries-and-limits-0.
Timeout issue
If the development solution is meant to ingest large files, you must configure the file upload size limits. Be aware that users can face timeout issues with large file uploads.
SharePoint on-premises is not the best place for extremely large files that eat up tons of storage space. This is where good governance will come into play.
If everyone developing, managing, and using solutions understands the limits, then it will be easier to prevent these types of issues. SharePoint storage is expensive; the use of connectors in your development can help to overcome timeout issues and storage limits. If the organization has access to other storage systems, then connectors can be developed to store the document external to SharePoint while allowing users to view the documents within SharePoint. This is a great method to consider if you run into this sort of issue because it alleviates the large storage expense while still taking advantage of the user interface and features of SharePoint that the users love.
Enterprise security
Begin with enterprise security in mind. You must follow the security standards of your organization. Do not wait until you are halfway through development, or even worse, finished with development and in production, to realize that your application goes against a policy. Make sure that you are familiar with the enterprise security policies before you begin development. It is often a good idea to have a meeting with the enterprise security group in the design phase to get initial approval and check that nothing you are developing is breaking any policies.
Summary
Microsoft has made it clear that the SharePoint development framework is the way of the future. Microsoft over the years has made the steady move from farm solutions to sandbox solutions to app solutions, and this in turn has made developing on the platform less risky and more uniform. Additionally, since SPFx uses common open source client development tools, traditional SharePoint developers who embraced this new way would now not be limited to only developing for SharePoint but could begin developing cross-platform. In the same vein, the agnostic framework has opened up the world of SharePoint development to developers that did not traditionally work in SharePoint. SPFx can be used to develop solutions both on-premises and on SharePoint Online. This standardized development method is great because as many organizations are looking to move their technological footprint from on-premises to the cloud, we must begin to create solutions even while on-premises that will migrate easily when the day comes.
Best practices should always be considered and adhered to when creating solutions. Taking the time to gather clear requirements is extremely important. You must make sure that you are building the solution that the client is expecting. Understanding the client's expectations occurs by listening to your client's needs and understanding the business problem that they need to solve. You need to work with the client throughout the entire development process to be sure that you are on track to providing that solution.
In this book, we tried to cover as much as we could to give you insights on what is new, what has changed, and what tools and knowledge you need to move forward in this new cloud-integrated SharePoint Server 2019 application. There are many people that work in this type of deployment and we hope we have touched on enough topics to give you insight into those teams and responsibilities, and enough technical information to get you moving on your project with confidence. Some of the topics on SharePoint 2019 require deeper knowledge and research, which we pointed out during the course of the book.
There was no way we could add any more to those areas in the book. When talking about technology, there are areas that require another book to learn what those technologies consist of. We recommend researching those areas and learning more about how you can implement SharePoint 2019 effectively from all standpoints. We hope this book has given you a good insight into implementing SharePoint 2019.
Questions
You can find the answers on GitHub under Assessments at https://github.com/PacktPublishing/Implementing-Microsoft-SharePoint-2019/blob/master/Assessments.docx
- In SPFx, Node.js v8.xx is currently supported. True or false?
a) True
b) False
- If you are an engineer who can create both frontend and backend fully functional web applications, which of the following do you qualify as?
a) DevOps engineer
b) Full stack engineer
c) Frontend engineer
- When dealing with client requirements, what is it best practice to do?
a) Speak with the client once, midway through development.
b) Gather requirements early on and continue to communicate with the client as requirements are refined and throughout the development process.
c) Gather all requirements from a junior member of the client staff and never speak to the decision-makers.
- What is NPM?
a) NPM is an open source Node.js software repository.
b) NPM is a product owned by IBM and is used to configure Azure.
c) NPM is a project management certification.
- SharePoint PowerShell allows you to manage Office 365 and Azure. True or false?
a) True
b) False
- What is the proper order of the development cycle?
a) Implementation, analysis, build, testing, design, maintenance
b) Analysis, design, testing, build, implementation, testing
c) Analysis, design, build, testing, implementation, maintenance
- SPFx web parts can be used on both classic and modern pages. True or false?
a) True
b) False
Further reading
For more information on SPFx, check out the following links:
- https://docs.microsoft.com/en-us/sharepoint/dev/spfx/sharepoint-2019-support
- https://docs.microsoft.com/en-us/sharepoint/dev/spfx/sharepoint-framework-overview
- https://docs.microsoft.com/en-us/sharepoint/dev/spfx/release-1.11.0
For more information on the SharePoint client library, check out https://docs.microsoft.com/en-us/sharepoint/dev/sp-add-ins/complete-basic-operations-using-sharepoint-client-library-code.
SharePoint code samples: https://docs.microsoft.com/en-us/sharepoint/dev/general-development/code-samples-for-sharepoint
SharePoint development center: https://developer.microsoft.com/en-us/sharepoint
SharePoint development documentation: https://docs.microsoft.com/en-us/sharepoint/dev/