Chapter 4: Installation Concepts
In this chapter, we will discuss SQL and SharePoint installation concepts and how to craft installations to fit the requirements your team is trying to build to support the infrastructure. In my travels, I have seen instances where many companies did not pay much attention to these initial steps on how the farm was installed, which later made it difficult to make changes in the infrastructure. We must take into consideration the different versions of software we should be using to make our infrastructure and project successful by implementing features that support our final build goals. Your server resource platform, as well as the version of the software, plays a big part in the infrastructure requirement efforts you are trying to support.
During our build, we must also pay attention to the configuration settings that also come into play to support the users in your community as these settings can make a difference in how the farm supports user requirement efforts. Some settings also play into how we recover from the disasters and hiccups we may face in our farm when the farm is in production use and available to our users.
In this chapter, we will go through the installation and configuration of SharePoint and SQL Server. The issues we have seen in most installations take the form of botched configurations. Looking closely at assessment reports from many different SharePoint farms and SQL Server instances will help bring up some obvious points in this book to help you avoid some pitfalls in the future.
We will also expand on some points that admins and others may gloss over as a non-issue at the beginning because they do this as part of their installation process. From what we have seen, we believe that most of the topics covered in this chapter need to be reviewed as there could be something you might have missed.
The following topics will be covered in this chapter:
- Installation updates
- Configuring SQL Server 2017
- Configuring SharePoint 2019 prerequisites
- SharePoint 2019 installation
Technical requirements
For you to understand this chapter and the knowledge shared, the following requirements must be met. Please review these points to ensure your understanding:
- Installation and configuration experience in SharePoint 2007/2010/2013/2016
- SQL Server experience with installation and configuration
You can find the code files present in this chapter on GitHub at https://github.com/PacktPublishing/Implementing-Microsoft-SharePoint-2019.
Let's get started!
Installation updates
We can see a different installation and evaluation process for the new versions of the Windows operating system, SQL, and SharePoint. In this section, we will go through initial installations of SQL Server 2017 Enterprise and SharePoint 2019 Enterprise to show you the step-by-step process of these new installations and point out the new and notable areas to key in on.
When we were writing this book, we really wanted to make sure to get the point across about changes. The reason why we mention this several times in this book is that a lot of you will be coming from a different version of SharePoint to upgrade to SharePoint 2019. So, we want to make sure to cover these areas well as some of you may be skipping versions of SharePoint, SQL, and operating systems to move to new Microsoft applications. Skipping over versions like this requires some research and there will be things you need to understand.
Some of the things in this installation that we need to talk about again are as follows:
- SQL Server and SharePoint do not coexist on the same server in this version.
- SharePoint 2019 only supports these versions of SQL Server: 2016, 2017, and 2019.
- SQL Server Express, SQL Azure, and SQL 2017 on Linux are not supported.
- Windows Server must be installed using Server with Desktop Experience.
As part of our configuration, we are required to use one of these server operating systems:
- Windows Server 2016 Standard or Datacenter (Desktop Experience)
- Windows Server 2019 Standard or Datacenter (Desktop Experience)
For the current installation scenarios, you can refer to the following site: https://docs.microsoft.com/en-us/sharepoint/install/hardware-and-software-requirements-2019.
Use one of the following operating systems:
- Microsoft SQL Server 2016 RTM Standard or Enterprise edition
- Microsoft SQL Server 2017 RTM Standard or Enterprise edition for Windows
A list of admin and user accounts needed for the installations of SQL and SharePoint is as follows (could be more depending on your needs):
- SPAdmin: Admin account to manage the farm, mainly used for Windows and SharePoint updates
- SPFarm: Farm account for the farm
- SPSearch: Runs the search application service
- SPWebApp: Runs the web applications in the farm; sometimes good to use separate service accounts in some situations
- SPCTWTS: Claims to Windows Token Service account needed for this service
- SPService: Service account for all services
- SPProfile: Runs the User Profile service in the farm
- SPUPSREP: For User Profile service connectivity to Active Directory (AD)
- SPCacheWrite: Cache account for the web application that has full control access
- SPCacheRead: Cache account for the web application that has read-only access
Now that we have looked at the installation details, let's move on to the configuration details.
List of configuration details
Now that we have created servers for our farm using the methods from Chapter 3, Creating and Managing Virtual Machines, we need to make sure we have done a check of our list of items that we will need during this process:
- AD domain installation complete.
- NIC card has been set on all Virtual Machines (VMs) with static IPs.
- All drives have been added to the servers created (second drives for SharePoint servers).
- Admin and service accounts are created.
- All servers have been connected to the AD domain.
- All admin accounts are added to the servers as local admins.
- List of service accounts and passwords.
- License keys for products being installed.
As you can see, this list is short and I am sure there are more items you could need during your installation. There are other items that I could have missed due to my environment being a demo of a basic configuration and not a more secure and sophisticated farm.
In the next section, we will go through the installation of SQL Server 2017 and break down the installation concepts based on requirements.
Configuring SQL Server 2017
The foundation of SharePoint is SQL Server. The database server holds all the data related to your SharePoint installation. SQL Server 2019 is also available for us to test during this proof of concept installation. There are big differences in the two versions of SQL due to updates in the 2019 version that support big data.
Let's talk about the differences for a minute to get you up to speed on SQL Server 2016, 2017, and 2019. SQL Server is supported if installed on the same server as SharePoint 2019. SQL Express is not supported as an automatic installation to support your single server installation. In production environments, we like to see SQL on a separate server for performance reasons.
Installation of SQL Server 2017 can be done on a new platform, which is exciting to see. Linux is now a platform that will support SQL Server 2016, 2017, and 2019, which you can now run on the Linux operating system. What does this mean to me? This could mean a lower cost for operating system licenses and also, Linux is known to be more stable than Windows (depending on who you talk to), so this could give you some benefits of moving your databases to a Linux server.
The installation prerequisites are as follows:
- The SQL admin account has been added to the local administrator group.
- All service accounts have been identified for supporting the installation.
- Local policies have been configured for the SQL admin account.
- Turn off your firewall or configure the port configuration.
Local policies for SQL Server service accounts are as follows:

Figure 4.1 – SQL Server service accounts
SQL Server Windows Firewall ports can be set for explicit ports, so the firewall does not have to be turned off.
Important Note
REMEMBER: If you are migrating to a cloud service, make sure you check how ports are configured as even if you have the firewall off on the server, the cloud service still requires you to configure the firewall outside the server. This would then allow you to open the ports necessary for the farm to communicate locally and over the internet. Do this configuration at the beginning so that you have no issues with setting up services at the end!
SQL outbound port configuration
Setting the firewall ports is a step you want to make sure to check before installation. Without it, you will not be able to communicate with the SharePoint servers. SharePoint servers will not be able to connect, create, or manage databases. We want to make sure to check the configuration of the server and check to see whether the Windows Firewall is even needed. In some cases, you may not need to have the firewall running. You also want to be sure that the AWS firewall ports are set within the service before you even start your installation.
The outbound ports are listed as follows. Make sure to name your ports specifically so that you know what they are being used for. You can also change the names as needed. The following code can be run in a command window as an administrator:
netsh advfirewall firewall add rule name="SQL RPC Transact SQL TCP Port 135" dir=out action=allow protocol=TCP localport=135
netsh advfirewall firewall add rule name="SQL Default TCP Port 1433" dir=out action=allow protocol=TCP localport=1433
netsh advfirewall firewall add rule name="SQL Named Instance TCP Port 1434" dir=out action=allow protocol=TCP localport=1434
netsh advfirewall firewall add rule name="SQL Named Instance UDP Port 1434" dir=out action=allow protocol=UDP localport=1434
netsh advfirewall firewall add rule name="SQL Broker UDP Port 4022" dir=out action=allow protocol=TCP localport=4022
netsh advfirewall firewall add rule name="SQL Analysis Services TCP Port 2383" dir=out action=allow protocol=TCP localport=2383
netsh advfirewall firewall add rule name="SQL Browser TCP Port 2382" dir=out action=allow protocol=TCP localport=2382
netsh advfirewall firewall add rule name="SQL IPSec UDP Port 500" dir=out action=allow protocol=UDP localport=500
netsh advfirewall firewall add rule name="SQL IPSec DB Mirroring TCP Port 4500" dir=out action=allow protocol=TCP localport=4500
The SQL outbound ports are now set, so let's set our inbound ports.
SQL inbound port configuration
Inbound ports are just as important as outbound ports, so make sure you update these ports before you start your installation. Name your ports specifically so that you know what they are being used for and change the names as needed.
Inbound ports are listed as follows. The following code can be run in a command window as an administrator:
netsh advfirewall firewall add rule name="SQL Default TCP Port 1433" dir=in action=allow protocol=TCP localport=1433
netsh advfirewall firewall add rule name="SQL Named Instance TCP Port 1434" dir=in action=allow protocol=TCP localport=1434
netsh advfirewall firewall add rule name="SQL Named Instance UDP Port 1434" dir=in action=allow protocol=UDP localport=1434
netsh advfirewall firewall add rule name="SQL Broker UDP Port 4022" dir=in action=allow protocol=TCP localport=4022
netsh advfirewall firewall add rule name="SQL DB Mirroring TCP Port 5022" dir=in action=allow protocol=TCP localport=5022
netsh advfirewall firewall add rule name="SQL DB Mirroring TCP Port 7022" dir=in action=allow protocol=TCP localport=7022
netsh advfirewall firewall add rule name="SQL Analysis Services TCP Port 2383" dir=in action=allow protocol=TCP localport=2383
netsh advfirewall firewall add rule name="SQL Browser TCP Port 2382" dir=in action=allow protocol=TCP localport=2382
netsh advfirewall firewall add rule name="SQL IPSec UDP Port 500" dir=in action=allow protocol=UDP localport=500
netsh advfirewall firewall add rule name="SQL IPSec DB Mirroring TCP Port 4500" dir=in action=allow protocol=TCP localport=4500
Now that you have created your VM for SQL Server, we need to set our feature installation, which consists of features being configured on the Windows server to support SQL Server 2017. Open a PowerShell window and run the following command as an administrator:
Install-WindowsFeature NET-HTTP-Activation,NET-Non-HTTP-Activ,NET-WCF-Pipe-Activation45,NET-WCF-HTTP-Activation45,Web-Server,Web-WebServer,Web-Common-Http,Web-Static-Content,Web-Default-Doc,Web-Dir-Browsing,Web-Http-Errors,Web-App-Dev,Web-Asp-Net,Web-Asp-Net45,Web-Net-Ext,Web-Net-Ext45,Web-ISAPI-Ext,Web-ISAPI-Filter,Web-Health,Web-Http-Logging,Web-Log-Libraries,Web-Request-Monitor,Web-Http-Tracing,Web-Security,Web-Basic-Auth,Web-Windows-Auth,Web-Filtering,Web-Performance,Web-Stat-Compression,Web-Dyn-Compression,Web-Mgmt-Tools,Web-Mgmt-Console,WAS,WAS-Process-Model,WAS-NET-Environment,WAS-Config-APIs,Windows-Identity-Foundation,Xps-Viewer -IncludeManagementTools -Verbose -Source (windows server installation locationsxs)
This command installs the features needed to support SQL Server:

Figure 4.2 – Prerequisite installation
In the past, we had to manually install features using a server manager, which could take up a lot of time depending on how many servers you had to prepare for installation.
To get started with the SQL installation, follow the steps given here:
- Log in with your SQL admin account only; do not use your personal account to install SQL Server. Also, have the media available on a DVD or USB to get started. After you have started the installation, you will see a window open called SQL Server Installation Center, as shown in the following screenshot:

Figure 4.3 – SQL Server Installation Center
- Click Installation on the left main navigation list and click the New SQL Server stand-alone installation or add features to an existing installation link in the main area of the screen at the top:

Figure 4.4 – Selecting a new SQL standalone installation
- Add your product key to continue the installation:
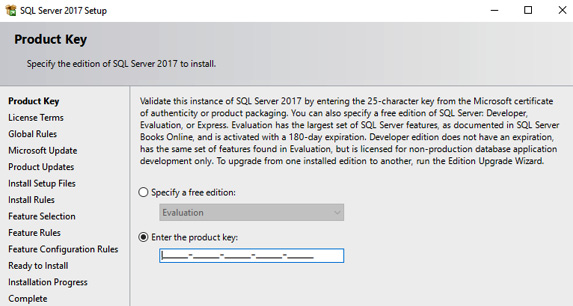
Figure 4.5 – Product key entry
- Click the checkbox to accept the license terms:
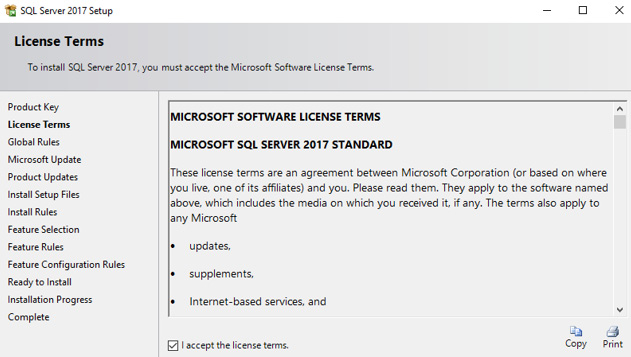
Figure 4.6 – License terms
- If you would like automatic updates to be provided via Windows Update, select the recommended process, and then select the checkbox. If you plan to use another method such as manual updates, then do not check this box, and just make sure you always download the updates and apply them as needed. Click Next to continue with the installation:

Figure 4.7 – Microsoft Update
- The SQL Server installation finds any updates and installs them. Your server must be connected to the internet to use Windows Update. Click Next to continue the installation:

Figure 4.8 – Install Setup Files
- Feature Selection provides the features you would like to install and use within the SQL configuration. Choose your features and select the location for the instance directory, feature directory, and x86 feature directory. More than likely, you will keep the same location on the C drive to support these features, but I have seen instances where there are three drives set up on servers that give an operating system, application, and data drive to support applications and growth:
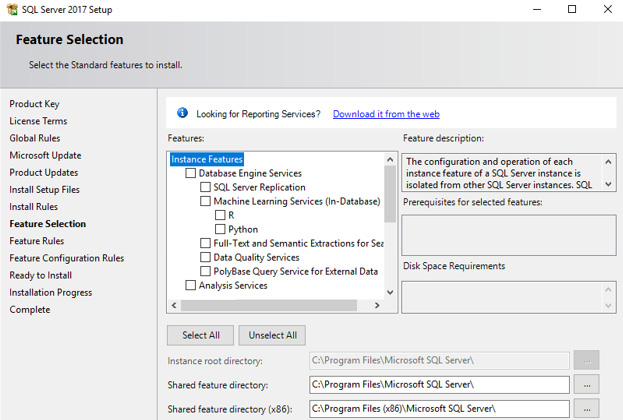
Figure 4.9 – Feature Selection
- As you can see in the feature choices, we have to select the features we would like to use in our SQL Server 2017 configuration. I chose the following:
- Database Engine Services
- SQL Server Replication
- Full-Text and Semantic Extractions for Search
- Analysis Services
- Some features do not need to be chosen as they do not pertain to SharePoint-supported features. Click Next to continue the installation:

Figure 4.10 – Note the features selected
- The next step is Instance Configuration. Click Next to install the default instance of SQL Server:
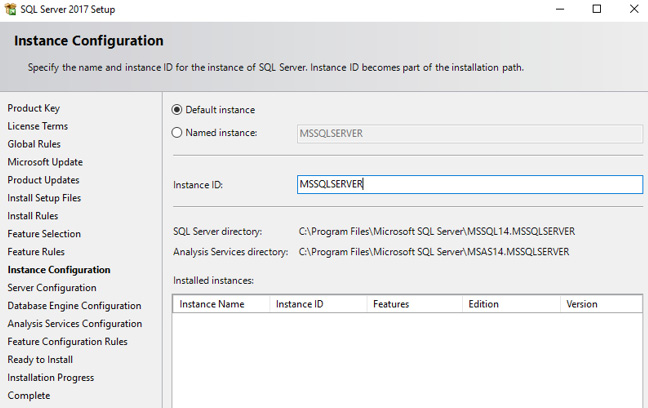
Figure 4.11 – Instance Configuration
- Since this is our first instance on the server, we will install the default instance. If you want, you can rename it using the instance ID. You can use Named instance for the next instances of SQL Server on the same server as a separate service. I have done that in the past when I have had third-party applications that needed a place to live. Since they are associated with SharePoint, I configured a named instance to house those third-party databases. This works great only if you have the resources to support all the components. I would not suggest doing this on a VM but only on a server that is not running virtualization.
- Service account configuration has not changed. Please add your service accounts to select the service you would like them to run. In my case, I have my SQL admin account, which I am logged into while running the setup and installation. The accounts I need for this configuration are to be used as service accounts. I have an account named SQL User mentioned in this chapter. You can name this account what you want but in my case, I named the account SQL Service. I will use it to configure the services. In some cases, admins have separate services using separate accounts. Click the Collation tab to continue the installation:

Figure 4.12 – The Service Accounts and Collation tabs
Important Note
As you select the account, make sure to click and choose them from the people picker; if not, you will receive an error that the account cannot be found.
- The collation at this point on the server must be configured to be case-insensitive. There have been many blogs talking about this and from a Microsoft standpoint, this does not need to be set to any specific collation as long as it's case-insensitive. The collations of the created databases must be set correctly with the SharePoint default collation, which is Latin1_General_CI_AS_KS_WS. Click Next to continue the installation.
- Setting authentication for administrators should be completed using the current account you are logged in with as a given and adding any other accounts that will be deemed administrators of the SQL instance. We do not want to select Mixed Mode for our SQL server. As a best practice, we should only be using Windows Authentication Mode to support SharePoint environments. If you plan to use Mixed Mode, in most cases, it means you plan to house other databases on the server as well. This goes against Microsoft's best practices as all SQL servers deemed that the data tier for SharePoint should only support that SharePoint farm. Click Next to continue the installation.
- This screen has not changed much with the SQL Server installation process and it still wants you to share the location in which it should hold the files for the configuration. Update the locations as needed in this window.
In theory, we should have several locations for this and should not have all files created on the same drive. As part of my installation process, I used separate disks to hold the locations of my database files, which are separated by configuration type. So, in theory, this configuration out of the box does not work for me, which is why I pre-create my databases.
The reason for pre-creating my databases is because I use separate drive spaces to house my config databases, content databases, service databases, search databases, TempDB databases, and any other databases that are part of my installation outside of SharePoint, like how Workflow Manager would be a house on its own drive space. The reason I do this type of setup is I want to get the best performance out of my databases and have them use their own space. So, on this screen, I would set up my targeted locations for these areas but the split will also happen later when more databases are created.
- Click TempDB to see the setting available for configuration and continue the installation:

Figure 4.13 – TempDB options
- Configuring TempDB, we will see a different screen than other SQL Server installations in the past. Although this is the same as for SQL Server 2016, I want to make sure that since these two products have been so closely released, you understand this new database engine configuration page. You may be migrating from SQL 2008 or 2012 at this point, so I do not want to miss out anything in the book. Click the FILESTREAM tab to continue the installation:

Figure 4.14 – FILESTREAM options
- FILESTREAM is used for Remote Blob Storage, also known as RBS. If you are planning to configure that service, you need to click the checkboxes associated with this feature so that it can be installed. Click Next to continue the installation:

Figure 4.15 – Server configuration
- Setting administrator rights within Analysis Services should be completed. Please add the admin account you are logged in with as you are performing the installation and any other accounts you will need to have admin access to this feature for administration. Click Next to continue the installation:
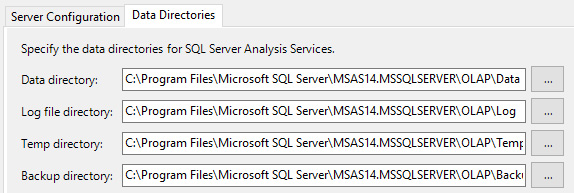
Figure 4.16 – Data Directories
- Configuring data directories goes back to what I was saying about pre-creating databases as well, which is the way I install and configure my databases. This area is also configured as drive space within my configuration to hold these databases. Choose your locations and click Next to continue the installation.
- Now that all the configurations have been set, we will click on Install and start the installation process for the SQL server.
- The installation is progressing and this does progress slowly, so just be patient and you will start seeing results.
- Installation is complete. Please click Close to finish the install and afterward, reboot your server. Your server is now ready for further configuration, which we will tackle in Chapter 5, Farm and Services Configuration.
We are not finished installing our SQL database server. If you need to add any other custom utilities or updates to your database server, please do so now. Once we get our SharePoint farm configured, we will set up our maintenance plans to back up our content and services.
Configuring SharePoint 2019 prerequisites
When we start the installation of SharePoint, we need to make sure the following things are available:
- Installation software (DVD, ISO, USB).
- Keys for licensing.
- Accounts created for the service and admin identities.
- AD: SharePoint Server 2019 is only supported with a minimum of AD 2003.
- Admin rights are given to the admin account running the installation.
- Download the prerequisites needed to do the installation.
- Identical hard drive configurations on all SharePoint servers (always at least two drives configured).
- Turn off Windows Firewall unless you have to download my script to configure the ports manually.
Note that the Office 2019 client cannot be installed on the same server as SharePoint Server 2019.
Preparing the server is the same as we did for SQL Server 2017 in the Configuring SQL Server 2017 section of this chapter. Repeat these steps on all SQL and SharePoint servers:
Install-WindowsFeature NET-HTTP-Activation,NET-Non-HTTP-Activ,NET-WCF-Pipe-Activation45,NET-WCF-HTTP-Activation45,Web-Server,Web-WebServer,Web-Common-Http,Web-Static-Content,Web-Default-Doc,Web-Dir-Browsing,Web-Http-Errors,Web-App-Dev,Web-Asp-Net,Web-Asp-Net45,Web-Net-Ext,Web-Net-Ext45,Web-ISAPI-Ext,Web-ISAPI-Filter,Web-Health,Web-Http-Logging,Web-Log-Libraries,Web-Request-Monitor,Web-Http-Tracing,Web-Security,Web-Basic-Auth,Web-Windows-Auth,Web-Filtering,Web-Performance,Web-Stat-Compression,Web-Dyn-Compression,Web-Mgmt-Tools,Web-Mgmt-Console,WAS,WAS-Process-Model,WAS-NET-Environment,WAS-Config-APIs,Windows-Identity-Foundation,Xps-Viewer -IncludeManagementTools -Verbose -Source (windows server installation locationsxs)
Important Note
Make sure to include the Windows Server media SXS location in the -Source parameter of the script.
Once you have run the feature installation script on the SharePoint server, you will see the confirmation that the installation succeeded, like so:

Figure 4.17 – Installation success confirmation
The local policy settings for SharePoint service accounts are as follows:
_B12062.jpg)
_B12062.jpg)
Figure 4.18 – Local policy table
Make sure to create the service accounts you need for your installation. The web application and service application pools can be used many times depending on what you need in your environment. For example, for an additional web application pool, I would add one for mysites to cover that web application separately from my main application pool. All installations of SharePoint, depending on the admin account, require different numbers of service accounts based on what you want to configure in your farm. There are a couple of accounts missing that we will talk about later in the book as those services are created:
- Cache accounts
- Workflow Manager accounts
- Office Online Server accounts
- SharePoint crawl account (only needed if you want to separate at that level for security)
- Business Connectivity service (accounts may be needed to connect to outside data sources)
The local policy is very important as the rights given to each service account are reflected in the local policy settings. If the service account is not given the proper rights, you will see errors in your event logs pertaining to that particular service, which can be misleading. This is due to the errors given not telling you specifically what the issue is in some cases.
Domain policies come into play as well as they can overwrite these local policies set by SharePoint automatically. This usually happens only when the server is rebooted, so you could think you have a great configuration until you reboot one day and then the service is down. Be very careful how you use local and domain policies within a SharePoint and SQL Server configuration. Talk to your AD group to make sure these areas within the domain and local server policies have been covered.
SharePoint outbound port configuration
Port settings for the SharePoint servers are required for communication between the farm servers and the SQL server. It is important that you do not skip this step as this can cause the farm to be non-operational.
As part of our configuration, the firewall is very important to configure as the ports for the server need to be open to support the SharePoint Server configuration. This script configures the firewall port outbound settings for SharePoint servers individually. The following code can be run in a command-line window as an administrator:
netsh advfirewall firewall add rule name="SharePoint Open Port 80" dir=out action=allow protocol=TCP localport=80
netsh advfirewall firewall add rule name="SharePoint Open Port 443" dir=out action=allow protocol=TCP localport=443
netsh advfirewall firewall add rule name="SharePoint SQL Open Ports" dir=out action=allow protocol=TCP localport=1433-1434
netsh advfirewall firewall add rule name="SharePoint SQL Open Port 445" dir=out action=allow protocol=TCP localport=445
netsh advfirewall firewall add rule name="SharePoint Open Port 25" dir=out action=allow protocol=TCP localport=25
netsh advfirewall firewall add rule name="SharePoint Open Port 16500-16519" dir=out action=allow protocol=TCP localport=16500-16519
netsh advfirewall firewall add rule name="SharePoint Open Port 22233" dir=out action=allow protocol=TCP localport=22233-22236
netsh advfirewall firewall add rule name="SharePoint Open Port 443" dir=out action=allow protocol=TCP localport=443
netsh advfirewall firewall add rule name="SharePoint Open Port 808" dir=out action=allow protocol=TCP localport=808
netsh advfirewall firewall add rule name="SharePoint Open Port 32843" dir=out action=allow protocol=TCP localport=32843-32846
netsh advfirewall firewall add rule name="SharePoint Workflow Manager Open Port 12290-12291" dir=out action=allow protocol=TCP localport=12290-12291
netsh advfirewall firewall add rule name="SharePoint Open Port 5725" dir=out action=allow protocol=TCP localport=5725
netsh advfirewall firewall add rule name="SharePoint Open Port 389" dir=out action=allow protocol=TCP localport=389
netsh advfirewall firewall add rule name="SharePoint Open Port 389" dir=out action=allow protocol=UDP localport=389
netsh advfirewall firewall add rule name="SharePoint Open Port 88" dir=out action=allow protocol=TCP localport=88
netsh advfirewall firewall add rule name="SharePoint Open Port 88" dir=out action=allow protocol=UDP localport=88
netsh advfirewall firewall add rule name="SharePoint Open Port 53" dir=out action=allow protocol=TCP localport=53
netsh advfirewall firewall add rule name="SharePoint Open Port 53" dir=out action=allow protocol=UDP localport=53
netsh advfirewall firewall add rule name="SharePoint Open Port 464" dir=out action=allow protocol=UDP localport=464
netsh advfirewall firewall add rule name="SharePoint Open Port 809" dir=out action=allow protocol=TCP localport=809
Once we have completed the outbound ports, let's configure the inbound ports on your SharePoint server next.
SharePoint Server inbound port configuration
Inbound ports are just as important as outbound ports. Communication between the farm server resources is needed to support the infrastructure. This script configures firewall port inbound settings for SharePoint Server. The following code can be run in a command window as an administrator:
netsh advfirewall firewall add rule name="SharePoint Open Port 80" dir=in action=allow protocol=TCP localport=80
netsh advfirewall firewall add rule name="SharePoint Open Port 443" dir=in action=allow protocol=TCP localport=443
netsh advfirewall firewall add rule name="SharePoint Open Port 445" dir=in action=allow protocol=TCP localport=445
netsh advfirewall firewall add rule name="SharePoint Open Port 25" dir=in action=allow protocol=TCP localport=25
netsh advfirewall firewall add rule name="SharePoint Open Port 16500 - 16519" dir=in action=allow protocol=TCP localport=16500-16519
netsh advfirewall firewall add rule name="SharePoint Open Port 22233" dir=in action=allow protocol=TCP localport=22233-22236
netsh advfirewall firewall add rule name="SharePoint Open Port 808" dir=in action=allow protocol=TCP localport=808
netsh advfirewall firewall add rule name="SharePoint Open Port 32843" dir=in action=allow protocol=TCP localport=32843-32846
netsh advfirewall firewall add rule name="SharePoint Workflow Manager Open Port 12290-12291" dir=in action=allow protocol=TCP localport=12290-12291
netsh advfirewall firewall add rule name="SharePoint Open Port 5725" dir=in action=allow protocol=TCP localport=5725
netsh advfirewall firewall add rule name="SharePoint Open Port 389" dir=in action=allow protocol=TCP localport=389
netsh advfirewall firewall add rule name="SharePoint Open Port 389" dir=in action=allow protocol=UDP localport=389
netsh advfirewall firewall add rule name="SharePoint Open Port 88" dir=in action=allow protocol=TCP localport=88
netsh advfirewall firewall add rule name="SharePoint Open Port 88" dir=in action=allow protocol=UDP localport=88
netsh advfirewall firewall add rule name="SharePoint Open Port 53" dir=in action=allow protocol=TCP localport=53
netsh advfirewall firewall add rule name="SharePoint Open Port 53" dir=in action=allow protocol=UDP localport=53
netsh advfirewall firewall add rule name="SharePoint Open Port 464" dir=in action=allow protocol=UDP localport=464
netsh advfirewall firewall add rule name="SharePoint Open Port 809" dir=in action=allow protocol=TCP localport=809
Now that we have completed our outbound and inbound port configuration, let's learn about the preparation toolkit.
Disabling loopback check
By installing SharePoint, you will see that there are many little hidden issues we need to overcome before installing the application, such as ports, for example. When you install SharePoint, you will find that if you leave out this configuration for disabling loopback check, you will not be able to access your SharePoint sites from your servers. You can do this manually by going to the registry and editing the HKLM:SystemCurrentControlSetControlLsa location and adding a new DWORD value of DisableLookbackCheck with a value of 1.
You can also simply use PowerShell:
New-ItemProperty HKLM:SystemCurrentControlSetControlLsa -Name "DisableLoopbackCheck" -Value "1" -PropertyType DWORD
Microsoft SharePoint preparation toolkit
The Microsoft SharePoint Products Preparation Tool installs the following prerequisites on SharePoint servers in a farm after server features are installed:
- Web server (IIS) role
- The Windows Process Activation Service feature
- Microsoft .NET Framework version 3.5
- Microsoft .NET Framework version 4.7.2
- Microsoft SQL Server 2012 Service Pack 4 Native Client
- Microsoft WCF Data Services 5.6
- Microsoft Identity Extensions
- Microsoft Information Protection and Control Client (MSIPC) 2.1
- Microsoft Sync Framework Runtime v1.0 SP1 (x64)
- Windows Server AppFabric 1.1
- Cumulative Update package 7 for Microsoft AppFabric 1.1 for Windows Server (KB 3092423)
- Visual C++ Redistributable package for Visual Studio 2012
- Visual C++ Redistributable package for Visual Studio 2017
The following are optional software installations that support SharePoint 2019. These are in support of business intelligence service capabilities and may be required to support these services:
- .NET Framework Data Provider for SQL Server (part of Microsoft .NET Framework).
- .NET Framework Data Provider for OLE DB (part of Microsoft .NET Framework).
- SharePoint Workflow Manager: You can install SharePoint Workflow Manager on a dedicated computer.
- Microsoft SQL Server 2008 R2 Reporting Services Add-in for Microsoft SharePoint Technologies: This add-on is used by Access Services for SharePoint Server 2019.
- Microsoft SQL Server 2012 Data-Tier Application (DAC) Framework 64-bit edition
- Microsoft SQL Server 2012 Transact-SQL ScriptDom 64-bit edition
- Microsoft System CLR Types for Microsoft SQL Server 2012 64-bit edition
- Microsoft SQL Server 2012 with SP1 LocalDB 64-bit edition
- Microsoft Data Services for.NET Framework 4 and Silverlight 4 (formerly ADO.NET Data Services)
- Exchange Web Services Managed API, version 1.2
There are two ways to install prerequisites:
- Online if your server is connected to the internet
- Offline, where you would need to go and download all the prerequisites beforehand and use PowerShell to install the needed components.
In our case, I will explain both and provide details on how to install them. There is one new way to install via PowerShell as well, which I will also point out as an option.
When installing from our SharePoint DVD, ISO, or USB installation, we will see that Microsoft has included a new choice to install SharePoint Server 2019. Now, instead of needing to access the prerequisite installation from the file manager, we can do this from the splash menu. Add the prerequisites to the folder within the installation, which means you need to copy the installation to the server you are installing from so that these files can be associated with the install.
Important Note
Before we start the installation preparation using the tools provided by SharePoint Server 2019, we need to make sure we copy our installation to a hard drive location on the server. We need to do this to provide any updates, as in cumulative updates you may want to include during the installation and all the prerequisite files needed to finish the preparation for the server installation.
Once you have added all the updates and prerequisite files to a local installation folder, follow the steps given here:
- Click on the Install software prerequisites link on the splash page to get started:
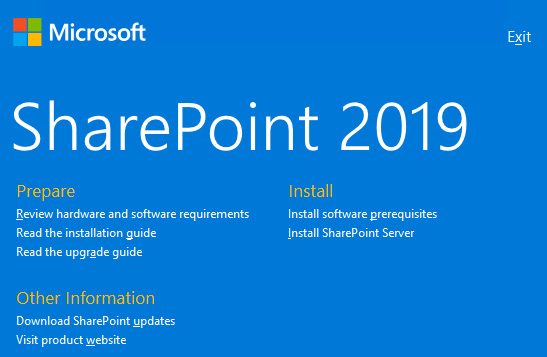
Figure 4.19 – SharePoint 2019 splash screen
- Click Next to continue the installation of the Products Preparation Tool:

Figure 4.20 – Products Preparation Tool
- Check the box to accept the license agreement and click Next:
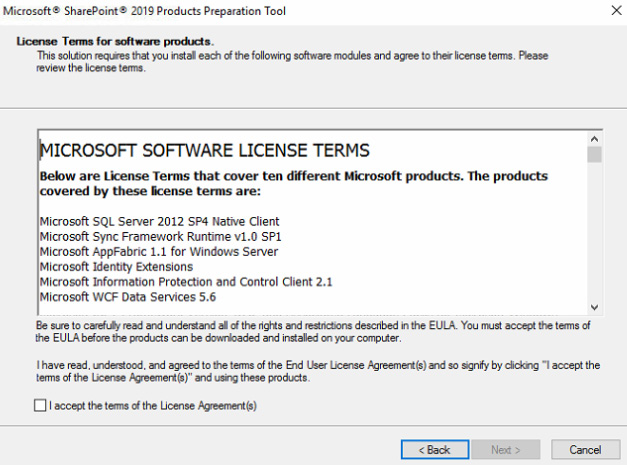
Figure 4.21 – License agreement
- Monitor the process of the preparation tool until complete:

Figure 4.22 – Installing prerequisites
- The server will reboot automatically during the installation and will continue after the server comes back up. You will be prompted with the following screen of the completed installation; just click Finish:
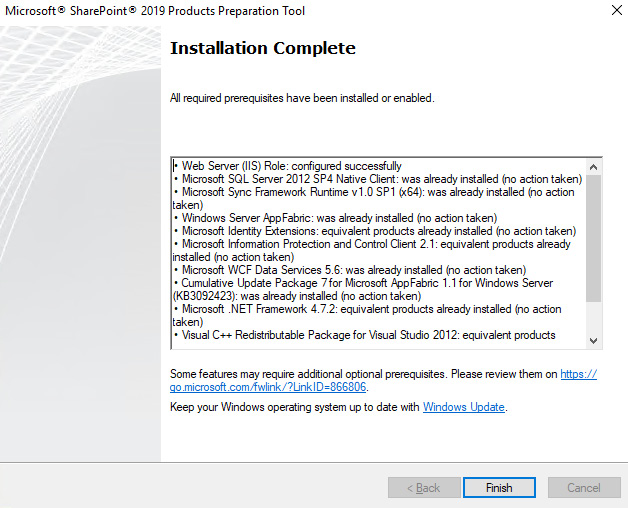
Figure 4.23 – Installation complete
This completes the GUI installation of the prerequisite files using the prerequisite installer from our installation files.
Scripted preparation tool installation
Installing using PowerShell is a different way of doing our installation. This method is used when we want to install the prerequisites offline.
Please run the following script to install the prerequisites using Command Prompt:
.prerequisiteinstaller.exe
/SQLNCli:c:(Folder)sqlncli.msi
/Sync:c:(Folder)Synchronization.msi
/AppFabric:c:(Folder)WindowsServerAppFabricSetup_x64.exe
/IDFX11:c:(Folder)MicrosoftIdentityExtensions-64.msi
/MSIPCClient:c:(Folder)setup_msipc_x64.exe
/WCFDataServices56:c:(Folder)WcfDataServices56.exe
/MSVCRT11:c:(Folder)vcredist_x64.exe
/MSVCRT141:c:(Folder)vc_redist.x64.exe
/KB3092423:c:(Folder)AppFabric-KB3092423-x64-ENU.exe
/DotNet472:c:(Folder)NDP472-KB4054530-x86-x64-AllOS-ENU.exe
/MSVCRT11:<file> Install Visual C++ Redistributable Package for Visual Studio 2012 from <file>.
/MSVCRT141:<file> Install Visual C++ Redistributable Package for Visual Studio 2017 from <file>.
There is also a new desired state configuration, which can be scripted to dynamically specify parameters for the prerequisites instead of the install doing it on its own from the internet. You can read more about that here: https://docs.microsoft.com/en-us/powershell/scripting/dsc/overview/overview?view=powershell-7.1.
Whether you use scripting or the GUI to install your prerequisites, it is up to you. It is good to practice scripting and PowerShell and as these scripts are elementary, they can help you start your journey to understand scripting and how it works. There is no real benefit in using either one, but best believe PowerShell is something you will need to understand. So, if you are new to it, start working with PowerShell now.
SharePoint 2019 installation
Now that we have finished our preparation for SharePoint Server 2019 installation, we can start our SharePoint Server 2019 install process. There are other tools that you can use to install SharePoint using an automated process. In this book, we will install using the manual method to get an understanding of what is actually going on in that process. Please follow along with the installation process:
- Once you encounter the splash screen for SharePoint 2019, choose Install SharePoint Server under the Install menu:

Figure 4.24 – The splash screen Install SharePoint Server option
- Check the box to accept the terms of the license agreement and click Continue:
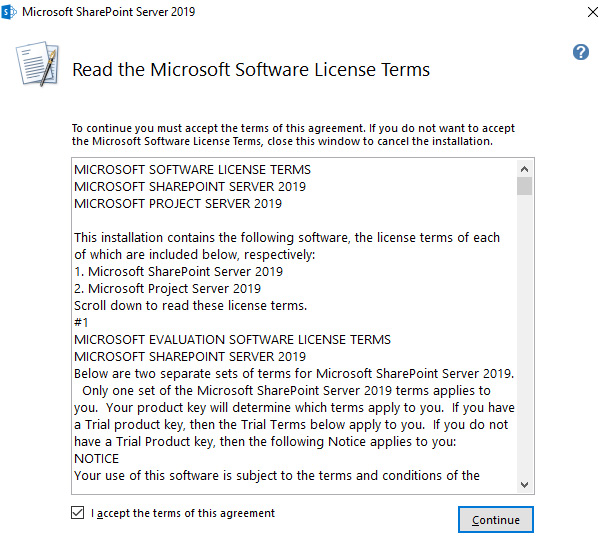
Figure 4.25 – License agreement
- Enter the license key for the product:

Figure 4.26 – Product key entry
- Choose the file locations for the installation. This screen is very important for setting up the application file locations and then your data location. Click Install Now to continue the installation:
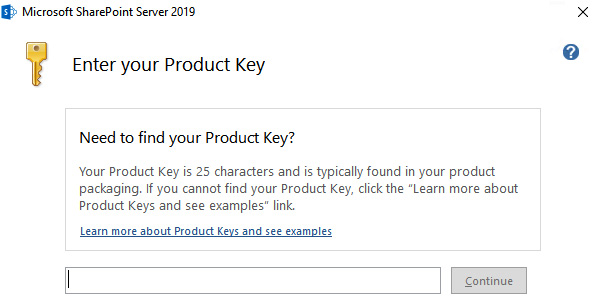
Figure 4.27 – Install Now
Tip
Make sure to change the data location as I have stated earlier to have at least two drives available, one for the operating system and then another for data, which will house your logs and search index. Also, make sure to create the logging and data drive large enough to grow your intended logs and search data, which you will need for now and a 2 to 3 year period.
- Monitor the progress of the installation for SharePoint Server 2019:

Figure 4.28 – Installation in progress
- Once the product has been installed, you will come to the Run Configuration Wizard screen. Please uncheck the box and click Close:

Figure 4.29 – Run Configuration Wizard
At this point, we will use a PowerShell script to configure our farm.
Configuration of SQL and SharePoint
So, now that we have all our servers installed, there are a few details we need to configure to make all these components work together for SharePoint and SQL Server. We will start with the following configurations:
- SQL alias creation
- Alias setup on SQL Server
We will use SQL aliases for the connectivity from SharePoint to the SQL server, so if we lose our SQL server, we can recreate the SQL server and use the same alias to connect to the farm from our SharePoint servers, and then our database server name never changes. You cannot do this using a named instance of a SQL server that is being used as the connecting SQL server name in your SharePoint farm.
Other areas of the configuration, such as logging, monitoring, and services, will be explained in Chapter 5, Farm and Services Configuration. These will be the SharePoint configurations needed to get ready to install service applications, use databases, and set server locations further. The following steps show the configuration for database connectivity settings so that we can complete the installation of SharePoint Server 2019:
- Find cliconfg in your server to configure your SQL alias connection:
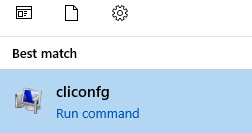
Figure 4.30 – Finding cliconfg
- Run the application as an administrator:
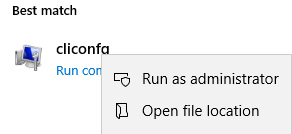
Figure 4.31 – Running as an administrator
- Enable TCP/IP:

Figure 4.32 – SQL Server Client Network Utility
- Configure the TCP/IP setting, as shown, giving it an alias name and the server name of the SQL server:

Figure 4.33 – Edit Network Library Configuration
Important Note
You can dynamically determine the port by keeping the checkbox checked, which sets the port on its own, or you can set the port manually to a different port other than 1433, which is the default for SQL connectivity.
- Click Apply, and then OK to finish:
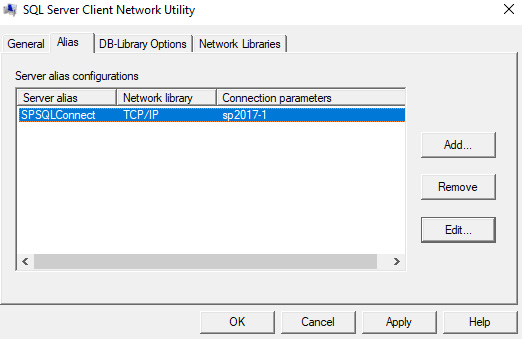
Figure 4.34 – SPSQLConnect server alias
- Now, we will test the alias we just created using ODBC. Open Administrator Tools from the server and click on ODBC Connectivity for 64 bit. Once open, select SQL Server to create a new data source and click Finish:

Figure 4.35 – Create New Data Source
- After clicking Finish, you will be prompted with a new window to create a new data source. Input a name and a description of the data source and the SQL server you are connecting to. The connected SQL server you are testing is the alias name you created in Step 5. Then, click Next:
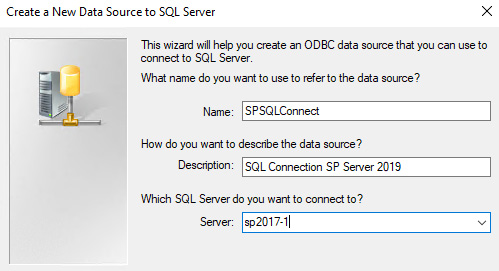
Figure 4.36 – Inputting a name/description/server
- Click Next to continue, which will test connectivity to your SQL server using the alias name:
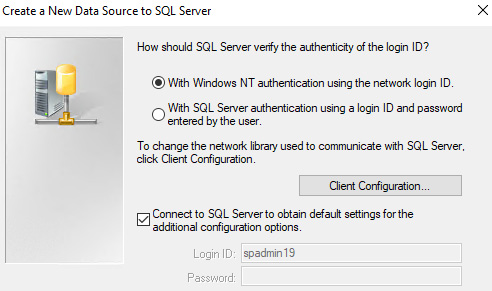
Figure 4.37 – Testing connectivity
We have now successfully connected to SQL Server 2017 to support our SharePoint farm.
Running the configuration script
To start the process of creating your farm, you will need to open PowerShell and follow the steps given here. We will create our farm using a PowerShell script so that we can name all of our databases:
Note
With the new SharePoint 2016 and SharePoint 2019 servers, we now need to use a new parameter: $ServerRole. This determines the MinRole that will be used on this server resource.
- Copy the script from GitHub called FarmCreation.ps1 and run this script to create your farm. Remember to change the fields where needed:
Add-PSSnapin "Microsoft.SharePoint.PowerShell
#Configuration Settings
$DatabaseServer = "SPSQLCONNECT"
$ConfigDatabase = "2019_Farm_Config"
$AdminContentDB = "2019_Farm_Content_Admin"
$Passphrase = "ENTER A PHRASE"
$FarmAccountName = "DomainSP_Farm"
$ServerRole="APPLICATION"
#Get the Farm Account Credentials
$FarmAccount = Get-Credential $FarmAccountName
$Passphrase = (ConvertTo-SecureString $Passphrase -AsPlainText -force)
#Create SharePoint Farm
Write-Host "Creating Configuration Database and Central Admin Content Database..."
New-SPConfigurationDatabase -DatabaseServer $DatabaseServer -DatabaseName $ConfigDatabase -AdministrationContentDatabaseName $AdminContentDB -Passphrase $Passphrase -FarmCredentials $FarmAccount -LocalServerRole $ServerRole -SkipRegisterAsDistributedCacheHost
$Farm = Get-SPFarm -ErrorAction SilentlyContinue -ErrorVariable err
if ($Farm -ne $null)
{
Write-Host "Installing SharePoint Resources..."
Initialize-SPResourceSecurity
Write-Host "Installing Farm Services ..."
Install-SPService
Write-Host "Installing SharePoint Features..."
Install-SPFeature -AllExistingFeatures
Write-Host "Creating Central Administration..."
New-SPCentralAdministration -Port 2019 -WindowsAuthProvider NTLM
Write-Host "Installing Application Content..."
Install-SPApplicationContent
Write-Host "SharePoint 2019 Farm Created Successfully!"
}
Important Note
Install-SpHelpCollection is no longer needed in our script as part of the SharePoint 2019 configuration. Also, if -LocalServerRole $ServerRole is not specified, the server will be created as a custom role. We also do not want to create a Distributed Cache service on this initial app server. So, we will include -SkipRegisterAsDistributedCacheHost.
- Monitoring progress: As you wait for the script to run, check the SQL server by refreshing the databases to see whether databases have started to be created:

Figure 4.38 – Checking the database creation status
- Once the script is finished, you will see that that farm was created successfully:

Figure 4.39 – Farm created successfully
- Navigate to Central Administration, and now the Central Administration site is ready for configuration:

Figure 4.40 – Central Administration
We will start that configuration in the next chapter.
Remote installations
You can install using remote installations, where you can use AutoSPInstaller to install SharePoint on multiple servers using one script from one server. The script first installs SharePoint locally to establish a baseline installation on the local server where the script is being executed. The script then installs SharePoint remotely using PowerShell Remoting and Windows Remote Management (WinRM) on the other servers you have configured in the script. These installations can be done all at once in a parallel or serial process based on the configuration file. WinRM must be enabled on the servers where you want SharePoint to be installed remotely. To learn more about remote installation, find AutoSPInstaller at the following link or review GitHub for more information: https://autospinstaller.com/.
Summary
If you are familiar with SharePoint, you can see that not a lot has changed in the installation process. There have been some cool additions to help with the process, but overall, we can see that if you know SharePoint installation, you can get through this pretty easily. The key things to remember are using the MinRoles, setting logging locations correctly, reviewing scripts, and installing all the prerequisites for the server, SQL and SharePoint, before installing.
In the next chapter, we will go through more configurations and understand how to put this farm altogether. There are many steps and variations to this configuration that we cannot cover in this book. We condensed as much as possible into the scope of the book. Although we are very clear about setting some areas of the configuration, you will see that some areas can be customized, which we will state in the following chapters.
Questions
You can find the answers on GitHub under Assessments at https://github.com/PacktPublishing/Implementing-Microsoft-SharePoint-2019/blob/master/Assessments.docx
- Why should we use a script to create our farm and not the configuration wizard?
- If we lost our SQL server due to a disaster, we could recover our databases on a named SQL Server instance and reconnect the farm with no issues. True or False?
- When installing our SharePoint servers, which firewall port supports Office Online Server?
- Local policy is needed when installing SharePoint. Why?
- Domain policies can interfere with the configuration of SharePoint and SQL Server. True or False?
- If I wanted to install my farm and other server resources all in one executed script, can I use PowerShell to do so?
- What parameter in our farm creation script is needed only for SharePoint Server 2016 and 2019?