
Chapter 6: AWS Glue and AWS Lake Formation
Although this book focuses on Athena and its rich functionality, you should be aware of AWS Glue and AWS Lake Formation. These services can be used with Athena to implement use cases that Athena cannot alone. AWS Lake Formation was created to help customers simplify creating data lakes by providing tools to help ingest data, secure data, and reduce the time it takes to get a functional data lake. Lake Formation is a layer that exists on top of AWS Glue and uses Glue's components as building blocks.
One of the main features that Lake Formation brings is fine-grained access controls and auditing to several AWS services, including Athena. Lake Formation augments AWS IAM to help secure the data lake. IAM provides authentication of the user, while Lake Formation provides authorization based on the principle that is requesting data. Every authorization request that goes through Lake Formation generates audit events in CloudTrail that are reported in the Lake Formation console, providing a single central place to administer and monitor the data lake.
AWS Lake Formation also provides a new table type called the governed table, which provides four key benefits. First, it provides atomic, consistent, isolated, and durable (ACID) transactions for metadata and data updates. Second, it provides automatic compaction of data, combining small data files to produce fewer and larger files to optimize query performance. Third, you can run queries on datasets as if they were run at a different point of time to see what the data looked like in the past before certain transactions have been applied. This feature is usually called time traveling. Fourth, governed tables provide row and cell-level filtering to enforce user permissions.
Fine-grained access control and governed tables directly integrate with Athena to provide security and enhanced functionality. Lake Formation and Glue can also provide functionality that aids in creating and maintaining a data lake. We will look at some of the functionality that Lake Formation and Glue provide that could solve some of the challenges that Athena cannot solve on its own.
In this chapter, we will cover the following topics:
- What AWS Glue and AWS Lake Formation can do for you
- Securing your data lake with Lake Formation
- What AWS Lake Formation governed tables can do for you
Technical requirements
For this chapter, if you wish to follow some of the walkthroughs, you will need the following:
- Internet access to GitHub, S3, and the AWS Console.
- A computer with either Chrome, Safari, or Microsoft Edge installed on it.
- An AWS account and accompanying IAM user (or role) with sufficient privileges to complete this chapter's activities. For simplicity, you can always run through these exercises with a user that has full access. However, we recommend using scoped-down IAM policies to avoid making costly mistakes and learn how to best use IAM to secure your applications and data. You can find a minimally scoped IAM policy for this chapter in this book's accompanying GitHub repository, which is listed as chapter_6/iam_policy_chapter_6.json. This policy includes the following:
- Permissions to create and list IAM roles and policies:
- We will be creating a service role for an AWS Glue Crawler to assume.
- Permissions to read, list, and write access to an S3 bucket.
- Permissions to read and write access to Glue Data Catalog databases, tables, and partitions:
- You will be creating databases, tables, and partitions manually and with Glue Crawlers.
- Access to run Athena queries.
- Permissions to create and list IAM roles and policies:
What AWS Glue and AWS Lake Formation can do for you
Lake Formation and Glue provide tools that aid in creating data lakes and extending functionality to your new or existing data lakes. There is a wide variety of functionality that it provides. In this section, we will go through a non-exhaustive list of features. An entire book could be written on Lake Formation and another on Glue, so we will not go through all of their features in detail in this chapter.
Except for fine-grained access control and governed tables, all features do not directly change how Athena works. If you start by not adopting any of the Lake Formation or AWS Glue features, you can adopt them in the future.
Let's take a look at some of the AWS Glue and Lake Formation features and how they can supplement Athena.
Using AWS Glue to cleanse, normalize, and transform data
Amazon Athena's performance and cost are highly dependent on the data format and layout of the data. In many scenarios, it may be cost-effective and improve performance to provide faster response times to users and applications to transform the data. We will dive into the details of the scenarios and decisions regarding when to perform this in Chapter 9, Serverless ETL Pipelines, so it may be a good idea to skip ahead if you are not familiar with this process.
This is where AWS Glue ETL can be really helpful for performing data transformations. AWS Glue ETL is a serverless ETL service that allows customers to write Spark code and execute it without provisioning resources. Many organizations use Apache Spark to perform their transformations and AWS Glue can be more cost-effective than managing Spark yourself. The transformed data after using AWS Glue can then be read and analyzed using Amazon Athena. AWS Glue ETL charges based on the resources that you use. ETL jobs can scale as Glue ETL provides different hardware types and instances in the Spark cluster to run on.
In this section, we will provide a quick summary of what Glue ETL can do. We will look at two ways to author jobs; that is, using Glue ETL and Glue Studio. Let's look at each one.
Glue ETL
AWS Glue ETL uses Apache Spark with Scala and PySpark, a Python-only runtime for lightweight jobs, and Apache Spark Streaming for steaming jobs. To execute a job, a user would create a script, store it in S3, and register it with an ETL job within Glue. Scripts can be executed with a wide variety of properties to give users flexibility and control. The following screenshot shows a sample script editing screen for a PySpark job within the Glue ETL console:
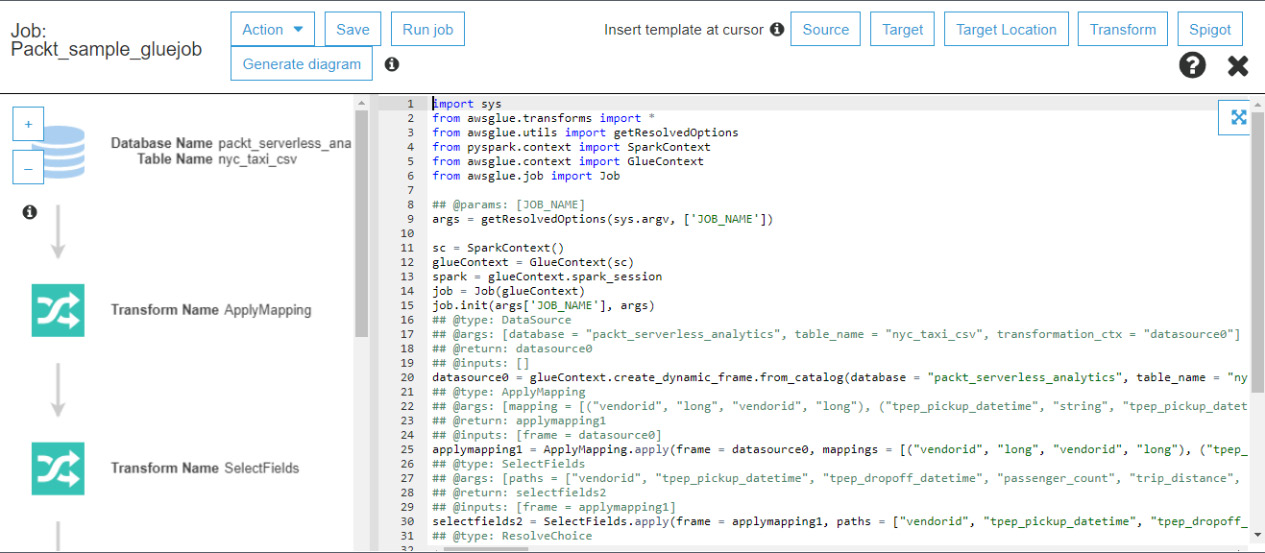
Figure 6.1 – Sample Glue ETL script editing screen
Once the script is ready to be run, the job can be executed using the run job dialog screen, as shown in the following screenshot:
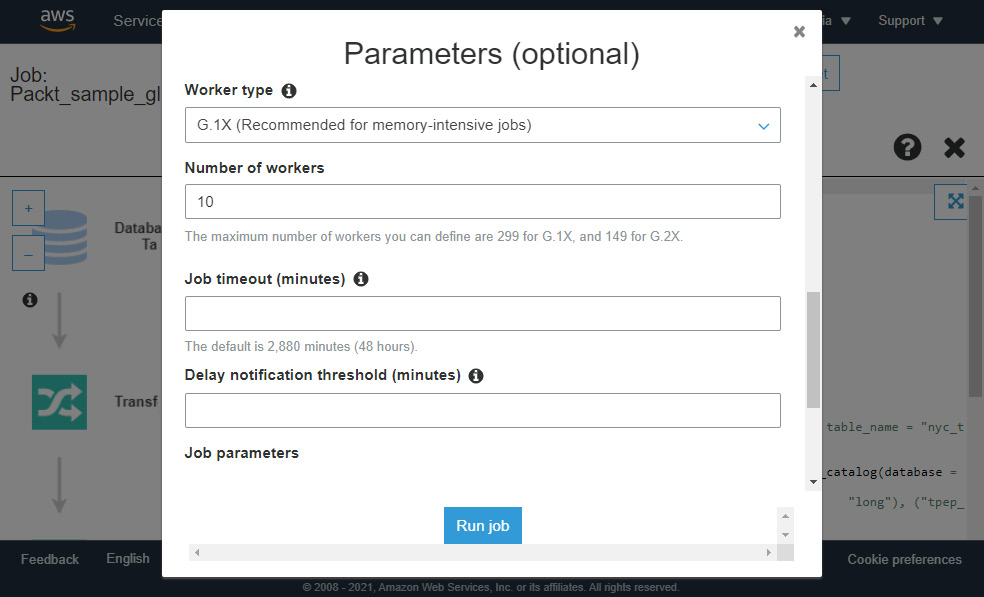
Figure 6.2 – Sample Glue ETL run screen
The Glue console can be used to look at the history of invocations of the job and provide job run information, logs, and other relevant information, as shown in the following screenshot:
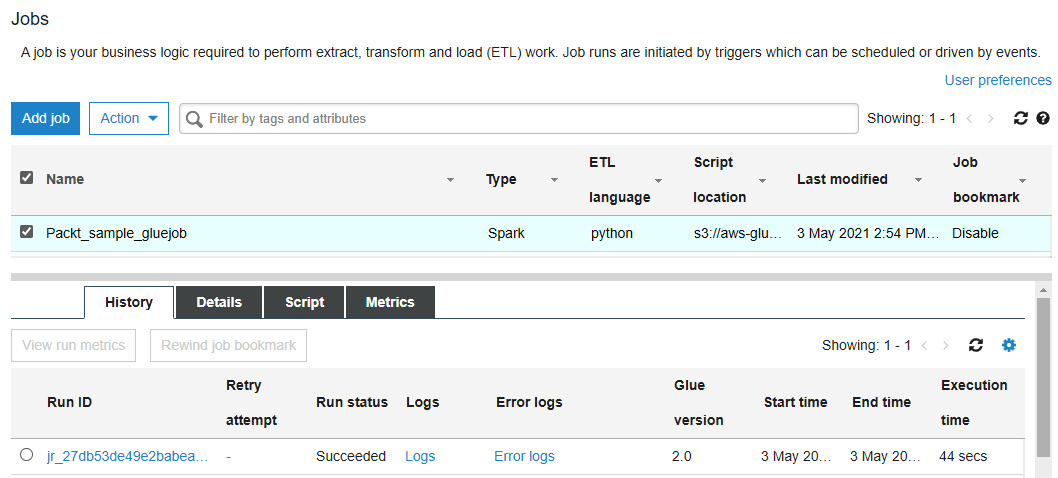
Figure 6.3 – Sample Glue ETL run
Many features make Glue ETL powerful, including Job Bookmarks, which only processes new files when reading a data source, Spark UI to monitor and debug Spark jobs, and publishing job metrics, to name a few.
Now, let's take a look at AWS Glue Studio, which helps with authoring and monitoring Glue ETL jobs.
AWS Glue Studio
AWS Glue Studio is a visual UI that simplifies the process of creating and monitoring Glue ETL jobs. Glue Studio provides enhanced visual editing for Glue jobs and dashboards, which provides job metrics such as running, completed, and failed jobs. It is an ideal tool for non-programmers who are not comfortable with writing code or those that want to do simple transformations.
The visual editor allows users to create complex jobs using mouse clicks instead of writing Spark code. You can piece together three building blocks: sources of data such as S3, RDS databases, Redshift, Kinesis, and Kafka streams; transformations on the data such as joining datasets, renaming, dropping, or filling in empty values in columns; and specifying one or more targets to store the results in various formats. The following screenshot of Glue Studio shows a sample job. Here, we have taken the NYC Taxi dataset and joined it to a location dataset to enrich it by translating the location IDs. We then output the resulting dataset to S3 using the Parquet format:
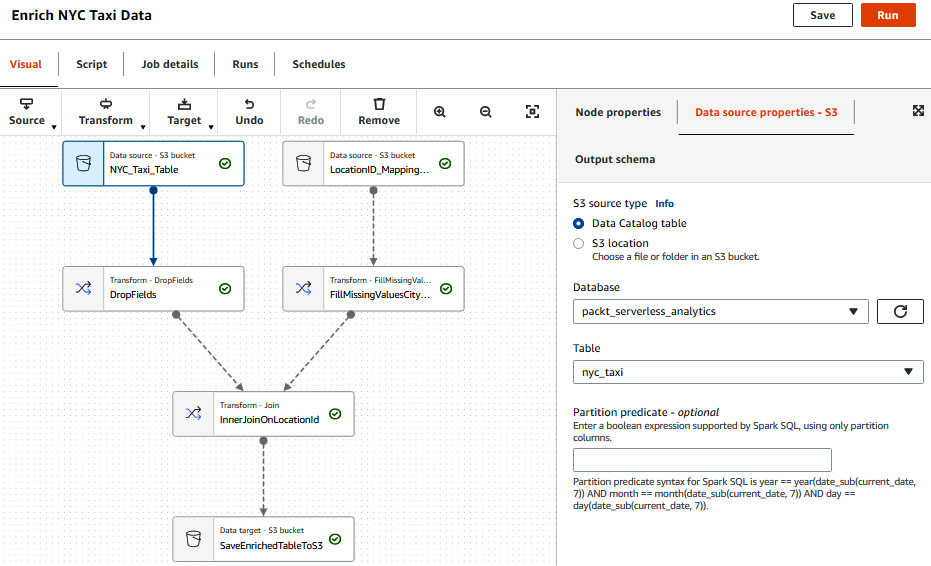
Figure 6.4 – Glue Studio visual editor screen to enrich the NYC Taxi dataset
Once the job has been authored within the visual editor, the source code that implements the execution graph will be auto-generated. The code can then be executed as a regular Glue ETL job on a scheduled basis or automatically triggered by an external event. You are then taken to a dashboard where you can monitor Glue ETL job executions. When you have multiple Glue ETL jobs that run regularly, monitoring and debugging jobs become essential to ensure data is getting generated successfully and on time. Glue Studio has a Monitoring tab that shows Glue ETL jobs that have run, their run state, their overall DPU usage to track costs, and other metrics. The following screenshot shows an example dashboard and the available metrics:
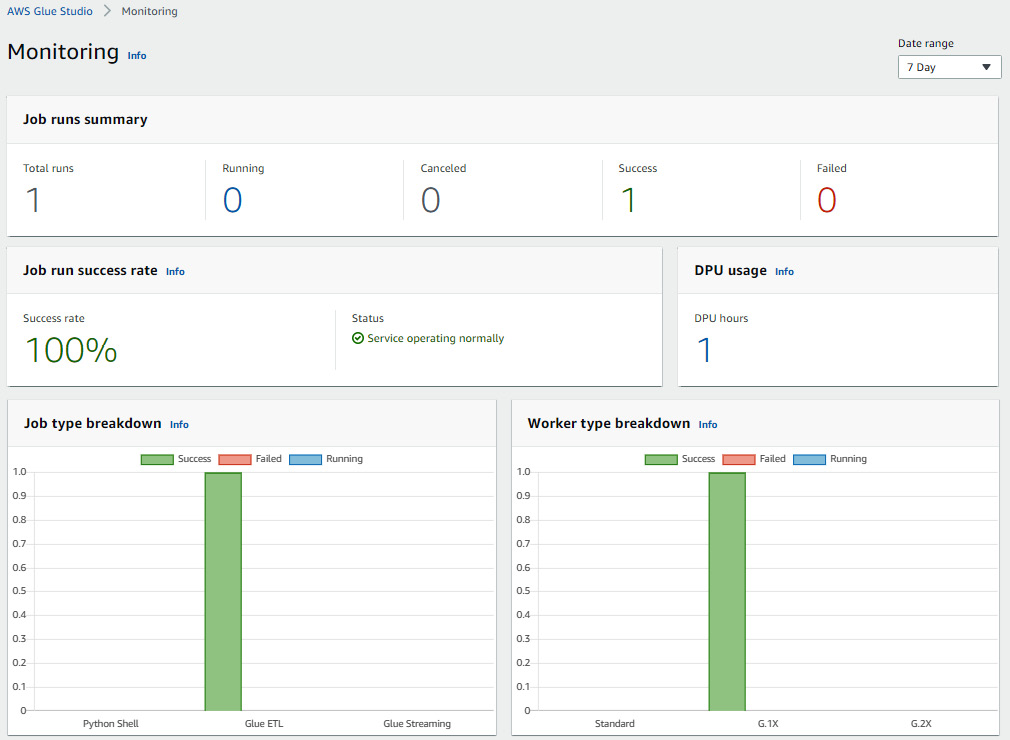
Figure 6.5 – Sample of the Glue Studio Monitoring screen
While AWS Glue Studio builds on top of AWS Glue ETL, Glue also has a separate product that makes it even easier to transform, cleanse, and explore datasets to get them ready for applications and machine learning. Let's take a quick look.
AWS Glue DataBrew
AWS Glue DataBrew is a data preparation and exploration tool that is entirely visual and doesn't require any coding. Unlike Glue Studio, where the visual job editor generates Glue ETL code, Glue DataBrew generates something else call recipes. Recipes are a collection of operations or transformations that are applied to a dataset that can be saved and applied to other datasets.
Glue DataBrew's visual editor provides rich functionality designed to make data preparation simple for all users. When a dataset is loaded into the editor, it will sample the dataset to surface key characteristics about it. This includes data quality-related metrics such as distinct values and missing values that may help decide on the type of transformations needed. Once a transformation has been selected, it can be previewed on the sample data, which makes iterating and testing easier and faster. The following is a sample screenshot of Glue DataBrew's visual editor, which shows some sample transformations on a column called object_name on the sample dataset:
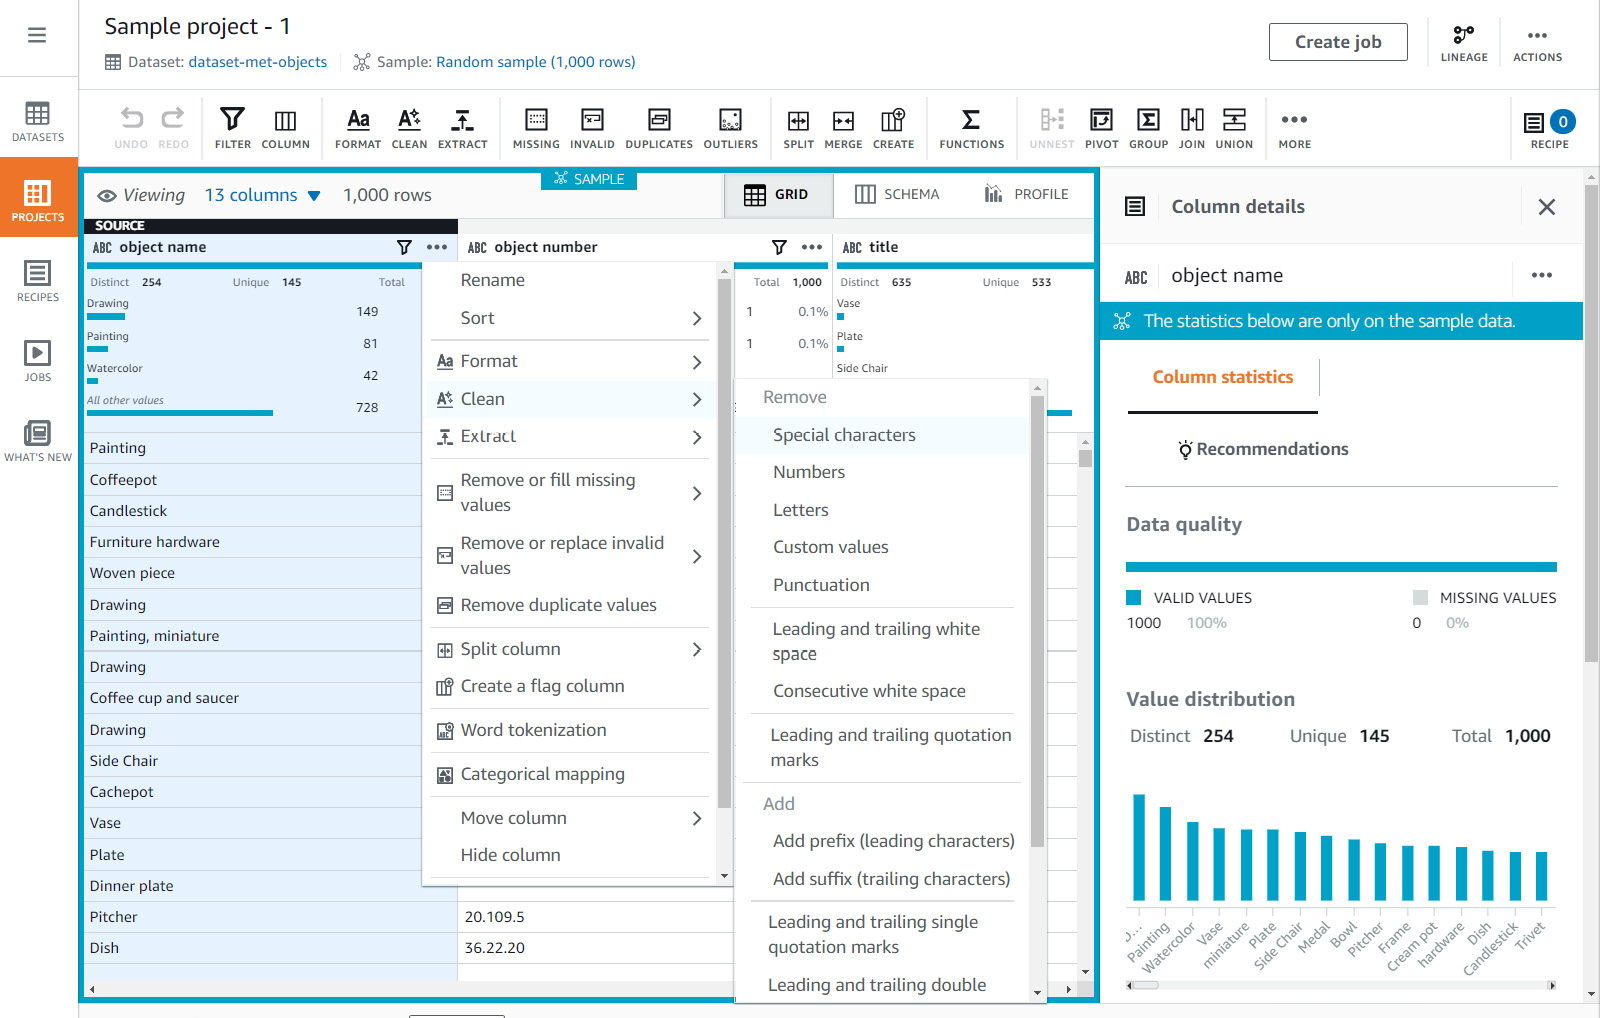
Figure 6.6 – Glue DataBrew sample screen
Glue DataBrew, at the time of writing this book, has over 250 operations and transformations that can be applied to datasets. The transformations range from simple column transformations such as changing data types or renaming columns, data cleaning functions such as changing case on strings, data quality operations such as filling in missing or empty values, and change column structures such as splitting a single column into multiple columns or merging them, to name a few.
Glue DataBrew's pricing is different than Glue ETL's. Glues DataBrew's visual editor charges by the session hour billed per half-hour, which is currently $2.00/hr. When DataBrew executes a recipe, it will use DataBrew execution nodes. Each node has 4 vCPUs and 16 GB of memory and is charged per hour and billed per minute.
Now that we've learned how individual datasets can be transformed and cleansed, let's look at AWS Glues Workflows and how it can piece together multiple transformations that generate data pipelines.
Using AWS Glue Workflows
Glue has many building blocks that can be used together to create what is known as data pipelines. Data pipelines consist of multiple extract, transform, and load jobs that take a complex operation and break them down into manageable parts. Some parts can be reused, run on different execution engines, and executed at other times. The goal is to make pipelines easier to optimize, make them easier to debug and monitor, and then check data quality in different stages to help identify issues earlier.
For example, suppose we are a seller on Amazon.com, and we get raw sales data put into an S3 bucket. We want to transform the data to feed it into a reporting system to generate reports. Before we can generate the reports, we need to cleanse the data, join the data to a product table that translates Amazon product IDs, called ASINs, to product names, join to an inventory table to show how many items we have in stock, and then group all the results by report periods. All these steps can be done within a single job, but our job may run for a long time, and diagnosing data quality issues may be complex. We may also want to save the output of enriched data before grouping the data to generate other reports or share it with another team. It would make sense to break the single job into multiple steps to reuse the job's output.
To manage the order of the job executions and dependencies, we would need an orchestrator to run these jobs and monitor them. This is where Glue Workflows can help. Glue Workflows allows Glue ETL jobs, Glue Crawlers, and Glue Triggers to execute in a particular order or workflow. The following screenshot shows a Glue Workflow that can be created to manage the report generation flow we discussed previously. Here, a workflow has been defined using Glue Workflows for the process of report generation:

Figure 6.7 – Glue Workflow of Glue ETL jobs, Glue Triggers, and Glue Crawlers to make a data pipeline
With a workflow defined, you can execute it based on a Glue Trigger. Glue Triggers kick off an action based on job flow dependencies that need to be met to execute the next action in the flow. Glue Triggers can be triggered on a fixed schedule, on-demand, or wait for other tasks to finish, such as Crawlers or Glue ETL jobs. In the preceding example, the workflow triggers are based on a schedule that kicks off the workflow at midnight every night. Once the workflow begins to execute, you can monitor each component, as shown in the following screenshot:
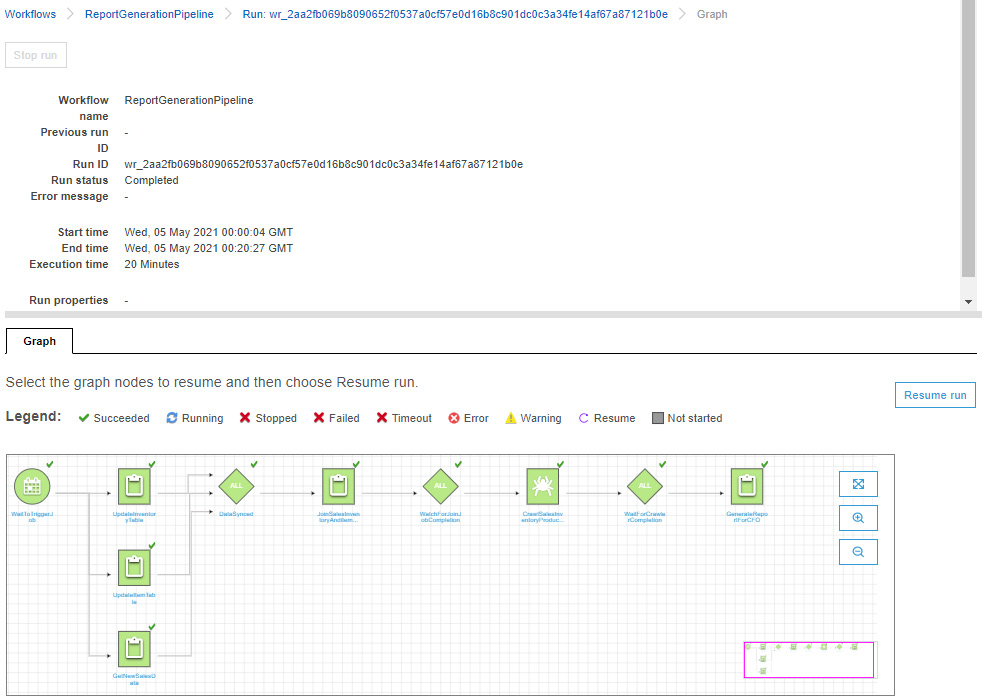
Figure 6.8 – Glue Workflow execution monitoring
In this way, we can monitor the workflow and look over its details as well.
Using AWS Lake Formation blueprints
A standard process that users perform within their data lakes is ingesting data. With a few clicks within the Lake Formation console, you can ingest data from databases, AWS CloudTrail, and load balancer logs. Lake Formation provides blueprints, a set of predefined code templates orchestrated with a Glue Workflow, to ingest from these data sources.
Lake Formation provides two types of database blueprints that can extract snapshots of data, or pull data incrementally; that is, data that has been inserted over a certain time. To create a blueprint, select the type from the Lake Formation console, as shown in the following screenshot:
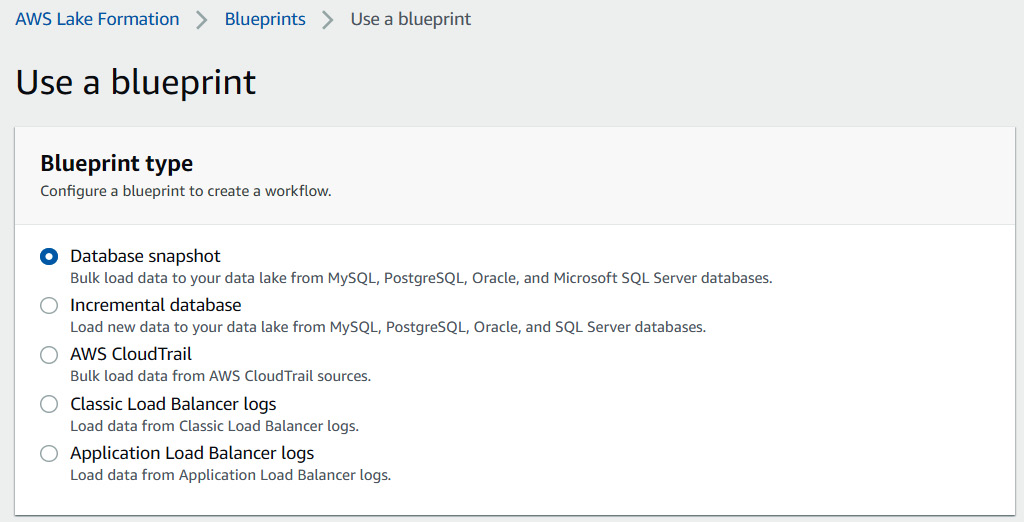
Figure 6.9 – Available blueprint types in Lake Formation
All Lake Formation blueprints require that you provide information about the source, the destination path in S3, and the frequency to pull the data.
Now, let's take a quick look at Glue Crawlers.
Using AWS Glue Crawlers
Glue Crawlers are processes that scan S3 for datasets and register the datasets into Glue Data Catalog. The Crawler reads a sample of the data in the dataset to retrieve or infer the dataset's schema, making registering datasets much easier and less error-prone. We touched on Glue Crawlers in previous chapters, and we take an in-depth look at them in Chapter 4, Metastores, Data Sources, and Data Lakes.
Now, let's look at how Lake Formation can help with securing your data lake.
Securing your data lake with Lake Formation
As we mentioned previously, Lake Formation leverages AWS Glue features, including Glue Data Catalog, to simplify creating, accessing, and securing data lakes. Athena uses Glue Data Catalog as its default Metastore and interacts with the service to retrieve metadata to execute queries against tables stored in Glue Data Catalog. Lake Formation adds a security layer on top of Glue tables by eliminating the need to secure individual tables using IAM. When Athena and other AWS analytics services need to access a table, they request permission from Lake Formation, which will authorize based on the calling principal's access policy. The following diagram illustrates this at a high level:
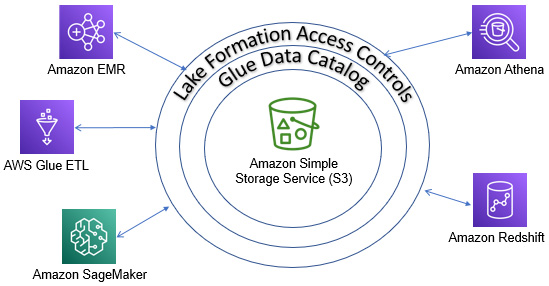
Figure 6.10 – How services interact with Lake Formation
In the following section, we will discuss the benefits of using Lake Formation for authorization and then look at some limitations to consider.
Benefits of using Lake Formation for authorization
Let's look at some of the benefits of using Lake Formation for authorization with Athena and AWS in general.
Finer grained data access controls
Lake Formation authorization occurs at a finer level than what can be achieved using IAM permissions alone. IAM policies can only provide permissions to objects stored in S3 and cannot control what the user can access within the files. This is what we refer to as coarse-grained access control. Lake Formation provides finer-grained access control by allowing us to define policies for subsets of data within an S3 object, namely column- and row-level control. This can be useful for various scenarios. If a dataset contains columns that contain sensitive data, instead of transforming the data to remove these columns, you can leave them in and restrict users to only see those columns containing non-sensitive information. Many times, this is required to meet compliance regulations.
Applying policies at the database, table, and column level
Access policies in Lake Formation are applied to databases, tables, and columns but not S3 paths. This has some benefits in that an administrator does not need to know about the underlying data in S3 when granting and revoking permissions. Tables can be used as an abstraction to the underlying data.
Scalability
Lake Formation permissions do not have a set size limit compared to what is allowed by IAM policies alone. There are limits to the number of inline and managed policies attached to an IAM role or IAM user with IAM policies. Large organizations could reach these limits and would need to develop custom code to generate credentials on the fly or split users into different AWS accounts.
Separating permissions with credentials
One of the leading security benefits of using Lake Formation is that the user running Athena queries does not need to configure access to the underlying data. Instead, when Athena needs access to the data, it sends a request to Lake Formation on behalf of the user to authorize them. If the request is authorized, temporary AWS credentials are provided to access the data. This separates the IAM permissions from the Lake Formation permissions. These temporary credentials are provided to the calling service – in this case, Athena – and not to the user to ensure they can only access data from a trusted service and not directly. When a Glue table is registered with Lake Formation, IAM permissions to S3 and the Glue table can be safely removed. All requests are logged, which can be audited. This flow can be challenging to follow, which is why we have provided the following diagram to help illustrate it:
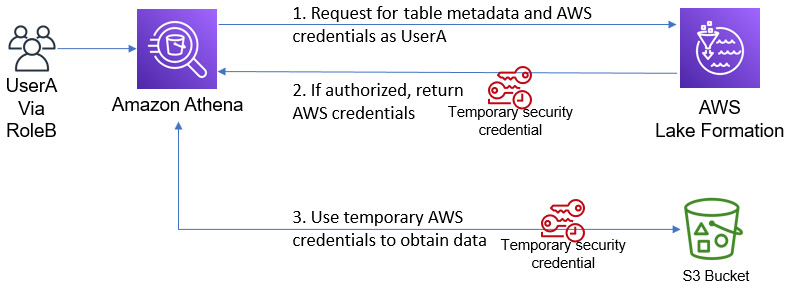
Figure 6.11 – How Athena interacts with Lake Formation to provide access control
For advanced users who use an identity provider to federate access from a directory service such as Microsoft Active Directory, Lake Formation can authorize the federated user and the directory groups they belong to. For example, if UserA federates and assumes the role of RoleB, then authorization can be done using UserA rather than RoleB. This is very useful when multiple users are assuming the same role to gain access to AWS services.
Security policies applied consistently across AWS services
Lake Formation provides a central administrative tool to control access to your data from AWS Glue, Amazon Athena, Amazon EMR, Amazon Redshift using Spectrum, and Amazon SageMaker. Access policies that are set in Lake Formation are applied to all Amazon Athena queries, Amazon Redshift queries on tables in S3 using Spectrum, AWS Glue and Amazon EMR Spark jobs, and Amazon SageMaker machine learning exploration using notebooks, pre-processing, and training.
Consistent security across AWS accounts
Many customers have adopted splitting their lines of business or groups using multiple AWS accounts. This allows for use cases where there is a central AWS account that contains the data lake, and different AWS accounts are the producers and consumers of data. Lake Formation allows you to share datasets with other AWS accounts by enforcing permissions on the metadata and data from a central place. Once data has been shared with consumer accounts, users can run queries in Athena against these tables.
Although this can be done using IAM policies, direct data access would need to be provided to other accounts. This results in a more complex set of policies that could be challenging to manage and would not allow for fine-grained access controls such as column-level or row-level access.
Limitations and considerations when using Lake Formation for authorization
Although there are many benefits to using Lake Formation for fine-grained access control, some limitations and considerations are important to understand when deciding to adopt. This list may change as Lake Formation continues to release new features, and we will go through a subset of items. A more complete list is located at https://amzn.to/3nwAvGN. If you have any questions, please contact your AWS representative or AWS support.
Athena query results cannot be managed by Lake Formation yet
When Athena runs a query, the query's results are stored in S3 in the customer's account. When results are requested through Athena APIs, they are read from S3 by Athena and returned to the caller. This ensures that customers have complete control over the resulting data. However, Lake Formation does not currently manage access permissions on S3 paths, but rather only catalog resources such as databases, tables, and columns. For this reason, it is recommended to use another mechanism to limit access to the query results. One solution is to use Athena workgroups to force the query result's location to a particular S3 location, and then employ IAM policies so that the results cannot be read by anyone outside the workgroup.
Athena does not query tables managed by Lake Formation that are encrypted using CSE-KMS encryption
S3 locations that are registered with Lake Formation cannot use CSE-KMS encryption with Athena yet. We do not recommend using CSE-KMS if possible, as discussed in Chapter 5, Securing Your Data. If this is not possible, then it is not recommended to use Lake Formation for data access controls and to rely on IAM policies instead.
Table partitions data must be located inside the tables directory
In the majority of cases, partition data is stored in a subdirectory inside the table's location. For example, if a table's location is s3://my_bucket/my_table/, then the partitions would be located at s3://my_bucket/my_table/my_partition=val1/ and s3://my_bucket/my_table/my_partition=val2/. If you have a partitioned table where the partition's location is not under the table's location, then Athena with Lake Formation authorization will not work.
Now that we have gone through a subset of limitations, let's look at enabling Lake Formation for data access control with Athena.
Walkthrough to enable Lake Formation for access control
To learn the process of enabling Lake Formation for access control, it is best to go through a walkthrough. This section will go through a sample setup for a new database that will have its access controlled using Lake Formation. We will test the access controls using Athena. If you wish to follow along, you will need to create two IAM users and an S3 bucket that will contain sample datasets. The first user will be given administrative access to Glue and Lake Formation to grant and revoke access to our data lake. A sample IAM policy for this user is available at https://bit.ly/3er86iv. The second user will be our Athena user, who will be able to run queries. A sample IAM policy for this user is available at https://bit.ly/2R87t4B.
The process that we will be going through will contain four steps as follows:
- First, we will create and register a data lake administrator.
- Then, we will register our S3 location with Lake Formation for management.
- After that, we will grant permissions to our database and tables.
- Finally, we will test the permissions that we have granted with Athena.
Upgrading Production Accounts to use Lake Formation Access Controls.
If you are looking to upgrade existing AWS accounts and databases, it's strongly suggested that you test the process in a non-production account first and document the steps taken. The upgrade process may look slightly different depending on factors such as data being encrypted, the IAM users/roles, existing policies, and more. The process of upgrading existing databases to use Lake Formation can be a little complicated. However, going through this process should give you a solid understanding of the pieces of Lake Formation that will make the upgrade process easier to navigate.
Creating and registering a data lake administrator
The first step is to register data lake administrators. For this walkthrough, I have created an IAM user named athena-lakeformation-admin that will act as our admin. We must select the administrative roles and tasks within the Lake Formation console and then click on the Choose administrators button to add our administrator user. Once we've done that, our console should look like this:
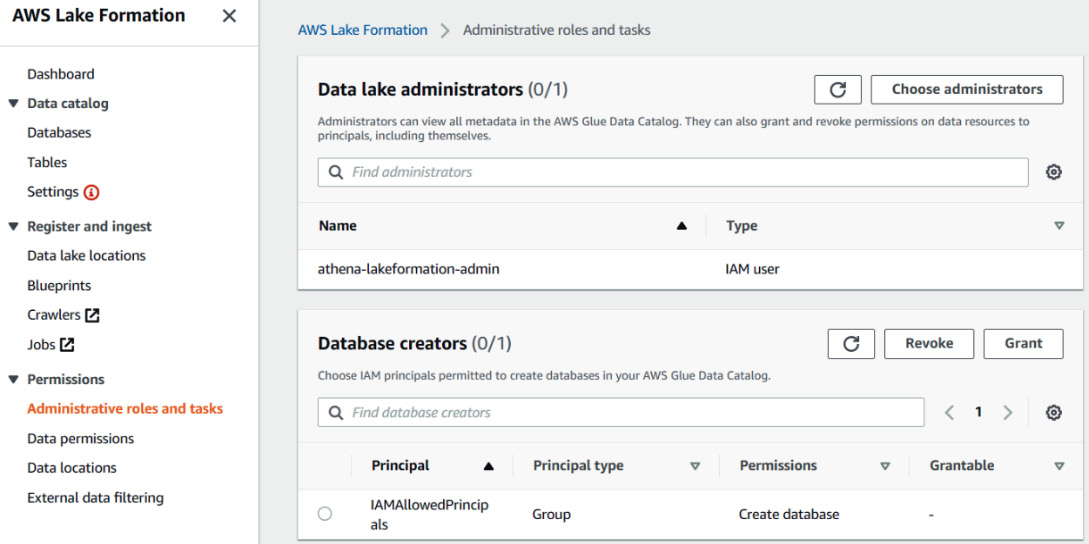
Figure 6.12 – Data lake administrator's screen
Once athena-lakeformation-admin has been added, we can switch to that user for the remainder of the interactions with the Lake Formation console. The next step is to register an S3 location with Lake Formation.
Registering an S3 location
The next step is to register our S3 location so that it can be accessed by Lake Formation. This process grants permissions to the Lake Formation service to assume an IAM role so that the service can interact with the data within the S3 location. When an authorization request is made to Lake Formation by an AWS service on behalf of an end user for a dataset, Lake Formation will assume this role and create temporary credentials. For this walkthrough, we will allow Lake Formation to assume a Service Linked Role, a type of IAM role that can only be used by AWS services. The AWS service will grant the role with the least amount of privilege to perform actions on your behalf. Once the Service Linked Role has been created, you can view the role in your IAM console and review the permissions that were granted to it. The only scenario when you would not want to use a Service Linked Role is when you want to manually manage permissions or use EMR with Lake Formation.
The following screenshot shows the Register location screen, which is where you can register a bucket named packt-serverless-analytics-888889908458-lakeformation using the Service Linked Role:
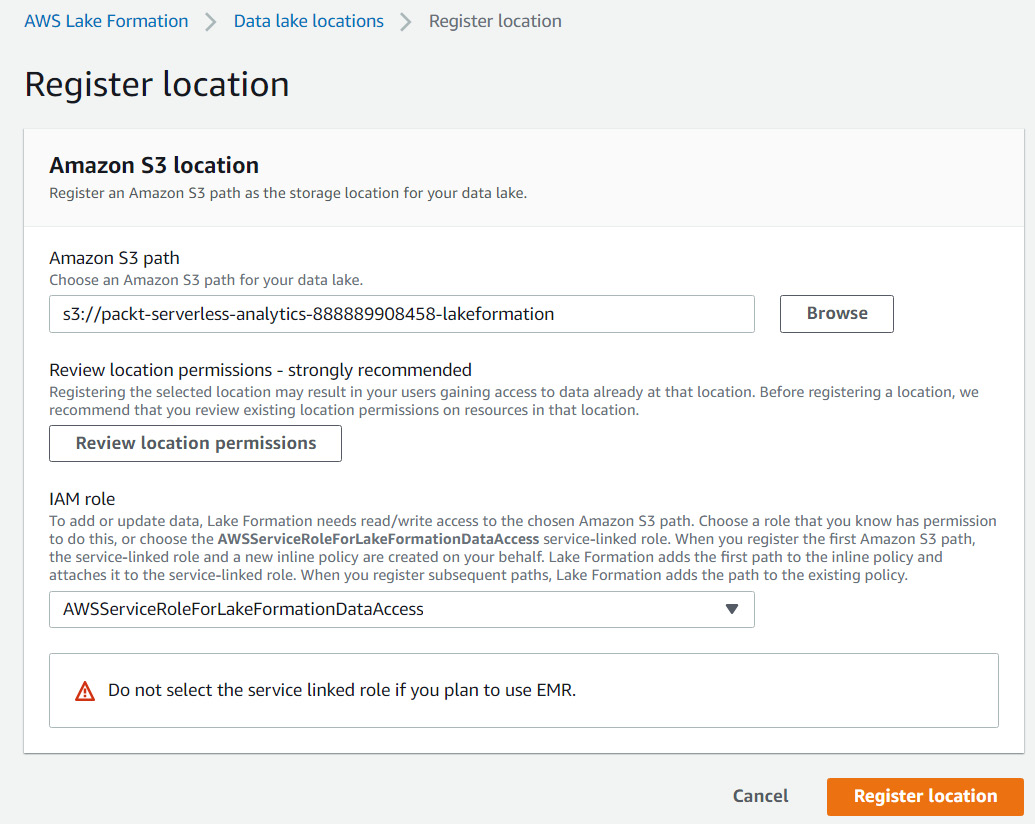
Figure 6.13 – Registering an S3 location with Lake Formation
Registering an S3 Location with Encryption Enabled
If you're registering an S3 location that has encryption enabled, some additional steps must be followed. See https://amzn.to/3hf39uW for more information on how to enable encrypted S3 paths.
Before registering a new S3 location, it is good to review the permissions that have already been granted to the S3 location to ensure that the registration process doesn't give permissions to unintended principals.
Now that we have registered an S3 location with Lake Formation, let's grant permissions for our admins to manage datasets in the storage location.
Granting permissions to an S3 location
The next step is to grant permissions to S3 locations for users that we wish to create databases and tables for. There is no other reason to grant users permissions to specific S3 locations. For this walkthrough, we will grant our athena-lakeformation-admin user permissions, as shown in the following screenshot:
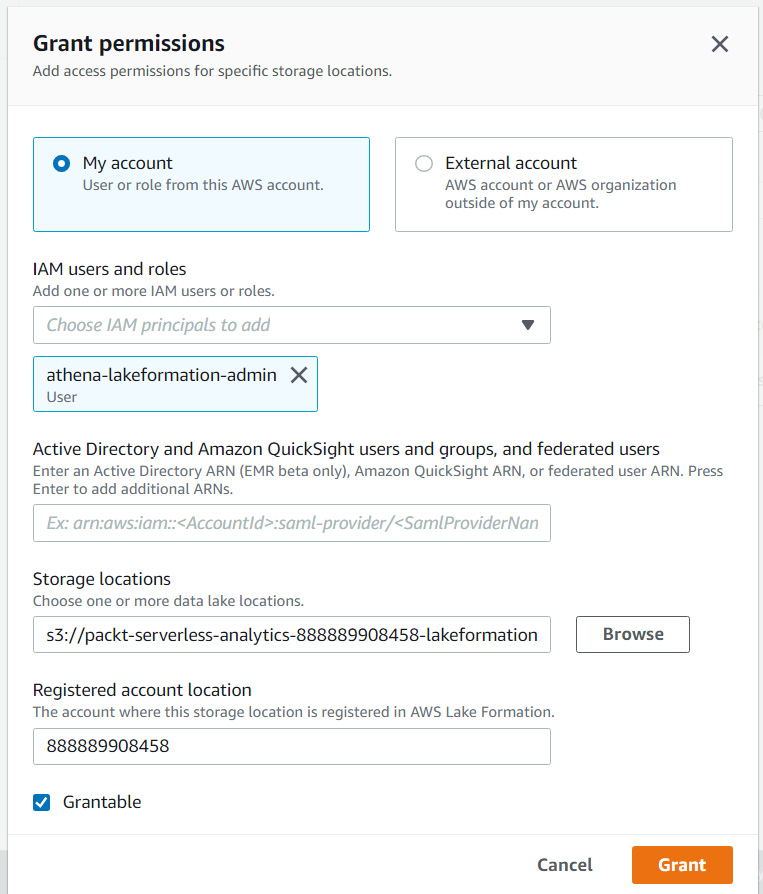
Figure 6.14 – Granting permissions to an S3 location for Lake Formation
The Grantable checkbox allows this user to grant other users permissions to this location as well. For example, if we wanted athena-lakeformation-UserA to grant permissions to athena-lakeformation-UserB, we would set Grantable for athena-lake-formation-UserA.
With permissions granted to athena-lakeformation-admin, let's create our database.
Creating and configuring a database
This step will create a new database called packt_serverless_analytics_lakeformation so that we can register tables within it. This database will be configured so that Lake Formation only manages its permissions. The following screenshot shows how to create the database within the Lake Formation console:
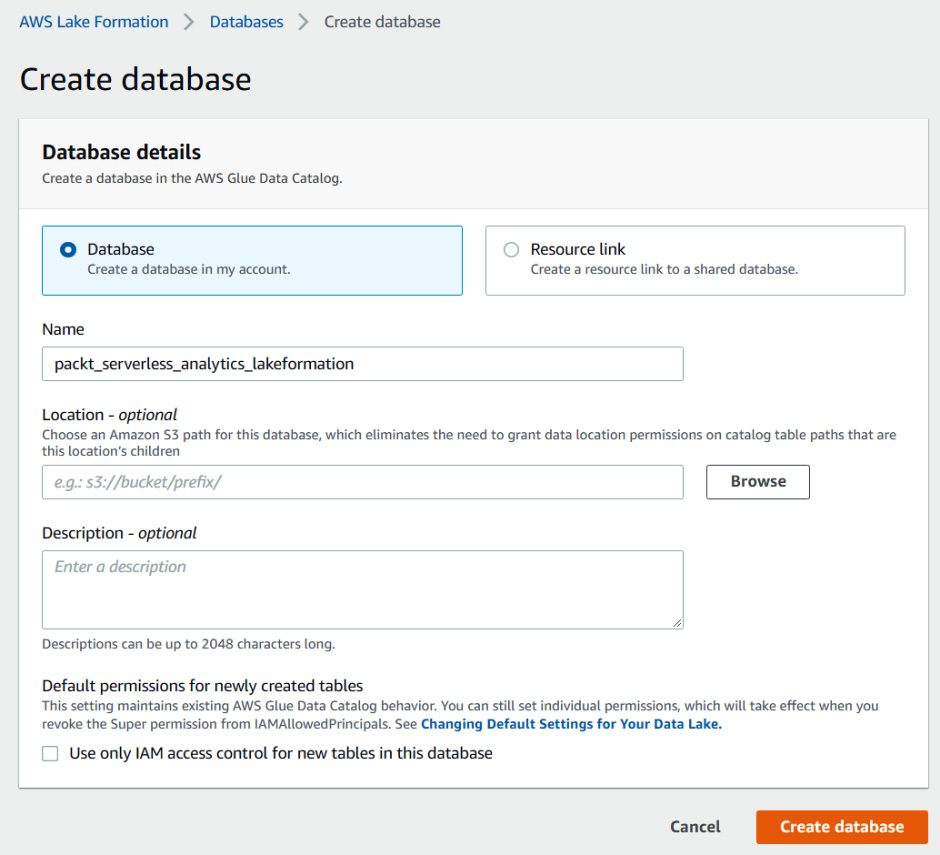
Figure 6.15 – Creating a database in Glue Data Catalog for Lake Formation permissions
We want to make sure that we uncheck Use only IAM access control for new tables in this database. We want Lake Formation to manage all permissions to our tables within the packt_serverless_analytics_lakeformation database.
If you look at the data permissions screen for the database and/or tables within the database and see that the IAMAllowedPrincipals principal has permissions, revoke its access. The IAMAllowedPrincipals group is a special group within Lake Formation that grants permissions to any IAM principal to interact with this location. Removing it will make Lake Formation the only source for permissions. The following screenshot illustrates this:
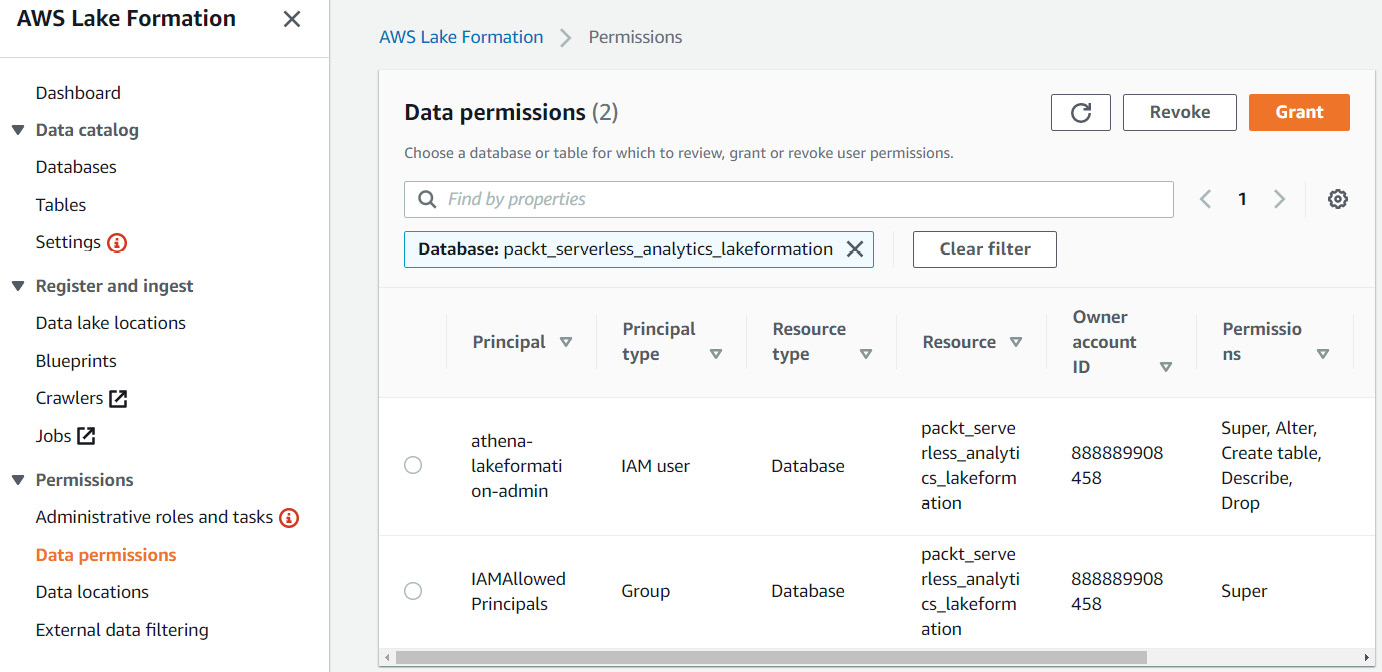
Figure 6.16 – Data permissions for database packt_serverless_analytics_lakeformation
Now, register a table that exists within your S3 bucket. For our walkthrough, we will register our NYC Taxi dataset as nyc_taxi. Now, we must grant permissions to our athena-lakeformation-UserA to access the database and tables of packt_serverless_analytics_lakeformation.
Granting permissions to a user
If we log in as athena-lakeformation-UserA and we go to Athena, we will see that the packt_serverless_analytics_lakeformation database is not visible, as shown in the following screenshot:
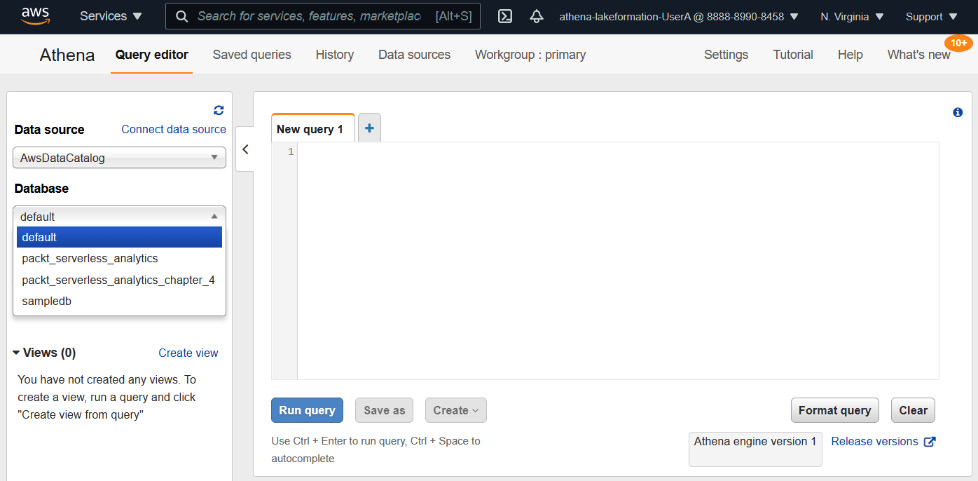
Figure 6.17 – The athena-lakeformation-UserA user's list of databases in Athena before being granted permission
Let's add permissions for athena-lakeformation-UserA by permitting them to describe the database, as shown in the following screenshot:
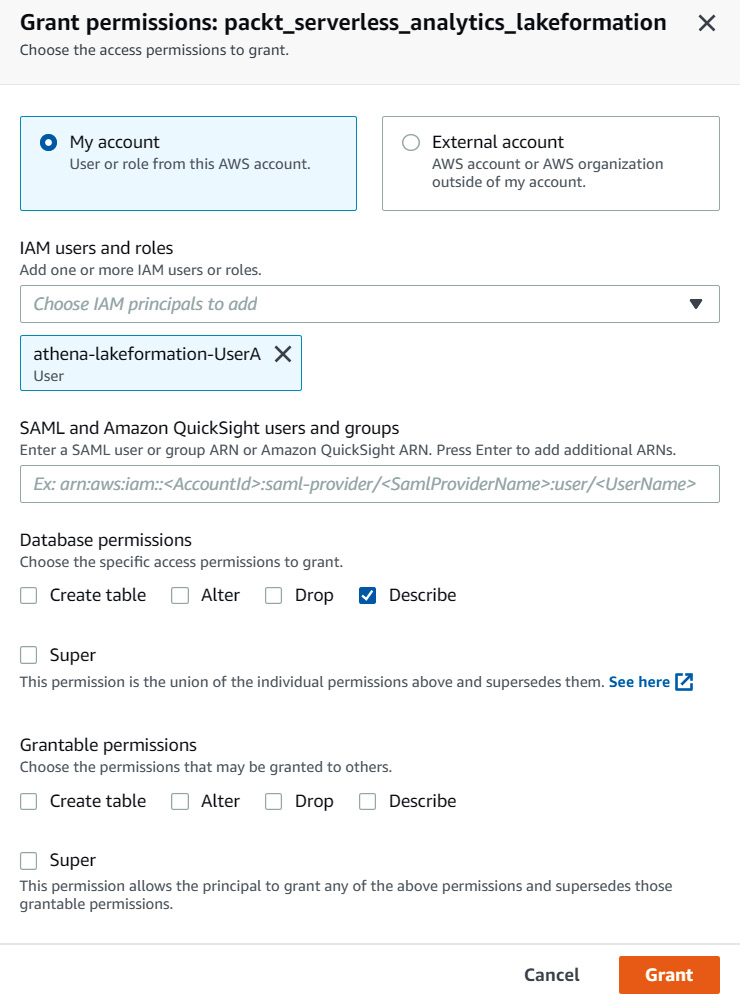
Figure 6.18 – Granting athena-lakeformation-UserA permission to the packt_serverless_analytics_lakeformation database
This has granted the user to see the database within Athena, as shown in the following screenshot:
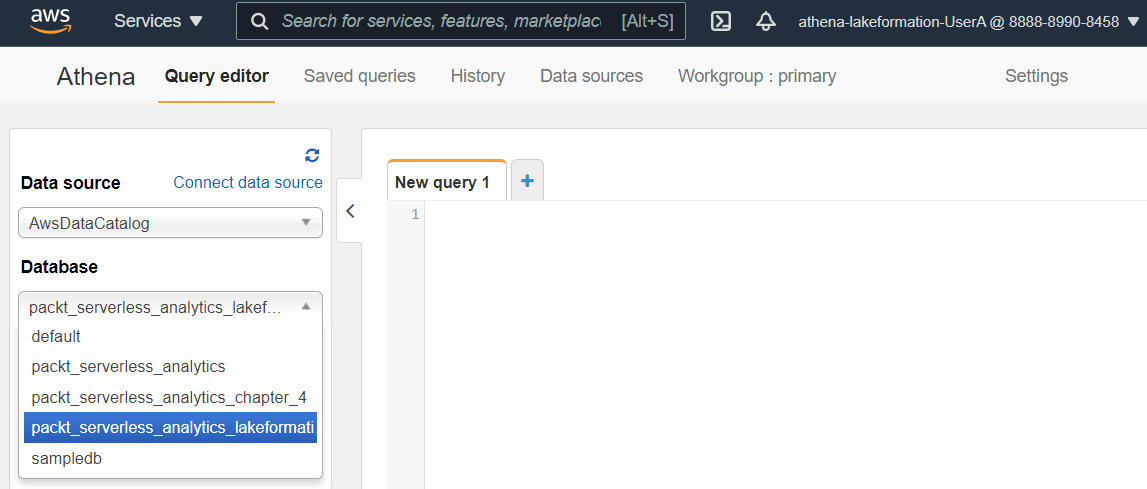
Figure 6.19 – The athena-lakeformation-UserA user's list of databases in Athena after being granted permission
Then, grant the user access to query the nyc_taxi table and exclude the tip_amount column as it may be sensitive data for the user to query. The following screenshot shows how to grant this permission:
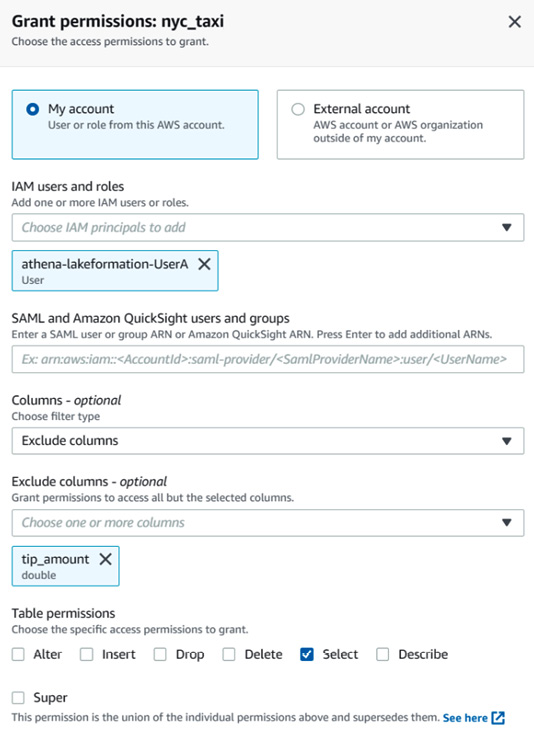
Figure 6.20 – Granting permission to nyc_taxi table to the athena-lakeformation-UserA user, excluding the tip_amount column
Note
If you have a filter on included or excluded columns, you should not select Describe permissions as you may receive an error message.
After granting these permissions, the user can query the table within Athena but will not get the tip_amount column:
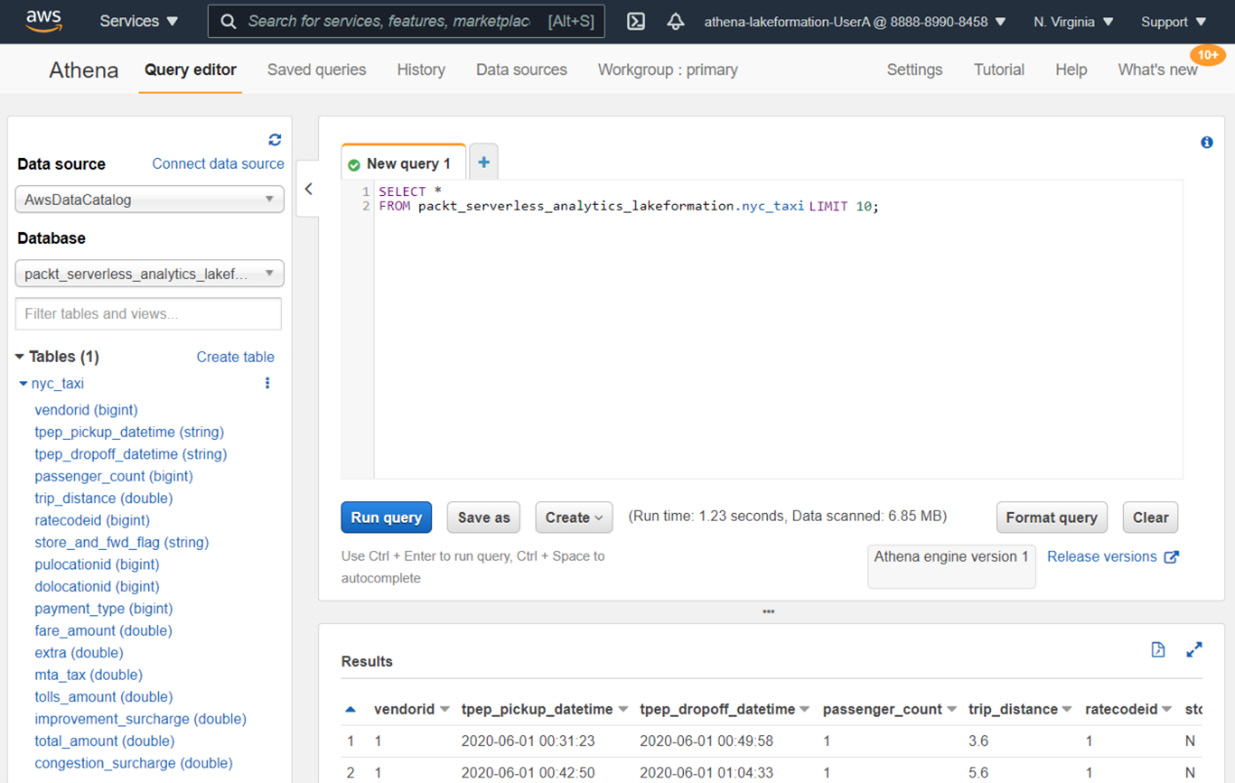
Figure 6.21 – Athena console querying the nyc_taxi dataset with column tip_amount not available
Now that we have enabled Lake Formation for Athena, let's look at governed tables and how they differ from regular tables.
What AWS Lake Formation governed tables can do for you
Lake Formation introduced a new table format called governed tables. Governed tables provide many features that aim to solve many of the pain points users have when storing data on S3. We have an entire chapter, Chapter 14, Lake Formation – Advanced Topics, dedicated to it, but we will summarize many of the benefits here. Let's take a look.
Transactions on tables stored in S3
Distributed filesystems such as Hadoop's Distributed File System and Amazon S3 are excellent choices for storing vast amounts of data and querying them. They also excel at overwriting files and deleting them. However, they were not designed to update and delete data within files. To support this functionality, tools have to download the file, find and update the rows, and then replace the entire file with the new one. This process can be very expensive as you will need to read the whole dataset to find the row. Indexes on primary columns can be added for some file formats to help find which files need replacing. However, queries that are performed on data being updated may not see consistent results and could lead to a bad user experience. Several projects were created to solve these challenges and to provide atomic, consistent, isolated, and durable (ACID) transactions to datasets, such as Apache Hive Transactional Tables, Apache Hudi, Apache Iceberg, and Databricks Delta Lake, to name a few. Governed tables is an AWS Lake Formation implementation of similar capabilities backed by a fully managed service. It provides ACID transactions to tables so that users can update and delete files and individual rows through a set of APIs. These store data in S3 to retain the benefits of reliability and scalability that S3 provides.
There are many use cases where having transactional capabilities is useful. Compliance with data protection laws such as GPDR is becoming more common today. This is a growing trend as other countries are introducing laws that mandate organizations to delete customer's data on request. Other use cases are when a dataset is being replicated from a different source, and data on S3 must match it.
Automated compaction of data
One of the main drivers of performance, when any query engine reads from S3 or HDFS, is how data is stored and the data format it is stored in. When customers ask why their queries may not be running as quickly as they think they should be running, the first question I ask is, how big are the file sizes that are being read? Most of the time, the files that are being read are tiny, from 10 KB to 10 MB. Having small files can be detrimental to query performance because of the number of round trips an engine must make to read each file. When a file is being read by a query engine, the engine must perform an open file operation to open a stream to the file. Then, the engine performs GetData operations to read the stream and closes the stream once it finishes. If the file is tiny, the open file operation can take up to 80% of the time it takes to read data. Having file sizes of a recommended length of between 128 MB and 1 GB dramatically reduces the performance impact of S3 List and Get operations. We'll go through some examples of this in Chapter 11, Operational Excellence – Maintenance, Optimization, and Troubleshooting.
AWS Lake Formation governed tables eliminate the issue of small files by automating data compaction by merging small files into larger ones in the background to ensure that data is stored optimally.
Time-traveling queries
Time-traveling queries allow users to execute queries as if those queries were executed at a different time and see what a dataset looked like at that time. This can have multiple applications and use cases. One application is to debug updates to a dataset to see when and how data changed. If an update was done incorrectly, then the transaction that caused the data quality issue can be rolled back. For example, if you have inventory data that gets updated regularly, and a user or customer suggests that the data is incorrect, using time-traveling queries can pinpoint the time when the inaccurate data was updated and the transaction that caused the data to be incorrect.
Row-level filtering
Row-level filtering is a data access feature that allows administrators to grant permissions at the row level for a dataset. There are many applications where this capability is useful. This is best illustrated with an example. Suppose there is a compliance rule in which a user can only access rows of data that match the geographical region from where they are accessing the data. An administrator may set a policy that allows company users residing in Germany to only access data that maps to records for German customers. Users from Germany can perform queries and only get data from their own country. Another example would be with lines of business. For example, a clothing company can allow salespeople from the footwear line of business to only access data for the brands they manage and not see data related to swimwear.
Some customers have implemented this type of behavior by taking a table and breaking it up into different tables representing a particular slice of the data they wish to manage access. However, this is not a scalable solution. If a user has access to multiple data dimensions, they will need to join the tables to get a complete picture.
Now, let's summarize what we went through in this chapter.
Summary
In this chapter, you learned what AWS Glue and AWS Lake Formation provide when building and maintaining data lakes on AWS. We then focused on Lake Formation's ability to provide fine-grained access controls and the benefits and limitations of this. We also went through a sample process of enabling Lake Formation access controls for a new database and how it works within Athena. Lastly, we touched on Lake Formation governed tables, what they are, and how they can solve many issues with storing datasets on a distributed filesystem. There are more advanced features of Lake Formation, and we will dive deeper into governed tables in Chapter 14, Lake Formation – Advanced Topics.
In the next part of this book, we will get our hands dirty by using Amazon Athena in various settings ranging from ad hoc data analysis, using Athena to build ETL pipelines, and building applications that use Athena. We'll also take some time to cover how you can troubleshoot and tune common Athena issues in the pursuit of operational excellence.
Further reading
To learn more about the topics that were covered in this chapter, take a look at the following resources:
- AWS Lake Formation resources, including blog posts and demo videos: http://amzn.to/394z9x7
- Registering an encrypted Amazon S3 location – AWS Lake Formation: https://amzn.to/3hf39uW
- Registering an Amazon S3 location in another AWS account – AWS Lake Formation: https://amzn.to/3baTVfI
- Limitations of using Lake Formation security with Athena: https://amzn.to/3nwAvGN