
Chapter 5: Securing Your Data
Data within an organization can be one of its most valuable assets. Data can drive business decisions for an organization, such as to whom and how to advertise, what the behavior of users on a website is, and how they react to sales or help businesses identify inefficient processes. An organization can also package and sell that data to customers or other organizations, getting direct revenue for the information it collects. Regardless, all organizations should protect the data they have from both internal and external entities.
We have all heard stories where a data breach has occurred in a large institution. It is a harrowing and traumatic event for the organization. There could be monetary penalties by governments for breaking laws. Still, for most companies, breaking customers' or the public's trust can be much more damaging. This is why large companies invest large amounts of resources into having dedicated security teams that provide rules of how data should be protected and handled.
Regardless of an organization's size, it is always a good idea to think about security at the beginning of any project. I always tell customers that it is much easier and cheaper to incorporate basic security early and often than later, and most are thankful that they did. By employing security measures later in the process, it becomes much more intrusive to add it. More applications may need to be changed to deal with new rules, or more users consuming data may need to change their processes. You may need to encrypt data in place, which may require system downtime. With some simple guidelines and features, we can avoid many of these headaches later on.
In this chapter, we will cover the following topics:
- General best practices to protect your data on AWS
- Encrypting your data and metadata in Glue Data Catalog
- Enabling coarse-grained access controls with IAM resource policies for data on S3
- Enabling fine-grained access controls with Lake Formation for data on S3
- Managing access through workgroups and tagging
- Auditing with CloudTrail and S3 access logs
Technical requirements
For this chapter, you will require the following:
- Internet access to GitHub, S3, and the AWS Console.
- A computer with Chrome, Safari, or Microsoft Edge and the AWS CLI version 2 installed.
- An AWS account and accompanying IAM user (or role) with sufficient privileges to complete this chapter's activities. For simplicity, you can always run through these exercises with a user that has full access. However, we recommend using scoped-down IAM policies to avoid making costly mistakes and learn how to best use IAM to secure your applications and data. You can find a minimally scoped IAM policy for this chapter in this book's accompanying GitHub repository, which is listed as chapter_5/iam_policy_chapter_5.json (https://bit.ly/3qAcNtU). This policy includes the following:
- Permissions to create and list IAM roles and policies. We will be creating a service role for an AWS Glue Crawler to assume.
- Permissions to read, list, and write access to an S3 bucket.
- Permissions to read and write access to Glue Data Catalog databases, tables, and partitions. You will be creating databases, tables, and partitions manually and with Glue Crawlers.
- The ability to create and run permissions for Glue Crawlers.
- The ability to gain access to run Athena queries.
- An S3 bucket that is readable and writeable. If you have not created an S3 bucket yet, you can do so from the CLI by running the following command:
aws s3api create-bucket --bucket <YOUR_BUCKET_NAME> --region us-east-1
General best practices to protect your data on AWS
In this section, we will go over some general best practices. However, before we do, we should understand some security basics. Let's start with what I call the five general pillars of security. They are as follows:
- Authentication: Can the user or principal prove who they are? Access to AWS resources depends on IAM authentication through AWS credentials, which are like logins and passwords. These credentials can be long-lived, such as IAM user credentials, or short-lived, such as the AWS credentials that are provided when an IAM role is assumed. Throughout this chapter, we will assume that AWS IAM is the only authentication mechanism that users can use. However, we will also look at other ways to authenticate in Chapter 7, Ad Hoc Analytics.
- Authorization: Is the user or principal provided permission to access a resource? When an action is requested against an AWS resource, the IAM credentials that are used are checked to see whether those credentials can access the resource.
- Data protection: Is the data secure while it is in transit or at rest? Data encryption is the most common way to protect data while transferring it between two parties and storing it.
- Auditing: Do you know who is accessing the data, and are they supposed to be accessing it? Auditing is usually the aspect of security that is most forgotten, but it is critical. Auditing serves two purposes: making sure that current access to data is what we expect it to be, and if it is not, then make changes to resource access policies, and assessing the severity of a breach and what was leaked. Severity can be measured by how long a breach occurred, who the actors were, and the sensitivity and amount of data that was accessed.
- Administration: How are the policies that grant permission to resources managed? Ideally, there would be a single place where permissions are granted.
Now that we understand the five pillars of security, there is one last point that I would like to make before getting into the best practices: No system can be 100% secure. When there is an incident, security policies aim to reduce the attack surface and blast radius. Attack surface means the different ways a bad actor can try to infiltrate a system. The larger the attack surface, the more ways that a system can be compromised. A blast radius is the amount of potential damage an actor can cause when a system is compromised.
Suppose there were two sets of AWS credentials. One set provides administrative access to an entire AWS account. The other gives read-only access to an S3 bucket that contains cat pictures. If the first set of credentials was obtained by an attacker, they would have access to all the data and be able to perform any action within the account. If the second set of credentials was obtained, they would be able to download cat pictures. The first event would be much more damaging and have a bigger blast radius. To reduce the likeliness of credentials being exposed, or to reduce the attack surface, these AWS credentials can be encrypted and access to them can be limited to only authorized users.
Now that we have a basic understanding of security, let's look at the best practices for securing your data.
Separating permissions based on IAM users, roles, or even accounts
I have seen too many companies use the same IAM credentials across several systems that access different data or services. This increases the blast radius if those credentials become compromised as the credentials likely would have been allowed to access all the resources all these systems need. If you need to disable the credentials because of an incident, then it would impact many services. A general rule is that an application should have its own IAM user or preferably an IAM role, and each user should get their own set of credentials.
It may make sense to provision different AWS accounts for each group or application if complexity dictates for larger organizations. This provides isolation for each group or application from others, without it impacting anything outside the account. Using AWS Organizations can help you manage and control accounts. One other frequent use of using separate accounts is in different stages of an application. For example, development, beta, and production environments run within their own AWS accounts, and then changes to policies within the development stage can be propagated to beta and then to production in an automated fashion.
Least privilege for IAM users, roles, and accounts
Within each chapter of this book, we have suggested that you use the IAM policies that we provide when completing the exercises. We do this so that you can use IAM credentials with the least privilege so that you can get into the habit of doing so. Using IAM principals with the least privilege aims to reduce the blast radius if those credentials are ever compromised; for example, if an intern accidentally puts them on GitHub; I am speaking from experience here.
Rotating IAM user credentials frequently
IAM user credentials are long-lived, which means that they can be used until they are rotated or the IAM user is deleted. Rotating credentials means that the old credentials are marked as expired, and a new set is created. This process reduces the attack surface because if credentials leak, they will only be used for a limited time. By the time someone finds them, they may no longer be used, or more importantly, this will limit the amount of time a bad actor can perform their actions for. One common scenario where this helps is if an employee leaves the company and takes credentials with them or, as in the previous section, if an intern accidentally publishes their credentials to GitHub.
Blocking public access on S3 buckets
Many companies recently made news in an embarrassing way. They had set their S3 buckets to be publicly accessible, and their data was available to the world. This scenario can easily be avoided by setting newly created and existing S3 buckets to block all public access. If you are an administrator, you can set this at the account level so that new buckets are not allowed to be made public.
The following screenshot shows the options that are available when setting this setting:
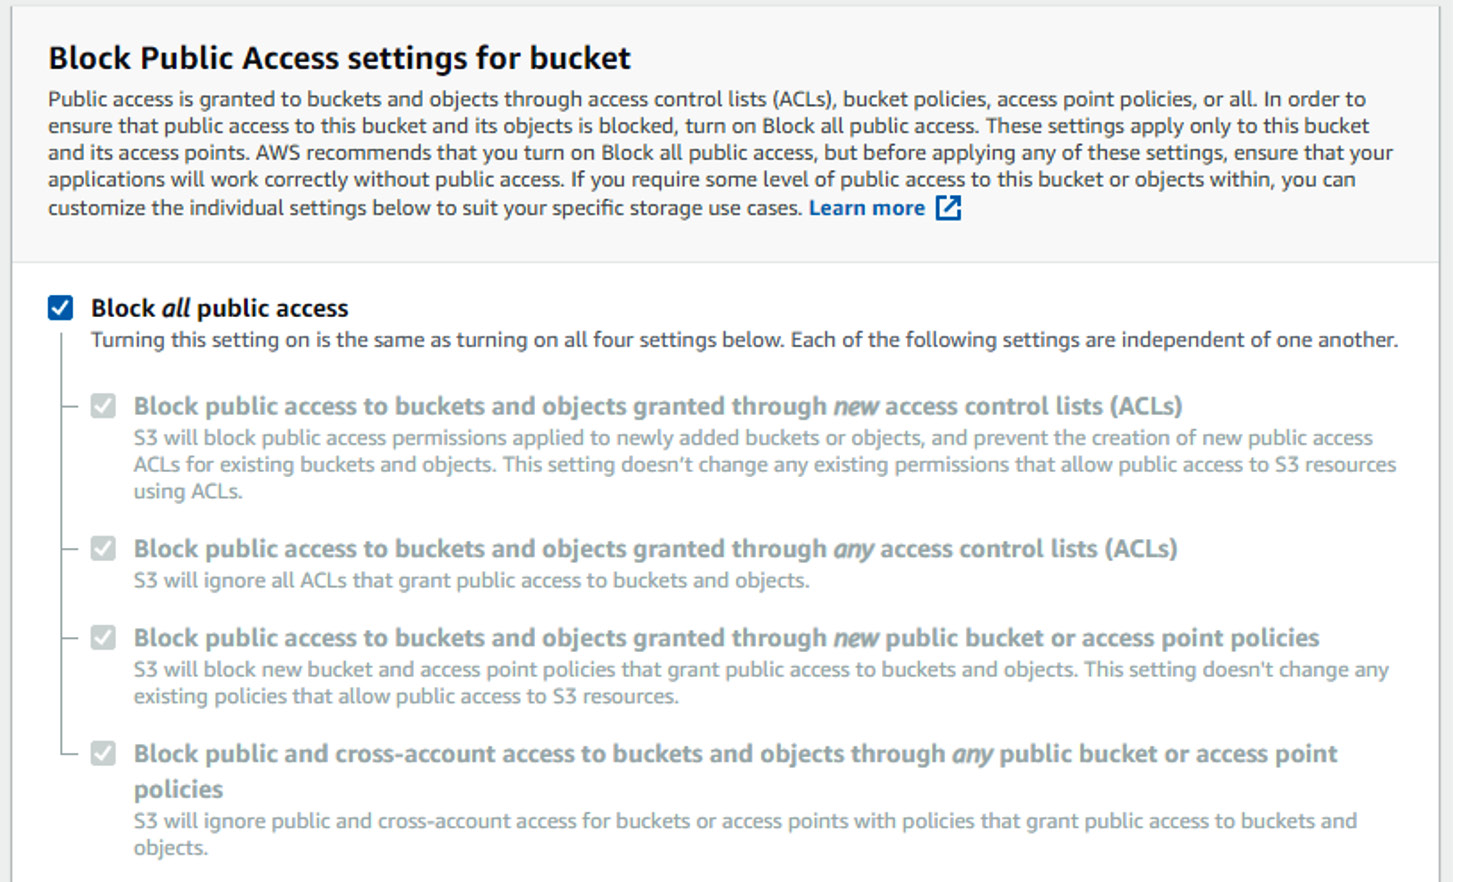
Figure 5.1 – Block Public Access settings for bucket page
It is very rare for an organization to want to allow data to be publicly available. If there is an excellent reason to do so, it is recommended that you put safeguards that prevent accidental data from going into the bucket. One approach is to have a separate AWS account and allow only a few trusted people to access it. An even better system would be to set up a process that copies data to the public bucket that a second person approves.
Enabling data and metadata encryption and enforcing it
Enabling data and metadata encryption early on can save a lot of time in the future and be considered before any project. If requirements change and encryption becomes required after data is stored unencrypted, some effort will need to be made to encrypt that data. In addition, any downstream consumers may also need to be changed to decrypt the data. This process can be avoided if the data is encrypted early in the process. To learn how to encrypt your data on S3, see the Encrypting your data and metadata in Glue Data Catalog section, later in this chapter.
Ensuring that auditing is enabled
Enabling auditing on AWS is relatively easy and cost-effective. However, the headache that results from not having auditing capabilities can be more costly and cannot be enabled after the fact. For more details on how to enable auditing using CloudTrail logs or S3 server access logs, please see the Auditing with CloudTrail and S3 access logs section, later in this chapter.
Good intentions cannot replace good mechanisms
Jeff Bezos was quoted to have said, "good intentions never work; you need good mechanisms." A mechanism is a process that enforces that something is done, regardless of if people have the best intentions. For instance, having the intention to wake up at 6 a.m. is not as effective as setting an alarm. When it comes to security, it is always best to have mechanisms by putting in enforcement where possible and auditing to ensure that the mechanisms are working. An example of enforcement would be to put an S3 bucket policy that rejects uploads unless the objects are encrypted.
Encrypting your data and metadata in Glue Data Catalog
There are many ways a malicious person may be able to get access to your data. They may be able to listen on a network for traffic between two applications. They may be able to pull a hard drive from a machine, server, or dumpster. They may be able to gain access to an account that has access to the data they need. Regardless of how the bad actor obtains your data, you do not want them to read the data, and data encryption is how that is done. Data encryption takes your data, encodes it using an encryption key, and makes it impossible to read without the decryption key.
Encryption algorithms where the encryption key and decryption keys are the same are called symmetric encryption. Algorithms in which the keys are different are called asymmetric encryption.
Let's look at how we can encrypt data on S3.
Encrypting your data
When your data is persisted somewhere, it should be encrypted. All the data that Athena temporarily stores on any disks on their clusters is encrypted and then wiped after each query. However, you will need to choose how to encrypt data that is stored on S3. With AWS services, typically, there are four different ways encryption can be done. The differences between the four relate to where the encryption key is stored and where the encryption/decryption occurs. Encryption can be done server-side or client-side. With server-side encryption, S3 performs encryption and decryption. The client will never see the encryption keys or encrypted data. With client-side encryption, the requester performs encryption and decryption and S3 will never see unencrypted data. With the encryption key, S3's encryption key can't be used, nor is an encryption key stored from a customer's AWS Key Management Service (KMS), nor is a key provided by the customer. Each of these options has performance, cost, and security considerations, which we will briefly discuss.
Enabling server-side encryption using S3 keys (SSE-S3)
This is the easiest and cheapest way to encrypt your data; that is, by leveraging S3's encryption keys. S3 will encrypt each object with a unique key and encrypt the key with S3's master key. The encrypted key is then stored as metadata for the object, which S3 can use later when reading. If someone did manage to access the raw, unencrypted data, they would still need S3's master key to decrypt the key that was used to encrypt the data. Using this encryption method does not have a financial cost, and its performance penalty should be negligible.
You can enable default encryption within S3. You can set SSE-S3 as the default encryption by configuring your bucket so that any time an object is written, it will automatically be encrypted using S3's encryption keys:

Figure 5.2 – Enabling default encryption using S3's keys
Next, we'll look at KMS keys.
Enabling server-side encryption using customers' KMS keys (SSE-KMS)
Rather than using S3's master encryption key, you can specify S3 to obtain encryption and decryption keys from your AWS account's KMS. The credentials that are used to read the data must have permissions to access the KMS key, and S3 will use the keys. Using this method is more secure because you can control who can access the keys. If needed, the KMS key can be deleted if you don't want the encrypted data to be readable by anyone, essentially making it useless.
Note
The cost of SSE-KMS is higher than SSE-S3 because there is a cost associated with making API calls to KMS. When S3 is encrypting or decrypting keys using KMS, it will call the service on your behalf. If you are making significant calls, this cost can quickly add up. It is recommended that a single bucket key allows S3 to cache the key to reduce the number of calls to KMS.
You can also mix and match master keys as the key's Amazon Resource Name (ARN) is stored in the object's metadata. However, you can enforce a KMS key to encrypt the data if one is not provided:
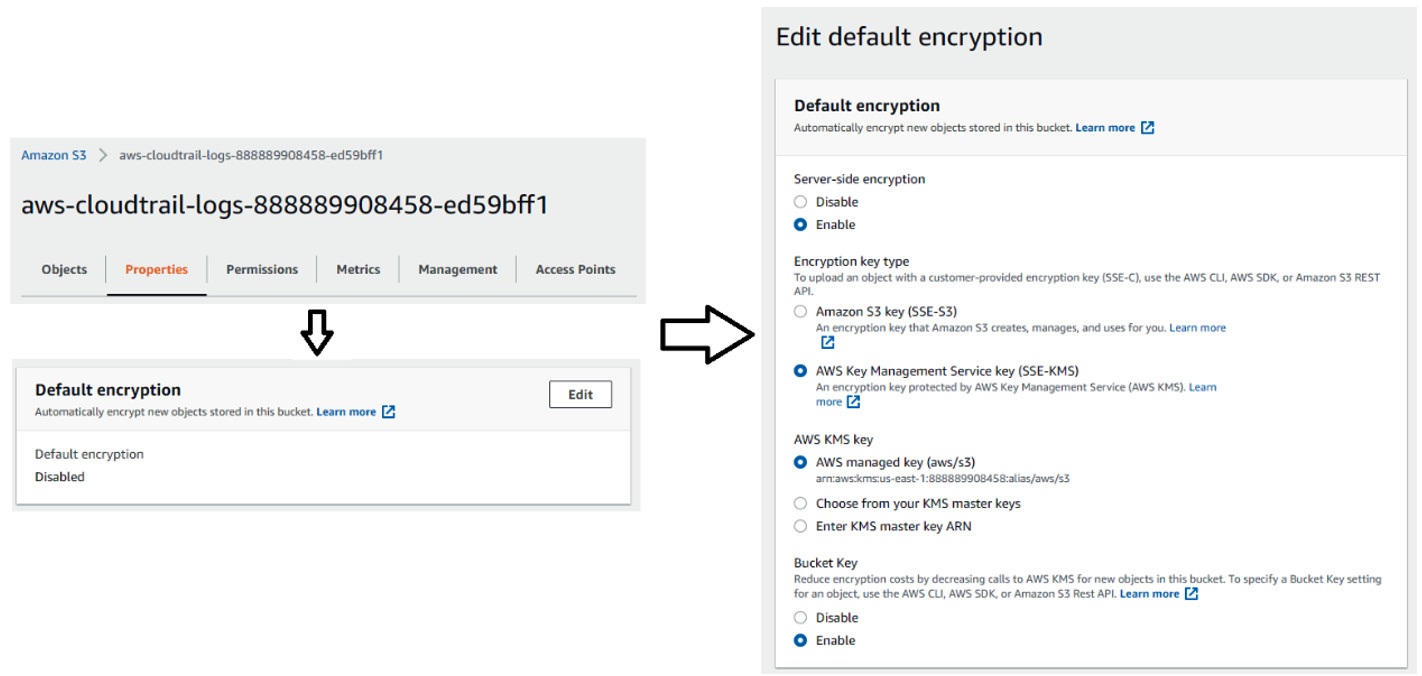
Figure 5.3 – Enabling SSE-KMS
When enabling SSE-KMS, by default, you can specify if the KMS key is managed by S3 or if you are going to maintain it. If S3 manages the key in your account, then the key is free, and it enforces a key rotation that is currently set for every 3 years. If you wish to manage the key, then you will have to pay for the cost of the key. You will also be responsible for rotating the keys, which is a best practice that limits the blast radius.
Enabling client-side encryption using customers' KMS keys (CSE-KMS)
CSE-KMS differs from SSE-KMS and SSE-S3 in that encryption and decryption are done within the client making the request. This method could have a noticeable effect on performance as encrypting and decrypting is a CPU-heavy operation and is not done on S3's fleet of servers. This method can also be much more expensive than SSE-KMS unless KMS key caching is implemented in the caller, which does not exist in Athena today. However, this method can be more secure with its increased cost. First, if there is a middleman attack, they can read your data while transferring it to you. A middleman attack involves a bad actor that has tricked your client into thinking it is talking to S3. At the same time, it proxies messages between S3 and your client. If the data is decrypted on the client side, the middleman does not have access to the decryption keys and won't be able to use the data. This scenario is unlikely to occur because of other mechanisms that AWS uses to prevent such attacks. Secondly, if S3 becomes compromised, the data cannot be decrypted because S3 cannot access the keys. Again, this is an improbable scenario.
When uploading to S3 using the AWS SDK, you need to use the AmazonS3EncryptionV2 API and provide a KMS ARN. If you're not using AWS SDK, then the x-amz-meta-x-amz-key HTTP header must be provided with the encrypted data key. To enable this option for reading within Athena, when specifying your CREATE TABLE statement in Athena, set the has_encrypted_data = true option in TBLPROPERTIES.
Reading CSE-KMS Files in Athena Using EMRFS with EMR
Athena has difficulty reading CSE-KMS encrypted files when using EMRFS with EMR and multipart uploads enabled for Parquet files. If you are writing Parquet files using EMR, ensure that multipart uploads are disabled.
Now, let's compare the different encryption methods.
Comparing encryption methods
The following table compares some important factors regarding the various encryption methods we have just discussed:

Figure 5.4 – Differences between different encryption methods on S3
Now, let's learn how we can enforce encryption on data in S3.
Mandating encryption at rest with S3
We can create a mechanism by mandating that any data stored in an S3 bucket uses encryption. This can be done by setting a bucket policy that allows only a specific encryption method. See the following example S3 bucket policy, which mandates that all the objects put into this bucket must use SSE-KMS. You can view and download this policy by going to https://bit.ly/3u4tGiD.
This policy has two statements. The first statement ensures that the x-amz-server-side-encryption header is present on any s3:PutObject operation. The second statement contains a condition that prevents any object from being put into the S3 bucket without x-amz-server-side-encryption being set to aws:kms.
Athena query results can also be encrypted. When an Athena query completes, it stores the results in an S3 bucket that you own. Administrators can set a workgroup to encrypt query results. In the workgroup settings, set the query results to be encrypted using SSE-KMS, CSE-KMS, or SSE-S3 and check the Override client-side settings box. The following screenshot shows how to set this up:

Figure 5.5 – Enforcing encryption on query results
Now that we have learned how to encrypt data, let's look at how we can encrypt our Glue Data Catalog.
Encrypting your metadata in Glue Data Catalog
Some users may want to encrypt their metadata in addition to their data. Metadata may contain sensitive information that you may not want to leave unprotected, such as partition values, table schemas, the location of your sensitive data, and so on. When encryption is enabled in Glue Data Catalog, the non-exhaustive list of information that is encrypted includes databases, tables, partitions, and table versions. Enabling encryption for Glue Data Catalog is relatively simple. The following screenshot shows how to enable encryption with a few clicks:

Figure 5.6 – Enabling Glue Data Catalog encryption in the Glue console
Like S3 data encryption, you can specify a Glue service managed KMS key (aws/glue) or provide a customer-managed KMS key. If having full control over the key is essential, select your customer-managed KMS key. Otherwise, you can allow Glue to manage the key at no cost.
Note
Glue only supports symmetric keys and will not work if an asymmetric key is provided.
Now that we know how to encrypt our data at rest, let's touch on data in transit.
Encrypting your data in transit
All the data that's read within Athena and between clients and AWS services such as S3 is encrypted using TLS. There is nothing you need to do on your part to enable this.
Now that we know how to encrypt our data, let's look at how we can enable coarse-grained access controls.
Enabling coarse-grained access controls with IAM resource policies for data on S3
Coarse-grained access control (CGAC) is a term that does not have an industry-standard definition. Generally, in this book, when we refer to CGAC in the context of data lakes, we are referring to object-level permissions such as individual files on S3. If a user has access to an object, they can access all the data within that file. Fine-grained access control (FGAC) provides authorization on data within the files, such as columns and rows. We will discuss FGAC in more detail in the next section.
Within AWS, there is one popular way to achieve CGAC with data on S3. That is through bucket policies that limit access to IAM principals. We will look at how to enable this in this section.
CGAC through S3 bucket policies
By default, access to S3 buckets is denied unless there are policies that grant access to it. Regarding a new IAM principal, either an IAM user or role, permissions must be provided to allow them to access S3 resources. There are several ways to grant permissions, but we will focus on two general ways to provide permissions in this section. The first way is to manage permissions to IAM principals within the same AWS account. The permissions that are granted to the IAM principal will be used by Athena to access the underlying data. The second way is to attach S3 bucket policies. Bucket policies allow more flexibility in that they can grant cross-AWS account access. They also have additional conditionals that can fine-tune access and enforce how users interact with that bucket.
If any IAM or S3 bucket policies grant access and there are no policies that deny access to the request, the principal will be able to perform the action on the S3 resource. Otherwise, the request will be rejected. The following diagram illustrates this:

Figure 5.7 – IAM permissions on S3 buckets and objects
Let's look at how we can attach IAM policies to IAM users or roles to control data access. There are two common ways organizations can control access through IAM. First, they can create an IAM user for each of the end users and provide them with AWS credentials and/or console access. Second, they can interact directly with S3 or indirectly using an AWS service such as Athena. An IAM group can be created with specific permissions to S3, and IAM users can be placed within that group. An IAM user that belongs to multiple groups will get a union of all the groups' policies. Using groups is preferred for managing permissions rather than manually setting permissions for individual IAM users because it is a lot less manual work. The other method is to provide permissions to IAM roles and allow your users to assume those roles. Either way, when the IAM principal submits a query to Athena, their permissions will be applied.
For small organizations, providing users with IAM credentials can be a convenient and quick way to control access to AWS resources. However, as organizations grow larger, managing IAM users can be challenging to manage. Also, organizations may want their users to federate into an IAM role using an identity provider to use their existing company login and password credentials. We will talk about this in more detail in Chapter 7, Ad Hoc Analytics.
An IAM policy that attaches to an IAM principal must have the following fields: a list of actions and resources and whether the rule grants or denies the operation on the resource. The following is an example policy that grants the analyst IAM user permission to perform actions on the bucket with an ARN of packt-serverless-analytics-01234567890:
{
"Version": "2012-10-17",
"Statement": [
{
"Sid": "ListBucketOnBucket",
"Effect": "Allow",
"Action": "s3:ListBucket",
"Resource": "arn:aws:s3:::packt-serverless-analytics-01234567890"
}, {
"Sid": "ReadObjectPermissions",
"Effect": "Allow",
"Action": ["s3:GetObject", "s3:PutObject"],
"Resource": "arn:aws:s3:::packt-serverless-analytics-01234567890/*"
}
]
}
This policy can be attached to an IAM group, an IAM user, or an IAM role. It will allow the principal to list all the objects within the packt-serverless-analytics-01234567890 bucket and read and write objects within that bucket.
This is done with two statements. The first statement allows the user to perform the s3:ListBucket operation on the bucket. The second statement allows the user to perform s3:GetObject and s3:PutObject in the same bucket. You may notice that the resource contains /* at the end of the second statement and not the first. The reason for this is that the first statement's operation is a bucket-level operation. The operations in the second statement are at the object level.
The previous policy can also be attached to an S3 bucket with one difference. Each of the statements must provide a list of principals. These principals can be applied to entire AWS accounts, IAM principals in the accounts, AWS services, federated users, and anonymous users (public access). There are some benefits to attaching bucket policies rather than attaching them to IAM principals. First, bucket policies have more conditional attributes it can check for. For example, the x-amz-server-side-encryption header can be matched to enforce encryption.
Another example is limiting access to the bucket from a VPC or IP address range, although queries that run on a bucket with this condition are not supported with Athena. Instead, you can use the aws:CalledVia condition to prevent access to an S3 bucket, except when it's called from Athena. Secondly, you can provide IAM principles in other AWS accounts access to the bucket. For example, an AWS account for a beta environment can be granted access to read-only data in a production account's S3 bucket. The following S3 bucket policy is an example of limiting read access to the packt-serverless-analytics-0123456789 bucket to only a few IAM users that can only be called from Athena:
{
"Version": "2012-10-17",
"Statement": [
{
"Sid": "ReadObjectPermissions",
"Effect": "Allow",
"Principal": {
"AWS": [
"arn:aws:iam::9876543210:user/luke",
"arn:aws:iam::9876543210:user/leia"
] },
"Action": ["s3:ListBucket", "s3:GetObject", "s3:PutObject"],
"Resource": ["arn:aws:s3:::packt-serverless-analytics-01234567890",
"arn:aws:s3:::packt-serverless-analytics-01234567890/*"],
"Condition":{
"ForAnyValue:StringEquals":{
"aws:CalledVia":[
"athena.amazonaws.com"
]
}
}
}
]
}
If you decide to go with attaching policies to IAM principals and/or S3 buckets, be aware that there are service quotas. There are limits on how large policies can be or the number of policies that can be attached. For S3 bucket policies, you can only have a single policy and it can only be up to 20 KB in size. There are limits to the number of policies you can attach to an IAM user or role, the number of groups an IAM user can belong to, and so on. For a full list, see https://docs.aws.amazon.com/IAM/latest/UserGuide/reference_iam-quotas.html.
Although many use cases can be satisfied using IAM to provide CGAC, FGACs may be needed for other use cases. Let's look at how we can achieve that.
Enabling FGACs with Lake Formation for data on S3
FGAC differs from coarse-grained data access control by providing access control finer than at a file or directory level. For example, FGAC may provide column filtering (setting permissions on individual columns), data masking (running the value of a column through some function that disambiguates its value), and row filtering (allowing users to see rows in a dataset that only pertain to them).
There are many open source and third-party applications that provide this access control level within the big data world. Examples of open sourced software include Apache Ranger and Apache Sentry. An example of a third-party application is Privacera. First-party integration is also available through AWS Lake Formation.
One of AWS Lake Formation's major components is providing FGACs to data within the data lake. Administrators can determine which users have access to which objects within Glue Data Catalog, such as tables, columns, and rows. We will discuss setting up and managing Lake Formation access control in depth in Chapter 6, AWS Glue and AWS Lake Formation.
Auditing with CloudTrail and S3 access logs
Auditing is an essential part of designing a secure system. Auditing provides validation that existing access policies are working and when there is a security incident, the impact of the incident and hopefully the bad actors. AWS has two native auditing mechanisms for data access that we will look at in detail: AWS CloudTrail and Amazon S3 access logs.
Auditing with AWS CloudTrail
AWS CloudTrail is a service that provides auditing capabilities for API calls that are made to all AWS services that support CloudTrail. When an AWS account is created, CloudTrail logging is enabled by default to help manage APIs. These APIs perform actions on AWS resources such as creating or describing EC2 instances, creating S3 buckets, or submitting Athena queries. The other class of events is data events. These are AWS APIs that are called on a resource itself. At the time of writing, S3 calls to list, get, put, or delete operations and Lambda invocations are considered data events.
Management events are created when an API is called that manage resources, such as starting an EC2 instance or configuring an S3 bucket. The first copy of management events is free, and any additional copies are charged at $2.00 per 100,000 events. The initial events are pushed to CloudTrail's system, which retains the events for up to 90 days, and can be downloaded in JSON or CSV format. If there are requirements to keep this data for longer than 90 days, you will need to create a new trail that stores events in S3, and you will incur a cost for this. You can then use Athena to query the exported audit records. The following screenshot shows what CloudTrail's Event history page looks like:

Figure 5.8 – Event history in AWS CloudTrail
The following screenshot shows the type of information stored in the event:

Figure 5.9 – CloudTrail event details for a GetTables event
Management events can be useful when tracking the usage of AWS services. For Athena, the StartQueryExecution and GetQueryExecution calls can be tracked, and information about who submitted the query and the query string is logged.
What management events do not provide is data events. For analytics, this means events that retrieve data from S3. To get data events, you will need to enable the data events and incur a cost of $0.10 per 100,000 events, plus any S3 storage the log files may take up. You can set up which buckets and prefixes you want to enable logging on or provide more advanced filters. S3 can generate a massive amount of events, which could lead to high costs. Using filters to capture events from only the buckets containing sensitive information may balance cost and auditability.
If you create new trails that export CloudTrail events to S3, you can use Athena to query the audit logs. Click Create Athena table in the top right-hand corner, as shown in the following screenshot:
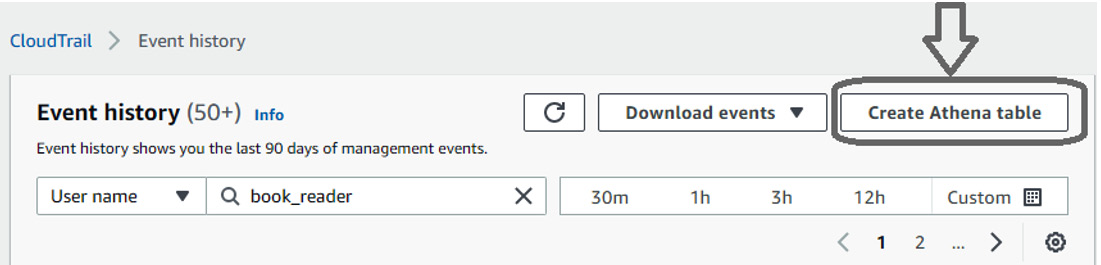
Figure 5.10 – The Create Athena table button in CloudTrail's Event history
This will create a new Athena table.
Auditing with S3 server access logs
S3 access logs differ from CloudTrail logs in a few ways. First, they provide more detailed information about a particular event. Second, it is free to enable, and the only cost that's incurred is the S3 storage costs of the logs. Lastly, the logs' delivery is done with the best effort, meaning that the logs' delivery is not guaranteed. However, from experience, this is rare.
To enable S3 access logs, you will need to enable it on a per-bucket basis and provide a bucket and an optional prefix for where logs are written. You can do this through the console by going to the bucket's Properties tab and enabling Server access logging, as shown in the following screenshot:

Figure 5.11 – Enabling Server access logging
Now that we have covered the general security aspects of data access on AWS, let's summarize what we learned in this chapter.
Summary
In this chapter, we have gone through some ways that we can protect data from malicious users. We know that no system can ever be 100% secure, but we can take some simple steps to avoid headaches in the future.
We looked at how encrypting your data early in projects can help save time and resources and how to encrypt data at rest and in transit. We looked at the difference between coarse-grained access versus FGACs to implement authorization. Authorization on S3 can be done through S3 bucket policies and/or IAM users, and role policies provide CGACs. Lastly, we looked at how auditing can be enabled and compared these approaches based on their cost and the information they can deliver.
We will dive into Lake Formation, an AWS service that creates and administrates a data lake easier and faster, in the next chapter.
Further reading
For more information regarding what was covered in this chapter, take a look at the following resources:
- Creating tables based on encrypted datasets in S3: https://docs.aws.amazon.com/athena/latest/ug/creating-tables-based-on-encrypted-datasets-in-s3.html
- Encrypt Glue Data Catalog: https://docs.aws.amazon.com/glue/latest/dg/encrypt-glue-data-catalog.html
- Example walkthroughs managing access to S3: https://docs.aws.amazon.com/AmazonS3/latest/userguide/example-walkthroughs-managing-access.html
- IAM Best Practices: https://docs.aws.amazon.com/IAM/latest/UserGuide/best-practices.html
- Example S3 Bucket Policies: https://docs.aws.amazon.com/AmazonS3/latest/userguide/example-bucket-policies.html
- Amazon S3 Policy Keys: https://docs.aws.amazon.com/AmazonS3/latest/userguide/amazon-s3-policy-keys.html