Chapter 10: Building Applications with Amazon Athena
Up to this point in the book, we've primarily been focusing on getting a feel for Athena as a product and what you can do with it. In this chapter, we're going to look at it from a slightly different angle and see how we can build our own product that leverages Athena. There are many things to consider when doing this, with the simplest being, how are we even going to call Athena? Previously, we've either used the AWS Console, the AWS CLI, and also occasionally the Athena Python SDK, but what other options are there? In terms of connecting to Athena, what should we consider? What security features are there for connecting? And finally, how do we make sure we continue to leverage Athena in the most performant and cost-effective way? These are all questions that we are going to try to answer throughout this chapter. This chapter will also be a nice reminder of how subjective writing software really is. A lot of decisions come down to personal preference, so I will do my best to present the facts and it will be up to you to decide which ones you care about the most.
In the forthcoming sections, we will cover the following topics:
- Connecting to Athena
- Best practices for connecting to Athena
- Securing your application
- Optimizing for performance and cost
Technical requirements
Wherever possible, we will provide samples or instructions to guide you through the setup. However, to complete the activities in this chapter, you will need to ensure you have the following prerequisites available. Our command-line examples will be executed using Ubuntu, but most Linux flavors should work without modification, including Ubuntu on Windows Subsystem for Linux.
You will need internet access to GitHub, S3, and the AWS Console.
You will also require a computer with the following:
- A Chrome, Safari, or Microsoft Edge browser installed
- The AWS CLI installed
This chapter also requires you to have an AWS account and an accompanying IAM user (or role) with sufficient privileges to complete this chapter's activities. Throughout this book, we will provide detailed IAM policies that attempt to honor the age-old best practice of "least privilege." For simplicity, you can always run through these exercises with a user who has full access. Still, we recommend using scoped-down IAM policies to avoid making costly mistakes and learning more about using IAM to secure your applications and data. You can find the suggested IAM policy for Chapter 10 in the book's accompanying GitHub repository listed as chapter_10/iam_policy_chapter_10.json here: https://bit.ly/3zM54wG. The primary additions from the IAM policy recommended for past chapters include the following:
- Adding SNS topic permissions for topics beginning with packt-*
- CloudTrail permissions for trails beginning with packt-*
- EventBridge permissions for managing rules
Connecting to Athena
So, you're ready to get started on your application built on top of Athena. You've got some initial data models prepared and registered within Athena and you want to start querying the data. Now how do you do that? If you've been following along with all of the exercises in this book, we've primarily interacted with Athena either directly through the AWS Console or the AWS CLI. If you have read Chapter 7, Ad Hoc Analytics, then you did get a small preview of the Athena Python SDK. So, your other options include using a JDBC Driver, an ODBC Driver, or, more generally, the AWS SDK, which is available in many languages (for a full list, see https://amzn.to/3BgXrQc).
So, before we figure out which one is right for you, let's go over what some of these options are. The SDK should be pretty straightforward; it's a language-native implementation for interacting with AWS's many APIs. But what about JDBC and ODBC; what are those?
JDBC and ODBC
JDBC, or Java Database Connectivity, is a Java database abstraction API. It is oriented primarily around interacting with relational, SQL-based databases (though there are some JDBC drivers out there for NoSQL databases as well). Essentially, it provides a standard mechanism for Java developers to connect to different database technologies by using the exact same (or very similar) code.
ODBC, or Open Database Connectivity, provides the same functionality as JDBC but is written in C, and so is intended for use in C, C++, C#, and so on.
The way both of these technologies work is that there is the common API, which is what the developers will be using directly in their code, and then there are drivers, which are the actual underlying implementation of the API. Both technologies allow for the dynamic loading of drivers, so as long as the driver is available to the running process, they can be used together. Let's take a look at a couple of examples of what using each one would look like. In both examples, we are going to connect to a MySQL database containing a table named awesome_packt_table with the data below and run a simple query against them.

Table 10.1 – awesome_packt_table data
We will run the following query:
import java.sql.Connection;
import java.sql.DriverManager;
import java.sql.SQLException;
public static void main(String args[]) {
// Notice we are using DriverManager, DriverManager is able to
// determine that we want to use the mysql driver by way of the
// "jdbc:mysql" in the url
// Create the connection in a try-with-resources to auto close
// when we are done
try (conn =
DriverManager.getConnection("jdbc:mysql://localhost/test_db?" +
"user=packt&password=supersecure")) {
// Statement is the object that will accept our query
stmt = conn.createStatement();
// And here we execute! Again putting results in the try with
// resources so it closes when we're done
try (results = stmt.executeQuery("SELECT title, publisher, publish_year FROM awesome_packt_table")) {
while (results.next()) {
// Returns "Serverless Analytics with Amazon Athena"
result.getString("title");
// Returns "Packt"
result.getString("publisher");
// Returns 2021
result.getInt("publish_year");
}
}
}
}
Code 10.1 – Sample JDBC code
And now let's take a look at what this would look like for ODBC:
using Microsoft.Data.Odbc;
static void Main(string[] args) {
// Unlike Java, there is no DriverManager, simply instantiate
// a new connection and indicate the driver in that connection.
string MyConString = "DRIVER={MySQL ODBC 3.51 Driver};" +
"SERVER=localhost;" +
"DATABASE=test_db;" +
"UID=packt;" +
"PASSWORD=supersecure;" +
"OPTION=3";
// Same as in Java, auto close when we are done
using (OdbcConnection connection =
new OdbcConnection(connectionString)) {
OdbcCommand MyCommand =
new OdbcCommand("SELECT title, publisher, publish_year FROM awesome_packt_table", connection);
using (OdbcDataReader Reader = command.ExecuteReader()) {
while (Reader.Read()) {
// Returns "Serverless Analytics with Amazon Athena"
Reader.GetString(0);
// Returns "Packt"
Reader.GetString("publisher");
// Returns 2021
Reader.GetInt32("publish_year");
}
}
}
}
Code 10.2 – Sample ODBC code
Now let's say we've moved our table out of MySQL and loaded it into Athena. Let's say everything else remains the same – the table name (assuming a default catalog) and column names are all identical. All we would have to do is change the following:
try (conn =
DriverManager.getConnection("jdbc:awsathena://" +
"AwsRegion=[AWS_REGION];" +
"User=[AWS_ACCESS_KEY];" +
"Password=[AWS_SECRET_KEY];" +
"S3OutputLocation=[OUTPUT]") {
Code 10.3 – Migrating to Athena JDBC
We can do the same for ODBC as follows:
string MyConString = "DRIVER={Simba Athena ODBC Driver};" +
"AwsRegion=[AWS_REGION];" +
"AuthenticationType=IAM Credentials;" +
"UID=[AWS_ACCESS_KEY];" +
"PWD=[AWS_SECRET_KEY];" +
"S3OutputLocation=[OUTPUT]";
Code 10.4 – Migrating to Athena ODBC
And that's it! All we did was change the connection strings for both drivers to match that of Athena and the drivers themselves have done the heavy lifting of understanding how to interact with MySQL versus Athena.
For the sake of completion, let's quickly discuss what you would have to do with the Athena SDK to accomplish the same query. You would start by instantiating your Athena client. Depending on where this is running (for example, on AWS provided compute such as EC2 or Lambda), you'd either use the default credentials provider, or you'd supply the credentials as in the two preceding figures. Then you would call StartQueryExecution with the query string and also provide a result location, which would be the same as Output above. Next, you would call GetQueryExecution repeatedly in a loop until the query completes, and finally, when it's done, you would call GetQueryResults.
Which one should I use?
The reality is that there is no perfect answer to this question; it kind of comes down to preference. Obviously, some decisions will be made for you depending on your tech stack; for instance, you probably won't use the JDBC driver, which is Java-specific, if you are writing your application in Python. You'd just go ahead and use the Python SDK. But let's say you've chosen Java as your application language, what now? Well, this is really where it gets a bit more subjective. There are pros and cons to both, so it's really up to you which ones matter most. First, let's get one thing out of the way; the implementation of the JDBC driver (and ODBC driver) utilizes the respective SDK implementations, so there's no difference in performance.
In general, the decision between the API abstraction options and the SDK centers around convenience versus flexibility. The convenience of JDBC/ODBC comes in a few different forms. Firstly, if your organization is one of many that already heavily uses those abstractions, then this would certainly fit in nicely with your stack. Also, if you think there's a chance that you might be switching data storage options, then this makes that painless, as we showed above (or perhaps you are switching to Athena, as we did above). And finally, the code can, in some cases, be more succinct when using JDBC/ODBC. The general call flow that we described previously ends up being around 100 lines of code, versus the 25 or so that we wrote for JDBC/ODBC. The abstractions provide easy mechanisms for getting the correct data type that you need for a value (refer to the preceding examples where we have getString and getInt), whereas with the Athena SDK, everything is returned as a string and it's your responsibility to convert it into whatever underlying type it is.
So then, why bother with the SDK? Well, if you have very long-running queries, you may not want to be constantly occupying a thread while waiting for the query to complete. Some queries could run for hours and that's a pretty significant waste of resources. That's not an option with JDBC/ODBC. There are some libraries that make them operate in an "async-like" fashion, but underneath there is always a thread that is fully taken while it waits for the query to complete. Below, we're also going to talk about how instead of polling for query execution status, we can actually integrate with AWS EventBridge to get push notifications for when a query execution status changes. Again, that is not something you can accomplish with abstractions. There is also always the possibility, since the JDBC and ODBC drivers depend on the SDK, that they may not immediately get any new features, or at least not as quickly as the SDK itself will. So, these sorts of things are where the SDK really shines in its ability to allow you to interact with Athena exactly how you want to.
With this information that we just covered, you now have the means to decide which option for interacting with Athena is right for you. For the remainder of this chapter, we're going to focus on making sure you are getting the most out of your usage of Athena. The metrics by which you track whether you are being as optimal as possible are going to depend on your circumstances – whether your goal is to have the lowest possible AWS bill, or whether it's to have a blazing fast application, that's up to you. My goal is that you leave this chapter with the necessary tools in your toolbox to accomplish your goals.
Best practices for connecting to Athena
In this section, we're going to go over some things to consider when connecting to and calling Athena, including idempotency tokens and query tracking.
Idempotency tokens
I know this statement may come as a huge surprise to you, but perfect software does not exist. It's going to fail. There's a reason why there are so many different options out there for monitoring the operational status of an application. And among the infinitesimal category of possible failure scenarios, they can be narrowed down to two large categories – safe to retry and not safe to retry. It's that second category we will be focusing on in this section. More specifically there is a subcategory of not safe to retry that can quickly be summarized as ¯\_(ツ)_/¯ – you have no clue whether it is safe to retry; you know something happened, but exactly what happened is a complete mystery.
Thankfully Athena (and many other services) has a nice mechanism for handling these very scenarios. They are called idempotency tokens. To be idempotent, an operation has to be able to guarantee that if repeatedly given an identical request, the operation will return an identical response. Surprisingly, there is a decent amount to unpack from such a simple statement. What defines an identical request? What defines an identical response? Those can be sort of subjective things. For example, an absolute value is an idempotent operation. It is always true that |x| == |x|. So, the request in that case is "x," and the response is always, well, the absolute value of x.
Now let's take a real-world example. Say you are going to buy coffee and you pay with your credit card; based on the definition of idempotency, for that single transaction, you could be charged the exact same amount twice, and get the exact same behavior twice (having a charge on your credit card), and that would qualify as "idempotent," if the request is simply defined as the "amount to charge" and the response is "charge successful." But that would not make you very happy, would it? That was rhetorical; of course it wouldn't! So instead, the request is defined as the combination of "amount to charge" AND a unique identifier for that transaction and the response is that that transaction successfully charged that amount exactly once. Now, if the coffee shop tries to send two identical requests containing that amount and the unique identifier, your credit card company will know not to take the second one as it was probably sent in error. Et voilà, we've arrived at an idempotency token! That transaction ID, in this case, is acting as the idempotency token; it is saying that if you see this ID twice and you've already successfully processed it, disregard any further attempts to process it. And that's exactly how they work in Athena.
In Athena, they are called ClientRequestTokens and they are only supported by some APIs (essentially any in which it could be undesirable to retry an identical request). StartQueryExecution is the one we are going to focus on, but another that is supported is CreateNamedQuery, because named queries are uniquely identified by an "ID," but that ID is not supplied at creation; it is generated as part of the creation process, so a retry without an idempotency token would result in two identical named queries being created with different IDs.
To better understand why we care about ClientRequestTokens in the context of the StartQueryExecution API, let's look at a couple of sample call flows.
In the first sequence below, Figure 10.6, you can see that no ClientRequestToken was provided. Athena successfully begins the execution of the query on a cluster but fails to return the response to the customer. The customer assumes it failed and reruns the query. Because there is no ClientRequestToken, Athena assumes it's a new query and runs it again. Now the customer has incurred double charges, which, much like the coffee scenario, is not desirable!

Figure 10.1 – Retrying a query against Athena without ClientRequestToken
But now, in the next sequence, Figure 10.7, you see that we ran the same query, experienced the same failure with Athena, but this time the customer supplied a ClientRequestToken. So, when the customer goes to retry, Athena is able to determine that it actually did successfully execute the previous request, and simply returns to the customer the identical response that it attempted to return in the previous call. Yay, we only paid once for our one cup of coffee!

Figure 10.2 – Retrying a query against Athena with ClientRequestToken
Hopefully, now you have an idea of the importance of idempotency and ClientRequestTokens. And now for the best news of all! If you are using the AWS SDK (or JDBC/ODBC driver, since, as we discussed previously, those rely on the AWS SDK) or the AWS CLI, then you actually don't have to do anything to leverage this feature! The AWS SDK/CLI will automatically populate the ClientRequestToken in your requests, which means that if that request gets retried, for whatever reason, it will be idempotent!
Query tracking
Pivoting away from failure handling and retries, let's talk a bit about what to do once you've successfully started execution of a query. Throughout this book, we have been leveraging the GetQueryExecution API to monitor the progress of a query. This is fine, but as your usage of Athena scales up, you are going to run into a couple of different issues. Firstly, tuning your application to poll at the right frequency can be a challenge. You don't want to poll so infrequently that you are adding unnecessary time on top of the query execution, particularly if you have queries that execute quickly, but on the flip side, you don't want to poll so frequently that you are consuming a ton of resources on your end (threads, I/O sockets, and so on) and also Athena API limits. Limits can generally be increased, but of course, there's a limit to that limit, and wouldn't it just be better to avoid having to deal with that? Well, some more good news! There is a way to do that!
Athena publishes any changes in the status of a query execution to AWS EventBridge. AWS EventBridge is a managed event bus service that allows AWS customers to process events produced by other systems (either AWS services or anyone else) in real time utilizing a push model. The way it works is that you configure a rule that tells EventBridge, for a given scenario and event, to forward that event to a target. There is also a second type of rule, which is a scheduled rule, so rather than reacting to an event, it triggers a target on some sort of schedule, either a cron job or an arbitrary time rate (for example, once an hour). For our purposes, we are going to focus on the first type of rule, which is the event-based rule.
So, let's run through a quick example of how to get set up with an EventBridge rule for Athena queries. To keep things simple, we're going to set it up so that we send an email based on Athena status changes. In this case, our target will be an SNS topic, which will, in turn, forward any messages it receives to an email we configure.
Note
Everything we are doing should fall well within the Free Tier limits, so assuming your account still qualifies, this next section should not cost you anything!
Step 1 – Setting up the SNS topic
Navigate to the SNS console, find topics, and then select Create topic. On the Create topic page, select the Standard type of topic, and then give it a descriptive name. Then you can leave the rest blank, go ahead, and scroll and click on the Create topic button.
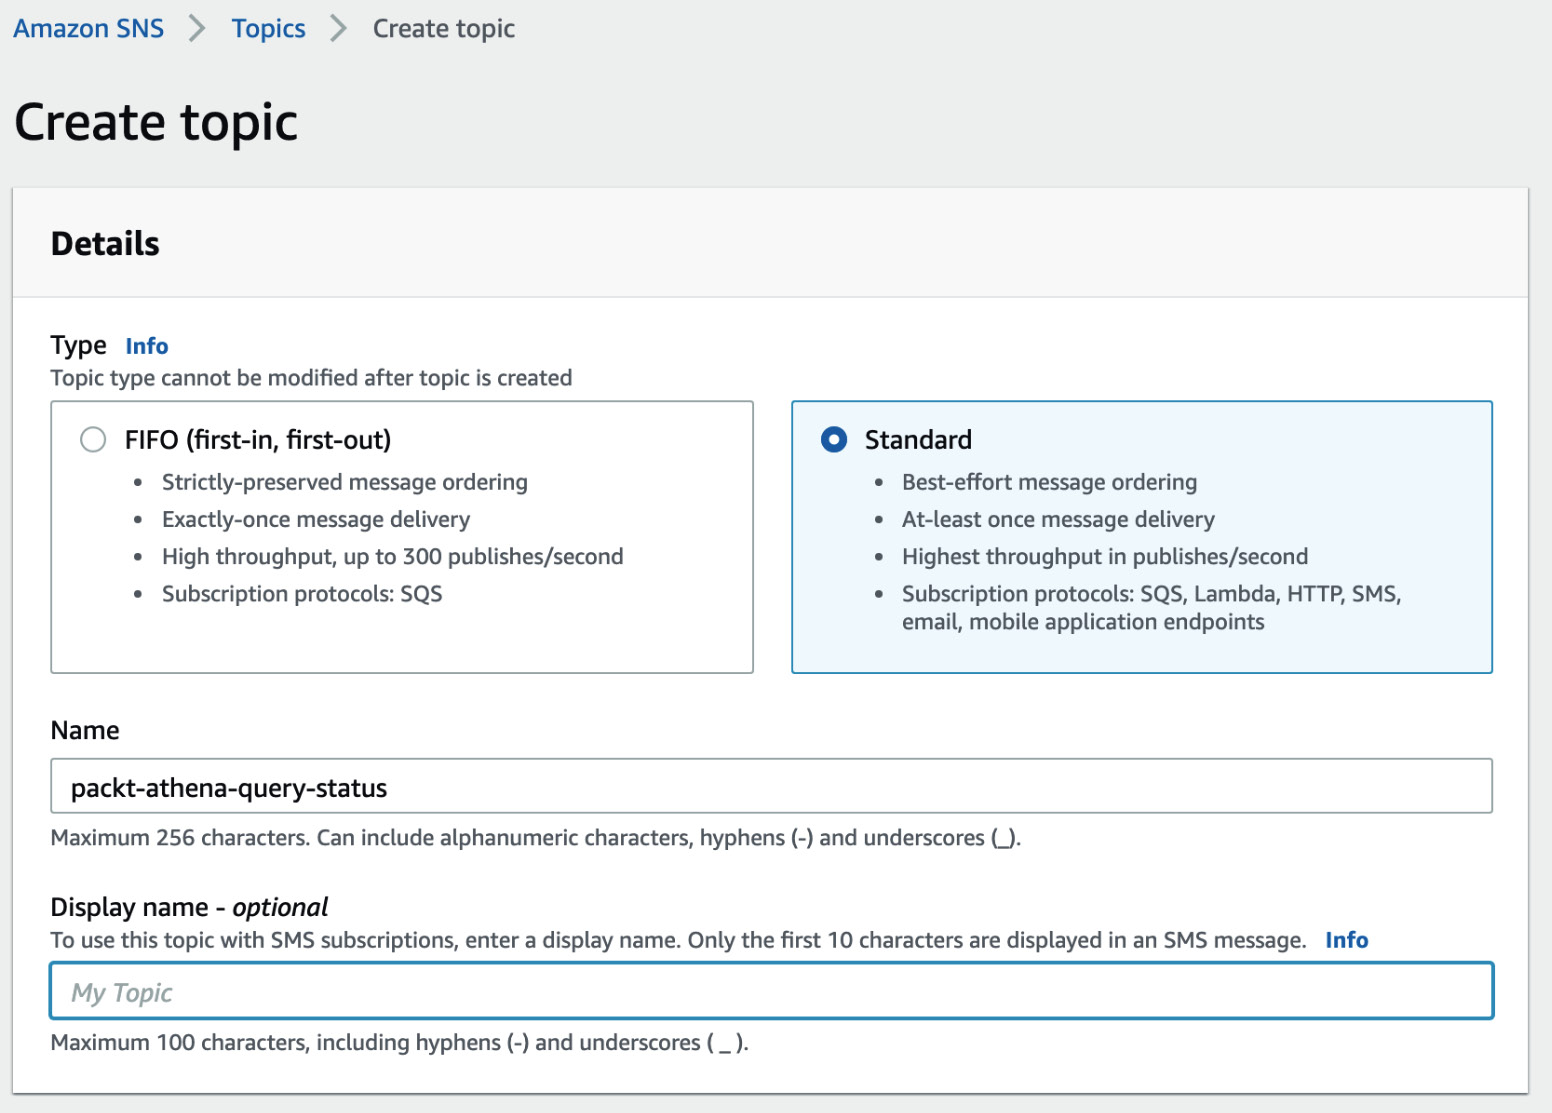
Figure 10.3 – Creating an SNS topic
You should be taken to the newly created topic's Details page. Look for a button now that says Create subscription. On that page, find the Protocol dropdown, and select Email. Enter the email you wish to receive the notifications where it says Endpoint. Then again, go ahead and leave the rest blank and select Create subscription.

Figure 10.4 – Creating an email subscription for your SNS topic
Before you can move on, go and check your email. You should receive an email that looks like the following. Assuming everything lines up (this is, in fact, the SNS topic you created), go ahead and click the Confirm subscription link.

Figure 10.5 – Sample subscription confirmation email
Step 2 – Setting up the EventBridge rule
Head on over to the EventBridge console and find Events > Rules in the navigation bar. Then, find and click the Create rule button. On the Create page, give a descriptive name; I called it packt-athena-emailer. For the pattern, select Event pattern > Pre-defined pattern by service. The provider should be AWS > Athena, and the event type should be Athena Query State Change. It should look like the following:

Figure 10.6 – EventBridge Athena query state change event pattern
Skip the event bus section; the defaults there are fine. Under Select targets, where it says Lambda function, change that to SNS topic and find the topic you just created in the previous section.

Figure 10.7 – EventBridge SNS topic target
Now, click the Create button and you're done!
Step 3 – Running a query
Finally, let's go ahead and navigate to the Athena console and run any query (I just picked a table in my catalog and selected the Preview table option). Once you've run that, you can go ahead and head back over to your email and you should receive some emails that look like the following:

Figure 10.8 – Athena query status emails
If you take a look, you will see we received three notifications for the status of our query. First, the execution went into the QUEUED state, then RUNNING, and finally SUCCEEDED. Pretty neat, huh?!
Emails are great and all, but you will probably want your automated system to be able to react to these events. You probably noticed already when you were setting up the rule, but if you didn't, EventBridge has a huge selection of possible targets that you can configure for a rule, so there's a really good chance that there is a target option that will fit nicely into your application. Take a look at the following URL, https://amzn.to/2UXrj4x, for the full list of targets.
Securing your application
In the previous section, we talked about some best practices when it comes to connecting to and calling Athena. In this section, we're going to touch a little bit more on that point, but with a focus on security, and then focus on some other mechanisms for using Athena in the safest way possible. In Chapter 5, Securing Your Data, we discussed the concepts of the attack surface and blast radius, two metrics by which you can measure how safe your application is, both in terms of preventing a bad actor from gaining access and then minimizing the impact in the event that they do gain access. Some of the stuff we are going to cover is not necessarily specific to an Athena-based application, but it is still very valuable information to keep in mind.
Credential management
Firstly, we're going to take a look at credentials, the entry point for secure communication with AWS. We're going to focus on two specific aspects of it – life cycle management and the distribution/persistence of credentials. Also, whether you are running your application within some standard AWS offerings versus the alternative makes a big difference here, so we'll discuss each separately.
If you are running your application on AWS compute options, such as EC2, ECS, Lambda, and others, then the problem of distributing credentials can be rather simple. In these cases, credentials are distributed to the hosts by way of metadata services (or in the case of Lambda, it is simply the credentials that are being used to execute the function). What this means is that, assuming the credentials distributed to the host are the ones that you need, you can simply rely on the default credentials provider within the AWS Client, and it will know to look for the metadata service. However, if you require credentials that are different from the ones that are distributed directly to the host, then you have a couple of options. The first is the case where you need IAM user credentials, and we're going to cover that in the next section when we discuss on-premises (out of AWS) applications. The second option is that you use IAM roles, which is the recommended approach in any case. In these cases, the credentials that are automatically distributed need the iam:AssumeRole permission on whatever role you want to actually assume. Then you can call the STS service to retrieve temporary credentials for that role and then instantiate the desired client with those credentials. In Java, this looks like the following:
AWSSecurityTokenService stsClient =
AWSSecurityTokenServiceClientBuilder.standard()
.build();
AssumeRoleRequest roleRequest = new AssumeRoleRequest()
.withRoleArn(roleARN)
.withRoleSessionName(roleSessionName);
AssumeRoleResult roleResponse = stsClient.assumeRole(roleRequest);
Credentials sessionCredentials = roleResponse.getCredentials();
BasicSessionCredentials awsCredentials = new BasicSessionCredentials(
sessionCredentials.getAccessKeyId(),
sessionCredentials.getSecretAccessKey(),
sessionCredentials.getSessionToken());
AthenaClient athenaClient = AthenaClient.builder()
.withCredentials(new AWSStaticCredentialsProvider(awsCredentials))
.build();
Roles make it such that you don't have to concern yourself with credential rotation at all; they are temporary credentials that you can just get new ones of whenever you need. The benefit of this is that if somehow role credentials get leaked, a bad actor will only be able to use them for a short period of time, thereby reducing the blast radius.
If you are in a situation where there is no automatic distribution of credentials handled by AWS, such as in an on-premises solution, then it is, of course, your responsibility to solve that. Many organizations in these cases end up building their own solutions, often referred to as credential stores. Credential stores are far preferable to the other option, where you store credentials on disk, such as in the AWS ~/.aws/credentials file, or even worse, in your code repository, the reason being, again, because we want to reduce the blast radius in the event a bad actor gains access to the host. If the credentials are stored elsewhere, then the actor will not necessarily be able to access them, but if they are on the disk, then now the actor has access to whatever resources those credentials have access to. Since these credential stores are often very custom and involve significant integration with whatever enterprise authentication mechanism that is being used, we're going to focus more on what to consider when following this approach. You still want to utilize roles as much as possible.
The credentials you are managing should primarily be utilized to access those roles so that in the event the credentials are leaked, you can quickly revoke those permissions, and any future attempts to use the role will fail. This is called least privilege, the idea being that any actor within a system has exactly the permissions it requires to perform its duty and no more, which is with the aim, again, of reducing the blast radius.
The other key consideration is automatic credential rotation. You should ensure that credentials get rotated so that in the event any credentials are leaked, they cannot be used indefinitely. By default, IAM will not rotate your credentials, which means that they will live on forever. IAM has a very helpful pattern for setting an automatic rotation system that you can use or at least reference here: https://amzn.to/3gRDHLk. In general, the system is a three-step process:
- Generate new keys.
- A short amount of time later, deactivate the old keys.
- A short amount of time later again, delete the deactivated keys.
The idea here is that after step 1, the system should pick up the new keys. After step 2, any systems still reliant on the old keys will start to fail, but if need be, you can reactivate until you switch, and then, in step 3, you completely eliminate the old keys once you've confirmed it's OK.
At the end of the day, doing your absolute best to keep credentials secret is, of course, the primary goal. But the other tools we've discussed are invaluable in reducing the blast radius in the event that credentials are in the hands of someone who shouldn't have them.
Network safety
The next thing we're going to focus on is ensuring that the communication between your application and Athena is as protected as possible. By default, all communications between the AWS SDK and an AWS service are encrypted via HTTPS and signed using AWS's Signature Version 4 signing process (more info on that here: https://amzn.to/3DvAg6I). These mechanisms do an excellent job of ensuring that any message sent to AWS is tamper-proof. So, this does a good job of minimizing your attack surface; however, if you haven't properly configured your network, then you are still requiring access to the public internet to communicate with AWS since, by default, all communication goes to AWS's public endpoint. The public internet, in this case, refers to anything accessible to anyone via the internet without requiring any additional network configuration (note: accessible means that the IP address will resolve, not that they have the necessary credentials). So, the implications of that are that there is a larger potential blast radius (for example, the bad actor, having gained access to your hardware, could call out to the public internet to retrieve a nasty script that they've already prepared in advance for wreaking havoc). I would guess by now you are seeing a pattern; AWS has an answer for this problem as well!
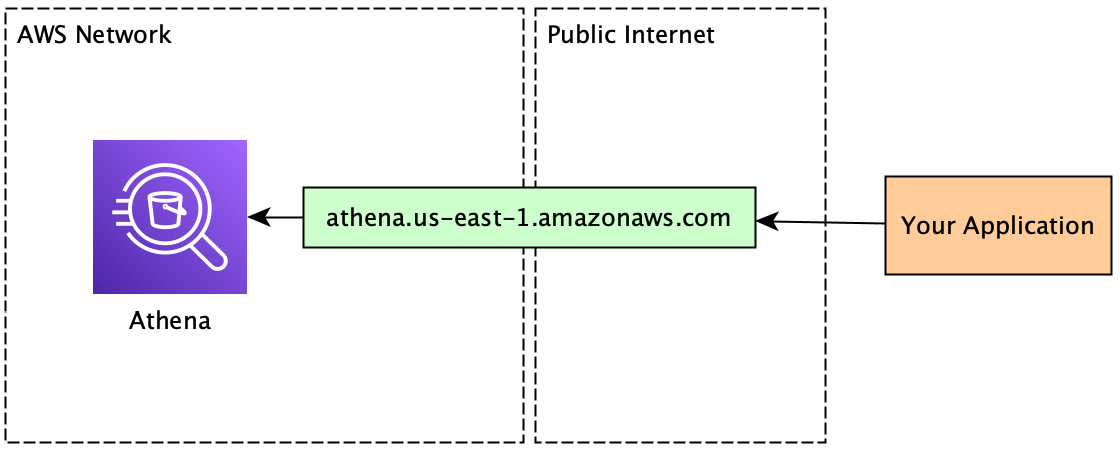
Figure 10.9 – Calling Athena over the public internet
VPCs, or Virtual Private Clouds, provide you with the ability to create isolated networks and are consistently one of the most recommended security features within AWS. VPCs enable fine-grain control over network traffic in and out of them and also within the VPC itself. There is much, much more to VPCs, but that sufficiently covers what we need to worry about here.
So, great, we can configure rules to allow traffic in and out of our private network. But we still have to communicate with AWS, so we still need access to the public internet to talk to AWS's public endpoint. This means that our VPC rules must allow for that traffic out of our network. Or… do we? (Hint: we don't.)

Figure 10.10 – Calling Athena over the public internet from inside your own VPC
AWS PrivateLink and VPC endpoints exist to solve this exact use case. A VPC endpoint is a resource you can provision inside your VPC, which can be communicated with by way of a private IP address, meaning that the IP address exists only in your VPC. A private IP address is explicitly separate from the public internet, meaning anyone outside of the VPC, if they tried to access that IP address, either it would exist on the public internet, pointing to a completely different resource, or it would simply not resolve. The VPC endpoint then routes your traffic to AWS PrivateLink. And finally, AWS PrivateLink allows for direct communication with an AWS service without leaving the AWS network!
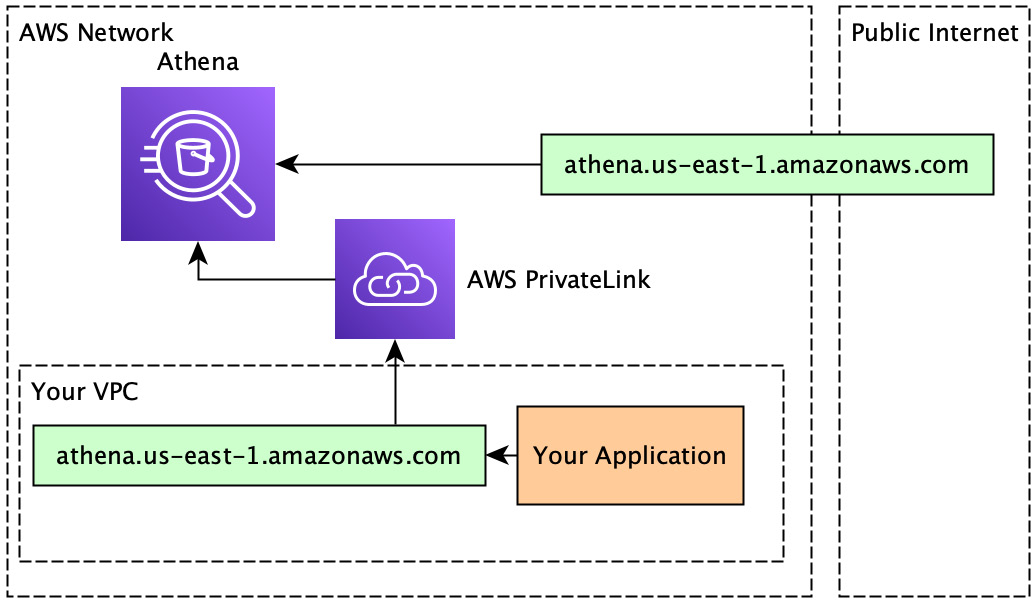
Figure 10.11 – Calling Athena using a VPC endpoint and PrivateLInk
VPCs and VPC endpoints are very powerful tools that allow you to have much finer-grain control over your network. The process of getting set up, while not difficult, requires a few more steps than we have time for. So, rather than walking you through all that you need to, I'm going to suggest you head on over to Athena's documentation on it here: https://amzn.to/3aifWrE. The one thing I'll point to from that documentation is just how easy it is once your VPC and endpoint are set up to actually start using the endpoint. In fact, if you enable private DNS hostnames for the endpoint you create, the endpoint to call will be identical to the public one (as seen in the preceding diagrams), meaning no additional configuration will be required. Your SDK will just automatically start communicating through PrivateLink to Athena instead of over the public endpoint.
Optimizing for performance and cost
Switching gears one last time, let's orient ourselves to optimizing our use of Athena. Again, remember that what is optimal differs depending on what your greater concerns are; either reducing your overall dollar costs or having the fastest possible experience, that's going to depend on your priorities. By the end of this section, you'll have a good starting point for achieving them.
Workload isolation
In Chapter 3, Key Features, Query Types, and Functions, we covered workgroups and how to leverage them to isolate workloads. Just to reiterate, workgroups allow you to splice up your Athena usage in such a way that you can specify who gets access to which data and how much of that data they can access through the WorkGroup resource and resource policies. Another huge benefit of workgroups is that you can visualize aggregated query metrics at the workgroup level. The way you can do this is when you create a workgroup, you make sure to enable publishing query metrics to AWS CloudWatch (see Figure 10.17). Note that this is disabled by default because there are additional charges associated with using CloudWatch.

Figure 10.12 – Workgroup CloudWatch query metrics option
Once you've enabled that, you should be able to head over to the workgroup and you can view the Metrics tab on your workgroup page, and you'll see some pretty handy metrics there! Now, if you are thoughtful in terms of how you break data up into different workgroups, you can leverage these metrics to determine which workgroups (and therefore which sets of data) are resulting in the worst performance and highest costs (in other words, most data reads). We'll take a closer look at how best to think about this soon, but for now, just observe and enjoy.
That relates to monitoring WorkGroup usage, but what about optimizing your workloads? I know I'm being super repetitive, but this is an important thing to keep in mind; what are you trying to optimize? WorkGroups have a nice feature for that where you can specify how much data a given WorkGroup can process, either in a given query or in a given time period. Remember that data processed is the metric utilized by Athena for billing. So, this feature allows you to tune what individual workgroups will cost you over time, so that's what we're optimizing for in this case.
And again, on the other hand, we have performance optimizations. As of the time of writing this book, in most regions, Athena allows you to have 20 active DML queries at a time. An attempt at running a query beyond that will result in a "too many queries" error. So, let's say you have two workloads, one is fast and frequent, while the other is slow and infrequent. And let's say that this fast and frequent workload is pretty consistently at or near 20 active DML queries at a time. What do we think is going to happen with that slow and infrequent query? Well, either it's going to frequently hit the "too many queries" error, or it's going to occupy an active query slot for the fast query for a long period of time, impacting the amount that can be executed in parallel with the fast one. The issue here is that these two workloads have very different scaling vectors, and none of that is based on the amount of data processed, and so WorkGroups won't really help in this case, since these limits are at the account level. So now it's time to look elsewhere for a solution. In these cases, it's a good idea to start considering branching out workloads into separate AWS accounts that can scale completely independently of one another. AWS Organizations is an excellent offering that makes it really easy to create AWS account trees where billing is all aggregated at the root of the tree, but the accounts still effectively act as independent entities.
Application monitoring
By now, you've split out your various workloads into separate WorkGroups and maybe even separate AWS accounts. But software and its use is a living thing; it's forever growing and, just as importantly, changing. So, monitoring the status of your application is extremely important.
By default, Athena logs all API calls plus the associated request parameters to AWS CloudTrail. AWS CloudTrail is a service aimed at empowering customers to audit all actions that are taken within their accounts. Actions, in this case, are API calls made against all services that log to CloudTrail (which should be most, if not all, of them). The data logged by Athena within CloudTrail includes the request parameters, such as the query string, and other valuable data such as the caller.
To get started with diving into your CloudTrail usage, we're actually going to use Athena to gain insights into our Athena usage. To get started, if you haven't done this already, you need to go to the CloudTrail console and create a trail. On the first page of the trail creation, give the trail a name, something descriptive. For your encryption settings, if you plan on using this in a production environment, you will want to turn this on, but keep in mind that KMS has costs associated with it. Each customer-managed key (CMK) is $1/month and then you pay based on your usage of the key as well (there is a free tier for this part). If you are just doing this for testing purposes, it's your decision whether or not you want to turn that on. Just don't forget what you decide if you end up continuing to use it (or not).
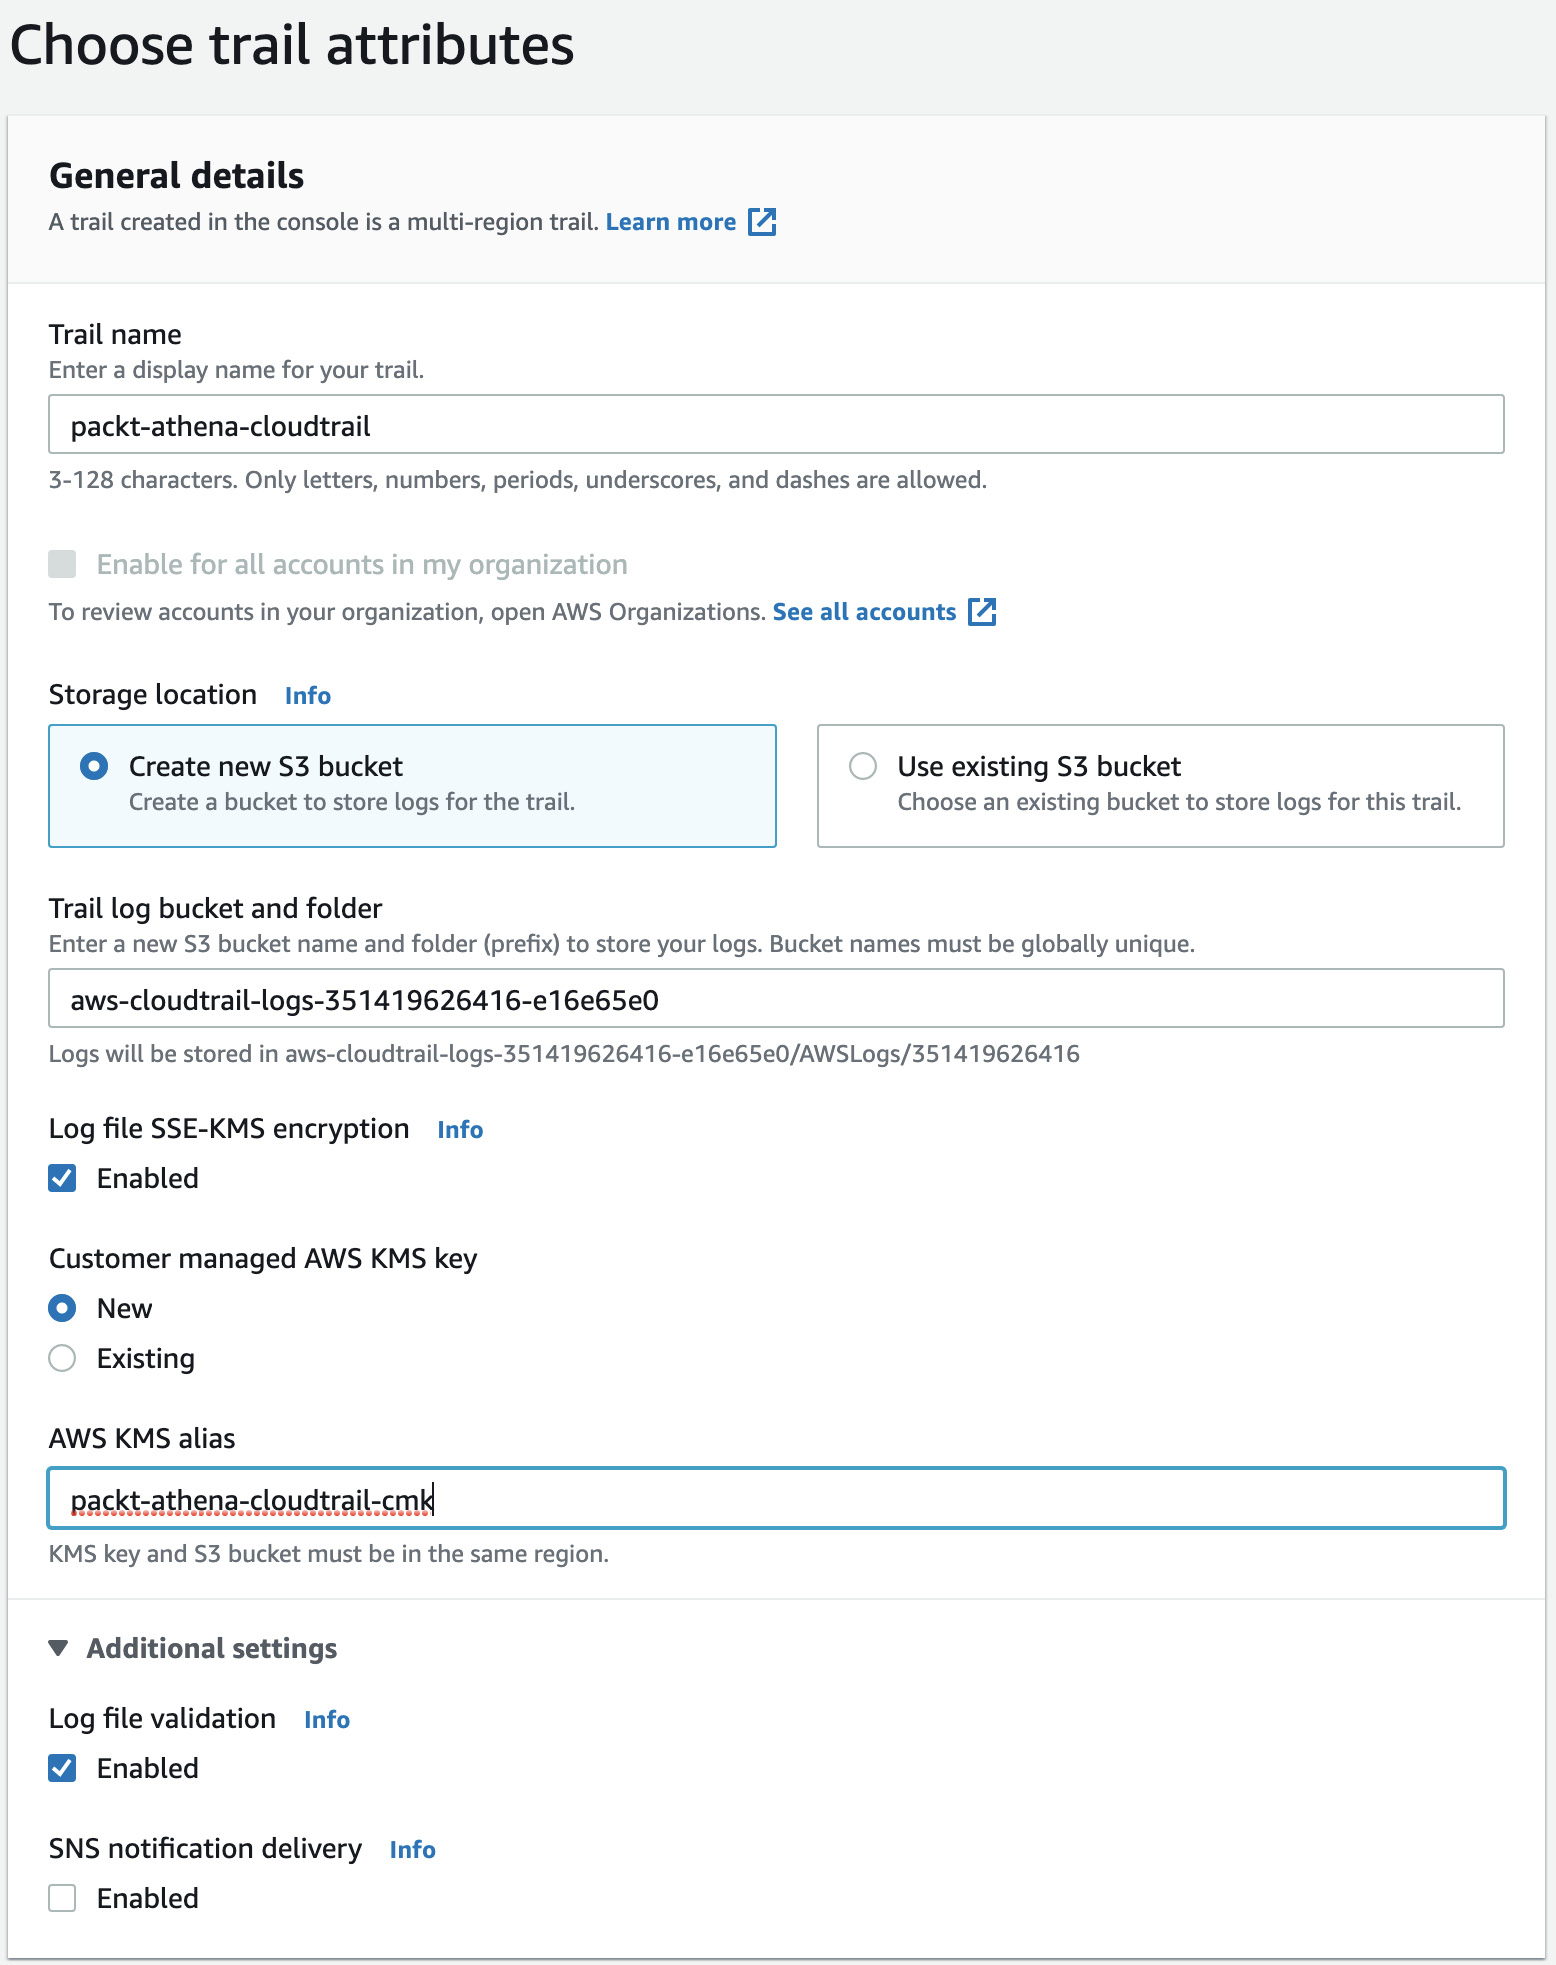
Figure 10.13 – CloudTrail trail attributes
Note the bucket name being used for the trail. The rest you can leave unmodified, and now move on to the next page. On this page, you don't need to change anything; all of the defaults apply. The management event type just refers to general AWS API calls.

Figure 10.14 – CloudTrail log events selection
Now, click Next again, verify that the summary page looks as you expect it to, and click Create trail at the bottom. Navigate over to the CloudTrail Event history page, locate the button that says Create Athena table, and then click that. Select the bucket corresponding to the trail we just created and then scroll down and click Create table. And now you're ready to start gaining insights from your CloudTrail events!

Figure 10.15 – CloudTrail Athena table creation dialog
Move over to Athena and switch to the default data catalog and you should see your newly created table there. Go ahead and preview it and take a quick look at what the data looks like. Three columns worthy of highlighting that we are particularly interested in right now are eventsource, eventname, and requestparameters. If you look at some samples of these, you'll see that eventsource corresponds to the service or caller that triggered the particular event, eventname is the API that was called, and requestparameters contains the values provided for that API call in the form of a JSON object (on many occasions, services will redact sensitive fields). So now let's try to derive some more useful information from here. Try running the following query. (If you just set up CloudTrail, you'll want to run a few random queries first before you run this one, otherwise you will get no results):
SELECT json_extract(requestparameters, '$.queryString') AS queryString
FROM "default"."<CLOUD_TRAIL_TABLE_NAME>"
WHERE eventsource = 'athena.amazonaws.com' and
eventname = 'StartQueryExecution'
You should get an output that looks something like that of Figure 10.16, where you see the various queries that have been executed (since you enabled the trail):

Figure 10.16 – Query strings from the CloudTrail Athena table
Now, at this point, you might be thinking that this is a difficult dataset to analyze, and you'd be right! Especially if you imagine that you've expanded your use of Athena to a massive amount. This is why it's so important that you use all of the various things we've discussed here together.
Let's say we've got a data warehouse for our coffee shop from earlier in the chapter. This warehouse contains data on transactions that have occurred over the past year and also data on what we have in our stockroom. For the stockroom, to begin with, we really only care about what is in there at any given time. So, we create a workgroup for checking that information. Essentially, our data is a daily snapshot of the items in stock. Our other workgroup contains the transaction data that we've got nicely partitioned by month and contains information about all the transactions that occurred each day. One day, one of our data analysts (yes this is a tech-coffee shop) runs a query to try and correlate transactions that are occurring and how they relate to how frequently perishable stock is being returned to determine what we need to buy less of. This ad hoc query turns out to be super useful, so it gets added as a regular job that gets run. But no one told the data engineer! Over time, the data engineer is checking on the metrics of the workgroup and notices that the performance for the stockroom workgroup has degraded significantly over time. The data engineer decides to query the CloudTrail logs for the table in that workgroup and notices a large number of queries that are running over a range of time instead of just a single day (the latest day), and because the table is not partitioned, it requires the entire table to be scanned. They now determine that this is a valuable dataset to have and create a new table that adds month-based partitioning on the stockroom so that it aligns with the transactions table.
I hope that, with the help of my silly little coffee shop example, you can see the power of combining all of these monitoring tools to ensure that you are always operating in the most optimal manner.
CTAS for large result sets
The last topic we are going to briefly discuss is not so much a best practice but just a nice trick to have in your back pocket in case you ever need it. Sometimes, you have queries that you run that produce very large numbers of results. As usual, you call GetQueryResults to get them and notice that you are spending a really long time on this part. The reason for this is that Athena stores all results in a single CSV file. And so GetQueryResults is, in turn, slowly reading through that line by line. In Chapter 3, Key Features, Query Types, and Functions, we learned about the CTAS (Create Table as Select) clause, which allows you to run a select query and rather than return the results to you directly, it puts those results into a new table in your catalog. So, one option to consider instead of reading through your large numbers of results in a single thread is to temporarily store the results in a separate table using CTAS and partition that table in such a way whereby you can leverage parallel reads by reading different partitions at the same time!
Summary
In this chapter, we covered a really broad array of topics, all focused on giving you the right concepts to consider when building an application that leverages Athena (though many topics would benefit you no matter what you are building).
We discussed your different options for connecting to Athena and how to decide which one is right for you, whether it is using the AWS SDK, the JDBC driver, or the ODBC driver – deciding between the convenience of implementation, especially if you are already familiar with the JDBC/ODBC frameworks, versus the flexibility of having direct access to the SDK.
Then we continued the discussion of connecting to Athena, but with a focus on best practices. Firstly, we covered making sure you are leveraging idempotency tokens (in Athena's case, ClientRequestTokens) to make sure you are safely retrying on unclear failures, which is a feature you get for free with the SDK! And then we looked at how best to track the status of queries, moving away from the standard model of polling GetQueryExecution until the query completes, and instead utilizing the push model by working with AWS EventBridge.
Next, we looked at being secure! We discussed how best to manage credentials, particularly when your application is not running with an AWS environment, and then, when you are in an AWS environment, how best to manage your network traffic to and from your application by leveraging VPCs and VPC endpoints.
Finally, we took a look at the various options you have for optimizing your application, whether it be for minimizing cost or maximizing performance. In this section, we reiterated from Chapter 3, Key Features, Query Types, and Functions, the idea of leveraging WorkGroups as a mechanism to isolate workloads both from an access and cost perspective. We also looked at how you can leverage WorkGroup-aggregated CloudWatch metrics for analyzing the overall performance and cost of workloads. Then, we saw where WorkGroups may not be able to help, which is when you have workloads with significantly different scaling vectors that you don't want to impact one another, and in that case, we recommended that you consider separating those into different AWS accounts under a single AWS organization. Continuing with the theme of monitoring, we discussed how you can leverage AWS CloudTrail in addition to well-defined workloads by WorkGroup to discover common access patterns that need to be optimized. Finally, we took a look at a trick you can do to speed up queries with very large result sets by leveraging CTAS to take advantage of the multi-file upload capability of CTAS.
Of course, there is so much to consider when building an application and we've only scratched the surface, but these topics should take you a long way by creating a solid foundation from which to get started. In the next chapter, we will check out operational excellence, in other words, how to monitor and optimize Athena for various uses.