
Chapter 13: Athena UDFs and ML
In this chapter, we will continue with the theme of enhancing Athena with our functionality by adding user-defined functions (UDFs) using AWS Lambda and AWS SageMaker. In Chapter 3, Key Features, Query Types, and Functions, we introduced the built-in functions that are available to you as a user of Athena. But as you build out your data lake and your Athena usage becomes more targeted at specific use cases, you may encounter situations where the built-in functions do not provide the exact functionality that you require. For such scenarios, Athena supports UDFs.
In this chapter, we are going to cover the basics of UDFs and how to create them. By the end, we will learn how we can apply UDFs to non-standard use cases and also to perform machine learning analysis on our data.
In this chapter, we will cover the following topics:
- What are UDFs?
- Writing, deploying, and using UDFs
- Using built-in machine learning UDFs
Technical requirements
Wherever possible, we will provide samples or instructions to guide you through the setup. However, to complete the activities in this chapter, you will need to ensure you have the following prerequisites available. Our command-line examples will be executed using Ubuntu, but most Linux flavors should work without modification, including Ubuntu on Windows Subsystem for Linux.
You will need internet access to GitHub, S3, and the AWS Console.
You will also require a computer with the following installed:
- Chrome, Safari, or Microsoft Edge
- The AWS CLI
This chapter also requires that you have an AWS account and accompanying IAM user (or role) with sufficient privileges to complete this chapter's activities. Throughout this book, we will provide detailed IAM policies that attempt to honor the age-old best practice of "least privilege." For simplicity, you can always run through these exercises with a user that has full access. Still, we recommend using scoped-down IAM policies to avoid making costly mistakes and learning more about using IAM to secure your applications and data. You can find the suggested IAM policy for this chapter in this book's accompanying GitHub repository, listed as chapter_13/iam_policy_chapter_13.json, here: https://bit.ly/3gnwCSm. No changes need to be made to the policy from Chapter 12, Athena Query Federation, so if you completed the exercises in that chapter, you don't need to make any modifications to your role.
What are UDFs?
If it wasn't already obvious before now, it has probably become pretty clear by this point that the world of big data analytics is vast and complex. Athena offers a very wide array of built-in functionality that enables you to analyze your data, but as your use cases grow, you may find that certain situations are not covered. Perhaps your data has a special encoding that can't be converted by Athena, or maybe you want to do some natural language processing to look for general sentiment in some free text fields. Whatever the situation may be, you can turn to user-defined functions (UDFs) to solve them. UDFs allow us, as users of Athena, to provide custom query behavior that can be used within the queries we are running.
UDFs are not a new concept created by Athena, so if you've been in the data analytics space for a while, you've likely already encountered them. The case of Athena is a bit more unique since you are not managing the query execution hardware, nor are you managing the software installed on that hardware. In traditional, self-managed data warehouse solutions, UDFs are typically registered within or alongside the program itself at startup time. For example, prestodb has support for custom functions (https://bit.ly/36q2Ir5), which are deployed alongside Presto by simply placing the .jar file in a pre-configured plugin directory.
If you read the preceding link on prestodb's support for custom functions, you may have noticed that there are three different types supported by the engine: scalar and aggregate functions. Scalar functions are used to add custom functionality to data existing in a single row. An example could be is_null, where it will simply return a boolean indicating whether the provided value is null. Aggregate functions, on the other hand, are used to create behavior across several rows (think avg). They require you to use AccumulatorState, which is where the aggregation is persisted across rows. At the time of writing this book, Athena only supports scalar functions.
For Athena, UDFs are referred to as external functions. In this chapter, we're going to cover the two different options available to you at the time of writing this book. These options are Lambda-based functions and SageMaker endpoint-based functions. Lambda-based functions, as the name implies, utilize a Lambda that gets invoked during the execution of your query. The following diagram shows the flow for Lambda-based UDF execution. If you read Chapter 12, Athena Query Federation, then the process of writing and deploying UDFs is going to look very similar to the process of writing and deploying a connector. If you skipped that chapter, then don't worry – we will go over everything again here:
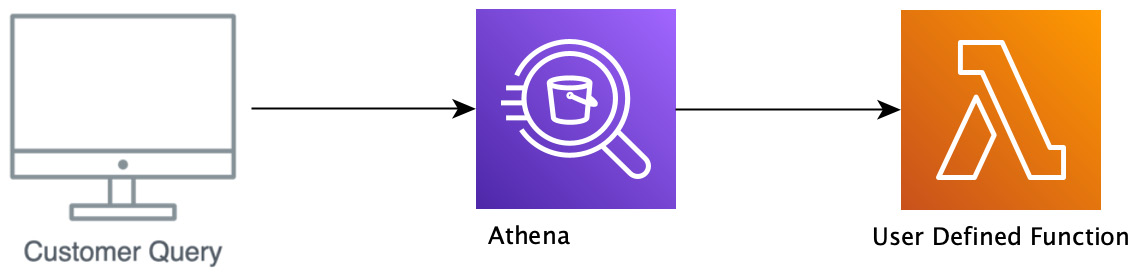
– Athena Lambda UDF workflow
The preceding diagram shows the flow for SageMaker-based UDF executions. If you completed the exercises in Chapter 7, Ad Hoc Analytics, some of the SageMaker setup will look familiar. However, we will be using SageMaker to train a model, so there will be some differences here:
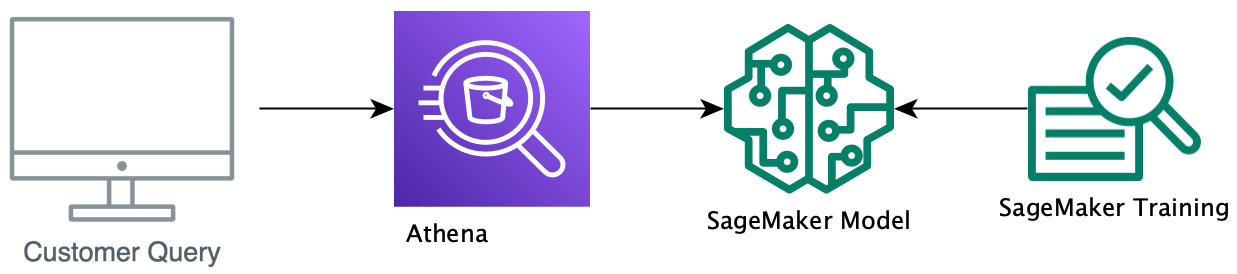
Figure 13.2 – Athena SageMaker UDF workflow
Now that we know what UDFs are, let's create a new one.
Writing a new UDF
So, now that we've gotten a bit of an idea of what UDFs are and when we might want to use them, let's go ahead and create one.
Setting up your development environment
To write a new UDF or modify an existing UDF, we'll need the ability to build, test, and package the code. So, our first task is to ensure we have a development environment with the appropriate builder tools. These tools will include Apache Maven, the AWS CLI, and the AWS Serverless Application Model (SAM) build tool. The Apache Foundation describes Maven as a "software project management and comprehension tool." That's a fancy way of saying Maven helps automate dependency management, build orchestration, and a host of related activities that can be added or augmented via plugins. The AWS SAM build tool is one option for packaging and deploying our UDF for use with Lambda and Serverless Application Repository. And, of course, the AWS CLI will be there for when we'll need to interact with AWS via the command line.
If you've already got an environment that meets these requirements (for example, if you completed the exercises in Chapter 12, Athena Query Federation), you're welcome to use it. If not, don't worry. We'll guide you through the setup for Debian Linux-based systems such as Ubuntu or Ubuntu on Windows Subsystem for Linux. Most of the commands will work on other flavors of *nix with minor modifications. We'll assume you will be using a basic text editor without any fancy builder tool integrations and that you need a guide for installing these other dependencies. Let's get started by cloning this book's accompanying GitHub repository by using the following command.
git clone https://github.com/PacktPublishing/Serverless-Analytics-with-Amazon-Athena.git
Inside the chapter_13 directory, you'll find a prepare_dev_env.sh script that you can run to install OpenJDK, Apache Maven, the AWS CLI, and the AWS SAM build tool. Depending on your CPU and disk speeds, the script may take 5 minutes or more to set up in your environment. If the script is successful, it will print the installed version of each required tool at the end. The output will look similar to the following, but don't worry if your versions differ slightly:
aws-cli/1.19.96 Python/2.7.18 Linux/4.19.128-microsoft-standard
SAM CLI, version 1.24.1
Apache Maven 3.5.4
openjdk version "11.0.11" 2021-04-20
javac 11.0.11
Next, we'll start writing the code for our custom UDF!
A Note About Java Versions
While the Athena Federation SDK should work fine with Java versions up to and including 11, issues have been reported with Apache Arrow with JDK versions beyond 8. The open source project has resolved many of these issues and provided configuration workarounds for the remaining items. If you run into errors that appear to be related to your JDK version, try executing the exercise with Open JDK 8.
Writing your UDF code
For this exercise, we'll be taking a closer look at the UDF that we used in Chapter 12, Athena Query Federation. Again, don't worry if you skipped that chapter as we will cover everything that you need to know here. To help you learn about writing UDFs, we've included a working example that you can check your work against. However, unlike Query Federation, where Athena provides a pretty wide selection of ready-made connectors, UDFs can be very customer use case-specific, so there isn't currently a large pre-built collection to browse through. So, you must understand the steps to go from nothing to a fully functional UDF. Due to this, I'm going to recommend that you try to avoid just copying and pasting from the working example and leverage that as a way to check and debug your work. To find the working code, navigate to the udf-example folder in the chapter_13 directory of the GitHub repository you cloned in the previous section (if you skipped that section, go ahead and clone it now!).
The UDF we'll be working with was initially provided by the Athena team as part of the Athena Federation SDK to teach customers how to write UDFs. This UDF is intentionally simple so that you can focus on the basics of understanding the components of a UDF rather than having to decipher complex function logic. The function will take in a parameter, decrypt it (using a hardcoded encryption key, which violates every security tenant, so please don't do this in production), and return the result of the decryption. We've also included some unit tests to verify the function code. In the end, we will deploy the UDF and use it in a query.
Athena provides an SDK that will handle any of the logic that's necessary for communicating with the main Athena query engine, as well as aiding in interactions with Apache Arrow. The SDK is implemented in Java, so it is recommended that you implement your UDF in Java as well (or Kotlin or Scala if you are feeling adventurous). Since the SDK is fully open source (https://bit.ly/3vXmm9j), you can technically write this in any language, so long as you reproduce the behavior, but that is not recommended other than for expert users with language-specific use cases.
Project setup
For this walkthrough, we are going to be using Apache Maven for our dependency management. To get started, let's go ahead and initialize a new Maven project:
mvn -B archetype:generate
-DarchetypeGroupId=org.apache.maven.archetypes
-DgroupId=<YOUR_GROUP_ID>
-DartifactId=<YOUR_ARTIFACT_ID>
If you aren't familiar with Maven, for this command, all you need to know is that you're going to get a skeleton application that we'll take a little bit of a closer look at in a second. Remember to replace YOUR_GROUP_ID with something that makes sense for you (for example, the AWS group ID; that is com.amazonaws) and then replace YOUR_ARTIFACT_ID with the project name (for example, udf-example).
After running that command, you should see a new directory with the name that you used for YOUR_ARTIFACT_ID. Inside that directory, you should see two things: an src/ directory and a file named pom.xml. The POM file (https://bit.ly/3xDLd2y) is the file where you declare your dependencies for your project. It is also where all of your build configurations go. A quick search on Amazon reveals seven pages of books on Maven, so we're not going to delve any deeper than we need to, but needless to say, it's a very powerful tool. Taking a quick look in the src/ folder, you'll see main/ and test/. Within each, there is some sample code that you can go ahead and delete.
The POM file
Next, we are going to update the POM file. We'll only have to do this once. The POM file is quite large, so rather than taking up two pages, I am going to recommend that you go to this book's GitHub repository and follow along and/or copy-paste (https://bit.ly/3msAs0x). I will cover some important sections that are worth understanding here:
<parent>
<artifactId>aws-athena-query-federation</artifactId>
<groupId>com.amazonaws</groupId>
<version>1.1</version>
</parent>
The <parent> tag tells Maven that we want to merge our POM file with the POM file of the referenced parent artifact. In this case, that is the POM file for the aws-athena-query-federation artifact, the POM of which you can find in the open source repository (https://bit.ly/2U4IErJ). The result of the merged POM is to ensure that all the dependencies are together:
<properties>
<maven.compiler.source>1.8</maven.compiler.source>
<maven.compiler.target>1.8</maven.compiler.target>
...
</properties>
As the note on Java versions states, Apache Arrow has sometimes been reported to have issues with JDK versions beyond 8, so we are forcing the compiler to use JDK 8 for our build, just to be on the safe side:
<dependency>
<groupId>com.amazonaws</groupId>
<artifactId>aws-athena-federation-sdk</artifactId>
<version>${aws-athena-federation-sdk.version}</version>
</dependency>
We are going to be extending a class from the Athena Federation SDK, so we need a dependency on that. Note that we are referencing the ${aws-athena-federation-sdk.version} variable. We did not declare that in our POM; we are getting that value from <parent>:
<build>
<pluginManagement><!-- lock down plugins versions to avoid using Maven defaults (may be moved to parent pom) -->
<plugins>
<plugin>
<groupId>org.apache.maven.plugins</groupId>
<artifactId>maven-shade-plugin</artifactId>
...
</plugin>
</plugins>
</pluginManagement>
</build>
</project>
Finally, we are using maven-shade-plugin. This instructs Maven, when it produces the .jar file for our package, to also include all of our dependencies to create an uber-jar (it can also help with renaming packages in case there are conflicts). An uber-jar is one of two ways to deploy your JVM-based application to AWS Lambda, with the other being just a ZIP file containing your code and all dependencies. Both work fine (fun fact, a .jar file is pretty much just a ZIP with a little extra Java-y information).
UserDefinedFunctionHandler
We're just about ready to start writing our UDF code, but before we do that, we're going to take a quick detour and peek at the code provided in the Athena Federation SDK that will aid us in creating our UDF. The SDK contains an abstract class called UserDefinedFunctionHandler that we will be extending. This class handles the deserializing messages that are sent from Athena's main engine and then delegates them down to the proper function handler. We're not going to delve super deep into what this handler is doing, but let's take a look at a few notable code pieces. You can see the full implementation here: https://bit.ly/3riRfTQ.
The first thing to notice is that the class implements RequestStreamHandler. This class comes from the AWS Lambda Java SDK and has a single method, called handleRequest, that you have to implement to have a Java-based Lambda function. The contract is very straightforward: you are given an InputStream containing the input values to your function, an OutputStream where your function will write its results, and a Context that contains mostly Lambda metadata about the function itself.
Next, scroll down until you find extractScalarFunctionMethod. We haven't discussed how to use UDFs in Athena queries yet, but this method is important for that. Generally speaking, at query time, we will tell Athena the name of the method to execute, and then this logic will use Java Reflection to find the implementation of that method in your UDF code. If you aren't familiar with Java Reflection or just aren't fully following what's happening here, that's okay – it isn't critical that you understand this logic. It can just sometimes be helpful to understand how everything pieces together.
The last bit we'll take a look at is the following block of code, which is located inside the processRows method:
for (Field field : inputRecords.getFields()) {
FieldReader fieldReader = inputRecords.getFieldReader(field.getName());
ArrowValueProjector arrowValueProjector = ProjectorUtils.createArrowValueProjector(fieldReader);
valueProjectors.add(arrowValueProjector);
}
As we mentioned previously, Athena leverages Apache Arrow to represent the data in transit between the query's execution and the UDF function. This logic is taking the fields (with field being a column in our table) returned in the query, creating an ArrowValueProjector for each field. These projectors are put there to make writing UDFs easier so that you, as the function writer, do not have to interact with or even understand Apache Arrow. Instead, you are given Java objects to operate on.
A Note About ArrowValueProjector's Performance
The convenience of ArrowValueProjector's comes at a cost. Data must be copied from the Arrow objects to the Java objects, and any data copying is always going to introduce some degree of latency, which, when magnified over potentially many thousands (or more) of rows of data, can add up. If you are noticing an unacceptable degree of latency introduced from your UDF, you can consider overriding the processRows method inside of UserDefinedFunctionHandler and operate directly on the Apache Arrow objects instead of converting from Arrow into Java.
UDF code
Now, we're ready to write our UDF! As we mentioned previously, the function is going to decrypt a parameter from our dataset using an encryption key that we've hardcoded. Again, do not do this in production – this is just to keep things simple to illustrate how to write a UDF.
To get started, let's go ahead and create a new class in our Java package and call it UdfExample. As we covered previously, we are going to be extending UserDefinedFunctionHandler, which has a constructor that requires a String parameter called sourceType. The value you assign to this isn't super important to you as it's primarily used for Athena's internals; just pick something descriptive. I chose "Packt_UdfExample".
Now, we're going to add our function code. Let's go ahead and create a new public method and call it decrypt. In this case, the return type of our method will be String, but in the general sense, the return type should map to whatever type we want the value to be in our query. For our input, we will take in a String as well, but again, we are not limited to strings, and we are also not limited to a single input. We can use as many as we want and whatever types we want, based on the types that our columns are stored as in our dataset.
At this point, you should have something that looks like the following:
package com.amazonaws;
import com.amazonaws.athena.connector.lambda.handlers.UserDefinedFunctionHandler;
public class UdfExample extends UserDefinedFunctionHandler {
private static final String SOURCE_TYPE = "Packt_UdfExample";
public UdfExample() {
super(SOURCE_TYPE);
}
public String decrypt(String encryptedColumnValue)
{
return null;
}
}
This is the minimum you would need to be able to register a UDF called decrypt! Of course, your function wouldn't perform any decryption, you would just get nulls back, but still, pat yourself on the back – you've created a UDF!
Now, we'll quickly go over the decryption logic. This isn't super important, since it's been created to demonstrate developing UDFs, so if you want, feel free to skip this portion and just copy the logic from the repository at https://bit.ly/3AZQUsR.
We are using what's called symmetric encryption. This means that the same key is used to encrypt and decrypt. This is in contrast to asymmetric encryption, where one key is used to encrypt (generally referred to as the public key) and another one is used to decrypt (the private key). We will be using AES as our encryption algorithm and Java's built-in cryptography library:
@VisibleForTesting
protected String symmetricDecrypt(String text, String secretKey)
throws NoSuchPaddingException, NoSuchAlgorithmException, InvalidKeyException, BadPaddingException,
IllegalBlockSizeException
{
cipher cipher;
String encryptedString;
byte[] encryptText;
byte[] raw;
SecretKeySpec skeySpec;
raw = Base64.decodeBase64(secretKey);
skeySpec = new SecretKeySpec(raw, "AES");
encryptText = Base64.decodeBase64(text);
cipher = cipher.getInstance("AES");
cipher.init(cipher.DECRYPT_MODE, skeySpec);
encryptedString = new String(cipher.doFinal(encryptText));
return encryptedString;
}
The preceding code is performing the decryption. Let's look at the code in bold in more detail. First, both the key string and the encrypted values are Base64-encoded, which is used to turn bytes into ASCII. Finally, at the bottom, we are creating a cipher, which is essentially the implementation of the AES algorithm. So, again, we're getting the raw bytes for both the key and the encrypted text, passing them both through the AES cipher, and getting back our decrypted bytes, which we are converting back into strings (which we know is safe to do, because we know the decrypted value is just a string, though it could, in theory, be more non-human-readable bytes).
Don't Forget to Test Your Code!
As with any code base, make sure you clearly define the contracts of your code and verify them with tests. We've included some test code in our sample as well, which I'd recommend you at least read through to understand what it's doing and then copy it over.
Building your UDF code
Before we can deploy our code, we need to build and package it. Thankfully, since we did all that nice setup earlier on in our POM, this is very easy to accomplish. Simply run one of the two commands:
mvn clean install
# If you want to run the tests as well run the following (this is not standard to Maven, it's just how we happened to set this package up)
mvn clean install -Dpublishing=true
Once this completes, you should have a newly generated directory named target. Inside of it, there should be a JAR file called udf-example-2021.33.1.jar.
Quick Note on Maven Shading
In the same target/directory, you may also see a file that looks like original-udf-example-2021.33.1.jar. This is the original .jar file that was produced by Maven. However, as we mentioned previously, we need to provide a .jar that contains all of our dependencies (the uber .jar). Again, the plugin responsible for that is called Maven Shade, and it actually moves the original .jar to a file called origin-[JAR_FILE_NAME], and then creates a new .jar with the same [JAR_FILE_NAME] that contains all the dependencies. If you look at the size of each of the files, you'll notice that udf-example-2021.33.1.jar is quite a bit larger than original-udf-example-2021.33.1.jar. In my case, it's 23 MB versus 4.6 KB.
Deploying your UDF code
We're ready to deploy our code! The process of deploying your function is no different than any other Java-based Lambda function, so if you are already familiar with that process, we aren't going to be introducing any new concepts. There are two primary mechanisms that we are going to cover to make direct calls to the AWS Lambda APIs and AWS SAM.
Direct calls to AWS Lambda APIs
In this section, we are going to directly call a Lambda by using the AWS CLI. This is a simpler and quicker way to get started but I wouldn't recommend it when maintaining your UDF in the long term.
Before we can register the Lambda, we need an execution role. The AWS Lambda docs provide a good overview of creating execution roles (https://amzn.to/3ign39a) but to get started quickly, you can just run the following commands:
aws iam create-role --role-name udf-example-role --assume-role-policy-document '{"Version": "2012-10-17","Statement": [{ "Effect": "Allow", "Principal": {"Service": "lambda.amazonaws.com"}, "Action": "sts:AssumeRole"}]}'
aws iam attach-role-policy --role-name udf-example-role --policy-arn arn:aws:iam::aws:policy/service-role/AWSLambdaBasicExecutionRole
The first command creates a role called udf-example-role with no permissions attached to it and a trust policy saying that AWS Lambda is allowed to assume it. The second command attaches the AWSLambdaBasicExecutionRole managed IAM policy to the newly created role.
Now that we've created our role, let's go ahead and create our function. To accomplish this, we are going to call the create-function API within AWS Lambda:
aws lambda create-function
--function-name UdfExample
--runtime java8
--role arn:aws:iam::1234567890123:role/udf-example-role
--handler com.amazonaws.UdfExample
--timeout 900
--zip-file fileb://./target/udf-example-2021.33.1.jar
And that's it! You've deployed a Lambda function.
Using your UDF
The time has finally come for us to use our shiny new UDF inside an Athena query! Registering a UDF is done at query execution time by way of the USING EXTERNAL FUNCTION clause, before your SELECT statement. The syntax for that looks like this:
USING EXTERNAL FUNCTION UDF_name(variable1 data_type[, variable2 data_type][,...])
RETURNS data_type
LAMBDA 'lambda_function_name'
SELECT [...] UDF_name(expression) [...]
First, let's get set up with some sample data. For that, we've provided some data (https://bit.ly/3gjYfvK) and a CREATE statement (https://bit.ly/3sGpmWz) that you can use in our repository. Upload the sample data and run the CREATE statement in Athena. Make sure that you replace <S3_BUCKET> in the CREATE statement with the name of the S3 bucket where you placed the sample data.
Now that we've got that set up, let's go ahead and try running a query using our UDF! Your results should match those shown in the following table:
USING EXTERNAL FUNCTION decrypt(encryptedData VARCHAR)
RETURNS VARCHAR
LAMBDA 'UdfExample'
SELECT year, month, day, encrypted_payload, decrypt(encrypted_payload) as decrypted_payload
FROM "packt_serverless_analytics"."chapter_13_udf_data"
limit 5.
This results in the following output:

Figure 13.3 – Decryption results
Just in case you think there is some wizardry going on here and I'm trying to trick you, I've gone ahead and included a class in the repository that sanity checks the results (https://bit.ly/2XCBgFu). You can give it an encrypted payload and it will return the expected output, so you can double-check it against the preceding values:
mvn compile exec:java -q -Dexec.mainClass="com.amazonaws.ResultSanityChecker" -Dexec.args="0UTIXoWnKqtQe8y+BSHNmdEXmWfQalRQH60pobsgwws="
Encrypted payload: 0UTIXoWnKqtQe8y+BSHNmdEXmWfQalRQH60pobsgwws=
Decrypted payload: SecretText-1755604178
A couple of other things to point out are that the signature of decrypt matches that of the method signature for decrypt in our function code, including its input types and return type. Though again, you'll notice that the types are VARCHAR versus String, which we have in Java – that's Apache Arrow and ArrowValueProjectors at work. And then, the Lambda function's name is just the name that we gave to the Lambda we created in the last step.
And that's it! Congratulations – you've just written your first UDF!
Maintaining Your UDF
Now that you've gotten your UDF running, let's talk briefly about how we're going to maintain the function. As we mentioned previously, there are two ways to deploy it; we chose the simpler way to get started, which was just to call the Lambda APIs from our Terminal, but that's not a maintainable way of doing that long term. For regular maintenance of your UDF, a very good place to turn to is AWS SAM. SAM is an open source framework provided by AWS that includes a ton of super handy functionality for building serverless applications. As an optional exercise, I recommend that you run through the documentation SAM provides on getting set up with SAM and a CI/CD tool of your choice: https://amzn.to/3kfQVlW. Alternatively, the walkthrough in Chapter 12, Athena Query Federation, also shows you how to utilize SAM to deploy an Athena Federation Connector.
Using built-in ML UDFs
In the previous section, we learned how we can create UDFs using Lambda. In this section, we're going to learn how to use Athena's built-in functionality to create UDFs that delegate down to a ML model. We're not going to delve too deeply into the ML aspects of things, though we will cover some basics just so you know what's happening. If you read Chapter 7, Ad Hoc Analytics, then some of this should be familiar.
Before you get started, note that you may incur some SageMaker charges during this. Particularly for the portion where we are training our models, we don't want to be waiting around forever, so we are leveraging the recommended cost/power instance type of ml.c5.xlarge. Total charges should be no more than a few dollars.
Pre-setup requirements
Before we are ready to head on over to SageMaker, there's a couple of things we need to put in place. First up is our favorite resource, an IAM role. By now, you're probably a pro at creating IAM roles, but in case you skipped directly to this chapter, we'll cover the creation process again. You can do this by navigating to the IAM Console, selecting the Roles section, and clicking the Create role button. Once you've done that, you'll be presented with the dialog shown in the following screenshot. Be sure to select AWS Service as the type of trusted entity and SageMaker as the entity:

Figure 13.4 – Create role dialog
The settings shown in the preceding screenshot indicate that we are creating a role that can be assumed by SageMaker, allowing SageMaker to perform the actions associated with the role inside your account. This helps scope down both the types of activities the IAM role can perform and the contexts from which it can be assumed. In the next step, you'll have the opportunity to add the specific policies for the activities we plan to perform using this IAM role. We recommend adding the packt_serverless_analytics policy that we have been enhancing throughout this book and used earlier in this chapter. As a reminder, you can find the suggested IAM policy in this book's accompanying GitHub repository, listed as chapter_13/iam_policy_chapter_13.json, here: https://bit.ly/3gnwCSm.
Once you've added the policy, you can move on to the Add Tags step. Adding tags is optional, so you can skip that for now and go to the final step of giving your new IAM role a name. We recommend naming your new IAM role packet-serverless-analytics-sagemaker since this chapter's IAM policy already includes permissions that will allow you to create and modify roles that match that name without added access. If everything went as expected, your IAM role summary should match what's shown in the following screenshot. If you forgot to attach the packt_serverless_analytics policy, you can do so now using the Attach Policies button:

Figure 13.5 – IAM role Summary dialog
Next, go ahead and copy the following CSV file into an S3 bucket of your choosing. Make sure to note where you put it for later:
wget -O taxi_ridership.csv https://bit.ly/3kblw45
aws s3 cp taxi_ridership.csv s3://<S3_BUCKET>/packt-serverless-analytics-chapter-13/ml-example/input/
Setting up your SageMaker notebook
Now, it's time to create our SageMaker Jupyter notebook; we're almost ready to start training! Head on over to the SageMaker console, find the Notebook > Notebook Instances section and select it. From there, you can click Create notebook instance to open the dialog shown in Figure 13.6 and Figure 13.7.
Using our notebook to train a model
Your notebook instance should be ready to use at this point. We're going to cover what we're doing in depth, but first, we will provide a quick overview of the steps we're going to take:
- Connect our notebook instance to Athena.
- Create a table in Athena using the CSV file we copied into our S3 bucket earlier.
- Read the contents of the table.
- Run a training job on our table data using the Random Cut Forest algorithm.
- Deploy our trained model to an endpoint.
If you'd like to skip ahead or need added guidance on writing the code snippets we'll be using to train our model, you can find a prepopulated notebook file in this book's GitHub repository at chapter_13/packt_serverless_analytics_chatper_13.ipynb, here: https://bit.ly/3sAErZV. GitHub nicely renders the notebook file so that you can see it right from the link. Unfortunately, that makes downloading it so that you can upload it to your SageMaker notebook instance later a bit tricky. To get around that, click on the Raw view, and then click Save As from your browser.
Connecting our notebook instance to Athena
From the SageMaker Console, go ahead and click the Open Jupyter link, as shown in the following screenshot. This will open a new browser tab or window connected to your Jupyter Notebook instances. Behind the scenes, SageMaker is handling all the connectivity between your browser and what is your Jupyter Notebook server:

Figure 13.6 – Open Jupyter Notebook
As shown in the preceding screenshot, you'll want to click on New and select conda_python3 for the notebook type. The value may appear at a different position in the dropdown than it does in the preceding screenshot, so don't be afraid to scroll to find it. This setting determines how our notebook will run the data exploration tasks we are about to write. By selecting conda_python3, we are telling Jupyter that it can run our code snippets using Python. Once you pick the notebook type, yet another browser tab will open that contains your new notebook. The new notebook file will be named Untitled.ipynb, so our first step will be to give it a helpful name by clicking on File and then Rename:

Figure 13.7 – Creating a new Notebook file
Now that your notebook is ready to use, we'll connect it to Amazon Athena by installing the Athena Python driver. To do this, we'll write the following code snippet in the first cell of the notebook. Cells are represented as free-form text boxes and can be executed independently, with subsequent cells having access to variables, data, and other states produced by earlier cells. After executing a cell, its output is shown immediately below it. You can edit, run, edit, and rerun a cell as often as you'd like. You can also add new cells at any time. Let's put this to practice by running our first cell. Once you've typed the code into the cell, you can either click Run or press Shift + Enter to run the cell and add a new cell directly below it:
import sys
!{sys.executable} -m pip install PyAthena
This particular cell will take a couple of minutes to execute, with the result containing a few dozen log lines detailing which software packages and dependencies were installed. Now, add another cell and paste the following code into it, make sure to replace <OUTPUT_S3_BUCKET> with the bucket you want the output data to be placed in, as well as <OUTPUT_S3_BUCKET_REGION>:
from pyathena import connect
import pandas as pd
import sagemaker
#TODO: Change the bucket to point to an s3 bucket to use for model output and training data
bucket = <OUTPUT_S3_BUCKET>
output_location = 's3://' + bucket + '/chapter_13/ml_output/'
# Connect to Athena
connection = connect(s3_staging_dir=output_location, region_name=<OUTPUT_S3_BUCKET_REGION>)
Now, we're connected to Athena!
Preparing our training data
Next, we are going to take the data that we copied into our <S3_BUCKET> in the pre-setup steps and create a table for it in Athena. Go ahead and add another cell and insert the following code into it:
create_table =
"""
CREATE EXTERNAL TABLE 'packt_serverless_analytics'.'chapter_13_taxi_ridership_data'(
'time' string ,
'number' int)
ROW FORMAT SERDE
'org.apache.hadoop.hive.serde2.OpenCSVSerde'
WITH SERDEPROPERTIES (
'separatorChar'=',')
STORED AS INPUTFORMAT
'org.apache.hadoop.mapred.TextInputFormat'
OUTPUTFORMAT
'org.apache.hadoop.hive.ql.io.HiveIgnoreKeyTextOutputFormat'
LOCATION
's3://<S3_BUCKET>/packt-serverless-analytics-chapter-13/ml_input/'
"""
Now, add one more cell to execute the CREATE statement:
## Create a new Athena table holding data we will use to predict anomalies
pd.read_sql(create_table, connection)
Finally, let's go ahead and read the contents of the table into an object so that we can use it later to train our model. And… you guessed it, add another cell!
results = pd.read_sql("SELECT * FROM default.taxi_ridership_data", connection)
Time to train!
This is the last step for our SageMaker notebook: training our model. So, we need one more of our favorite things, a cell!
from sagemaker import RandomCutForest
prefix = 'athena-ml/anomalydetection'
execution_role = sagemaker.get_execution_role()
session = sagemaker.Session()
# specify general training job information
rcf = RandomCutForest(role=execution_role,
instance_count=1,
instance_type='ml.c5.xlarge',
data_location='s3://{}/{}/'.format(bucket, prefix),
output_path='s3://{}/{}/output'.format(bucket, prefix),
num_samples_per_tree=512,
num_trees=50,
framework_version="2.54.0",
py_version="py3")
# Run the training job using the results we got from the Athena query earlier
rcf.fit(rcf.record_set(results.number.values.reshape(-1,1)))
print('Training job name: {}'.format(rcf.latest_training_job.job_name))
rcf_inference = rcf.deploy(
initial_instance_count=1,
instance_type='ml.c5.xlarge',
)
print(' Endpoint name (used by Athena): {}'.format(rcf_inference.endpoint_name))
You should see a whole bunch of output for this last cell, but if you scroll to the bottom, you should see the following output. The value we are particularly interested in is the endpoint name, so make sure that you save that for later:

Figure 13.8 – Training output
The Random Cut Forest model
In this section, we trained a model in SageMaker using the Random Cut Forest (RCF) algorithm. Since it's a neat algorithm, we'll briefly cover how it works. RCF is what's known as an unsupervised algorithm. These are often used to detect anomalous data points within a dataset. An unsupervised algorithm means that it does not require additional assistance (sometimes referred to as data labeling) from a human to train the model. If you ever saw the tech talk of the engineer who trained his cat door to be able to detect when his cat brought in a "gift" from outside, that is what's known as a supervised algorithm. In that case, the engineer would physically indicate to the model whether a given image contained a "gift" or not. RCF works by taking in a target value (known as a tree) – in our case, that's the number of riders for a given period – and then comparing it against all of the other values (known as the forest) using random "cuts" through the forest, until it identifies a section containing only the single tree we are looking for. The fewer cuts that are required, the more anomalous the value is determined to be. If you visualize what it would be like to take a literal forest and create slices until you find a specific tree, it's going to take way fewer slices to find the lonesome tree away from all other trees, as opposed to one that is in a very tight cluster of trees.
Using our trained model in an Athena UDF
With our fancy taxi ridership model all trained and ready to do some work, let's find some unexpected ridership amounts! Just like in the walkthrough regarding custom UDFs, we are going to use the USING EXTERNAL FUNCTION clause and then a SELECT statement to utilize the new function. The syntax looks very similar for the ML-based UDFs:
USING EXTERNAL FUNCTION ml_function_name (variable1 data_type[, variable2 data_type][,...])
RETURNS data_type
SAGEMAKER 'sagemaker_endpoint'
SELECT ml_function_name()
There are a few main differences. The biggest difference is that unlike in the Lambda-based UDFs, where the function name was mapped to something in our UDF code, the ml_function_name value is just any random identifier that we want to create – it doesn't correspond to anything that we did in our SageMaker Notebook. Then, instead of the type being LAMBDA plus a Lambda function name, it's now SAGEMAKER plus the endpoint name that was output at the end of our Notebook's execution. So, our final query ends up looking something like the following. Notice that we are querying against the same data we used to train our model, which makes sense since we are comparing a single value within our dataset against the entire dataset as a whole:
USING EXTERNAL FUNCTION detect_anomaly(b INT) RETURNS DOUBLE SAGEMAKER 'randomcutforest-2021-08-22-03-10-43-029'
SELECT time, number as number_of_rides, detect_anomaly(number) as score
FROM "packt_serverless_analytics"."chapter_13_taxi_ridership_data"
ORDER BY score desc
LIMIT 5
You should get the following results:

Figure 13.9 – Top 5 most anomalous half hour periods for NYC taxi ridership
Thus, we have used SageMaker notebooks to train a ML UDF model.
Summary
In this chapter, we walked through a couple of different examples of how Athena allows you to inject custom functionality, known as user-defined functions, into your queries. We started by looking at fully custom UDF behavior through Lambdas. We created and deployed our own Lambda, and then took a closer look at how we can keep a healthy, well-maintained Lambda-based UDF. After that, we took a look at the built-in UDF functionality that Athena provides for integrating your queries with SageMaker ML models. We used this to determine if taxi ridership was anomalous during a specific time.
We've only scratched the surface of the power of UDFs, but this should serve as a solid reminder for when you encounter a business use case that you can't solve perfectly with the functionality provided out of the box. In the next and final chapter, we will summarize some advanced functions that Athena provides and conclude our book!