
Chapter 5: Managing the Security and Compliance Settings in Microsoft Teams
In this chapter, we will examine the principles of security and compliance within Microsoft Teams. You will learn about the different Teams admin roles that are available and what they do, gain an understanding of compliance features for Teams, such as retention policies and sensitivity policies, and we will also show you how to set up security- and compliance-related alerting for Microsoft Teams. Additionally, we will introduce you to information barrier policies, which can be used to separate groups of Teams users so that they may not communicate directly, and finally examine some of the security reporting features available for Microsoft Teams. Learning about these principles will help you to manage Microsoft Teams on a day-to-day basis and also help you to pass the MS-700 exam.
In this chapter, we're going to cover the following main topics:
- Understanding and assigning the Teams admin roles
- Managing retention and sensitivity policies for Microsoft Teams
- Setting up alerts for security and compliance in Microsoft Teams
- Understanding and implementing information barrier policies for Microsoft Teams
- Understanding the security reports available within Microsoft Teams
Technical requirements
In this chapter, you will need to have access to the Microsoft Teams admin center, which you can reach at https://admin.teams.microsoft.com. You will need to be a Global Administrator in order to carry out most of the steps covered in this chapter. However, the Compliance Administrator role will be enough for many of the activities described.
You will also need to be able to access Windows PowerShell to configure Information Barrier segments and policies.
Understanding and assigning the Teams admin roles
When configuring Microsoft Teams for your organization, it is necessary to understand and assign the appropriate administrator roles so that only authorized staff may configure user settings and features for Teams. It is important to only grant the access that is needed and no more.
To facilitate only the required level of administrative access, Microsoft Teams comes with five administrator roles, which can be assigned to the appropriate people in your organization who need to manage Teams workloads. These roles range from having full permissions, and subsets of permissions, to the features and settings that may be configured from the Microsoft Teams admin center and Windows PowerShell.
In this section, we will examine each of these roles and explain the tools and features that are available to those assigned to these roles.
The roles available are as follows:

Important note
The Global Administrator role within Microsoft 365 has all the same permissions and capabilities that are assigned to the Teams Service Administrator role.
So, now that you are aware of these available admin roles for Teams, let's look at how you can assign these roles to users in your organization.
Assigning Teams admin roles to users
To assign a Teams admin role to your users, you will need to connect to the Azure portal as a Global Administrator. In the following example, we will assign the Teams Communications Support Engineer role to a user named Adele Vance. This is achieved by completing the following steps:
- From the Azure portal at https://portal.azure.com, navigate to Azure Active Directory and then, under the Manage section, choose Users, as shown in Figure 5.1:

Figure 5.1 – Accessing users from the Azure portal
- Next, under Users | All users (Preview), we need to choose the user, and click to open it to assign the role to, which in this case is Adele Vance, as shown in Figure 5.2:
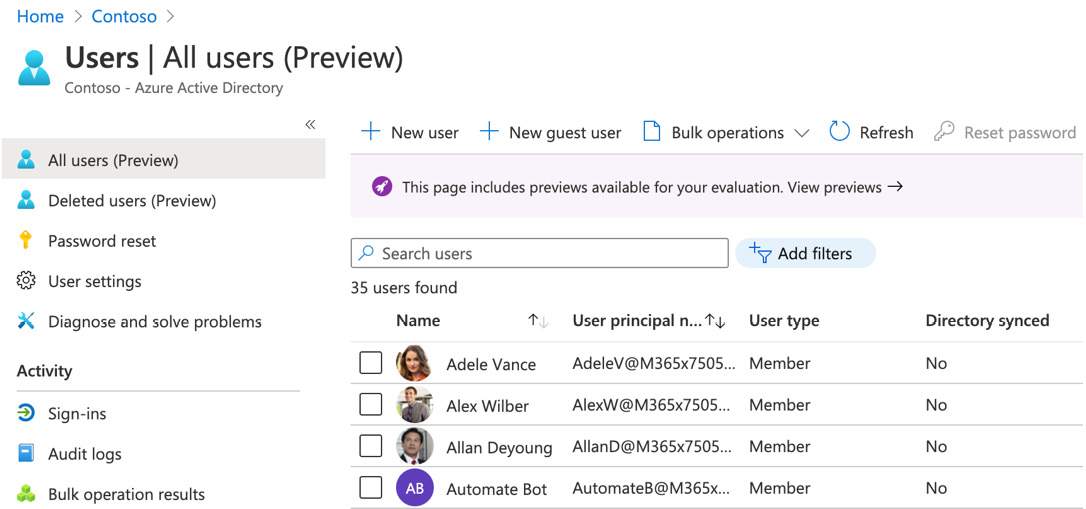
Figure 5.2 – Selecting the user to assign the role to
- Once you have clicked to open the user object, click on Assigned roles, as shown in Figure 5.3:
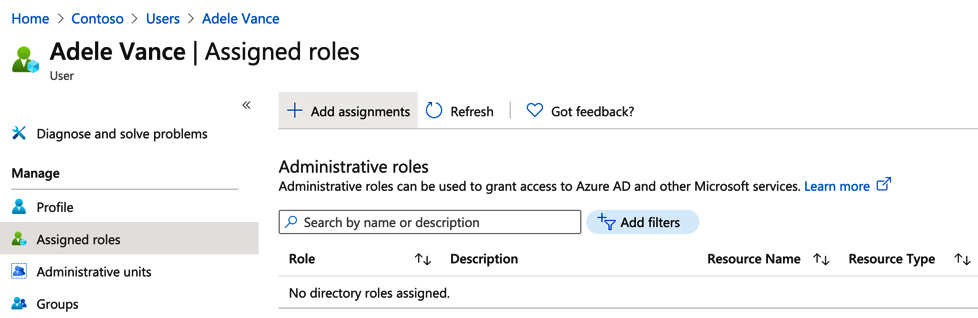
Figure 5.3 – Choosing Assigned roles from within the user object
- Click on + Add assignments and, in the Directory roles search box, type in "Teams" and hit Enter (you can also scroll through the full list of roles). The list of Teams admin roles is now as shown in Figure 5.4:
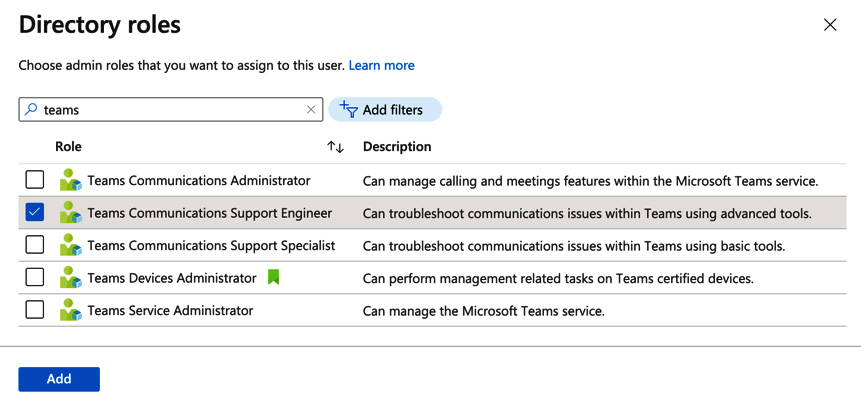
Figure 5.4 – Searching for directory roles
- Select the Teams Communications Support Engineer role and click on Add. The role will now be added to the user as shown in Figure 5.5:
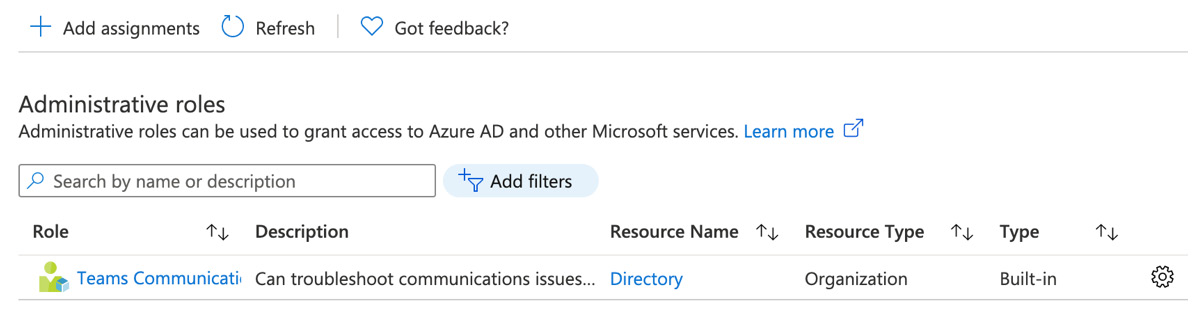
Figure 5.5 – The Teams Communications Support Engineer role added to the user
It is also possible to add a Teams admin role by using Windows PowerShell. This can be achieved by completing the following steps:
- Open PowerShell and run the following command to connect to Azure Active Directory (AD):
Connect-AzureAD
- Enter your Global Administrator credentials when prompted and you will be connected to Azure AD. In the following example, we will assign a user named Alex Wilber to the Teams Service Administrator role by running the following PowerShell commands:
$userName="[email protected]"
$roleName="Teams Service Administrator"
$role = Get-AzureADDirectoryRole | Where {$_.displayName -eq $roleName}
if ($role -eq $null) {
$roleTemplate = Get-AzureADDirectoryRoleTemplate | Where {$_.displayName -eq $roleName}
Enable-AzureADDirectoryRole -RoleTemplateId $roleTemplate.ObjectId
$role = Get-AzureADDirectoryRole | Where {$_.displayName -eq $roleName}
}
Add-AzureADDirectoryRoleMember -ObjectId $role.ObjectId -RefObjectId (Get-AzureADUser | Where {$_.UserPrincipalName -eq $userName}).ObjectID
- When executed, this is shown as displayed in Figure 5.6:
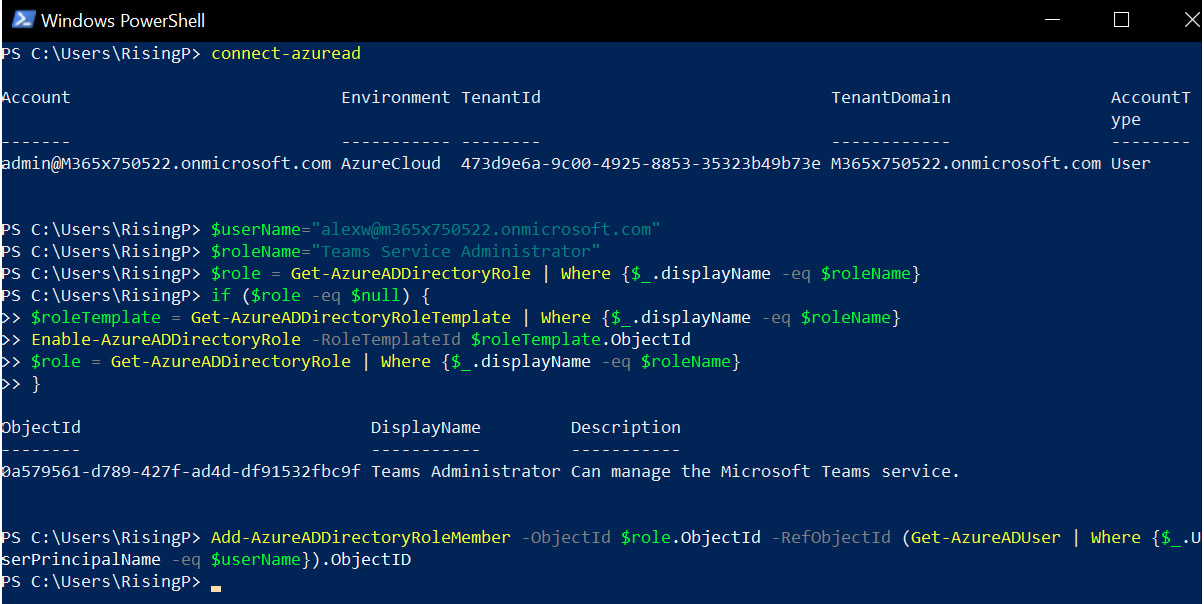
Figure 5.6 – Adding a Teams admin role to a user with Windows PowerShell
- Now, if we check Alex Wilber in the Azure portal, we can see the role assignment successfully applied as shown in Figure 5.7:
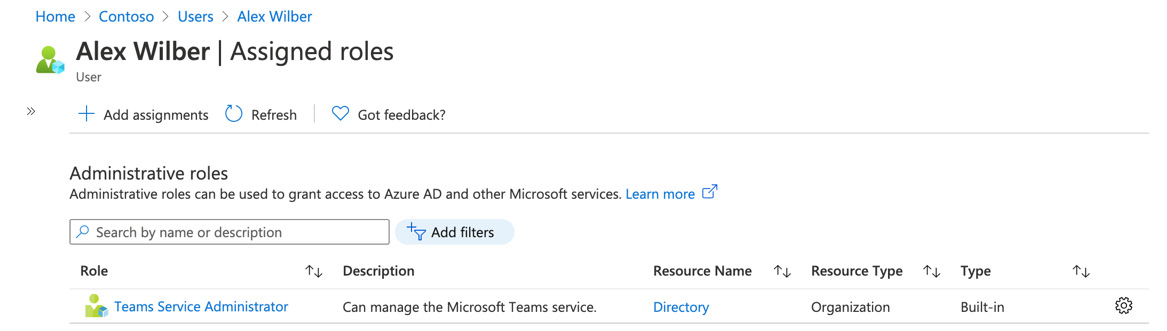
Figure 5.7 – Teams admin role successfully assigned to a user via PowerShell
So, to recap what you have learned in this section, we have introduced you to the five Teams admin roles that are available within Azure AD. We showed you how you can assign these roles to your users via the Azure portal, and by using Windows PowerShell.
Next, we will look at configuring retention and sensitivity policies for Microsoft Teams.
Managing retention and sensitivity policies for Microsoft Teams
In this section, we will show you how to configure retention policies and sensitivity labels for use with your Microsoft Teams deployment. Retention policies ensure that the information stored in your Microsoft 365 locations are appropriately retained or deleted based on industry regulations or internal policies. Sensitivity labels allow you to control access to your company data stored in Microsoft Teams to ensure that only authorized personnel can access this content. We will look at retention policies first.
Retention policies for Microsoft Teams
When you use retention policies with Microsoft Teams, the most important consideration is to determine your industry obligations and any internal policies that your organization has in place. This is to ensure that data is retained as long as required, but also not retained longer than it should be.
Teams retention policies enable you to do the following:
- Retain Teams chats and channel messages for a defined time period, and then take no action.
- Retain Teams chats and channel messages for a defined time period, and then delete the content.
- Delete Teams chats and channel messages following a defined time period.
Teams private chat messages are stored in an Azure-powered chat service and ingested to the user's Exchange mailbox for compliance, while Teams group chats are stored in the group mailbox.
When a user makes changes or deletes content within Teams chats or channels that is subject to a retention policy, a copy of the original content is saved to a hidden folder named Substrateholds, while the retention policy remains in effect.
While the retention policy remains in effect, the content may be searched for by compliance admins by using eDiscovery. Once the retention period passes, however, and the content is permanently deleted, it cannot be searched for.
Before you configure retention policies for Teams, it is important to be aware of the following limitations:
- Teams retention policies may not be configured together with other Microsoft 365 workload, such as Exchange Online, OneDrive, or SharePoint. They must be configured separately.
- Teams retention policies only work with standard Teams channels. Private channels are not supported.
- Advanced retention settings, such as keywords, are not supported.
- If one or more retention policies have conflicting settings, then retention will always win out over deletion.
To create a retention policy for Microsoft Teams, you will need to complete the following steps:
- Log in to the Microsoft Compliance center as a Global Administrator, a Compliance Administrator at https://compliance.microsoft.com, and navigate to Solutions | Catlog, as shown in Figure 5.8:

Figure 5.8 – Microsoft 365 Compliance center
- Under Information governance, click View:

Figure 5.9 – Information governance in the compliance center
- Next, click on Open solution:
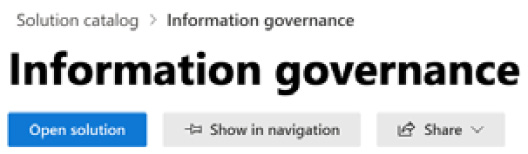
Figure 5.10 – Opening the information governance solution
- From the Information governance screen, select the Retention tab shown in Figure 5.11:
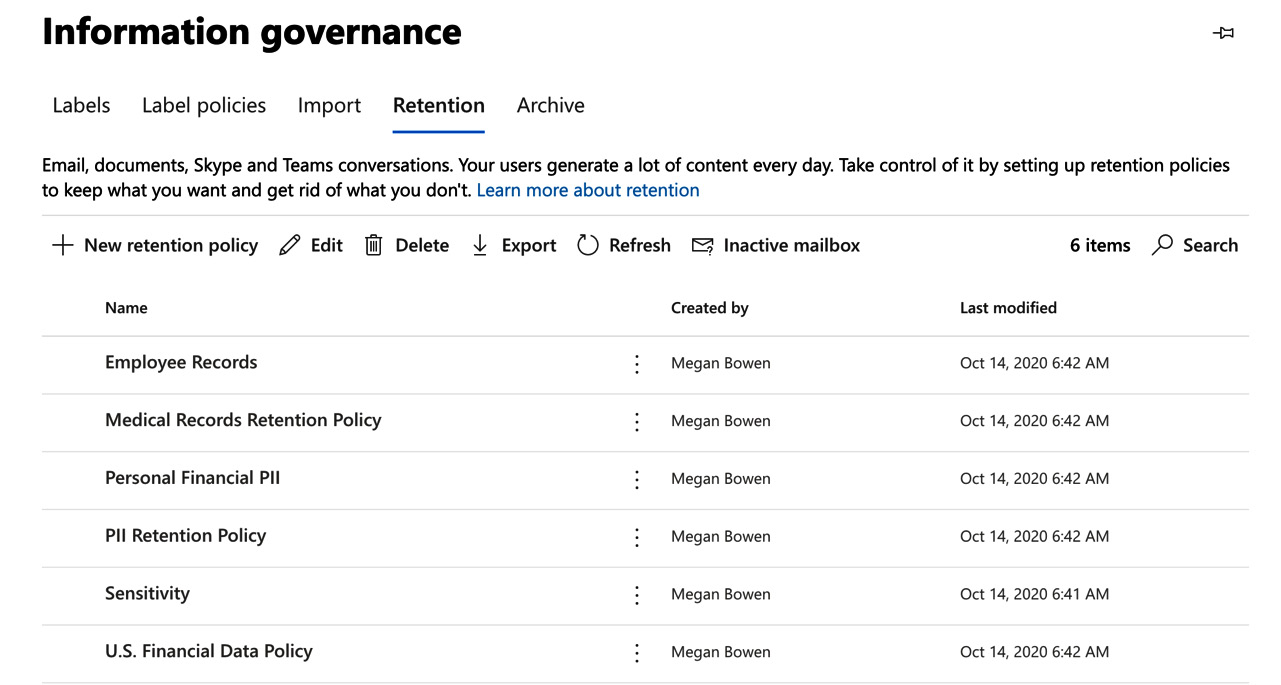
Figure 5.11 – Opening the retention tab
- Click on + New retention policy. Add a name and description for your retention policy. In this example, we will name the policy Teams retention policy, as shown in Figure 5.12:
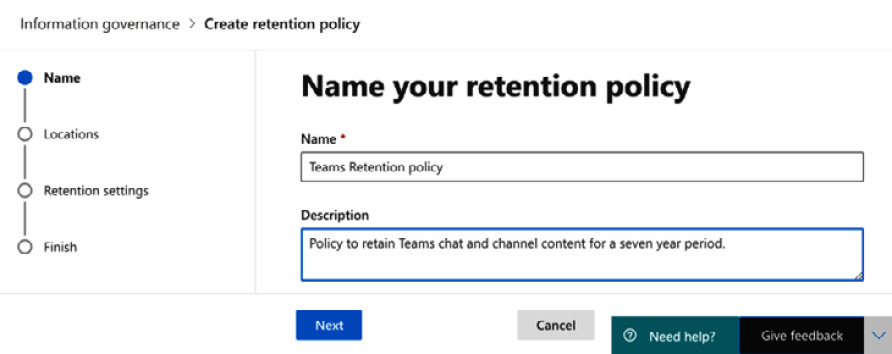
Figure 5.12 – Name your retention policy
- Click Next, and you will be taken to the choices for the Microsoft 365 service locations that you may include in your retention policy. You will note that when you select either or both of the Teams retention policies, all other locations are automatically toggled to Off. This is due to the fact that Teams retention policies may not coexist with other Microsoft 365 workloads in the same policy as we described earlier in this chapter.
For this example, we will select both Teams channel messages and Teams chats. These could be selected in separate policies if required. It is also possible to filter the Teams that will be targeted by the policy. However, in this example, we will leave All Teams selected for the policy, as illustrated in Figure 5.13:
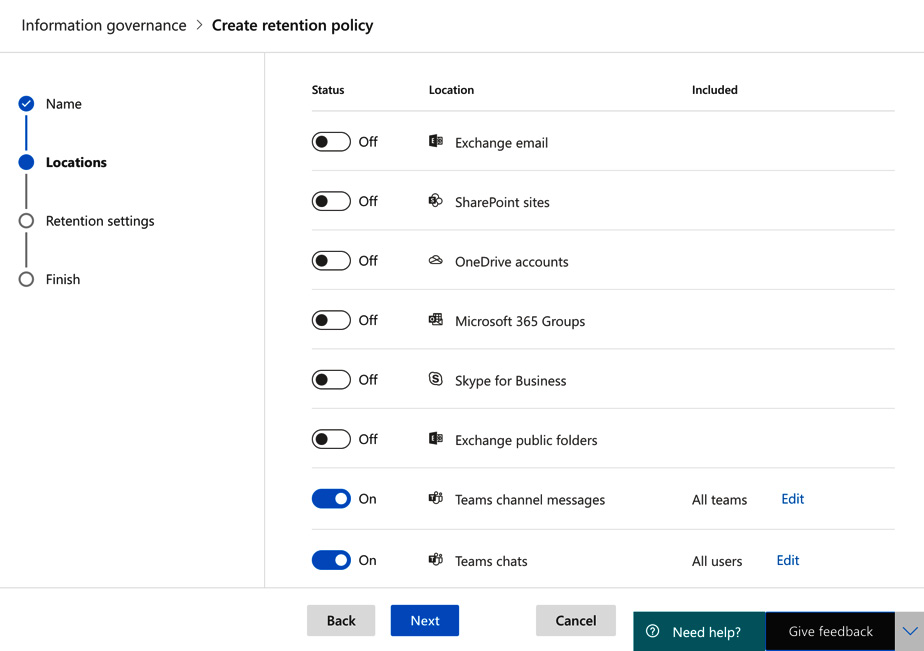
Figure 5.13 – Choosing locations for your retention policy
- Click Next. Now we can choose our retention settings. In this example, we will set the policy to retain items for a 7-year period and then delete the content automatically. This is shown in Figure 5.14:
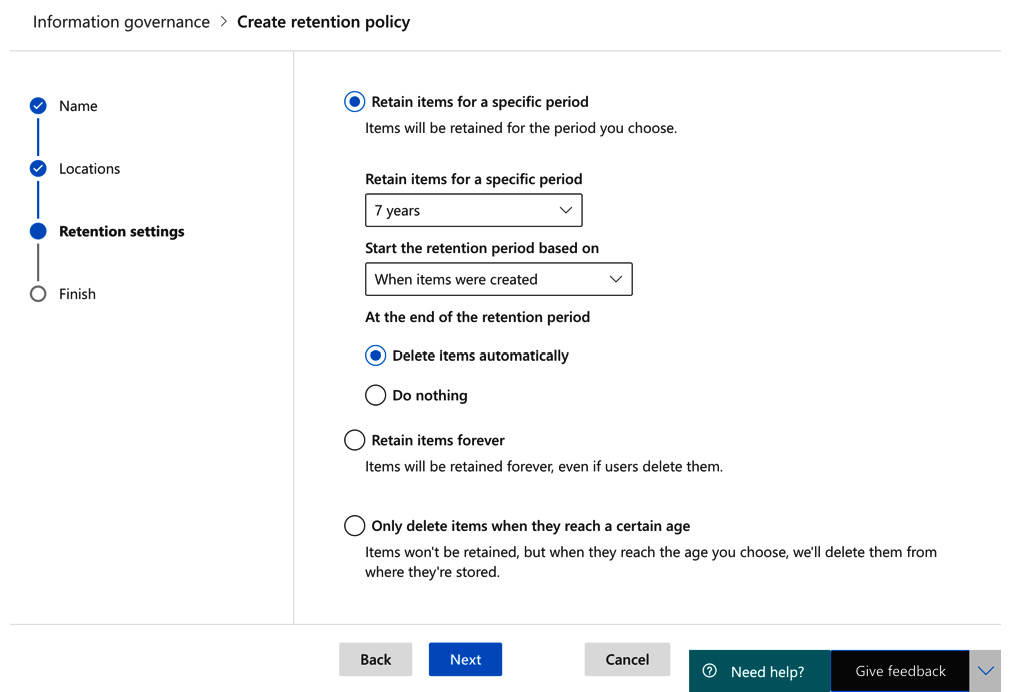
Figure 5.14 – Retention settings
- Click Next. Now we can review the settings. Figure 5.15 shows the settings we have configured, along with a warning that content will be automatically deleted after the retention period:

Figure 5.15 – Reviewing and finishing configuring the retention policy
- Click Submit. Then, click Done, as shown in Figure 5.16:
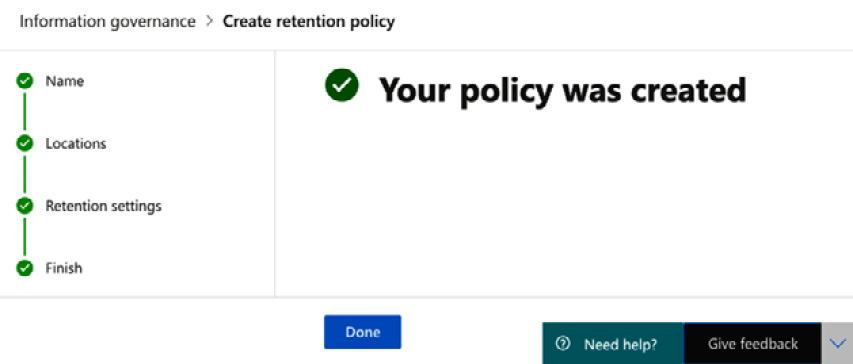
Figure 5.16 – The policy has been created
So, our policy has now been successfully created, and will retain items within Teams chat and channel messages for 7 years, based on when the items were created. At the end of the retention period, the content will be automatically deleted.
Important note
Any files that are shared in private chats will be stored in OneDrive for the user who shared the file. In addition, if users upload any files to a channel chat, these will be stored in the SharePoint site for that team. To retain such content, you must also create retention policies for OneDrive and SharePoint Online.
Next, we will look at sensitivity labels.
Sensitivity labels
When sensitivity labels are applied to a team, the collaborative content within the team is regulated to ensure that only authorized users may gain access. Sensitivity labels are created from the Microsoft 365 Compliance center. In the following example, we will create and publish a label that will apply to all users in the organization and select the group and site settings so that the label may be applied to a team.
Important note
The following steps include instructions relating to groups and sites in relation to sensitivity labels. Sensitivity labeling for sites and groups is not enabled by default. This must be explicitly enabled in Microsoft 365 tenants. More details on this can be found at the end of this chapter in the Further reading section.
To do this, we need to complete the following steps:
- Log in to the compliance center at https://compliance.microsoft.com as a Global Administrator, a Compliance Administrator, a Compliance Data Administrator, or as a Security Administrator. From Solution catalog, which we accessed earlier to create our retention policy, this time choose the Information protection section and then click View:
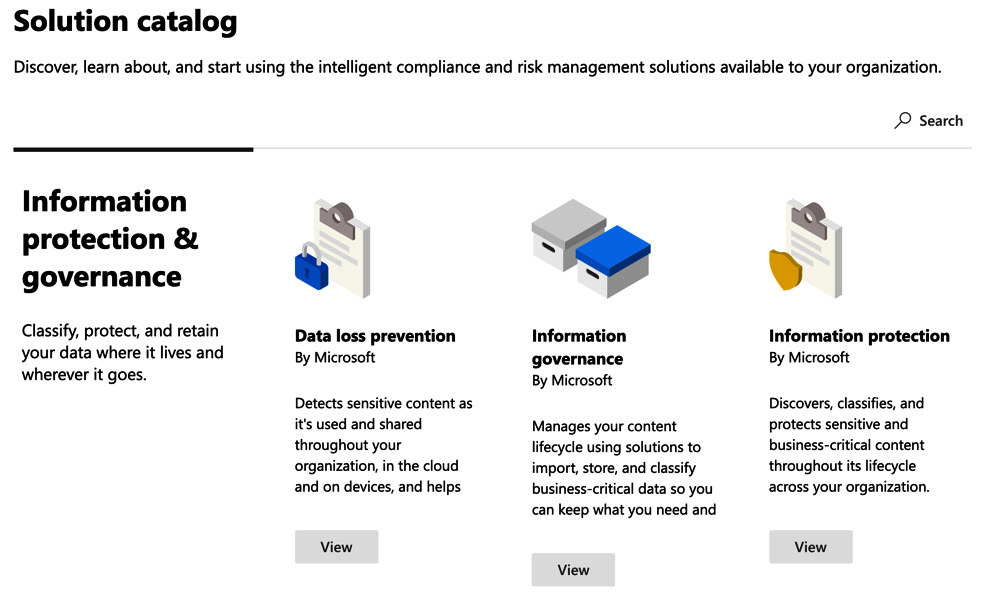
Figure 5.17 – Selecting information protection from the compliance center
- Click on Open solution, as shown in Figure 5.18:

Figure 5.18 – Opening the Information protection solution from the compliance center
- This will take you to the Labels section, as shown in Figure 5.19. We can see that in the demo tenant we are using in this example, there are some labels already configured. If you are working in a production tenant, you will need to create some labels. In this example, we will modify the Public label to configure it for use with Groups & Sites so that it may be used with Microsoft Teams:
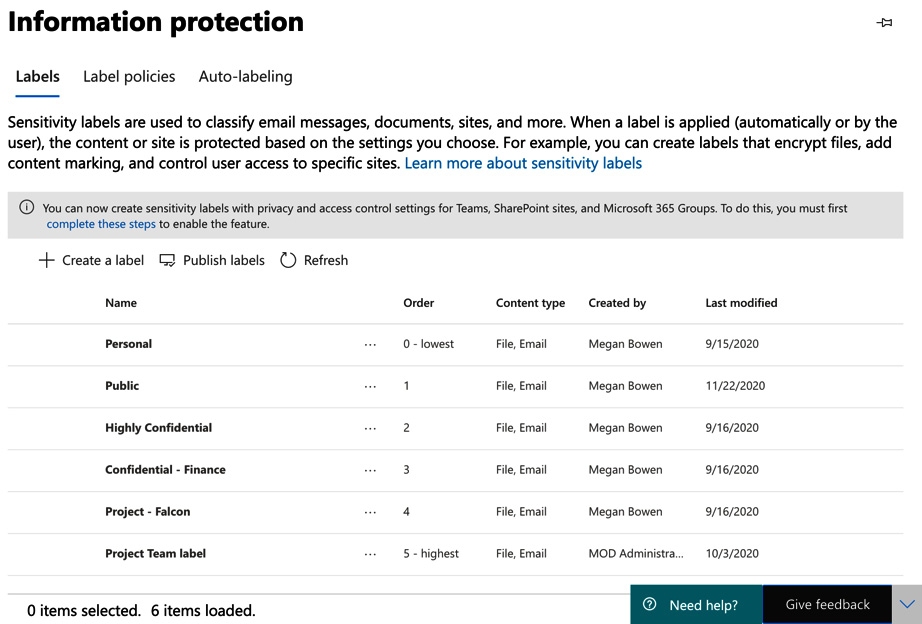
Figure 5.19 – Labels in the compliance center
- Click on the Public label and then keep clicking Next until you reach the Scope | Groups & sites section where you will see Define the scope for this label:

Figure 5.20 – Defining the scope for this label
- Click Next and then select the checkboxes next to the privacy and device access settings as shown in Figure 5.21:

Figure 5.21 – Selecting the privacy and device access checkboxes
- Click Next, and here we will set the privacy level for the label to be Public:
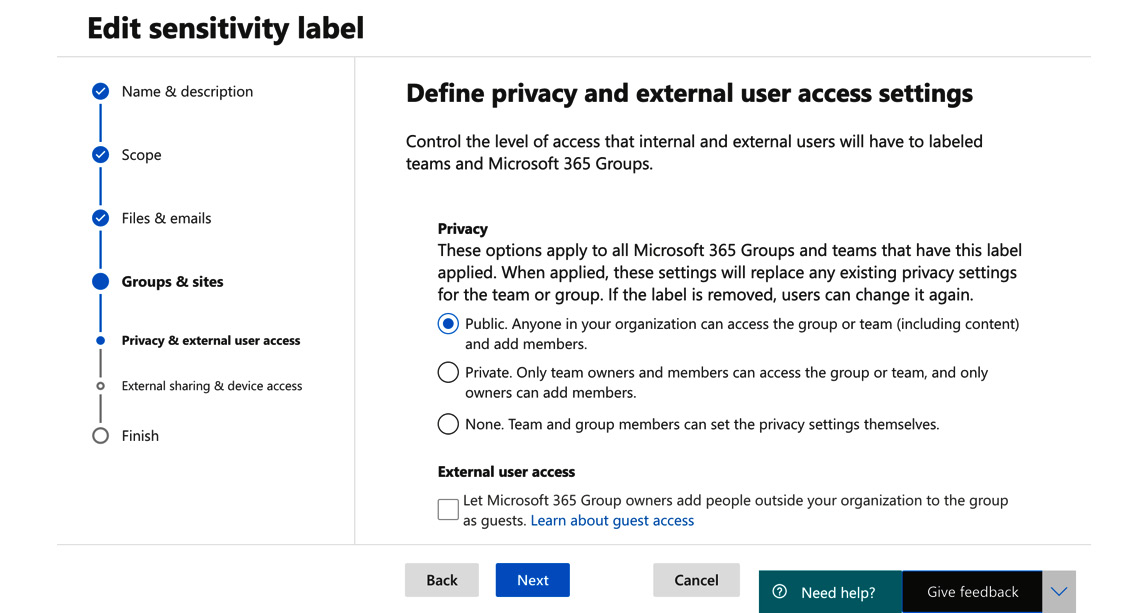
Figure 5.22 – Setting the privacy level for the label
- Under Define external sharing and device access settings, we will choose the Allow full access from desktop apps, mobile apps, and the web option:
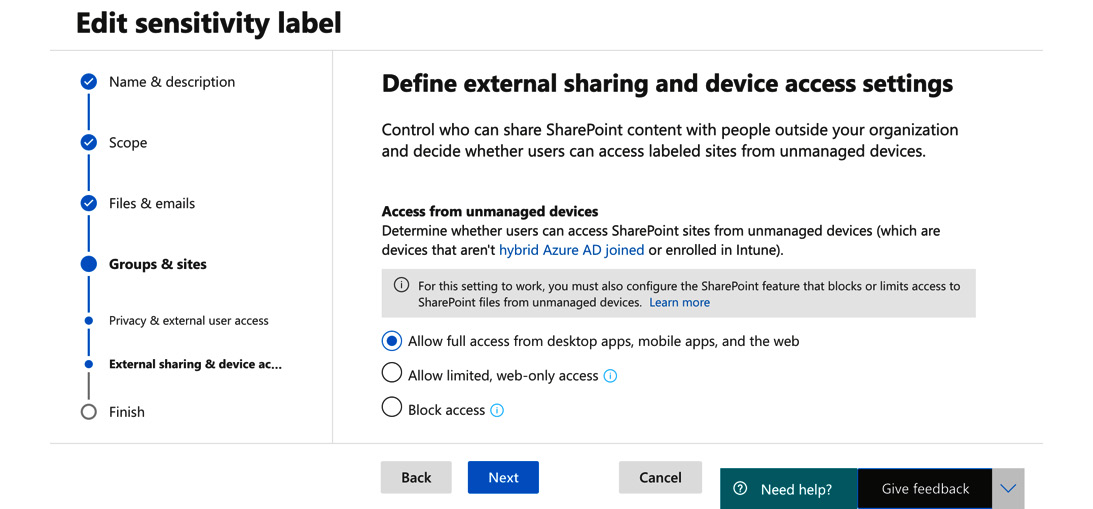
Figure 5.23 – Setting external sharing and device access settings
- Click Next and complete the label wizard to save your changes.
Now that we have amended our label, the next step is to apply it to a team. You can do this by creating a new team or editing an existing team. In this example, we will set up a new team by completing the following steps:
- Log in to Microsoft Teams and select Join or create a team | Create a Team | From Scratch. For this example, we will choose the option of a Public team. We also have the option to set a sensitivity label for our team. In Figure 5.24, the sensitivity label has been set to Public by selecting it from the drop-down option:
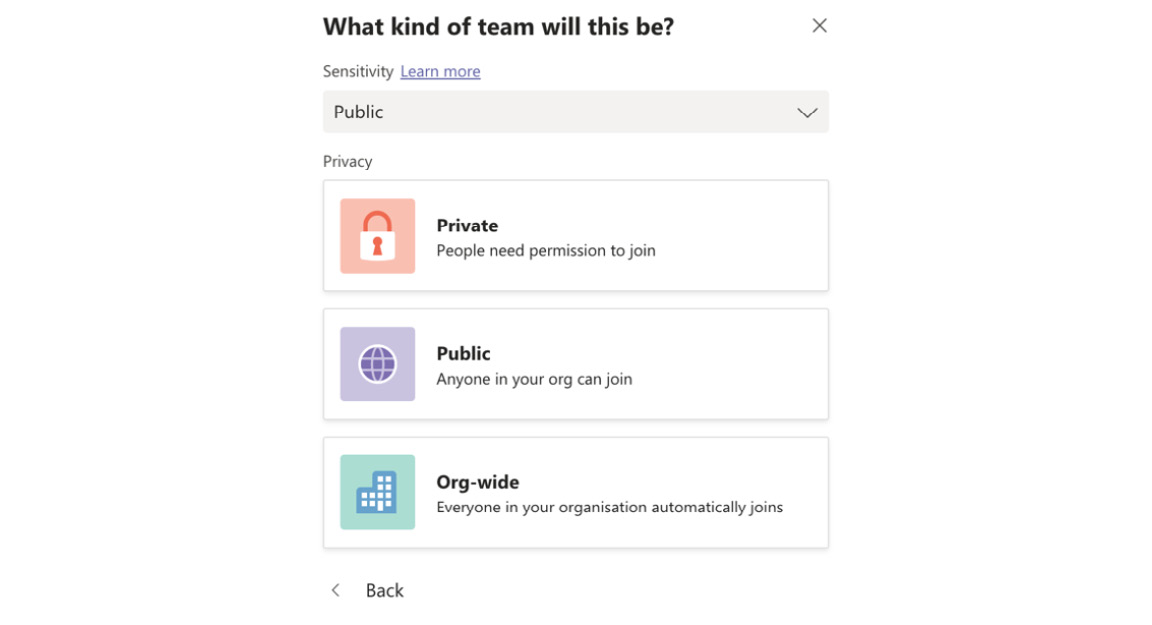
Figure 5.24 – Choosing a sensitivity label and privacy option for the team
- Once the team has been created, you will note that the label assigned to the team is shown in the top-right corner next to the Meet button:

Figure 5.25 – Sensitivity label for the team shown in the General channel
In this section, we examined the principles of applying retention policies and sensitivity labels in Microsoft Teams. We created a retention policy and a sensitivity label.
Next, we will look at how you can set up alerts for security and compliance within Microsoft Teams.
Setting up alerts for security and compliance in Microsoft Teams
As a Microsoft Teams administrator, you will need to regularly monitor your environment to ensure that user activities are in line with the policies and settings that you have put in place. To do this, you can create alert policies from the Microsoft 365 Security & Compliance Center. You can monitor for activities, such as when teams were created or deleted, or when the settings of a team have been modified.
Important note
In the following steps, we will use the security and compliance center. However, the audit log search may now also be carried out from the compliance center at https://compliance.microsoft.com.
This can be achieved by completing the following steps:
- Log in to the security and compliance center at https://protection.office.com and navigate to Search | Audit log search:

Figure 5.26 – Audit log search in the security and compliance center
- Under the search option, type in the word "Team" and by clicking to show the results for all activities, you will see all the alert options available to you for Microsoft Teams, as shown in Figure 5.27. We will choose the Created team option in this example:
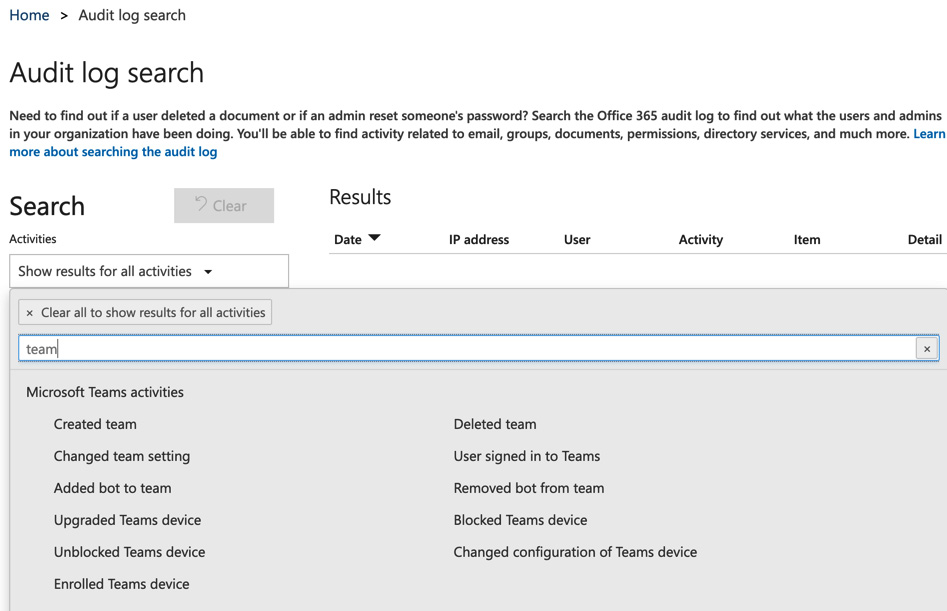
Figure 5.27 – Microsoft Teams activities in the audit log search
- Once you have selected Created team, and clicked to get out of the search area, select + New alert policy, as shown in Figure 5.28:
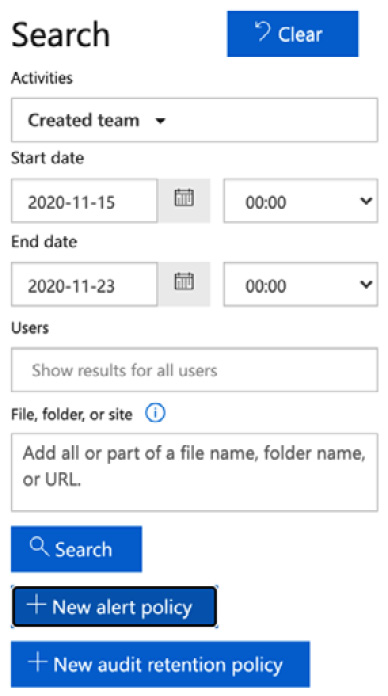
Figure 5.28 – Choosing + New alert policy
- Next, we need to provide a name and description for our alert policy, setting it to Send this alert when… and the activity to Created team. For this example, we will leave the Users field set to Show results for all users:
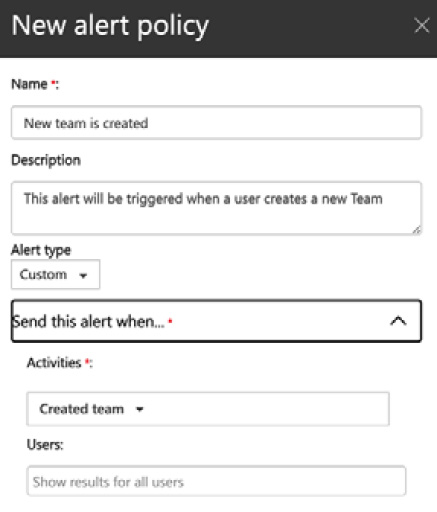
Figure 5.29 – Settings for a new alert policy
- Scroll down further, and you can set the recipients for the alert policy as shown in Figure 5.30:

Figure 5.30 – Settings for a new alert policy
- Click Save. The saved alert policy can be viewed by clicking on Activity alerts, as shown in Figure 5.31:
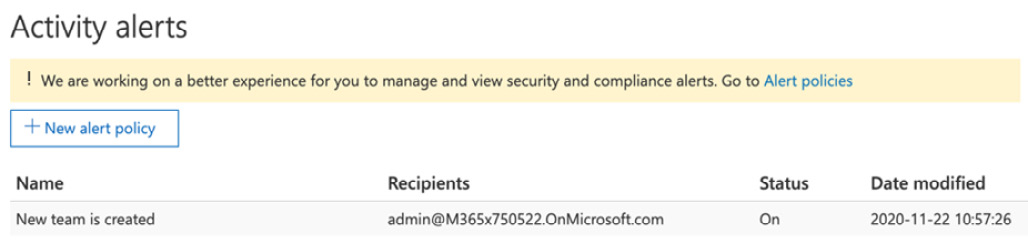
Figure 5.31 – New alert policy shown in the Activity alerts section
The result of this is that when a new team is created by any user in the organization, an alert will be sent to the recipients chosen in the alert policy.
In this section, we have shown you how to set up alert policies for activities related to Microsoft Teams. Next, we will talk about implementing information barrier policies.
Understanding and implementing information barrier policies for Microsoft Teams
Information barriers may be configured in Microsoft 365 if you have departments or individuals who must be prevented from communicating with one another, or even prevented from finding each other in lookups. To configure information barrier policies, we need to use PowerShell commands from the Microsoft 365 compliance center, and you must have one of the following admin roles assigned to you:
- Global administrator
- Compliance administrator
- IB compliance management
In the following example, we will create two information barrier segments called Retail and Marketing. These segments will refer to the department field for all user objects to determine which users will be affected. We will then create an information barrier policy to prevent users in the retail department from communicating with users in the marketing department.
In order to configure information barriers for Microsoft Teams, we need to complete the following steps:
- Log in to the Teams admin center and navigate to Org-wide settings | Teams settings. Scroll down to Search by name and set the Scope directory search using an Exchange address book policy option to On. Then, click Save:

Figure 5.32 – Setting up a scoped directory search in the Teams admin center
- Next, we have to create two information barrier segments for the departments we wish to keep separate. This is achieved by running the following PowerShell commands to connect to Security and Compliance PowerShell:
$UserCredential = Get-Credential
$Session = New-PSSession -ConfigurationName Microsoft.Exchange -ConnectionUri https://ps.compliance.protection.outlook.com/powershell-liveid/ -Credential $UserCredential -Authentication Basic -AllowRedirection
Import-PSSession $Session -DisableNameChecking
- Now that we are connected to Security and Compliance PowerShell, we need to create our information barrier segments as follows:
New-OrganizationSegment -Name "Retail" -UserGroupFilter "Department -eq 'Retail'"
The preceding command sets up an information barrier segment called Retail. We now have to repeat this process and create another segment called Marketing.
The results of these PowerShell inputs are shown in Figure 5.33:
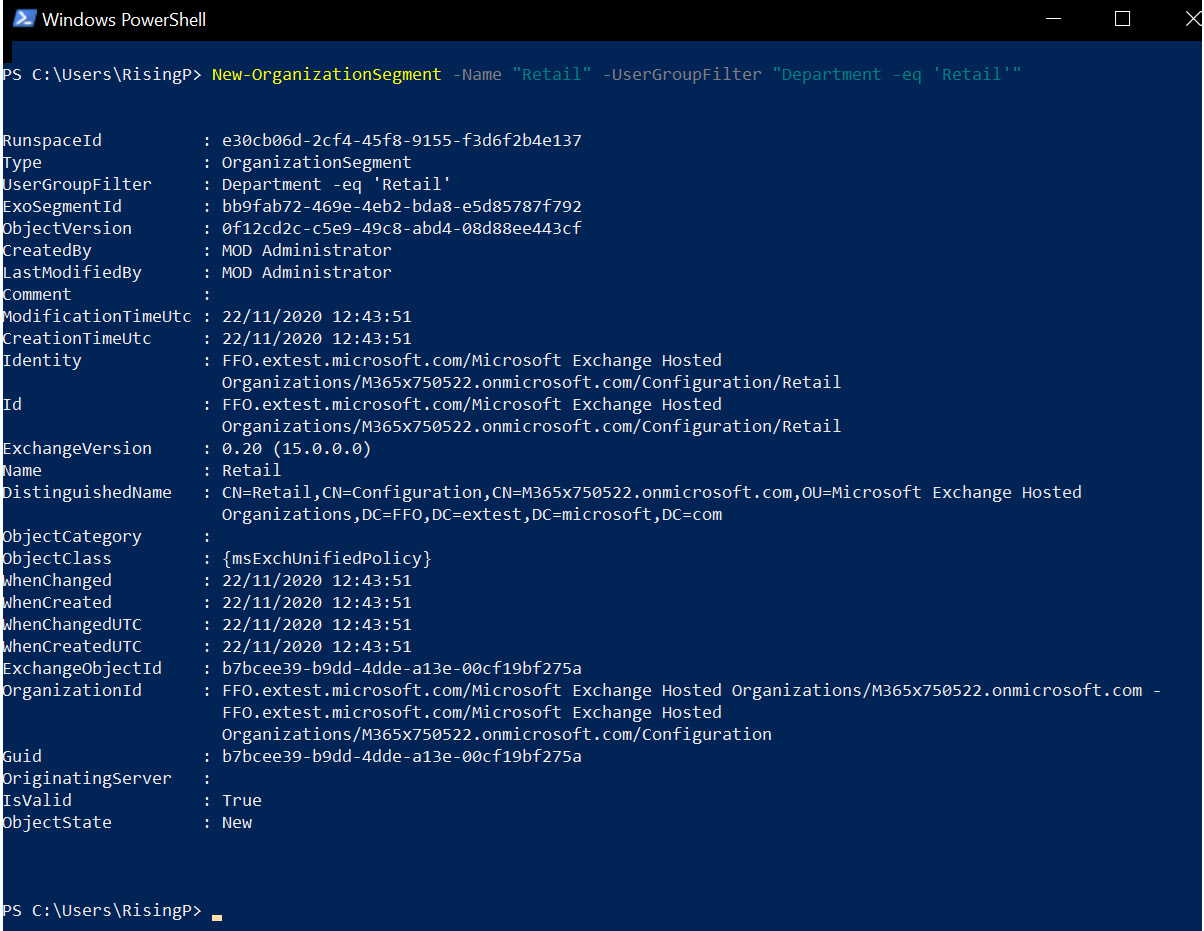
Figure 5.33 – Configuring information barrier segments
- Now that we have our two segments configured, we can create our information barrier policy to prevent these two departments from communicating with each other:
New-InformationBarrierPolicy -Name "Retail-Marketing" -AssignedSegment "Retail" -SegmentsBlocked "Marketing" -State Inactive
The execution of the preceding command is shown in Figure 5.34:
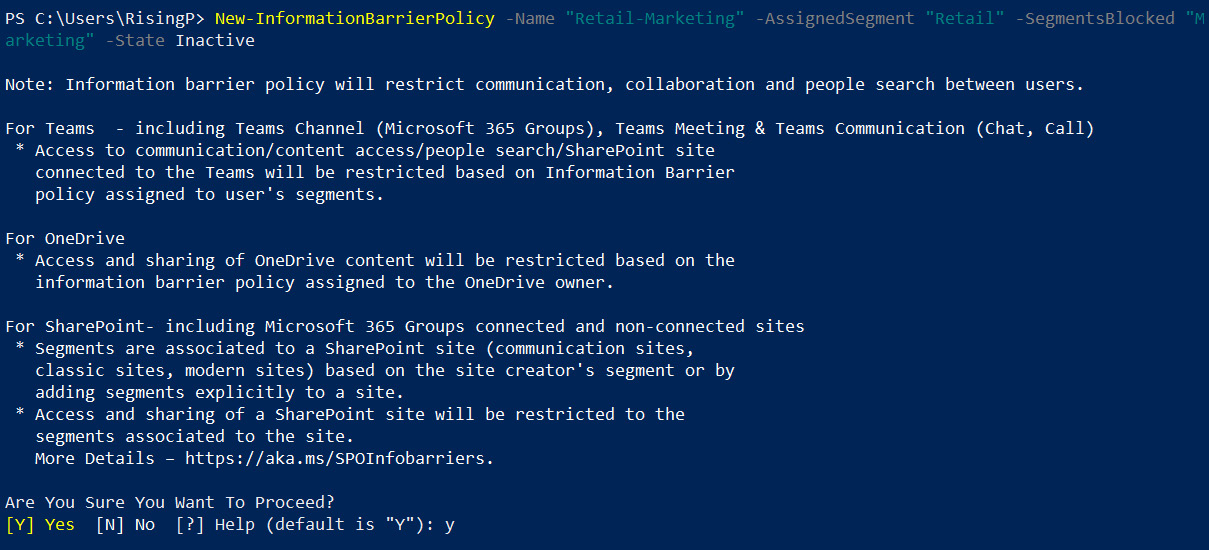
Figure 5.34 – Setting up a new information barrier policy
- Press Y to confirm that you wish to proceed:
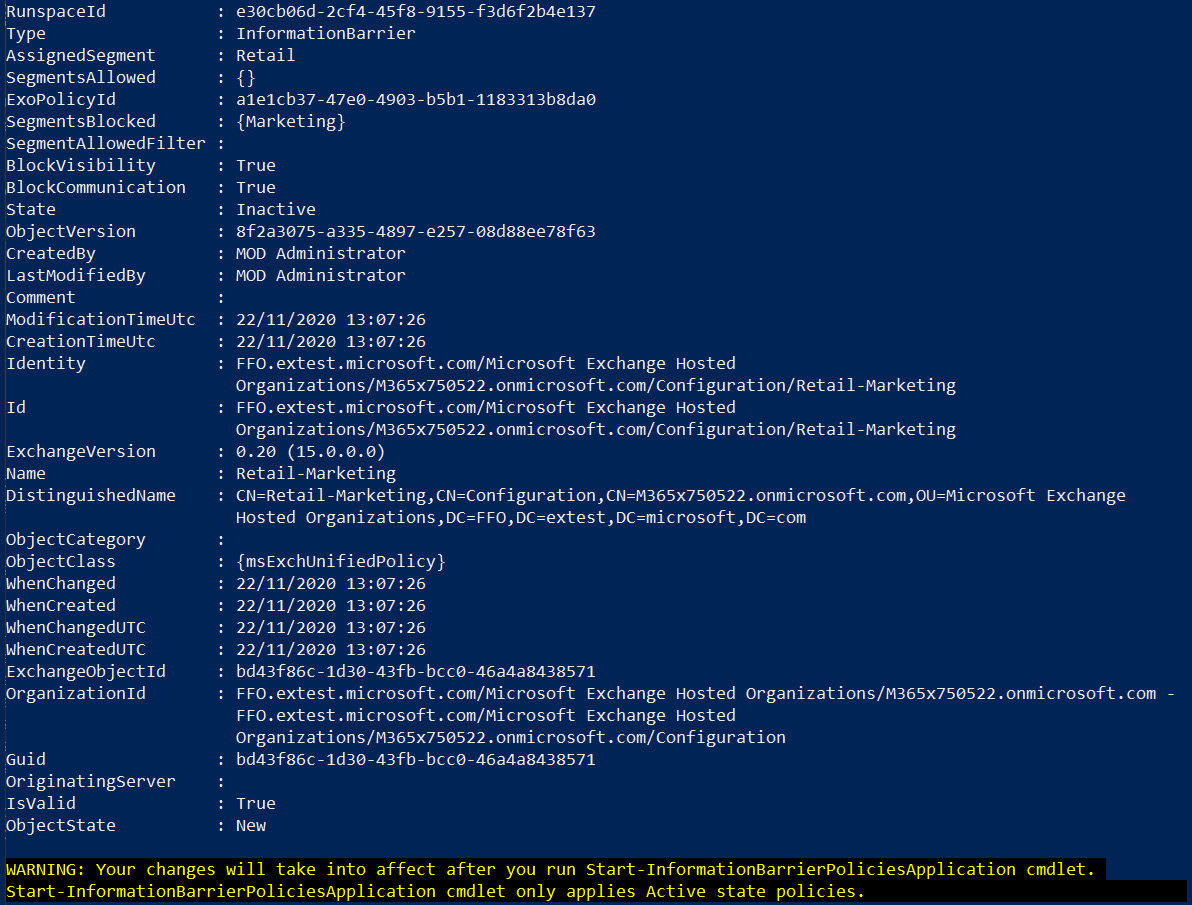
Figure 5.35 – New information barrier policy created
- Finally, run the following command to apply the information barrier policy settings:
Start-InformationBarrierPoliciesApplication
The execution of this command is shown in Figure 5.36:
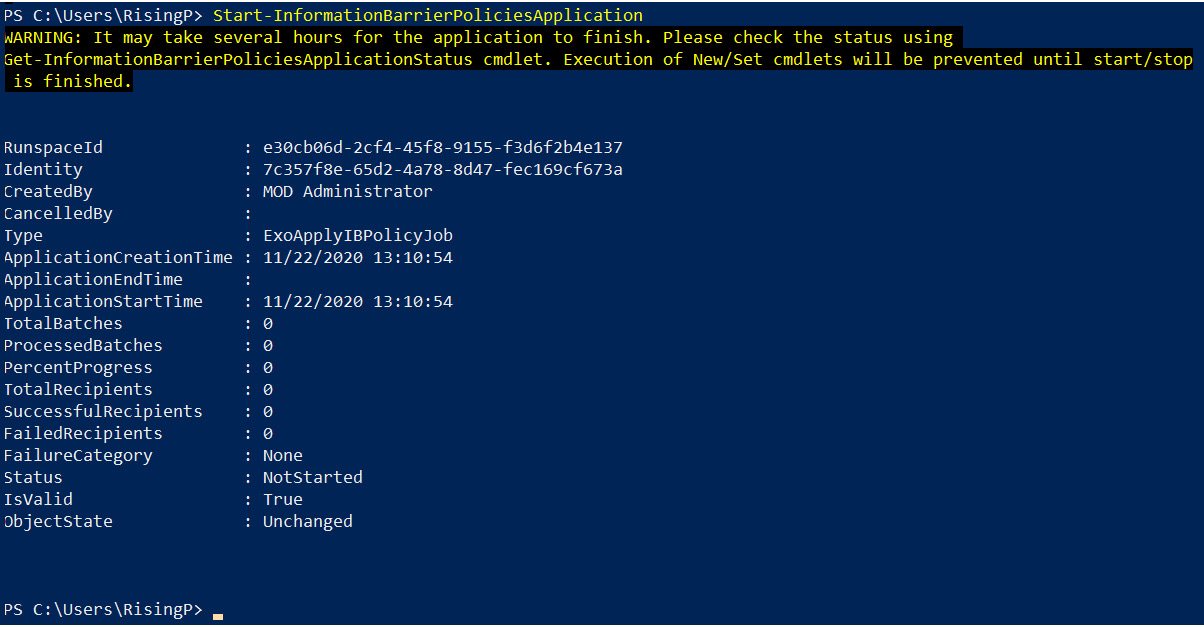
Figure 5.36 – Starting the information barrier policies application
- Once you have completed the aforementioned steps, it will be several hours before the settings applied take effect. Once successfully applied, users with department attributes that match the information barrier segments will not be able to search for each other in Teams, as shown in Figure 5.37:

Figure 5.37 – A user cannot be found in Teams due to an information barrier being applied
It is also possible to apply multiple segments to an information barrier policy, as well as explicitly allowing just one segment to be able to communicate with another segment.
In this section, we introduced you to the principles of information barriers in Microsoft Teams. We showed you how to create segments based on Azure AD attributes and then create policies that define which segments can communicate with each other.
In the final section of this chapter, we will examine the security reports available within Microsoft Teams.
Understanding the security reports available within Microsoft Teams
The Teams admin center includes many reports that you can access from the Analytics & reports menu. In this section, we will show you how to access these reports and explain their functions.
In order to access these reports, you must have one of the following admin roles assigned to you:
- Global administrator
- Teams service administrator
- Skype for Business administrator
We can access these reports by completing the following steps:
- Log in to the Teams admin center and navigate to Analytics & reports | Usage reports, as shown in Figure 5.38:
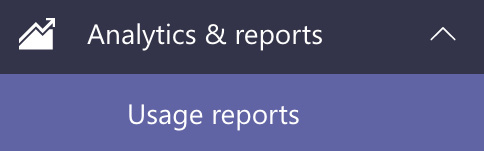
Figure 5.38 – Analytics & reports in the Teams admin center
- You will now see the options shown in Figure 5.39:
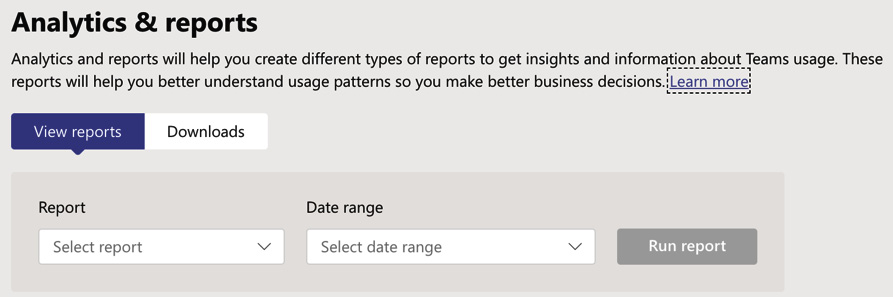
Figure 5.39 – Viewing the available reports
- Click on the dropdown under Report and choose the report you wish to run:

Figure 5.40 – Available reports
- In this example, we will choose the Teams user activity report, and select a date range of 90 days. There are two other date range options you can select. These are 7 days and 30 days (however, other available reports have different date range options). With these settings selected, we then need to click on Run report:
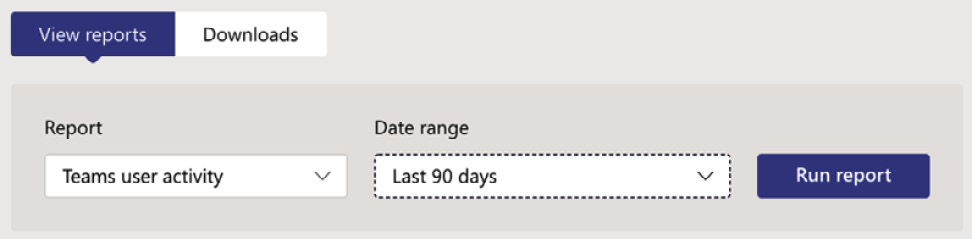
Figure 5.41 – Running a report
- The report is run and displayed immediately in graph format, as shown in Figure 5.42:
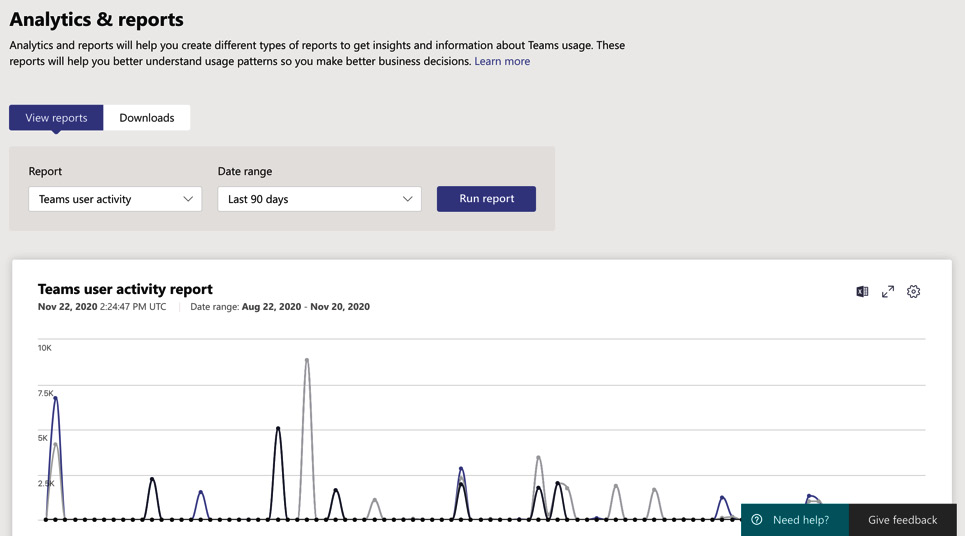
Figure 5.42 – Viewing the report results
- At the top right of the report, you have three options. These are Export to Excel, Full Screen, and Edit Columns:

Figure 5.43 – Report view options
- Selecting the Export to Excel option will make the report available to you in the Downloads tab, as shown in Figure 5.44:
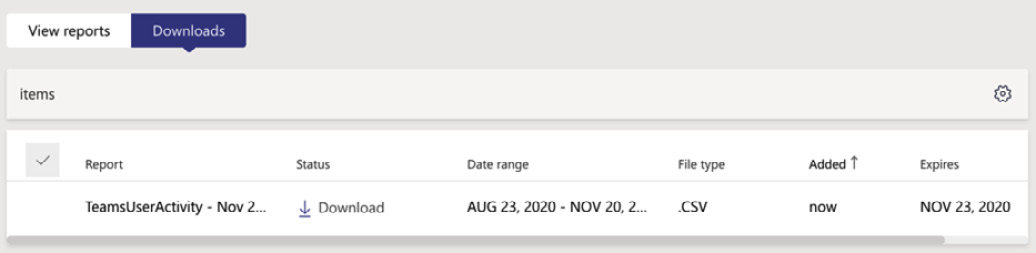
Figure 5.44 – Report download completed
Important note
The Live event usage report is not one that can be exported.
The reports available within the Analytics & reports section are described as follows:

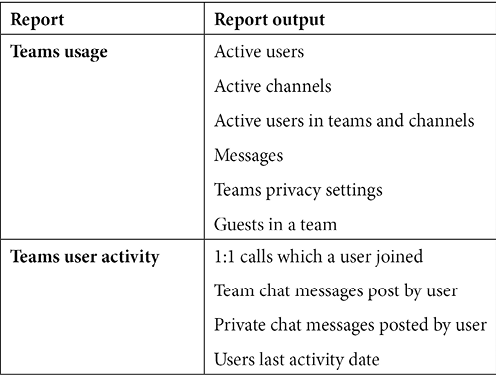
The preceding reports will provide invaluable information to Teams administrators about usage and activity within their environment.
In this section, we showed you how to access the available reports for Teams within the Teams admin center. You learned how to access these reports from the Analytics & reports section, and we showed you a description of what each report does.
Summary
In this chapter, we have introduced you to the principles of managing the security and compliance settings for Microsoft Teams. You learned that there are several admin roles for Teams that can be assigned to users in your organization depending on their roles. We showed you how to view and assign these roles from the Teams admin center.
You also learned about retention policies and sensitivity labels and how to use the compliance center to configure these for Teams workloads.
In addition, we demonstrated how to configure alert policies for Microsoft Teams activities, and how information barriers can be used to set up segments based on Azure AD attributes to ensure that departments in your organization that should not be allowed to communicate would not be able to search for each other within Teams.
Finally, we explained the available security reports within Microsoft Teams and how to access and run these reports from the Analytics & reports section of the Teams admin center.
In the next chapter, we will show you how to manage devices to use Microsoft Teams. This will include deploying the Teams client to devices such as Windows, virtual desktops, macOS, and mobile devices. You will also learn how to manage the settings, which are deployed to these devices by setting up configuration profiles. Finally, we will examine the subject of Teams Rooms and show how to configure Teams Rooms devices and Collaboration bars.
Questions
As we conclude, here is a list of questions for you to test your knowledge regarding this chapter's material. You will find the answers in the Assessments section of the Appendix:
- Which of the following is not a Teams admin role?
a. Teams service administrator
b. Teams device administrator
c. Teams communications administrator
d. Teams device support engineer
- True or false: The Teams service administrator has access to all features and settings within the Teams admin center.
a. True
b. False
- Where would you go to configure alert policies for Microsoft Teams?
a. The security center
b. The compliance center
c. The security and compliance center
d. The Microsoft 365 admin center
- True or false: Sensitivity labels cannot be configured for use with Microsoft Teams.
a. True
b. False
- Which of the following best describes information barriers?
a. They prevent users from communicating with external users.
b. They prevent users from communicating with other users by configuring information barrier segments.
c. They prevent users from using information protection features.
d. They prevent users from using information governance features.
- Which of the following is not a possible action of a retention policy?
a. Retain, then delete.
b. Retain, then do nothing.
c. Delete after a dynamically determined time period.
d. Delete after a defined time period.
- True or false: Retention policies for Teams can be set up in the same policy as other Microsoft 365 workloads.
a. True
b. False
- Which of the following is a possible action after running a report from the Teams admin center?
a. Download the report and export to Power BI.
b. Download the report and export to Excel.
c. Download the report and export to PDF.
d. Download the report and export to a TXT file.
- True or false: Retention policies can be applied to private channels in Teams.
a. True
b. False
- What is the least privileged Teams admin role that can be used to configure meeting policies and meeting settings?
a. Teams service administrator
b. Teams communications administrator
c. Teams communications support engineer
d. Teams communications support specialist
Further reading
- Using Microsoft Teams administrator roles to manage Teams: https://docs.microsoft.com/en-us/MicrosoftTeams/using-admin-roles
- Retention policies in Microsoft Teams: https://docs.microsoft.com/en-us/microsoftteams/retention-policies
- Sensitivity labels for Microsoft Teams: https://docs.microsoft.com/en-us/microsoftteams/sensitivity-labels
- Configuring sensitivity labels for Groups, Teams, and SharePoint sites: https://docs.microsoft.com/en-us/microsoft-365/compliance/sensitivity-labels-teams-groups-sites?view=o365-worldwide
- Alert policies in the security and compliance center: https://docs.microsoft.com/en-us/microsoft-365/compliance/alert-policies?view=o365-worldwide
- Information barriers in Teams: https://docs.microsoft.com/en-us/microsoftteams/information-barriers-in-teams
- Defining information barrier policies: https://docs.microsoft.com/en-us/microsoft-365/compliance/information-barriers-policies?view=o365-worldwide
- Teams analytics and reports: https://docs.microsoft.com/en-us/microsoftteams/teams-analytics-and-reports/teams-usage-report
- Microsoft Teams activity reports: https://docs.microsoft.com/en-us/microsoftteams/teams-activity-reports
- Microsoft Teams analytics and reporting: https://docs.microsoft.com/en-us/microsoftteams/teams-analytics-and-reports/teams-reporting-reference