
Chapter 1: Planning Your Migration to Microsoft Teams
If you are planning to start using Microsoft Teams within your organization, there is a strong chance that you will be upgrading from Skype for Business. If this is the case, then it is critical to plan your upgrade to Teams in a diligent and thorough manner in order to ensure a seamless transition for your users. In this chapter, we will explain the principles of upgrading from Skype for Business to Microsoft Teams.
We will demonstrate the concepts of coexistence modes within Teams, and how to choose an appropriate upgrade path. This will include an explanation of the differences between coexistence mode at the organizational level and per-user level. We will also explain the process of migrating Skype for Business meetings to Teams using the Meeting Migration service, along with how to set Teams upgrade notifications and meeting application choices.
In this chapter, we're going to cover the following main topics:
- Planning an upgrade path and coexistence mode from Skype for Business
- Understanding coexistence mode at both the organization and per-user level
- Configuring the Meeting Migration Service to migrate Skype for Business meetings to Teams
- Setting the Microsoft Teams upgrade notifications and default apps while in coexistence mode
Technical requirements
In this chapter, you will need to have access to the Microsoft Teams Admin Center, which you can reach at https://admin.teams.microsoft.com. You will need to be either a Global Administrator or a Teams Service Administrator in order to have full access to the features and capabilities within the Teams admin center.
You will also need to be able to connect to the Skype for Business Online PowerShell in order to run the commands required to configure hybrid connectivity between Skype for Business on-premises (if you have one) and your Microsoft 365 environment.
Planning an upgrade path and coexistence mode from Skype for Business
Skype for Business Online will reach its end of life on July 31, 2021. Because of this, many organizations will need to plan how they are going to introduce and transition to Microsoft Teams. There is the option to complete this journey gradually by running Skype for Business and Teams alongside each other for a time, or by moving fully to Teams.
In this section, we will help you to understand the methods and tools that are key to a successful transition, and the principles of coexistence between Skype for Business and Microsoft Teams.
Choosing your upgrade path
The steps required to complete your migration to Microsoft Teams are largely dependent on which version of Skype for Business you are currently running in your organization. If you are running Skype for Business Online, then you will need to complete a coexistence mode setup with Teams.
However, should you be running Skype for Business on-premises, the process is more complex and requires not only setting up coexistence, but first establishing hybrid connectivity with your Microsoft 365 environment. This is required because Skype for Business on-premises users must be moved to the cloud in order to function correctly during the subsequent coexistence mode setup.
Understanding hybrid connectivity
In order to configure hybrid connectivity between your Skype for Business on-premises environment and Microsoft Teams, there are three key steps that need to be completed. These are as follows:
- Federate your on-premises Edge service with Microsoft 365. This will allow your on-premises users to communicate with your Microsoft 365 users. To enable federation, you need to run the following command from the Skype for Business Server Management Shell:
Set-CSAccessEdgeConfiguration -AllowOutsideUsers $True -AllowFederatedUsers $True -EnablePartnerDiscovery $True -UseDnsSrvRouting
- Set your on-premises environment to trust Microsoft 365 and configure a shared Session Initiation Protocol (SIP) address space. This will allow Microsoft 365 to host users who have an SIP domain address from the on-premises environment. To achieve this, we need to set a hosting provider by running the following commands.
- First, check to see whether there is an existing hosting provider, and if so, remove it:
Get-CsHostingProvider | ?{ $_.ProxyFqdn -eq "sipfed.online.lync.com" } | Remove-CsHostingProvider
- Then, create the new hosting provider as follows:
New-CsHostingProvider -Identity Office365 -ProxyFqdn "sipfed.online.lync.com" -Enabled $true -EnabledSharedAddressSpace $true -HostsOCSUsers $true -VerificationLevel UseSourceVerification -IsLocal $false -AutodiscoverUrl https://webdir.online.lync.com/Autodiscover/AutodiscoverService.svc/root
- Finally, enable the shared SIP address space in your Microsoft 365 environment by connecting to Skype for Business Online PowerShell with the following commands:
$cred = Get-Credential
Import-PSSession (New-CsOnlineSession -Credential $cred) -AllowClobber
- Once connected, we need to run the following command:
Set-CsTenantFederationConfiguration -SharedSipAddressSpace $true
Important note
You must not change the SharedSipAddressSpace $true value to false until there are no Skype for Business users on the premises.
Now that you understand how to configure hybrid connectivity, let's look at the coexistence modes for Skype for Business and Microsoft Teams.
Understanding organizational coexistence modes
Skype for Business and Microsoft Teams can interoperate during the upgrade process at an organizational level. This means that during the process, some users may be using only Teams, while others may be using a mixture of Teams and Skype for Business. There are several coexistence modes available and these may be applied by Teams Administrators by using the Microsoft Teams admin center, which you can access by performing the following steps:
- From your internet browser, navigate to https://admin.teams.microsoft.com. You will be prompted to sign in with your Microsoft 365 credentials, as shown in the following screenshot:

Figure 1.1 – Microsoft 365 Sign in screen
- Enter your administrator credentials and then click Next to log in. The Teams admin center Dashboard screen is shown (Figure 1.2):
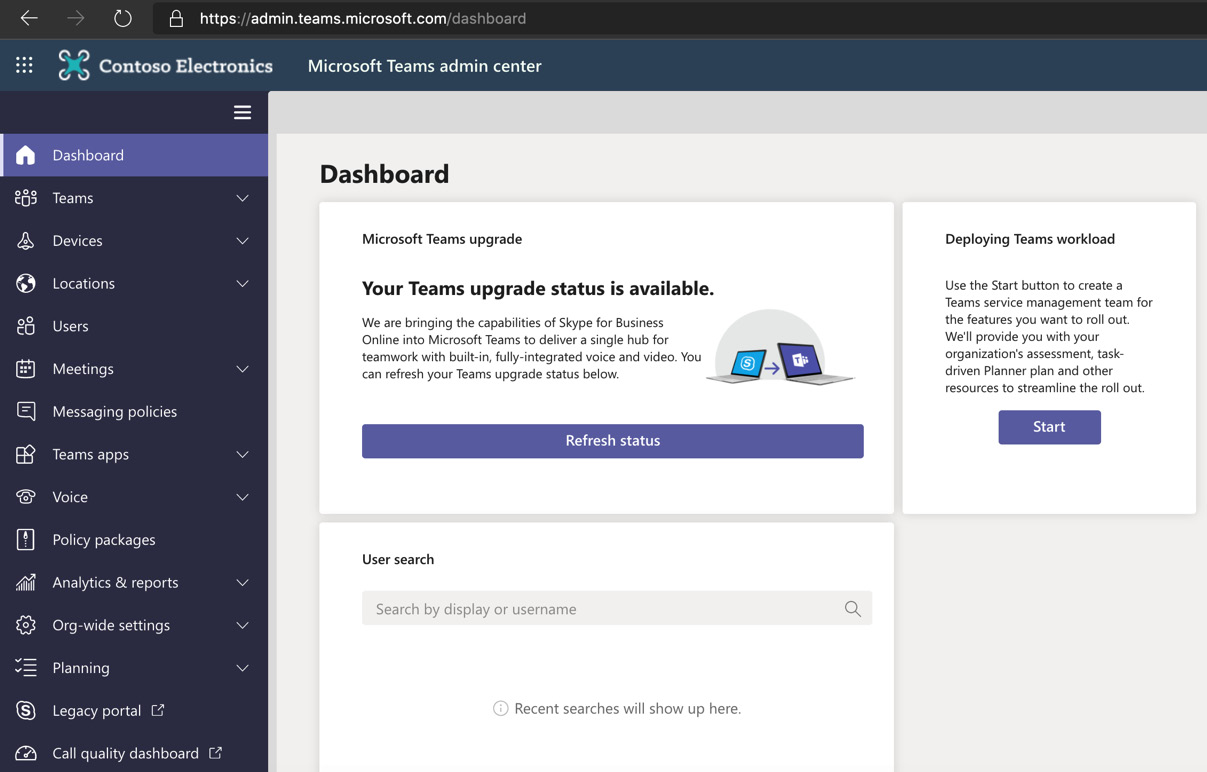
Figure 1.2 – Teams admin center
- From the left-hand navigation pane, select Org-wide settings | Teams upgrade, as shown in Figure 1.3:
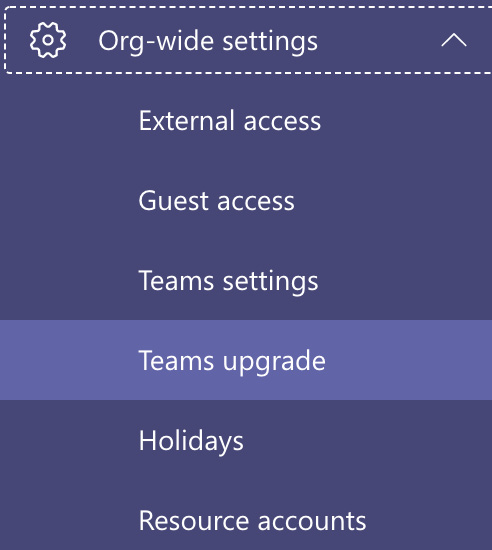
Figure 1.3 – Org-wide settings
- You will now see the Teams upgrade options that are available to you. These are shown in Figure 1.4:
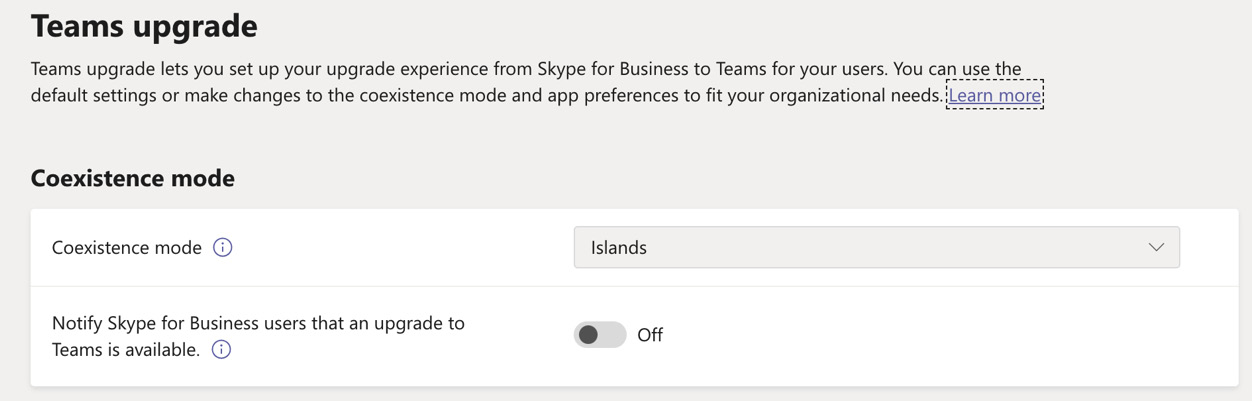
Figure 1.4 – Teams upgrade settings
- Under Coexistence mode, select the drop-down menu and you will see the following upgrade options (these will be explained in more detail in the following section of this chapter):

Figure 1.5 – Coexistence mode options
In the preceding example, the coexistence mode is set to Islands at the organizational level. This means that users may use a combination of both the Skype for Business and Teams apps. When planning a migration to Microsoft Teams, the ultimate objective is to enable Teams only mode across the entire organization.
However, we don't have to set all your users to Teams only mode at the same time, and any of the available coexistence modes may be used during the migration. The principles of per-user coexistence modes and how they differ from organizational coexistence modes are also important to understand. We will explain these differences in more detail in the Understanding coexistence mode at both the organization and per-user level section.
Tip
Make sure that you fully understand your hybrid connectivity and coexistence requirements when planning for your migration to Microsoft Teams from Skype for Business. It is important to engage with key stakeholders to understand how they will be affected by the transition, and this will help ensure that you plan correctly.
In this section, you learned about the upgrade paths available to Microsoft Teams. We showed you how to access the Microsoft Teams admin center and the Teams upgrade settings. We also examined the five coexistence options available while carrying out the migration to Teams.
Next, let's examine the differences of setting coexistence at both the organizational level and the per-user level.
Understanding coexistence mode at both the organization and per-user level
Now that you understand how to set coexistence mode for your organization from the Teams admin center, it is important to be aware that you also have the option to set coexistence for individual users or small sets of users as well.
In this section, we will look at the different options available in each of these methods, and some of the decisions that you will need to make.
Important note
Some older versions of Skype for Business clients may not respect some of the coexistence settings that you configure. Therefore, it is highly recommended to keep your Skype for Business versions up to date for all your users wherever possible.
We will start by taking a closer look at setting your upgrade options at the organizational level.
Setting the upgrade options for the whole organization in the Teams admin center
In the previous section, we showed you the five different upgrade options that are available from the Org-wide settings in the Teams admin center. In this section, we will explain when and why to choose each of these options.
In order to set the organization-wide upgrade options, we need to perform the following steps:
- Log in to Teams admin center, as described in the previous section of this chapter, and navigate to Org-wide settings | Teams upgrade.
- From the Coexistence mode drop-down menu, select from one of the following options:
Islands: Choose this option to enable all your users to use both Skype for Business and Teams apps at the same time. There is no interoperability used when in Islands mode, and users will use Skype for Business to communicate only with other Skype for Business users, and Teams to communicate only with other Teams users. So, in effect, the two separate apps are, in fact, islands and completely independent of one another.
Skype for Business only: Choose this option if you require all your users to use only Skype for Business. There will be no use of Teams at all with this method.
Skype for Business with Teams collaboration: Choose this option if you require your users to use mainly Skype for Business, but also Teams, in order to collaborate in channels.
Skype for Business with Teams collaboration and meetings: Choose this option if you require your users to use mainly Skype for Business, but also Teams in order to collaborate in channels, and to join and participate in Teams meetings. This mode also enables users to be able to create Teams meetings as well as join them. Skype meetings call also still be joined.
Teams only: Choose this option if you require your users to only use Teams. In this scenario, users can still join Skype for Business meetings from Teams.
Saving your settings
Once you have chosen the required Teams upgrade settings for your organization, you may review your choices and then click to save them, as shown in the following screenshot:
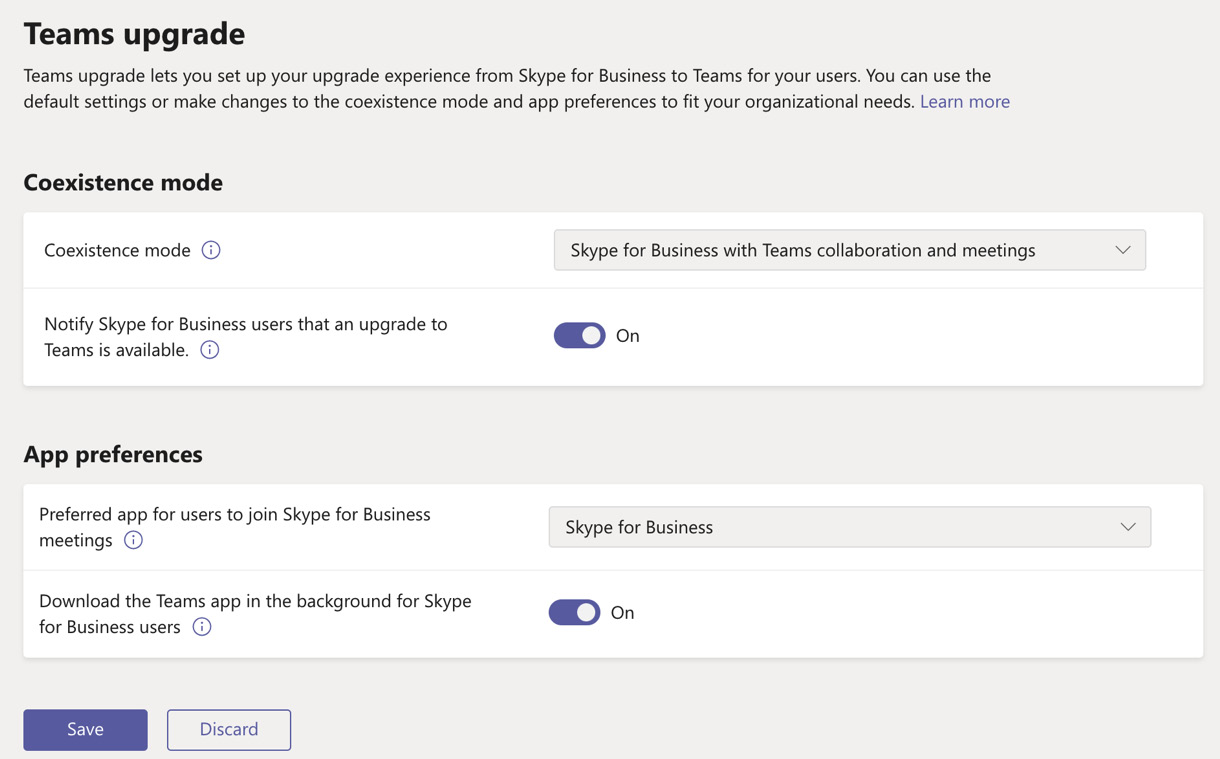
Figure 1.6 – Teams upgrade settings
Important note
Due to recent changes from Microsoft at the time of writing, it is not possible to set the org level to Teams Only unless all DNS records point to Skype Online. Therefore, unless you migrate all users to Skype only, and then point the DNS records to Skype Online, you will encounter errors.
Next, we will review the per-user upgrade options.
Setting the upgrade options for individual users in the Teams admin center
In this section, we will demonstrate how to set the upgrade options on a per-user basis. This can be achieved by performing the following steps:
- Log in to the Teams admin center, as described in the previous section of this chapter and navigate to Users. You will see the list of your Teams users as shown in Figure 1.7:
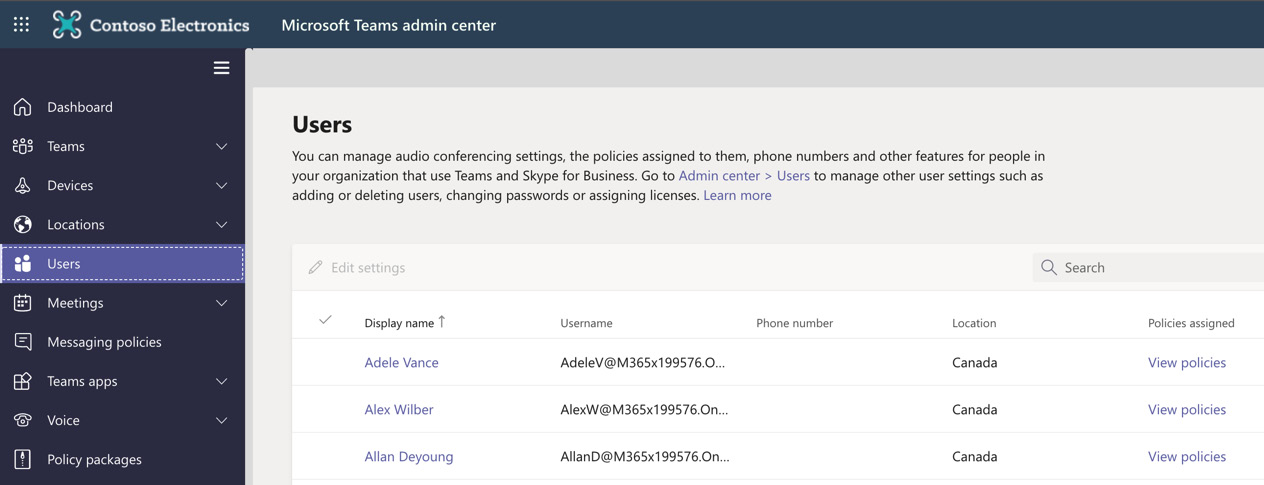
Figure 1.7 – Teams users
- Select one of the users from the list. In this example, we will choose Adele Vance. Scroll down to the Account section for this user and, under Teams upgrade, you will see the options available for this user to set the coexistence mode:
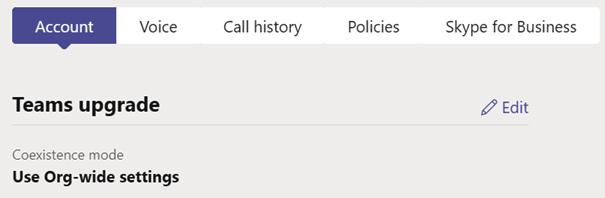
Figure 1.8 – Teams upgrade options
- Click on Edit as shown in Figure 1.8 to change the upgrade setting and select from the following options:
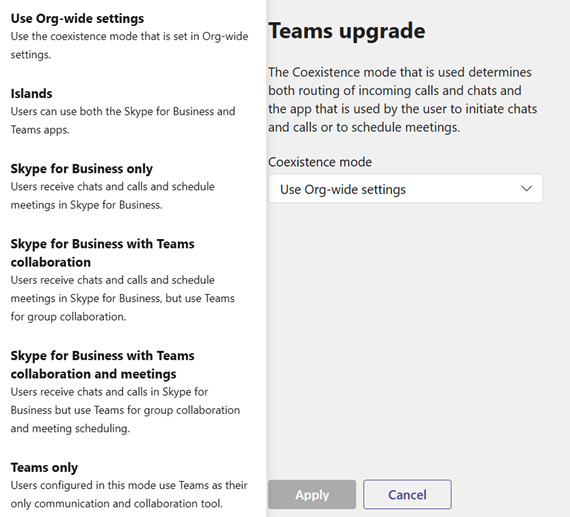
Figure 1.9 – Teams upgrade options
Use Org-wide settings: Choose this option if you would like the user to inherit the settings you configured in the Org-wide settings.
Islands: Choose this option to enable the user to use both Skype for Business and Teams apps at the same time.
Skype for Business only: Choose this option if you require the user to use only Skype for Business. There will be no use of Teams at all for the user with this method.
Skype for Business with Teams collaboration: Choose this option if you require the user to use mainly Skype for Business, but also Teams in order to collaborate in channels.
Skype for Business with Teams collaboration and meetings: Choose this option if you require the user to use mainly Skype for Business, but also Teams in order to collaborate in channels, and to join and participate in Teams meetings. This mode also enables users to be able to create Teams meetings.
Teams only: Choose this option if you require the user to only use Teams.
- Once you have selected the desired upgrade setting for the user, click to save your changes.
In this section, we showed you the differences between setting your Teams upgrade options at the organization level, and at the per-user level. Next, we will explain how to migrate Skype for Business meetings to Microsoft Teams.
Configuring the Meeting Migration Service to migrate Skype for Business meetings to Teams
While completing your organizations upgrade to Microsoft Teams, you will need to understand the Meeting Migration Service (MMS) in certain situations. The MMS will be automatically triggered to update the meetings of your organization's users under the following circumstances:
- Users are migrated from Skype for Business on-premises to Skype for Business Online or Microsoft Teams (in Teams only mode).
- A user's audio-conferencing settings are modified.
- A user's coexistence mode is upgraded to Teams only.
- A user's coexistence mode is set to Skype for Business with Teams collaboration and meetings.
- Using the PowerShell command, Start-CsExMeetingMigration.
The automatic triggering of the MMS in any of the preceding conditions can be disabled by Teams administrators if required. In addition, it is also possible for the MMS to be triggered manually by Teams administrators by using PowerShell.
Important note
It is not possible to use the MMS if the user's mailbox resides on an Exchange on-premises environment, or if offboarding the user from the cloud back to on-premises.
So how does this work? Essentially, the MMS utilizes a queue system. When a user is set for migration, a search is performed against their mailbox for existing meeting events, and these are then converted to Skype for Business Online meetings, or Teams Meetings depending upon the upgrade and coexistence options, which are targeted to that user. The meeting block details are then all replaced, and the meeting invite is then updated for all invitees with the updated meeting details.
As an example, when a user is using Skype for Business on-premises, the meeting details within the invitation will appear as shown in the following screenshot:

Figure 1.10 – Skype meeting invite
However, once the user's migration has been migrated to Teams, the MMS will update the meeting invites in the user's calendar as follows:

Figure 1.11 – Teams meeting invite
Important note
If a user has edited the meeting invitation and added customized text, this will not be migrated. The updated meeting details will be the default content. In addition, content such as whiteboards and polls are not migrated with the MMS, and any such items will need to be manually recreated. Meetings with over 250 attendees may also not be migrated.
Of the five aforementioned criteria for when the MMS will be triggered, the first four will occur in a very automated fashion in most cases, so we will not focus on the processes that take place when these occur. If you would like to learn more about these, you may refer to the following Microsoft documentation:
We will, however, spend some time looking at how meetings are migrated to Teams by using PowerShell commands.
Manually migrating meetings to Teams using PowerShell
By using PowerShell, Teams administrators may manually trigger meeting migrations for users with the Start-CsExMeetingMigration command.
An example of how this command could be applied to an individual user within your organization is shown here:
Start-CsExMeetingMigration -Identity [email protected] -TargetMeetingType Teams
This command will create a migration request for the targeted user that will result in all the user's meetings being migrated to Teams.
While the migration is in progress, you may check on the status of the migration by running the following PowerShell command:
Get-CsMeetingMigrationStatus -Identity [email protected]
Should you encounter any issues with migrating the meetings using PowerShell, individual users can use the per-user Meeting Migration Tool instead of migrating their own meetings. Details on how to use the Meeting Migration Tool can be found at the following link: https://support.microsoft.com/en-gb/office/meeting-update-tool-for-skype-for-business-and-lync-2b525fe6-ed0f-4331-b533-c31546fcf4d4?ui=en-us&rs=en-gb&ad=gb.
Should the Meeting Migration Tool also fail for any reason, users may need to manually create new meetings, or contact Microsoft for support.
In this section, we have explained the principles of the MMS and how it is used to update the meetings of your organization's users during your migration to Teams. You learned that the MMS will be automatically triggered in several situations, and that you can manually migrate your users' meetings using PowerShell and the Start-CsExMeetingMigration command.
Next, we will look at the options available to set Teams upgrade notifications and default apps while in coexistence mode.
Setting the Microsoft Teams upgrade notifications and default apps while in coexistence mode
When you are planning any significant change or upgrade process within your business IT environment, communication is a crucial part of the success or failure of your project. How you prepare your end users for an upcoming change will also impact their perception of any new technologies that you are planning to introduce.
This principle of effective communication is particularly applicable when planning your migration to Microsoft Teams.
Fortunately, the Microsoft Teams admin center contains some settings that can help you to ensure that your transition to Teams is accompanied by well-informed users.
To configure these settings, you will need to ensure that you have your Teams upgrade settings configured and ready, as described earlier in this chapter. You will then need to perform the following steps:
- Log in to Teams admin center with your administrator account at https://admin.teams.microsoft.com:
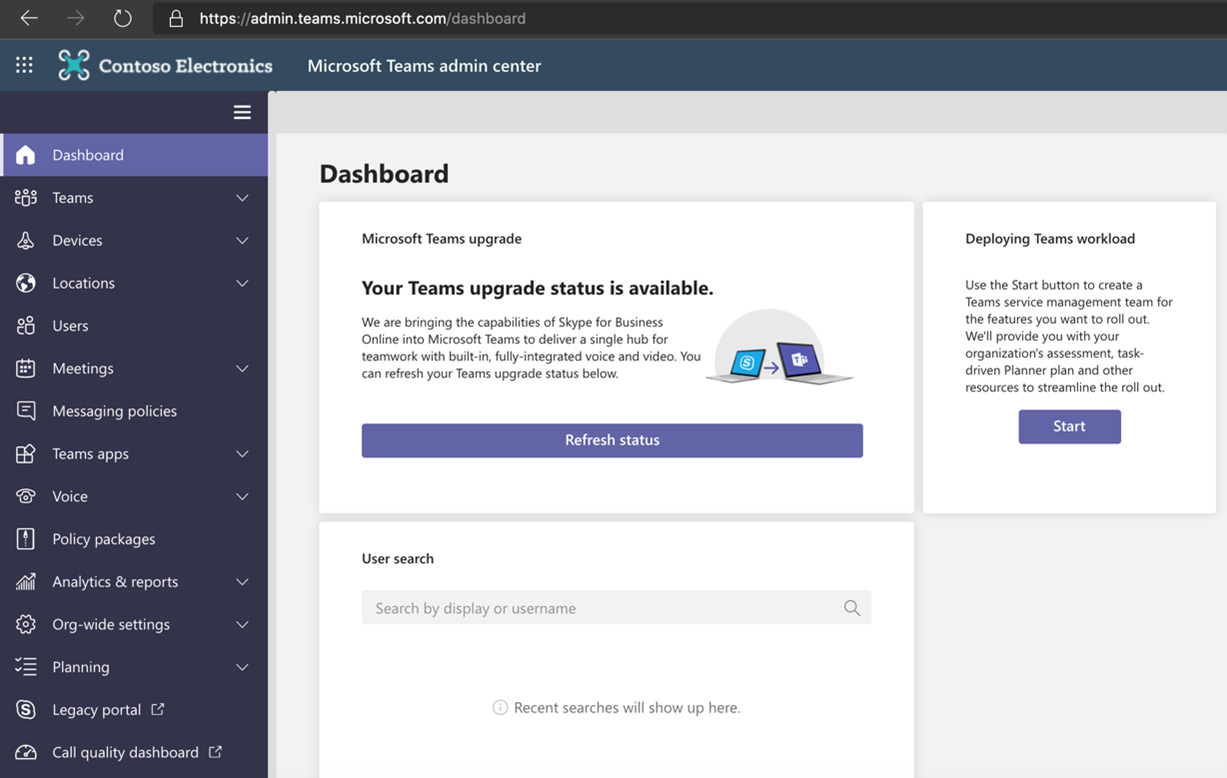
Figure 1.12 – Teams admin center
- On the left-hand navigation pane, select Org-wide settings, and choose Teams upgrade:

Figure 1.13 – Org-wide settings
- Once again, this will take you to the Teams upgrade settings:
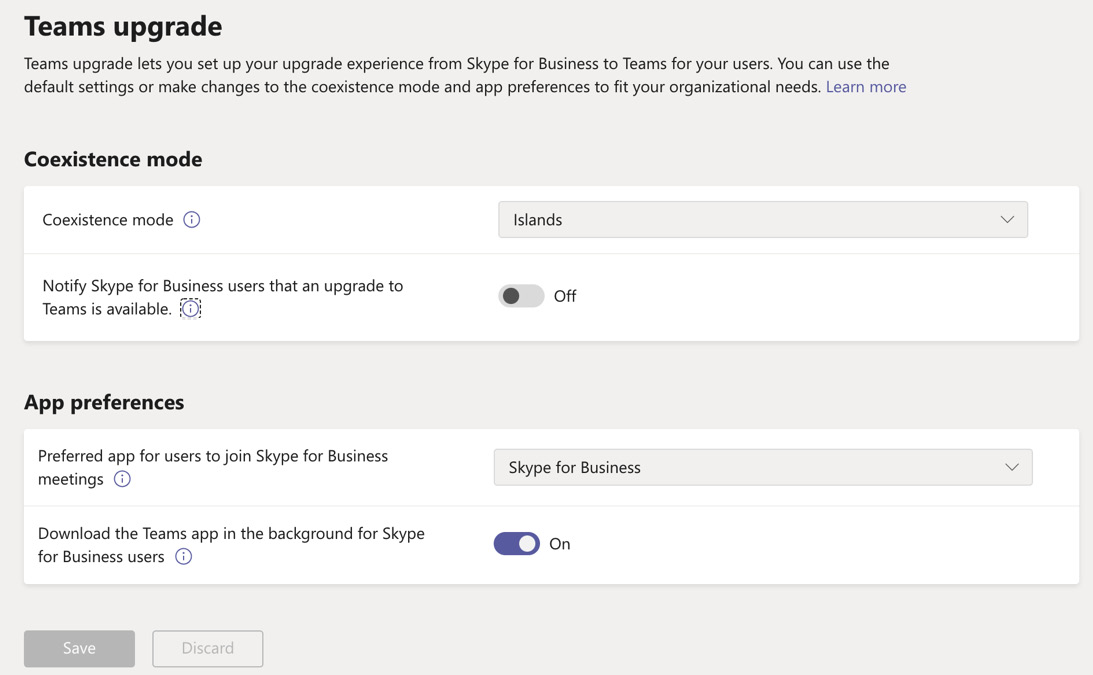
Figure 1.14 – Teams upgrade and App preferences
- Under Coexistence mode, select Notify Skype for Business users that an upgrade to Teams is available. Note that this relates to Skype Online users only. Further reading on options for hybrid users moving to Teams is included at the end of the chapter in the Further reading section:

Figure 1.15 – Notifying Skype for Business users regarding the upgrade
- Hovering over the information icon in this section will provide you with further information about what this setting will do once it is activated:
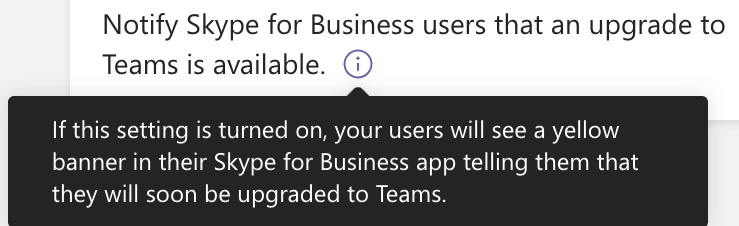
Figure 1.16 – Explanation of this setting
- To enable user notifications, move the slider to On:

Figure 1.17 – Notifying Skype for Business users regarding the upgrade
The effect of this setting is that users will see a visual prompt within their Skype for Business app that informs them that the upgrade to Microsoft Teams is coming.
Next, we will illustrate how to set App preferences.
Setting app preferences
In addition to setting your upgrade options, you will also need to choose App preferences from the Teams upgrade section of Teams admin center:

Figure 1.18 – App preferences
The first of these settings allows you to select the Preferred app for users to join Skype for Business meetings option. The options for the preferred app may be configured as follows:
- First, hover your cursor over the information icon and you will see that this setting is independent of the values chosen in the Understanding coexistence mode at both the organization and per-user level section:

Figure 1.19 – App preferences
- Next, click the dropdown next to Preferred app for users to join Skype for Business meetings. This will show you the options available for this setting. These options can be seen in Figure 1.20:

Figure 1.20 – App preferences
The first option is Skype Meetings app: This is the app for the consumer version of Skype.
The second option is Skype for Business: This is a limited features version of Skype for Business.
- Once you have selected your preferred Skype app, move your cursor to hover over the option to Download the Teams app in the background for Skype for Business users. This will show you the impact of choosing this setting:
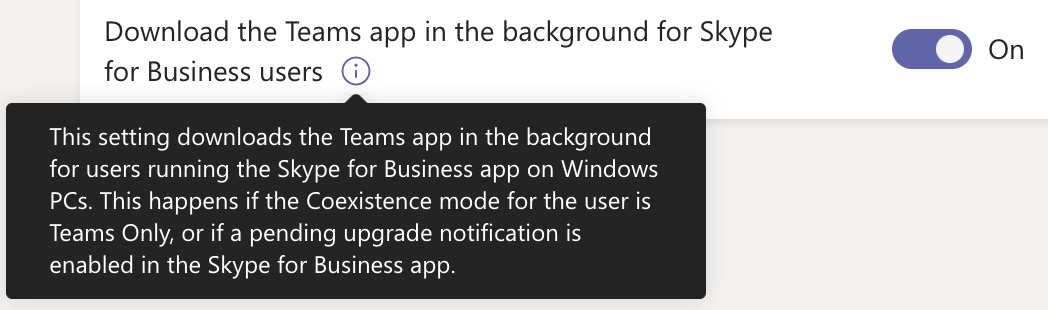
Figure 1.21 – Downloading the Teams app in the background
- You should move the slider to the On position in order to activate this feature. This will cause the Teams app to be downloaded in the background on the Windows PCs of users who are running the Skype for Business app. For on-premises users, it is default behavior that when notifications are enabled, Win32 Skype for Business clients will silently download the Teams client so that the rich client is available prior to moving the user to Teams Only mode. However, you can also disable this behavior.
Important note
As highlighted in Figure 1.20, the setting to download the Teams app in the background for Skype for Business users will only be applied should the coexistence setting for the user be set to Teams Only, or if a pending upgrade notification is enabled in the Skype for Business app.
In this section, we have shown you how to set the Microsoft Teams upgrade notifications options and choose your default apps from the Microsoft Teams admin center. You learned that you can notify your users that a Teams upgrade is planned, that you can choose the preferred app for users to join Skype for Business meetings, and that the Teams app can be automatically downloaded in the background for users.
Summary
In this chapter, we explained the options that are available for planning a migration from Skype for Business on-premises, and Skype for Business Online to Microsoft Teams. You learned that in order to upgrade to Teams from Skype for Business on-premises, you need to configure hybrid connectivity to Microsoft Teams before choosing and configuring the appropriate coexistence mode. Additionally, we showed you how an upgrade to Teams from Skype for Business Online only requires coexistence settings to be configured.
We also explained how coexistence may be configured at both the organizational and per-user level, and how users' existing meetings may be migrated either automatically or triggered manually with PowerShell commands. Finally, we demonstrated how to configure Teams upgrade notifications and how to set your default apps while in coexistence mode.
In the next chapter, we will demonstrate how to assess your network readiness for a Microsoft Teams deployment. You will learn how to use the Teams Network planning tool, and the Network Testing Companion tool within the Teams admin center. We will also show you how to calculate the bandwidth you will require to successfully run Teams Meetings and Live Events, how the required network ports and protocols need to be configured, and how to optimize media configuration using Quality of Service (QoS).
Questions
As we conclude, here is a list of questions for you to test your knowledge regarding this chapter's material. You will find the answers in the Assessments section of the Appendix:
- When running Skype for Business on-premises, which of the following will be required to prepare for a migration to Microsoft Teams?
a. Configure coexistence with Teams only
b. Configure hybrid connectivity with Teams only
c. Configure both hybrid connectivity and coexistence with Teams
d. None of the above
- What is the name of the service that can manually or automatically migrate users' Skype for Business meetings to teams?
a. Skype for Business admin center
b. Meeting Migration Tool
c. Teams admin center
d. Meeting Migration Service
- True or false – Skype for Business internal users can communicate with Teams internal users when the coexistence mode is set to Islands mode?
a. True
b. False
- Which of following is the correct URL for the Teams admin center?
a. https://teams.microsoft.com
b. https://admin.teams.office.com
- True or false – With the Skype for Business with Teams Collaboration coexistence mode, users will use mainly Skype for Business, but can use Teams for collaborating in team channels?
a. True
b. False
- Which of the following is not one of the coexistence options available within the Teams upgrade options?
a. Lync with Teams Collaboration
b. Teams only
c. Skype for Business only
d. Islands
e. Skype for Business with Teams Collaboration
- Which sections of the Teams admin center allow you to configure Teams coexistence settings? (Choose two).
a. Org-wide settings | Teams settings
b. Org-wide settings | Teams upgrade
c. Users
d. Teams | Manage Teams
- True or false – The PowerShell command to trigger meeting migrations is Start-CsExMeetingMigration?
a. True
b. False
- Which of the following is not one of the steps completed when configuring hybrid connectivity between Skype for Business on premises and Microsoft Teams?
a. Federate your on-premises Edge service with Microsoft 365
b. Set your on-premises environment to trust Microsoft 365 and configure a shared Session Initiation Protocol (SIP) address space
c. Enable the shared SIP address space in your Microsoft 365 environment by using Skype for Business Online PowerShell
d. Enable the shared SIP address space in your Microsoft 365 environment by using the Teams admin center
- True or false – In coexistence mode, when selecting the option to Notify Skype for Business users that an upgrade to Teams is available, users will see a yellow banner in the Skype for Business app telling them that they will soon be upgraded to Teams?
a. True
b. False
Further reading
Here are links to more information on some of the topics that we have covered in this chapter:
- Upgrading from Skype for Business Online to Teams: https://docs.microsoft.com/en-us/MicrosoftTeams/upgrade-to-teams-execute-skypeforbusinessonline
- Skype for Business Online to be retired in 2021: https://techcommunity.microsoft.com/t5/microsoft-teams-blog/skype-for-business-online-to-be-retired-in-2021/ba-p/777833
- Planning your Teams upgrade: https://docs.microsoft.com/en-gb/learn/modules/m365-teams-upgrade-plan-upgrade/
- Getting started with your Microsoft Teams upgrade: https://docs.microsoft.com/en-us/MicrosoftTeams/upgrade-start-here
- About the upgrade framework: https://docs.microsoft.com/en-us/MicrosoftTeams/upgrade-framework
- Teams upgrade planning workshops: https://docs.microsoft.com/en-us/MicrosoftTeams/upgrade-workshops-landing-page
- Upgrading from a Skype for Business on-premises deployment to Teams: https://docs.microsoft.com/en-us/microsoftteams/upgrade-to-teams-execute-skypeforbusinessonpremises
- Configuring hybrid connectivity between Skype for Business Server and Microsoft Teams: https://docs.microsoft.com/en-us/skypeforbusiness/hybrid/configure-hybrid-connectivity?toc=/SkypeForBusiness/toc.json&bc=/SkypeForBusiness/breadcrumb/toc.json
- Configuring a Skype for Business hybrid: https://docs.microsoft.com/en-us/skypeforbusiness/hybrid/configure-federation-with-skype-for-business-online
- Managing Teams in the Microsoft Teams admin center: https://docs.microsoft.com/en-us/microsoftteams/manage-teams-in-modern-portal
- Using the Meeting Migration Service (MMS): https://docs.microsoft.com/en-us/skypeforbusiness/audio-conferencing-in-office-365/setting-up-the-meeting-migration-service-mms
- Moving users from on-premises to Teams: https://docs.microsoft.com/en-us/skypeforbusiness/hybrid/move-users-from-on-premises-to-teams