
Chapter 11: Managing Phone System in Microsoft Teams
In this chapter, we will explain the principles of managing Phone System within Microsoft Teams. You will learn how to manage resource accounts, which may be required for call queues, and configure auto attendants. We will also demonstrate how to set up policies to control the behavior of features such as call park, calling, and caller IDs in Microsoft Teams. Finally, we will show you how to access and interpret Health Dashboard for Direct Routing, which allows you to monitor connections between your session border controllers and the Direct Routing interface.
In this chapter, we're going to cover the following main topics:
- Managing resource accounts
- Creating and managing call queues
- Creating and managing auto attendants
- Managing call park, calling, and caller ID policies
- Understanding and accessing Health Dashboard for Direct Routing
Technical requirements
In this chapter you will need to have access to the Microsoft Teams admin center, which you can reach at https://admin.teams.microsoft.com. You will need to be either a Global Administrator or a Teams Service Administrator to have full access to the features and capabilities within the Teams admin center.
To create resource accounts, you'll need a phone system license. Call queues and auto attendants will also need to be assigned Phone System – Virtual User licenses (these are free).
Managing resource accounts
Resource accounts are Azure Active Directory (AD) objects (specifically disabled user objects) that can have phone numbers assigned to them. These could be for conference rooms, call queues, auto attendants, equipment, and so on.
When working with Teams, we will use resource accounts specifically for our call queues and auto attendants. Having a resource account designated for these allows us to assign call queues and auto attendant phone numbers. We'll cover the setup of call queues and auto attendants in detail later in this chapter.
First, let's look at the process of creating a new resource account.
Creating and editing a resource account
To create a resource account, do the following:
- Go to the Microsoft Teams admin center at https://admin.teams.microsoft.com.
- Select Org-wide settings > Resource accounts from the left-hand menu.
- Click Add.
- Provide the following information for the new resource account:
Display name (how it'll show up in Azure AD and lookups).
Username (for instance, [email protected]).
Resource account type (how it will be used). This can be Auto attendant or Call queue.
- Click Save.
Later, you can edit your resource account by repeating Steps 1-2 and selecting the display name of the account you wish to edit. You can only edit some settings if the account is currently not assigned to a voice application (a call queue or an auto attendant). If it's assigned to something, you'll need to unassign the resource account, make changes, and then reassign it.
Tip
Once created, you cannot edit a resource account's username in the Microsoft Teams admin center. You can only modify the display name and resource account type if the account is unassigned, and you can also change the phone number type and assignment.
You can also create resource accounts using PowerShell.
Creating a resource account using PowerShell
The Skype for Business PowerShell module's cmdlet for creating a new resource account is New-CsOnlineApplicationInstance. This is paired with one of two application IDs that indicate whether Resource account type is Auto attendant or Call queue. They are as follows:
- Auto attendant: ce933385-9390-45d1-9512-c8d228074e07
- Call queue: 11cd3e2e-fccb-42ad-ad00-878b93575e07
Here's an example of using this cmdlet with an application ID to provision a new resource account:
New-CsOnlineApplicationInstance -UserPrincipalName [email protected] -ApplicationId "ce933385-9390-45d1-9512-c8d228074e07" -DisplayName "Auto Attendant - Help Desk"
Now let's assign a phone number to our new resource account.
Assigning a phone number to a resource account
Once your account is created, you can assign a phone number to it that will be used to reach the call queue or auto attendant associated with the account. To assign or unassign a phone number, follow these steps:
- Go to the Microsoft Teams admin center at https://admin.teams.microsoft.com.
- Select Org-wide settings > Resource accounts from the left-hand menu.
- Select the display name of an existing resource account.
- Click Assign/unassign.
- Select options for each of the settings:
a. Choose a Phone number type option (None, Online, Toll-free, or On-premises).
b. For Assigned phone number, choose an available phone number to associate with the account. If none is available, you may need to get additional numbers of the correct type (auto attendant or call queue). See Chapter 10, Managing Phone Numbers in Microsoft Teams, for assistance.
c. If you already have your auto attendant set up, you can assign it under Select an auto attendant here as well.
- Click Save.
You'll want to make sure a license is assigned to the resource account (use the free Phone System – Virtual User license) before it can be used.
To unassign numbers, simply repeat Steps 1-4 and remove the assigned number from the settings.
Assigning/unassigning Direct Routing numbers to/from resource accounts
You will need to use PowerShell when assigning a Direct Routing (on-premises) number to a resource account (see Chapter 10, Managing Phone Numbers in Microsoft Teams, for more information on Direct Routing). You could accomplish this by using the following cmdlet and parameters, for example:
Set-CsOnlineApplicationInstance -Identity [email protected] -OnpremPhoneNumber +11234567890
To unassign a Direct Routing number, you'd use something similar to the following:
Set-CsOnlineApplicationInstance -Identity [email protected] -OnpremPhoneNumber ""
Next, we'll cover deleting a resource account.
Deleting a resource account
Before a resource account can be deleted, you must first unassign any numbers assigned to it. Once unassociated with a service number, you can delete the resource account from the Users node of the Microsoft Teams admin center as you would with a user.
In the next sections, we'll be covering call queues and auto attendants, which can be associated with resource accounts.
Creating and managing call queues
Before we create a call queue or auto attendant, there are steps that need to be taken to make the process simple. Let's look at those steps first.
Preparing to create and manage call queues and auto attendants
Before you can use call queues and auto attendants, you must follow these steps:
- You must have purchased or transferred the phone numbers to be used.
- You'll then need a resource account created in Azure AD for each of the lines (both queues and auto attendants). A resource account can be assigned more than one service number if needed.
- Each resource account for call queues and auto attendants must be assigned a Phone System – Virtual User license, and each user who will receive calls from a call queue must have a calling plan.
- Next, you'll create the holidays your auto attendants should be aware of for off-hours call handling.
- You may choose to also configure call park and retrieval if you wish to implement that in your solution.
- Create the groups (security, distribution list, team membership, or M365 group) to be used in call handling, such as a team for Service Desk members who will answer call queue calls (this is optional, as you can directly assign individual members if you wish).
- If you're allowing dial-by-extension, you'll need to make sure each user to be reached by extension has that property populated in their Azure AD profile.
Tip
Use Microsoft Teams team membership for call queue agent population so that those agents also have a space for collaboration, shared storage, and more to help standardize their responses, work, and internal collaboration.
It's important that you order or transfer service numbers and then create resource accounts to which you'll assign those numbers prior to creating auto attendants and call queues. During the configuration of auto attendants and call queues, you'll have the chance to attach the resource account (with an assigned number already) to the new voice app, saving you a significant amount of backpedaling.
Now you've completed the steps necessary to begin creating and using auto attendants and call queues.
Call queues
Call queues are like virtual lobbies that allow you to configure the following:
- A greeting
- Hold music
- Call routing (first in, first out)
- Options for overflow and timeout
You might combine an auto attendant with a call queue so that users press 1 to speak with the Service Desk, then are placed in the Service Desk call queue until a representative/agent can take their call:
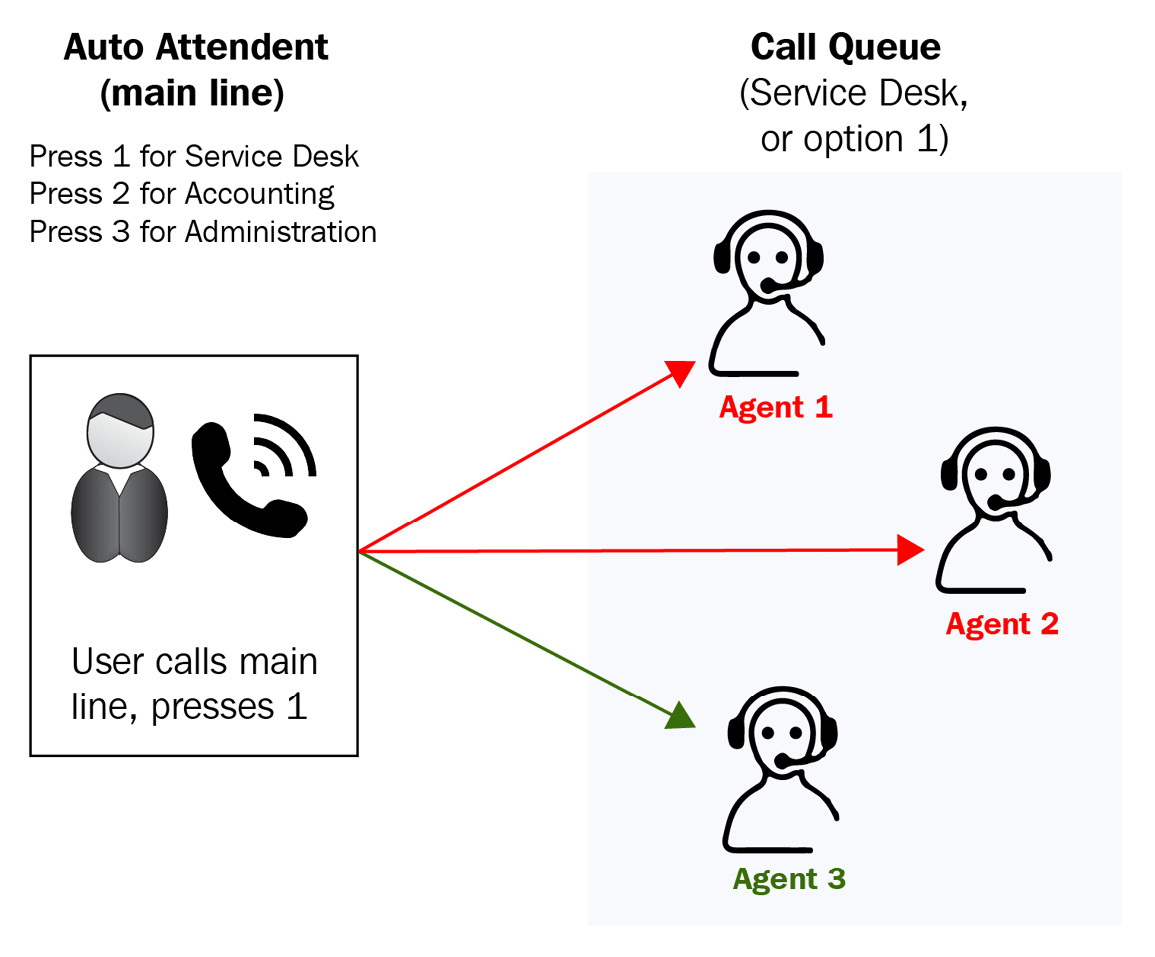
Figure 11.1 – Call queues
Call queues can have users waiting for the first available of a group of users, send them to voicemail, or redirect users to other queues and auto attendants.
Call queues can be created in multiple languages, similar to auto attendants, but cannot handle off-hours calls like auto attendants. You'd want to use an auto attendant as the greeting and handler, then only redirect to call queues during appropriate hours.
An excellent feature of call queues is the ability to integrate with Teams presence indicators. This means that if a representative of the Service Desk is unavailable, they won't receive call queue calls until they're available again.
Creating a call queue
It's important that you've completed the prerequisites mentioned in the Managing resource accounts section. You'll save time by already having ordered the service number for your call queue and already having assigned it to a resource account (which you'll create if there isn't one before creating this call queue).
You'll also save time by already having created the group or team whose membership will make up the agent/associate pool of those who will be responsible for answering calls waiting in this queue.
When ready, you'll follow these steps to create the call queue:
- Go to the Teams admin center at https://admin.teams.microsoft.com.
- Select Voice > Call queues from the left-hand menu.
- Click Add.
- Name your call queue.
- Select or create the resource account(s) to associate with this call queue.
- Set the Language setting for this call queue to be used for voicemail transcription, system prompts, and greetings.
- Set Greeting to either No greeting or Play an audio file (which you'll upload here).
- Either set Music on hold to the default Teams-provided music or upload your own audio file.
- Add users (individually) and/or groups to the Call answering section. These are the agents who will receive calls from this queue. Individuals that are listed are prioritized higher than groups. The specific individuals and groups are ordered within each category based on the routing method you'll specify in Step 11.
- Choose whether this call queue should be in conference mode. When this is enabled, agents will get calls more quickly and directly. If Off, calls are redirected traditionally via a transfer.
- Choose the Routing method setting to use to prioritize who receives calls from those listed in Step 9. You can choose Attendant routing (all available agents ring, and the first to pick up stops the ringing for the rest), Serial routing (this will work down the list one by one until someone answers, prioritizing individuals before groups), Round robin (evenly distribute call volume to agents), or Longest idle (whoever has been set to Available the longest).
- Choose to enable Presence-based routing (where someone's Teams presence determines their availability to take a call), as well as Agents can opt out of taking calls (agents can reject a call).
- Choose a number of seconds for Agent alert time, which determines how long the phone rings before moving on to its next course of action, such as trying another agent according to the Routing method settings.
- Next, you can specify Call overflow handling, which either disconnects or redirects callers if the queue reaches a certain number of users (up to 200).
- Choose Call time out handling settings for the maximum caller wait time (up to 45 mins) and whether to disconnect or redirect the caller at that specified time.
- Click Save.
When choosing overflow and timeout handling in Steps 14-15, you can choose to redirect callers to another user, voicemail, a voice app (another auto attendant or call queue), or an external phone number.
Important note
Agents who use Skype for Business instead of Teams will not receive calls from the queue if Conference mode, Longest idle, or Presence-based routing are enabled, as shown in Figure 11.2:
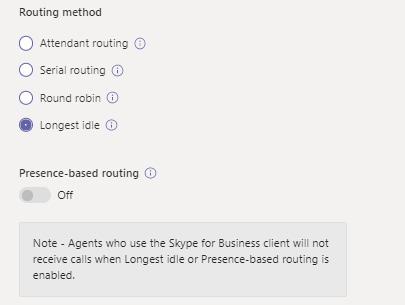
Figure 11.2 – Routing method settings for a call queue with the conditional disclaimer about agents who may be using Skype for Business that won't receive calls if the setting are saved as-is
Now that we've prepared for auto attendants and call queues and configured call queues, let's change our focus to auto attendants.
Creating and managing auto attendants
Auto attendants are the bot-like operators for calls that provide numeric button options for users to get to the right department or person. You can either record and upload the audio used by the auto attendant or use text-to-speech technology (system-generated prompts) for the greeting and menu.
Each auto attendant has its own language and time zone, making it easy for it to assist in business needs during local business hours in the most appropriate language. Being available during business hours is helpful, as is the counterpart of configuring it to respond during off-hours, weekends, holidays, and so on in a way that's most appropriate for the context.
Each auto attendant can optionally be configured with a specific person in your organization set as the operator. This allows someone to speak personally with a professional in your organization who is familiar with the business processes or structure of the business area in which the auto attendant is meant to work.
Users can use auto attendants to search the company directory by name or extension. You configure the dial scope to note who should be included in the searchable directory available to callers. This would be useful to make sure your C-suite executives' direct lines aren't directly reachable by callers, for example.
Creating an auto attendant
Creating auto attendants involves a few more steps than creating a call queue. You'll follow these steps to create an auto attendant in the Microsoft Teams admin center:
- Go to the Teams admin center at https://admin.teams.microsoft.com.
- Select Voice > Auto attendants from the left-hand menu.
- Click Add.
- Name your auto attendant.
- Choose an operator (optional) for the auto attendant if you want users to be able to opt to speak with an associated individual instead of the auto attendant. This can be set to No operator, Person in organization, Voice app (another auto attendant or call queue), or External phone number.
- Choose the auto attendant's assigned Time zone and Language settings from the drop-down menus.
- Choose whether to enable voice inputs or stick with strictly numeric button inputs.
So far, you should have completed the steps shown in Figure 11.3:
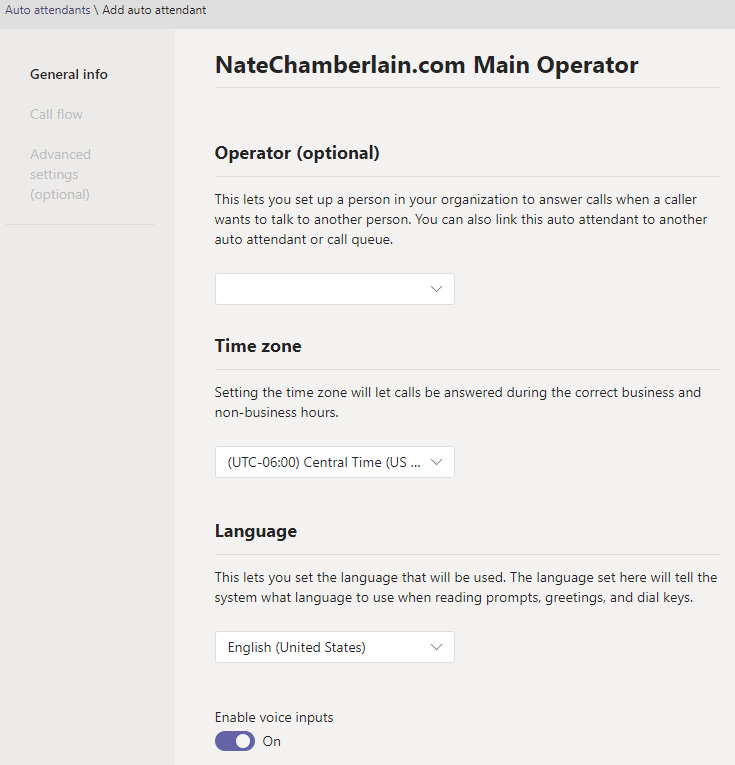
Figure 11.3 – The General info section of creating a new auto attendant
- Click Next to proceed to Call flow settings.
- Set the greeting message to No greeting, Play an audio file (you'll upload this if selected), or Type in a greeting message (for text-to-voice narration).
- Choose either Disconnect, Redirect call (to a person, voice app, external number, or voicemail), or Play menu options.
- If you choose Play menu options, you'll need to either upload a recording of the options being read aloud with their corresponding numbers or type in the message to be narrated with text-to-voice technology. You'll click Assign a dial key for each number that will be configured to redirect to a person, voicemail, app, operator, or external account as seen in Figure 11.4:
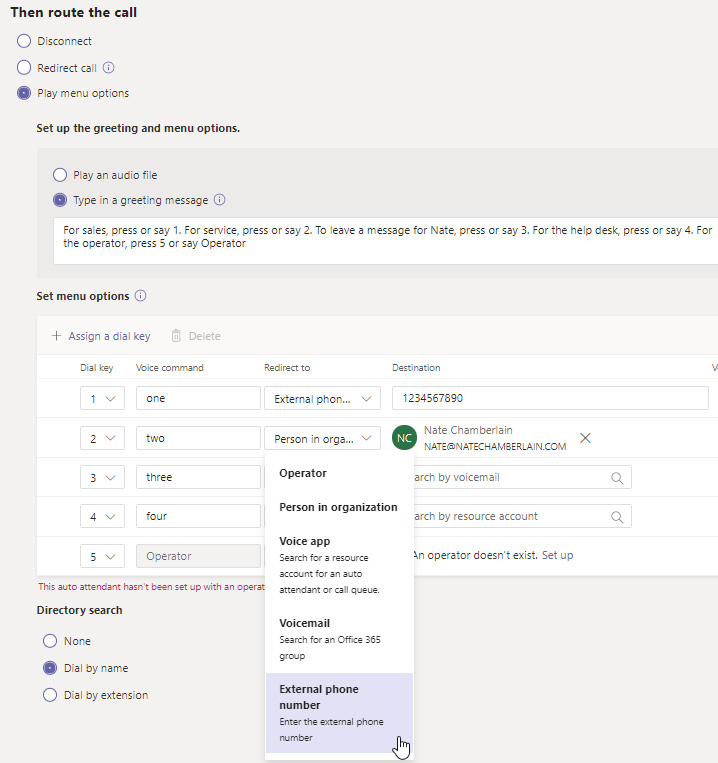
Figure 11.4 – Call flow settings for a new auto attendant where menu options are being configured
- Click Finish if you're done, or Next if you want to configure the following optional settings:
a. Business hours (days and times to consider the default in terms of call flow)
b. After hours call flow (repeat of Steps 9-11 but for the special handling of off-hours calls)
c. Holiday call flow (repeat of Steps 9-11 but for the handling of calls during holiday breaks that you specify)
d. Dial scope (who is searchable by name or extension in the directory, specified individually or by group for inclusion or exclusion)
e. Resource accounts (add an existing or new resource account to associate with the auto attendant)
In order for your auto attendant to have a number, you need to be sure to complete optional Step 12e. You will have ordered or transferred a service number(s) in advance and assigned the number(s) to the resource accounts that you created as mentioned in the Preparing for call queues and auto attendants sub-section earlier this chapter.
Important note
If you choose to create a new holiday during Step 12c, you'll be redirected away from your auto attendant setup to create the org-wide holiday in the Teams admin center and will need to start the auto attendant creation from scratch. Save your auto attendant, then edit it later to include holiday details if the holiday isn't created in advance.
After your auto attendant is created, you'll find it listed among the rest you've created by repeating Steps 1-2. You can come back here to edit the auto attendant's settings at any time.
Now let's review the call park, calling, and caller ID settings available to us.
Managing call park, calling, and caller ID policies
In this section, we'll take a close look at call park, calling, and caller ID policies in the Microsoft Teams admin center under the Voice node.
With all of these policies, there are PowerShell options. Each is prefixed with New- (create), Set- (modify), or Grant- (assign to users/groups). Even if not all three are explicitly mentioned in the following subsections, just remember that each type has these three cmdlets.
Let's start by reviewing call park policies.
Call park policies
Call park enables users to place calls on hold and transfer them to other users. As with other Teams policies, only one call park policy can be applied to a single user.
Call park policies can be configured with the following settings:

In these settings, only the first (Allow call park) can be changed in the policy creation/modification page. The other three numeric value fields are disabled regardless of the first setting's configuration.
Important note
Call park and retrieve is only available if your tenant is in Teams Only deployment mode. You cannot implement this ability for Skype for Business IP phones.
You can modify an existing call park policy by using PowerShell. Use the Set-CsTeamsCallParkPolicy cmdlet with -Identity (policy name) and -AllowCallPark parameters such as in the following example, disabling call park for the Global policy:
Set-CsTeamsCallParkPolicy -Identity Global -AllowCallPark $false
You can also create new policies using the same PowerShell parameters but with the New-CsTeamsCallParkPolicy cmdlet instead of the Set cmdlet.
Now let's review calling policies.
Calling policies
Calling policies determine which calling features users in your organization are allowed to use. You might, for example, create a custom policy to prevent a group of users from being able to use call forwarding. As with all other Teams policies, only one calling policy can be assigned to a user. If a policy isn't explicitly applied to a user, the default global policy will apply.
To create a custom calling policy, go to the Microsoft Teams admin center at https://admin.teams.microsoft.com and choose Voice > Calling policies from the left-hand menu. Once there, click Add.
Each calling policy can be configured with the following settings:

Busy on busy is a newer setting whose name can be a bit confusing. It simply means you will (if the policy is applied to you) provide a busy signal to callers when you're already on a call (whether actively, or one placed on hold) and you won't be distracted by a notification of another call. In the global policy, this is disabled by default, meaning users can still receive and make calls even if they're already on a call.
When each setting for your custom policy is configured as you wish, click Save. You'll be redirected back to the Calling policies page.
As with other Teams policies, you can assign a policy to users by selecting it on its page then choosing Manage users from the menu.
You can alternatively use the Users node to assign policies to users in bulk (select all users to whom you're applying policy changes, then choose Edit settings). This bulk option allows you to set not only calling policies, but multiple policies in one action. Figure 11.5 shows the pane that appears when editing multiple policy settings for users on the Users node of the Microsoft Teams admin center:
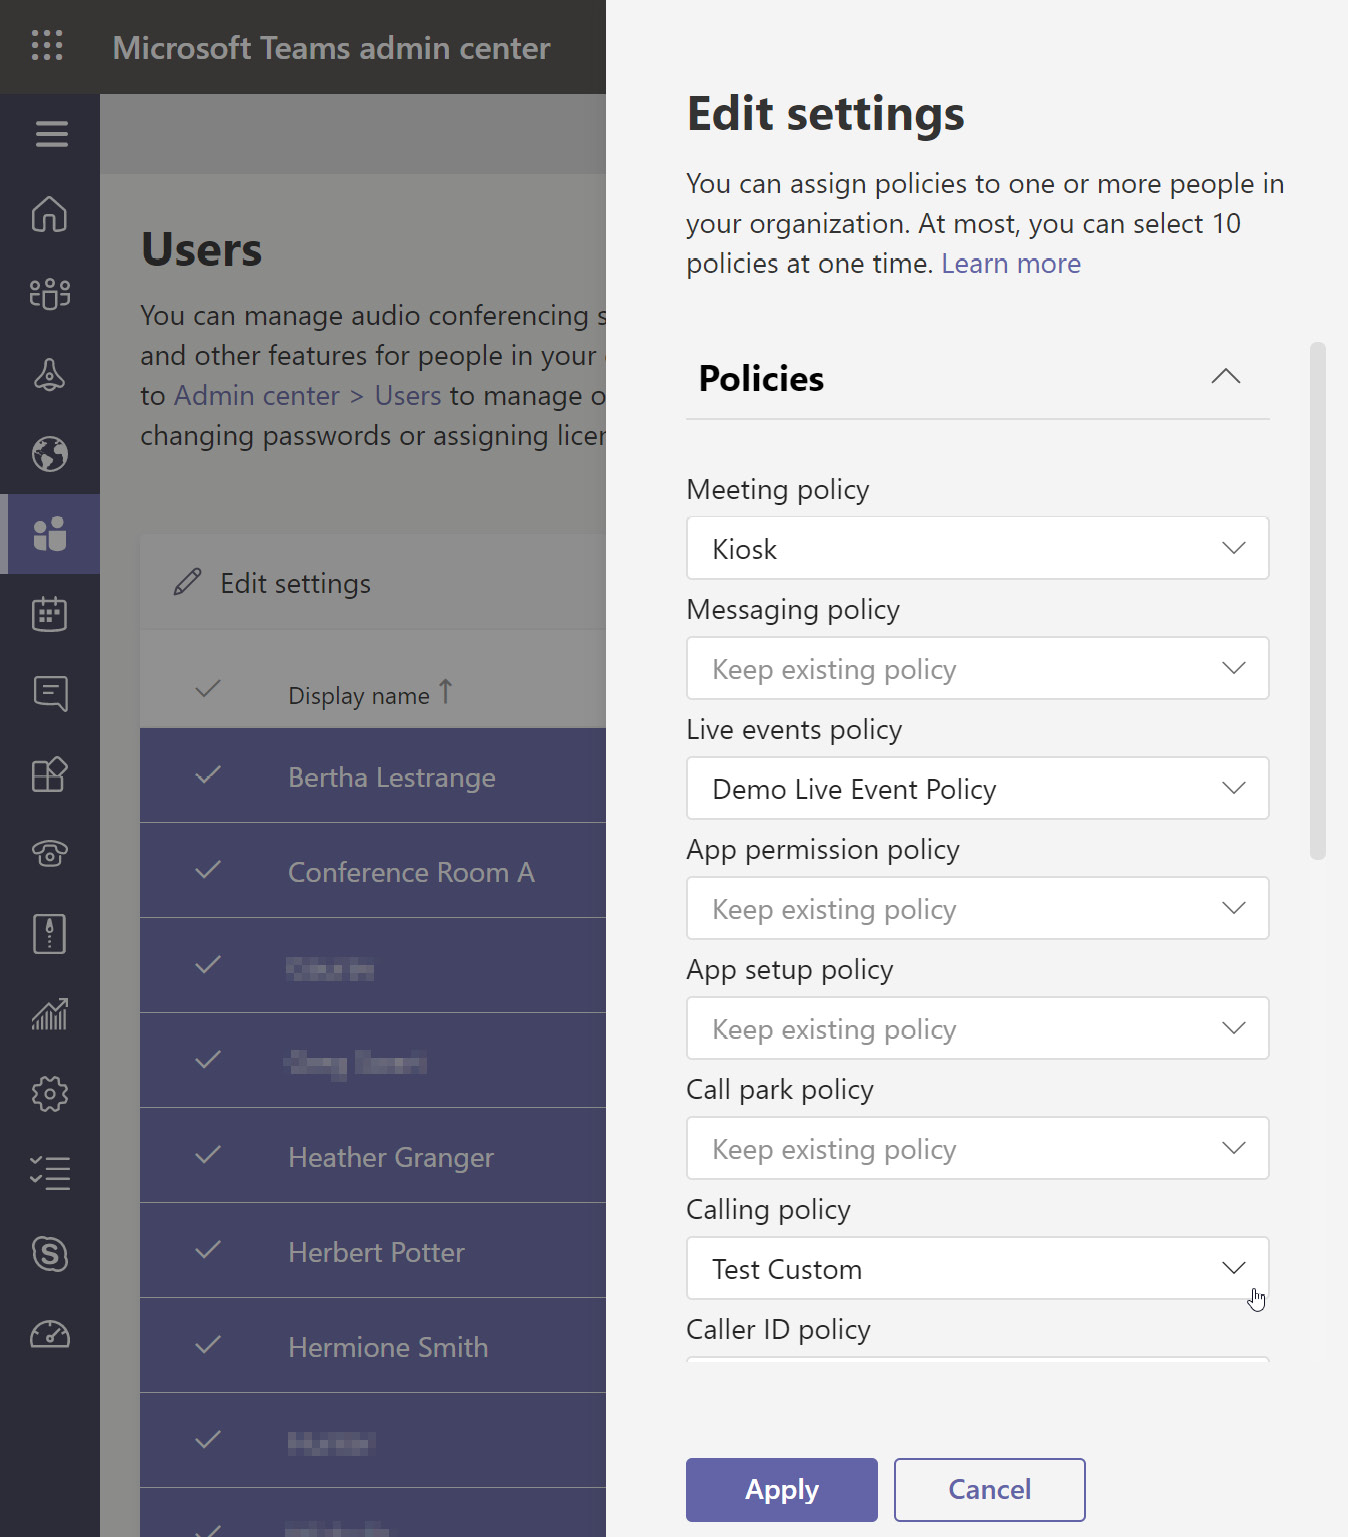
Figure 11.5 – The Edit settings pane of the Users node for bulk policy modification
You can also update calling policy settings via PowerShell using the Set-CsTeamsCallingPolicy cmdlet. An example might be the following, in which we're disallowing call forwarding on the Global policy:
Set-CsTeamsCallingPolicy -Identity Global -AllowCallForwardingToPhone $false
Replace Set with New in order to create a policy rather than modifying an existing policy.
Lastly, let's look at caller ID policies.
Caller ID policies
Caller ID policies either modify or block the caller ID experience for users in your organization. By default, recipients of your users' calls see the user's assigned phone number displayed when they're calling.
You can change the number that displays, which might be helpful when callers from help desk environments don't want personal lines shown but would rather people call a shared queue for the group.
In some scenarios, it may also be helpful to replace all users' phone numbers with an auto attendant for the whole organization if a user makes an external outgoing call to the PSTN. This would make sure returned calls go through a dedicated process rather than calling users directly and having individual lines.
Caller ID policies can be configured with the following settings:

If you choose to enable Override the caller ID policy, users can choose for themselves whether their number or Anonymous shows when they make outbound calls. Figure 11.6 shows a caller ID policy being created that will set the caller ID for its users to Anonymous when they make outbound calls. It also allows the individual users to override that setting and choose to show their number instead:
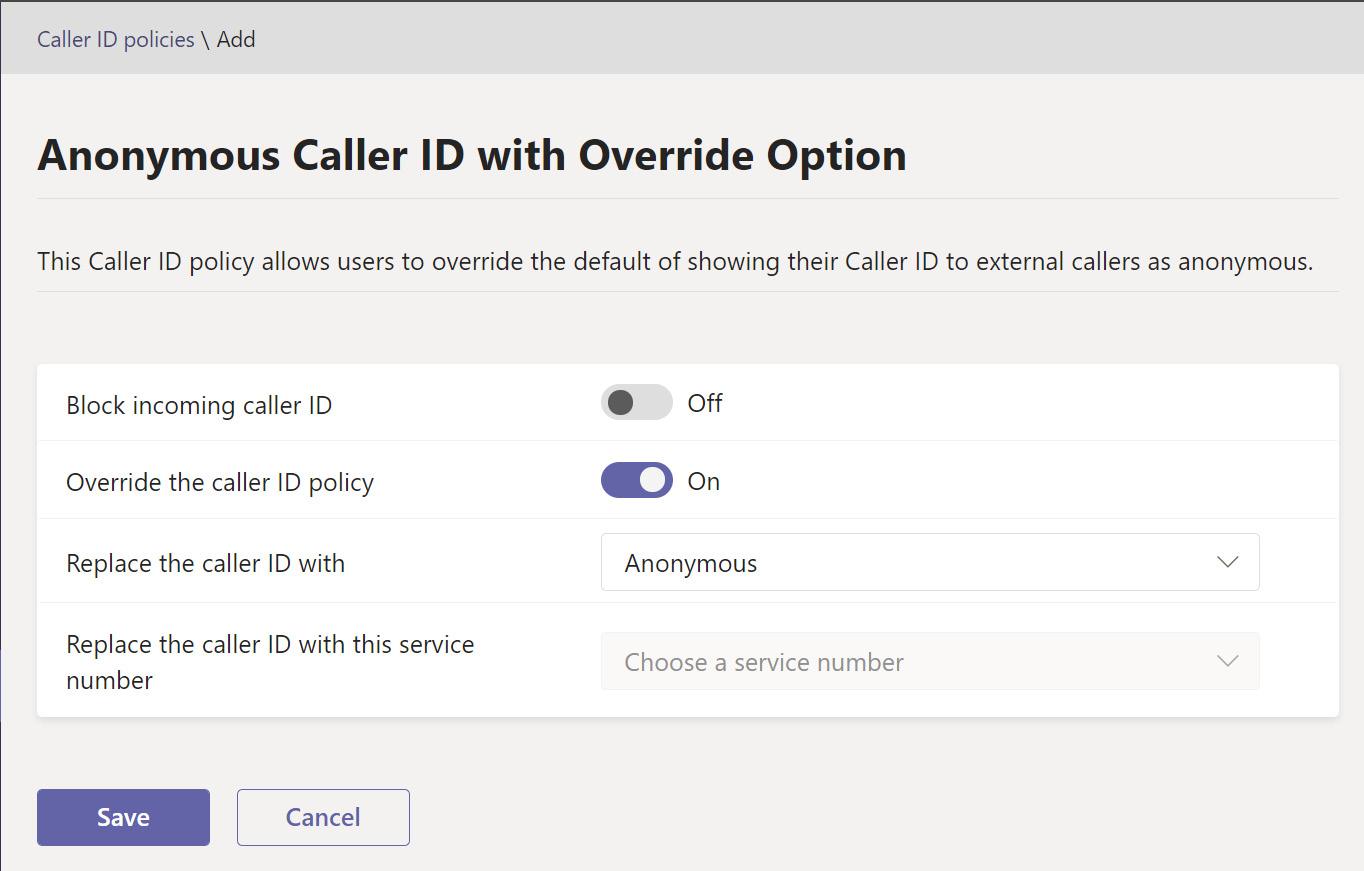
Figure 11.6 – A caller ID policy showing the caller ID as Anonymous but allowing override
Caller ID is also known as Calling Line Identity/ID. This is what's used in the PowerShell cmdlets for Caller ID policies. The cmdlets are New-CsCallingLineIdentity (create new), Set-CsCallingLineIdentity (modify existing), and Grant-CsCallingLineIdentity (assign to users). An example of usage might be the following, where a new caller ID policy is being created that sets the caller ID to display as Anonymous for outgoing calls but allows users to override that setting:
New-CsCallingLineIdentity -Identity AnonymousOutgoing -Description "Anonymous displays for outgoing calls." -CallingIDSubstitute Anonymous -EnableUserOverride $true
Now let's look at how to understand and access Health Dashboard for Direct Routing.
Understanding and accessing the Health Dashboard for Direct Routing
Health Dashboard for Direct Routing measures two main items in your Teams environment when you've deployed an on-premises solution connecting SBCs to your Direct Routing interface. These two measures are as follows:
- The health of connected SBCs
- Information about connected SBCs
For example, this dashboard would be helpful in analyzing dropped call information. This is also the place where, in Chapter 10, Managing Phone Numbers in Microsoft Teams, we set up SBCs, PSTN usage records, and voice routes to be used with voice routing policies.
Health Dashboard can be found via the Microsoft Teams admin center (https://admin.teams.microsoft.com) > Voice > Direct Routing. It consists of a Health Dashboard summary, then areas for SBCs, voice routes, and PSTN usage records.
The Health Dashboard summary shows the following:
- Total SBCs
- Voice routes
- SBCs with issues
The SBCs section of the dashboard lists all of your SBCs and shows the network effectiveness, average call duration, TLS connectivity status, SIP options status, concurrent calls capacity, and whether the SBC is enabled. SBCs can be viewed in list format or as a map using the Map View icon.
The voice routes section lists the priority, name, description, regex pattern, related PSTN usage, and SBCs enrolled for each voice route. These can be searched, edited, and re-prioritized from this tab.
PSTN usage records can be added and deleted from the Manage PSTN usage records panel.
Summary
In this chapter, we covered the management of resource accounts that are used for things such as call queues and auto attendants, which provide a more efficient experience for both the caller and recipient(s).
We then took a deeper dive into the configuration and management of call queues and auto attendants. These are assigned to resource accounts with phone numbers.
We covered three main policies that can alter the Teams calling experience for users: call park, calling, and caller ID. These features enhance user capabilities in your organization and can be configured differently for various users and groups.
Lastly, we explored Health Dashboard for Direct Routing and its components, which only apply to environments that utilize Direct Routing on-premises.
In the next chapter, we'll cover creating and managing teams.
Questions
As we conclude, here is a list of questions for you to test your knowledge regarding this chapter's material. You will find the answers in the Assessments section of the Appendix:
- An auto attendant can read typed text aloud for greetings and menu options so that you don't need to record (and re-record) and upload audio files. True or false?
a. True
b. False
- You've been asked to create a general service desk number that features an automated greeting and hold music when users call. The call must not have menu options once the call is received by the service desk. You'll need to create at least three of the following items to accomplish the goal – what are the most appropriate items to create (select all that apply)?
a. An auto-attendant
b. A call queue
c. A call park
d. A resource account
e. A service number (call queue type)
f. A service number (auto-attendant type)
- Your users need to be able to place a call on hold, then transfer it to other users. What should you create for users who need that ability?
a. Caller ID policy
b. Call park policy
c. Calling policy
d. Voice routing policy
- You have a certain set of users in the organization who should not be interrupted during a call with another call coming in. The caller who would otherwise interrupt should be given a busy signal. What do you configure for users who are not to be interrupted during calls and meetings?
a. Dial plan
b. Call park policy
c. Calling policy
d. Voice routing policy
- You need to make sure outgoing calls from your organization show up on recipients' phones with a centralized, auto attendant phone number rather than the caller's specific, individual phone number. What should you create?
a. Caller ID policy
b. Call park policy
c. Calling policy
d. Voice routing policy
- Your help desk staff are using the longest idle setting in their call queue to determine which agent receives the next call to the queue. One of your agents uses Skype for Business and can communicate with other users and make calls, but they're not receiving any calls from the call queue. What's the cause?
a. The user needs to update their Skype client.
b. The user needs an additional license.
c. Longest idle doesn't work with Skype for Business.
d. Call queues don't work with Skype for Business.
- Agents who use Skype for Business will only receive calls from a call queue if which of the following routing methods are used (select all that apply)?
a. Attendant routing
b. Serial routing
c. Round robin
d. Longest idle
- Which of the following can be used to specify the agents to receive calls in a particular call queue (select all that apply)?
a. Security group
b. Distribution list
c. Teams team members
d. M365/O365 group
- You need auto attendant calls to be handled differently for an upcoming holiday in which most offices will be closed. What two actions should you take?
a. Create a work schedule in Microsoft Teams Shifts.
b. Create a holiday (Org-wide settings > Holidays).
c. Update the auto attendant's call flows during holidays settings.
d. Update the auto attendant's call flow for afterhours settings
- Which of the following is not a Teams voice policy type?
a. Call queue
b. Call park
c. Caller ID
d. Calling
Further reading
Here are links to more information on some of the topics that we have covered in this chapter:
- What is Phone System?: https://docs.microsoft.com/en-us/microsoftteams/what-is-phone-system-in-office-365
- Manage resource accounts in Microsoft Teams: https://docs.microsoft.com/en-us/microsoftteams/manage-resource-accounts
- Create a call queue: https://docs.microsoft.com/en-us/microsoftteams/create-a-phone-system-call-queue
- Set up an auto attendant: https://docs.microsoft.com/en-us/microsoftteams/create-a-phone-system-auto-attendant
- Answer auto attendant and call queue calls directly from Teams: https://docs.microsoft.com/en-us/microsoftteams/answer-auto-attendant-and-call-queue-calls
- Small business example – set up an Auto Attendant: https://docs.microsoft.com/en-us/microsoftteams/tutorial-org-aa
- What are Cloud auto attendants?: https://docs.microsoft.com/en-us/microsoftteams/what-are-phone-system-auto-attendants
- Call park and retrieve in Microsoft Teams: https://docs.microsoft.com/en-us/microsoftteams/call-park-and-retrieve
- Calling policies in Microsoft Teams: https://docs.microsoft.com/en-us/microsoftteams/teams-calling-policy
- Manage emergency calling policies in Microsoft Teams: https://docs.microsoft.com/en-us/microsoftteams/manage-emergency-calling-policies
- Manage caller ID policies in Microsoft Teams: https://docs.microsoft.com/en-us/microsoftteams/caller-id-policies
- Set the caller ID for a user: https://docs.microsoft.com/en-us/microsoftteams/set-the-caller-id-for-a-user
- How can caller ID be used in your organization?: https://docs.microsoft.com/en-us/microsoftteams/how-can-caller-id-be-used-in-your-organization
- Health Dashboard for Direct Routing: https://docs.microsoft.com/en-us/microsoftteams/direct-routing-health-dashboard
- Monitor and troubleshoot Direct Routing: https://docs.microsoft.com/en-us/microsoftteams/direct-routing-monitor-and-troubleshoot