
Chapter 8: Managing Collaboration and Chat within Microsoft Teams
In this chapter, we will examine the collaboration and chat aspects of Microsoft Teams. We will explore the options available to Teams administrators to control which Teams chat features users can leverage by configuring messaging policies. We will also look at how you can control external access to your Teams environment, as well as to SharePoint and OneDrive specifically, since they're integrated but managed separately. Then we will explain the process of creating channels within Microsoft Teams, including private channels. We will then conclude this chapter by examining how email integration and cloud file storage settings work within Microsoft Teams.
In this chapter, we'll look at the skills that will help you meet the test requirements under Manage chat and collaboration experiences in the MS-700 exam:
- Configuring messaging policies
- Managing external access and setting external access options for SharePoint and OneDrive
- Managing Teams' channels and private channel creation
- Managing email integration for Teams
- Managing cloud file storage settings
Technical requirements
In this chapter, you will need to have access to the Microsoft Teams admin center, which you can reach at https://admin.teams.microsoft.com. You will need to be either a Global Administrator or a Teams Service Administrator to have full access to the features and capabilities within the Teams admin center.
You will also need access to the SharePoint admin center for skills specifically associated with managing external access in SharePoint and OneDrive. You'll need to be a Global Administrator or a SharePoint Administrator for the steps involved there.
Configuring messaging policies
Messaging policies allow Teams administrators to indicate which messaging features team owners and members are allowed to use. For example, you may wish to prevent the deletion of sent messages for a specific group of users – a messaging policy is what would allow this.
By default, your organization has a global policy assigned to all users. This global policy can be modified, or you can create additional policies to assign to specific groups and users, leaving the global default in place for users to whom the custom messaging policies won't apply.
Important note
Each user in your organization can only have one messaging policy applied to them at any one time. This affects their experience in all Teams uniformly and cannot differ per team.
Creating messaging policies
To create a new messaging policy, select Messaging policies from the left-hand menu of the Microsoft Teams admin center at https://admin.teams.microsoft.com. Then, click Add.
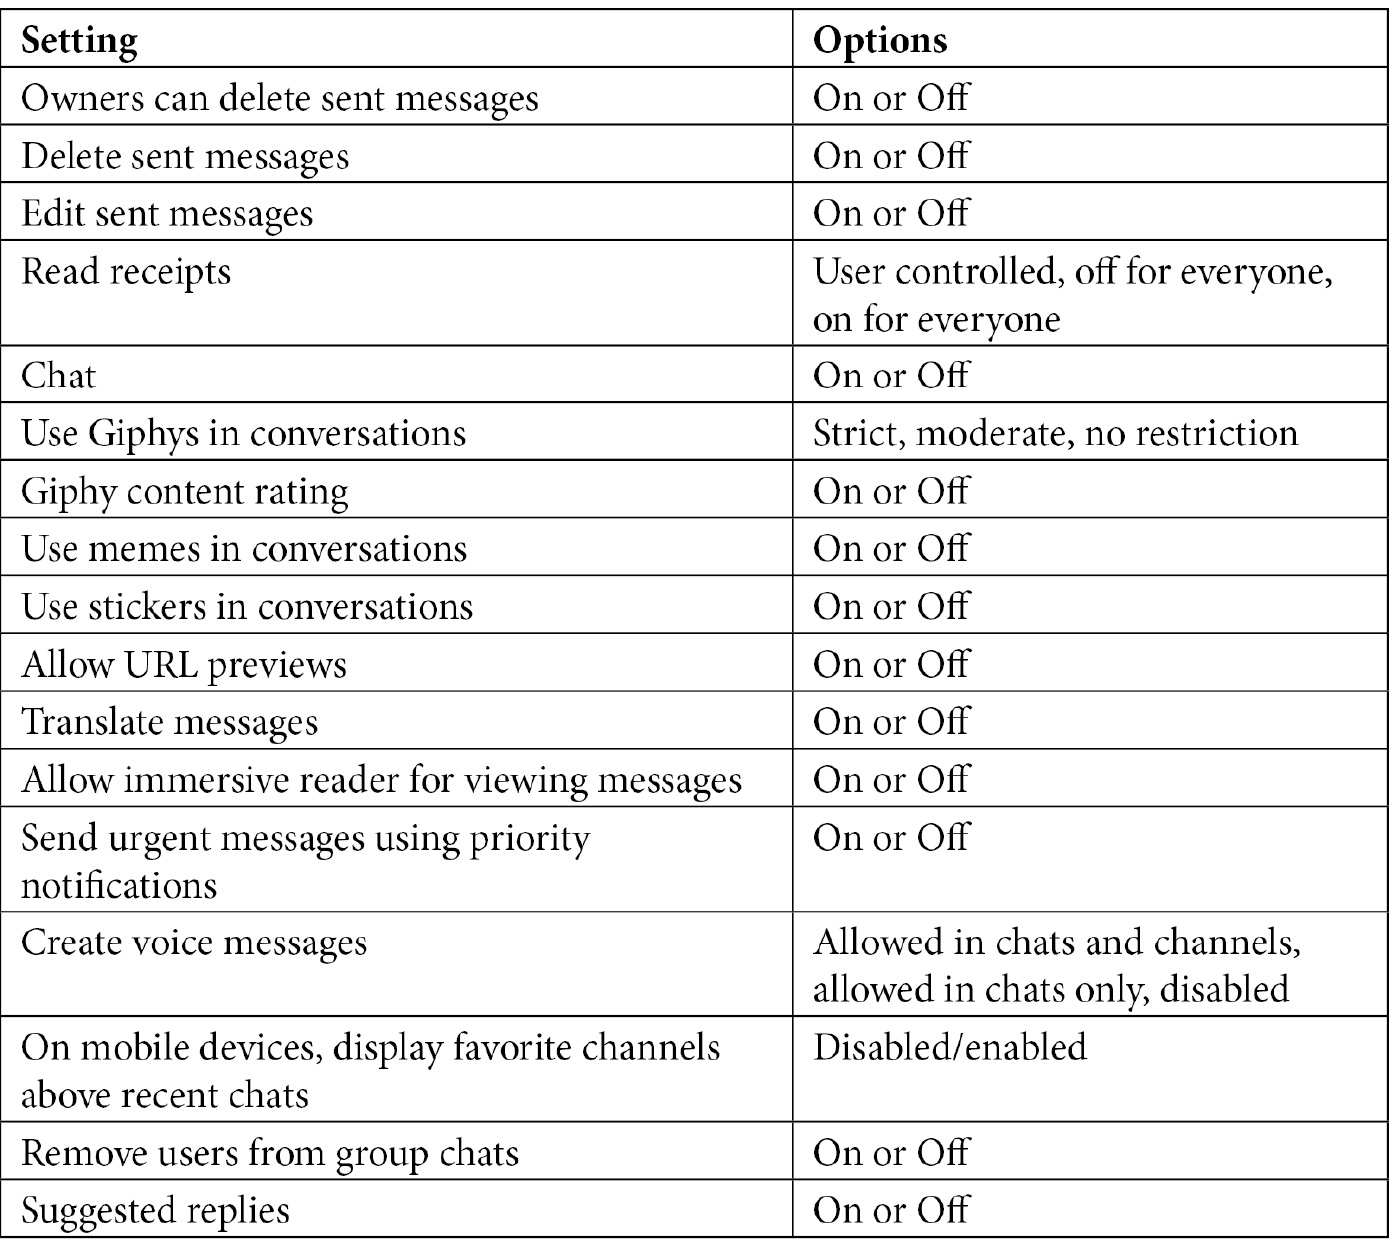
Messaging policies can be configured to affect the following features in Teams:
Important note
To delete a messaging policy, you must first reassign all users currently assigned to it to a different policy before deletion is allowed.
Once the policy is configured and saved, it can be assigned.
Assigning messaging policies
Messaging policies can be assigned to specific users and groups (such as security groups or distribution lists), overriding the current policy assigned to them. This can be done by selecting the new policy, followed by Manage users from the menu. This allows manual assignment of a policy, but can be labor-intensive for large numbers of groups and users:
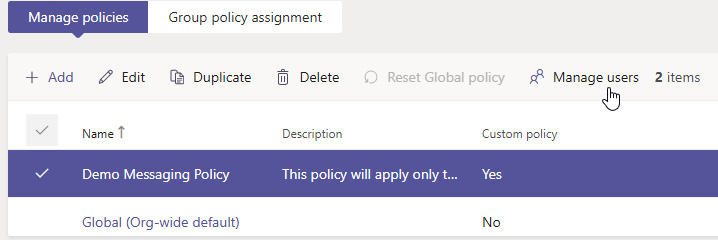
Figure 8.1 – Options available for a selected messaging policy in the Messaging policies section of the Microsoft Teams admin center
For assigning policies to larger batches of users, you can go to Microsoft Teams admin center and then click Users from the left-hand menu. Here you can use the checkmark above the selection column to select all users, or you can filter/search as needed to select the larger group of users for whom you'll be adjusting policy settings:
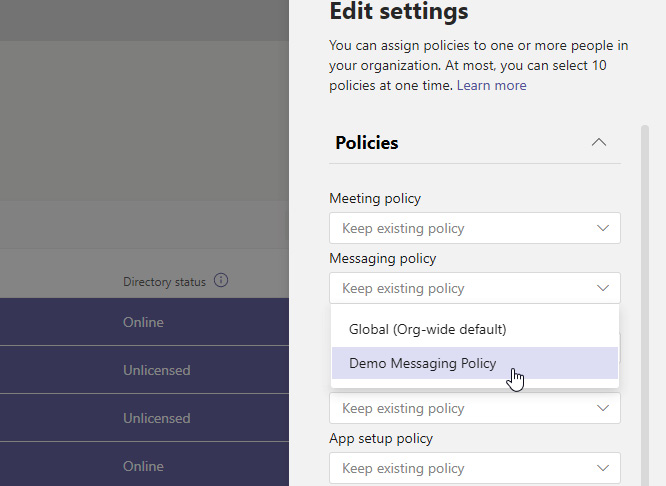
Figure 8.2 – Side panel showing assignment process for multiple types of policies to a large group of users selected in the Users page of the Microsoft Teams admin center
In the event a user is part of multiple groups where each have policies assigned to them, you configure the rank for policies under Group Policy Assignment on the Messaging policies page of the Microsoft Teams admin center. As seen in Figure 8.3, you select a group, enter a numeric rank, and then select the policy assigned to that group:

Figure 8.3 – Side panel for assigning a policy and its rank to members of a specific group
In some cases, the Microsoft Teams admin center may prove too hands-on for large-scale operations. In those circumstances, we turn to PowerShell.
Assigning messaging policies via PowerShell
Using the SkypeForBusiness PowerShell module, you can assign messaging policies to one or more users using the Grant-CsTeamsMessagingPolicy PowerShell cmdlet rather than the Microsoft Teams admin center. In many cases, this would be much more efficient:
- If assigning a messaging policy to one user, you would use something like the following:
Grant-CsTeamsMessagingPolicy -identity "Nate Chamberlain" -PolicyName ITAdminPolicy
- And if assigning to many users, you might filter all users by department or another attribute. That PowerShell command would resemble the following:
Get-CsOnlineUser -Filter {Department -eq 'IT Administration'} | Grant-CsTeamsMessagingPolicy -PolicyName "ITAdminPolicy"
You can also use the MicrosoftTeamsPowerShell module's New-CsBatchPolicyAssignmentOperation cmdlet with the -PolicyType TeamsMessagingPolicy parameter and value to assign a messaging policy to users in bulk. A batch can contain up to 5,000 users. The following example demonstrates how this might look, where users are referenced using SIPs in an array (though it could also be a reference to a text file of SIPs or otherwise):
$users_ids = @("[email protected]","[email protected]","[email protected]")
New-CsBatchPolicyAssignmentOperation -PolicyType TeamsMessagingPolicy -PolicyName ITAdminPolicy -Identity $users_ids -OperationName "Batch assign ITAdminPolicy"
Tip
Replace the -PolicyName parameter's value with $null to unassign the specified policy type for the specified users. The affected users would then fall back to the default (global) policy.
Also located in the MicrosoftTeamsPowerShell module is the New-CsGroupPolicyAssignment cmdlet. This allows a policy to be assigned to a security group or members of a distribution list. Note that group policy assignment is only recommended for groups with no more than 50,000 users. In the following example, using the HR department group's SIP, we use this cmdlet to assign the AllOn policy to its members:
New-CsGroupPolicyAssignment -GroupId [email protected] -PolicyType TeamsMeetingPolicy -PolicyName AllOn
Next, we'll cover external access in Teams, as well as SharePoint and OneDrive as they relate to Teams.
Managing external access and setting external access options for SharePoint and OneDrive
For admins more familiar with external access settings in SharePoint and OneDrive, it may be confusing to differentiate between guest access and external access.
External access allows the users of Teams in other domains to find you and use the communication features of calling, chatting, and setting up meetings with you. They do not have individual team or channel access, or access to the SharePoint content in the backend. It's strictly communication and meeting abilities. External users do not have to sign out of their own domain/organization in order to be able to communicate with you in yours.
Guest access is the ability to allow a user from another organization to be a member of a team. In addition to communication features, guest access members can also collaborate in Teams, channels, and on files. They have mostly the same team capabilities as internal members (unless a guest policy has been adjusted to make them more restricted). Guests may have to switch organizations within the Teams client so that they can sign in to your Team(s) using the email address that included the invitation to join. Guests added to Teams (by owners or admins) are added to your organization's Azure Active Directory as guests.
Tip
To see a full comparison of the abilities granted to external access versus guest access, check out https://docs.microsoft.com/en-us/microsoftteams/communicate-with-users-from-other-organizations#compare-external-and-guest-access.
In this section, we are focusing on external access. To explore guest access more, review Chapter 4, Configuring Guest Access in Microsoft Teams.
Configuring external access settings in Microsoft Teams
To get to external access settings for Microsoft Teams, go to Microsoft Teams admin center at https://admin.teams.microsoft.com and select Org-wide settings from the left-hand menu. Then, choose External access.
External access settings include the following:

If you block a domain, all others will be allowed unless you list others explicitly. For example, if you block external access for users in the contoso.com domain, users from any other domain (unless also listed as blocked) are still allowed.
If you allow a domain, all others will be blocked. For example, if you choose to allow external access to contoso.com, no other domains will be allowed to be used with external access unless they're also explicitly listed as allowed in the External access settings.
Important note
Allowed/blocked domains only apply to meetings if the anonymous access setting for meetings is set to off. If it is on, allowed/blocked domains listed in the External access settings will be disregarded for meetings.
When allowing/blocking domains, the settings are quite simple. You enter the domain, followed by your decision to allow or block it, as seen here:
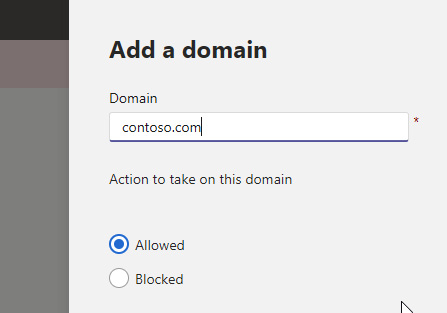
Figure 8.4 – The right panel when adding a domain to be allowed or blocked in the External access settings of the Microsoft Teams admin center
You would not mix allowed and blocked domains as that configuration would conflict with itself. Typically, you'd decide that you want to either allow a specific list of domains or block a specific list of domains.
Configure external access for SharePoint and OneDrive for Business
Teams uses SharePoint for Teams channel file storage, and OneDrive for Business for 1:1 and group chat file storage. The external sharing settings applied to SharePoint and OneDrive for Business (which are shared settings) do affect users' experiences in Teams since Teams' External access settings do not override them. You should configure both (Teams and SharePoint) external access/sharing settings so that they work well together and do not conflict or restrain users unintentionally.
You find the External sharing settings for SharePoint by going to the SharePoint admin center at https://YOURTENANT-admin.sharepoint.com and selecting Policies > Sharing from the left-hand menu.
SharePoint admin center adds the following External sharing settings to content stored in SharePoint and OneDrive, but accessed via Teams. Note that SharePoint's external sharing settings apply to guest users (those invited as team members), but not those simply with external access (to communicate via Teams chat and meetings, for example):

You can see these options in Figure 8.5:

Figure 8.5 – The External sharing settings section of the SharePoint admin center's Policies > Sharing section
Important note
Any changes made in the SharePoint admin center's External sharing settings are global throughout your SharePoint environment, but should be considered the baseline policy. Individual sites can have unique, stricter (but not more permissive) settings that could affect Teams sharing experiences.
So even if your Teams' settings for guest users are most permissive, if SharePoint has restricted sharing settings, those will apply to SharePoint content despite its usage via the Teams interface.
Next, let's look at managing Teams channels.
Managing Teams' channels and private channel creation
In this section, we're going to cover management of Teams channels, but also policies that enable or disable your team owners' ability to create private channels.
Microsoft Teams channels allow for a team's separation of conversations and collaboration activities by task, subgroup, product, topic, and so on. Each team channel has a Files tab that mirrors a folder sharing the channel's name in a document library on the team's affiliated SharePoint Online site collection. If you had six channels in a team, there would be six folders in the affiliated site's document library, for example.
Each channel always has its own conversation thread, its own unique set of tabs along the top, and some channels can also be private, with a unique subset of members from the parent team.
To see all the channels in an existing team via the client, look in the Team's settings (click the ellipsis next to the team name, and then Manage team). There's a tab in the Team settings for channels. For each team, you can choose to show or hide each channel for you, for members, or both by selecting the Show for me and/or Show for members checkboxes. If hidden, the channel is just included in an expandable list of hidden channels. This allows you to make higher priority or important channels always readily available/visible, while less important channels can be collapsed and placed out of sight.
From the Channels tab, you can also perform the following actions:
- Search for channels
- See all the channel names, grouped by active and deleted
- See channel types (standard/open or private)
- See the latest activity by channel
- Create new channels
- Manage individual channels via their ellipses
Under Manage individual channels via their ellipses, we have the following options:
- Channel notifications
- Pin/Unpin
- Manage channel (see next section)
- Get email address
- Get link to channel
- Edit the channel
- Connectors
- Delete this channel
Managing channels for a team
Each channel in a team has its own Channel settings. These are found by selecting the three dots/ellipsis next to a channel's name and selecting Manage channel:
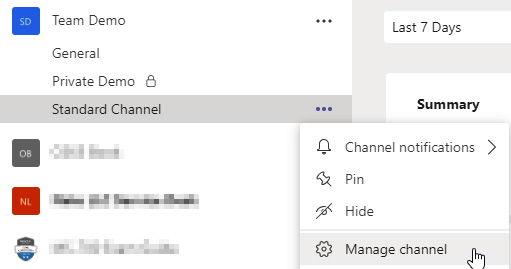
Figure 8.6 – The location of the Manage channel option for a specific channel is found on its ellipsis menu in the left-hand Teams navigation panel
Let's now look at some of the options for managing the channel.
Channel moderation
As a team owner, you can enable channel moderation for a team. This means an owner can select an individual in the team who can start new posts and reply to existing posts. Channel moderation is different for a team's general channel than it is for additional channels.
For general channels' moderation settings, an owner can choose one of the following:
- Anyone can post messages
- Anyone can post; show an alert that posting will notify everyone (recommended for large teams)
- Only owners can post messages
For standard (additional) channels, owners can choose whether Channel moderation is On or Off. If it's Off, the owner chooses whether everyone (selected by default) or everyone except guests can start new posts. If it's On, the owner specifies the following:
- Moderators (the list of moderators is set to Team Owners by default, but additional members can be added. Team owners cannot be removed, however.)
- Team member permissions (multi-select)
The options that appear under Team member permissions are as follows:
- Allow members to reply to channel messages
- Allow members to pin channel messages
- Allow bots to submit channel messages
- Allow connectors to submit channel messages
You can see an example of a standard channel's settings in the following screenshot:
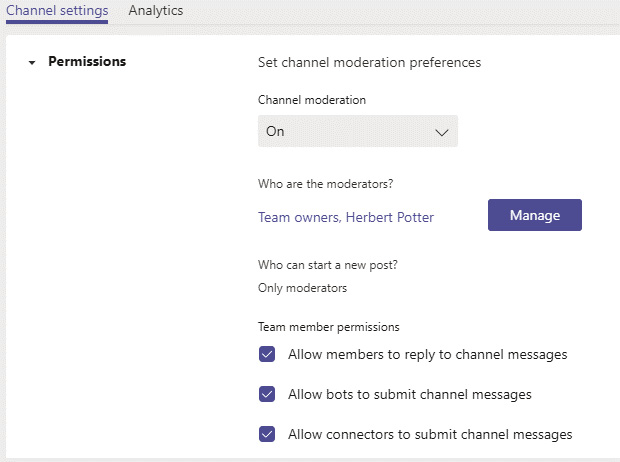
Figure 8.7 – The channel settings (not general or private)
Let's now move on to the next option – channel analytics.
Channel analytics
Team owners can also see analytics for each channel for the last 7, 30, or 90 days. Analytics include the following:
- Summary: The number of users and the number of apps
- Engagement: The number of posts, replies, mentions, and reactions
Private channel difference
Because private channels have separate membership management and their own separate SharePoint site collection, their settings more closely resemble a full Team's settings. In addition to the Settings and Analytics tabs, a private channel has members for the management of members from the parent team that also need access to the private channel:
Figure 8.8 – Private channel settings, closely resembling those of a full team
Because private channels do provision a new site collection in SharePoint, governance over the ability to create private channels should be considered thoughtfully. Next, we'll cover how to restrict the ability to create private channels (and therefore separate SharePoint site collections).
Managing private channel creation policies
Private channels only appear for members of that private channel within a team. While all team members see the standard/general channels, you have to be made a member of private channels within that team separately. Private channels do not share a SharePoint site collection with its parent team – they are provided with a new, separate SharePoint site collection to maintain the security boundary of the parent team.
Important note
Private channels can have a maximum of 250 members. A team can have up to 30 private channels, including deleted private channels deleted in the previous 30 days. After 30 days, these soft deleted channels will no longer count toward the 30 max figure.
Team owners can restrict private channel creation from Team settings: Settings > Member permissions > Allow members to create private channels. But you, as a Teams Service Administrator, can restrict specific users and groups from creating private channels regardless of individual team settings. To manage who can create private channels, you'll create a Teams policy in the Microsoft Teams admin center.
You may wish to simply use the default global policy to set private channel creation to on or off for all users. In other cases, you'll want to create a new Teams policy to turn it on for some users and off for others.
To create a new Teams policy, perform the following steps:
- Click Teams > Teams policies from the left-hand menu of the Microsoft Teams admin center.
- Then, click Add.
- To restrict the creation of private channels, you'll simply give the policy a name, description, and toggle off the Create private channels option.
- Save the policy, and then apply it to users or groups using the Manage policies or Group policy assignment tabs, respectively:

Figure 8.9 – A new Teams policy in which private channel creation has been disabled
You could also create this policy via PowerShell using the New-CsTeamsChannelsPolicy cmdlet with the -AllowPrivateChannelCreation parameter set to $false. For example, a full command might be as follows:
New-CsTeamsChannelsPolicy -Identity RestrictPrivateChannels -AllowPrivateChannelCreation $false
Now, let's explore email integration in Teams.
Managing Email integration in Teams
Email integration in Teams allows users to email channels in order to post. You can find a channel's unique email address by clicking the ellipsis button (three dots) next to a channel name and then Get email address. Emails sent to this address post like any other post in the channel conversation, and replies to the post do not get sent back to the emailer – they act as a normal reply to a normal post.
From the Microsoft Teams admin center, you can find the org-wide Email integration settings by choosing Org-wide settings > Teams settings from the left-hand menu. Scroll down on the Teams settings page until you find the Email integration section:

Figure 8.10 – Org-wide Email integration settings in the Microsoft Teams admin center
Here, you can choose whether users can email unique channel email addresses as a method of posting in the channel. You can restrict allowed domains to make sure users are only emailing from your organization(s), or leave this option blank to allow any email address to post to the channel.
You can also adjust email integration settings per team, rather than at the tenant level. To adjust your individual team's email integration settings, choose the ellipsis next to a channel name and choose Get email address. Then, choose Advanced settings. Here, you can see (and remove) the channel's email address as well as choose one of the following:
- Anyone can send emails to this address
- Only members of this team
- Only email sent from these domains (and specify those domains in the accompanying textbox, comma-delimited)
Important note
Troubleshooting successful email delivery to channels: In addition to the settings previously mentioned being configured, an email must satisfy certain criteria in order to be delivered and posted to a channel. Emails must have fewer than 51 inline images, have fewer than 21 attachments, and have no attachment greater than 10 MB. If the email meets these criteria, the feature is enabled, the sender's domain is allowed, and the email will be delivered. You should also check to make sure the channel's associated folder in SharePoint hasn't been deleted or renamed.
Lastly, we'll take a look at the cloud file storage settings within Teams.
Managing cloud file storage settings
Each team (and channel) can have unique cloud storage options configured for its members. A team member might do this when they have pre-existing storage in Google Drive that they intend to use alongside their channel's auto-provisioned SharePoint document library folder.
To add cloud storage to a channel's Files tab, perform the following steps:
- Go to the Files tab and select Add cloud storage.
- From here, you can select which cloud storage provider you'd like to add to the channel's Files tab.
This doesn't grant permission to the cloud storage location. Users must individually have access to the third-party provider location in order to be able to view it integrated in Teams:
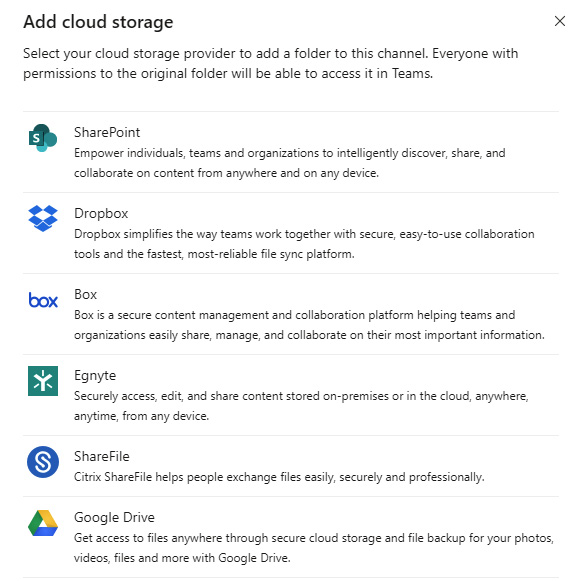
Figure 8.11 – Cloud storage options for team members adding cloud storage to their channel's Files tab
Once a location has been added, it appears as a folder on the Files tab alongside content stored in the default SharePoint location.
In the Microsoft Teams admin center, you can enable or disable specific cloud storage providers, as seen in the following screenshot, from the configuration options available in the Microsoft Teams admin center: Org-wide settings > Teams settings > Files. The options you can enable or disable correspond to the cloud storage options presented to team members seen previously:

Figure 8.12 – Cloud storage options are found under the Files section of the Teams settings in the Microsoft Teams admin center
Since SharePoint is required for Teams' file storage in the backend, it cannot be disabled.
Summary
In this chapter, we covered the configuration and assignment of Microsoft Teams messaging policies to users via the Microsoft Teams admin center and PowerShell. This allows us to customize the messaging experience of our users to meet compliance, governance, or user experience requirements.
We then covered external access to Microsoft Teams, as well as SharePoint and OneDrive as they relate to our usage of Microsoft Teams. Understanding how these apps share responsibility access to content helps us protect our teams and the related business processes from potential vulnerabilities.
Next, we covered channel creation, both standard and private, followed by email integration in Teams, and lastly managing cloud file storage settings. Each of these aspects come together to create a robust collaboration environment that exists within our specifications.
In the next chapter, we'll begin exploring the management of meetings and live events in Microsoft Teams.
Questions
As we conclude, here is a list of questions for you to test your knowledge regarding the material covered in this chapter. You will find the answers in the Assessments section of the Appendix:
- You've determined that a messaging policy is no longer needed in the organization and should be deleted. The users who are currently assigned to it need to be reverted to the global default policy. What course of action should you take?
a. Use PowerShell to delete the unnecessary policy.
b. Use the Teams admin center or PowerShell to reassign the global policy to affected users, and then delete the unneeded policy.
c. Email team owners with a request to assign the affected members to the global policy.
d. Delete the unnecessary policy from the Teams admin center. The assigned policy of affected users will automatically fall back to the default global setting.
- True or false? Users can have up to three messaging policies assigned to them at any one time. In the event of conflicting policy settings, the last to be assigned takes precedence.
a. True
b. False
- True or false? Users can have one messaging policy assigned to them at any one time. In the event that they are a member of multiple groups that have conflicting messaging policies assigned to them, the group with the higher numeric rank in Group messaging policies will take precedence.
a. True
b. False
- You need to prevent your tailspintoys.com users from messaging external recipients in the contoso.com domain. You create a messaging policy. Does this accomplish your objective?
a. Yes
b. No
- You need to prevent your tailspintoys.com users from communicating with contoso.com users in chats and meetings. Guest users are not allowed in your organization, so the solution just needs to address communication between organizations. What should you modify?
a. Guest access
b. Messaging policies
c. Meeting policies
d. External access settings
- You don't want to restrict contoso.com users from external access calls and meetings, but you do want to ensure that they aren't sent share links to content found in Teams (but stored in SharePoint). You therefore change the Microsoft Teams External access settings. Could this accomplish the goal?
a. Yes
b. No
- You don't want to restrict contoso.com users from external access calls and meetings, but you do want to ensure that they aren't sent share links to content found in Teams (but stored in SharePoint). You change the SharePoint External sharing settings. Could this accomplish your goal?
a. Yes
b. No
- You're receiving support tickets saying guest users cannot access files or shared notebooks in Teams that they are members of. There are no issues with communication features such as chats or channel conversations. Where should you configure external sharing to ensure that these users can also get to the files and notebooks?
a. SharePoint Online admin center
b. Azure AD admin center
c. OneDrive for Business admin center
d. Microsoft Teams admin center
- You've been asked to restrict a group of users who haven't completed Teams training from creating private channels. What should you create in the Microsoft Teams admin center that you can apply to those users/groups so as to prevent private channel creation?
a. Messaging policy
b. Meeting policy
c. Teams policy
d. Setup policy
- An email sent to a channel in Teams wasn't delivered. Which of the following should you check?
a. Message characteristics (attachment count, image count, and so on)
b. Whether the sender's domain is allowed
c. Whether the feature is enabled at tenant and/or Team level
d. All of the above
Further reading
Here are a number of links to more information on some of the topics that we have covered in this chapter:
- Managing messaging policies in Teams: https://docs.microsoft.com/en-us/microsoftteams/messaging-policies-in-teams
- Grant-CsTeamsMessagingPolicy: https://docs.microsoft.com/en-us/powershell/module/skype/grant-csteamsmessagingpolicy?view=skype-ps
- New-CsBatchPolicyAssignmentOperation: https://docs.microsoft.com/en-us/powershell/module/teams/new-csbatchpolicyassignmentoperation
- Managing Teams policies in Microsoft Teams: https://docs.microsoft.com/en-us/microsoftteams/teams-policies
- Managing external access in Microsoft Teams: https://docs.microsoft.com/en-us/microsoftteams/manage-external-access
- External sharing overview: https://docs.microsoft.com/en-us/sharepoint/external-sharing-overview
- Communicating with users from other organizations in Microsoft Teams: https://docs.microsoft.com/en-us/microsoftteams/communicate-with-users-from-other-organizations
- Setting up and managing channel moderation in Microsoft Teams: https://docs.microsoft.com/en-us/microsoftteams/manage-channel-moderation-in-teams
- Overview of teams and channels in Microsoft Teams: https://docs.microsoft.com/en-us/microsoftteams/teams-channels-overview
- Seeing all the channels in a team: https://support.office.com/en-us/article/see-all-channels-in-a-team-15bb047f-a20e-4774-8718-8cd14161b6d0
- Creating a channel in Teams: https://support.office.com/en-us/article/create-a-channel-in-teams-fda0b75e-5b90-4fb8-8857-7e102b014525
- Managing the life cycle of private channels in Microsoft Teams: https://docs.microsoft.com/en-us/microsoftteams/private-channels-life-cycle-management
- Private channels in Microsoft Teams: https://docs.microsoft.com/en-us/microsoftteams/private-channels
- Managing teams' policies in Microsoft Teams: https://docs.microsoft.com/en-us/MicrosoftTeams/teams-policies
- New-CsTeamsChannelsPolicy: https://docs.microsoft.com/en-us/powershell/module/skype/new-csteamschannelspolicy
- Managing Microsoft Teams settings for your organization: https://docs.microsoft.com/en-us/microsoftteams/enable-features-office-365
- Sending an email to a channel in Teams: https://support.office.com/en-us/article/send-an-email-to-a-channel-in-teams-d91db004-d9d7-4a47-82e6-fb1b16dfd51e
- Managing who can send email to a channel in Teams: https://support.office.com/en-us/article/manage-who-can-send-email-to-a-channel-in-teams-4f1a1224-e71b-45de-8f68-8e08f7874fa9
- Managing Microsoft Teams settings for your organization: https://docs.microsoft.com/en-us/microsoftteams/enable-features-office-365