
Chapter 11: Items and Related Lists
Items are a key part of every NetSuite implementation since they represent more than just what the business buys and sells. They're also used to define the charges and fees, discounts, and other accounting-related things the company needs to keep track of. Every consultant needs to learn how to correctly set up items, as well as related lists in NetSuite, to avoid problems or confusion later on.
In this chapter, we will cover the following topics:
- Enabling item types, inventory management options, and so on
- Defining the item forms and fields
- Defining purchase prices and sales pricing for items
- Setting up Matrix item types and Item Options
- Setting up other item types as needed
You will be working primarily with the people who have been put in charge of owning the list of items from your client's subject matter experts for the work in this chapter. Those people might be from the IT department, the product team, or elsewhere within the company. They each need to understand how to add, edit, import, and remove items by the time they get through these topics.
Enabling item types, inventory management options, and so on
Starting from your client's requirements (which you should have already gathered, as described in Chapter 7, Getting to Know the Organization's Customers, Other Entities, and Items), you can now go into their account and start to enable the Item and Inventory features they need. We do this via the Enable Features screen, which can be found via Setup | Company | Enable Features. You should have previously visited this screen with the client to make basic system-wide choices and to set up the accounting features. Now, you can use the General tab to make choices that will affect the business' use of items, such as whether they need the Multiple Units of Measure and Multiple Currencies features. Then, visit the Items and Inventory tab to make further configuration choices.
There are approximately 40 choices on this screen, so we won't cover them all, but it's important to carefully consider each of your choices as you work your way down this list. Which of these you enable will vary with your client's industry, and also with how they will use items within the system. Make sure you're familiar with each option. You need to know, for instance, which native features will cover your client's requirements and whether any additional customizations are needed to get them up and running.
For instance, with a feature such as Gift Certificates, NetSuite's implementation is generally limited and only works in one particular way. You must know how closely your client's requirements match the system's feature before you decide to enable it here. This is because if the native feature doesn't help your client, then you're better off leaving this feature disabled (as it is by default) and replacing it with some other solution (such as one from a SuiteApp/partner or customization you create for the client specifically). The users should not have to guess which Gift Certificates screen they should go to – the native one or the custom one – so don't enable the native option if they won't use it at all.
Some of these options require you to enable other, related options or make irreversible changes to the account once enabled. For instance, Inventory Status requires the use of the Advanced Bin/Numbered Inventory Management option. And enabling the Advanced Bill of Materials feature makes changes to various item screens so that it's difficult to undo later. If you have access to one, it's always a good idea to try changes to features like these in a Sandbox account first, either yours or the clients, to make sure you understand the full effects each change will have on the account.
Once you've enabled the features your client needs, the next step is to start defining item forms.
Defining the item forms and fields
We will start the defining process by reviewing the forms for each of your client's critical item types – Inventory, Non-Inventory, Service, and Discount – and making sure they're set up to work as per the client's requirements. (This can be done by going to Customization | Forms | Entry Forms).
Here's what the default form screen looks like for Inventory Part items:
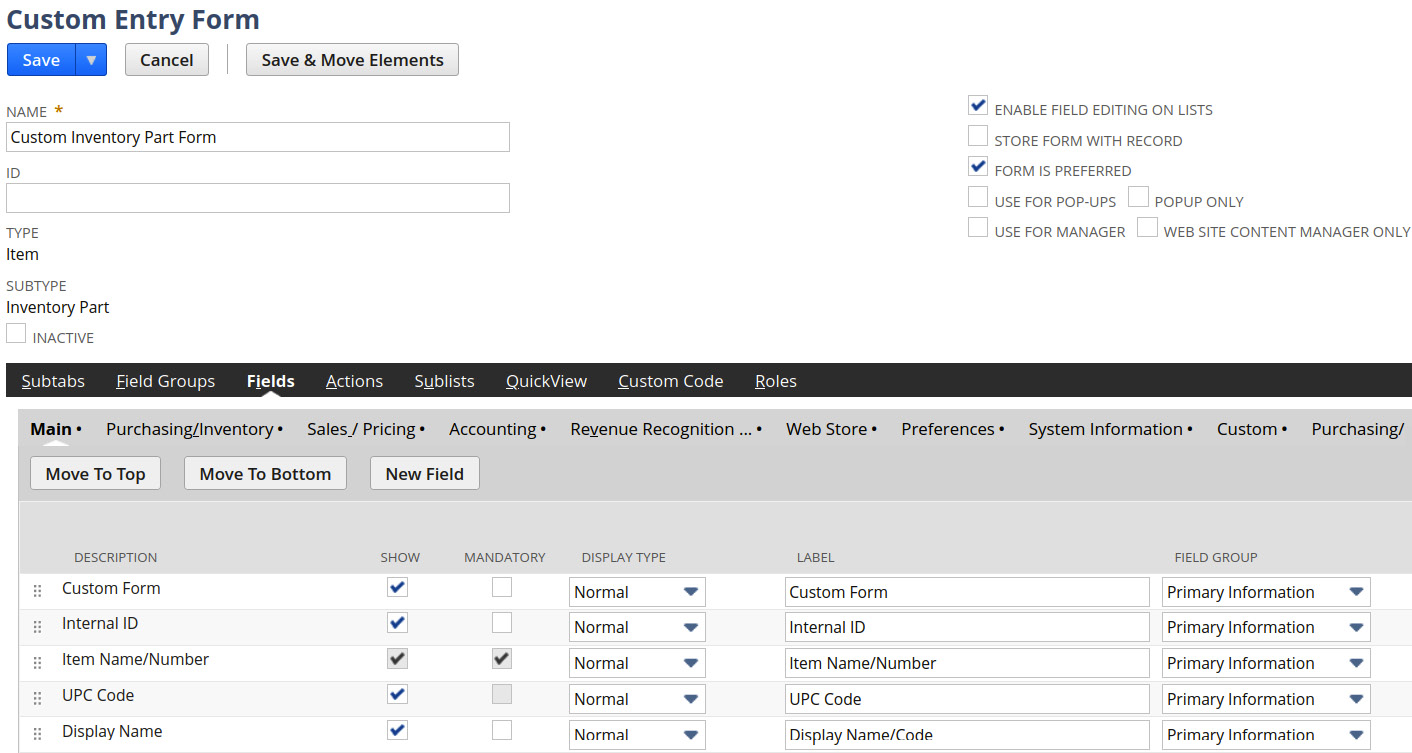
Figure 11.1 – The default Inventory Item form with the fields list
As I've mentioned in prior chapters, take this time to remove anything the users don't need to see while you're doing this. Create a copy of each of the standard forms with a name including the client's initials, and save each item type form. Some clients will need multiple forms for one type, such as for Inventory or Assembly Items. We always try to stick to just one form per item type, but special circumstances drive us to solutions like this sometimes.
Once the forms have been set up for every item type, you can start talking to the client about setting up items. It's fine to show the users how to set up an item manually a few times, via clicking around in the UI, since this allows them to become familiar with the lists and fields, but then we always end up performing CSV imports for the majority of the items list. This ties into the forms' designs too, since the list of fields they should include in the CSV Import is directly related to the fields and lists that are available on the form.
We typically provide a CSV template file for their use, in the form of an Excel file, and that should include a set of header rows with explanatory text. This helps them understand the values that will be allowed for each column and gets them up to speed on the native CSV Import format NetSuite will expect from them. We like to make these imports the client's job to perform for themselves because this gets them hands-on practice with interacting with the system, and it also makes them responsible for the success of the imports. That's critical because otherwise, some clients would stand back and hope that their implementation team will complete tasks like this for them. However, they need to see that they can learn to do things like this themselves, with coaching and demonstrations from you, of course.
Depending on the overall length and complexity of your project, a first version of the full items list should have been imported into the account about 20-30% of the way through the project. This is because you can't do it until their requirements are fully understood, but you need to complete this step before you can move on to other things such as setting up customers and transactions in the account later. It's not uncommon for us to realize we have a problem with the way we imported the first set of items, by the way, and in those cases, we erase them (where NetSuite allows) and re-import them, with the data corrected in some way. Just remember – NetSuite won't allow you to completely delete an item with any transactions posted using it, so you might have to remove those first, adding to the time and effort it takes to fix mistakes at this stage. A good amount of planning is needed to avoid these costly mistakes but many of the system's finer points need to be learned first-hand.
Once you have at least a starter list of items in the account, you can add additional details to them, which is common when we must address costs and prices for each item. Let's look at that next.
Defining purchase prices and sales pricing for items
You can establish the prices your client will pay their suppliers for each item and the prices they want to charge at the same time you import items. I've found, however, that many clients have more complex requirements around these two topics, so we typically do this as a follow-on exercise. We define the basics about the items first and then export those item lists from the account as CSV files. Then, we use those files as the starting points for the purchase price and sales pricing updates we make next.
Purchase prices can be defined per item in several different ways, and how each client wants to do this will vary by the item's type, their business needs, and more. The native Purchase Price field is available on every inventory and other item type screens if the client is OK with having just one price per item within the account. Populating this field is optional, though; if we don't set it per item, then NetSuite will set a default price on Purchase Orders based on the most recent purchase order for the same item. We can take this a bit further by setting purchase prices per vendor, on the Purchasing/Inventory sublist. This is useful when the business buys the item from more than one vendor.
NetSuite will automatically update Last Purchase Price via the costs entered onto inbound transactions such as Item Receipts and Inventory Transfers. If your client has Landed Costs to factor in for their items, check out the Help page called Item/Cost Detail for more information on all the features they can use to help with this.
With the Procure to Pay (PTP) prices set, let's talk about the Order To Cash (OTC) prices next. Sales pricing is more complicated. First, we can set a Base Price or MSRP or whatever the client chooses to name this default Price Level. And then a client can define as many additional price levels as they need, which can either set a price as a percentage of that base price or be manually set to any arbitrary amount. These amounts on the item screen control the default for each item, but the actual price that we'll see the system use on the various sales transactions is based on a more complex set of rules. We'll go over that in detail when we get to Chapter 15, Order-to-Cash Transactions.
But for now, just know that sales pricing items are fairly flexible and we should always try to convince each client to stick with the set of native pricing features, if at all possible. This includes setting the Item Group field on the item and using Quantity Pricing Tiers per item, allowing the company to price higher quantities at a lower price, for instance.
In this highly competitive world, though, we know that many companies are successful only when they carefully set their prices versus their competitors, so the native features won't always get us where we need to be. Pricing customizations are fairly common, and there are several SuiteApps and customization bundles available from NetSuite and its partners to help streamline this in the most common ways. For instance, check out Effective Date Pricing in the system's Help pages, or look for more solutions from your NetSuite contacts or the SuiteApp Marketplace (the SuiteApps menu in the NetSuite UI).
Next, let's talk about one of the more complicated item setups that can trip up the progress on a project; that is, if we're not aware of all the potential problems that they can cause if they're not handled correctly – Matrix items.
Setting up Matrix item types and Item Options
When a client needs to track multiple variations of an item, we have a couple of options we can recommend, depending on the situation. First, you might start by suggesting that they use Item Options. This is simply a list of things we can assign to any one item. We might, for instance, have an item called 100% Cotton Hoodie and we know we can sell it in red, blue, or orange styles. So long as we just have a simple set of variations like this, Item Options can work fairly well. We just set the list of options on the item's screen and then we can select from that list when creating a Sales Order later on.
This can be too limiting, though, for many items, and in those cases, we need to go with the more complex Matrix-type items. With Matrix items, the system allows us to define a parent item, the Hoodie in the preceding example, and then a set of child matrix items, each representing one variation of that parent. For instance, if we need to set up and sell separate items for color and size variations, we would create children for the hoodie called Red – XL, Red – L, and Red – M. We can either create these items ourselves via a CSV import, though NetSuite offers Matrix Item Assistant, which walks us through the process of defining the parent and the variations and then creates the child matrix items for us automatically.
This is what that Assistant looks like:
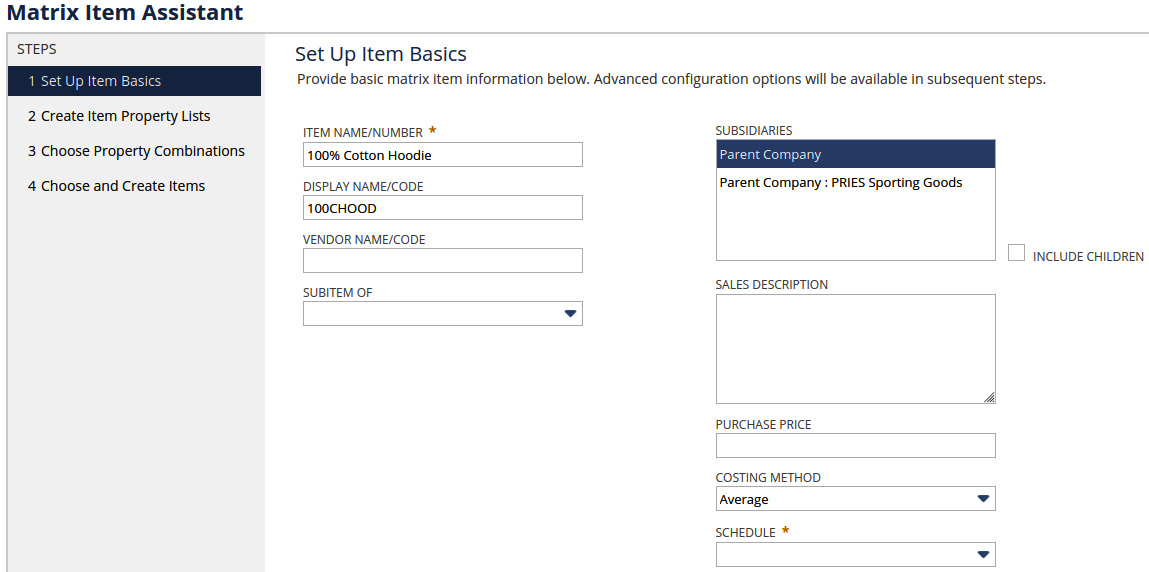
Figure 11.2 – The first screen of Matrix Item Assistant
Assuming you've decided you do need to use Matrix items, this is a good screen to walk your item experts through, since it should help the users understand all the details that go into defining an item of this type. And they'll see what makes Matrix item types different from the non-Matrix types. They can then manage the CSV Imports better, in my experience (and that's how we usually handle this for the full item list).
While we're on this topic, we should take the time to explain how using Matrix-type items is more complicated for the users who do things such as create orders, track item availability, and so on. It's important to show the SMEs how they'll select a matrix item on a Sales Order, for instance, and how Matrix items affect their various inventory and financial reports. This is true for both if you decide to use Matrix items right from the start or have to switch to using them later on in a project (as has happened on my jobs quite a few times).
The system supports many other types of items, of course, so let's review setting up and using a few of those that are commonly implemented.
Setting up other item types as needed
Depending on the features you've enabled for your client's account, they may need your help getting a few other item types set up. The following sections cover the most common of those, but just know that these tend to be simpler to explain and get the client up and running with.
Description
Create a Description type of items when you want to include a text message on transaction lines, but have no price or other details associated with it. For instance, we've had clients who wanted the users to be able to tack on a line to their orders saying something like You received free shipping for the item above! in some cases.
Discount
When you define a discount type item, we do not tell NetSuite how the discount will work (for example, 10% off) and which items it can be used with – we do all that on a separate screen. Discount items are a part of promotion tracking in NetSuite. Some companies will only need the simple promotions the system offers natively, but many need the more robust SuitePromotions SuiteApp when they require control over the discounts being applied.
Here's the screen we will see when setting up a new Discount type item:
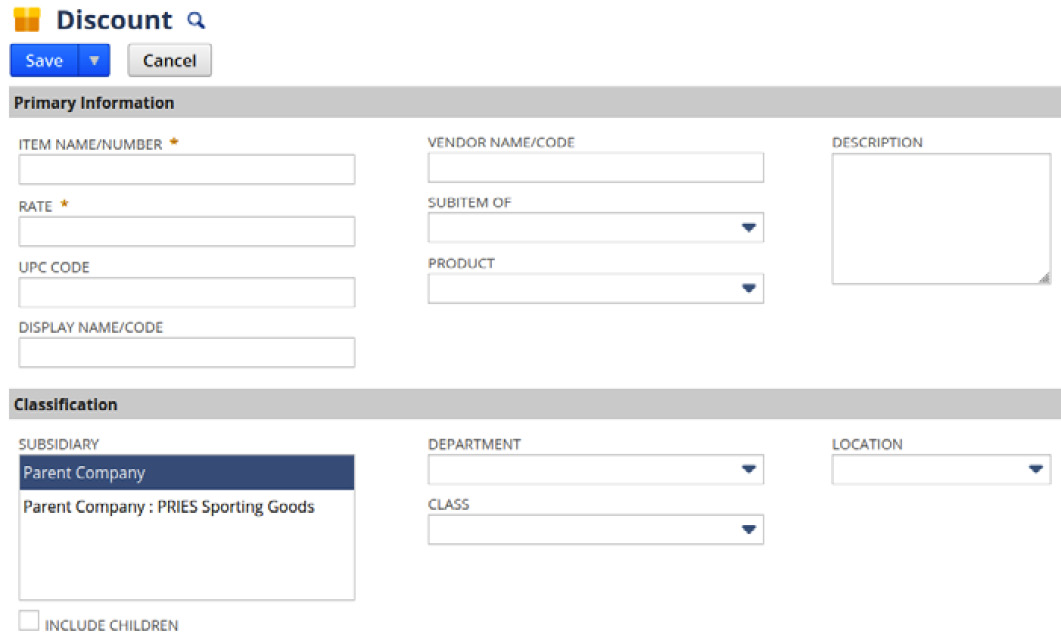
Figure 11.3 – The new Discount item screen is much simpler than for the other types
There aren't a lot of fields to fill in here. We usually include some description of the discount in the item name field though, such as 10% off or Buy one get one free.
Assembly Items versus Item Groups versus Kits
Assembly Items, Item Groups, and Kits are all based on a single item that has a list of components. They differ in how we track the inventory and the pricing for the item that is sold to customers.
Assemblies have to be built in NetSuite via a Work Order (and more, sometimes). Item Groups are simply shortcuts that allow to you enter a set of items onto an order (for instance) rather than making you select all of the component items. They are not stocked or fulfilled as a group, though. Kits are like Groups, except that they can be sold as a single item (but we can choose to have NetSuite display the full component list on Sales Orders if the client wants to see that). Check out the Help page titled Groups, Assemblies, and Kit/Packages for more on this; it's very informative and this is an important topic to know well as you consult your clients.
Other charges
The name of this item type seems very generic, but these items have a specific use. It's typically software and services businesses that need to define these charges as part of their contract or subscription sales. They are simple to define in the system, and they are used in conjunction with the SuiteBilling or other solution's sales process. For instance, if a company sells their customers a subscription to a service, and the customers can incur additional charges when they require additional services, that client will define an Other Charge type item for this purpose.
Subtotal
Some clients want to control the list of items on their invoices very carefully, and in the cases where they need to show a sub-total for any set of items, we use this item type. Setting these up is very simple, and then NetSuite allows users to insert one into an invoice as needed. When we do that, NetSuite calculates the item prices and discounts above the subtotal line and sums them up. The remaining lines on the transaction will have their own subtotal and then the total if one is needed. I've found this to be occasionally needed for my services or software industry clients who send invoices with lots of lines for many items and then need to group them for one reason or another.
Setting up items, in all their various forms, takes time to do right, but it's so key to making the rest of the implementation project go smoothly. At this point, you know how important gathering the requirements for item types and their related lists are in the earlier stage of the project. This is because you can't define these things now without a clear idea of all item uses. You can always come back and repeat any of the preceding steps when new information comes to light – and you most likely will need to – but getting things set up right the first time is still a big help to everyone working on the implementation.
Summary
We typically spend anywhere from 2 weeks to a month working with a client, getting their items list set up in the system initially. We then tweak the items' definitions throughout the rest of the implementation, right up until we go live. Most of the details you set initially can be changed later, but some are tougher to modify, such as the item's type. Following this book's order of events, you should have clear requirements documented before you start to define items in an account. However, we're always open to changing our plans as our understanding of the client's business changes over time.
This chapter should make it clear that the order in which we perform setup steps in an account is very important, and you should note that we need to have a good, solid first pass on the full item list that's imported into an account before we tackle setting up and processing transactions. We'll start that work in Chapter 13, Financial Transactions and Period Closes, right after we spend some time setting up the customers and other entity records in Chapter 12, Customers, Vendors, Contacts, and Other Entities.
Self-assessment
Here are some challenges for you to consider, which I hope will make you think about how you might handle situations like these within your implementation projects:
- Your client tells you that in addition to all the products they sell, they also need to offer their customers a way to download user manuals in PDF form for some items. What's one way you can use a native NetSuite feature to meet this demand?
- Your client likes the feature that allows them to define a new item record in a pop-up window, such as for new discounts they enter on the fly, but they want to control the list of fields available in that popup. Is there a way you can set up the item form for just this use case?
- The warehouse manager needs to be able to directly edit item record details such as the stocking units or preferred Bin. But they're complaining about having so many fields on the screen that are not related to their work. How can you help them with this?
- One of your clients wants to be able to sell items that they purchase from a supplier and which are then always directly shipped to their customers. Since they never have possession of these items, they probably should not create them as inventory items. How should they set them up in their account?
- You show your client how Matrix items work in NetSuite and they're put off by the extra steps involved in creating and using them on transactions. They need to track a small list of combinations of color and size for just a few items. Is there any way to use Item Options for this requirement?