
Chapter 14: Procure-to-Pay Transactions
Once you have Vendors and Items in the account, you can start helping your client learn to use the Procure-To-Pay (PTP) transactions: Purchases, Vendor Bills, Payments, Returns, and Credits. For some companies, PTP is only for internal business purchases, but for many businesses, the entire business depends on getting this right since if they pay too much or don't buy the right products, their sales will be negatively affected.
In this chapter, we will cover the following topics:
- Using Requisitions, Purchase Requests, and Purchase Orders
- Managing Special Orders and Drop Ship Orders
- Utilizing Inbound Shipments and processing Item Receipts
- Planning for and using Vendor Bills
- Tracking Vendor Prepayments and making Vendor Payments
- Processing Vendor Returns and Vendor Credits
The business buyers and Accounts Payable (A/P) managers and employees will be your primary contacts as you work your way through these activities. They should have already completed the NetSuite Foundations training before you begin training them further on the system's A/P features.
Using Requisitions, Purchase Requests, and Purchase Orders
Every business needs to purchase various things to keep its doors open. A software company might only need to pay for things such as rent, utilities, and office supplies, but a manufacturer or wholesale distributor needs to also purchase at least some of the products they will sell. In Chapter 11, Items and Related Lists, we talked about the various types of items NetSuite supports and their various uses. We can enter purchases into the system for any items that were set up as either an inventory type item or a Non-Inventory or Service type item For Purchase or For Resale. Let's start looking at these PTP transactions by covering the various ways NetSuite lets us enter and track purchases.
Important Tip
As we talk about the PTP process in this chapter, remember that NetSuite doesn't have any screens or features using that phrase. Instead, the system refers to all of the things we'll discuss in this chapter as Supply Chain Management. You can find that as a top-level heading in the Help system and you can refer to those pages if you need any additional assistance with these topics.
The normal, minimal process flow for Purchases looks something like this:

Figure 14.1 – A typical purchasing process for many companies
However, this is not the only way NetSuite knows to handle purchases. There are other steps in the process for some businesses, including Requisitions and Purchase Requests. We typically see these used in companies where the employees need to request things that they need to do their jobs.
We use Requisitions as a sort of pre-purchase transaction. They allow one or many employees to indicate which things they need. They don't have to know which vendor the items are sourced from to create a requisition; they just indicate which items they need and their quantities. Either the employee or someone in the A/P department will specify the amount the company should expect to pay for each item, and then these transactions are typically run through an approval process of some sort. When they're approved, they can be converted into Purchase Orders (POs) one at a time or in bulk (or they can be rejected, of course).
Separate from Requisitions, we have Purchase Requests as a method for tracking employee requests for purchases. Employees usually must log into the Employee Center to create a new Purchase Request, and each transaction is tagged to a specific Vendor. Once the employee creates the transaction, it should usually go through the company's approval process. The native approval process is very simple and not very flexible (it relies on the employee's supervisor to approve the request), so this is something we routinely customize, based on the client's requirements. As soon as a Purchase Request is approved, it appears in the same place as all POs. Managers can still review them from there, and the employee can always review their status via the Employee Center.
Once a Requisition or a Purchase Request has been converted into a PO, we manage them via the Transactions | Purchases | Enter Purchase Orders | List screen. Users with access can also create a new Purchase any time they like, directly, of course. Getting the PTP users used to working on the PO screen is usually not a problem, especially if you've previously helped them set up the forms they will use. Depending on the client, you might also need to provide a CSV import template file to streamline the bulk PO creation process for them.
For services and software companies, we typically see some Purchase Orders being used to track non-tangibles such as contractor or consulting expenses. This can easily be enabled on the Accounting Preferences screen, and then you'll see both expenses and items sublists available on the PO screen, like this:
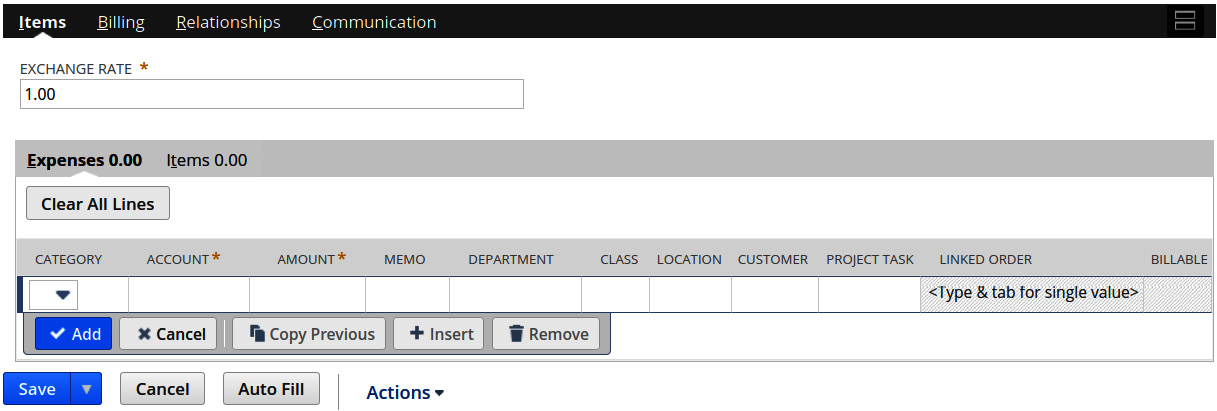
Figure 14.2 – The expenses and items lists enabled on a Purchase Order in NetSuite
With this configuration, the company can enter purchases as they need, including things such as utilities, bank service charges, time from a contractor, or other services. Expense lines on transactions in the system are always tagged to a General Ledger (GL) account instead of an item, and they can also be tied to a project if the account has been set up for project tracking. For example, if your client is a maker of tax software, they might hire professional tax accountants to assist customers with audits. Those projects would typically be associated with any POs that were created for the consultants they hire.
Inventory and other item types that are entered in a PO are generally assumed to be added to the company's inventory when they are received (unless they are Drop-Ship Items, as explained in the next section) and they can have an Expected Receipt Date. This is generally very useful since everyone wants to know when to expect the things they buy, but every company must decide how this date will be set, and some companies need to take this even further. We sometimes need to break this down (for instance) so that it includes estimates for when the item will be manufactured, shipped, and when it will arrive in the destination country as well. This is more common among certain industries, such as furniture makers/distributors. We can add custom fields in these cases to store the additional data, but then customization (a Workflow or Script) will be needed if the dates must be auto-populated, either via bulk updates of some sort or from other sources outside the system.
There are a few other features worth exploring around POs as well, including Purchase Contracts and blanket POs. We use these to decide, along with a Vendor, if we wish to buy sets of items over time, and this helps streamline the data entry in the system. Check out their Help pages for more information on these sometimes very handy features.
For some companies, we might need to directly relate sales to their purchases. Let's take a look at the two special types of POs we might create for these reasons.
Managing Special Orders and Drop Ship Orders
Purchase Orders are created for all types of purchases, including those NetSuite calls Special Orders. These are orders for items we don't normally stock or treat like another inventory. For instance, if your client is a plumbing supply company, they might create some items in their account when a customer specifically requests them, and in those cases, they want the system to track the purchase as a special or very rare occurrence. We define these special use cases on the item record versus on the PO. When we purchase these items, they sometimes require some special customization or personalization, such as when a team jersey needs the team's name added to the back. Special orders are typically begun in the system as a Sales Order. The item is added to the order and when NetSuite knows which vendor is preferred, it will automatically create a Purchase Order for the item with that Vendor. The PO is then linked to the Sales Order and the fulfillment is handled when our client gets the special item in stock.
Alternatively, when the manufacturer of an item will ship an item directly from their facility to the end customer, we call that a Drop-Ship item/order. The process begins on a Sales Order again, but in this case, we don't directly fulfill the order ourselves. Instead, we just record the fulfillment in the account when the manufacturer notifies us they have shipped the order and then proceed with billing the order from there.
In both cases, tracking additional transactions creates a little more complexity for the users, but generally, they like how NetSuite affords them visibility into each step in the process. These same transactions (Special and Drop Ship Sales/Purchase Orders) can be used for intercompany sales as well, where Subsidiary A buys an item from Subsidiary B, for instance.
Once items can be purchased, we typically need to then track them and eventually receive them in the inventory. We'll look at those transactions next.
Utilizing Inbound Shipments and processing Item Receipts
Once a purchase has been created in the system, the business will find a way to communicate that to their Vendor, via email, a portal created especially for that purpose, or as a worst case, via printed paper copies when necessary. The Vendors then queue up the work and let us know when we can expect to receive the items. For products coming from one country to another, such as is commonly the case for purchases made from Asian manufacturers and suppliers, we sometimes want to track those shipments as they are in progress. NetSuite offers us the Inbound Shipment transaction for this. The fields for these records natively allow us to track a status (To Be Shipped, In Transit, and others), a list of items in a shipment (most commonly this is a container being transported via a ship), the related Landed Costs, and more.
For the companies that need this feature, we usually want to associate various sets of items from multiple POs with one Inbound Shipment and then track its status as the products are on their way to the company's warehouses. One key aspect of this is tracking when the products become our client's property. This can vary, depending on a few factors, but NetSuite offers a Take Ownership button in the UI for this purpose. A user is expected to select that button when they know the shipment has reached whichever point in its journey where the company owns the items. This can be automated as well, for businesses that do a lot of international shipping.
Once the items have reached our client's warehouse, each Inbound Shipment can be received in bulk, and the system takes care of updating the related Purchase Orders accordingly. Once the items are in stock, we can create the set of needed Vendor Bills in bulk as well. Again, since it's very common to have more than one PO related to an Inbound Shipment, we will end up with a set of bills created in the end as well.
Whether we're using Inbound Shipments or not, the main transaction we use to convert items into inventory is the Item Receipt. A receipt is a mechanism we use to tell NetSuite that items we purchased are now in our possession, typically in our warehouse or a retail store. Items can be received in a bulk process (via Transactions | Purchases | Receive Orders) or we can receive individual orders when needed. The default Receipt screen is relatively simple to work with, having just a few fields in the header section at the top and then a sublist for items. Note that there is no Status field on a receipt; they are only used once we have the items.
This is what the default bulk Receive Orders screen looks like:
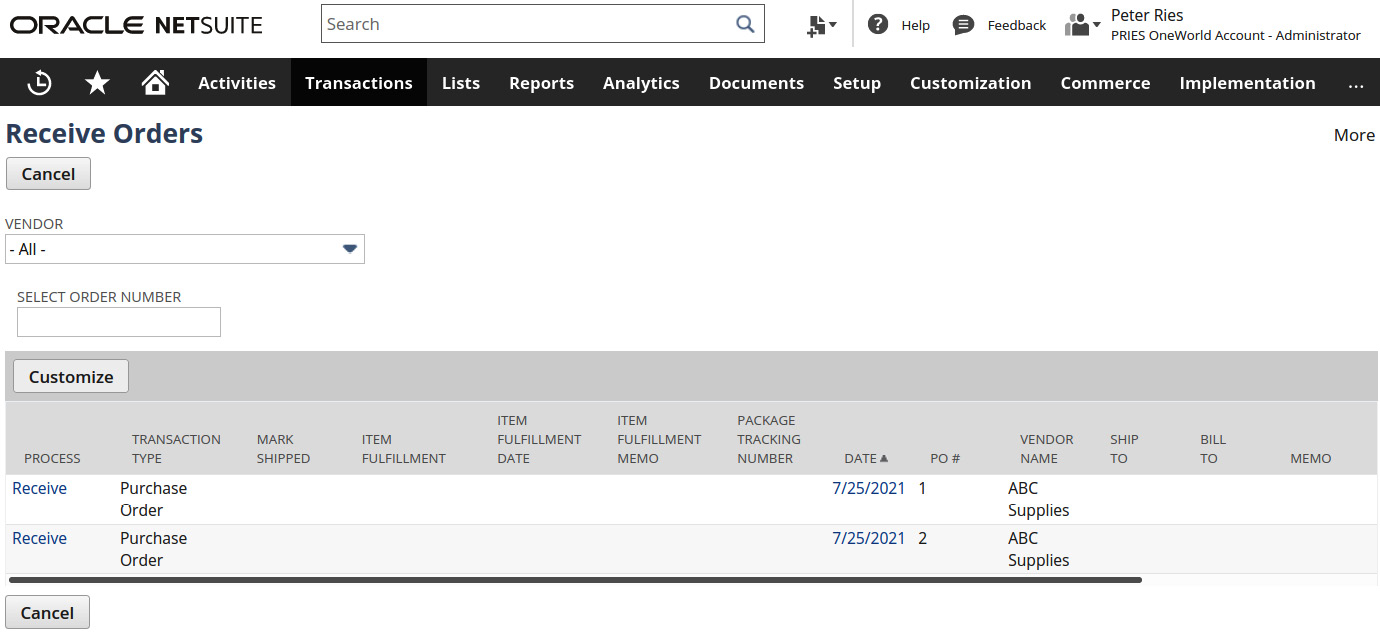
Figure 14.3 – The Receive Orders screen in NetSuite
This screen allows you to select each PO or Inventory Transfer that is ready to be received so that you can process them one at a time. If you enable the Advanced Receiving options, then you can receive multiple orders at once. Whether you have 1 or 100 orders waiting to be received, you can select those that are arriving today, and the system will create the receipts for you. This is very handy if the business usually receives the same quantity they ordered, but otherwise, it can be more trouble than just receiving each order individually.
As you create each receipt, the three most important data points the system is looking for are the location where the inventory is now stored, the quantity of the items received, and the cost you want to associate with that quantity. This cost feeds into the system's cost accounting reporting, so it is typically something we want to focus on at this moment, to make sure we're getting it right. Many companies with inventory consider this a critical part of the business' success, for instance. NetSuite allows us to track item costs in a few ways, but most of those options rely on this amount being entered onto receipts. The costing fields and options are all on the Item screen, so we should set up each item for its intended use before receiving anything. Read the Help page on this topic if you're not familiar with NetSuite's supported choices.
An Item Receipt can also be used to indicate when expenses are incurred, for your utility bills or services purchased, for instance, if the PO has expense items on it.
One other thing to note here is that Purchase Orders and Item Receipts are frequently integrated with NetSuite's or third-party Warehouse Management Systems (WMS) for larger companies who manage inventory, which makes sense since the WMS needs to know what you've purchased. They are then used to let NetSuite know what was received. (We'll talk about fulfillment in Chapter 15, Order-to-Cash Transactions). This typically comes in the form of a SuiteApp we install but this can sometimes require customization to complete as a client wishes.
All receipts can be billed as soon as they are created. NetSuite also offers the option to bill a PO before it's received. In this case, the Bill is created before we know the quantity we will receive, so as you'll learn in the next section, matching up the items and quantities on POs, receipts, and Bills is very important to NetSuite's manufacturing and wholesale distributor clients.
Planning for and using Vendor Bills
Vendor bills in NetSuite record the amounts a business owes them for purchases. Since vendor bills are part of A/P, that team usually has a lot to say about how they're set up and used. We bring vendor bills into an account via CSV imports and integrations with EDI partners, and can create them manually, as needed. When created directly in the system, we can do this one at a time, or use the Bill Purchase Orders screen to create them in bulk. Once they're in the account, the A/P team determines when they need to be paid (some come with terms, some are due on receipt) and batch processes them via the Payments interface (as described in the next section).
Some clients don't always need to enter Bills for every payable, though. NetSuite allows us to simply print a check for cases where the payment was made in exchange for the goods at the time they were received. If a bakery's employee had to go buy 10 bags of flour from a grocery store, in an emergency, they pay for the items at that time, so there's not necessarily a need for a Vendor Bill unless the A/P team has decided this is their policy, even in these cases.
Vendor bills also have an approval process, just like the other PTP transactions. When vendor bill approvals are needed, we usually see a chain of managers providing the approvals, depending on the Bill's total. The approval workflow that comes with the system normally covers most company's needs, but customizations are possible too. The approval usually includes a review of the PO and Item Receipt details, to make sure they're aligned or that any variances were properly addressed. And that's where the Three-Way Match workflow comes in.
Most companies I've worked with within the wholesale distribution industry wish to use NetSuite's Three-Way Match feature to help them validate the items, quantities, and amounts on PO and Item Receipts with Vendor Bills so that they will always know when there are discrepancies. For example, if the PO said we ordered 20 of an item, and we enter the bill (before the receipt) for 20, then we need to know if we didn't receive 20 of that item. In that case, some sort of adjustment is needed to reflect the reality of the receipt. The vendor might still send us the missing quantity, but for now, we should only pay for the quantity we received. Check out the 3 Way Match Vendor Bill Approval Workflow in the NetSuite Help pages for more information.
Paying for what we purchase is a necessary part of the PTP process. The system does what it can to streamline this part of the process and make it as simple as possible, but there are a few things to watch out for, as we'll learn in the next section.
Tracking Vendor Prepayments and making Vendor Payments
Every company with Vendor Bills must pay them, somehow, at some time. But some businesses also need to prepay for their orders from some of their vendors. These can be called deposits or prepayments by the client, but in the system, we refer to them as Vendor Prepayments (VPPs). They are entered like other payments, except that each VPP can be applied to just one Purchase Order. NetSuite can automatically apply these VPPs to the Vendor Bill when it's created if you've enabled that option (in Accounting Preferences). We can disable this feature if the client prefers to apply VPPs to POs manually. NetSuite tracks the list of VPPs for each Vendor and makes it easy enough to associate them with Vendor Bills as they are created, but generally, it's easier to let the system apply the VPP to the Bill for you.
When the time arrives to train users on creating Vendor Payments, we show A/P users how to use the Pay Bills and Bill Payments screens to create Vendor Payments in bulk whenever possible. This allows them to create the payments for a set of bills all at once while applying filters to the list of open bills. This is what that screen looks like, except most clients will usually have a long list of open bills they could be creating payments for:
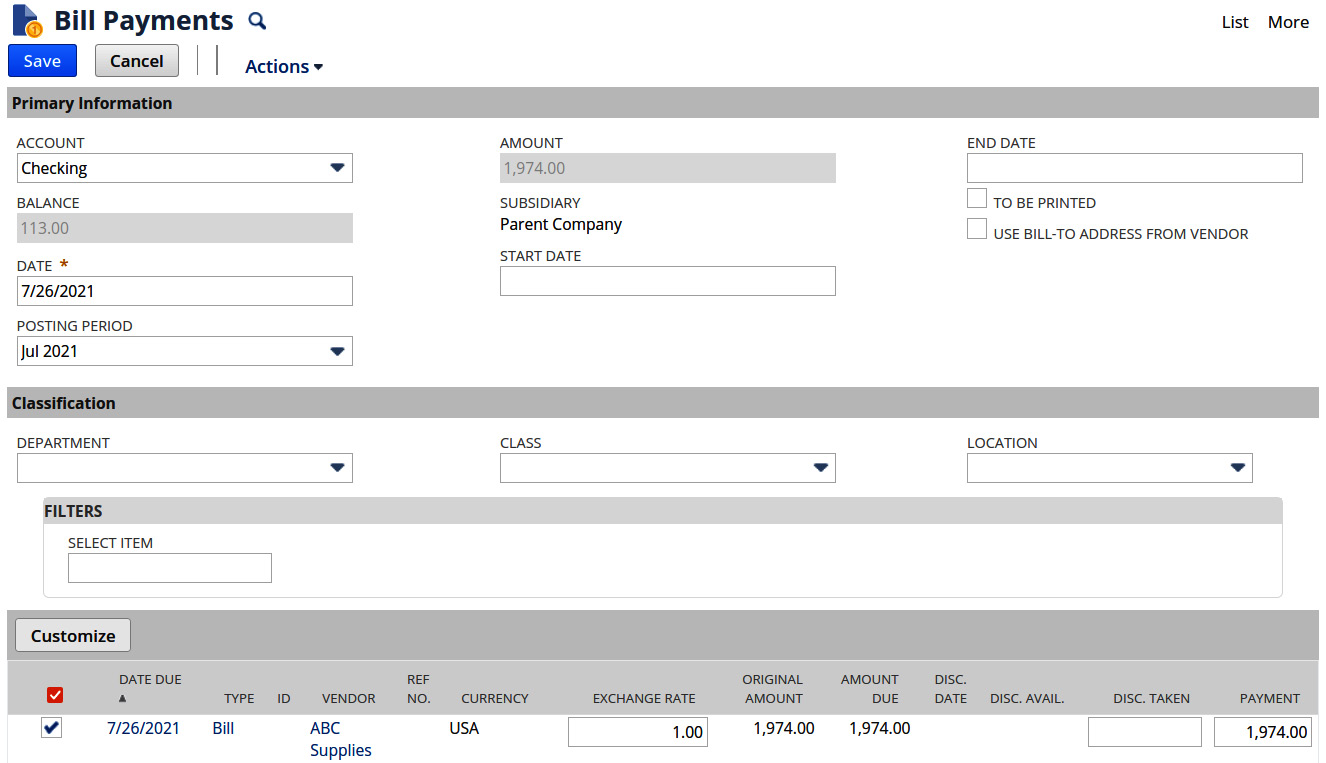
Figure 14.4 – The Bill Payments screen for applying payments to open Vendor Bills
On this screen, A/P users can choose which bills to pay, and they can enter the amount of the payment and enter a discount if any discount can be applied.
There are a few things to note about applying payments to Vendor Bills. Let's take a look.
Posting Periods
Like any transaction that will have an impact on a GL, Bill Payments have a Posting Period field, and this will always default to the current period. Users can select a different period when they need to.
To Be Printed
If you need to print a check for any payment, you can select this checkbox and the system will queue up the checks for a user to print in bulk from a separate screen (Transactions | Management | Print Checks and Forms).
GL impact
After each payment has been saved into NetSuite, you'll be able to view the GL impact (debits and credits per account) on a subtab while viewing the payment.
When we use the Pay Bills screen to create a set of payments all at once, we enter all the payment details, select the Bills to be paid, and then submit the form. NetSuite processes those in a batch, in the background. We can check on the status of the Bill Payments batch, or any such bulk operation, by selecting the Transaction | Payables | Pay Bills | Status menu. That screen tells us how many payments have been created and, if applicable, if any errors that had occurred during that processing.
Once the A/P users are familiar with processing Bills and Payments, it's time to make sure they can also process Returns and Credits when they need to.
Processing Vendor Returns and Vendor Credits
Vendor Return Authorizations (or just Returns) are transactions we use in NetSuite to tell the system when an item we purchased needs to be sent back to the supplier. We can create them either directly from a PO screen (once the PO's items have been received) or by selecting Transactions | Purchases | Enter Vendor Return Authorizations. We typically use these when an item has been received in a damaged state, or sometimes a company has an agreement with their supplier that allows them to return some number of unsold products. Let's take a look at this process:
- Once a Vendor Return is created in the system, the items need to be fulfilled, which means shipped out to the Vendor. This can be done via the Return button on the Vendor Return screen. Clicking that takes us to a new Item Fulfillment transaction screen. We enter the details of exactly what was shipped out and then the return is complete.
- Once a Vendor Return has been fulfilled, it moves to the Pending Credit status. This means we can now create a Vendor Credit transaction for the items on that Return. We can always create standalone Vendor Credits too, for situations when we want to record a credit without performing a return first. Vendor Credits, or as NetSuite sometimes calls them, Bill Credits, are used to reduce the payable account balance for the Vendor, which you might need to do for a variety of reasons. For example, if you have $1,000 of open Vendor Bills from one vendor, but you negotiated a discount with them over the phone for some of those orders, you might enter a Credit to reflect that discount in NetSuite.
- On a Vendor Credit, we can then indicate the expenses or items we are getting the credit for, or we can use Apply list to select any open Bills we are receiving this credit for. We do not have to tie a Credit to a Bill though since there are times when the credit will not be associated with any set of Bills. NetSuite will generally try to pre-enter the expenses, items, or Bills to apply a Credit to for you, depending on how you initially create it.
In this section, we talked about how to process returns and credits for Vendor purchases. That wraps up our discussion of the PTP transactions and processes within NetSuite. There is a lot more you can learn, as with all the topics in this book. I suggest that you explore the Help and training videos NetSuite provides if you want to explore any of these features in greater depth.
Summary
The Procure To Pay process within NetSuite is usually robust enough to meet the requirements of both large and small NetSuite clients. It includes a set of transactions that allow us to track and manage vendor purchases, receipts, payments, and returns. There are always going to be places that some businesses need to customize, but the native features provided here are very strong as a starting point. I hope you've learned how to talk your clients through the PTP screens in the system since, without a solid foundation for the buyers and A/P users, the business can't be successful on the sales or A/R side.
In the next chapter, we'll move on to the Order To Cash process and its transactions – Estimates, Sales Orders, Fulfillments, and more.
Self-assessment
When you work with a variety of clients, you know they will each have their unique requirements, and sometimes, they can present some real challenges. Think about these self-assessment questions as if you are the one who must solve the problem for a client. Be creative and have fun answering these questions:
- Your client provides services to legal practices. Occasionally, they must hire an outside contractor to provide the expertise they lack. Which of the purchase transactions described in this chapter might suit this purpose?
- ABC Co sells electronics to the transportation industry. One of their customers asks them to provide a slightly modified version of a GPS tracker. Which transaction might be the right way to track their purchase of these devices?
- When your client buys widgets from one of their suppliers, they must place a 50% deposit at the time of the PO. They typically place multiple orders for those parts. Can they create one VPP for all the POs they enter at any one time?
- Your client is using Withholding Taxes on Vendor Bills and they occasionally see a message saying, "Your transaction does not balance" on that screen. What should they do to correct this? (Hint: Search in SuiteAnswers for some of these keywords if you're not familiar with this.)
- DEF Inc buys a lot of parts from one main Vendor, and they frequently return parts to them as well. They process those returns outside of the system, but they still need to record them in NetSuite. How can you help them streamline the Vendor Return and Credit processes so that their users can make these entries as easily as possible?