
Chapter 6: Understanding the Organization's Accounting and Finance
Every business, including not-for-profits, has some accounting to be done in NetSuite. However, since not every NetSuite client runs their business directly in the Enterprise Resource Planning (ERP) system, determining just the right mix of accounting features your client's organization should use is an important skill you will need to develop. This starts with understanding NetSuite's features and the terms used to describe them, but also requires an understanding of the laws and regulations for the region the business will operate in, along with other factors. By the end of this chapter, I hope you'll know how to do all these things, and get your client on the right track to maintaining their accounting and finances in NetSuite.
In this chapter, we will learn about implementing the following NetSuite features:
- Enabling features and setting up the accounting basics
- General Ledger and Chart of Accounts
- Setting up segmentation—Subsidiaries, Locations, Departments, Classes, and so on
- Understanding the Accounts Payable feature
- Understanding the Accounts Receivable feature
Note
From this chapter forward, we will include a mention at the beginning of each chapter indicating who you will be working with as you cover these topics during the implementation—in other words, who the subject matter experts are.
For this chapter, you will be helping the senior leaders and accounting department of the business to get started with the product. Make sure the users who will be making these configurations have the right permissions in the account (via their roles) to streamline these sessions.
Enabling features and setting up the accounting basics
When we begin to work with a new NetSuite client, their NetSuite account is created from a template by the NetSuite infrastructure team. As it comes online, it has its own unique account number and URL, so we can then log in to it. This initial account is what we call the out-of-the-box NetSuite product. It has some default features and settings enabled, but generally, it's not very useful yet. It requires us to begin tweaking those defaults and enabling more features to suit the client's business needs.
If you're following the chapters in this book in order, by the time the account is enabled and you have access to it, you should have already begun generally understanding the business and gathering the client's requirements. Now, you can start to walk them through the initial setup of their account, and that usually starts with setting the company information and enabling features.
In the Company Information screen, you can enter the business's company name, legal name, logo, email address, physical address, and more. Refer to the following screenshot for one example of what this screen looks like:
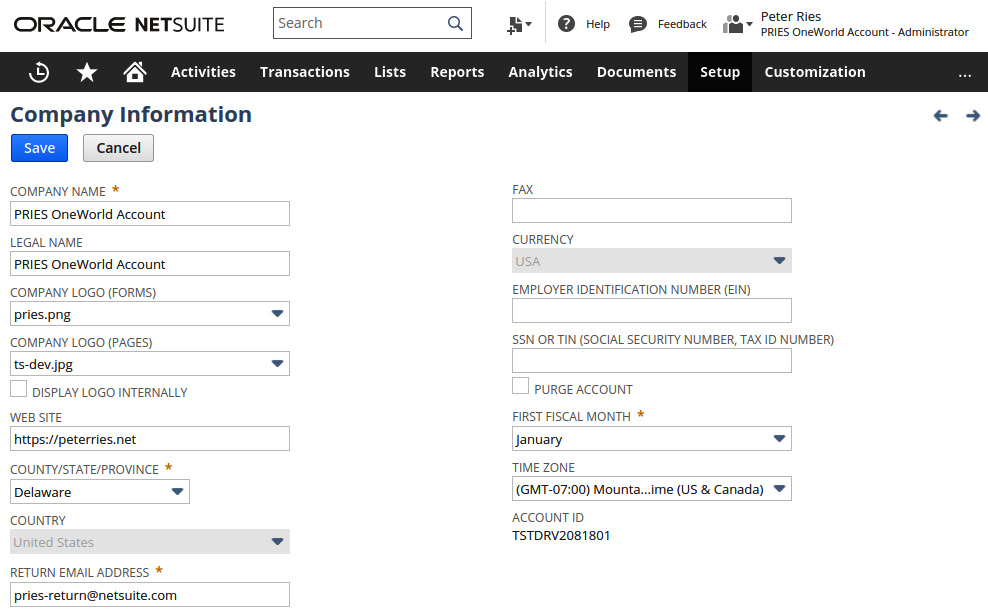
Figure 6.1 – The NetSuite screen for company information
This is a good first screen to walk a client through, in that it has relatively few fields and has a couple of sublists, so they can get used to browsing the NetSuite user interface (UI). This is a good time to talk to the users about how they can usually change a field's value once it's set, but not always. Since the NetSuite UI doesn't call that out, it will be up to you to mention the fields, lists, and others, where this applies.
Next up, introduce the client to the Enable Features screen. This is where we like to talk about how some features can simply be turned on here, but others require NetSuite to enable them first. Those are the billable modules and add-ons which have a cost associated with them. The client's sales team should have already enabled the modules that were agreed upon in the sales cycle, but it's always a good idea to review these things as you complete these first NetSuite walkthroughs and confirm everything that should be available in the account is enabled correctly.
Important Note
Some of the features you can enable here have specific legal Terms & Conditions that apply to them, and those terms must be accepted before the feature will become enabled. Only a representative of the client's company with the relevant authority can accept those terms. For this reason, someone from the client should be driving as you go through this screen, so they can click the I Agree button each time it pops up.
On Enable Features, we don't usually talk to the client about every single option – there are a lot! But instead, have a plan in mind to talk only about those options you know are relevant to the business. For instance, if they are only using the financial features of their NetSuite account, then you can disable the Accounts Receivable features such as Sales Orders and Return Authorizations. There are many basic features and several advanced options too. You can usually equate advanced with more complicated, but this also means more powerful too. I generally only enable these features if I am sure a business needs them, as making their account harder to use is never seen as a positive. This is where experience with the system over time pays off for you as a consultant or NetSuite administrator.
In any case, go through enough of the features to make sure the users are familiar with this screen and know to come back to it if they need to tweak their account. This is also a good place to reinforce the idea of roles and permissions, and to point out that only NetSuite administrators and custom roles with this specific permission can access this screen.
Lastly, this is also the time to introduce the idea of change management to the users. A NetSuite account is made up of thousands of settings, all of which have a material effect on users' experiences with the system. As you've seen, we start tweaking those things from the first day, and the pace of change only accelerates as we approach the go live. Keeping track of changes is not critical when we first start out, but the closer we get to going live, the more important it becomes to keep track of the big changes we make in an account. Make sure the users are aware of this first, and then make sure everyone (not just the first users) is aware of the importance of only making changes when the client's group of administrators has OK'd them. Make sure everyone knows how to use System Notes on records and the other histories NetSuite makes available too.
Once the most important features are enabled and the client's first users have seen how you do this, you can move on with confidence that the screens you need to set up next will all be there and will work as expected. After the meeting where you walk through these steps with the client, it's usually a good idea to review all of them to make sure it was done correctly and to close any loose ends or open questions that came up during the session with the users.
Next, let's talk about the next set of setup steps we usually take with new clients—the general ledger and accounting information.
Defining the general ledger and Chart of Accounts
Every client I have worked with within NetSuite wants to use the financial features. I suppose it would be possible to only use NetSuite's customer relationship management (CRM) features and not the general ledger, but I haven't seen this done yet. That means they're going to want to set up their Chart of Accounts (COA) next (I'm assuming here that you have a basic understanding of business accounting as we cover this topic, by the way).
The Accounts list in NetSuite is found at Setup | Accounting | Chart of Accounts. Out of the box, NetSuite includes a list of the most common accounts most businesses will use, but you'll find you don't use that list very often. More commonly, the business will bring a list of accounts with them from their current business and, for the most part, will want to use the same account names and numbers. This is OK, as you can help them use the CSV Import feature to bring their accounts into the system easily (in fact, that's usually the first thing we teach them to import, and it's a great skill for them to have since we'll have lots of other lists and data to import very soon).
As you work to define this list, the users will notice that NetSuite's Account Types list is static, meaning you can't add a custom value to this list. That should normally be OK, as we use this occasion to remind the client about how we're implementing with best practices in mind, and there really shouldn't be a need to add a new value to this list.
As you talk about each of the available types, you can expand on things as needed, so briefly talk about bank integrations for bank accounts, and expense categories for expense accounts. Talk about currencies while you're in there, and how NetSuite can pull in exchange rates from the internet if they need it.
This is where we start getting to some of the chicken-and-egg scenarios as well, by the way. For instance, to fully define the accounts, you might need to apply restrictions by class, department, or location (the segmentations), but you might not have covered those yet. Just call these things out when you get to them and make a note that you'll come back to them to finish the definition of the account, once you have those other things in place.
Assign someone the homework of getting their COA into a format that can be imported into the system. It's a good idea to provide a client with a template, maybe in a text CSV file or as an Excel file, so they don't have to start from scratch. Help them get through that, since it's probably their first time using the CSV Import feature, and it can be a little tricky in the beginning.
Also, before we move on, this is a good time to introduce the users to the Accounting Periods screen. This is where you'll have a conversation with them about how they will track their financial periods for reports. Some companies make this easy and use a standard calendar year, but NetSuite offers a variety of choices here for companies, depending on how they wish to set up their periods. Since most companies will have made this choice before and want to continue using the same model they are now, you'll help them choose from the available options. You can see those when you select Set Up Full Year, and in that screen, you select a starting month, fiscal year-end, and the PERIOD FORMAT, as shown in the following screenshot:
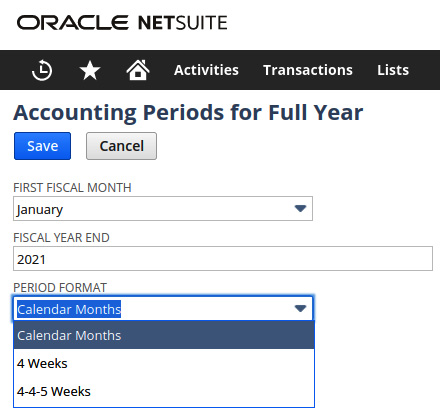
Figure 6.2 – Setting up the accounting periods for a new year in NetSuite
The Calendar Months option is the simplest to maintain, but all three options NetSuite supports are selectable. When we select either 4 Weeks or 4-4-5 Weeks, then we want to make sure that the client knows this affects how posting periods are assigned to transactions based on their dates. This is typically exactly what the accounting team wants, but it can confuse other users later on if not explained to them. Next, we'll dig into how to set up segmentation.
Setting up segmentation—subsidiaries, locations, departments, classes
We use segmentation in NetSuite to classify and categorize the purchases, sales, and items, among other things. NetSuite's Help also refers to this as classification. Both terms work the same. This is most helpful for accounting and other types of reporting, and so the accounting teams usually have a lot of opinions about exactly how this needs to be done.
NetSuite offers the following lists as the primary means for segmenting the company's activities.
Subsidiaries
A subsidiary is the highest level of segmentation. It represents the business's legal entities (in fact, many businesses use this term). Talk the client through setting these up in the Setup | Company | Subsidiaries screen, and talk about how they'll use the system's hierarchy (with multiple levels of parent companies) and whether they'll need to use Elimination subsidiaries as well (in which case, select the Elimination checkbox field). Notice that in NetSuite, many things are defined on each subsidiary's screen, including the logos, the website's URL, and more.
In most cases, your clients will just need to quickly learn what NetSuite means by subsidiary, then they'll know exactly how to tell you to set them up. Some smaller companies can just get along with the one parent company subsidiary, but many companies need more. Apply the settings as you see them to each as you create their subs (subsidiaries) in the account. You can delete a sub after creating it, but not once there are any other records relating to that sub, so take the time to get this done correctly (this same rule applies to all of these segmentation elements).
Locations
When we talk about locations, we're usually either referring to offices, warehouses, or stores. But your client's business might have other locations they want to keep track of in the system. For instance, they might need to store inventory in a location that doesn't exist (for accounting reasons versus warehouse reasons). The system doesn't provide any starter location entries for us, since there's no way for NetSuite to know what each client needs here. However, getting them into the account, just by typing them in, is usually not a chore.
If the business sells software, they might not have any use for multiple locations, but otherwise, take the time to talk the client through the fields for at least one location while you're here, since we want to make sure we get this done correctly. If needed, you can define a hierarchy again for situations where a location is needed for inventory tracking (for instance) and the client wants to be able to roll up reporting for the main location and its sub-locations.
Make sure you select the Make Inventory Available checkbox if the client needs to track any sort of inventory for this location, shown as follows:
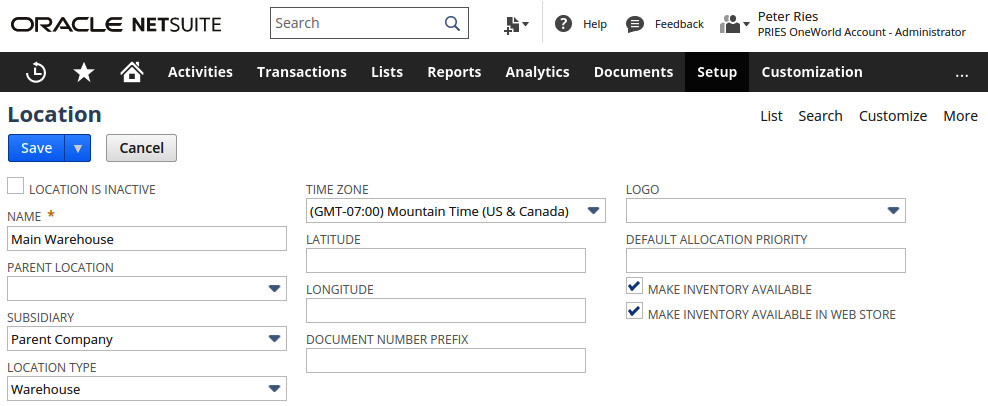
Figure 6.3 – The Location setup screen in NetSuite
This might include cases where we create a virtual location for tracking damaged goods within a warehouse. We do this sometimes because it's a simpler way of tracking bad products. This is a case of NetSuite offering much more advanced features if we choose to have them, however for some companies, just being able to store damaged goods in a separate location is enough from a reporting standpoint (the folks in the warehouse will already have their own process for dealing with broken things). And if the client will use SuiteCommerce or SuiteCommerce Advanced for selling items via their e-commerce web store, then select the Make Inventory Available In the Web Store checkbox as well.
Departments
Most businesses will come to NetSuite with an idea of their departments already. In the screen where we set these up (Setup | Company | Departments), you'll notice there are just a few fields. We give them a name and define a hierarchy again, and then we assign them to one or more subsidiaries. Once you point out that the system uses departments as the main way to categorize all reports, then most clients should be able to provide you with this list for importing. Again, assign that task to someone and let the client perform the import. They can choose any department names they like, but do explain to them that these need to not duplicate other segments you're using, and the list should be complete. So, they need to define departments to cover all of their sales, purchases, accounting, inventory categories, special cases, once-per-year events, and so on. This is a teach them to fish moment you don't want to avoid.
Classes
Every business has an idea for how they want to see their reports broken down, and some will need a metric beyond the legal entity (subsidiary), the locations, and the departments. This is where classes come in. Since each business can define their class list however they need, they can use this to indicate whatever other metric they want to use for their reports. The most common way we set up classes for clients is to describe their product categories at a high level. But sometimes, this doesn't come to light immediately, and that's OK. You never have to create classes and you can easily come back to them later if you don't see a need at first, and a need arises later on.
Custom segments
For companies who need even more ways to classify things, the system also supports the definition of custom segments. These can be any other metric/measure they need, assuming they're already using departments and classes. You set these up as segments. They get a custom record type for storing the data, and then they can be used on entities, transactions, and so on, just like the native segments.
Before we move on, let me point out that there are many, many other settings, preferences, lists, and more to be set up in a new NetSuite account, and we're not going to cover them all here. Make sure you do talk to the client about these things though, just because they are so important to most businesses and new users will usually take a long time to find them on their own. Here are more that are used:
- Setup | Company | General Preferences
- Setup | Company | Rename Records / Transactions
- Setup | Company | Auto-Generated Numbers
- Setup | Accounting | Accounting Preferences
- Setup | Accounting | Accounting Lists
Important Tip
Another thing you might need to enable and set up now, if the business has a clear need for it, is NetSuite's Multi-Book Accounting. I won't go into much detail on that here, but you enable the feature under Setup | Company | Enable Features. But make sure you're very familiar with all the pros and cons of this feature before doing so. Seek guidance from a more experienced NetSuite consultant if you're brand new to this topic, since setting this up incorrectly can be costly and time-consuming if you need to change the feature/settings later on.
With these features set up in the account, you'll know that every bit of data you create in the account will show up on accounting and other reports just the way the client wants to see them. With this safely done, you can next move on to some of the other accounting-related features for Accounts Payable (A/P) and Account Receivables (A/R).
Understanding the Accounts Payable feature
With A/P, businesses get the standard features, including the relevant transactions (Purchase Requisitions, Orders, and Vendor Bills and Returns) and settings, but you might also want to enable a couple of other features for clients who need them. For instance, Blanket Purchase Orders make it easy to manage bulk purchases that are received in smaller quantities over time, and the Advanced Receiving and Inbound Shipment options are available for businesses that need more granular inbound transaction tracking. One other nice feature is the Vendor Prepayments for companies that make deposits at the time of their purchases and then apply those to the bill once the order is received.
In the NetSuite Help screens, you'll find most of the A/P topics under the Supply Change Management (or SCM) heading. We're going to cover the setup of things such as Vendors and Items in the next chapter, so for now, there's not a lot more to be set up for A/P.
Understanding the Accounts Receivable feature
On the A/R side, there is a bit more setup to be done. In addition to choosing which transactions your client will use, you can also choose whether to enable things like Promotions (NetSuite offers a few different solutions on this, depending on how complicated the promotions can be), Gross Profit tracking, and all of the shipping options (since they mostly affect sales). Shipping can be very simple or very, very complicated, so we'll tackle that in more detail for sure in Chapter 15, Order-to-Cash Transactions.
If the business is in the services industry, this is when you would enable the Projects features, or maybe even NetSuite's Advanced Projects.
This is also a good time to talk about SuiteApps that might be needed, such as Avalara's AvaTax solution, or one of the advanced invoicing apps. As stated before, understanding the client's requirements before you get into enabling features will smooth this process considerably.
We won't go into these other things in much detail, but just know that when needed, you should be beginning to talk to the client about a few other things, such as the following:
- Taxes
- Shipping
- Manufacturing
- Sales and marketing settings
Having set your client's segments and accounting features, you can be sure that NetSuite will show you the right screens and allow for proper initial reports (before you start customizing, at least). This is important, and that's why we cover this at this stage.
Summary
In this chapter, we've covered how we usually walk the client through the initial configuration choices in their account and get things such as segmentation and preferences set up. This is key to the entire implementation since the choices we make now will have a large effect on how we can use the rest of the account later. Most of these choices can be tweaked if things change later, but knowing about the ones you cannot change or can't delete later is important too. Apply the things you learned in the requirements and roles and users phases earlier as you help the client define their lists of subsidiaries, locations, departments, and so on. If you do this, you should have no trouble getting through this work for each of your clients. You should also have the users set up the screens whenever possible so they get the hands-on experience they need to feel confident when working in the system.
In the next chapter, we'll learn how to analyze your client's lists of entities and items and begin to set those up in the account. For many companies, this is an Aha! moment where they start to see how their NetSuite account will be set up for their specific business, and it's fun to be the consultant there when this happens.
Self-assessment
Here are a few things related to the initial account setup for you to think about each time you get to this point in a project:
- Your client tells you they have multiple businesses and they must keep them completely separate in the system. They ask you how to enable completely separate accounts. What do you tell them? How can you help them achieve what they need with their one NetSuite account? When would you consider the idea of having more than one NetSuite account?
- While talking through the Enable Features screen, your client mentions something you've never heard before, and you know this will be a significant change in the project, affecting the schedule and budgets. In addition to letting your project managers know about this, when would you bring the sales team (your company's or NetSuite's) into the conversation?
- One day, you receive the list of departments your client uses in their current (legacy) ERP system, and notice there is an entry called Assembly, but you've never discussed this with them before. You ask about it, and they say this is rarely used now, for times when they create paper documentation for their software. What's the simplest way you can set this up for them without creating a lot of extra work for the accounting people?
- While discussing the Accounting Lists and Preferences with the accounting team, an argument starts over some detail. The accountants want to change how expenses have always been broken down in the COA to cover their needs, but the accounting manager doesn't see the need to change this. The conversation starts to drift, and you can tell this could take a long time to resolve. How can you help smooth things along, and avoid losing track of the main purposes for the call or meeting?
- In the middle of your segmentation session, talking about how custom segments might solve a problem someone brought up, a user asks you a question you don't confidently know the answer to. Which NetSuite features might you open up and reference, in order to both answer their question and also guide them to the stores of helpful information provided within the system?