
Chapter 8: Practice Labs – Implementing and Managing Storage
The best way to become efficient with Azure is to get hands-on experience to test your skill set. This chapter will test the skills you acquired in Chapters 6, Managing Storage, and Chapter 7, Securing Storage. The labs in this chapter reference the official Microsoft learning labs on GitHub as well as some additional labs to enhance your understanding and experience working with storage.
In this chapter, we are going to cover the following topics:
- Managing the Azure Storage lab
- The Azure Functions AzCopy lab
- Connecting storage using a private link endpoint lab
Technical requirements
To execute the labs in this chapter, you will need the following:
- Access to an Azure subscription with owner or contributor privileges. If you do not have access to one, students can enroll for a free account: https://azure.microsoft.com/en-in/free/.
- PowerShell 5.1 or later installed on a PC where the labs can be practiced from; note that many examples can only be followed from a PC or https://shell.azure.com (PowerShell 7.0.6 LTS or later is recommended).
Top Tip
Either the AZ module or AzureRM module should be installed; you cannot have both. Installation will fail should you try to run both.
- Installation of the AZ module can be performed by running the following in an administrative PowerShell session:
Set-ExecutionPolicy -ExecutionPolicy RemoteSigned -Scope CurrentUser
Install-Module -Name Az -Scope CurrentUser -Repository PSGallery -Force
Note
Even though the labs are on GitHub, no GitHub account is required to access the labs.
Managing the Azure Storage lab
- This lab will guide you through creating a storage account and configuring the Blob storage, authentication and authorization. Finally, you will create a file share where you restrict network access for the storage account:
- Estimated time: 45 minutes.
- Lab method: PowerShell and the Azure portal.
- Lab scenario: In this lab, you play the role of an administrator evaluating the utility and functionality provided by Azure. You need to determine whether it is fit for purpose and will conduct some basic tests. You need to explore the different mechanisms available to you for storage and whether they can meet any security objectives your organization may have.
- Visit the given link (Lab URL) to the official Microsoft learning GitHub labs, where you will be guided through each task step by step to achieve the following objectives.
Lab objectives:
- Task one: Provision the resource groups for the lab.
- Task two: Create and configure the lab storage accounts.
- Task three: Create a blob container and upload data.
- Task four: Configure the storage account authentication and authorization.
- Task five: Create and configure an Azure Files share.
- Task six: Configure firewall network access for the storage account.
- Lab URL: https://microsoftlearning.github.io/AZ-104-MicrosoftAzureAdministrator/Instructions/Labs/LAB_07-Manage_Azure_Storage.html.
- Lab architecture diagram:
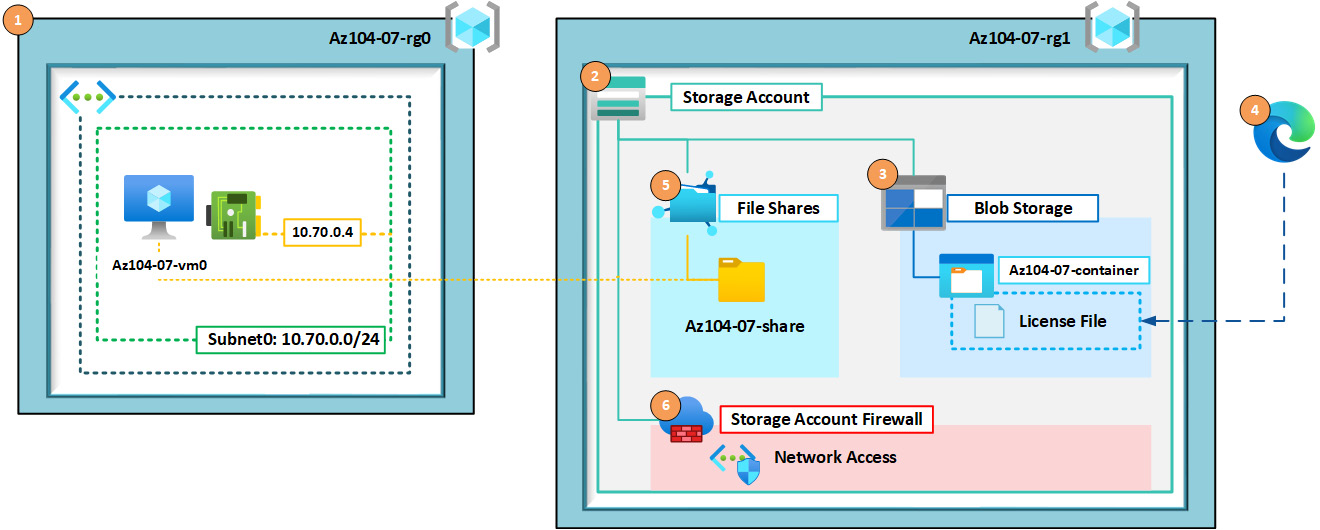
Figure 8.1 – The lab architecture diagram
Let's now proceed to the next lab exercise.
The Azure Functions AzCopy lab
This lab will guide you through creating a storage account, configuring the Blob storage and containers, creating an Azure function, configuring the code for replication, and finally, testing whether replication occurs automatically:
- Estimated time: 45 minutes.
- Lab method: PowerShell and the Azure portal.
- Lab scenario: In this lab, you play the role of an administrator evaluating the utility and functionality provided by AzCopy. You need to determine whether it can be used to replicate data from a source container to another destination container. You need to run AzCopy whenever a file is added to a predetermined share or container.
Lab objectives:
- Task one: Provision the resource groups for the lab.
- Task two: Create and configure the lab storage accounts.
- Task three: Create and configure the Azure Files shares.
- Task four: Create the blob containers.
- Task five: Create and configure an Azure function.
- Task six: Upload some data to the source blob container.
- Task seven: Confirm replication has occurred.
- Lab URL: Not applicable.
- Lab architecture diagram:
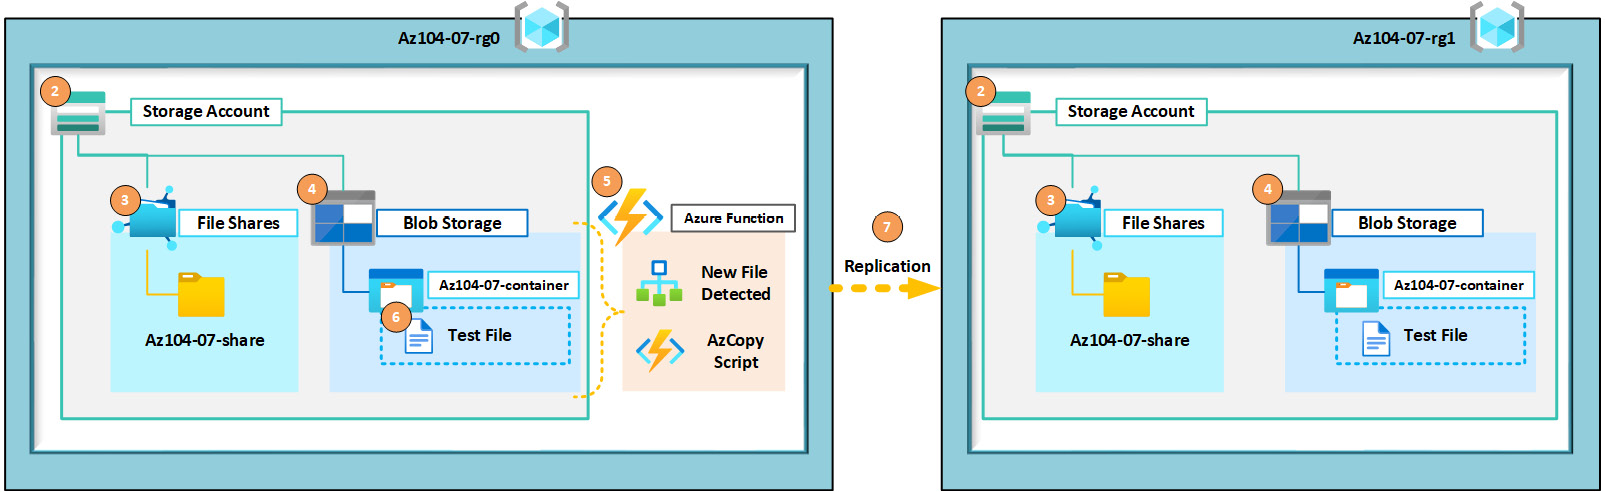
Figure 8.2 – Lab architecture diagram
Let's now proceed to the step-by-step execution of the lab.
Lab steps
The following PowerShell script has been broken into smaller sections to explain what is created at each point.
Prerequisites
The following PowerShell code runs to add the modules required and specifies the location to be used:
# Modules
# confirm the required modules are installed
try{Import-Module Az;}
catch{Write-Host "Installing AZ Module..." -NoNewline; Install-Module AZ -Force -AllowClobber; Write-Host "done" -ForegroundColor Green;}
try{Import-Module Az.Functions;}
catch{Write-Host "Installing AZ.Functions Module..." -NoNewline; Install-Module AZ.Functions -Force -AllowClobber; Write-Host "done" -ForegroundColor Green;}
#? Variables that apply to the whole script
$Location = "Westeurope";
# Authenticate to Azure
Connect-AzAccount
$SubscriptionId = "xxxxxxx";
Select-AzSubscription -SubscriptionId $SubscriptionId
Task one: Provision the resource groups for the lab.
The following PowerShell code creates the resource groups for the lab environment:
# Resource Group 1
$resourceGroup1 = "Az104-07-rg0";
New-AzResourceGroup -Name $resourceGroup1 -Location $Location;
# Resource Group 2
$resourceGroup2 = "Az104-07-rg1";
New-AzResourceGroup -Name $resourceGroup2 -Location $Location;
Task two: Create and configure the lab storage accounts.
The following PowerShell code creates and configures the storage accounts for this lab:
# Common Paramters / Variables
$date = Get-date -Format "yyMMddhhmm";
$SkuName = "Standard_LRS";
# Storage Account 1
$storageAccountName1 = "$($resourceGroup1.ToLower() -replace("-"))$date";
New-AzStorageAccount -Name $storageAccountName1 -ResourceGroupName $resourceGroup1 -Location $Location -SkuName $SkuName;
# Storage Account 2
$storageAccountName2 = "$($resourceGroup2.ToLower() -replace("-"))$date";
New-AzStorageAccount -Name $storageAccountName2 -ResourceGroupName $resourceGroup2 -Location $Location -SkuName $SkuName;
Task three: Create and configure the Azure Files shares.
The following PowerShell code creates and configures the Azure file shares:
# Common Paramters / Variables
$ShareName= "az104-07-share";
# Storage Account 1
$Context1 = (Get-AzStorageAccount -ResourceGroupName $ResourceGroup1 -AccountName $StorageAccountName1).Context;
New-AzStorageShare -Name $ShareName -Context $Context1
# Storage Account 2
$Context2= (Get-AzStorageAccount -ResourceGroupName $ResourceGroup2 -AccountName $StorageAccountName2).Context;
New-AzStorageShare -Name $ShareName -Context $Context2
Task four: Create the blob containers.
The following PowerShell code creates the blob containers:
# Common Paramters / Variables
$ContainerName = "az104-07-container"
# Storage Account 1
New-AzStorageContainer -Name $ContainerName -Context $Context1 -Permission Blob
# Storage Account 2
New-AzStorageContainer -Name $ContainerName -Context $Context2 -Permission Blob
Task five: Create and configure an Azure function.
The following PowerShell code creates and configures the Azure function:
# Create an app service plan, then a function app then
$appServicePlanName = "az104-07-appsp-$date";
$azureFunctionApp = "az10407function-$date";
New-AzAppServicePlan -ResourceGroupName $resourceGroup1 -Name $appServicePlanName -Location $Location -Tier "Basic" -NumberofWorkers 1 -WorkerSize "Small"
New-AzFunctionApp -Name "$azureFunctionApp" -ResourceGroupName "$resourceGroup1" -PlanName $appServicePlanName -StorageAccountName $storageAccountName1 -Runtime PowerShell
Important Note
It should be noted that the service plan required must be with a Windows operating system; it is for this reason that the deployed service plan will be for Windows.
The following screenshot shows the Windows operating system selected as part of the service plan; you can view this from the Overview section of the App Service plan we created:
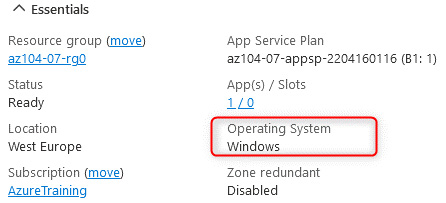
Figure 8.3 – App Service plan – the Windows operating system
Log in to Azure, navigate to the Azure function that we've created, and click Functions on the left menu. Click + Create, and then on the Create function blade, leave Development environment as Develop in portal and select the Azure Blob Storage trigger template. Change the New Function name to Blobcopy, set the path to az104-07-container/{name}, select AzureWebJobsStorage as Storage account connection, and click Create:
Top Tip
The App Service plan that is created can be equated to a server environment that will host the function. This can also be used for hosting web applications.
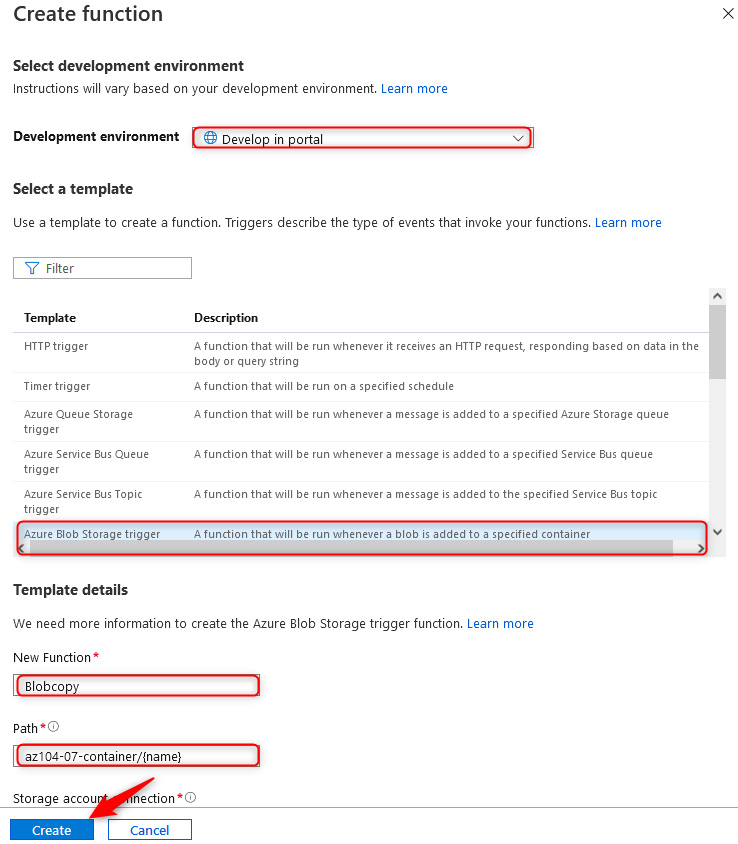
Figure 8.4 – Create function
Generate Secure Access Tokens (SAS tokens) for both storage accounts and note them. Now that your function has been created, click Code + Test on the left menu and paste the following code, replacing the $SrcSASToken text with the SAS token from the storage account in the Az104-07-rg0 resource group, and replacing the $DstSASToken text with the SAS token from the storage account in the Az104-07-rg1 resource group. Also, replace StorageAccountName1 with the name of the storage account in the Az104-07-rg0 resource group, and replace StorageAccountName2 with the name of the storage account in the Az104-07-rg1 resource group. Click Save once the code is modified:
# Input bindings are passed in via param block.
param([byte[]] $InputBlob, $TriggerMetadata)
# Define variables
$SrcStgAccURI = "https://StorageAccountName1.blob.core.windows.net/"
$SrcBlobContainer = "az104-07-container"
$SrcSASToken = "YourSASToken"
$SrcFullPath = "$($SrcStgAccURI)$($SrcBlobContainer)/$($SrcSASToken)"
$DstStgAccURI = "https://StorageAccountName2.blob.core.windows.net/"
$DstBlobContainer = "az104-07-container"
$DstSASToken = "YourSASToken"
$DstFullPath = "$($DstStgAccURI)$($DstBlobContainer)/$($DstSASToken)"
# Test if AzCopy.exe exists in current folder
$WantFile = "azcopy.exe"
$AzCopyExists = Test-Path $WantFile
# Download AzCopy if it doesn't exist
If ($AzCopyExists -eq $False) {
    Write-Host "AzCopy not found. Downloading...";
    Invoke-WebRequest -Uri "https://aka.ms/downloadazcopy-v10-windows" -OutFile AzCopy.zip -UseBasicParsing
    Expand-Archive ./AzCopy.zip ./AzCopy -Force
    # Copy AzCopy to current dir
    Get-ChildItem ./AzCopy/*/azcopy.exe | Copy-Item -Destination "./AzCopy.exe"
}
else { Write-Host "AzCopy found, skipping download." }
# Run AzCopy from source blob to destination file share
Write-Host "Backing up storage account..."
$env:AZCOPY_JOB_PLAN_LOCATION = $env:temp+'.azcopy'
$env:AZCOPY_LOG_LOCATION=$env:temp+'.azcopy'
./azcopy.exe copy $SrcFullPath $DstFullPath --overwrite=ifsourcenewer --recursive
Top Tip
The following lines of code change the plan and log file paths for the AzCopy application. This prevents errors from occurring when running the application in the function, as they cannot write to the default folder locations:
$env:AZCOPY_JOB_PLAN_LOCATION = $env:temp+'.azcopy'
$env:AZCOPY_LOG_LOCATION=$env:temp+'.azcopy'
Task six: Upload some data to the source blob container.
We will now upload some data to the source blob container.
Navigate to the storage account in the Az104-07-rg0 resource group, click on Containers on the left menu, click az104-07-container, and click Upload to upload a file to the container:
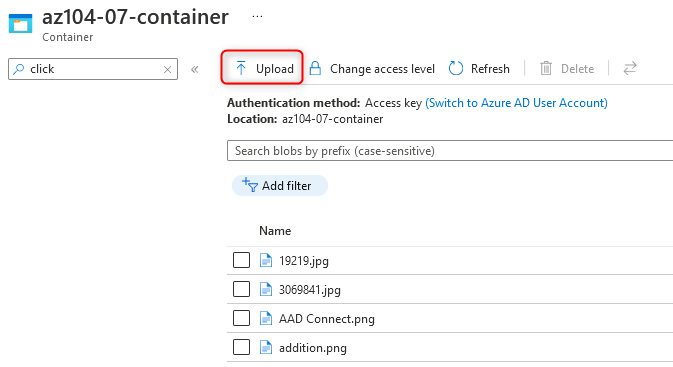
Figure 8.5 – The source container
Let's now proceed to the last task.
Task seven: Confirm replication has occurred.
We will now confirm the replication script is working as expected.
Navigate to the storage account in the Az104-07-rg1 resource group, click on Containers on the left menu, click az104-07-container, and note the files in the destination container. These should now emulate the source container, thereby confirming working replication:
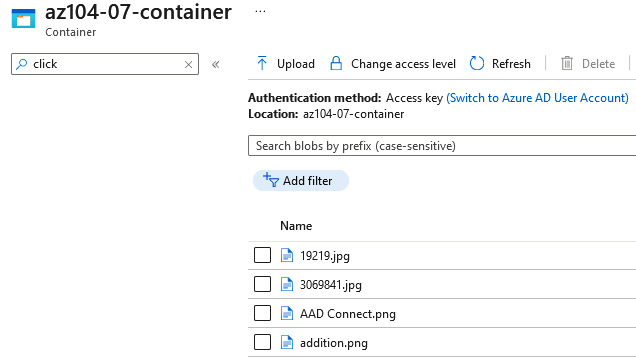
Figure 8.6 – The destination container
You have now demonstrated the replication of data using Azure Functions and AzCopy to replicate data between two different storage accounts and blob containers triggered through an upload operation. Based on the operation's success, you have determined that AzCopy can be utilized through functions to meet your company requirements. You will now need to build a replication strategy to align with business requirements before implementing a production solution.
The lab is completed; you can now remove all the associated resources for the lab.
Top Tip
While performing this exercise, you may have noticed the option on a storage account to configure replication. This replication option replicates all transactions and creates what is known as a mirror of the storage on the source in the destination storage account. Using the AzCopy exercise, you can create your own governance mechanisms on functions to ensure that data is copied as it's initially loaded and never deleted or modified by using AzCopy.
Connecting storage using a private endpoint lab
This lab will guide you through connecting an Azure private endpoint to a storage account, which will connect to a virtual machine in the same VNet. You will then prove connectivity to the storage account through the private endpoint:
- Estimated time: 45 minutes.
- Lab method: PowerShell.
- Lab scenario: In this lab, you play the role of an administrator seeking to employ a secure method to communicate with an Azure Storage account. You have identified an Azure private endpoint as being a mechanism to control traffic over a local endpoint and want to prove its functionality before implementing it within your organization's environment. This lab will guide you through each task step by step to achieve the following objectives.
Lab objectives:
- Task one: Provision the resource groups for the lab.
- Task two: Create and configure an Azure Storage account.
- Task three: Create and configure the Azure Files shares.
- Task four: Provision a vNET.
- Task five: Provision a Virtual Machine (VM).
- Task six: Deploy a private endpoint to the storage account.
- Task seven: Test connectivity from the server to the file share over the local IP.
- Lab URL: Not applicable.
- Lab architecture diagram:
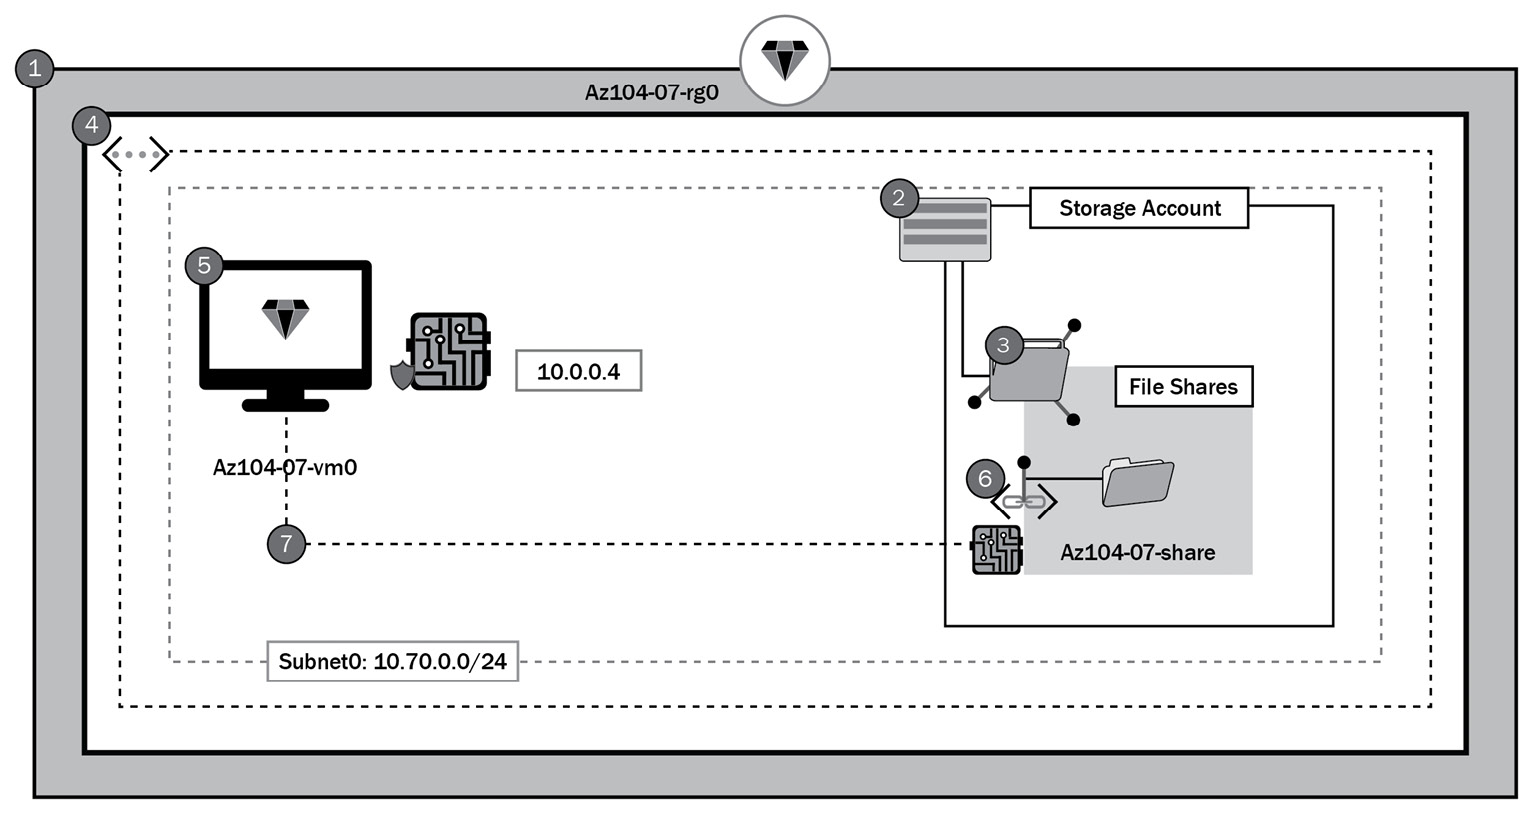
Figure 8.7 – Lab architecture diagram
Let's now proceed toward the step-by-step execution of the lab.
Lab steps
In the following demonstration, we will attach a private endpoint to a storage account:
Task one: Provision the resource groups for the lab.
The following PowerShell code creates the resource groups for the lab environment:
#? TASK 1 - Provision the resource groups for the lab
#? ////////////////////////////////////////////////////////
# Resource Group 1
$resourceGroup1 = "Az104-07-rg0";
New-AzResourceGroup -Name $resourceGroup1 -Location $Location;
Task two: Create and configure an Azure Storage account.
The following PowerShell code creates and configures the storage accounts for this lab:
#? TASK 2 - Create and configure the lab storage accounts
#? ////////////////////////////////////////////////////////
# Common Paramters / Variables
$date = Get-date -Format "yyMMddhhmm";
$SkuName = "Standard_LRS";
# Storage Account 1
$storageAccountName1 = "$($resourceGroup1.ToLower() -replace("-"))$date";
New-AzStorageAccount -Name $storageAccountName1 -ResourceGroupName $resourceGroup1 -Location $Location -SkuName $SkuName;
Task three: Create and configure the Azure Files shares.
The following PowerShell code creates and configures the Azure file shares:
# Common Paramters / Variables
$ShareName= "az104-07-share";
# Storage Account 1
$Context1 = (Get-AzStorageAccount -ResourceGroupName $ResourceGroup1 -AccountName $StorageAccountName1).Context;
New-AzStorageShare -Name $ShareName -Context $Context1
Task four: Provision a vNET.
The following PowerShell code creates and configures the Azure vNET:
## Create backend subnet config. ##
$subnetConfig = New-AzVirtualNetworkSubnetConfig -Name myBackendSubnet -AddressPrefix 10.0.0.0/24
## Create the virtual network. ##
$parameters1 = @{
    Name = 'MyVNet'
    ResourceGroupName = "$ResourceGroup1"
    Location = "$Location"
    AddressPrefix = '10.0.0.0/16'
    Subnet = $subnetConfig
}
$vnet = New-AzVirtualNetwork @parameters1
Task 5: Provision a VM.
The following PowerShell code creates and configures the Azure VM. It will also create an Network Security Group (NSG) associated with the VM network interface and allow remote desktop (RDP) access:
## Set credentials for server admin and password. ##
$adminUsername = 'Student'
$adminPassword = 'Pa55w.rd1234'
$adminCreds = New-Object PSCredential $adminUsername, ($adminPassword | ConvertTo-SecureString -AsPlainText -Force)
$OperatingSystemParameters = @{
    PublisherName = 'MicrosoftWindowsServer'
    Offer = 'WindowsServer'
    Skus = '2019-Datacenter'
    Version = 'latest'
}
$vmName = "myVM"
$vmSize = "Standard_DS1_v2"
$NSGName = "$vmName-nsg"
$subnetid = (Get-AzVirtualNetworkSubnetConfig -Name 'myBackendSubnet' -VirtualNetwork $vnet).Id
$nsg = New-AzNetworkSecurityGroup -ResourceGroupName "$ResourceGroup1" -Location "$Location" -Name "$NSGName"
$nsgParams = @{
    'Name'                     = 'allowRDP'
    'NetworkSecurityGroup'     = $NSG
    'Protocol'                 = 'TCP'
    'Direction'                = 'Inbound'
    'Priority'                 = 200
    'SourceAddressPrefix'      = '*'
    'SourcePortRange'          = '*'
    'DestinationAddressPrefix' = '*'
    'DestinationPortRange'     = 3389
    'Access'                   = 'Allow'
}
Add-AzNetworkSecurityRuleConfig @nsgParams | Set-AzNetworkSecurityGroup
$pip = New-AzPublicIpAddress -Name "$vmName-ip" -ResourceGroupName "$ResourceGroup1" -Location "$Location" -AllocationMethod Dynamic
$nic = New-AzNetworkInterface -Name "$($vmName)$(Get-Random)" -ResourceGroupName "$ResourceGroup1" -Location "$Location" -SubnetId $subnetid -PublicIpAddressId $pip.Id -NetworkSecurityGroupId $nsg.Id
$vmConfig = New-AzVMConfig -VMName $vmName -VMSize $vmSize
Add-AzVMNetworkInterface -VM $vmConfig -Id $nic.Id
Set-AzVMOperatingSystem -VM $vmConfig -Windows -ComputerName $vmName -Credential $adminCreds
Set-AzVMSourceImage -VM $vmConfig @OperatingSystemParameters
Set-AzVMOSDisk -VM $vmConfig -Name "$($vmName)_OsDisk_1_$(Get-Random)" -CreateOption fromImage
Set-AzVMBootDiagnostic -VM $vmConfig -Disable
## Create the virtual machine ##
New-AzVM -ResourceGroupName "$ResourceGroup1" -Location "$Location" -VM $vmConfig
Task six: Deploy a private endpoint to the storage account.
The following PowerShell code creates a private endpoint and associates this with the storage account we created earlier:
$storageAccount = Get-AzStorageAccount -ResourceGroupName $resourceGroup1 -Name $storageAccountName1
$privateEndpointConnection = New-AzPrivateLinkServiceConnection -Name 'myConnection' -PrivateLinkServiceId ($storageAccount.Id) -GroupId 'file';
## Disable private endpoint network policy ##
$vnet.Subnets[0].PrivateEndpointNetworkPolicies="Disabled"
$vnet | Set-AzVirtualNetwork
## Create private endpoint
New-AzPrivateEndpoint -ResourceGroupName "$resourceGroup1" -Name "myPrivateEndpoint" -Location "$Location" -Subnet ($vnet.Subnets[0]) -PrivateLinkServiceConnection $privateEndpointConnection
Task seven: Test connectivity from the server to the file share over the local IP address.
Follow the following steps to check connectivity to the file share:
- Log in to the server we created in task five using the credentials you specified. In the Azure portal, navigate to the VM and click Connect, and then click RDP. Click Download RDP file on the screen that follows:

Figure 8.8 – Connect to a VM
Enter the credentials for the VM.
- Open the file explorer and click This PC on the left navigation menu. Click Computer on the top menu bar and then click Map network drive:
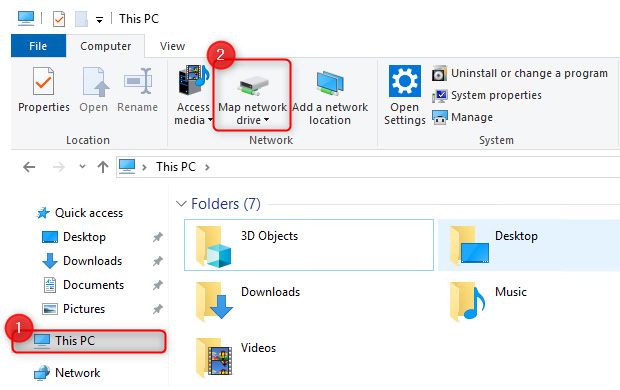
Figure 8.9 – Mapping the network drive
- Choose a Drive letter and enter the IP address and share (10.0.0.5 if following along as per the lab) in the Folder input, such as \10.0.0.5az104-07-share, click on Connect using different credentials, and then click Finish:
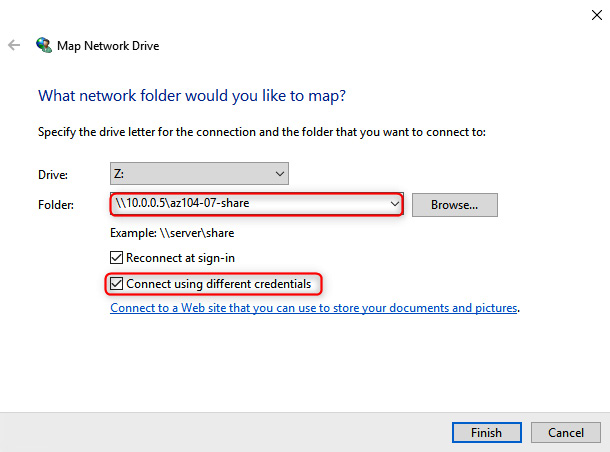
Figure 8.10 – Selecting the folder path
- For the credentials, enter the storage account name as the username, and then you will need to navigate to the storage account in Azure and use the storage account key as the password. Click Remember my credentials and then OK:
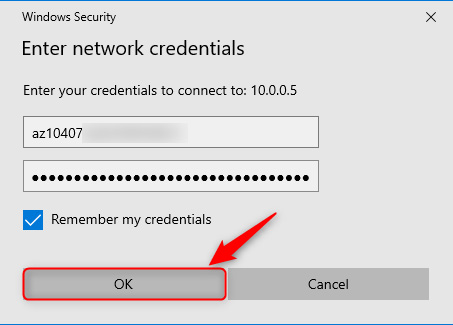
Figure 8.11 – Enter storage account credentials
You have now mapped the network share. This has been connected over the private endpoint. You can test whether it is functional by uploading a file.
The lab is completed; you can now remove all the associated resources for the lab.
Note
It is best practice to remove unused resources to ensure that there are no unexpected costs, even though resources created in this lab do not incur additional costs.
This brings us to the end of labs for Chapter 6, Understanding and Managing Storage, and Chapter 7, Securing Storage.
Summary
In this chapter, we had a look at scenario-based labs, which tested our skills in the following areas: managing Azure storage, creating an Azure function with AzCopy for replication, connecting storage to a private endpoint, and proving our deployments and configurations.
In the next part of the book, we'll cover the deployment and management of Azure compute resources. We will explore VMs, automation of VM deployments using Azure Resource Manager (ARM) templates, containers, and app services.