
10
Searching, Reporting, and Analysis
From Chapter 2, Using Jira for Business Projects, to Chapter 6, Screen Management, we have looked at how Jira can be used as an information system to gather data from users. In Chapter 7, Workflow and Business Process, and Chapter 8, Emails and Notifications, we discussed some of the features that Jira provides to add value to the gathered data through workflows and notifications. In this chapter, we will look at the other half of the equation—getting the data out and presenting it as useful information to the users.
By the end of this chapter, you will have covered the following topics:
- Utilizing the search interface in Jira
- Learning about the different search options available in Jira
- Getting to know about filters and how you can share search results with other users
- Generating reports in Jira
- Sharing information with dashboards and gadgets
Specifically, this chapter will explore the following topics:
- Search interface and options in Jira
- Working with search results
- Filters
- Reports
- Dashboards
- Gadgets
- The HR project
Search interface and options in Jira
As an information system, Jira comes loaded with features and options to search for data and present the search results to end users. Jira comes with three options to perform searches:
- Quick/text search: This allows you to search for issues quickly through simple text-based search queries
- Basic/simple search: This lets you specify issue field criteria via intuitive UI controls
- Advanced search: This lets you construct powerful search queries with Jira’s own search language, Jira Query Language (JQL)
However, before we start looking into the details of all the search options, let’s first take a look at the main search interface that you will be using in Jira while performing your searches.
Issue navigator
The issue navigator is the primary interface through which you will be performing most of your searches in Jira. You can access it by clicking on the Issues menu in the top menu bar and then selecting the Search for issues option.
The issue navigator is divided into several sections:
- The first section is where you will specify all of your search criteria, such as the project you want to search and the issue type you are interested in
- The second section displays the results of your search
- The third section includes the operations that you can perform on the search results, such as exporting them into various formats
- The fourth and last section lists a number of preconfigured and user-created filters
When you access the issue navigator for the first time, you will be in the Basic Search mode. The following screenshot shows the issue navigator in this mode:

Figure 10.1 – Issue navigator
In basic search, as you can see, you specify your search criteria with UI controls, selecting values for each field.
Note
If you previously visited the issue navigator and chose to use a different search option, such as advanced search, then Jira will remember this and open up advanced search instead.
Quick search
This first search option we will look at is the quick search functionality, which allows you to perform quick simple searches based on the text contained in the issue’s summary, description, or comments. This allows you to perform quick text-based searches on all issues in Jira.
The quick search function has several additional features to let you perform more specialized searches with minimal typing, through smart querying. Jira has a list of built-in queries, which you can use as your quick search terms to pull up issues with a specific issue type and/or status. Some useful queries are included in the following table (you can find a full quick search reference at https://confluence.atlassian.com/jiracoreserver/quick-searching-939937704.html):
|
Smart query |
Result |
|
Issue key (for example, HD-12) |
Takes you directly to the issue with the specified issue key |
|
Project key (for example, HD) |
Displays all issues in the project specified by the key on the Issue Navigator page |
|
my or my open bugs |
Displays all issues that are assigned to the currently logged-in user |
|
overdue |
Displays all issues that are due before today |
|
Issues with a particular status (for example, open) |
Displays all issues with the specified status |
|
Issues with a particular resolution (for example, resolved) |
Displays all issues with the specified resolution |
Table 10.1 – Smart query
You can combine these queries to create quick yet powerful searches in Jira. For example, the following query brings back all the resolved issues in the Help Desk project, where HD is the project key:
HD resolved
Running a quick search is much simpler than either basic or advanced searches. All you have to do is type in either the text you want to search with or the smart query in the Quick Search box in the top-right corner, and press Enter on your keyboard.
As you can see, the goal of a quick search is to allow you to find what you are looking for in the quickest possible way. With a smart query, you are able to perform more than just simple text-based searches.
It is important to note that quick search is case-sensitive. For example, searching with My instead of my will become a simple text search rather than issues that are assigned to the currently logged-in user.
Basic search
This is also known as simple search. The basic search interface lets you select fields you want to search with, such as issue status, and specify values for these fields. With basic search, Jira will display a list of searchable fields, and prompt you for the possible search values for the selected field. This is very handy for fields such as Status, and select list-based custom fields, as you do not have to remember all the possible options.
For example, as shown in the following screenshot, we are searching for issues in the Demonstration project with a status of To Do. To help you with that, Jira will list all available statuses for you to select:
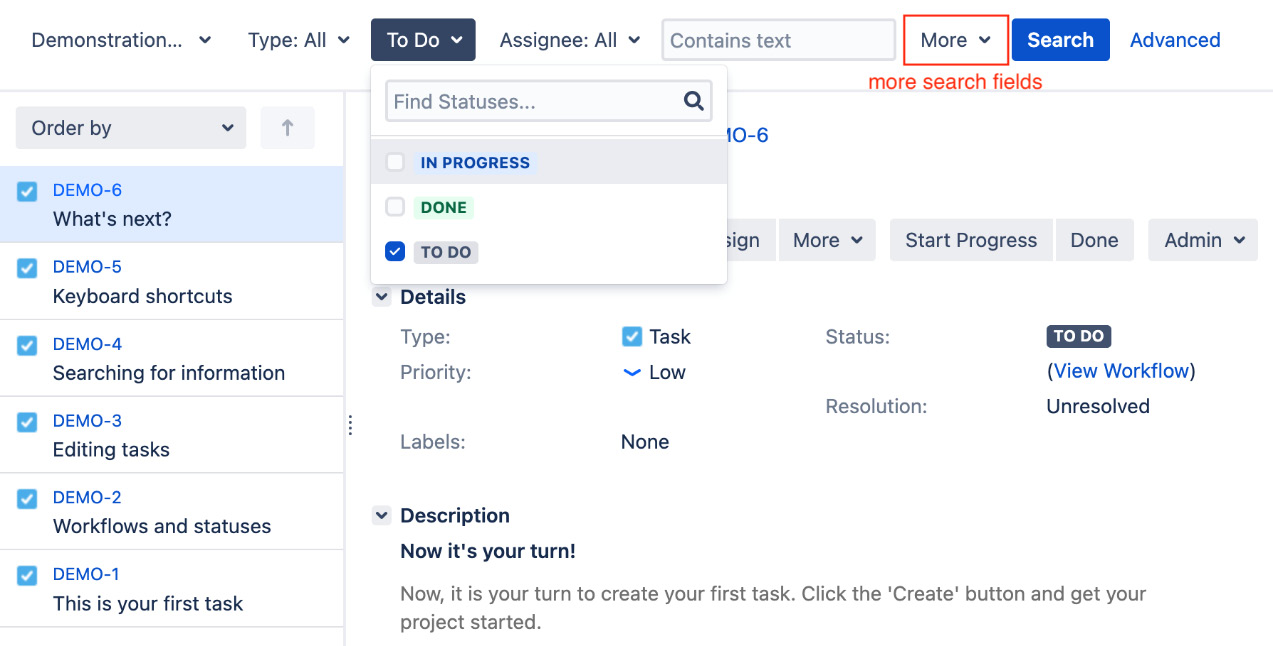
Figure 10.2 – Basic search
While working with the Basic Search interface, Jira will have the default fields of Project, Issue Type, Status, and Assignee visible. You can add fields to the search by clicking on the More drop-down option and then selecting a field you want to use in the search. Perform the following steps to construct and run a basic search:
- Browse to the Issue Navigator page. If you do not see the basic search interface and the Basic link is showing, click on it to switch to basic search.
- Select and fill in the fields in the basic search interface. You can click on More to add more fields to the search criteria.
Note
Jira will automatically update the search results every time you make a change to the search criteria.
When working with basic search, one thing to keep in mind is that the configurations applied to the selected project and issue type such as workflow statuses and context of the custom fields are all taken into consideration. (Please see Chapter 5, Field Management, for field configuration.) For example, if a custom field is set to be applicable to only specific projects and/or issue types, you have to select a project and issue type as part of your search for the custom field to show up.
Advanced search with JQL
Basic search is useful and will fulfill most of the user’s search needs. However, there are still some limitations. One such limitation is that basic search allows you to perform searches based on inclusive logic but not exclusive logic. For example, if you need to search for issues in all but one project, you will have to select every project except for the one to be excluded since the basic search interface does not let you specify exclusions.
This is where advanced search comes in. With advanced search, instead of using a field selection-based interface, you will be using what is known as JQL.
JQL is a custom query language developed by Atlassian. If you are familiar with the Structured Query Language (SQL) used by databases such as MySQL, you will notice that JQL has a similar syntax; however, JQL is not the same as SQL.
One of the most notable differences between JQL and SQL is that JQL does not start with a SELECT statement. A JQL query consists of a field followed by an operator, and then by a value such as assignee = john or a function (which will return a value) such as assignee = currentUser().
You cannot specify which fields to return from a query with JQL, which is different from SQL. You can think of a JQL query as the part that comes after the WHERE keyword in a normal SQL SELECT statement. The following table summarizes the components in JQL:
|
JQL component |
Description |
|
Keyword |
Keywords in JQL are special reserved words that do the following: Join queries together, such as AND Determine the logic of the query, such as NOT Have special meaning, such as NULL Provide specific functions, such as ORDER BY |
|
Operator |
Operators are symbols or words that can be used to evaluate the value of a field on the left and the values to be checked on the right. Examples include the following: Equals: = Greater than: > IN: When checking whether the field value is in one of the many values specified in parentheses |
|
Field |
Fields are Jira system and custom fields. When used in JQL, the value of the field for issues is used to evaluate the query. |
|
Functions |
Functions in JQL perform specific calculations or logic and return the results as values that can be used for evaluation with an operator. |
Table 10.2 – JQL components
Each JQL query is essentially made up of one or more components. A basic JQL query consists of the following three elements:
- Field: This can be an issue field (for example, a status) or a custom field.
- Operator: This defines the comparison logic (for example, = or >) that must be fulfilled for an issue to be returned in the result.
- Value: This is what the field will be compared to; it can be a literal value expressed as text (for example, Bug) or a function that will return a value. If the value you are searching for contains spaces, you need to put quotes around it—for example, issuetype = "New Feature".
Queries can then be linked together to form a more complex query with keywords such as logical AND or OR. For example, a basic query to get all the issues with a status of Done will look similar to this:
status = Done
A more complex query to get all issues with a Resolved status, a Bug issue type, and which are assigned to the currently logged-in user, will look similar to this (where currentUser() is a JQL function):
issuetype = Bug and status = Resolved and assignee = currentUser()
Discussing each and every JQL function and operator is out of the scope of the book, but you can get a full reference by clicking on the help icon in the advanced search interface. A full JQL syntax reference can be found at https://confluence.atlassian.com/jiracoreserver0822/advanced-searching-1141970390.html.
You can access the advanced search interface from the Issue Navigator page, as follows:
- Browse to the Issue Navigator page.
- Click on the Advanced link on the right if you are not in advanced mode already.
- Construct your JQL query.
- Click on the Search button or press the Enter key on your keyboard.
As JQL has a complex structure and it takes some time to get familiar with, the advanced search interface has some very useful features to help you construct your query. The interface has an autocomplete feature (which can be turned off from the General Configuration setting) that can help you pick out keywords, values, and operators to use.
It also validates your query in real time and informs you whether your query is valid, as shown in the following screenshot:
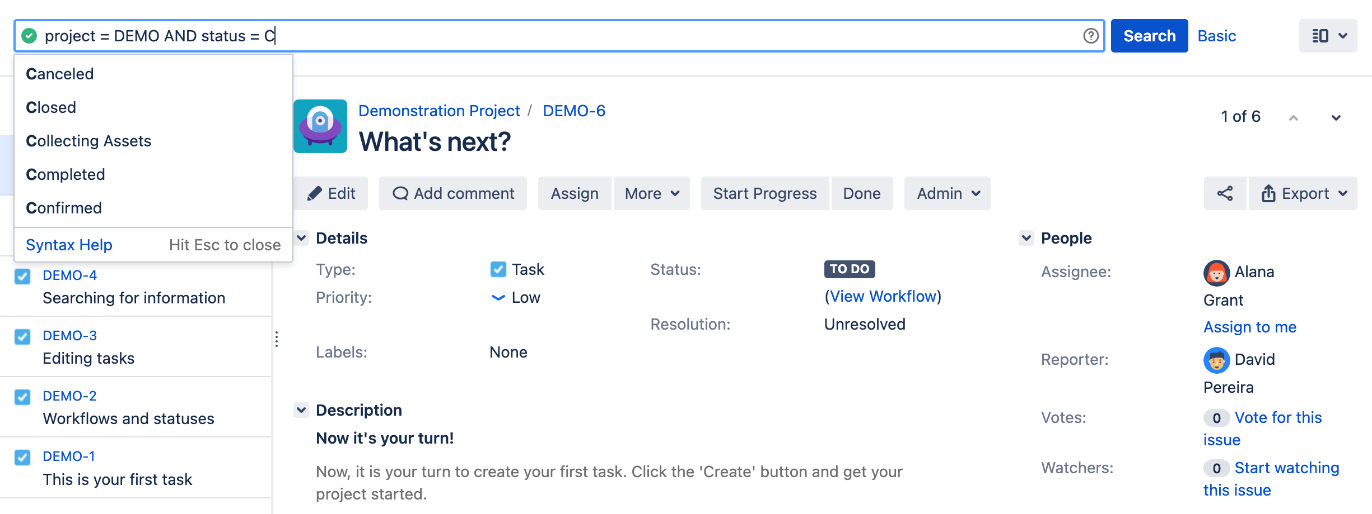
Figure 10.3 – Advanced search
You can switch between basic and advanced search by clicking on the Basic/Advanced link while running your queries, and Jira will automatically convert your search criteria into and from JQL. In fact, this is a rather useful feature and can help you learn the basic syntax of JQL when you are first starting up, by first constructing your search in basic and then seeing what the equivalent JQL is.
Tip
Switching between simple and advanced search can help you get familiar with the basics of JQL.
You need to take note, however, that not all JQL can be converted into basic search since you can do a lot more with JQL than with the basic search interface. The Basic/Advanced toggle link will be disabled if the current JQL cannot be converted to the basic search interface.
Now that we have seen how to perform searches in Jira, we will look at different ways we can use and work with the search results, starting with the various features and operations available directly from the issue navigator.
Working with search results
The issue navigator is capable of more than letting you run searches and presenting you with the results. It also has other features that allow you to do the following:
- Display search results in different view options
- Export search results in different formats
- Select columns you want to see for issues in the results
- Share your search results with other people
- Create and manage filters
We will explore each of these features in the following sections.
Switching result views
The issue navigator can display your search results in two different views. The default view is Detail View, where issues from results are listed on the left-hand side, and the currently selected issue’s details are displayed on the right. This view allows you to select and view detailed content of an issue, as well as edit the issue.
The second view is List View, where issues are listed in a tabular format. The issue’s field values are displayed as table columns. As you will see later, you can configure the table columns as well as the way they are ordered. You can switch between the two views by selecting options from the Views menu next to the Basic/Advanced option.
Customizing the column layout
If you are using the List View option to display your search results, you can configure the field columns to be displayed. In Jira, you can customize your issue navigator for all your personal searches and also on a per-search level with filters (which we will discuss later in this chapter). If you are an administrator, you can set a default column layout for all users (which can be overwritten by each user’s own column layout settings).
Perform the following steps to customize your global issue navigator’s column layout:
- Browse to the Issue Navigator page.
- Change your result view to List View.
- Select the Columns drop-down menu and a column layout option, as shown here:

Figure 10.4 – Configuring search columns
The following options can be used to lay out columns:
- My Defaults: This column layout will be applied to all your searches
- Filter: This column layout will be applied only to the current filter
- System: This column layout will be applied to all searches
To add or remove a field column, simply check or uncheck the field from the list. To reorder the column layout, you can drag the columns left or right to their appropriate locations.
Exporting search results
From the issue navigator, Jira allows you to export your search results to a variety of formats, such as MS Word and CSV. Jira is also able to present your search results in different formats, such as XML or print-friendly pages.
When you select formats such as Word or Excel, Jira will generate the appropriate file and let you download it directly. Perform the following steps to export your results to a different format:
- Browse to the Issue Navigator page.
- Execute a search.
- Select the Export drop-down menu in the top-right corner.
- Select a format you wish to see your search results in, as shown:
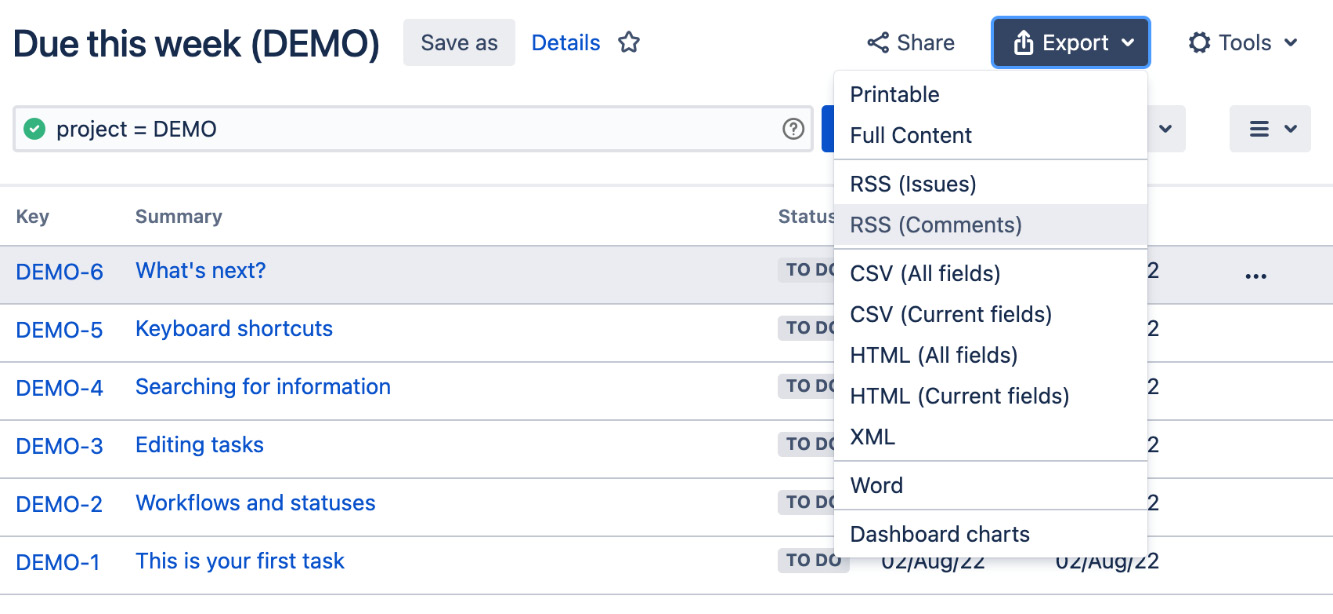
Figure 10.5 – Exporting search results
Depending on the format you select, some formats will be on screen (for example, printable), while others will prompt you with a download dialog box (for example, Excel).
Sharing search results
After completing a search, you may want to share the results with your colleagues. Now, you can tell your colleagues to run the same search or, as we will see later in the chapter, save your search as a filter and then share it with other people. Alternatively, a more convenient way is to use the built-in share feature, especially if this is a one-off share.
To share your current search results, all you have to do is click on the Share button in the top-right corner and type in the user’s name or an email address (if they are not Jira users). You can add multiple users or email addresses so that you can share this with more than one person. You can also add a quick note, letting people know why you are sharing the search results with them, and Jira will send out emails to all selected users and email addresses.
Filters
After you have run a search query, sometimes it is useful to save the query for later use. For example, you may have created queries for several projects, listing all the open bugs and new features in each project that are to be completed by a certain date so that you can keep an eye on their progress.
Instead of recreating this search query every time you want to check up on the statuses, you can save the query as a filter that can be reused at a later stage. You can think of filters as named search queries that can be reused.
Other than being able to quickly pull up a report without having to recreate queries, saving search queries as filters provides you with other benefits:
- Sharing saved filters with other users
- Using the filters as a source of data to generate reports
- Using the filters for agile boards (see Chapter 3, Using Jira for Agile Projects)
- Displaying results on a dashboard as a gadget
- Subscribing to the search queries to have results emailed to you automatically
A few things to keep in mind when creating and using filters as the data source for gadgets and agile boards are noted here:
- When you are creating a filter for agile boards, make sure you select relevant projects as part of your search query.
- When you are creating a filter for gadgets and agile boards, make sure you share the filter with the same group of users that has access to the gadgets and boards. Otherwise, they will not see any results.
We will explore all of the advanced operations you can perform with filters, and explain some of the new terms and concepts, such as dashboards and gadgets, in later sections. However, let’s look at how we can create and manage filters first.
Creating a filter
To create a new filter, you will first have to construct and execute your search query. You can do this with any of the three available search options provided in Jira, but please note that the search result must bring you to the Issue Navigator page. If you are using the quick search option and search by issue key, you will not be able to create a filter.
Once you have executed your query, regardless of whether it brings back any result, you will be able to create a new filter based on the executed search, as follows:
- Browse to the Issue Navigator page.
- Construct and execute a search query in Jira.
- Click on the Save as button at the top.
- Enter a meaningful name for the filter.
- Click on the Submit button to create the filter.
Once you have created the filter, all your search parameters will be saved. In the future, when you rerun the saved filter, Jira will retrieve the updated results based on the same parameters.
Take note that you need to click on the New filter button to start a new search if you have created a filter. Since the issue navigator remembers your last search, if you were working with an existing filter without starting a new search, you would, in fact, be modifying the current filter instead.
Managing filters
As the number of created filters grows, you will need a centralized location to manage and maintain them.
You can access the Manage Filters page through the issue navigator, as follows:
- Browse to the Issue Navigator page.
- Click on the Find filters link on the left-hand side. You can also access the Manage Filters page by going through the top navigator bar.
- Bring up the drop-down menu from Issues.
- Click on the Manage filters option at the bottom of the list.
The Manage Filters page displays the filters that are visible to you in three main categories, as set out in the tabs to the left, along with an option to search for existing filters:
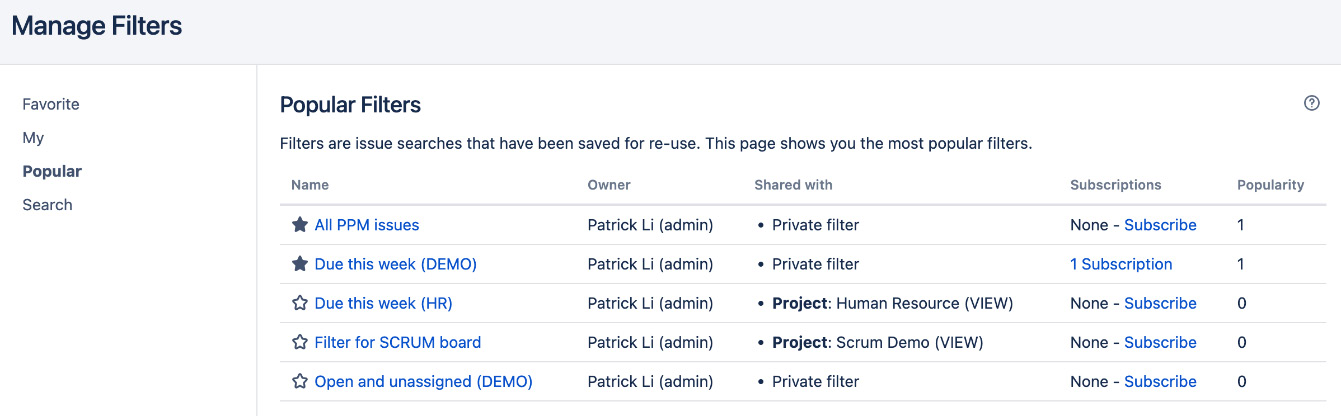
Figure 10.6 – Manage Filters page
- Favorite: This option lists filters with a gray star next to their names. These filters will be listed in the Issues drop-down menu. You can mark a filter as a favorite by clicking on the star directly.
- My: This option lists the filters that are created by you.
- Popular: This option lists the top 20 filters that have the most people marking them as favorites.
- Search: This option searches for existing filters that are shared by other users.
The preceding screenshot also shows that both the All PPM issues and Due this week (DEMO) filters are marked as favorites.
Sharing a filter
After creating a filter, you can update its details such as name and description, sharing permission, and search parameters. By default, newly created filters are not shared, which means they are only visible to you. To share your filters with other users, perform the following steps:
- Browse to the Manage Filters page.
- Click on the Edit option for the filter you wish to share.
- Select a group/project role to share the filter with and click Add.
- Click on the Save button to apply the changes.
This is shown in the following screenshot:
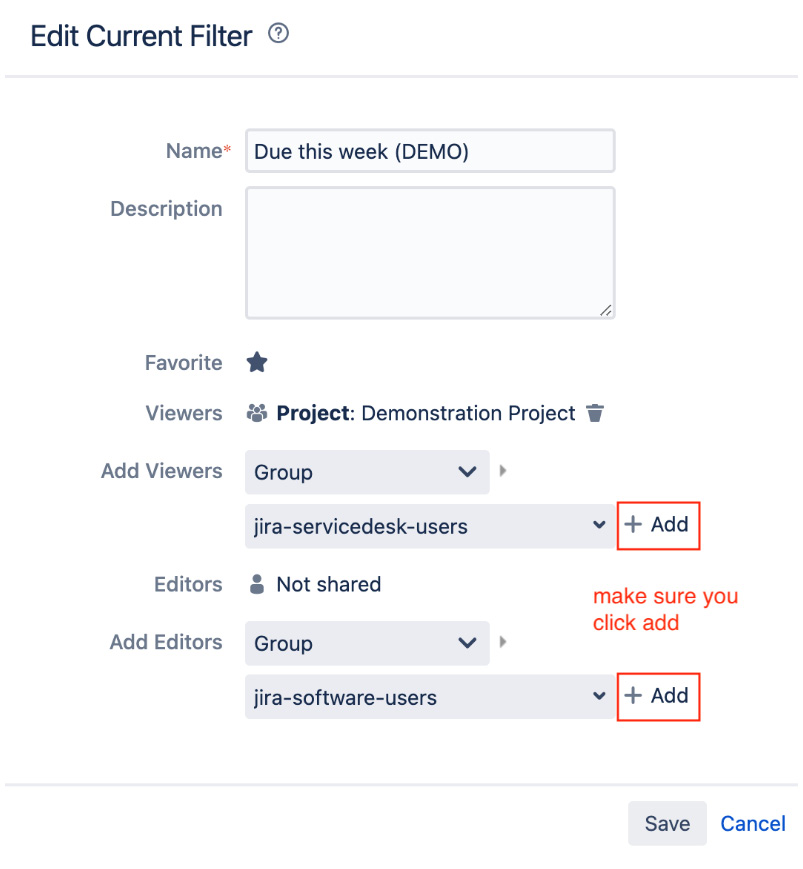
Figure 10.7 – Sharing a filter
Note
Make sure you click on the Add link after you have chosen a group or a project to share a filter with.
For you to be able to share a filter, you will also need to have the Create Shared Object global permission (please refer to Chapter 9, Securing Jira, for more information on global permissions).
When you share your filter, you can choose who will have view permission, which means being able to see and run your filter (search results are still controlled by project and issue permissions), and who will be able to make modifications to your filter. As we will see later, Jira administrators can also change the ownership of filters that are shared.
Subscribing to a filter
You have seen in Chapter 8, Emails and Notifications, that Jira is able to send out emails when certain events occur to keep the users updated. With filters, Jira takes this feature one step further by allowing users to subscribe to a filter.
When you subscribe to a filter, Jira will run a search based on the filter and send you the results in an email. You can specify a schedule of when and how often Jira should perform this. For example, you can set up a subscription to have Jira send you the results every morning before you come to work so that when you open up your mail inbox, you will have a full list of issues that require your attention.
To subscribe to a filter, you will need to be able to see the filter (either created by you or shared with you by other users). Here’s how you can do this:
- Browse to the Manage Filters page.
- Locate the filter you wish to subscribe to.
- Click on the Subscribe link for the filter.
- Select a recipient of the subscription. Normally, this will be you (Personal Subscription). You can also create subscriptions for other people by selecting a group.
- Check the Email this filter, even if there are no issues found option if you wish to have an email sent to you if there are no results returned from the filter. This can be useful to make sure that the reason you are not getting emails is not due to other errors.
- Specify a frequency and time when Jira can send you emails.
This is shown in the following screenshot:
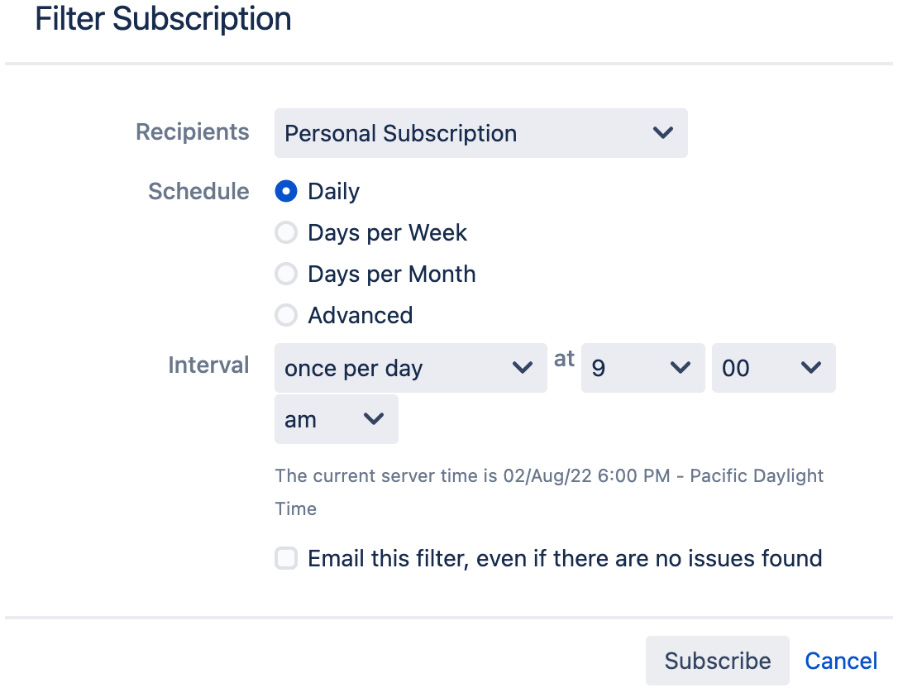
Figure 10.8 – Subscribe filter
- Click on the Subscribe button. This will create a subscription and take you back to the Manage Filters page. The Subscribe link will increment the number of subscriptions; for example, 1 Subscription.
- Click on the 1 Subscription link to verify the subscription has been created correctly.
- Click on the Run now link to test your new subscription. You should see something like this on your Subscription screen once you are done:

Figure 10.9 – Viewing subscriptions
Deleting a filter
You can delete a filter when it is no longer needed. However, since you can share your filters with other users and they can create subscriptions, you need to keep in mind that the filter might be used by an agile board or in other places, as well as the fact that you may impact other users if the filter is shared. Luckily, when you delete a filter, Jira will inform you if other people are using the filter. Here’s how you can do this:
- Browse to the Manage Filters page.
- Click on the Delete link for the filter you wish to remove. This will bring up the Delete Filter confirmation dialog box.
- Make sure that the removal of the filter will not impact other users.
- Click on the Delete button to remove the filter.
Jira will inform you if the filter is being used by Jira or if there are users subscribed to it. You can click through to see a list of subscribers, and then decide to either proceed with deleting the filter and letting the other users know or leave the filter in Jira.
Changing the ownership of a filter
Usually, Jira only allows the filter’s owner to make changes to it unless the right to edit is given to other users. This is usually not a problem for private filters, but when a filter is shared with other users or used for agile boards or dashboard gadgets, this can be problematic when the owner leaves the organization.
For this reason, the Jira administrator is able to change the ownership of a shared filter. Perform the following steps to change a filter’s ownership:
- Browse to the Jira administration console.
- Select the System tab and then the Shared filters option.
- Search for the filter you wish to change ownership of.
- Click on the Change Owner option.
- Search for and select a user that will be the new owner.
- Click on the Change Owner button.
This is shown in the following screenshot:
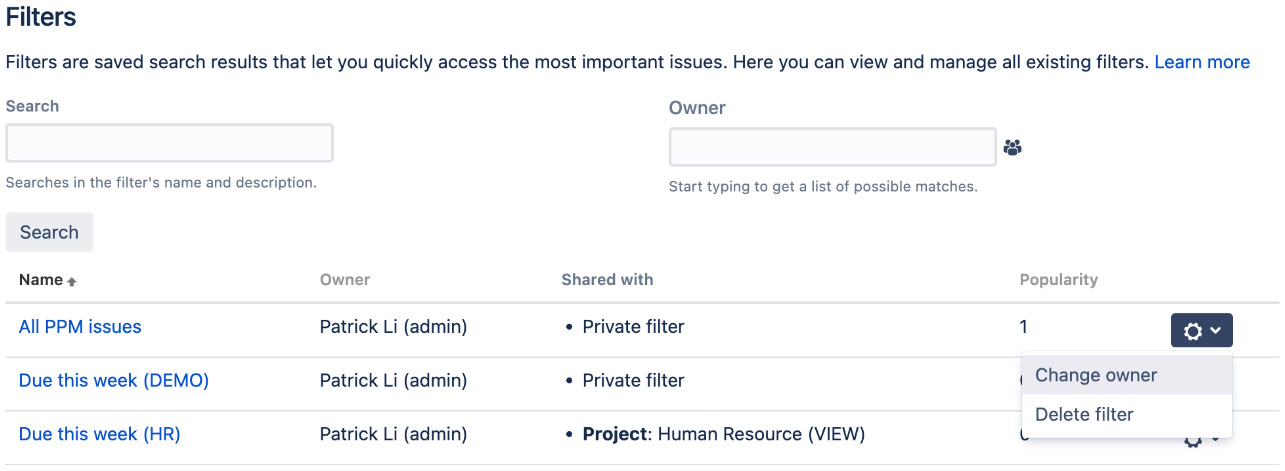
Figure 10.10 – Changing filter ownership
Filters are a very useful feature in Jira—not only can you use them to access previous searches and share them with others, as we will see in later sections, but Jira also lets you run reports and create dashboards based on your filters. Let’s have a look.
Reports
Apart from JQL and filters, Jira also provides specialized reports to help you get a better understanding of the statistics for your projects, issues, users, and more. Most reports in Jira are designed to report on issues from a specific project; however, some reports can be used globally across multiple projects, with filters.
Generating a report
All Jira reports are accessed from the Browse Project page of a specific project, regardless of whether the report is project-specific or global. The difference between the two types of reports is that a global report will let you choose a filter as a source of data, while a project-specific report will have its source of data predetermined based on the project you are in.
When generating a report, you will often need to supply several configuration options. For example, you may have to select a filter that will provide the data for the report, or select a field to report on. The configuration options vary from report to report, but there will always be hints and suggestions to help you work out what each option is.
Perform the following steps to create a report; you will first need to get to a project’s browse page:
- Select a project you wish to report on.
- Click on the Reports option from the left panel.
- Select a report you wish to create. The types of reports available will vary depending on the project type.
- Specify configuration options for the report.
- Click on the Next button to create the report.
Jira comes with a number of reports that are specifically designed around reporting on agile projects, such as the Burndown Chart, as well as the basic set of charts that come with Jira Core, such as Average Age Report and Pie Chart Report. The types of reports available to you depend on the type of project. Scrum and Kanban projects will have reports under the Agile category, as shown in the following screenshot:
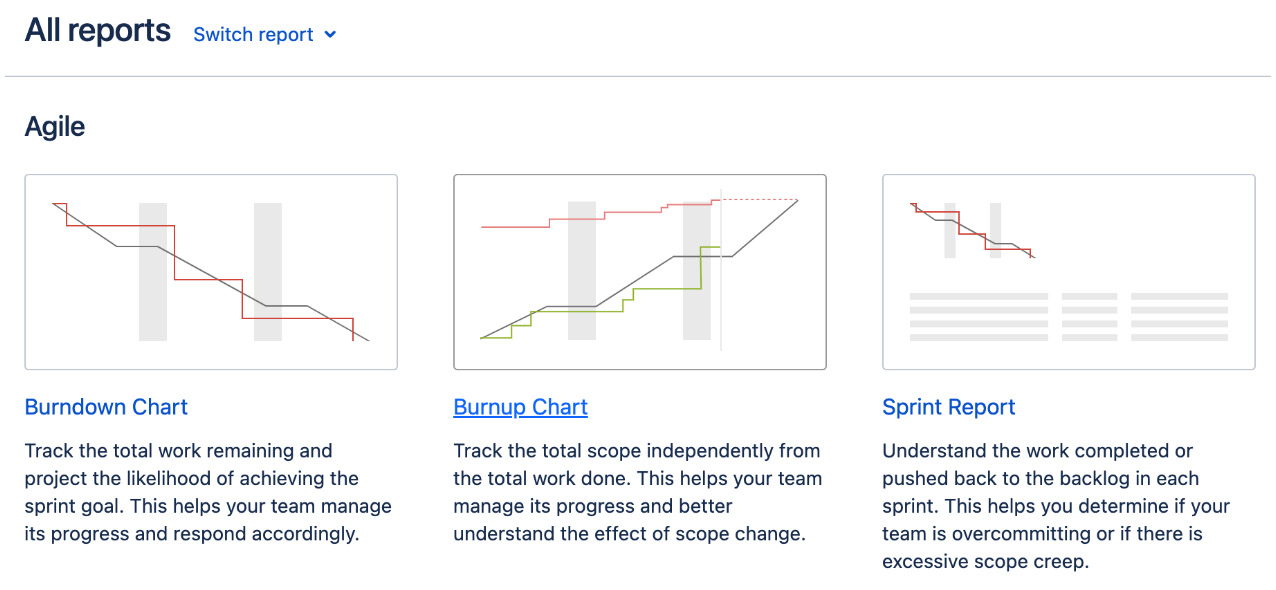
Figure 10.11 – Reports
Let’s create a pie chart report, as follows:
- We will first select the type of report to be generated by selecting it from a list of available report types that come with Jira, as shown in the following screenshot:
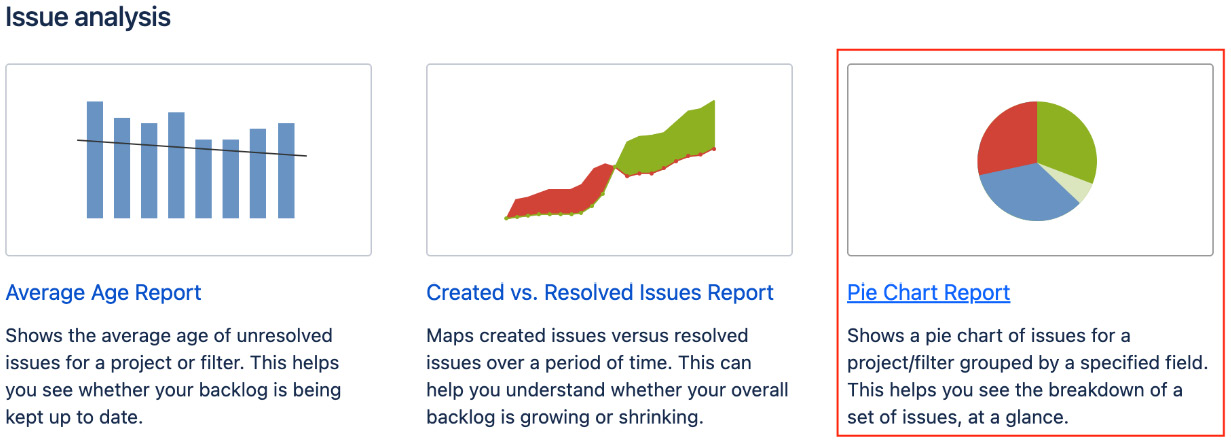
Figure 10.12 – Selecting a report
- We will then configure the necessary report parameters. In this case, you need to specify whether you are generating a report based on a project or an existing filter; by default, the current project will be preselected. You also need to specify which issue field you will be reporting on, as you can see from the following screenshot:
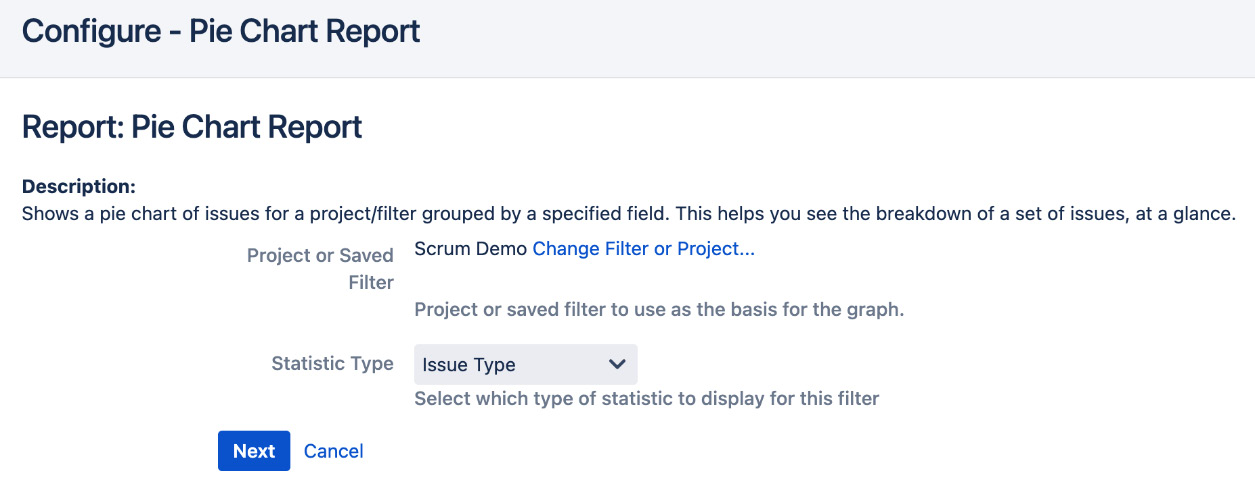
Figure 10.13 – Configuring the report
- Once you have configured the report and clicked on the Next button, Jira will generate a report and present it on the screen, as shown in the following diagram:
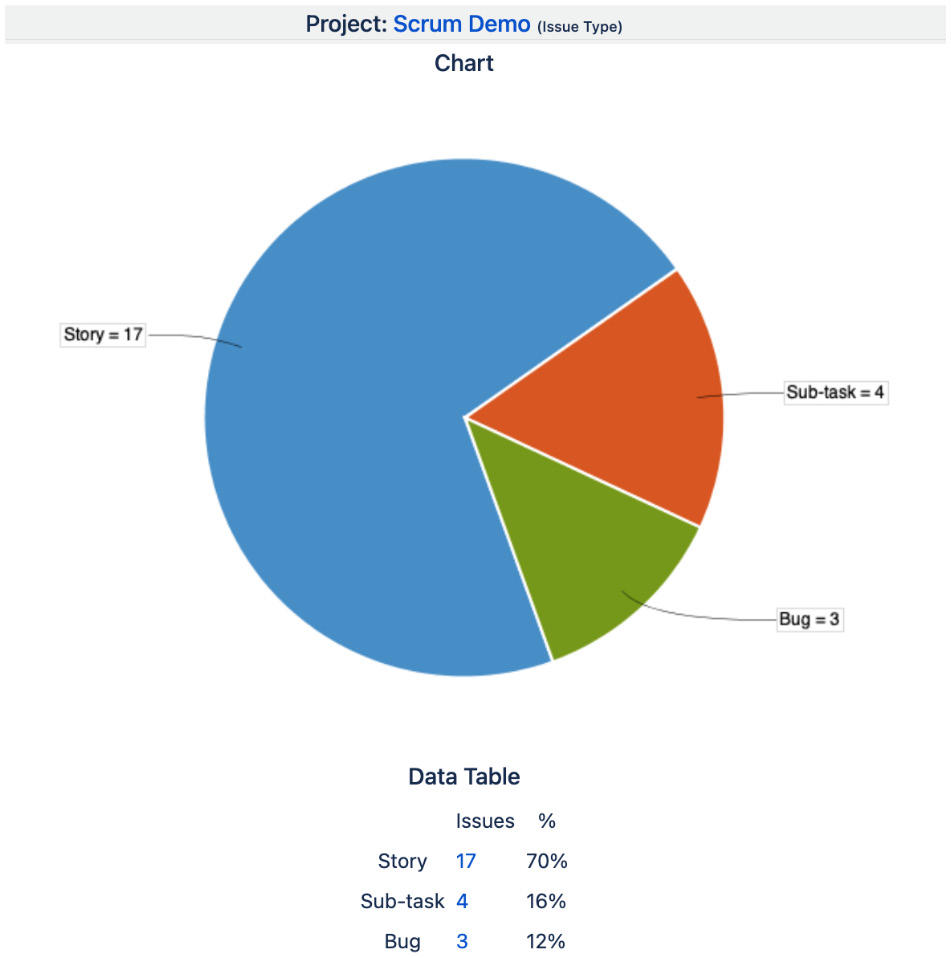
Figure 10.14 – Generated report
The report type determines the report’s layout. Some reports have a chart associated with them (for example, Pie Chart Report), whereas other reports will have a tabular layout (for example, Single Level Group By Report). Some reports will even have an option for you to export their content into formats such as Microsoft Excel (for example, Time Tracking Report).
Reports are run on a specific project and are run on demand. Jira also lets you create dashboards that can display data across multiple projects and can be dynamically updated to always show the latest data.
Dashboards
The dashboard is the first page you see when you access Jira. Dashboards host mini-applications known as gadgets, which provide various data and information from your Jira instance. Jira is able to present many of its features, such as filters and reports, on the dashboard using these gadgets, so it is a great way to provide users with a quick one-page view of information that is relevant or of interest to them.
When designing a dashboard, you should always consider the target audience and choose the most appropriate gadgets for the job. For example, a dashboard for the management might have more charts, while a dashboard for a support team can make use of more list-style gadgets.
Managing dashboards
When you first install Jira, the default dashboard you see is called the System Dashboard, and it is preconfigured to show some useful information, such as all issues that are assigned to you. Here’s how you can manage dashboards:
- Since everyone shares the system dashboard, you as a normal user cannot make changes to it, but you can create your own dashboards. Each dashboard’s functions are configured independently.
- Bring down the drop-down menu from Dashboards.
- Select the Manage Dashboards option. This will bring you to the Manage Dashboards page, as shown in the following screenshot:

Figure 10.15 – Manage Dashboards page
From this page, you can edit and maintain dashboards created by you, search dashboards created and shared by others, and mark them as favorites so that they will be listed as tabs for easy access.
When a dashboard is marked as a favorite by clicking on the star icon in front of its name, the dashboard will be accessible when you click on the Dashboards link on the top menu bar. If you have more than one favorite dashboard, each will be listed in the tab and you can select which one to display.
Creating a dashboard
The default System Dashboard cannot be changed by normal users, so if you want to have a personalized dashboard displaying information that is specific to you, you will need to create a new dashboard. Perform the following steps to create a new dashboard:
- Browse to the Manage Dashboards page.
- Click on the Create new dashboard button.
- Enter a meaningful name and description for the new dashboard.
- Select whether you wish to copy from an existing dashboard or start with a blank one. This is similar to creating a new screen from scratch or copying an existing screen.
- Select whether or not the new dashboard will be a favorite dashboard (for easy access) by clicking on the star icon.
- Select whether you wish to share the dashboard with other users. If you share your dashboard with everyone by choosing the Everyone option, then users that are not logged in will also be able to see your dashboard.
- Click on the Add button to create the dashboard.
The following screenshot shows how you can create a new dashboard from scratch (blank dashboard) and allow view access to all members of the Hummingbird project, and allow edit access to members of the hummingbird-managers group:
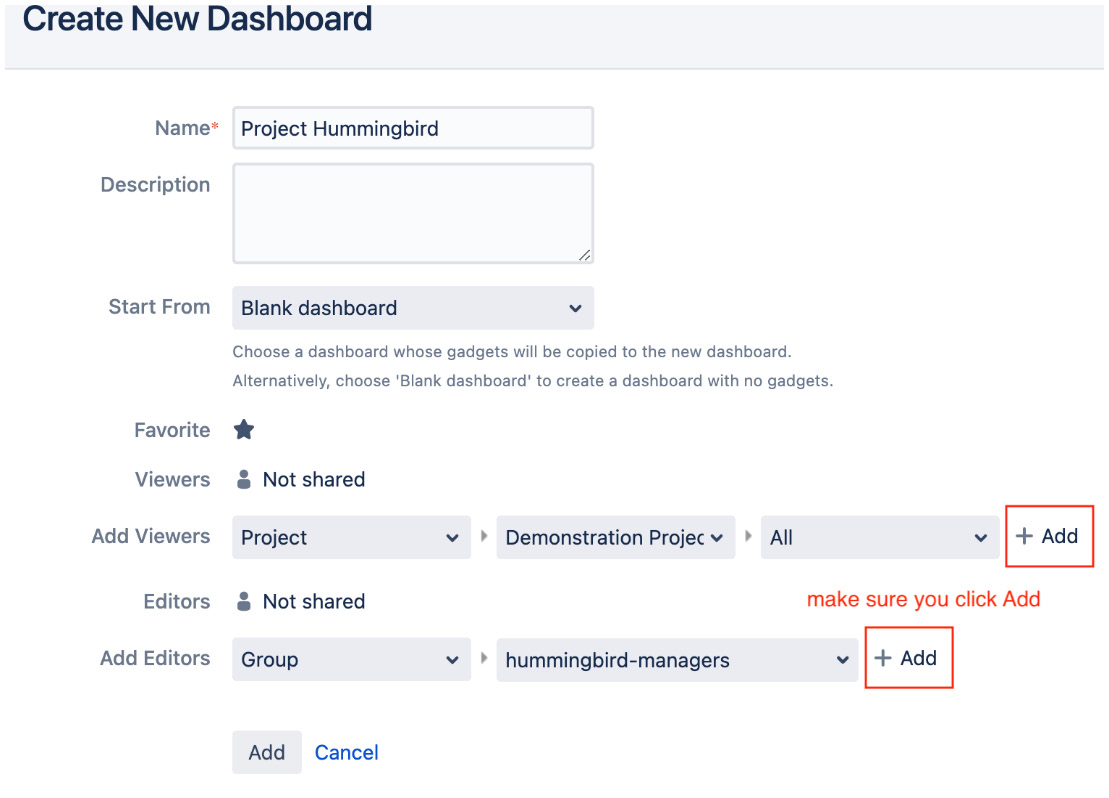
Figure 10.16 – Creating a new dashboard
For you to be able to share a dashboard, you will also need to have the Create Shared Object global permission (please refer to Chapter 9, Securing Jira, for more information on global permissions).
Once you have created the new dashboard, you will be taken immediately to it. As the owner of the new dashboard, you will be able to edit its layout and add gadgets to it. We will be looking at these configuration options in the next section.
Configuring a dashboard
All custom-created dashboards can be configured once they have been created. As the owner, there are two aspects of a dashboard you can configure:
- Layout: This describes how the dashboard page will be divided
- Contents: This describes the gadgets that are to be added to the dashboard
Setting a layout for the dashboard
You have to be the owner of the dashboard (created by you) to set the layout. Setting a dashboard’s layout is quite simple and straightforward. If you are the owner, you will have the Edit Layout option in the top-right corner while you view the dashboard.
Jira comes with five layouts that you can choose from. These layouts differ in how the dashboard page’s onscreen real estate is divided. By default, a new dashboard has a second layout that divides it into two columns of equal size. Perform the following steps to set a layout for a dashboard:
- Bring up the drop-down menu from Dashboards.
- Select a dashboard you wish to edit the layout for.
- Click on the Edit Layout option in the top-right corner. This will bring up the Edit layout dialog.
- Select a layout to which you wish to change, as follows:
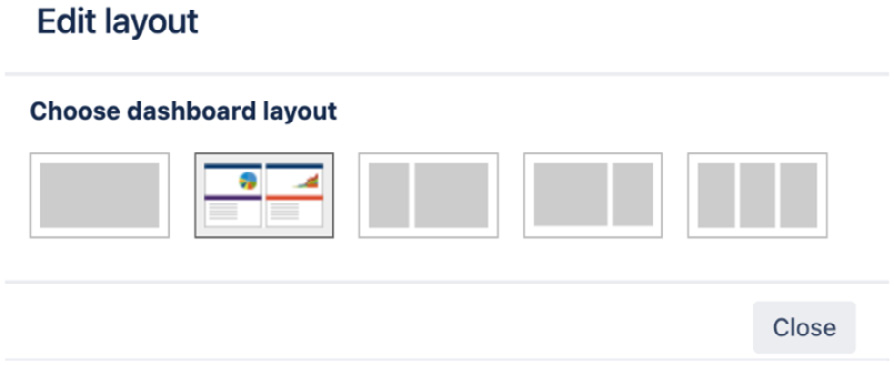
Figure 10.17 – Selecting a dashboard layout
A layout selected from the dialog box will be immediately applied to the dashboard. Any existing contents will automatically have their size and positions adjusted to fit the new layout. After you have decided on your dashboard’s layout, you can start adding contents, known as gadgets, onto your dashboard. We will cover gadgets later in this chapter.
Changing the ownership of a dashboard
As with filters, the Jira administrator can change the ownership of a dashboard to a different user, in case the original user has left the organization. Perform the following steps to change a dashboard’s ownership:
- Browse to the Jira administration console.
- Select the System tab and then the Shared dashboards option.
- Search for a dashboard you wish to change ownership of.
- Click on the Change Owner option.
- Search for and select a user that will be the new owner.
- Click on the Change owner button, as shown in the following screenshot:
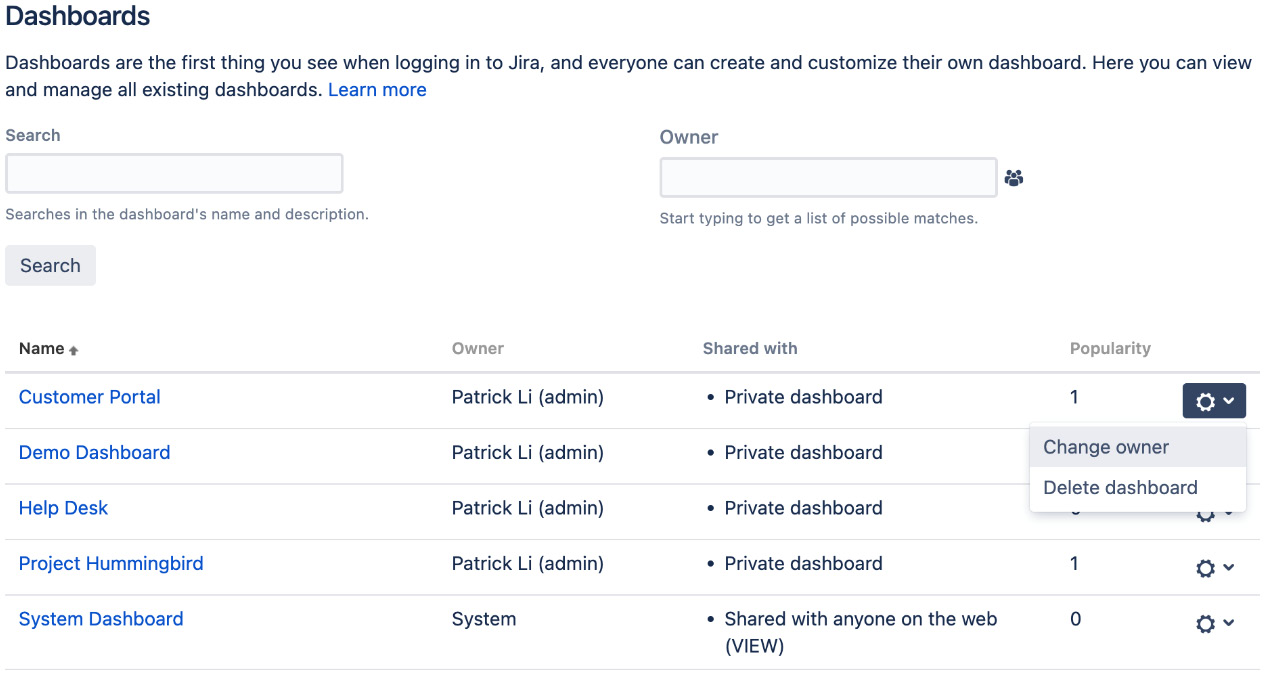
Figure 10.18 – Changing dashboard ownership
Gadgets
Gadgets are like mini-applications that live on a dashboard in Jira. They are similar to widgets in most of the smartphones we have today or portlets in most portal applications. Each gadget has its own unique interface and behavior. For example, the Pie Chart gadget displays data in a pie chart, while the Assigned to Me gadget lists all the unresolved issues that are assigned to the current user in a table. Gadgets are another way for you to use search filters, by visually presenting the results to end users. Jira comes with many useful gadgets out of the box, and you can add more gadgets to Jira from third-party apps. We will cover how to install and manage third-party apps in Chapter 12.
Let’s start by looking at how to add a gadget to your dashboard.
Placing a gadget on the dashboard
All gadgets are listed in the gadget directory. Jira comes with a number of useful gadgets, such as the Assigned to Me gadget that you see on the System Dashboard. The following screenshot shows the gadget directory, listing all bundled gadgets in Jira:
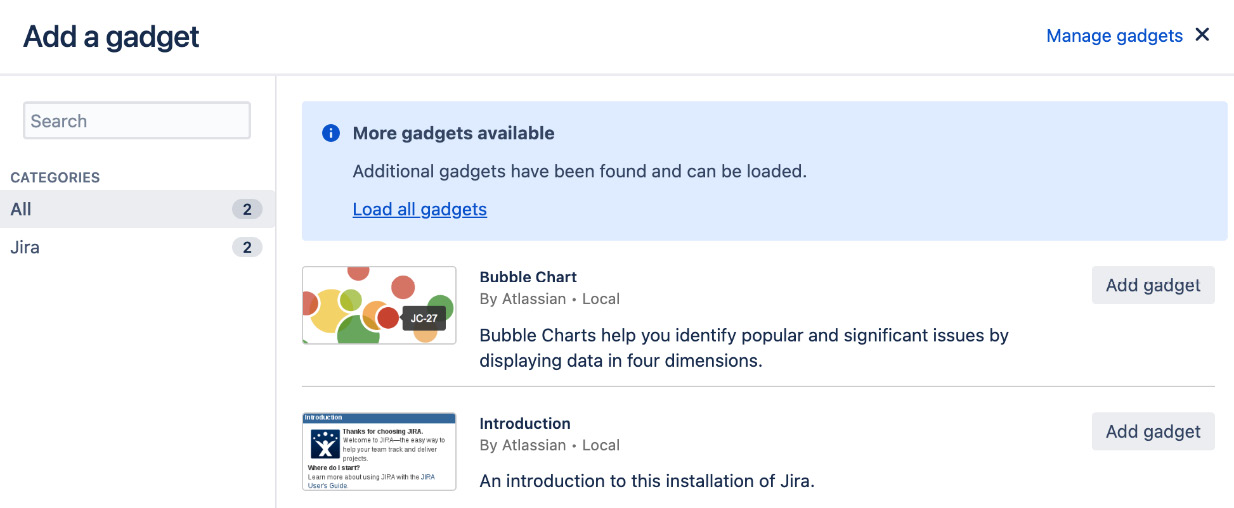
Figure 10.19 – Gadget directory
Perform the following steps to place a gadget onto your dashboard:
- Bring up the drop-down menu from Dashboards.
- Select a dashboard you wish to add a gadget to.
- Click on the Add Gadget option in the top-right corner. This will bring up the Gadget Directory window.
- Click on the Load all gadgets link to make all gadgets appear. You only need to do this for the first time when you load the gadget directory.
- Click on the Add gadget button for the gadget you wish to add.
- Close the dialog to return to the dashboard.
Depending on the gadget you selected, some gadgets will require additional options to be configured. For these gadgets, you will be presented with their configuration screen on the dashboard. Fill in the options and click on the Save button.
Let’s look at the following screenshot of the configuration screen for the Filter Results gadget:
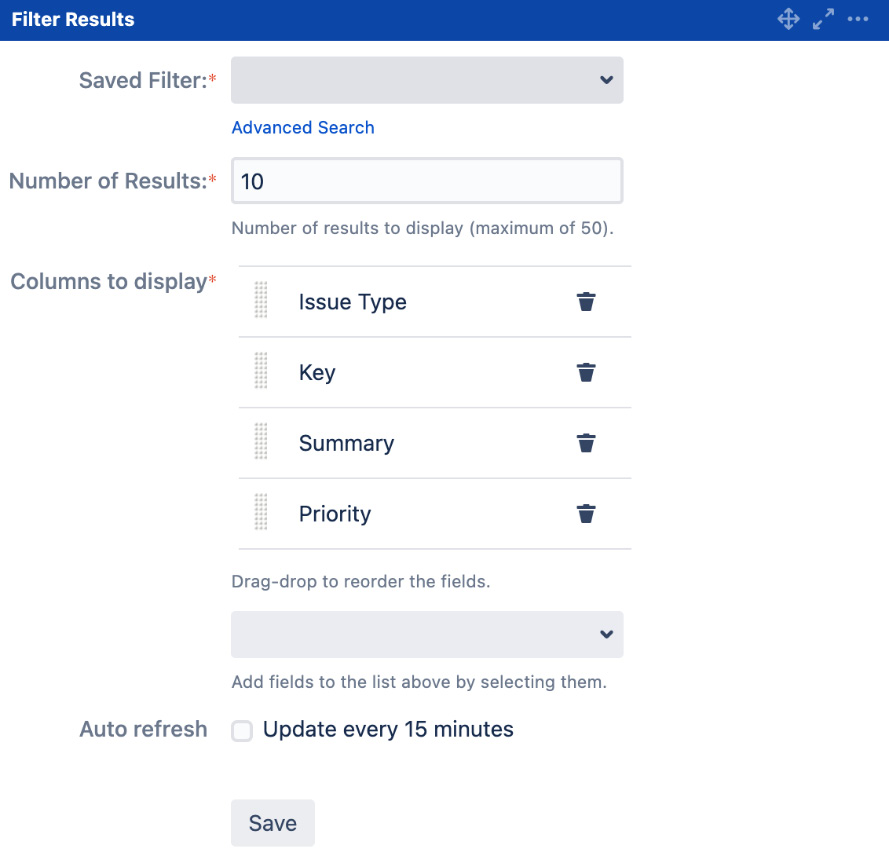
Figure 10.20 – Configuring a gadget
On the configuration screen, you can select a search filter to display and control the number of results to show and the fields to include. One common parameter is the Auto refresh option, where you can decide how often the gadget can refresh its content or stay static if you leave it unchecked. Whenever you refresh the entire dashboard, all gadgets will load the latest data, but if you stay on the dashboard for an extended period of time, each gadget can automatically refresh its data, so the content will not become stale over time.
When you add a gadget, it’s usually added to the first available spot on the dashboard. This sometimes might not be where you want to display the gadget on the dashboard, and in other cases, you might want to move the existing gadgets around from time to time. As the owner of the dashboard, you can easily move gadgets on a dashboard by dragging and dropping them to the desired location.
Editing a gadget
After configuring your gadget when you first place it on your dashboard, the gadget will remember this and use it to render its content. You can update the configuration details or even its look and feel, as follows:
- Browse to the dashboard that has gadgets you wish to update.
- Hover over a gadget and click on the down arrow button in the top-right corner of it. This will bring up the gadget configuration menu.
- Click on the Edit option.
- This will change the gadget into its configuration mode.
- Update the configuration options.
- Click on the Save button to apply the changes. You can see an example of what this might look like here:
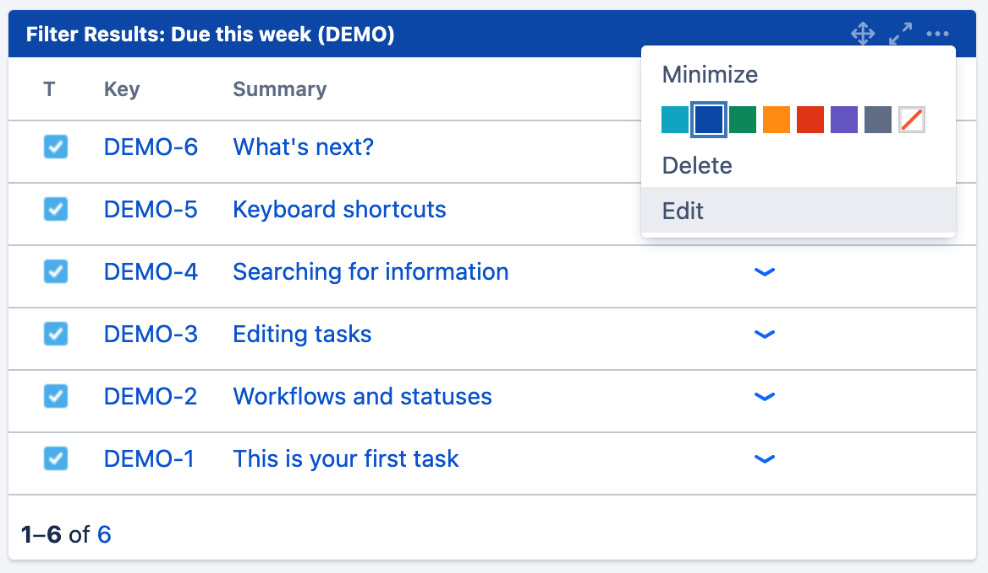
Figure 10.21 – Editing a gadget
The preceding screenshot shows the Edit menu for the Assigned to Me gadget. Some gadgets will have a Refresh option. Since gadgets retrieve their data asynchronously through AJAX, you can use this option to refresh the gadget itself without refreshing the entire page. The Edit, Delete, and Color options are only available to the owner of the dashboard.
Deleting a gadget
As the owner of the dashboard, you can remove existing gadgets from the dashboard when they are no longer needed. When you remove a gadget from a dashboard, please note that all the other users who have access to your dashboard will no longer see it. Perform the following steps to delete a gadget:
- Browse to a dashboard that has gadgets you wish to delete.
- Hover over the gadget and click on the down arrow button in the top-right-hand corner of it. This will bring up the gadget configuration menu.
- Click on the Delete option.
- Confirm the removal when prompted.
Once removed, the gadget will disappear from the dashboard. If you choose to re-add the same gadget at a later stage, you will have to reconfigure it again.
This covers searches, reports, and dashboards in Jira. In the next section, we will build a custom dashboard for our HR project.
The HR project
In our previous chapters and exercises, we built and customized a Jira project to collect data from users. What we need to do now is process and present this data back to the users. The goal we are trying to achieve in this exercise is to set up a dashboard for our HR team that will have useful information such as statistics and issue listings, which can help our team members to better organize themselves to provide better services to other departments.
Setting up filters
The first step is to create a useful filter that can be shared with the other members of the team and that also acts as a source of data to feed our gadgets. We will use the advanced search to construct our search. Proceed as follows:
- Browse to the Issue Navigator page.
- Click on the Advanced link to switch to advanced search with JQL.
- Type project = HR and issuetype in ("New Employee", Termination) and resolution is empty order by priority code in the JQL search query.
- Click on the Search button to execute the search.
- Click on the Save as button to bring up the Save Filter dialog.
- Name the filter Unresolved HR Tasks and click on the Submit button.
- Share the filter with the hr-team group set up in Chapter 9, Securing Jira, by clicking on the Details link next to the Save as button.
This filter searches for and returns a list of unresolved issues of the New Employee and Termination type from our HR project. The search results are then ordered by their priority so that the users can determine the urgency. As you will see in the later steps, this filter will be used as the source of data for your gadgets to present information on your dashboard.
Setting up dashboards
The next step is to create a new dashboard for your helpdesk team. What you need is a dashboard specifically for your team so that you can share information easily. For example, you can have a dashboard displayed on a large overhead projector showing all high-priority incidents that need to be addressed. Perform the following steps to do this:
- Browse to the Manage Dashboards page.
- Click on the Create new dashboard button.
- Name the new dashboard Human Resources.
- Select a blank dashboard as your base.
- Check the new dashboard as a favorite.
- Share the dashboard with the hr-team group.
- Click on the Add button to create the dashboard.
In our example, we will use the two default column layouts for your new dashboard. Alternatively, you are free to experiment with other layouts and find ones that best suit your needs.
Setting up gadgets
Now that you have set up your portal dashboard page and shared it with the other members of the team, you need to start adding some useful information to it. One example would be to have all unresolved incidents that are waiting to be processed on the dashboard display. Jira has an Assigned to Me gadget that shows all issues that are assigned to the currently logged-in user, but what you need is a global list irrespective of the assignee of the incident.
Luckily, Jira also has a Filter Results gadget that displays search results based on a search filter. Since you have already created a filter that returns all unresolved tasks in your HR project, the combination of both will nicely solve your problem. Proceed as follows:
- Browse to the Human Resources dashboard you have just created.
- Click on the Add Gadget option in the top-right corner.
- Click on the Add gadget button for the Filter Results gadget.
- Select the Unresolved HR Tasks filter you created.
- Add any additional fields you wish to add for the Columns to display option.
- Enable Auto refresh and set the interval to 15 minutes.
- Click on the Save button.
This will add a new Filter Results gadget to your new dashboard, using your filter as the source of data. The gadget will auto-refresh its contents every 15 minutes, so you will not need to refresh the page all the time. You can add some other gadgets to the dashboard to make it more informative and useful. Some other useful gadgets include the Activity Stream and Assigned to Me gadgets.
Putting it together
This is pretty much all you have to do to set up and share a dashboard in Jira. After you have added a gadget to it, you will be able to see it in action. The great thing about this is that, since you have shared the dashboard with others on the team, they will be able to see the dashboard too. Members of the team will be able to search for your new dashboard or mark it as a favorite to add it to their list of dashboards.
You do have to keep in mind that if you are using a filter as a source of data for your gadget, you have to share the filter with other users too; otherwise, they will not be able to see anything from the gadget.
Summary
In this chapter, we covered how users can search and report on the data they have put into Jira, which is an essential component of any information system. Jira provides a robust search facility by offering many different search options to users, including quick, simple, and advanced searches. You can save and name your searches by creating filters that can be rerun at later stages to save you from recreating the same search again.
Jira also allows you to create configurable reports on projects or results brought back from search filters. Information can be shared with others through a dashboard, which acts as a portal for users to quickly have a glance at the data kept in Jira.
In the next chapter, we will look at the other application in the Jira family, Jira Service Desk, which helps to change Jira into a fully functional service desk with powerful features, such as the customer portal and SLA management.