
3
Using Jira for Agile Projects
In the previous chapter, we looked at the basics of the Jira project and used Jira for generic task management. In this chapter, we will focus on using Jira for agile software development projects with Scrum, Kanban, and Kanplan. We will provide a brief overview of each of the agile methodologies and look at how to use Jira for both.
In this chapter, we will cover the following topics:
- Getting an overview of Scrum and Kanban
- Running a project with Scrum in Jira
- Running a project with Kanban in Jira
- Configuring agile boards
- Grooming your backlog
- Creating a new agile board for your project
- Including multiple projects on your board
Getting an overview of Scrum and Kanban
Scrum and Kanban are the two agile software development methodologies that are supported by Jira. If you are already familiar with Scrum and Kanban, feel free to skip this section. However, if you come from a more traditional waterfall model and are new to the agile methodologies, then here is a quick overview of them both. I would strongly recommend that you pick up an additional resource to learn more about each of the methodologies. A good place to start is the Atlassian Agile Coach, which can be found at https://www.atlassian.com/agile/about. We will take a quick look at both Scrum and Kanban in this section.
Scrum
Scrum is different from the waterfall model in that it prescribes the notion of iteration. With Scrum, a project is divided into several iterations, called sprints, each lasting from 2 to 4 weeks, to produce a fully tested and potentially shippable product at the end.
At the beginning of each sprint, the product owner and the team come together in what is called a sprint-planning meeting. In this meeting, the scope of the next sprint is decided. This usually includes top-priority items from the backlog, which contains all incomplete work.
During each sprint, the team meets daily to review progress and flag any potential problems or impediments, and plans how to address them. These meetings are short, and the goal here is to make sure that everyone on the team is on the same page.
At the end of the sprint, the team will come together to review the outcome of the sprint and look at the things they did right and the things that did not go well. The goal is to identify areas of improvement, which will feed into future sprints. This process continues until the project is completed.
Kanban
Kanban, unlike Scrum, which runs in iterations, focuses more on the actual execution of the delivery. It has a heavy emphasis on visualizing the delivery workflow from start to finish, places limits on different stages of the workflow by controlling how many work items are allowed to be in each stage, and measures the lead time.
With Kanban, it is important to be able to visually see the work items going through the workflow, identify areas of inefficiency and bottlenecks, and correct them. It is a continuous process, with work coming in from one end and going out from the other, making sure that things go through as efficiently as possible.
Running a project with Scrum in Jira
Scrum is the first agile methodology we will look at. With Jira, a Scrum project consists mainly of two components – the backlog where you and your team will do most of your planning, and the active sprint agile board, which your team will use to track the progress of their current sprint. Let’s start with creating a new Scrum project in Jira.
Creating a Scrum project
The first step to working with Scrum in Jira is to create a project using the Scrum template. Follow these steps to do so:
- Select the Create project option from the Projects drop-down menu.
- Choose the Scrum software development template and click Next:

Figure 3.1 – Creating a Scrum project
- Accept the settings and click Next.
- Enter the name and key for the new project and click Submit.
Once the new Scrum project has been created, you will be taken to the Scrum interface, as shown in the following screenshot:
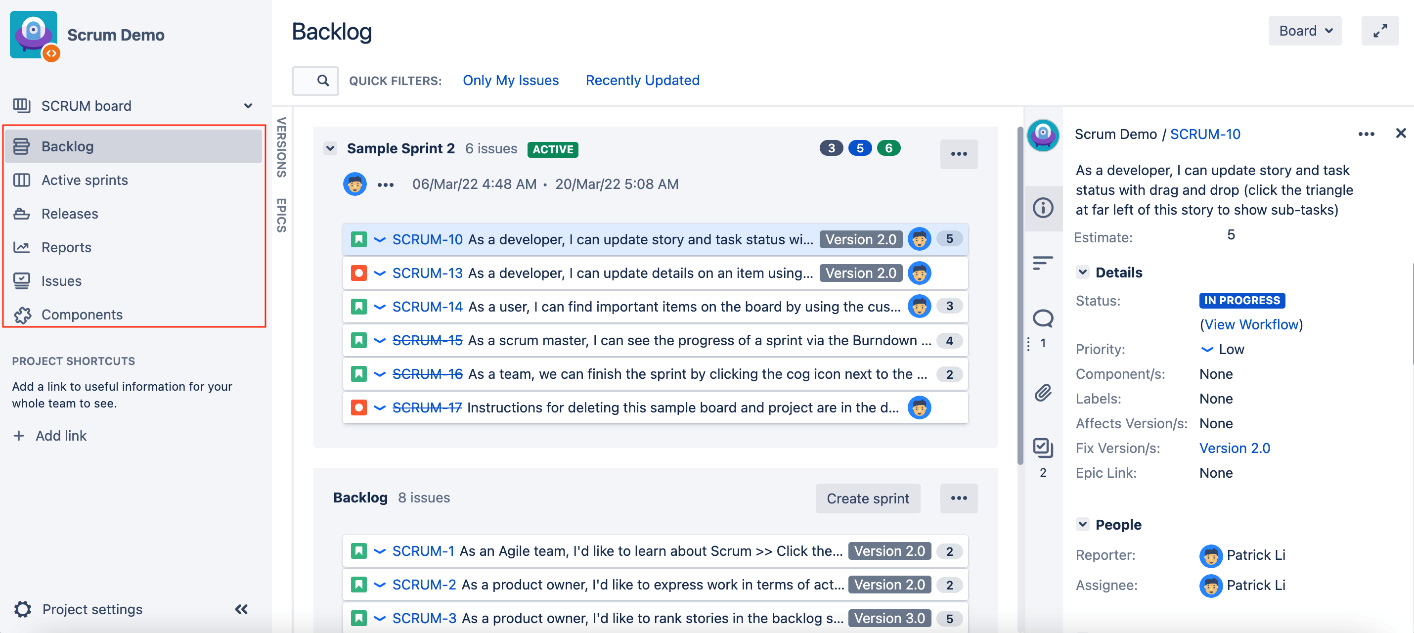
Figure 3.2 – Scrum interface
The Scrum interface has the following main sections:
- Backlog: This is where all unplanned issues are stored. You can think of it as a to-do list. The product owner and the development team will work together to define the priorities of issues in the backlog, which will then be scheduled into sprints for delivery.
- Active sprints: This view shows the sprints that are currently underway and the issues that are part of the sprints. This is what the development team will use on a day-to-day basis to track their progress.
- Reports: This view contains several reports that you can generate to view the project’s performance. These reports help you and your team visualize how the project is progressing and provide valuable feedback that you can use in future sprint-planning sessions for improvements.
Let’s take a closer look at each of these sections, starting with the backlog.
Working with the backlog
The backlog is the to-do list of your project and is where you keep all your incomplete features (usually represented as stories) and tasks. When you first start, you may have an empty backlog, so the first step is for the product owner and the team to work together to populate it with stories and tasks that need to be completed. During this step, it works more like a brainstorming session, where the team works together to translate requirements from customers and other stakeholders into actionable stories and tasks.
Prioritizing and estimating work
Once you have populated the backlog, the next step is to estimate and prioritize the issues so that you can plan and build a schedule of how to complete them. In Jira, prioritizing issues in the backlog means dragging and dropping them up and down in the backlog. To increase the priority of an issue, you can simply drag it higher in the backlog list. While it is usually the product owner’s responsibility to prioritize which features to deliver first, the team should also be involved in this process to make sure that everyone is in sync regarding the direction of the project.
Estimating work is a critical part of Scrum, and the success of your sprints heavily depends on how well you and your team can estimate. One thing people often get confused about is that they tend to think of estimation in terms of time – for example, story A will take 5 hours to complete and story B will take 10 hours. While this may seem right at first, what will often end up happening is that people will either work extra hard to make the estimate seem accurate or give big estimates because they are uncertain about the task at hand. This can lead to problems as the project goes on since nobody wants to be known as either the person that cannot give a reliable estimate or the person that is inefficient because they constantly go over the estimates.
One way to avoid this pitfall is to use a different approach to estimation called story points, which is the default estimation method in Jira. The idea behind this is to measure and estimate issues based on their complexity, rather than simply the time required to complete them. So, if you start a sprint with a total of 10 story points worth of issues, and at the end of the sprint you are unable to complete all of them, this might indicate that you have been too aggressive and may need to reduce your expectations. Since the estimation is not made based on the time taken, it simply indicates that perhaps the issues are too complex, and you will need to break them down further into more digestible pieces. This helps prevent people from feeling like they are constantly running against the clock and helps you better define and break down tasks into smaller, more manageable chunks.
Sometimes, however, you may find it difficult to estimate the complexity of your stories. This is usually a sign that you either do not have enough information about the story or that the story’s scope is too big and needs to be broken down. It is important for the team to realize this and not shy away from going back to ask more questions so that they can fully understand the purpose of the story before providing an estimate.
Now that we have determined a way to estimate our issues, we can move on. Entering the estimate is as simple as doing the following:
- Select the issue to estimate from the backlog.
- Enter the number of story points into the Estimate field, as shown in the following screenshot:

Figure 3.3 – Story points
You should not change the estimate once the issue has been added to an active sprint. Changing the estimate mid-sprint can lead to bad estimation during the spring planning phase and future improvements.
Creating a new sprint
With the backlog populated and issues estimated, the next step is to create a sprint for the team to start working on. Note that you will need to have the Manage Sprints permission to create new sprints. Permissions will be covered in Chapter 9, Securing Jira.
To create a new sprint, follow these steps:
- Go to the backlog of your project.
- Click on the Create sprint button.
- Enter a name for the sprint.
- Select the duration of the sprint and click on the Create button. Generally speaking, you want to keep your sprint short. Between 1 and 2 weeks is usually a good length.
- Add issues to the sprint by dragging and dropping issues that have been prioritized by the team into the sprint box, as shown in the following screenshot:
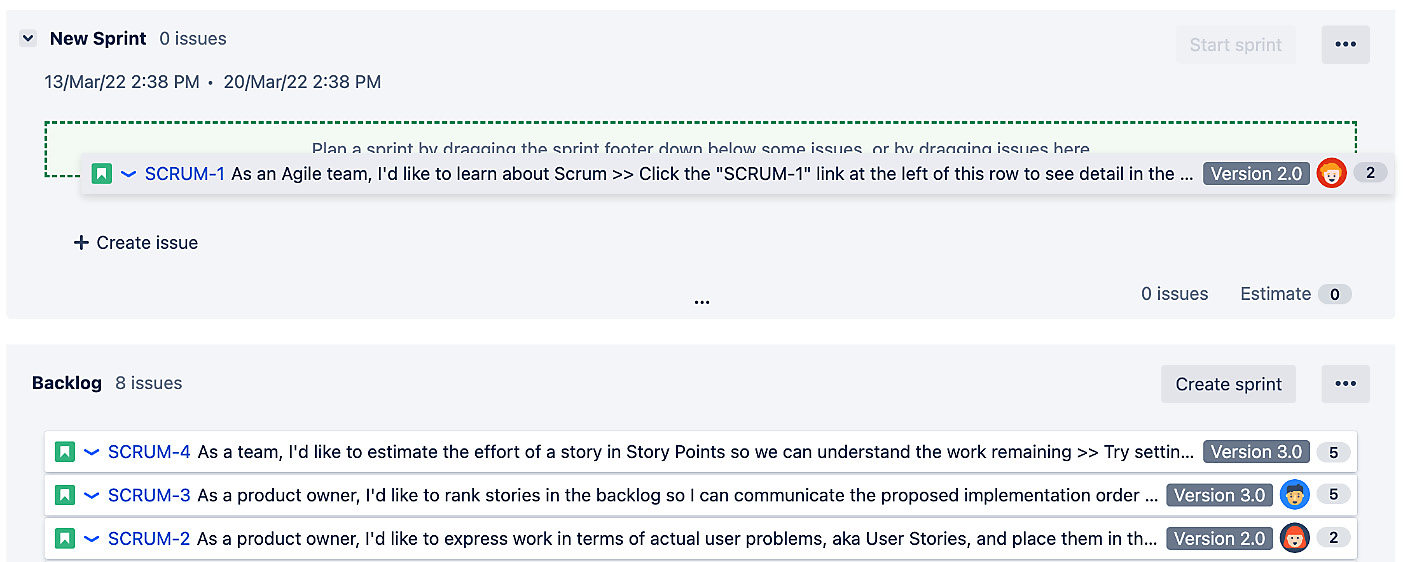
Figure 3.4 – Creating a sprint
Once the team has decided on the scope, it’s time to start the sprint:
- Click on the Start sprint button.
- Updating the sprint’s duration is necessary. Click on the Start button to start your sprint, as shown in the following screenshot:
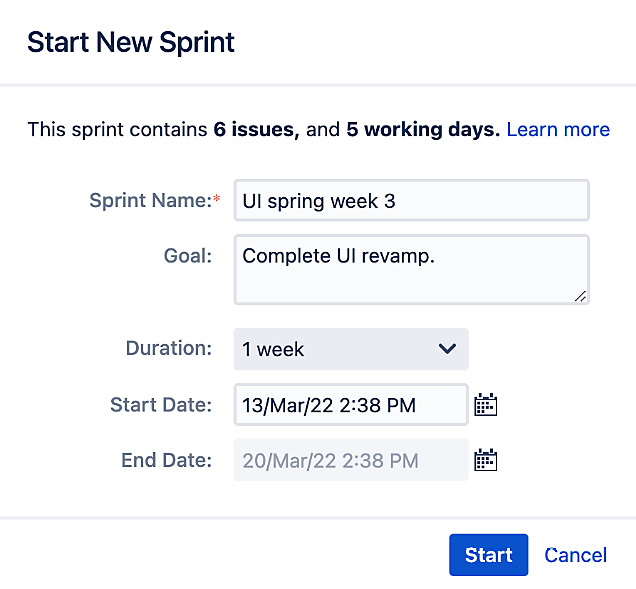
Figure 3.5 – Starting a new sprint
You can select the Custom option for the sprint’s duration if you want to specify the end date of the sprint yourself instead of using the auto-calculated date.
Once the sprint has been started, you can go to the active sprints view and the team can start working on the delivery.
If the Start sprint button is grayed out, this means that you already have an active sprint running and do not have the parallel sprints option enabled, or that you do not have the Manage Sprints permission. Permissions will be covered in Chapter 9, Securing Jira.
Normally, you will only have one team working on the project at any given time, but if you have a big team, and people can work on different parts of the project at the same time, you need to enable the Parallel Sprints option:
- Log into Jira as an administrator.
- Browse the Jira administration console.
- Select the Applications tab and then Jira Software configuration.
- Check the Parallel Sprints option to enable it.
With the Parallel Sprints option enabled, you can start multiple sprints at the same time. When running multiple sprints, it is best to keep them separate from each other so that they do not get in each other’s way. A good example is having two sprints focusing on different areas of the project, such as delivery and documentation.
When you have parallel sprints, since the active sprint view (see the next section) will only show one sprint at a time, you will need to toggle between the sprints, as shown in the following screenshot:
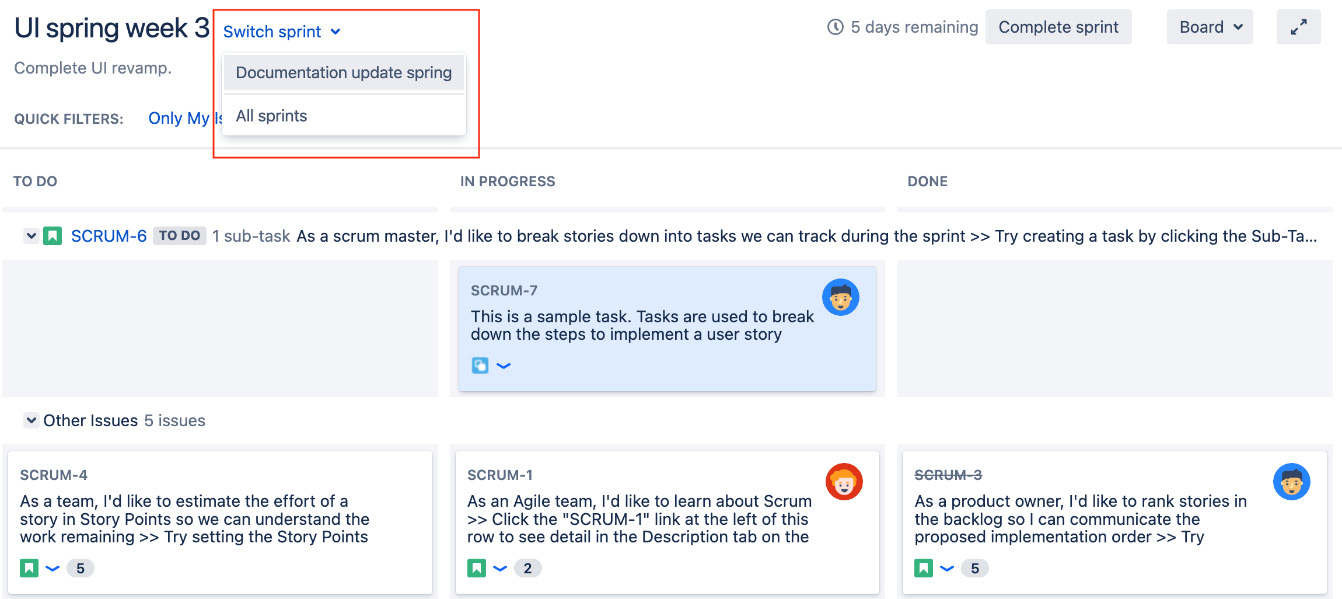
Figure 3.6 – Scrum sprint
With a sprint created, let’s take a look at what happens during the sprint.
Running a sprint
Once the team has prioritized the issues and started a sprint during the sprint-planning meeting, the agile board will switch over to the active sprint view. For normal teams, you will have one active sprint at any given time, and your active sprint board will look as follows:
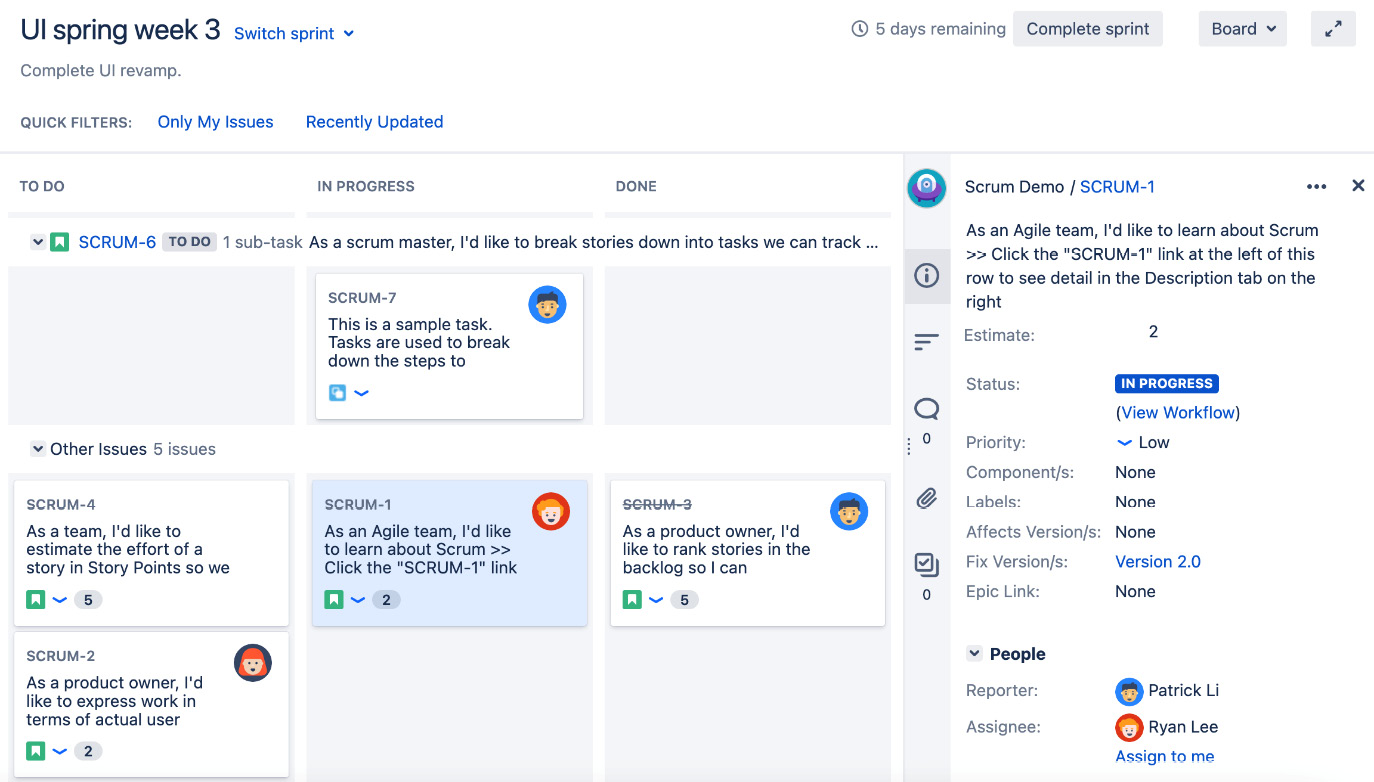
Figure 3.7 – Active sprint board
On the Scrum board, each issue is represented as a card, and the board itself is made up of vertical columns that represent the various states an issue can be in, and they are mapped to the workflow that’s used by the project. So, in our example, we have the default workflow with three states – To Do, In Progress, and Done. As we will see later, the project administrator will be able to customize this. Team members move the issue card across the board into the appropriate columns as they work and complete their tasks.
The board can also be divided into several horizontal rows called swimlanes. These help you group similar issues and make your board easier to understand. In our example, we are grouping issues into swimlanes based on stories. Just like columns, the project administrator can customize how swimlanes should be defined.
When a sprint is underway, it is important to avoid introducing scope creep by adding more issues to the sprint, and it falls on the Scrum master and the product owner to make sure that the team is not distracted or blocked by any impediments. However, from time to time, emergencies that demand certain features or fixes that need to be included do arise, and in these cases, you can add new issues to the active sprint from the backlog view.
However, keep in mind that this should not become a common habit, as it is a distraction, and is usually a sign of bad sprint planning or poor communication with stakeholders. For this reason, Jira will prompt you whenever you try to add more issues to an active sprint, as shown in the following screenshot:
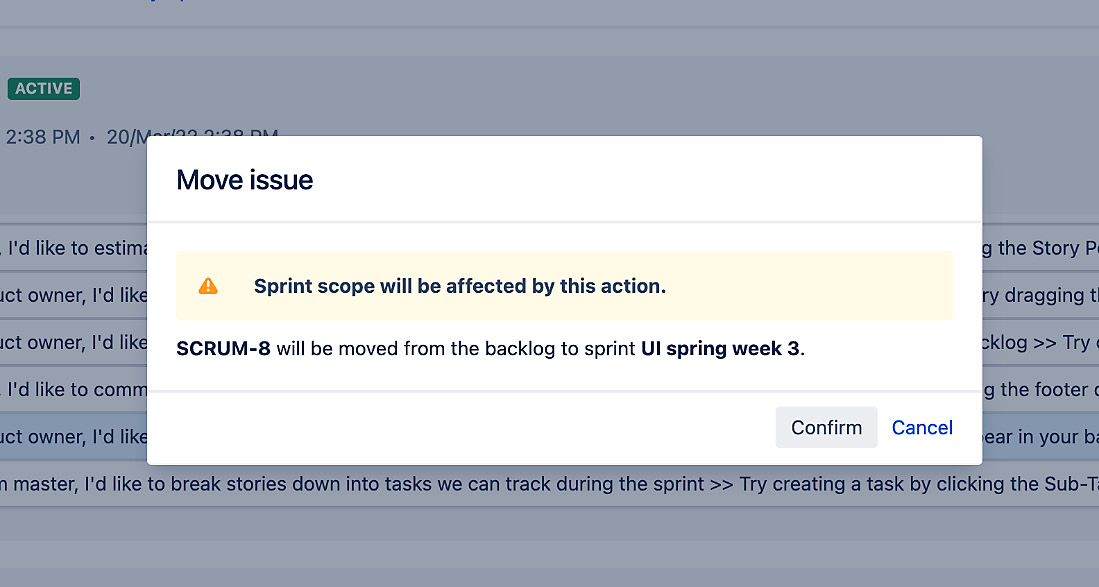
Figure 3.8 – Sprint scope creep
At the end of the sprint, you need to complete the sprint by doing the following:
- Go to the Scrum board and click Active sprints.
- Click on the Complete sprint link, as shown in the following screenshot:
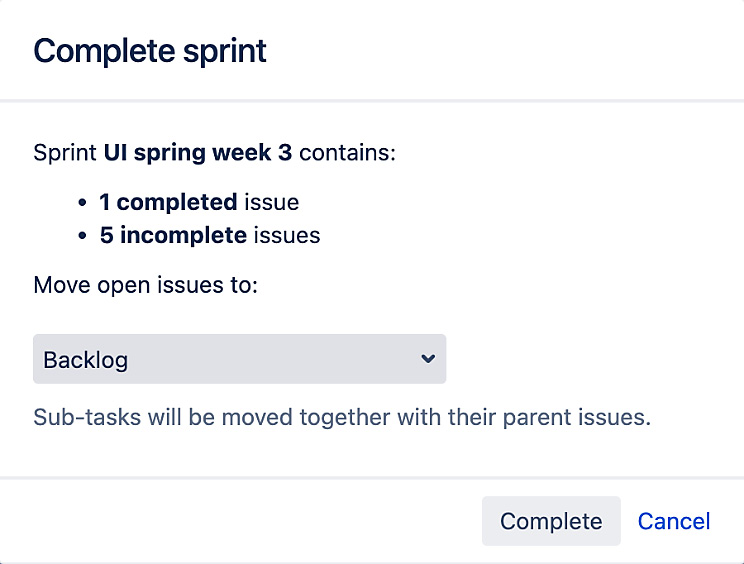
Figure 3.9 – Complete sprint
- Click on the Complete button to finish the sprint.
Once you have completed a sprint in Jira, any unfinished issues will be placed back into the backlog. Sometimes, you may have other sprints that are planned but not active; in this case, issues that are not completed from the current active sprint can be automatically added to the next available sprint.
It can be tempting to extend the sprint for just a few more days because you have just one more issue to complete. While this is not a hard rule, you should generally avoid this and just let the incomplete issue go back to the backlog and reprioritize it during the next sprint meeting. This is because Scrum is an iterative process, and the goal is not to make everyone work as hard as possible but to be able to retrospectively look at what the team did right and/or wrong in the previous sprint and address that in the next sprint. Perhaps the reason for this is because of an inaccurate estimation or incorrect assumptions that were made during requirement gathering. The point here is that the team should view this as an opportunity to improve rather than a failure to be rushed through. Simply extending the current sprint to accommodate incomplete items can turn into a slippery slope where the practice of extending sprints becomes the norm and the root problem is masked.
Running a project with Kanban in Jira
Now that we have seen how to run projects with Scrum, it is time to look at the other agile methodology Jira supports – Kanban. Compared to Scrum, Kanban can be a simpler methodology to get started with for teams that are new to agile. Unlike Scrum, which has a backlog and requires the team to prioritize and plan their delivery in sprints, Kanban focuses purely on the execution and measurement of throughput.
In Jira, a typical Kanban board will have the following differences compared to a Scrum board:
- There is no backlog view by default. Since Kanban does not have a sprint-planning phase, your board acts as the backlog. We will see how to enable backlog for Kanban later in this chapter.
- There are no active sprints. The idea behind Kanban is that you have a continuous flow of work.
- Scrum and Kanban have different types of reports that are specifically designed for each of the methodologies.
- Columns can have minimum and maximum constraints.
- Columns will be highlighted if the constraints are violated. As shown in the following screenshot, both the SELECTED FOR DEVELOPMENT and IN PROGRESS columns are highlighted because of constraint violations:
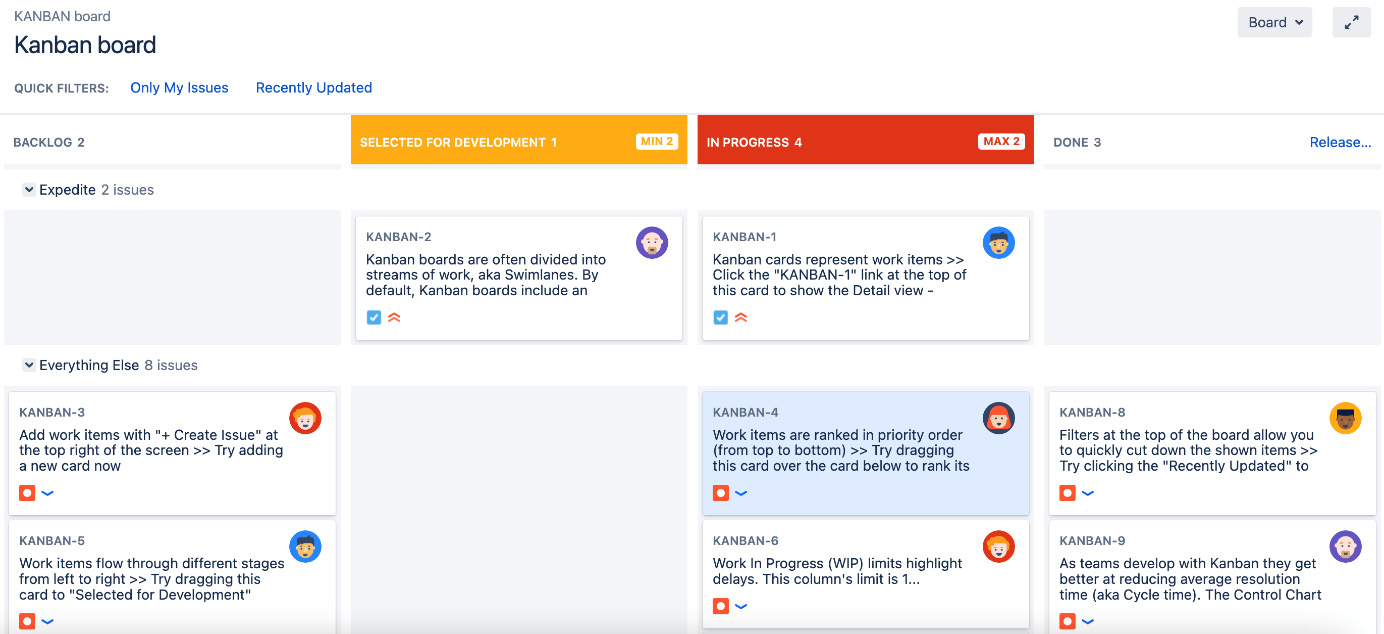
Figure 3.10 – Kanban board
Now that we have seen what a Kanban project looks like in Jira, let’s learn how to create a Kanban project.
Creating a Kanban project
The first step to working with Kanban in Jira is to create a project with the Kanban template. Follow these steps:
- Select the Create project option from the Projects drop-down menu.
- Choose the Kanban software development template and click Next, as shown in the following screenshot:
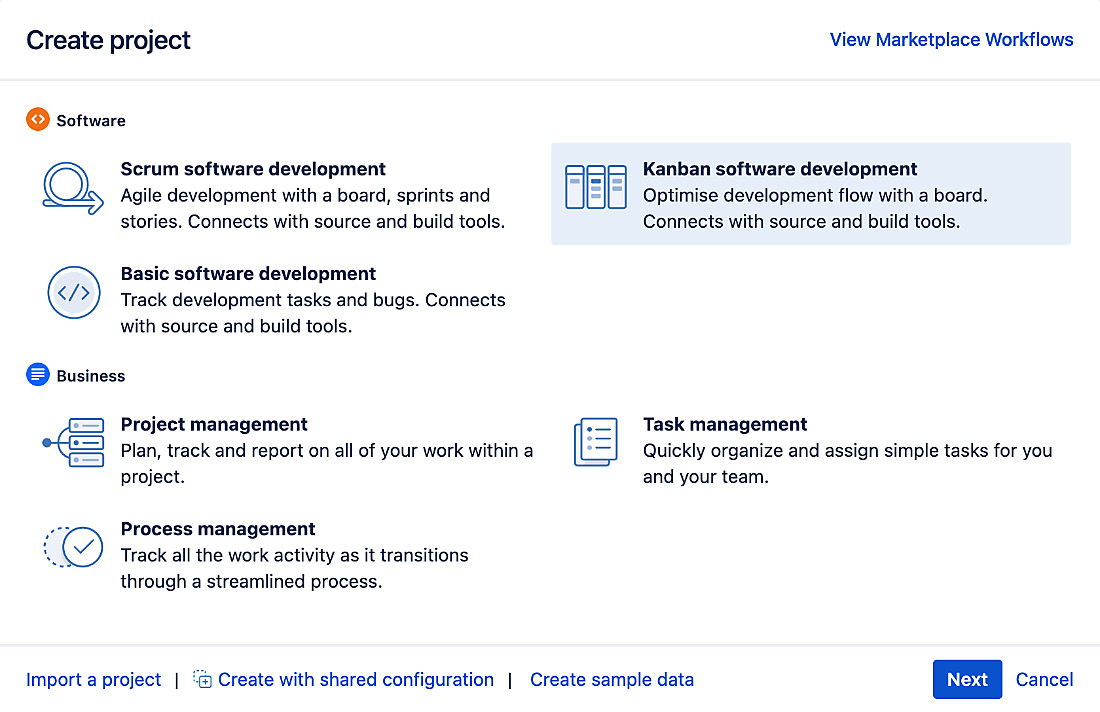
Figure 3.11 – Creating a Kanban project
- Accept the settings and click Next.
- Enter the name and key for the new project and click Submit.
After you have created a Kanban project, you will be taken to the Kanban board view, which looks very similar to the active sprint view of a Scrum board. Remember, with Kanban, it is as if you are running a sprint that does not end, or that ends when the entire project is completed. Therefore, the agile board itself focuses on helping you and your team to execute the delivery.
Using the Kanban board
As we mentioned earlier, with Kanban, there is no sprint planning by default, so instead of having a backlog, everything happens on the Kanban board directly. Working with the Kanban board is very simple; newly created issues are added to the first column of the board directly, named BACKLOG (by default), as it acts as your backlog of issues with Kanban. Members of the team will then grab issues from the BACKLOG column, assign the issue to them, and move them through the workflow. During various stages, issues may need to be reassigned to other users – for example, when an issue leaves the development stage and enters testing, it may be reassigned to a test engineer. As more and more issues are completed, you can configure the board to automatically take completed issues off the board after a period or perform a release, which will take all issues in the DONE column from the board (still in the system). The first option is good for teams using Kanban for general task management, and the option to use releases fits better with software development where versions can be released.
Let’s look at an example of the Kanban board, as shown in the following screenshot, in which we can see that we have problems in both the In Development and In Testing phases of our process. In Development is highlighted in red, meaning that we have enough work there, which is a sign of a bottleneck. In Testing is highlighted in yellow, which means that we do not have enough work, which is a sign of inefficiency:
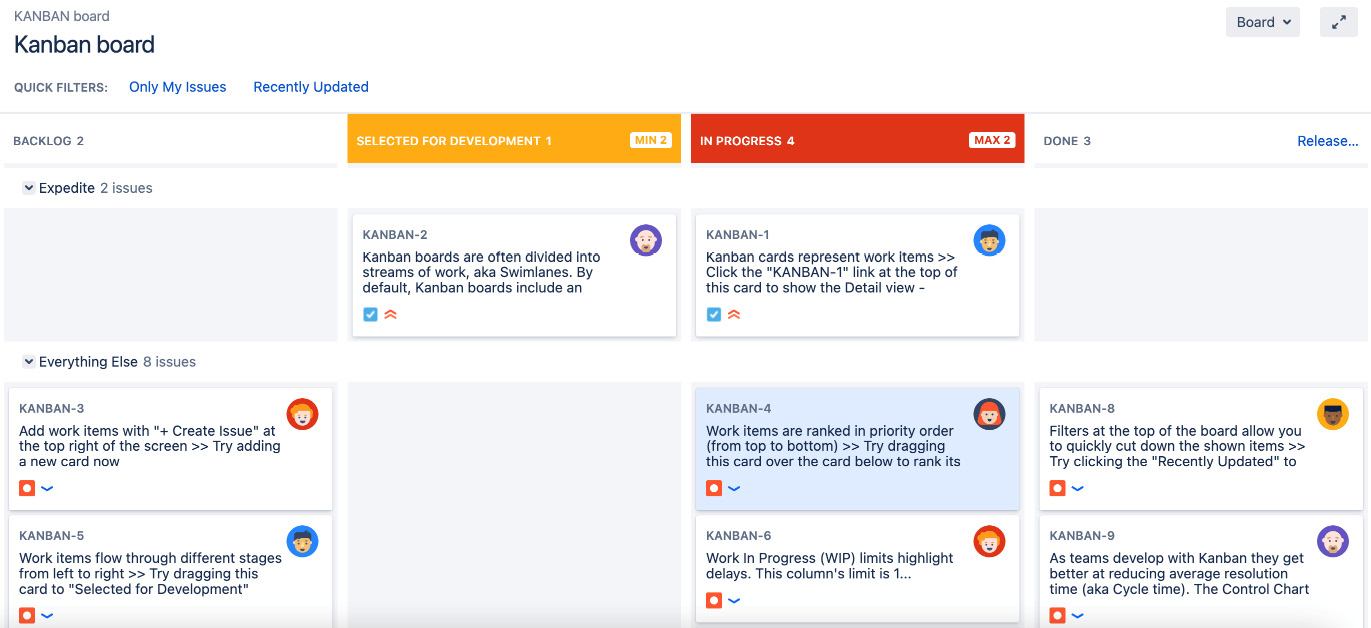
Figure 3.12 – Kanban board
With this, the board can visually tell us where we are having problems, which allows us to focus on these problem areas. The bottleneck in the In Development phase could mean that we do not have enough developers, which causes the inefficiency in the In Testing phase, where our testers are simply sitting around waiting for work to come through.
This raises a common question – what should the correct constraints be for my columns? The quick answer is to try and experiment as you go.
The long answer is that there is no single correct, silver bullet answer. What you need to understand is that many factors can influence the throughput of your team, such as the size of your team, a team member leaving or joining, and the tasks at hand. In our example, the easy solution would be to lower the limit for both columns, and then we are done. But often, it is just as important for you to find the root cause of the problem rather than trying to simply fix the board itself. Perhaps what you should try to do is get more developers on your team so that you can keep up the pace that is required for delivery. The takeaway here is that the Kanban board can help you pinpoint the areas of a problem, and it is up to you and your team to figure out the cause and find the appropriate solution.
Enabling a backlog for Kanban
For those of you who come from Scrum, not having a proper backlog may feel uncomfortable, or perhaps as your project grows, having all the new issues being displayed on the Kanban board in the BACKLOG column becomes too unwieldy. The good news is that Jira supports a hybrid methodology of Kanban and Scrum, called Kanplan, which lets you have a backlog for Kanban as well.
To add a Scrum-style backlog to your Kanban project, you can simply map the appropriate status into the Kanban BACKLOG column. Follow these steps:
- Browse your project’s agile board.
- Click on the Board menu and select the Configure option.
- Select the Columns option from the left navigation panel. By default, there is a column called BACKLOG.
- Delete the BACKLOG column.
- Drag and drop the now unmapped Backlog status from the Unmapped Statuses column on the right to the Kanban backlog on the left, as shown in the following screenshot:
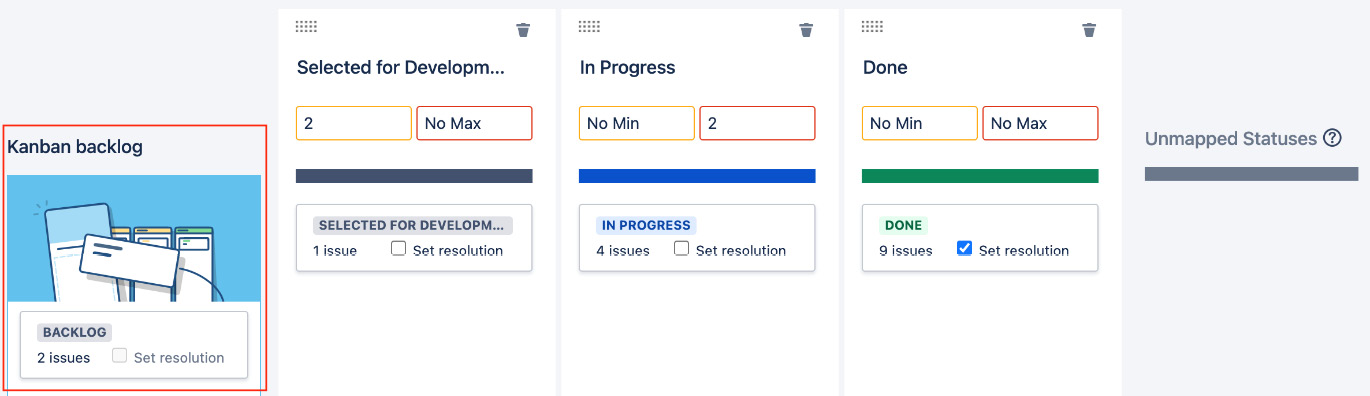
Figure 3.13 – Configuring the Kanban backlog
With a status mapped in the Kanban backlog column, you will now have a backlog that looks and works just like a Scrum project, and any newly created issues will be added to the backlog since they will be in the backlog workflow status, as shown in the following screenshot:
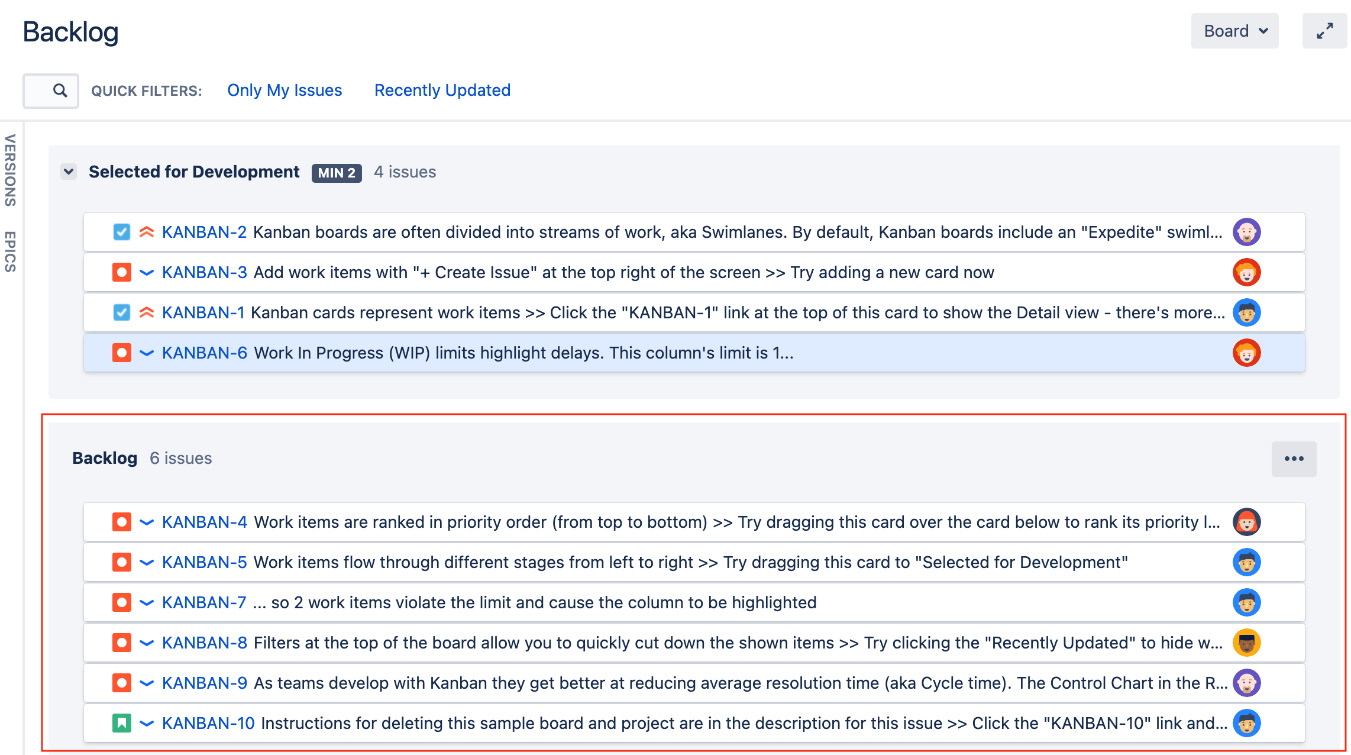
Figure 3.14 – Kanban backlog
You can map more than one status to the backlog, and as we will see in Chapter 7, Workflow and Business Process, when we cover workflows in depth, you may have a more complex process, and issues in different statuses can appear in the backlog. Another benefit of having a backlog for Kanban is that if you have hundreds of issues, it is a lot faster and more efficient for Jira to display them this way than on the Kanban board.
Since there could be hundreds of issues in your backlog, the backlog view also has a quick search bar that lets you quickly filter and look for the issues you need. If you have your issues assigned to epics and versions, you can also use the EPICS and VERSIONS panel to display the issues that are relevant to the epics and versions you select.
Now that we have seen how to use Jira to run both Scrum and Kanban projects, let’s take a look at how to customize our agile board.
Configuring agile boards
Jira’s agile board is highly customizable, and many of the customization options leverage the core features of Jira, such as workflows. If you are not familiar with them, do not worry – we will cover these at a high level in the context of the agile board and dive into the details of each later in this book. In this section, we will explore these customization options, starting with the board’s column layouts.
Configuring columns
For both Scrum and Kanban, the board’s columns are mapped to the workflow that’s used by the project, and the default workflow that’s created is very simple. For example, the default Scrum workflow contains three statuses – To Do, In Progress, and Done. However, this is often not enough, as projects will have additional steps in their development cycle, such as testing and review. To add new columns to your board, follow these steps:
- Browse your project’s agile board.
- Click on the Board menu and select the Configure option.
- Select the Columns option from the left navigation panel.
- Click on the Add column button.
- Enter the name for the new column and select its category. Generally, your new column will fall into the In Progress category, unless you are replacing the To Do or Done column:
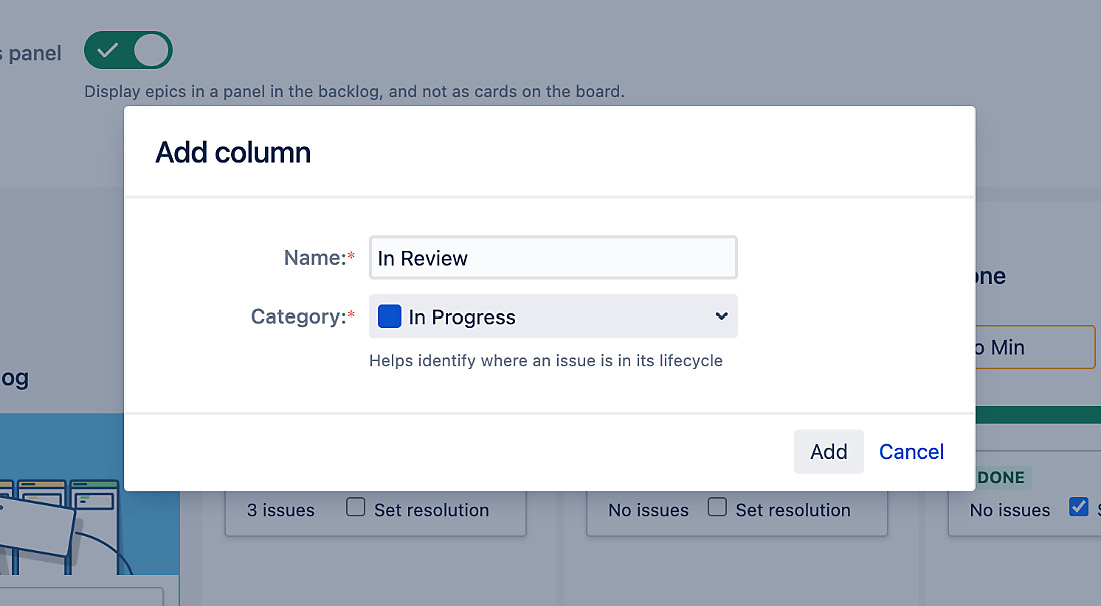
Figure 3.15 – Add column
- Drag and drop the new column to place it in the correct location within your development workflow.
- Check the Set resolution checkbox if the column represents the completion of the issue – for example, Done. This will automatically set the issue’s resolution to Done. If you want to be able to choose the resolution value or use a different resolution value when completing an issue, don’t worry – we will cover this in Chapter 7, Workflow and Business Process.
For projects that are using the workflows that were created along with your new project (also known as a Simplified Workflow), this is all you need to do to customize your columns, as shown in the following screenshot. If you have an existing workflow and want to adapt your columns to that, then you will learn how to do this when we cover workflows in Chapter 7, Workflow and Business Process.
Adding column constraints
In the previous section, we mentioned that one of the key aspects of Kanban is to control the amount of work that is sent through.
While work constraints are a concept that’s used in Kanban, sometimes, people also adopt it with Scrum. This allows you to use Scrum for planning and Kanban for execution in a hybrid methodology called Scrumban.
To set up column constraints for your agile board, follow these steps:
- Browse your project’s agile board.
- Click on the Board menu and select the Configure option.
- Select the Columns option from the left navigation panel.
- Select how you want the constraint to be calculated in the Column Constraint option. By default, the Kanban board will use the Issue Count option, while the Scrum board will not have any default constraints.
- Enter the minimum and maximum value for each of the columns you want to apply a constraint to.
You do not have to set both the minimum and maximum for a constraint. Consider the example that’s shown in the following screenshot, where we have set the constraint for Selected for Development so that it has at least two issues and no more than 10. For the In Progress column, we have only limited it to no more than five issues, but there is no minimum value, meaning that it can have no issues at all. We also placed a maximum limit of 15 issues for the Done column so that we are alerted when the team has reached the threshold of completed issues and a release needs to be made:
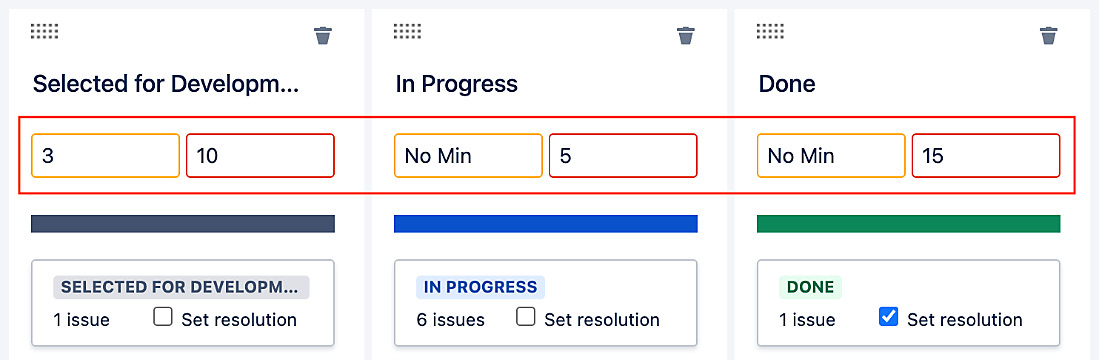
Figure 3.16 – Column constraints
After you have set the column constraints for your board, every time the constraints are violated, Jira will immediately alert you on your agile board. For example, in the following screenshot, we have two issues in the Selected for Development column, which has a minimum of three issues, so the column is highlighted in yellow. In the In Progress column, we have six issues, and since it has a maximum limit of 5 issues, the column is highlighted in red.
Note that while Jira will highlight the columns when a constraint is violated, this does not stop you from breaking the constraints. It is simply a way to alert the team that something has gone wrong in the process and that it needs to be reviewed and corrected:
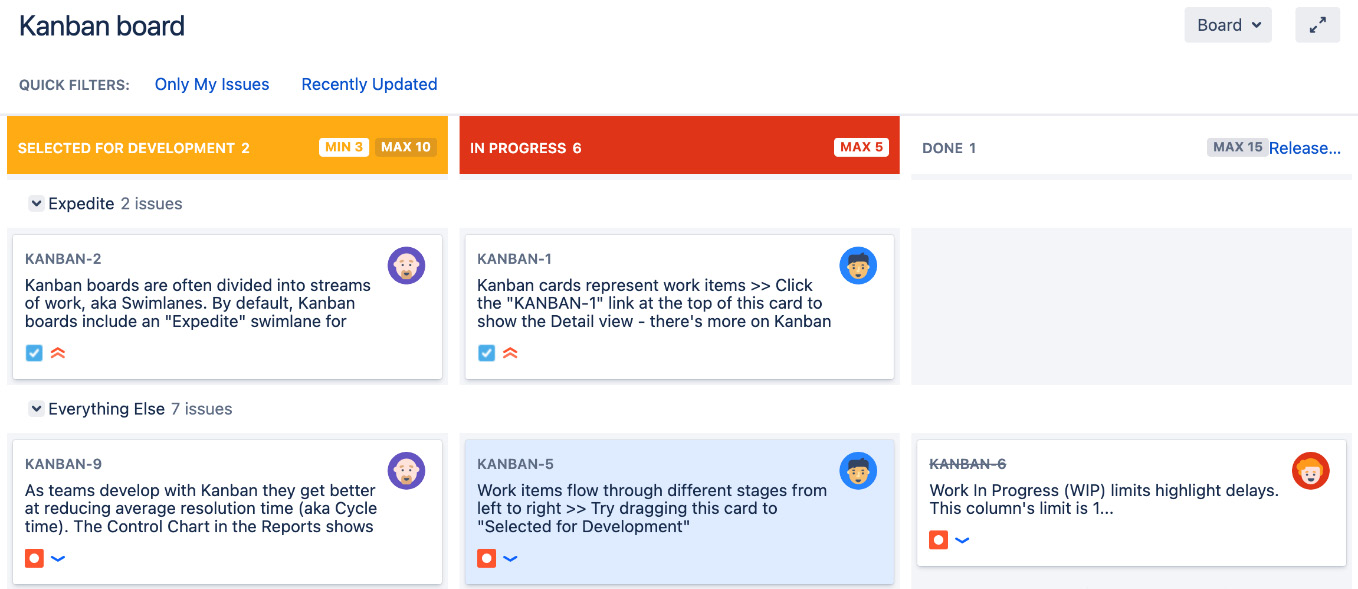
Figure 3.17 – Constraint violation
Columns help visualize the workflow and status issues. Now, let’s look at how we can group similar issues on the board.
Setting up swimlanes
As we saw earlier, Jira’s agile board lets you group similar issues together in horizontal rows called swimlanes. Unlike columns, which are mapped to workflow statuses, you can define swimlanes based on any criteria, including custom fields you have added yourself. To set up swimlanes for your board, follow these steps:
- Browse your project’s agile board.
- Click on the Board menu and select the Configure option.
- Select the Swimlanes option from the left navigation panel.
- Select how you want to define your swimlanes in the Base Swimlanes on field.
- If you choose the Queries option, you will need to define the query for each swimlane you want to add to the board.
There are six options to choose from when choosing how swimlanes will be defined, as shown here:
- Queries: Swimlanes will be based on the Jira Query Language (JQL) queries you define. For each swimlane, you need to define the JQL query that will return the issues you want for the swimlane. Issues that match more than one query will only be included in the first swimlane. JQL will be covered in Chapter 10, Searching, Reporting, and Analysis.
- Stories: Swimlanes will be based on user stories. Subtasks that belong to the same story will be displayed in the same swimlane. Subtasks will be covered in Chapter 4, Working with Issues.
- Assignees: The swimlane will be based on each issue’s assignee. Issues with the same assignee will be grouped in the same swimlane. The sample Scrum board we saw in the Scrum section uses this option.
- Epics: Swimlanes will be based on epics that each issue belongs to. Issues in the same epic will be grouped into the same swimlane.
- Projects: Swimlanes will be based on the project that each issue belongs to. As we will see later in this chapter, an agile board can include issues from multiple projects.
- No Swimlanes: The agile board will not be using swimlanes, so all issues will be grouped in a single row.
As shown in the following screenshot, we are using the Queries option and we have defined two swimlanes (and the default Everything Else lane). For the JQL query, we are searching based on a custom field that we have created called Source to determine whether the feature request comes from a customer or as a result of an internal review. Custom fields will be covered in Chapter 5, Field Management.
Using queries is the most flexible option when it comes to configuring your swimlanes since Jira’s query language is very powerful and allows you to define any arbitrary rule for them:

Figure 3.18 – Configuring swimlanes
Defining quick filters
By default, your agile board will display all issues. For Scrum, it will be all issues in the sprint, while for Kanban, it will be all issues that have not been released. This can be quite distracting when you have many issues and only want to focus on specific ones. While swimlanes can help with that, having too many issues on the board can still be very noisy.
One useful feature that Jira has is that you can create several predefined filters for your board. With these, you can quickly filter out the issues you do not care about and only have the issues that matter to you shown on the board. Note that this means that the other issues aren’t removed from the board – they are simply hidden from view.
Jira already comes with two built-in quick filters, called Only My Issues and Recently Updated. You can create your own by following these steps:
- Browse your project’s agile board.
- Click on the Board menu and select the Configure option.
- Select the Quick Filters option from the left navigation panel.
- Enter a name for the new filter and the JQL query that will return the filtered issues.
In the following screenshot, we are creating a new quick filter called Salesforce Label and using the JQL to search for issues with a label called Salesforce:
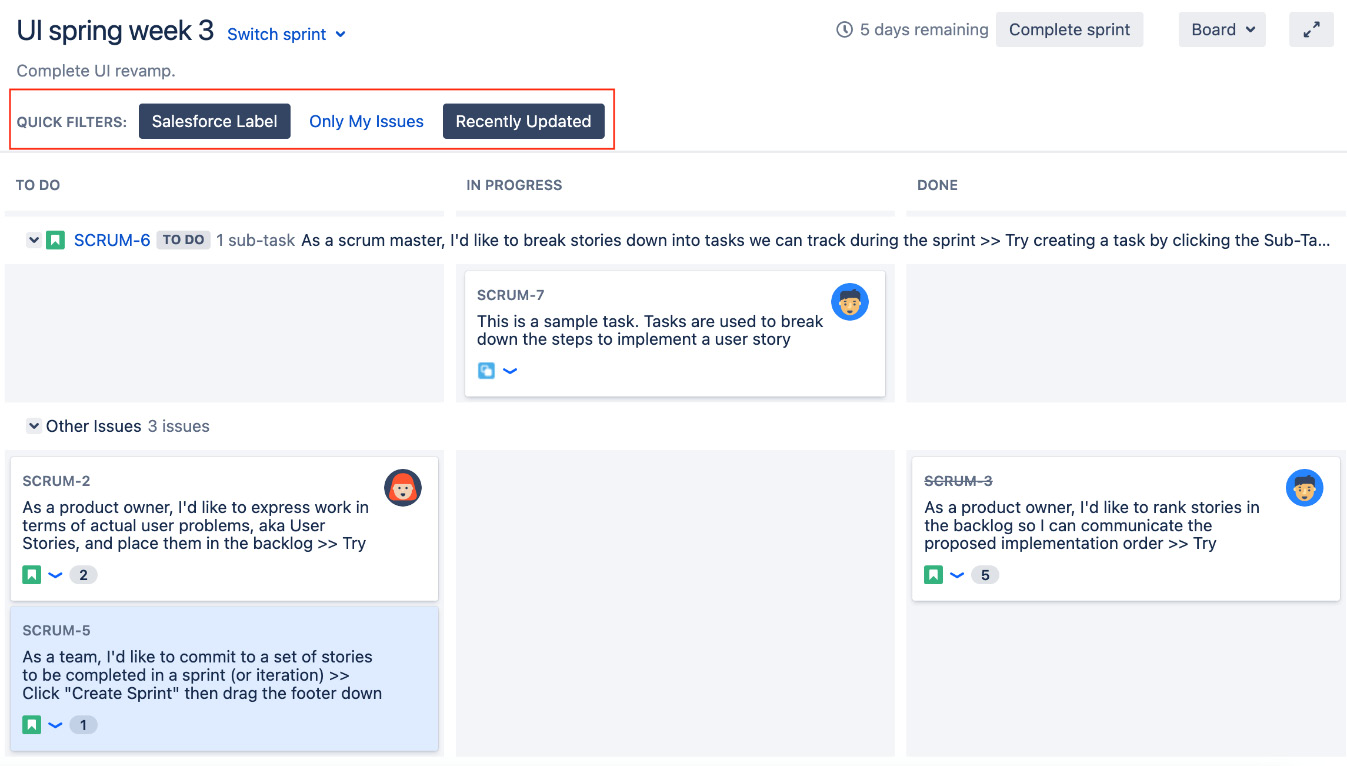
Figure 3.19 – Quick filters
Now that we have covered all the major components of the agile board for Scrum and Kanban, it is time to take a look at the other important component: your backlog.
Grooming your backlog
If you are using Scrum or Kanplan, then a big part of your routine will be to groom your backlog. This means making sure that high-priority items are floated to the top and not getting buried. This is a constant exercise and is especially important as you and your team approach the start of a new sprint, in the case of Scrum. With Kanplan, it is just as important to prioritize the tasks so that your team can maintain their throughput and not violate any constraints because of poor planning.
Jira’s backlog comes with several handy features to help you avoid turning backlog grooming into a tedious exercise. To prioritize issues in your backlog, you simply move the high-priority issues up and move the low-priority issues down. While this seems very simple, as your backlog grows, it can become tricky to drag an issue from the bottom of a backlog with hundreds of issues to the top – and let’s not forget that newly added issues go to the bottom by default. What you can do in this case is right-click the issue you want to move and select the Top of Backlog option from the Send to menu. This will move the issue to the top of the backlog. You can do this with multiple issues as well by simply holding down the Shift or Ctrl key on your keyboard to select all the issues you want to move and either use the Send to menu or drag and drop, as shown in the following screenshot:

Figure 3.20 – Grooming your backlog
Backlog grooming is a very important aspect of running a successful Scrum or Kanban project. A well-groomed backlog means the issues in the backlog are being reviewed, defined, and prioritized. Without this, teams will not be able to plan their sprint (in the case of Scrum) and what they should focus on.
So, what if you have multiple teams all working on the same project and they all need their own boards? And what if one team uses Scrum and the other team wants to use Kanban? We will look at how you can have multiple boards for your project in the next section.
Creating a new agile board for your project
When you create a new project using the Scrum and Kanban project template, as described earlier in this chapter, Jira will automatically create an agile board for your project. Along with this default board, you can create additional boards for your project.
For example, if you created a Scrum project, and you have two teams working on the project, you can create a new Scrum board for the second team so that each team can work with their own agile boards and not get in each other’s way. Another example is if your second team needs to run their part of the project using Kanban, then you can easily add a new Kanban board to the Scrum project so that each team can use the agile methodology they want for the same project. To add a new agile board to your project, follow these steps:
- Browse your project’s agile board.
- Click the current board’s name from the top left-hand corner and select the Create board option.
- Select the agile board type you want to create and follow the onscreen wizard to create the new board, as shown in the following screenshot:
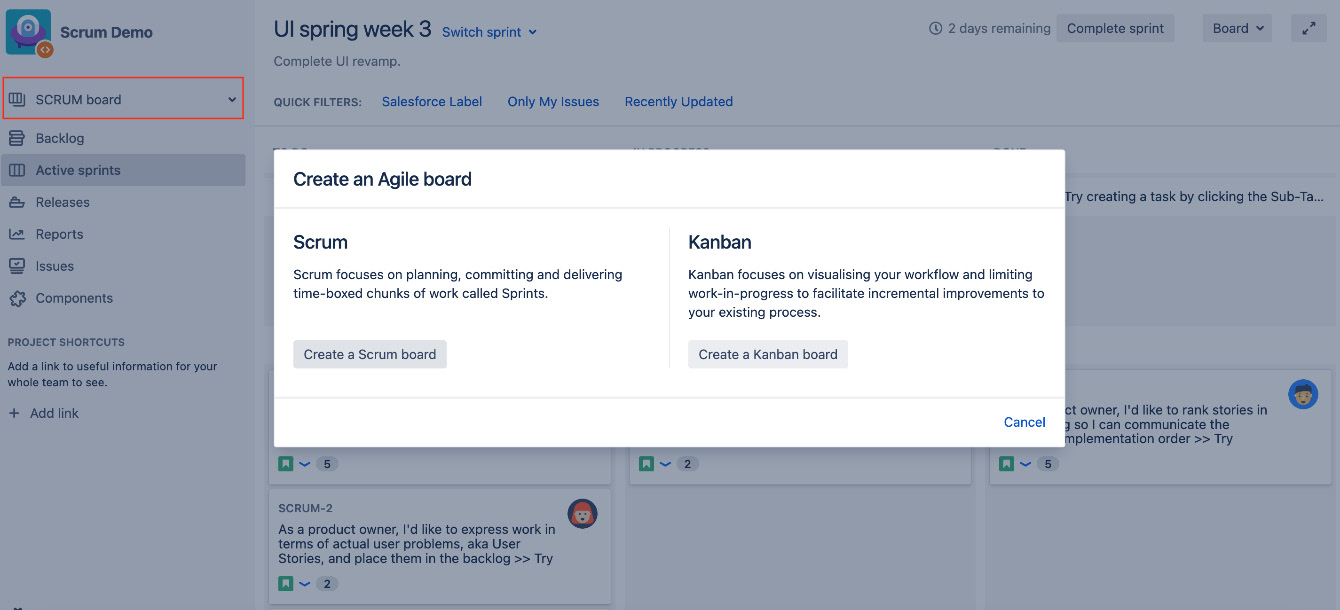
Figure 3.21 – Adding a new agile board
By being able to have multiple boards for your project, you have the flexibility to run your project with multiple teams, each having their own board for their work. Next, we will look at how to include issues from multiple projects on a single board.
Including multiple projects on your board
By default, when you create a new project, the agile board that’s created will only include issues from the current project. This is usually fine if your project is self-contained; however, there might be cases where you have multiple projects that are related or dependent on each other, and for you to get an overall picture, you need to have issues from all of those projects shown on a single agile board.
The good news is that Jira lets you do just this. One thing to understand here is that Jira uses what is called a filter to define what issues will be included on the board. Filters are like saved search queries, and when a project is created, Jira automatically creates a filter that includes all of the issues from the current project. This is why the default agile board that’s created with the project will always display the project’s issues. Filters will be discussed in Chapter 10, Searching, Reporting, and Analysis.
So, for you to include issues from other projects on the agile board, all you need to do is update the board by following these steps:
- Browse your project’s agile board.
- Click on the Board menu and select the Configure option.
- Select the General option from the left navigation panel.
- Click on the Edit Filter Query link for the Saved Filter option if you want to update the filter that is currently being used by the board, as shown in the following screenshot. Usually, only the filter owner can change a filter’s query, but since filters created with the board have the same owner as the board by default, you can edit the query. Alternatively, if you already have a filter that has all the issues you want to include, you can hover over and click on the current filter and then select the new filter to use. Filters will be covered in Chapter 10, Searching, Reporting, and Analysis:

Figure 3.22 – Configuring the board filter
Since filters need to be shared with users for them to see the issues they return, make sure your filter is shared with the same group of users that the board is set to. Generally, you can just share the filter with the project.
Summary
In this chapter, we introduced the software project templates that come with Jira and the two main agile methodologies it supports, namely Scrum and Kanban. We talked about how you can run projects in each of the methodologies using Jira and the features it provides.
We also looked at some of the customization options that are available for you as the project owner so that you can configure the agile board to fit your needs. We looked at how to customize the board’s columns to better adapt to your team’s workflow and how to use swimlanes to group similar issues together to better organize the layout of your board. We also looked at how to create quick filters to easily filter out irrelevant issues from view so that we can focus on the issues that matter and reduce noise if you have a very busy board.
In the next chapter, we will look at issues, the key data you work with in your projects, and what you can do with it.