
9
Hexagonal Architecture –Decoupling External Systems
We’ve already learned how to write tests using the arrange, act, and assert template. We’ve also learned about some software design principles, known as the SOLID principles, that help us break our software down into smaller components. Finally, we’ve learned how test doubles can stand in for collaborating components to make FIRST unit tests easier to write. In this chapter, we’re going to combine all those techniques into a powerful design approach known as the hexagonal architecture.
Using this approach, we will benefit from getting more of our application logic under unit tests and reducing the number of integration and end-to-end tests required. We will build in a natural resilience to changes outside our application. Development chores such as changing a database supplier will be simplified, by having fewer places where our code needs to be changed. We will also be able to unit test across larger units, bringing some tests that require end-to-end testing in other approaches under unit tests instead.
In this chapter, we’re going to cover the following main topics:
- Why external systems are difficult
- Dependency inversion to the rescue
- Abstracting out the external system
- Writing the domain code
- Substituting test doubles for external systems
- Unit testing bigger units
- Wordz – abstracting the database
Technical requirements
The code for this chapter can be found at https://github.com/PacktPublishing/Test-Driven-Development-with-Java/tree/main/chapter09.
Why external systems are difficult
In this section, we’re going to review the driving force behind the hexagonal architecture approach – the difficulty of working with external systems. Dependencies on external systems cause problems in development. The solution leads to a nice design approach.
Let’s look at a simple way of handling external systems. The task of our user is to pull a report of this month’s sales from a database. We will write one piece of code that does exactly that. The software design looks like this:
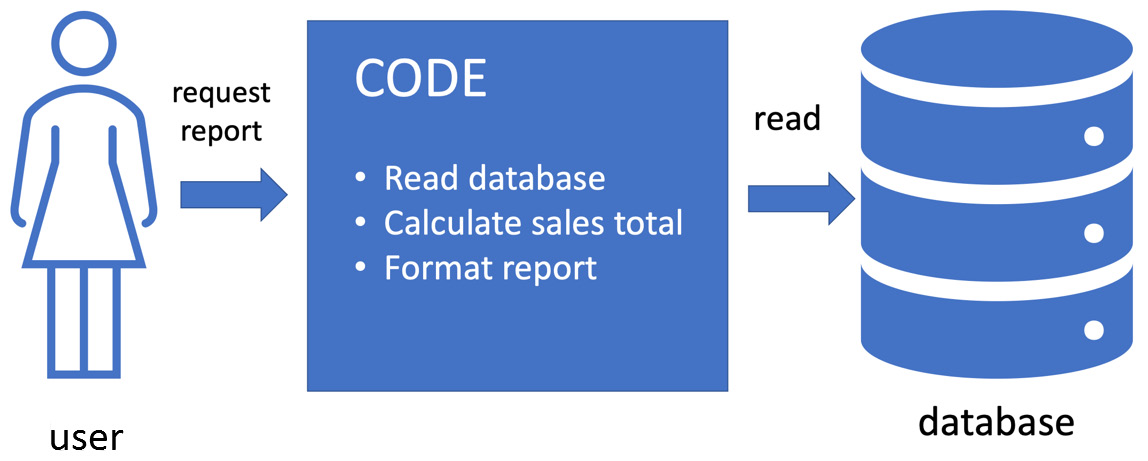
Figure 9.1 – One piece of code does everything
In this design, we have sales data stored in a database in the usual way. We write some code to pull the report on behalf of our user. It is a single piece of code that does the whole job as a single step. It will connect to the database, send a query, receive the results, do some processing, and format the results ready for the user to read.
On the plus side, we know this style of coding works. It will achieve its aim of providing that sales report to the user. On the downside, the code combines three different responsibilities – accessing a database, performing logic, and formatting a report. It might mix up SQL statements to the database with html5 tags to make a formatted report. As we saw in a previous chapter, this can make future code changes in one area ripple out and impact the other areas. Ideally, that should not happen. But the real challenge is writing a test for this one piece of code. We’ll need to parse and understand whatever format we send the report to the user in. We’ll also need to work directly with that database.
In the following subsections, we’ll review some wider challenges that external systems present to testing. These include environmental problems, accidental transactions, uncertain data, operating system calls, and third-party libraries.
Environmental problems bring trouble
The environment that our software runs in often causes challenges. Suppose our code reads data from a database. Even if the code is correct, it might not be able to read that data, due to problems in the environment beyond our control. Such problems include the following:
- Network connection dropped: Many reasons can cause this. Locally, a network cable is pulled out by mistake. Maybe the database is hosted over the internet somewhere, and our ISP has dropped the connection.
- Power failures: A power failure on the database server, or a local network switch is enough to put the database out of our reach.
- Equipment limits: Maybe the database server itself has run out of disk space and cannot operate. Maybe the exact query we have written is hitting the database in a way that takes a long time to complete, perhaps due to missing indices.
Whatever the cause, if our code cannot access the data in the database, it’s not going to work. As this is a possibility, writing a test for our report generation code is made much harder.
Even when our code can access the data in the database, it’s not that easy to work with in testing. Suppose we write a test that verifies that we can read the production database correctly, by reading a username. What username would we expect to read? We don’t know, because the test is not in control of what data gets added. The available usernames will be whatever names were added by real users. We could make the test add a known test username to the database – but then, we have just created a fake user that real users can interact with. This is not what we want at all.
A database stores data, causing further problems for our tests. Suppose we write a test against a test database, which begins by writing a test username. If we have run this test before, the test username will already be stored in the database. Typically, the database will report a duplicate item error and the test will fail.
Tests against databases need cleaning up. Any test data stored must be deleted after the tests have been completed. If we attempt to delete data after the test has succeeded, the deletion code may never run if the test fails. We could avoid this by always deleting the data before the test runs. Such tests will be slow to run.
Accidentally triggering real transactions from tests
When our code is limited to only accessing a production system, then every time we use that code, something will happen in production. The payment processor may issue charges. Real bank accounts may become debited. Alarms may be activated, causing real evacuations. In a famous example from Hawaii, a system test triggered a real text message saying Hawaii was under missile attack – which it wasn’t. This is serious stuff.
Hawaii false missile attack warning
For details on this example of testing going wrong, see https://en.wikipedia.org/wiki/2018_Hawaii_false_missile_alert.
Accidental real transactions can result in real losses to a company. They could end up as losses to the 3Rs of a business – revenue, reputation, and retention. None of those are good. Our tests mustn’t accidentally trigger real consequences from production systems.
What data should we expect?
In our sales report example, the biggest problem with writing a test is that we would need to know what the correct answer is to the monthly sales report in advance. How do we do that when we are connected to the production system? The answer will be whatever the sales report says it is. We have no other way of knowing.
The fact that we need the sales report code to be working correctly before we can test that the sales report code is working correctly is a big problem here! This is a circular dependency we cannot break.
Operating system calls and system time
Sometimes, our code may need to make calls to the operating system to do its job. Perhaps it needs to delete all the files in a directory from time to time or it may be dependent on the system time. An example would be a log file cleanup utility, which runs every Monday at 02:00 A.M. The utility will delete every file in the /logfiles/ directory.
Testing such a utility would be difficult. We would have to wait until 02:00 A.M. on Monday and verify that all the log files have been deleted. While we could make this work, it isn’t very effective. It would be nice to find a better approach that allowed us to test anytime we liked, ideally without deleting any files.
Challenges with third-party services
A common task in business software is to accept payment from a customer. For that, we inevitably use a third-party payment processor such as PayPal or Stripe, as two examples. In addition to the challenges of network connectivity, third-party APIs provide us with further challenges:
- Service downtime: Many third-party APIs will have a period of scheduled maintenance where the service is unavailable for a time. That spells “test failed” for us.
- API changes: Suppose our code uses API version 1 and API version 2 is pushed live. Our code will still be using version 1 calls, which might no longer work on version 2 of the API. Now, that is considered rather bad practice – it’s called breaking a published interface – but it can and does happen. Worse, with our one piece of code, the version 2 changes might cause changes everywhere in our code.
- Slow responses: If our code makes an API call to an external service, there is always a possibility that the response will come back later than expected by our code. Our code will fail in some way usually and cause tests to fail.
Plenty of challenges exist when we mix external services and a single monolithic piece of code, complicating both maintenance and testing. The question is what can we do about it? The next section looks at how the Dependency Inversion Principle can help us follow a design approach known as a hexagonal architecture, which makes external systems easier to deal with.
Dependency inversion to the rescue
In this section, we will review a design approach known as the hexagonal architecture, based on the SOLID principles we already know. Using this approach allows us to use TDD more effectively across more of our code base.
We learned about the Dependency Inversion Principle previously in this book. We saw that it helps us isolate some code we wanted to test from the details of its collaborators. We noted that was useful for testing things that connected to external systems that were outside of our control. We saw how the single responsibility principle guided us into splitting up software into smaller, more focused tasks.
Applying these ideas to our earlier sales reporting example, we would arrive at an improved design, as shown in the following diagram:
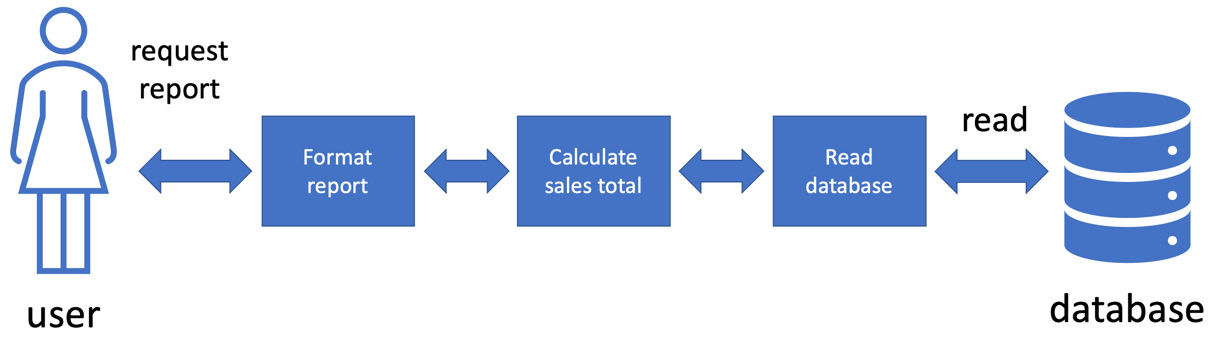
Figure 9.2 – Applying SOLID to our sales report
The preceding diagram shows how we have applied SOLID principles to splitting up our sales report code. We have used the single responsibility principle to break down the overall task into three separate tasks:
- Formatting the report
- Calculating the sales total
- Reading the sales data from the database
This already makes the application a little easier to work with. More importantly, we’ve isolated the code that calculates the sales total from both the user and the database. This calculation no longer directly accesses the database. It goes through another piece of code responsible for doing only that. Likewise, the calculation result isn’t directly formatted and sent to the user. Another piece of code is responsible for that.
We can apply the Dependency Inversion Principle here as well. By inverting the dependencies on the formatting and database access code, our calculated sales total is now free from knowing any of their details. We’ve made a significant breakthrough:
- The calculation code is now fully isolated from the database and formatting
- We can swap in any piece of code that can access any database
- We can swap in any piece of code that can format a report
- We can use test doubles in place of the formatting and database access code
The biggest benefit is that we can swap in any piece of code that can access any database, without changing the calculation code. For example, we could change from a Postgres SQL database to a Mongo NoSQL database without changing the calculation code. We can use a test double for the database so that we can test the calculation code as a FIRST unit test. These are very significant advantages, not just in terms of TDD and testing, but also in terms of how our code is organized. Considering the one-piece sales report solution to this one, we have moved from pure writing code to software engineering. We’re thinking beyond just getting code to work and focusing on making code easy to work with. The next few subsections will look at how we can generalize this approach, resulting in the hexagonal architecture. We will understand how this approach delivers a logical organization of code that helps us apply TDD more effectively.
Generalizing this approach to the hexagonal architecture
This combination of the single responsibility principle and dependency inversion seems to have brought us some benefits. Could we extend this approach to the entire application and get the same benefits? Could we find a way to separate all our application logic and data representations from the constraints of external influence? We most certainly can, and the general form of this design is shown in the following diagram:
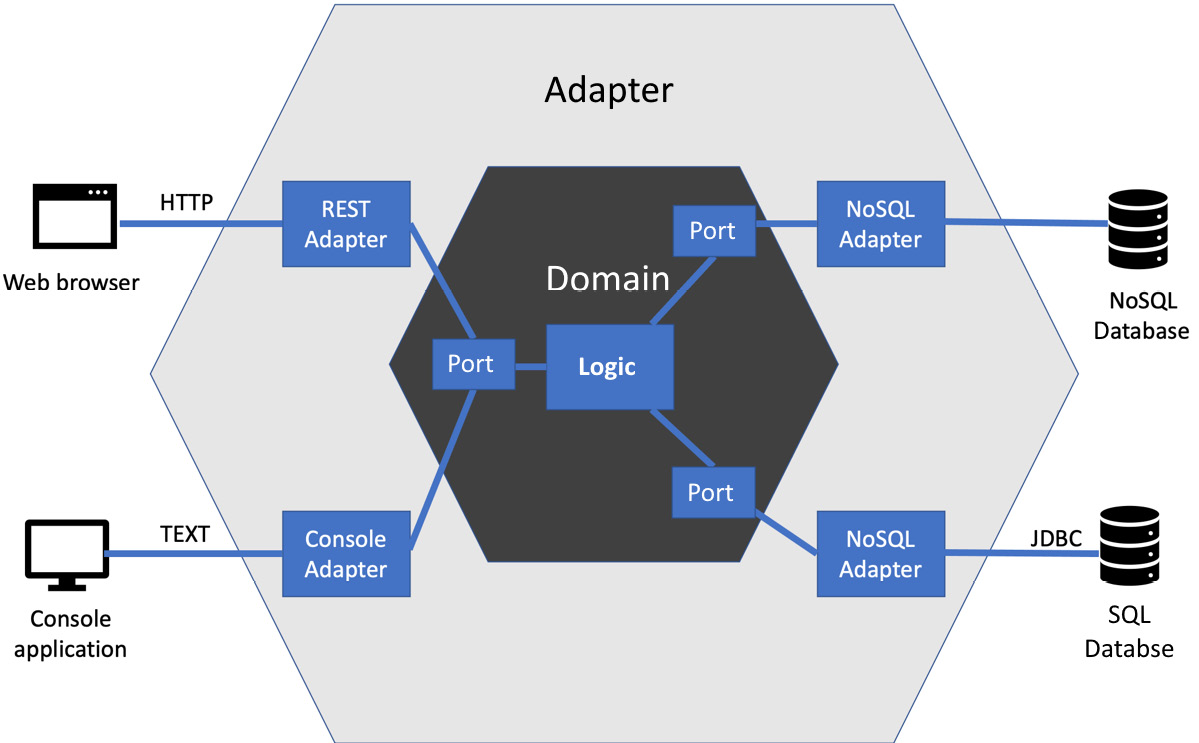
Figure 9.3 – Hexagonal architecture
The preceding diagram shows what happens when we generalize the use of dependency inversion and single responsibility to an entire application. It is called the hexagonal architecture, also known as ports and adapters after the original term used by Alastair Cockburn, who first described this approach. The benefit is that it completely isolates the core logic of our application from the details of external systems. This helps us with testing that core logic. It also provides a reasonable template for a well-engineered design for our code.
Overview of the hexagonal architecture’s components
To provide us with this isolation of our core application logic, the hexagonal architecture divides the whole program into four spaces:
- External systems, including web browsers, databases, and other computing services
- Adapters implement the specific APIs required by the external systems
- Ports are the abstraction of what our application needs from the external system
- The domain model contains our application logic, free of external system details
The central core of our application is the domain model, surrounded by the support it needs from external systems. It indirectly uses but is not defined by those external systems. Let’s walk through each component in the hexagonal architecture in more detail, to understand what each one is and is not responsible for.
External systems connect to adapters
External systems are all the things that live outside of our code base. They include things that the user directly interacts with, such as the web browser and the console application in the preceding diagram. They also include data stores, such as both the SQL database and the NoSQL database. Other examples of common external systems include desktop graphical user interfaces, filesystems, downstream web service APIs, and hardware device drivers. Most applications will need to interact with systems like these.
In the hexagonal architecture, the core of our application code does not know any details about how the external systems are interacted with. The responsibility of communicating with external systems is given to a piece of code known as an adapter.
As an example, the following diagram shows how a web browser would connect to our code via a REST adapter:
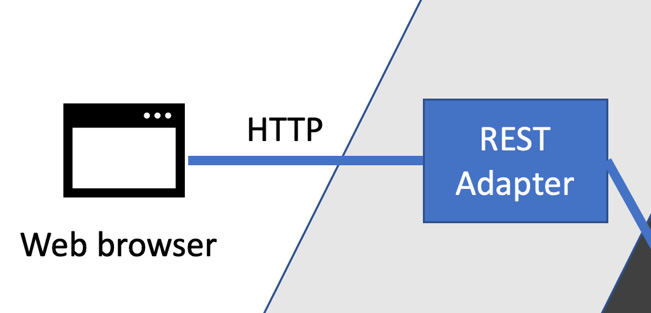
Figure 9.4 – Browser connecting to a REST adapter
In the preceding diagram, we can see the web browser connecting to a REST adapter. This adapter understands HTTP requests and responses, which are the very core of the web. It also understands the JSON data format, often using libraries to convert the JSON data into some internal representation for our code. This adapter will also understand the specific protocol that we will have designed for our application’s REST API – the precise sequence of HTTP verbs, responses, status codes, and JSON-encoded payload data we come up with as an API.
Note
Adapters encapsulate all the knowledge our system needs to interact with an external system – and nothing else. This knowledge is defined by the external system’s specifications. Some of those may be designed by ourselves.
Adapters have the single responsibility of knowing how to interact with an external system. If that external system changes its public interface, only our adapter will need to change.
Adapters connect to ports
Moving toward the domain model, adapters connect to ports. Ports are part of the domain model. They abstract away the details of the adapter’s intricate knowledge of its external system. Ports answer a slightly different question: what do we need that external system for? The ports use the Dependency Inversion Principle to isolate our domain code from knowing any details about the adapters. They are written purely in terms of our domain model:
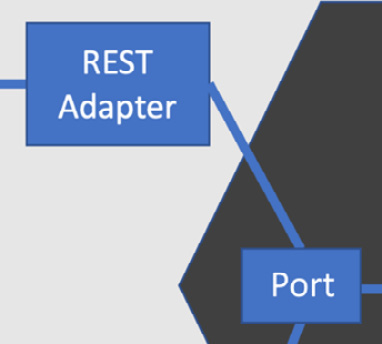
Figure 9.5 – Adapters connect to ports
The REST adapter described previously encapsulates the details of running a REST API, using knowledge of HTTP and JSON. It connects to a commands port, which provides our abstraction of commands coming in from the web – or anywhere else, for that matter. Given our sales report example earlier, the commands port would include a technology-free way of requesting a sales report. In code, it might look as simple as this:
package com.sales.domain;
import java.time.LocalDate;
public interface Commands {
    SalesReport calculateForPeriod(LocalDate start,
                                   LocalDate end);
}
This code fragment features the following:
- No references to HttpServletRequest or anything to do with HTTP
- No references to JSON formats
- References to our domain model – SalesReport and java.time.LocalDate
- The public access modifier, so it can be called from the REST adapter
This interface is a port. It gives us a general-purpose way to get a sales report from our application. Referring to Figure 9.3, we can see that the console adapter also connects to this port, providing the user with a command-line interface to our application. The reason is that while users can access our application using different kinds of external systems – the web and the command line – our application does the same thing in either case. It only supports one set of commands, no matter where those commands are requested from. Fetching a SalesReport object is just that, no matter which technology you request it from.
Note
Ports provide a logical view of what our application needs from an external system, without constraining how those needs should be met technically.
Ports are where we invert dependencies. Ports represent the reason our domain model needs those external systems. If the adapters represent the how, ports represent the why.
Ports connect to our domain model
The final step in the chain is connecting to the domain model itself. This is where our application logic lives. Think of it as pure logic for the problem our application is solving. Because of the ports and adapters, the domain logic is unconstrained by details of external systems:
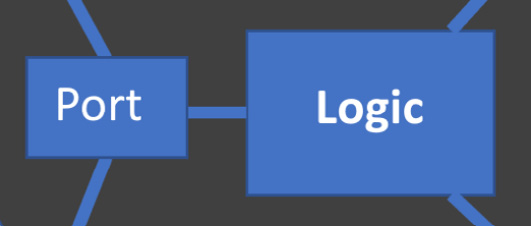
Figure 9.6 – Ports connect to the domain model
The domain model represents the things our users want to do, in code. Every user story is described by code here. Ideally, the code in this layer uses the language of the problem we are solving, instead of technology details. When we do this well, this code becomes storytelling – it describes actions our users care about in terms they have told us about. It uses their language – the language of our users – not obscure computer language.
The domain model can contain code written in any paradigm. It might use functional programming (FP) ideas. It may even use object-oriented programming (OOP) ideas. It might be procedural. It might even use an off-the-shelf library that we configure declaratively. My current style is to use OOP for the overall structure and organization of a program, then use FP ideas inside the object methods to implement them. It makes no difference to either the hexagonal architecture or TDD how we implement this domain model. Whatever way suits your coding style is just fine here, so long as you use the ideas of ports and adapters.
Note
The domain model contains code that describes how the user’s problem is being solved. This is the essential logic of our application that creates business value.
At the center of the entire application is the domain model. It contains the logic that brings the user’s stories to life.
The golden rule – the domain never connects directly to adapters
To preserve the benefits of isolating the domain model from adapters and external systems, we follow one simple rule: the domain model never connects directly to any of the adapters. This is always done through a port.
When our code follows this design approach, it is straightforward to check whether we’ve got the ports and adapters split right. We can make two high-level structural decisions:
- The domain model lives in a domain package (and sub packages)
- The adapters live in an adapters package (and sub packages)
We can analyze the code to check that anything in the domain package contains no import statements from the adapters package. Import checks can be done visually in code reviews or pairing/mobbing. Static analysis tools such as SonarQube can automate import checks as part of the build pipeline.
The golden rules of the hexagonal architecture
The domain model never connects directly to anything in the adapter layer so that our application logic does not depend on details of external systems.
The adapters connect to ports so that code connecting to external systems is isolated.
Ports are part of the domain model to create abstractions of external systems.
The domain model and the adapters depend on the ports only. This is dependency inversion at work.
These simple rules keep our design in line and preserve the isolation of the domain model.
Why the hexagon shape?
The idea behind the hexagon shape used in the diagram is that each face represents one external system. In terms of a graphical representation of a design, having up to six external systems represented is usually sufficient. The idea of the inner and outer hexagons to represent the domain model and adapter layer shows graphically how the domain model is the core of our application and that it is isolated from external systems by the ports and adapter layer.
The critical idea behind the hexagonal architecture is the ports and adapters technique. The actual number of sides depends on how many external systems there are. The number of those is not important.
In this section, we introduced the hexagonal architecture and the benefits it provides, and provided a general overview of how all the essential pieces fit together. Let’s turn to the next section and look specifically at the decisions we need to make to abstract out an external system.
Abstracting out the external system
In this section, we will consider some of the decisions we need to make when applying the hexagonal architecture approach. We’ll take a step-by-step approach to handling external systems, where we will first decide what the domain model needs, then work out the right abstractions that hide their technical details. We will consider two common external systems: web requests and database access.
Deciding what our domain model needs
The place to begin our design is with our domain model. We need to devise a suitable port for our domain model to interact with. This port has to be free from any details of our external system, and at the same time, it must answer the question of what our application needs this system for. We are creating an abstraction.
A good way to think about abstractions is to think about what would stay the same if we changed how we performed a task. Suppose we want to eat warm soup for lunch. We might warm it in a pan on the stove or perhaps warm it in the microwave. No matter how we choose to do it, what we are doing stays the same. We are warming the soup and that is the abstraction we’re looking for.
We don’t often warm soup in software systems unless we are building an automated soup vending machine. But there are several common kinds of abstractions we will be using. This is because common kinds of external systems are used when building a typical web application. The first and most obvious is the connection to the web itself. In most applications, we will encounter some kind of data store, typically a third-party database system. For many applications, we will also be calling out to another web service. In turn, this service may call others in a fleet of services, all internal to our company. Another typical web service call is to a third-party web service provider, such as a credit card payment processor, as an example.
Let’s look at ways of abstracting these common external systems.
Abstracting web requests and responses
Our application will respond to HTTP requests and responses. The port we need to design represents the request and the response in terms of our domain model, stripping away the web technology.
Our sales report example could introduce these ideas as two simple domain objects. These requests can be represented by a RequestSalesReport class:
package com.sales.domain;
import java.time.LocalDate;
public class RequestSalesReport {
    private final LocalDate start;
    private final LocalDate end;
    public RequestSalesReport(LocalDate start,
                              LocalDate end){
        this.start = start;
        this.end = end;
    }
    public SalesReport produce(SalesReporting reporting) {
        return reporting.reportForPeriod(start, end);
    }
}
Here, we can see the critical pieces of our domain model of the request:
- What we are requesting – that is, a sales report, captured in the class name
- The parameters of that request – that is, the start and end dates of the reporting period
We can see how the response is represented:
- The SalesReport class will contain the raw information requested
We can also see what is not present:
- The data formats used in the web request
- HTTP status codes, such as 200 OK
- HTTPServletRequest and HttpServletResponse or equivalent framework objects
This is a pure domain model representation of a request for a sales report between two dates. There is no hint of this having come from the web, a fact that is very useful as we can request it from other input sources, such as a desktop GUI or a command line. Even better, we can create these domain model objects very easily in a unit test.
The preceding example shows an object-oriented, tell-don’t-ask approach. We could just as easily choose an FP approach. If we did, we would represent the request and response as pure data structures. The record facility that was added to Java 17 is well suited to representing such data structures. What’s important is that the request and response are written purely in domain model terms – nothing of the web technology should be present.
Abstracting the database
Without data, most applications aren’t particularly useful. Without data storage, they become rather forgetful of the data we supply. Accessing data stores such as relational databases and NoSQL databases is a common task in web application development.
In a hexagonal architecture, we start by designing the port that the domain model will interact with, again in pure domain terms. The way to create a database abstraction is to think about what data needs storing and not how it will be stored.
A database port has two components:
- An interface to invert the dependency on the database.
The interface is often known as a repository. It has also been termed a data access object. Whatever the name, it has the job of isolating the domain model from any part of our database and its access technology.
A value object exists to transfer data from place to place. Two value objects that each hold the same data values are considered equal. They are ideal for transferring data between the database and our code.
Returning to our sales report example, one possible design for our repository would be this:
package com.sales.domain;
public interface SalesRepository {
    List<Sale> allWithinDateRange(LocalDate start,
                                  LocalDate end);
}
Here, we have a method called allWithinDateRange() that allows us to fetch a set of individual sales transactions falling within a particular date range. The data is returned as java.util.List of simple Sale value objects. These are fully featured domain model objects. They may well have methods on them that perform some of the critical application logic. They may be little more than basic data structures, perhaps using a Java 17 record structure. This choice is part of our job in deciding what a well-engineered design looks like in our specific case.
Again, we can see what is not present:
- Database connection strings
- JDBC or JPA API details – the standard Java Database Connectivity library
- SQL queries (or NoSQL queries)
- Database schema and table names
- Database stored procedure details
Our repository designs focus on what our domain model needs our database to provide but does not constrain how it provides. As a result, some interesting decisions have to be taken in designing our repository, concerning how much work we put into the database and how much we do in the domain model itself. Examples of this include deciding whether we will write a complex query in the database adapter, or whether we will write simpler ones and perform additional work in the domain model. Likewise, will we make use of stored procedures in the database?
Whatever trade-offs we decide in these decisions, once again, the database adapter is where all those decisions reside. The adapter is where we see the database connection strings, query strings, table names, and so on. The adapter encapsulates the design details of our data schema and database technology.
Abstracting calls to web services
Making calls to other web services is a frequent development task. Examples include calls to payment processors and address lookup services. Sometimes, these are third-party external services, and sometimes, they live inside our web service fleet. Either way, they generally require some HTTP calls to be made from our application.
Abstracting these calls proceeds along similar lines to abstracting the database. Our port is made up of an interface that inverts the dependency on the web service we are calling, and some value objects that transfer data.
An example of abstracting a call to a mapping API such as Google Maps, for example, might look like this:
package com.sales.domain;
public interface MappingService {
    void addReview(GeographicLocation location,
                   Review review);
}
We have an interface representing MappingService as a whole. We’ve added a method to add a review of a particular location on whichever service provider we end up using. We’re using GeographicLocation to represent a place, defined in our terms. It may well have a latitude and longitude pair in it or it may be based on postal code. That’s another design decision. Again, we see no sign of the underlying map service or its API details. That code lives in the adapter, which would connect to the real external mapping web service.
This abstraction offers us benefits in being able to use a test double for that external service and being able to change service providers in the future. You never know when an external service might shut down or become too costly to use. It’s nice to keep our options open by using the hexagonal architecture.
This section has presented some ideas for the most common tasks in working with external systems in a hexagonal architecture. In the next section, we’ll discuss general approaches to writing code in the domain model.
Writing the domain code
In this section, we will look at some of the things we need to think about as we write the code for our domain model. We’ll cover what kinds of libraries we should and should not use in the domain model, how we deal with application configuration and initialization, and we’ll also think about what impact popular frameworks have.
Deciding what should be in our domain model
Our domain model is the very core of our application and the hexagonal architecture puts it up front and center. A good domain model is written using the language of our users’ problem domain; that’s where the name comes from. We should see the names of program elements that our users would recognize. We should recognize the problem being solved over and above the mechanisms we are using to solve it. Ideally, we will see terms from our user stories being used in our domain model.
Applying the hexagonal architecture, we choose our domain model to be independent of those things that are not essential to solving the problem. That’s why external systems are isolated. We may initially think that creating a sales report means that we must read a file and we must create an HTML document. But that’s not the essential heart of the problem. We simply need to get sales data from somewhere, perform some calculations to get totals for our report, then format it somehow. The somewhere and somehow can change, without affecting the essence of our solution.
Bearing this constraint in mind, we can take any standard analysis and design approach. We are free to choose objects or decompose them into functions as we normally do. We only have to preserve that distinction between the essence of the problem and the implementation details.
We need to exercise judgment in these decisions. In our sales report example, the source of the sales data is of no consequence. As a counter-example, suppose we are making a linter for our Java program files – it’s quite reasonable to have the concept of files represented directly in our domain model. This problem domain is all about working with Java files, so we should make that clear. We may still decouple the domain model of a file from the OS-specific details of reading and writing it, but the concept would be in the domain model.
Using libraries and frameworks in the domain model
The domain model can use any pre-written library or framework to help do its job. Popular libraries such as Apache Commons or the Java Standard Runtime library generally present no problems here. However, we need to be aware of frameworks that bind us to the world of external systems and our adapter layer. We need to invert dependencies on those frameworks, leaving them to be just an implementation detail of the adapter layer.
An example might be the @RestController annotation of Spring Boot. It looks like pure domain code at first sight, but it ties the class tightly to generated code that is specific to the web adapter.
Deciding on a programming approach
The domain model can be written using any programming paradigm. This flexibility means that we will need to decide on which approach to use. This is never a purely technical decision, like with so many things in software. We should consider the following:
- Existing team skills and preferences: What paradigm does the team know best? Which paradigm would they like to use, given the chance?
- Existing libraries, frameworks, and code bases: If we are going to be using pre-written code – and let’s face it, we almost certainly will – then what paradigm would best suit that code?
- Style guides and other code mandates: Are we working with an existing style guide or paradigm? If we are being paid for our work – or we are contributing to an existing open source project – we will need to adopt the paradigm set out for us.
The good news is that whatever paradigm we choose, we will be able to write our domain model successfully. While the code may look different, equivalent functionality can be written using any of the paradigms.
Substituting test doubles for external systems
In this section, we’ll discuss one of the biggest advantages that the hexagonal architecture brings to TDD: high testability. It also brings some workflow advantages.
Replacing the adapters with test doubles
The key advantage the hexagonal architecture brings to TDD is that it is trivially easy to replace all the adapters with test doubles, giving us the ability to test the entire domain model with FIRST unit tests. We can test the entire application core logic without test environments, test databases, or HTTP tools such as Postman or curl – just fast, repeatable unit tests. Our testing setup looks like this:
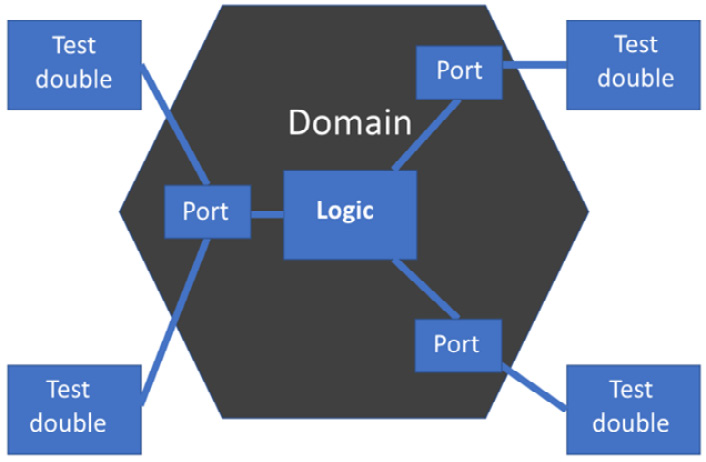
Figure 9.7 – Testing the domain model
We can see that all the adapters have been replaced by test doubles, completely freeing us from our environment of external systems. Unit tests can now cover the whole domain model, reducing the need for integration tests.
We gain several benefits by doing this:
- We can write TDD tests first with ease: There’s no friction in writing a simple test double that lives entirely in memory and has no dependencies on the test environment.
- We gain FIRST unit test benefits: Our tests run very fast indeed and are repeatable. Typically, testing an entire domain model takes the order of seconds, not hours. The tests will repeatably pass or fail, meaning we are never wondering whether a build failure was due to a flaky integration test failure.
- It unlocks our team: We can do useful work building the core logic of our system, without having to wait for test environments to be designed and built.
The techniques for creating the test doubles were outlined in Chapter 8, Test Doubles – Stubs and Mocks. There is nothing new required in terms of implementing these doubles.
One consequence of being able to test the whole domain model is that we can apply TDD and FIRST unit tests to much larger program units. The next section discusses what that means for us.
Unit testing bigger units
The previous section introduced the idea of surrounding our domain model with test doubles for every port. This gives us some interesting opportunities to discuss in this section. We can test units that are as large as a user story.
We’re familiar with unit tests as being things that test in the small. There’s a good chance you’ll have heard somebody say that a unit test should only ever apply to a single function, or that every class should have one unit test for every method. We’ve already seen how that’s not the best way to use unit tests. Tests like those miss out on some advantages. We are better served by thinking of tests as covering behavior instead.
The combined approach of designing with the hexagonal architecture and testing behaviors instead of implementation details leads to an interesting system layering. Instead of having traditional layers, as we might do in a three-tier architecture, we have circles of increasingly higher-level behavior. Inside our domain model, we will find those tests-in-the-small. But as we move outward, toward the adapter layer, we will find bigger units of behavior.
Unit testing entire user stories
The ports in the domain model form a natural high-level boundary of the domain model. If we review what we’ve learned in this chapter, we’ll see that this boundary consists of the following:
- The essence of requests from users
- The essence of a response from our application
- The essence of how data needs storing and accessing
- All using technology-free code
This layer is the essence of what our application does, free from the details of how it does it. It is nothing less than the original user stories themselves. The most significant thing about this domain model is that we can write FIRST unit tests against it. We have all we need to replace difficult-to-test external systems with simple test doubles. We can write unit tests that cover entire user stories, confirming that our core logic is correct.
Faster, more reliable testing
Traditionally, testing user stories involved slower integration tests in a test environment. The hexagonal architecture enables unit tests to replace some of these integration tests, speeding up our builds and providing greater repeatability of our testing.
We can now test-drive at three granularities against our domain model:
- Against a single method or function
- Against the public behaviors of a class and any collaborators it has
- Against the core logic of an entire user story
This is a big benefit of the hexagonal architecture. The isolation from external services has the effect of pushing the essential logic of a user story into the domain model, where it interacts with ports. As we’ve seen, those ports – by design – are trivially easy to write test doubles for. It’s worth restating the key benefits of FIRST unit tests:
- They are very fast, so testing our user stories will be very fast
- They are highly repeatable, so we can trust test passes and failures
As we cover wide areas of functionality with unit tests, we blur the line between integration and unit testing. We remove friction from developers testing more of the user stories by making that testing easier. Using more unit tests improves build times, as the tests run quickly and give reliable pass/fail results. Fewer integration tests are needed, which is good as they run more slowly and are more prone to incorrect results.
In the next section, we’ll apply what we’ve learned to our Wordz application. We will write a port that abstracts out the details of fetching a word for our users to guess.
Wordz – abstracting the database
In this section, we will apply what we’ve learned to our Wordz application and create a port suitable for fetching the words to present to a user. We will write the adapters and integration tests in Chapter 14, Driving the Database Layer.
Designing the repository interface
The first job in designing our port is to decide what it should be doing. For a database port, we need to think about the split between what we want our domain model to be responsible for and what we will push out to the database. The ports we use for a database are generally called repository interfaces.
Three broad principles should guide us:
- Think about what the domain model needs – why do we need this data? What will it be used for?
- Don’t simply echo an assumed database implementation – don’t think in terms of tables and foreign keys at this stage. That comes later when we decide how to implement the storage. Sometimes, database performance considerations mean we have to revisit the abstraction we create here. We would then trade off leaking some database implementation details here if it allowed the database to function better. We should defer such decisions as late as we can.
- Consider when we should leverage the database engine more. Perhaps we intend to use complex stored procedures in the database engine. Reflect this split of behavior in the repository interface. It may suggest a higher-level abstraction in the repository interface.
For our running example application, let’s consider the task of fetching a word at random for the user to guess. How should we divide the work between the domain and database? There are two broad options:
- Let the database choose a word at random
- Let the domain model generate a random number and let the database supply a numbered word
In general, letting the database do more work results in faster data handling; the database code is closer to the data and isn’t dragging it over a network connection into our domain model. But how do we persuade a database to choose something at random? We know that for relational databases, we can issue a query that will return results in no guaranteed order. That’s sort of random. But would it be random enough? Across all possible implementations? Seems unlikely.
The alternative is to let the domain model code decide which word to pick by generating a random number. We can then issue a query to fetch the word associated with that number. This also suggests that each word has an associated number with it – something we can provide when we design the database schema later.
This approach implies we need the domain model to pick a random number from all the numbers associated with the words. That implies the domain model needs to know the full set of numbers to choose from. We can make another design decision here. The numbers used to identify a word will start at 1 and increase by one for each word. We can provide a method on our port that returns the upper bound of these numbers. Then, we are all set to define that repository interface – with a test.
The test class starts with the package declaration and library imports we need:
package com.wordz.domain;
import org.junit.jupiter.api.BeforeEach;
import org.junit.jupiter.api.Test;
import org.junit.jupiter.api.extension.ExtendWith;
import org.mockito.Mock;
import org.mockito.MockitoAnnotations;
import static org.assertj.core.api.Assertions.*;
import static org.mockito.Mockito.when;
We enable Mockito integration with an annotation provided by the junit-jupiter library. We add the annotation at the class level:
@ExtendWith(MockitoExtension.class)
public class WordSelectionTest {
This will ensure that Mockito is initialized on each test run. The next part of the test defines some integer constants for readability:
    private static final int HIGHEST_WORD_NUMBER = 3;
    private static final int WORD_NUMBER_SHINE = 2;
We need two test doubles, which we want Mockito to generate. We need a stub for the word repository and a stub for a random number generator. We must add fields for these stubs. We will mark the fields with the Mockito @Mock annotation so that Mockito will generate the doubles for us:
    @Mock
    private WordRepository repository;
    @Mock
    private RandomNumbers random;
Mockito sees no difference between a mock or stub when we use the @Mock annotation. It simply creates a test double that can be configured for use either as a mock or a stub. This is done later in the test code.
We will name the test method selectsWordAtRandom(). We want to drive out a class that we will call WordSelection and make it responsible for choosing one word at random from WordRepository:
    @Test
    void selectsWordAtRandom() {
        when(repository.highestWordNumber())
            .thenReturn(HIGHEST_WORD_NUMBER);
        when(repository.fetchWordByNumber(WORD_NUMBER_SHINE))
            .thenReturn("SHINE");
        when(random.next(HIGHEST_WORD_NUMBER))
            .thenReturn(WORD_NUMBER_SHINE);
        var selector = new WordSelection(repository,
                                         random);
        String actual = selector.chooseRandomWord();
        assertThat(actual).isEqualTo("SHINE");
    }
}
The preceding test was written in the normal way, adding lines to capture each design decision:
- The WordSelection class encapsulates the algorithm, which selects a word to guess
- The WordSelection constructor takes two dependencies:
- WordRepository is the port for stored words
- RandomNumbers is the port for random number generation
- The chooseRandomWord() method will return a randomly chosen word as a String
- The arrange section is moved out to the beforeEachTest() method:
@BeforeEach
void beforeEachTest() {when(repository.highestWordNumber())
.thenReturn(HIGHEST_WORD_NUMBER);
when(repository.fetchWordByNumber(WORD_NUMBER_SHINE))
.thenReturn("SHINE");}
This will set up the test data in the stub for our WordRepository at the start of each test. The word identified by number 2 is defined as SHINE, so we can check that in the assert.
- Out of that test code flows the following definition of two interface methods:
package com.wordz.domain;
public interface WordRepository {String fetchWordByNumber(int number);
int highestWordNumber();
}
The WordRepository interface defines our application’s view of the database. We only need two facilities for our current needs:
- A fetchWordByNumber() method to fetch a word, given its identifying number
- A highestWordNumber() method to say what the highest word number will be
The test has also driven out the interface needed for our random number generator:
package com.wordz.domain;
public interface RandomNumbers {
    int next(int upperBoundInclusive);
}
The single next() method returns int in the range of 1 to the upperBoundInclusive number.
With both the test and port interfaces defined, we can write the domain model code:
package com.wordz.domain;
public class WordSelection {
    private final WordRepository repository;
    private final RandomNumbers random;
    public WordSelection(WordRepository repository,
                         RandomNumbers random) {
        this.repository = repository;
        this.random = random;
    }
    public String chooseRandomWord() {
        int wordNumber =
           random.next(repository.highestWordNumber());
        return repository.fetchWordByNumber(wordNumber);
    }
}
Notice how this code does not import anything from outside the com.wordz.domain package. It is pure application logic, relying only on the port interfaces to access stored words and random numbers. With this, our production code for the domain model of WordSelection is complete.
Designing the database and random numbers adapters
The next job is to implement the RandomNumbers port and database access code that implements our WordRepository interface. In outline, we’ll choose a database product, research how to connect to it and run database queries, then test-drive that code using an integration test. We will defer doing these tasks to part three of this book, in Chapter 13, Driving the Domain Layer, and Chapter 14, Driving the Database Layer.
Summary
In this chapter, we learned how to apply the SOLID principles to decouple external systems completely, leading to an application architecture known as the hexagonal architecture. We saw how this allows us to use test doubles in place of external systems, making our tests simpler to write, with repeatable results. This, in turn, allows us to test entire user stories with a FIRST unit test. As a bonus, we isolate ourselves from future changes in those external systems, limiting the amount of rework that would be required to support new technologies. We’ve seen how the hexagonal architecture combined with dependency injection allows us to support several different external systems choices and select the one we want at runtime via configuration.
The next chapter will look at the different styles of automated testing that apply to the different sections of a hexagonal architecture application. This approach is summarized as the Test Pyramid, and we shall learn more about it there.
Questions and answers
Take a look at the following questions and answers regarding this chapter’s content:
- Can we add the hexagonal architecture later?
Not always. We can refactor it. The challenge can be too much code that directly depends on details of external systems. If that’s the starting point, this refactoring will be challenging. There will be a lot of rework to do. This implies that some degree of up-front design and architectural discussion is required before we start work.
- Is the hexagonal architecture specific to OOP?
No. It is a way of organizing dependencies in our code. It can be applied to OOP, FP, procedural programming, or anything else – so long as those dependencies are managed correctly.
- When should we not use the hexagonal architecture?
When we have no real logic in our domain model. This is common for very small CRUD microservices that typically frontend a database table. With no logic to isolate, putting in all this code has no benefit. We may as well do TDD with integration tests only and accept that we won’t be able to use FIRST unit tests.
- Can we only have one port for an external system?
No. It is often better if we have more ports. Suppose we have a single Postgres database connected to our application, holding data on users, sales, and product inventory. We could simply have a single repository interface, with methods to work with those three datasets. But it will be better to split that interface up (following ISP) and have UserRepository, SalesRepository, and InventoryRepository. The ports provide a view of what our domain model wants from external systems. Ports are not a one-to-one mapping to hardware.
Further reading
To learn more about the topics that were covered in this chapter, take a look at the following resources:
- Hexagonal architecture, Alastair Cockburn: https://alistair.cockburn.us/hexagonal-architecture/
The original description of the hexagonal architecture in terms of ports and adapters.
Credits the original inventors of the term FIRST, Tim Ottinger and Brett Schuchert.
Guide to testing code deployed on production systems, without accidentally triggering unintended consequences.