
5
Writing Our First Test
It’s time for us to dive in and write our first TDD unit test in this chapter. To help us do this, we will learn about a simple template that helps us organize each test into a logical, readable piece of code. Along the way, we will learn some key principles we can use to make our tests effective. We will see how writing the test first forces us to make decisions about the design of our code and its ease of use, before needing to think about implementation details.
After some examples covering those techniques, we will make a start on our Wordz application, writing a test first before adding production code to make that test pass. We will use the popular Java unit testing libraries JUnit5 and AssertJ to help us write easy-to-read tests.
In this chapter, we will cover the following main principles behind writing effective unit tests:
- Starting TDD: Arrange-Act-Assert
- Defining a good test
- Catching common errors
- Asserting exceptions
- Only testing public methods
- Learning from our tests
- Beginning Wordz – our first test
Technical requirements
The final code in this chapter can be found at https://github.com/PacktPublishing/Test-Driven-Development-with-Java/tree/main/chapter05.
Starting TDD: Arrange-Act-Assert
Unit tests are nothing mysterious. They’re just code, executable code written in the same language that you write your application in. Each unit test forms the first use of the code you want to write. It calls the code just as it will be called in the real application. The test executes that code, captures all the outputs that we care about, and checks that they are what we expected them to be. Because the test uses our code in the exact same way that the real application will, we get instant feedback on how easy or difficult our code is to use. This might sound obvious, and it is, but it is a powerful tool to help us write clean and correct code. Let’s take a look at an example of a unit test and learn how to define its structure.
Defining the test structure
It’s always helpful to have templates to follow when we do things and unit tests are no exception. Based on commercial work done on the Chrysler Comprehensive Compensation Project, TDD inventor Kent Beck found that unit tests had certain features in common. This became summarized as a recommended structure for test code, called Arrange-Act-Assert or AAA.
The original definition of AAA
The original description of AAA can be found here, in the C2 wiki: http://wiki.c2.com/?ArrangeActAssert.
To explain what each section does, let’s walk through a completed unit test for a piece of code where we want to ensure that a username is displayed in lowercase:
import org.junit.jupiter.api.Test;
import static org.assertj.core.api.Assertions.*;
public class UsernameTest {
    @Test
    public void convertsToLowerCase() {
        var username = new Username("SirJakington35179");
        String actual = username.asLowerCase();
        assertThat(actual).isEqualTo("sirjakington35179");
    }
}
The first thing to notice is the class name for our test: UsernameTest. This is the first piece of storytelling for readers of our code. We are describing the behavioral area we are testing, in this case, usernames. All our tests, and indeed all our code, should follow this storytelling approach: what do we want the readers of our code to understand? We want them to clearly see what the problem that we are solving is and how the code that solves it should be used. We want to demonstrate to them that the code works correctly.
The unit test itself is the convertsToLowerCase() method. Again, the name describes what we expect to happen. When the code runs successfully, the username will be converted to lowercase. The names are intentionally simple, clear, and descriptive. This method has the @Test annotation from the JUnit5 test framework. The annotation tells JUnit that this is a test that it can run for us.
Inside the @Test method, we can see our Arrange-Act-Assert structure. We first arrange for our code to be able to run. This involves creating any objects required, supplying any configuration needed, and connecting any dependent objects and functions. Sometimes, we do not need this step, for example, if we are testing a simple standalone function. In our example code, the Arrange step is the line that creates the username object and supplies a name to the constructor. It then stores that object ready to use in the local username variable. It is the first line of the var username = new Username("SirJakington35179"); test method body.
The Act step follows. This is the part where we cause our code under test to act – we run that code. This is always a call to the code under test, supplying any necessary parameters, and arranging to capture the results. In the example, the String actual = username.asLowerCase(); line is the Act step. We call the asLowerCase() method on our username object. It takes no parameters and returns a simple String object containing the lowercase text sirjakington35179 as a result.
Completing our test is the final Assert step. The assertThat(actual).isEqualTo("sirjakington35179"); line is our Assert step here. It uses the assertThat() method and the isEqualTo() method from the AssertJ fluent assertions library. Its job is to check whether the result we returned from the Act step matches our expectations or not. Here, we are testing whether all the uppercase letters in the original name have been converted to lowercase.
Unit tests like this are easy to write, easy to read, and they run very quickly. Many such tests can run in under 1 second.
The JUnit library is the industry-standard unit test framework for Java. It provides us with a means to annotate Java methods as unit tests, lets us run all our tests, and visually displays the results, as shown here in the IntelliJ IDE window:
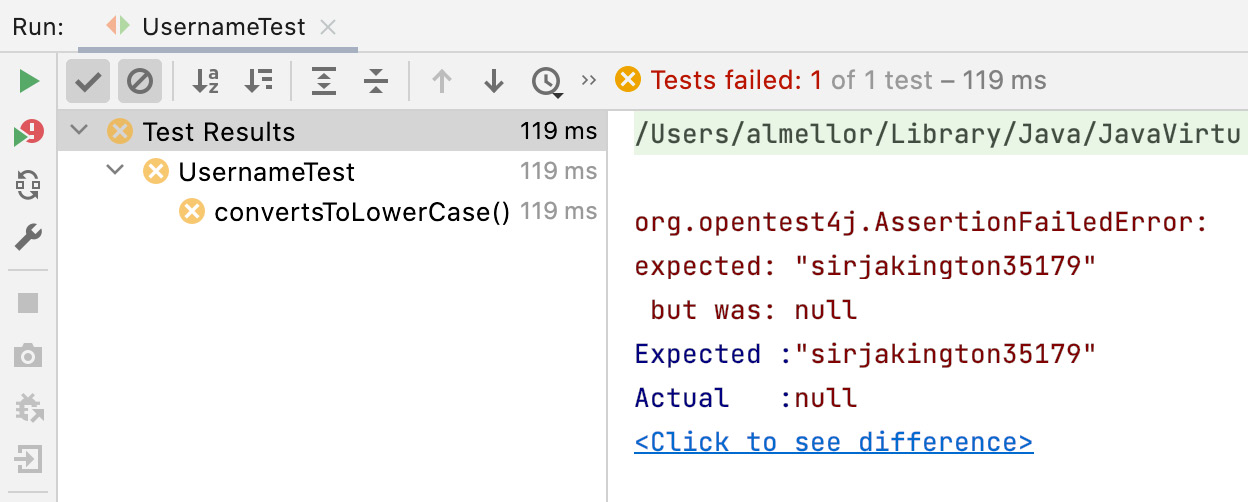
Figure 5.1 – Output from the JUnit test runner
We see here that the unit test failed. The test expected the result to be the sirjakington35179 text string but instead, we received null. Using TDD, we would complete just enough code to make that test pass:

Figure 5.2 – A JUnit test pass
We can see that our change to the production code has made this test pass. It has gone green, to use the popular term. Tests that fail are described as red tests and those that pass are green. This is based on the colors shown in popular IDEs, which are based on traffic signals in turn. Seeing all these short iterations of red tests turning to green is surprisingly satisfying, as well as building confidence in our work. The tests help us focus on the design of our code by forcing us to work backward from outcomes. Let’s look at what this means.
Working backward from outcomes
One thing we notice right away is just how unimportant the actual code that makes this test pass is. Everything in this test is about defining the expectations of that code. We are setting boundaries around why our code is useful and what we expect it to do. We are not constraining how it does it in any way. We are taking an outside-in view of code. Any implementation that makes our test pass is acceptable.
This seems to be a transition point in learning to use TDD. Many of us learned to program by writing implementations first. We thought about how the code would work. We went deep into the algorithms and data structures behind a specific implementation. Then, as a last thought, we wrapped it all up in some kind of callable interface.
TDD turns this on its head. We intentionally design our callable interface first, as this is what the users of that code will see. We use the test to precisely describe how the code will be set up, how it will be called, and what we can expect it to do for us. Once we get used to doing this outside-in design first, TDD follows very naturally and improves our workflow efficiency in several important ways. Let’s review what these improvements are.
Increasing workflow efficiency
Unit tests like these increase our efficiency as developers in several ways. The most obvious is that the code we write has passed a test: we know it works. We are not waiting around for a manual QA process to find a defect and then raise a bug report for rework in the future. We find and fix bugs now, before ever releasing them into the main source trunk, let alone to users. We have documented our intentions for our colleagues. If anyone wants to know how our Username class works, it is right there in the test – how you create the object, which methods you can call, and what we expect the outcomes to be.
Unit tests give us a way to run code in isolation. We are no longer forced to rebuild a whole application, run it, set up test data entries in our database, log in to the user interface, navigate to the correct screen, and then visually inspect the output of our code. We run the test. That’s it. This allows us to execute code that is not yet fully integrated into our application’s main trunk. This speeds up our work. We can get started more quickly, spend more time on developing the code at hand, and spend less time on cumbersome manual testing and deployment processes.
A further benefit is that this act of design improves the modularity of our code. By designing code that can be tested in small pieces, we remind ourselves to write code that can execute in small pieces. That has been the basic approach to design since the 1960s and remains as effective today as it ever was.
This section has covered the standard structure that we use to organize every unit test but it doesn’t guarantee that we will write a good test. To achieve this, each test needs to have particular properties. The FIRST principles describe the properties of a good test. Let’s learn how to apply these next.
Defining a good test
Like all code, unit test code can be written in better or worse ways. We’ve seen how AAA helps us structure a test correctly and how accurate, descriptive names tell the story of what we intend our code to do. The most useful tests also follow the FIRST principles and use one assert per test.
Applying the FIRST principles
These are a set of five principles that make tests more effective:
- Fast
- Isolated
- Repeatable
- Self-verifying
- Timely
Unit tests need to be fast, just as our earlier example was. This is especially important for test-first TDD, as we want that immediate feedback while we explore our design and implementation. If we run a unit test, and it takes even as little as 15 seconds to complete, we will soon stop running tests as often. We will degenerate into writing big chunks of production code without tests so that we spend less time waiting for slow tests to finish. This is the exact opposite of what we want from TDD, so we work hard to keep tests fast. We need unit tests to run in 2 seconds or less, ideally milliseconds. Even two seconds is really quite a high number.
Tests need to be isolated from one another. This means that we can pick any test or any combination of tests and run them in any order we like and always get the same result. One test must not depend on another test having been run before it. This is often a symptom of failing to write fast tests, so we compensate by caching results or arranging step setups. This is a mistake, as it slows down development, especially for our colleagues. The reason is that we don’t know the special order in which the tests must run. When we run any test on its own, and if it has not been properly isolated, it will fail as a false negative. That test no longer tells us anything about our code under test. It only tells us that we have not run some other test before it, without telling us which test that might be. Isolation is critical to a healthy TDD workflow.
Repeatable tests are vital to TDD. Whenever we run a test with the same production code, that test must always return the same pass or fail result. This might sound obvious but care needs to be taken to achieve this. Think about a test that checks a function that returns a random number between 1 and 10. If we assert that the number seven is returned, this test will only pass occasionally, even if we have correctly coded the function. In this regard, three popular sources of misery are tests involving the database, tests against time, and tests through the user interface. We will explore techniques to handle these situations in Chapter 8, Test Doubles –Stubs and Mocks.
All tests must be self-verifying. This means we need executable code to run and check whether the outputs are as expected. This step must be automated. We must not leave this check to manual inspection, perhaps by writing the output to a console and having a human check it against a test plan. Unit tests derive huge value from being automated. The computer checks the production code, freeing us from the tedium of following a test plan, the slowness of human activities, and the likelihood of human error.
Timely tests are tests written at just the right time to be most useful. The ideal time to write a test is just before writing the code that makes that test pass. It’s not unusual to see teams use less beneficial approaches. The worst one, of course, is to never write any unit tests and rely on manual QA to find bugs. With this approach, we get none of the design feedback available. The other extreme is to have an analyst write every test for the component – or even the whole system – upfront, leaving the coding as a mechanical exercise. This also fails to learn from design feedback. It can also result in overspecified tests that lock in poor design and implementation choices. Many teams start by writing some code and then go on to write a unit test, thereby missing out on an opportunity for early design feedback. It can also lead to untested code and faulty edge case handling.
We’ve seen how the FIRST principles help us focus on crafting a good test. Another important principle is not to try to test too much all at once. If we do, the test becomes very difficult to understand. A simple solution to this is to write a single assert per test, which we will cover next.
Using one assert per test
Tests provide the most useful feedback when they are short and specific. They act as a microscope working on the code, each test highlighting one small aspect of our code. The best way to ensure this happens is by writing one assertion per test. This prevents us from tackling too much in one test. This focuses on the error messages we get during test failures and helps us control the complexity of our code. It forces us to break things down a little further.
Deciding on the scope of a unit test
Another common misunderstanding is what a unit means in a unit test. The unit refers to the test isolation itself – each test can be considered a standalone unit. As a result, the size of the code under test can vary a lot, as long as that test can run in isolation.
Thinking of the test itself as the unit unifies several popular opinions about what the scope of a unit test should be. Often, it is said that the unit is the smallest piece of testable code – a function, method, class, or package. All of these are valid options. Another common argument is that a unit test should be a class test – one unit test class per production code class, with one unit test method per production method. While common, this isn’t usually the best approach. It unnecessarily couples the structure of the test to the structure of the implementation, making the code harder to change in the future, not easier.
The ideal goal of a unit test is to cover one externally visible behavior. This applies at several different scales in the code base. We can unit test an entire user story across multiple packages of classes, provided we can avoid manipulating external systems such as a database or the user interface. We’ll look into techniques for doing that in Chapter 9, Hexagonal Architecture – Decoupling External Systems. We often also use unit tests that are closer to the details of the code, testing only the public methods of a single class.
Once we have written our test based on the design that we would like our code to have, we can concentrate on the more obvious aspect of testing: verifying that our code is correct.
Catching common errors
The traditional view of testing is of it as a process to check that code works as it is intended to work. Unit tests excel at this and automate the process of running the code with known inputs and checking for expected outputs. As we are human, all of us make mistakes from time to time as we write code and some of these can have significant impacts. There are several common simple mistakes we can make and unit tests excel at catching them all. The most likely errors are the following:
- Off-by-one errors
- Inverted conditional logic
- Missing conditions
- Uninitialized data
- The wrong algorithm
- Broken equality checks
As an example, going back to our earlier test for a lowercase username, suppose we decided not to implement this using the String built-in .toLowerCase() method, but instead tried to roll our own loop code, like this:
public class Username {
    private final String name;
    public Username(String username) {
        name = username;
    }
    public String asLowerCase() {
        var result = new StringBuilder();
        for (int i=1; i < name.length(); i++) {
            char current = name.charAt(i);
            if (current > 'A' && current < 'Z') {
                result.append(current + 'a' - 'A');
            } else {
                result.append( current );
            }
        }
        return result.toString() ;
    }
}
We would see right away that this code isn’t correct. The test fails, as shown in the following figure:

Figure 5.3 – A common coding error
The first error in this code is a simple off-by-one error – the first letter is missing from the output. That points to an error in initializing our loop index but there are other errors in this code as well. This test reveals two defects. Further tests would reveal two more. Can you see what they are by visual inspection alone? How much more time and effort is it to analyze code like this in our heads, rather than using automated tests?
Asserting exceptions
One area where unit tests excel is in testing error handling code. As an example of testing exception throwing, let’s add a business requirement that our usernames must be at least four characters long. We think about the design we want and decide to throw a custom exception if the name is too short. We decide to represent this custom exception as class InvalidNameException. Here’s what the test looks like, using AssertJ:
@Test
public void rejectsShortName() {
    assertThatExceptionOfType(InvalidNameException.class)
            .isThrownBy(()->new Username("Abc"));
}
We can consider adding another test specifically aimed at proving that a name of four characters is accepted and no exception is thrown:
@Test
public void acceptsMinimumLengthName() {
    assertThatNoException()
            .isThrownBy(()->new Username("Abcd"));
}
Alternatively, we may simply decide that this explicit test is not needed. We may cover it implicitly with other tests. It is a good practice to add both tests to make our intentions clear.
The test names are fairly general, starting with either rejects or accepts. They describe the outcome that the code is being tested for. This allows us to change our minds about the error handling mechanics later, perhaps switching to something other than exceptions to signal the error.
Unit tests can catch common programming errors and verify error handling logic. Let’s look at a major principle of writing our unit tests to give us maximum flexibility when implementing our methods.
Only testing public methods
TDD is all about testing the behaviors of components, not their implementations. As we have seen in our test in the previous section, having a test for the behavior we want enables us to choose any implementation that will do the job. We focus on what’s important – what a component does – not on the less important details – how it does it.
Inside a test, this appears as calling public methods or functions on public classes and packages. The public methods are the behaviors we choose to expose to the wider application. Any private data or supporting code in classes, methods, or functions remain hidden.
A common mistake that developers make when learning TDD is that they make things public just to simplify testing. Resist the temptation. A typical mistake here is to take a private data field and expose it for testing using a public getter method. This weakens the encapsulation of that class. It is now more likely that the getter will be misused. Future developers may add methods to other classes that really belong in this one. The design of our production code is important. Fortunately, there is a simple way of preserving encapsulation without compromising testing.
Preserving encapsulation
If we feel we need to add getters to all our private data so that the test can check that each one is as expected, it is often better to treat this as a value object. A value object is an object that lacks identity. Any two value objects that contain the same data are considered to be equal. Using value objects, we can make another object containing the same private data and then test that the two objects are equal.
In Java, this requires us to code a custom equals() method for our class. If we do this, we should also code a hashcode() method, as the two go hand in hand. Any implementation that works will do. I recommend using the Apache commons3 library, which uses Java reflection capabilities to do this:
@Override
public boolean equals(Object other) {
    return EqualsBuilder.reflectionEquals(this, other);
}
@Override
public int hashCode() {
    return HashCodeBuilder.reflectionHashCode(this);
}
You can find out more about these library methods at https://commons.apache.org/proper/commons-lang/.
Simply adding those two methods (and the Apache commons3 library) to our class means that we can keep all our data fields private and still check that all the fields have the expected data in them. We simply create a new object with all the expected fields, then assert that it is equal to the object we are testing.
As we write each test, we are using the code under test for the first time. This allows us to learn a lot about how easy our code is to use, allowing us to make changes if we need to.
Learning from our tests
Our tests are a rich source of feedback on our design. As we make decisions, we write them as test code. Seeing this code – the first usage of our production code – brings into sharp focus how good our proposed design is. When our design isn’t good, the AAA sections of our test will reveal those design issues as code smells in the test. Let’s try to understand in detail how each of these can help identify a faulty design.
A messy Arrange step
If the code in our Arrange step is messy, our object may be difficult to create and configure. It may need too many parameters in a constructor or too many optional parameters left as null in the test. It may be that the object needs too many dependencies injected, indicating that it has too many responsibilities or it might need too many primitive data parameters to pass in a lot of configuration items. These are signals that the way we create our object might benefit from a redesign.
A messy Act step
Calling the main part of the code in the Act step is usually straightforward but it can reveal some basic design errors. For example, we might have unclear parameters that we pass in, signatures such as a list of Boolean or String objects. It is very hard to know what each one means. We could redesign this by wrapping those difficult parameters in an easy-to-understand new class, called a configuration object. Another possible problem is if the Act step requires multiple calls to be made in a specific order. That is error-prone. It is easy to call them in the wrong order or forget one of the calls. We could redesign to use a single method that wraps all of this detail.
A messy Assert step
The Assert step will reveal whether the results of our code are difficult to use. Problem areas might include having to call accessors in a specific order or perhaps returning some conventional code smells, such as an array of results where every index has a different meaning. We can redesign to use safer constructs in either case.
In each of these cases, one of the sections of code in our unit test looks wrong – it has a code smell. That is because the design of the code we are testing has the same code smell. This is what is meant by unit tests giving fast feedback on design. They are the first user of the code we are writing, so we can identify problem areas early on.
We now have all the techniques we need to start writing our first test for our example application. Let’s make a start.
Limitations of unit tests
One very important idea is that an automated test can only prove the presence of a defect, not the absence. What this means is that if we think of a boundary condition, write a test for that, and the test fails, we know we have a defect in our logic. However, if all our tests pass, that does not and cannot mean our code is free of defects. It only means that our code is free of all the defects that we have thought to test for. There simply is no magic solution that can ensure our code is defect-free. TDD gives us a significant boost in that direction but we must never claim our code is defect-free just because all our tests pass. This is simply untrue.
One important consequence of this is that our QA engineering colleagues remain as important as they ever were, although we now help them start from an easier standing point. We can deliver TDD-tested code to our manual QA colleagues, and they can be assured that many defects have been prevented and proven to be absent. This means that they can start work on manual exploratory testing, finding all the things we never thought to test. Working together, we can use their defect reports to write further unit tests to rectify what they find. The contribution of QA engineers remains vital, even with TDD. We need all the help our team can get in our efforts to write high-quality software.
Code coverage – an often-meaningless metric
Code coverage is a measure of how many lines of code have been executed in a given run. It is measured by instrumenting the code and this is something that a code coverage tool will do for us. It is often used in conjunction with unit testing to measure how many lines of code were executed while running the test suite.
In theory, you can see how this might mean that missing tests can be discovered in a scientific way. If we see that a line of code was not run, we must have a missing test somewhere. That is both true and helpful but the converse is not true. Suppose we get 100% code coverage during our test run. Does that mean the software is now completely tested and correct? No.
Consider having a single test for an if (x < 2) statement. We can write a test that will cause this line to execute and be included in code coverage reports. However, a single test is not enough to cover all the possibilities of behavior. The conditional statement might have the wrong operator – less than instead of less than or equal to. It might have the incorrect limit of 2 when it should be 20. Any single test cannot fully explore the combinations of behavior in that statement. We can have code coverage tell us that the line has been run and that our single test passed but we can still have several logic errors remaining. We can have 100% code coverage and still have missing tests.
Writing the wrong tests
Time for a short personal story about how my best attempt at TDD went spectacularly wrong. In a mobile application that calculated personal tax reports, there was a particular yes/no checkbox in the app to indicate whether you had a student loan or not, since this affects the tax you pay. It had six consequences in our application and I thoroughly TDD tested each one, carefully writing my tests first.
Sadly, I had misread the user story. I had inverted every single test. Where the checkbox should apply the relevant tax, it now did not apply it, and vice versa.
This was thankfully picked up by our QA engineer. Her only comment was that she could find absolutely no workaround in the system for this defect. We concluded that TDD had done an excellent job of making the code do what I wanted it to do but I had done a rather less excellent job of figuring out what that should be. At least it was a very quick fix and retest.
Beginning Wordz
Let’s apply these ideas to our Wordz application. We’re going to start with a class that will contain the core of our application logic, one that represents a word to guess and that can work out the score for a guess.
We begin by creating a unit test class and this immediately puts us into software design mode: what should we call the test? We’ll go with WordTest, as that outlines the area we want to cover – the word to be guessed.
Typical Java project structures are divided into packages. The production code lives under src/main/java and the test code is located under src/test/java. This structure describes how production and test code are equally important parts of the source code, while giving us a way to compile and deploy only the production code. We always ship test code with the production code when we are dealing with source code, but for deployed executables, we only omit the tests. We will also follow the basic Java package convention of having a unique name for our company or project at the top level. This helps avoid clashes with library code. We’ll call ours com.wordz, named after the application.
The next design step is to decide which behavior to drive out and test first. We always want a simple version of a happy path, something that will help drive out the normal logic that will most commonly execute. We can cover edge cases and error conditions later. To begin with, let’s write a test that will return the score for a single letter that is incorrect:
- Write the following code to begin our test:
public class WordTest {@Test
public void oneIncorrectLetter() {}
}
The name of the test gives us an overview of what the test is doing.
- To start our design, we decide to use a class called Word to represent our word. We also decide to supply the word to guess as a constructor parameter to our object instance of class Word we want to create. We code these design decisions into the test:
@Test
public void oneIncorrectLetter () {new Word("A");}
- We use autocomplete at this point to create a new Word class in its own file. Double-check in src/main folder tree and not src/test:

Figure 5.4 – Creating a class dialog
- Click OK to create the file in the source tree inside the right package.
- Now, we rename the Word constructor parameter:
public class Word {public Word(String correctWord) {// No Action
}
}
- Next, we return to the test. We capture the new object as a local variable so that we can test it:
@Test
public void oneIncorrectLetter () {var word = new Word("A");}
The next design step is to think of a way to pass a guess into the Word class and return a score.
- Passing the guess in is an easy decision – we’ll use a method that we’ll call guess(). We can code these decisions into the test:
@Test
public void oneIncorrectLetter () {var word = new Word("A");word.guess("Z");}
- Use autocomplete to add the guess() method to the Word class:
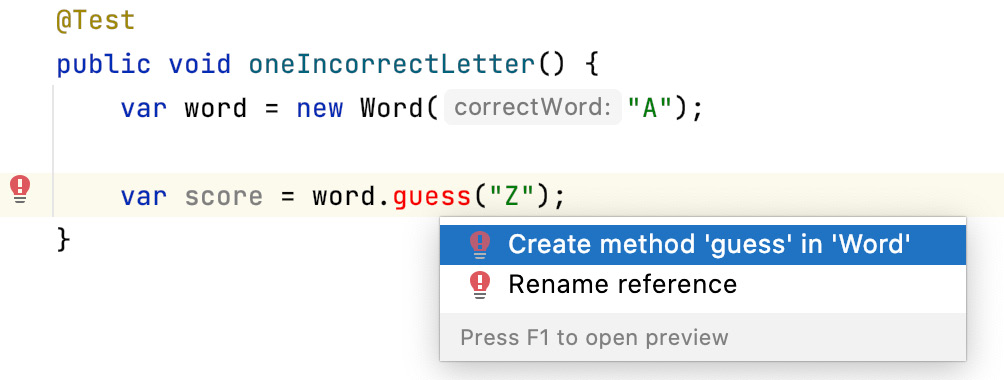
Figure 5.5 – Creating the Word class
- Click Enter to add the method, then change the parameter name to a descriptive name:
public void guess(String attempt) {}
- Next, let’s add a way to get the resulting score from that guess. Start with the test:
@Test
public void oneIncorrectLetter () {var word = new Word("A");var score = word.guess("Z");}
Then, we need a little think about what to return from the production code.
We probably want an object of some sort. This object must represent the score from that guess. Because our current user story is about the scores for a five-letter word and the details of each letter, we must return one of exactly right, right letter, wrong place, or letter not present.
There are several ways to do this and now is the time to stop and think about them. Here are some viable approaches:
- A class with five getters, each one returning an enum.
- A Java 17 record type with the same getters.
- A class with an iterator method, which iterates over five enum constants.
- A class with an iterator method that returns one interface for each letter score. The scoring code would implement a concrete class for each type of score. This would be a purely object-oriented way of adding a callback for each possible outcome.
- A class that iterated over results for each letter and you passed in a Java 8 lambda function for each of the outcomes. The correct one would be called as a callback for each letter.
That’s already a lot of design options. The key part of TDD is that we are considering this now before we write any production code. To help us decide, let’s sketch out what the calling code will look like. We need to consider plausible extensions to the code – will we need more or fewer than five letters in a word? Would the scoring rules ever change? Should we care about any of those things right now? Would the people reading this code in the future more easily grasp any one of these ideas than the others? TDD gives us fast feedback on our design decisions and that forces us to take a design workout right now.
One overriding decision is that we will not return the colors that each letter should have. That will be a UI code decision. For this core domain logic, we will return only the fact that the letter is correct, in the wrong position, or not present.
It’s easy enough with TDD to sketch out the calling code because it is the test code itself. After about 15 minutes of pondering what to do, here are the three design decisions we will use in this code:
- Supporting a variable number of letters in a word
- Representing the score using a simple enum of INCORRECT, PART_CORRECT, or CORRECT
- Accessing each score by its position in the word, zero-based
These decisions support the KISS principle, usually termed keep it simple, stupid. The decision to support a variable number of letters does make me wonder whether I’ve overstepped another principle – YAGNI – or you ain’t gonna need it. In this case, I’m convincing myself that it’s not too much of a speculative design and that the readability of the score object will make up for that. Let’s move on to the design:
- Capture these decisions in the test:
@Test
public void oneIncorrectLetter() {var word = new Word("A");var score = word.guess("Z");var result = score.letter(0);
assertThat(result).isEqualTo(Letter.INCORRECT);
}
We can see how this test has locked in those design decisions about how we will use our objects. It says nothing at all about how we will implement those methods internally. This is critical to effective TDD. We have also captured and documented all the design decisions in this test. Creating an executable specification such as this is an important benefit of TDD.
- Now, run this test. Watch it fail. This is a surprisingly important step.
We might think at first that we only ever want to see passing tests. This is not totally true. Part of the work in TDD is having confidence that your tests are working. Seeing a test fail when we know we have not written the code to make it pass yet gives us confidence that our test is probably checking the right things.
- Let’s make that test pass, by adding code to class Word:
public class Word {public Word(String correctWord) {// Not Implemented
}
public Score guess(String attempt) {var score = new Score();
return score;
}
}
- Next, create class Score:
public class Score {public Letter letter(int position) {return Letter.INCORRECT;
}
}
Again, we used IDE shortcuts to do most of the work in writing that code for us. The test passes:
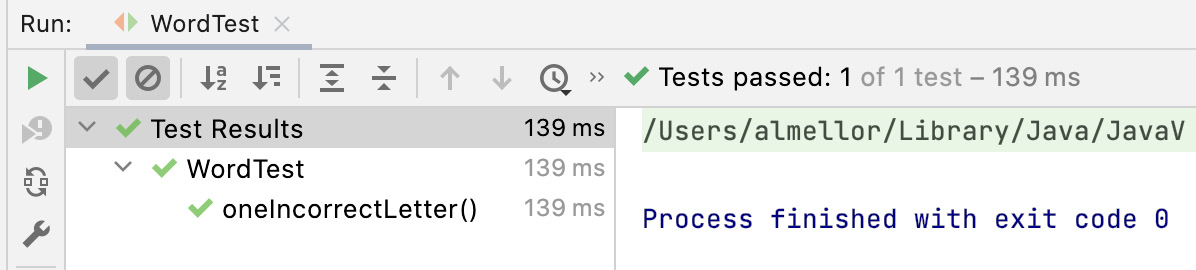
Figure 5.6 – A test passing in IntelliJ
We can see that the test passed and that it took 0.139 seconds to run. That certainly beats any manual test.
We also have a repeatable test, which we can run for the remainder of the project life cycle. The time saving compared to manual testing will add up every time we run the test suite.
You will notice that although the test passes, the code seems like it is cheating. The test only ever expects Letter.INCORRECT and the code is hardcoded to always return that. It clearly could never possibly work for any other values! This is expected at this stage. Our first test has set out a rough design for the interface of our code. It has not yet begun to drive out the full implementation. We will do that with our subsequent tests. This process is called triangulation, where we rely on adding tests to drive out the missing implementation details. By doing this, all our code is covered by tests. We get 100% meaningful code coverage for free. More importantly, it breaks our work down into smaller chunks, creates progress with frequent deliverables, and can lead to some interesting solutions.
Another thing to notice is that our one test led us to create two classes, covered by that one test. This is highly recommended. Remember that our unit test covers a behavior, not any specific implementation of that behavior.
Summary
We’ve taken our first steps into TDD and learned about the AAA structure of each test. We’ve seen how it is possible to design our software and write our test before our production code and get cleaner, more modular designs as a result. We learned what makes for a good test and learned some common techniques used to catch common programming errors and test code that throws exceptions.
It is important to understand the flow of using AAA sections inside our FIRST tests, as this gives us a template we can reliably follow. It is also important to understand the flow of design ideas, as used in the previous Wordz example. Writing our tests is literally taking the design decisions we make and capturing them in unit test code. This provides fast feedback on how clean our design is, as well as providing an executable specification for future readers of our code.
In the next chapter, we will add tests and drive out a complete implementation for our word-scoring object. We will see how TDD has a rhythm that drives work forward. We will use the Red, Green, Refactor approach to keep refining our code and keep both code and tests clean without overengineering them.
Questions and answers
- How do we know what test to write if we have no code to test?
We reframe this thinking. Tests help us design a small section of code upfront. We decide what interface we want for this code and then capture these decisions in the AAA steps of a unit test. We write just enough code to make the test compile, and then just enough to make the test run and fail. At this point, we have an executable specification for our code to guide us as we go on to write the production code.
- Must we stick to one test class per production class?
No, and this is a common misunderstanding when using unit tests. The goal of each test is to specify and run a behavior. This behavior will be implemented in some way using code – functions, classes, objects, library calls, and the like – but this test in no way constrains how the behavior is implemented. Some unit tests test only one function. Some have one test per public method per class. Others, like in our worked example, give rise to more than one class to satisfy the test.
- Do we always use the AAA structure?
It’s a useful recommendation to start out that way but we sometimes find that we can omit or collapse a step and improve the readability of a test. We might omit the Arrange step, if we had nothing to create for, say, a static method. We may collapse the Act step into the Assert step for a simple method call to make the test more readable. We can factor our common Arrange step code into a JUnit @BeforeEach annotate method.
- Are tests throwaway code?
No. They are treated with the same importance and care as production code. The test code is kept clean just as the production code is kept clean. The readability of our test code is paramount. We must be able to skim-read a test and quickly see why it exists and what it does. The test code is not deployed in production but that does not make it any less important.