4
Building an Application Using TDD
We’re going to learn the practical side of TDD by building the application test first. We are also going to use an approach known as agile software development as we build. Being agile means building our software in small, self-contained iterations instead of building it all at once. These small steps allow us to learn more about the software design as we go. We adapt and refine the design over time, as we become more certain of how a good design might look. We can offer working functionality to early test users and receive their feedback long before the application is complete. This is valuable. As we have seen in earlier chapters, TDD is an excellent approach for providing rapid feedback on self-contained pieces of software. It is the perfect complement to agile development.
To help us build in this way, this chapter will introduce the technique of user stories, which is a way of capturing requirements that fits an agile approach well. We will prepare our Java development environment ready for test-first development before describing what our application will do.
In this chapter, we’re going to cover the following topics:
- Introducing the Wordz application
- Exploring agile methods
Technical requirements
The final code for this chapter can be found at https://github.com/PacktPublishing/Test-Driven-Development-with-Java/tree/main/chapter04.
To code along – which I highly recommend – we need to set up our development environment first. This will use the excellent JetBrains IntelliJ Java Integrated Development Environment (IDE), a free-of-charge Java SDK from Amazon, and some libraries to help us with writing our tests and including the libraries in our Java project. We will assemble all our development tools in the next section.
Preparing our development environment
For this project, we will be using the following tools:
- IntelliJ IDEA IDE 2022.1.3 (Community Edition) or higher
- Amazon Corretto Java 17 JDK
- The JUnit 5 unit test framework
- The AssertJ fluent assertions framework
- The Gradle dependency management system
We will begin by installing our Java IDE, the JetBrains IntelliJ IDE Community Edition, before adding the rest of the tools.
Installing the IntelliJ IDE
To help us work with Java source code, we will use the JetBrains IntelliJ Java IDE, using its free-of-charge Community Edition. This is a popular IDE used in the software industry – and for good reason. It combines an excellent Java editor with auto-completion and code suggestions, together with a debugger, automated refactoring support, Git source control tools, and excellent integration for running tests.
To install IntelliJ, see the following steps:
- Go to https://www.jetbrains.com/idea/download/.
- Click on the tab for your operating system.
- Scroll down to the Community section.
- Follow the installation instructions for your operating system.
Once complete, the IntelliJ IDE should be installed on your computer. The next step is to create an empty Java project, using the Gradle package management system, and then set up whichever version of Java we wish to use. The installations for Mac, Windows, and Linux are usually straightforward.
Setting up the Java project and libraries
Once IntelliJ is installed, we can import the starter project provided in the accompanying GitHub repository. This will set up a Java project that uses the Amazon Corretto 17 Java Development Kit (JDK), the JUnit 5 unit test runner, the Gradle build management system, and the AssertJ fluent assertions library.
To do this, see the following steps:
- In your web browser, go to https://github.com/PacktPublishing/Test-Driven-Development-with-Java.
- Use your preferred git tool to clone the whole repository on your computer. If you use the git command-line tool, this will be as follows:
git clone https://github.com/PacktPublishing/Test-Driven-Development-with-Java.git
- Launch IntelliJ. You should see the welcome screen:

Figure 4.1 – IntelliJ welcome screen
- Click Open and then navigate to the chapter04 folder of the repository that we just cloned. Click to highlight it:
Figure 4.2 – Select the code folder

Figure 4.3 – IntelliJ workspace view
We now have the IDE set up with a skeleton project containing everything we need to make a start. In the next section, we will describe the main features of the application we are going to build, which we will start to do in the next chapter.
Introducing the Wordz application
In this section, we will describe the application that we are going to build at a high level, before going on to look at the agile process we will use to build it. The application is called Wordz and it is based on a popular word guessing game. Players try to guess a five-letter word. Points are scored based on how quickly a player guesses the word. The player gets feedback on each guess to steer them towards the right answer. We are going to build the server-side components of this application throughout the remainder of this book using various TDD techniques.
Describing the rules of Wordz
To play Wordz, a player will have up to six attempts to guess a five-letter word. After each attempt, letters in the word are highlighted as follows:
- The correct letter in the correct position has a black background
- The correct letter in the wrong position has a gray background
- Incorrect letters not present in the word have a white background
The player can use this feedback to make a better next guess. Once a player guesses the word correctly, they score some points. They get six points for a correct guess on the first attempt, five points for a correct guess on the second attempt, and one point for a correct guess on the sixth and final attempt. Players compete against each other in various rounds to gain the highest score. Wordz is a fun game as well as a gentle brain workout.
Whilst building a user interface is outside the scope of this book, it is very helpful to see a possible example:

Figure 4.4 – The Wordz game
Technically, we are going to create the backend web service component for this game. It will expose an Application Programming Interface (API) so that a user interface can use the service and will keep track of the game state in a database.
To focus on the techniques of TDD, we will leave certain things out of our scope, such as user authentication and the user interface. A production version would, of course, include these aspects. But to implement these features, we don’t need any new TDD techniques.
This simple design will allow us to fully explore TDD through all the layers of a typical web application.
Now that we’ve defined what we’re going to build, the next section will introduce the development approach we will use to build it.
Exploring agile methods
As we build Wordz, we are going to use an iterative approach, where we build the application as a series of features that our users can work with. This is known as agile development. It is effective as it allows us to ship features to users earlier and on a regular schedule. It allows us as developers to learn more about the problems we are solving and how a good software design looks as we go. This section will compare the benefits of agile development to waterfall approaches, then introduce an agile requirements gathering tool called user stories.
The predecessor to agile is called waterfall development. It is called this because the project stages flow as a waterfall does, each one is fully completed before the next one is begun.
In a waterfall project, we split development into sequential stages:
- Collecting requirements
- Performing an analysis of requirements
- Creating a complete software design
- Writing all the code
- Testing the code
In theory, every stage is perfectly executed, everything works, and there are no problems. In reality, there are always problems.
We discover certain requirements we had missed. We find that the design documents cannot be coded exactly as they were written. We find missing parts of the design. The coding itself can run into difficulties. The worst part is that the end user never sees any working software until the very end. If what they see is not what they had in mind, we have a very expensive set of changes and reworking to do.
The reason for this is that humans have limited foresight. Try as we might, we cannot predict the future with any accuracy. I can sit here with a hot cup of coffee and know accurately that it will go cold in twenty minutes. But I can’t tell you what the weather will be three months from now. Our ability to predict the future is limited to short time frames, for processes with clear-cut causes and effects.
Waterfall development performs very poorly in the face of uncertainty and change. It is designed around the notion that all things can be known and planned in advance. A better approach is to embrace change and uncertainty, making it an active part of the development process. This is the basis of agile development. At its core lies an iterative approach, where we take one small feature that our users care about, then build that feature completely, allowing our users to try it out. If changes are needed, we do another iteration of development. The costs of change are much lower when our development process actively supports change.
Professional agile development processes rely on maintaining one single code base that is always tested and represents the best version to date of our software. This code is always ready to deploy to users. We grow this code base one feature at a time, continuously improving its design as we go.
Techniques such as TDD play a major role in this, by ensuring our code is well designed and thoroughly tested. Every time we commit code to the main trunk, we already know it has passed many TDD tests. We know we are happy with its design.
To better support iterative development, we choose an iterative technique for capturing requirements. This technique is called user stories, which we will describe in the next section.
Reading user stories – the building block of planning
As development is iterative and embraces refactoring and reworking, it makes sense that the old methods of specifying requirements won’t work. We are no longer served by thousands of pages of requirements set in stone up front. We are better served by taking one requirement at a time, building it, and learning from it. Over time, we can prioritize the features users want and learn more about how a good design will look.
Through agile techniques, we do not have to know the future in advance; we can discover it alongside our users.
Supporting this change is a new way to express requirements. Waterfall projects start with a complete requirements document, detailing every feature formally. The complete set of requirements – often thousands of them – were expressed in formal language such as “The system shall…” and then the details were explained in terms of changes to the software system. With agile development, we don’t want to capture requirements in that way. We want to capture them following two key principles:
- Requirements are presented one at a time in isolation
- We emphasize the value to the user, not the technical impact on the system
The technique for doing this is called the user story. The first user story to tackle for Wordz looks as follows:
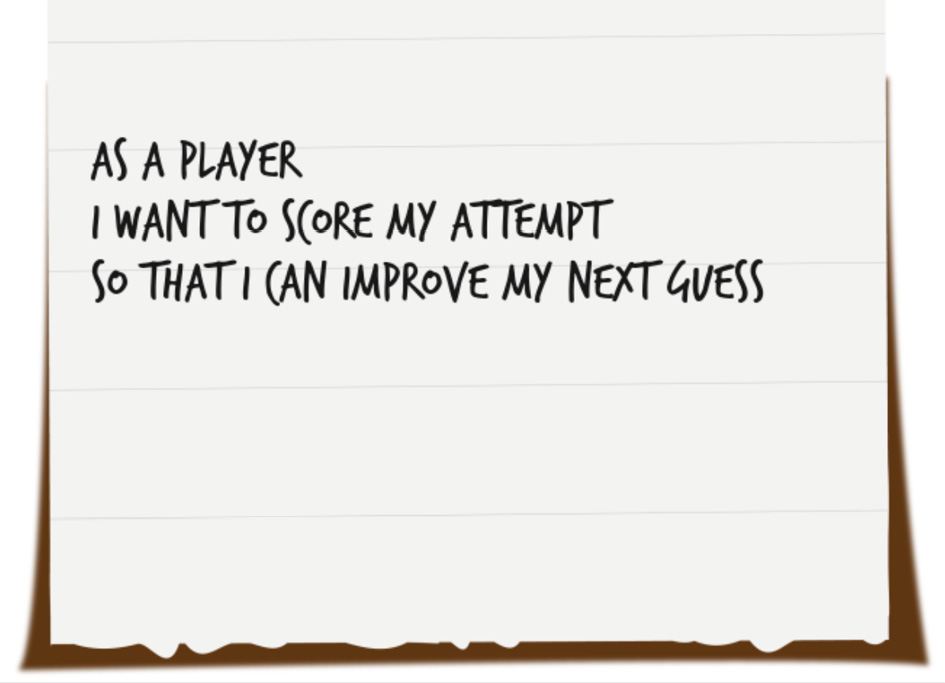
Figure 4.5 – The user story
The format of a user story is always the same – it comprises three sections:
- As a [person or machine that uses the software], …
- I want [a specific outcome from that software] …
- … so that [a task that is important is achieved].
The three sections are written this way to emphasize that agile development centers around value delivered to the users of the system. These are not technical requirements. They do not (indeed, must not) specify a solution. They simply state which user of the system should get what valuable outcome out of it.
The first part always starts with “As a ….” It then names the user role that this story will improve. This can be any user – whether human or machine – of the system. The one thing it must never be is the system itself, as in, “As a system.” This is to enforce clear thinking in our user stories; they must always deliver some benefit to some user of the system. They are never an end in themselves.
To give an example from a photo-taking app, as developers, we might want a technical activity to optimize photo storage. We might write a story such as, “As a system, I want to compact my image data to optimize storage.” Instead of writing from a technical viewpoint, we can reframe this to highlight the benefit to the user: “As a photographer, I want fast access to my stored photographs and to maximize space for new ones.”
The “I want…” section describes the desired outcome the user wants. It is always described in user terminology, not technical terminology. Again, this helps us focus on what our users want our software to achieve for them. It is the purest form of capturing the requirements. There is no attempt made at this stage to suggest how anything will be implemented. We simply capture what it is that the user sets out to do.
The final part, “…so that…”, provides context. The “As a …” section describes who benefits, the “I want…” section describes how they benefit, and the “…so that…” section describes why they need this feature. This forms the justification for the time and costs required for developing this feature. It can be used to prioritize which features to develop next.
This user story is where we start development. The heart of the Wordz application is its ability to evaluate and score the player’s current guess at a word. It’s worth looking at how this work will proceed.
Combining agile development with TDD
TDD is a perfect complement to agile development. As we learned in earlier chapters, TDD helps us improve our design and prove that our logic is correct. Everything we do is aimed at delivering working software to our users, without defects, as quickly as possible. TDD is a great way to achieve this.
The workflow we will use is typical for an agile TDD project:
- Pick a user story prioritized for impact.
- Think a little about the design to aim for.
- Use TDD to write the application logic in the core.
- Use TDD to write code to connect the core to a database.
- Use TDD to write code to connect to an API endpoint.
This process repeats. It forms the rhythm of writing the core application logic under a unit test, then growing the application outward, connecting it to API endpoints, user interfaces, databases, and external web services. Working this way, we retain a lot of flexibility within our code. We can also work quickly, concentrating upfront on the most important parts of our application code.
Summary
We’ve learned the key ideas that let us build an application iteratively, getting value at each step and avoiding a big design up front approach that often disappoints. We can read user stories, which will drive building our TDD application in small, well-defined steps. We now also know the process we will use to build our application – using TDD to get a thoroughly tested, central core of clean code, and then drive out connections to the real world.
In the next chapter, we’ll make a start on our application. We will learn the three key components of every TDD test by writing our first test and making sure it passes.
Questions and answers
- Waterfall development sounds as though it should work well – why doesn’t it?
Waterfall development would work well if we knew about every missing requirement, every change request from the users, every bad design decision, and every coding error at the start of the project. But humans have limited foresight, and it is impossible to know these things in advance. So, waterfall projects never work smoothly. Expensive changes crop up at a later stage of the project – just when you don’t have the time to address them.
- Can we do agile development without TDD?
Yes, although that way, we miss out on the advantages of TDD that we’ve covered in previous chapters. We also make our job harder. An important part of Agile development is always demonstrating the latest working code. Without TDD, we need to add a large manual test cycle into our process. This slows us down significantly.
Further reading
- Mastering React Test-Driven Development, ISBN 9781789133417
If you would like to build a user interface for the Wordz application, using the popular React web UI framework is an excellent way to do it. This Packt book is one of my personal favorites. It shows how to apply the same kind of TDD techniques we are using server-side into frontend work. It also explains React development from the ground up in a highly readable way.
- Agile Model-Based Systems Engineering Cookbook, ISBN 9781838985837
This book provides further details on how to craft effective user stories and other useful techniques for capturing agile requirements, modeling, and analysis.