
10
FIRST Tests and the Test Pyramid
So far in this book, we’ve seen the value of writing unit tests that run quickly and give repeatable results. Called FIRST tests, these provide rapid feedback on our design. They are the gold standard of unit tests. We’ve also seen how the hexagonal architecture helps us design our code in a way that gets the maximum amount covered by FIRST unit tests. But we’ve also limited ourselves to testing only our domain model – the core of our application logic. We simply have no tests covering how our domain model behaves once it connects to the outside world.
In this chapter, we will cover all the other kinds of tests that we need. We will introduce the test pyramid, which is a way of thinking about the different kinds of tests needed, and how many of each we should have. We’ll discuss what each kind of test covers and useful techniques and tools to help. We’ll also bring the whole system together by introducing CI/CD pipelines and test environments, outlining the critical role they play in combining code components to create a system for our end users.
In this chapter, we’re going to cover the following main topics:
- The test pyramid
- Unit tests – FIRST tests
- Integration tests
- End-to-end and user acceptance tests
- CI/CD pipelines and test environments
- Wordz – integration test for our database
Technical requirements
The code for this chapter can be found at https://github.com/PacktPublishing/Test-Driven-Development-with-Java/tree/main/chapter10.
To run this code, we will need to install the open source Postgres database locally.
To install Postgres, do the following:
- Go to https://www.postgresql.org/download/ in your browser.
- Click on the correct installer for your operating system:

Figure 10.1 – Postgres installer selection
- Follow the instructions for your operating system.
The test pyramid
A very useful way of thinking about different kinds of tests is by using the test pyramid. It is a simple graphical representation of the different kinds of tests we need around our code and the relative numbers of each. This section introduces the key ideas behind the test pyramid.
The test pyramid in graphic form looks as follows:

Figure 10.2 – The test pyramid
We can see from the previous graphic that tests are divided into four layers. We have unit tests at the bottom. Integration tests are layered on top of those. The pyramid is completed by end-to-end and user acceptance tests at the top. The graphic shows unit tests in our system are the highest in number, with fewer integration tests and the least number of acceptance tests.
Some of these kinds of tests are new to this book. Let’s define what they are:
- Unit tests
These are familiar. They are the FIRST tests we have been using up until now. One defining feature of these tests is that they do not require the presence of any external systems, such as databases or payment processors.
- Integration tests
These tests verify that a software component is correctly integrated with an external system, such as a database. These tests are slow and critically dependent on the external environment being available and correctly set up for our test.
- End-to-end tests
These are the broadest of all tests. An end-to-end test represents something very close to the end user experience. This test is performed against all the real components of the system – possibly in test environments with test data – using the same commands as a real user would use.
- User acceptance tests
This is where the real system is tested as a user would use it. Here, we can confirm that the final system is fit for purpose, according to the requirements the user has given us.
It’s not obvious at first why having fewer tests of any kind would be an advantage. After all, everything up until now in this book has positively praised the value of testing. Why do we not simply have all the tests? The answer is a pragmatic one: not all tests are created equal. They don’t all offer equal value to us as developers.
The reason for the shape of this pyramid is to reflect the practical value of each layer of testing. Unit tests written as FIRST tests are fast and repeatable. If we could build a system out of only these unit tests, we surely would. But unit tests do not exercise every part of our code base. Specifically, they do not exercise connections from our code to the outside world. Nor do they exercise our application in the same way as a user would use it. As we progress up through the layers of testing, we move away from testing the internal components of our software and move toward testing how it interacts with external systems and, ultimately, the end user of our application.
The test pyramid is about balance. It aims to create layers of tests that achieve the following:
- Run as quickly as possible
- Cover as much code as possible
- Prevent as many defects as possible
- Minimize duplication of the test effort
In the following sections, we will look at a breakdown of the tests involved at each layer of the test pyramid. We’ll consider the strengths and weaknesses of each kind of test, allowing us to understand what the test pyramid is guiding us toward.
Unit tests – FIRST tests
In this section, we’re going to look at the base of the test pyramid, which consists of unit tests. We’ll examine why this layer is critical to success.
By now, we’re very familiar with FIRST unit tests. The preceding chapters have covered these in detail. They are the gold standard of unit tests. They are fast to run. They are repeatable and reliable. They run isolated from each other, so we can run one, or run many and run them in any order we choose. FIRST tests are the powerhouses of TDD, enabling us to work with a rapid feedback loop as we code. Ideally, all our code would fall under this feedback loop. It provides a fast, efficient way to work. At every step, we can execute code and prove to ourselves that it is working as we intended. As a helpful byproduct, by writing tests that exercise each possible desirable behavior in our code, we will end up exercising every possible code path. We will get 100% meaningful test coverage of code under unit tests when we work in this way.
Because of their advantages, unit tests form the bedrock of our testing strategy. They are represented as the base of the test pyramid.
Unit tests have advantages and limitations, as summarized in the following table:
|
Advantages |
Limitations |
|
These are the fastest-running tests and provide the fastest possible feedback loop for our code. |
The smaller scope of these tests means that having all unit tests pass is no guarantee that the system as a whole is working correctly. |
|
Stable and repeatable, having no dependencies on things outside of our control. |
They can be written with too strong a tie to implementation details, making future additions and refactoring difficult. |
|
Can provide very detailed coverage of a specific set of logic. Locate defects accurately. |
Not helpful for testing interactions with external systems. |
Table 10.1 – Unit test advantages and disadvantages
In any system, we expect to have the largest number of tests at the unit level. The test pyramid represents this graphically.
We can’t achieve full coverage by using unit tests alone in the real world but we can improve our situation. By applying the hexagonal architecture to our application, we can get the majority of code under unit tests. Our fast-running unit tests can cover a lot of ground like this and provide a lot of confidence in our application logic. We can get as far as knowing that if the external systems behave as we expect them to, our domain layer code will be able to correctly handle every use case we have thought about.
The test position when using unit tests alone is shown in the following diagram:

Figure 10.3 – Unit tests cover the domain model
Unit tests only test components of our domain model. They do not test external systems, nor do they use external systems. They rely on test doubles to simulate our external systems for us. This gives us advantages in development cycle speed but has the drawback that our connections to those external systems remain untested. If we have a piece of unit-tested code that accesses a repository interface, we know that its logic works with a stub repository. Its internal logic will even have 100% test coverage and this will be valid. But we won’t know if it will work with the real repository yet.
The adapter layer code is responsible for those connections, and it is not tested at the unit test level. To test this layer, we’re going to need a different approach to testing. We will need to test what happens when our domain layer code is integrated with actual external systems.
The next section looks at how we test these external systems adapters using a kind of testing known as integration tests.
Integration tests
In this section, we’re going to look at the next layer up in the test pyramid: integration testing. We’ll see why it’s important, review helpful tools, and understand the role of integration testing in the overall scheme of things.
Integration tests exist to test that our code will successfully integrate with external systems. Our core application logic is tested by unit tests, which, by design, do not interact with external systems. This means that we need to test behavior with those external systems at some point.
Integration tests are the second layer up in the test pyramid. They have advantages and limitations, as summarized in the following table:
|
Advantages |
Limitations |
|
Test that software components interact correctly when connected |
Require test environments to be set up and maintained |
|
Provide a closer simulation of the software system as it will be used live |
Tests run more slowly than unit tests |
|
Susceptible to problems in the test environment, such as incorrect data or network connection failures |
Table 10.2 – Integration test advantages and disadvantages
There should be fewer integration tests than unit tests. Ideally, far fewer. While unit tests avoided many problems of testing external systems by using test doubles, integration tests must now face those challenges. By nature, they are more difficult to set up. They can be less repeatable. They generally run more slowly than unit tests do, as they wait for responses from external systems.
To give a sense of this, a typical system might have thousands of unit tests and hundreds of acceptance tests. In between, we have several integration tests. Many integration tests point to a design opportunity. We can refactor the code so that our integration test is pushed down to being a unit test or promoted to being an acceptance test.
Another reason to have fewer integration tests is due to flaky tests. A flaky test is a nickname given to a test that sometimes passes and sometimes fails. When it fails, it is due to some problem interacting with the external system and not a defect in the code we are testing. Such a failure is called a false negative test result – a result that can mislead us.
Flaky tests are a nuisance precisely because we cannot immediately tell the root cause of the failure. Without diving into error logs, we only know that the test failed. This leads to developers learning to ignore these failed tests, often choosing to re-run the test suite several times until the flaky test passes. The problem here is that we are training developers to have less faith in their tests. We are training them to ignore test failures. This is not a good place to be.
What should an integration test cover?
In our design so far, we have decoupled external systems from our domain code using the Dependency Inversion Principle. We have created an interface defining how we use that external system. There will be some implementation of this interface, which is what our integration test will be covering. In hexagonal architecture terms, this is an adapter.
This adapter should only contain the minimum amount of code necessary to interact with the external system in a way that satisfies our interface. It should have no application logic in it at all. That should be inside the domain layer and covered by unit tests. We call this a thin adapter, doing only enough work to adapt to the external system. This means our integration test is nicely limited in scope.
We can represent the scope of an integration test like so:

Figure 10.4 – Integration tests cover the adapter layer
Integration tests only test the adapter layer components, those pieces of code that directly interact with external systems, such as databases and web endpoints. The integration test will create an instance of the adapter under test and arrange for it to connect to a version of the external service. This is important. We’re still not connecting to the production services yet. Until the integration test passes, we’re not sure that our adapter code works correctly. So, we don’t want to access real services just yet. We also want to have that extra level of control over these services. We want to be able to safely and easily create test accounts and fake data to use with our adapter. That means we need a collection of live-like services and databases to use. That means they have to live and run somewhere.
Test environments are the name given to the arrangement of external systems we use in integration tests. It is an environment for running web services and data sources, specifically for testing.
A test environment enables our code to connect to test versions of real external systems. It’s one step closer to production readiness, compared to the unit test level. There are some challenges involved in using test environments, however. Let’s look into the good practices for testing integrations with databases and web services.
Testing database adapters
The basic approach to testing a database adapter is to set up a database server in the test environment and get the code under test to connect to it. The integration test will preload a known dataset into the database as part of its Arrange step. The test then runs the code that interacts with the database in the Act step. The Assert step can inspect the database to see if expected database changes happened.
The biggest challenge in testing a database is that it remembers data. Now, this might seem a little obvious, as that is the entire point of using a database in the first place. But it conflicts with one of the goals of testing: to have isolated, repeatable tests. As an example, if our test created a new user account for user testuser1 and that was stored in the database, we would have a problem running that test again. It would not be able to create testuser1 and instead would receive a user already exists error.
There are different approaches to overcoming this problem, each with trade-offs:
- Delete all data from the database before and after each test case
This approach preserves the isolation of our tests, but it is slow. We have to recreate the test database schema before every test.
- Delete all data before and after the full set of adapter tests run
We delete data less often, allowing several related tests to run against the same database. This loses test isolation due to the stored data, as the database will not be in the state expected at the start of the next test. We have to run tests in a particular order, and they must all pass, to avoid spoiling the database state for the next test. This is not a good approach.
- Use randomized data
Instead of creating testuser1 in our test, we randomize names. So, on one run, we might get testuser-cfee-0a9b-931f. On the next run, the randomly chosen username would be something else. The state stored in the database will not conflict with another run of the same test. This is another way to preserve test isolation. However, it does mean that tests can be harder to read. It requires periodic cleanup of the test database.
- Rollback transactions
We can add data required by our tests inside a database transaction. We can roll back the transaction at the end of the test.
- Ignore the problem
Sometimes, if we work with read-only databases, we can add test data that will never be accessed by the production code and leave it there. If this works, it is an attractive option requiring no extra effort.
Tools such as database-rider, available from https://database-rider.github.io/getting-started/, assist by providing library code to connect to databases and initialize them with test data.
Testing web services
A similar approach is used to test the integration with web services. A test version of the web service is set to run in the test environment. The adapter code is set to connect to this test version of the web service, instead of the real version. Our integration test can then examine how the adapter code behaves. There might be additional web APIs on the test service to allow inspection by the assertions in our test.
Again, the disadvantages are a slower running test and the risk of flaky tests due to issues as trivial as network congestion.
Sandbox APIs
Sometimes, hosting our own local service might be impossible, or at least undesirable. Third-party vendors are usually unwilling to release test versions of their service for us to use in our test environment. Instead, they typically offer a sandbox API. This is a version of their service that the third party hosts, not us. It is disconnected from their production systems. This sandbox allows us to create test accounts and test data, safe from affecting anything real in production. It will respond to our requests as their production versions will respond, but without taking any action such as taking payment. Consider them test simulators for real services.
Consumer-driven contract testing
A useful approach to testing interactions with web services is called consumer-driven contract testing. We consider our code as having a contract with the external service. We agree to call certain API functions on the external service, supplying data in the form required. We need the external service to respond to us predictably, with data in a known format and well-understood status codes. This forms a contract between the two parties – our code and the external service API.
Consumer-driven contract testing involves two components, based on that contract, often using code generated by tools. This is represented in the following figure:
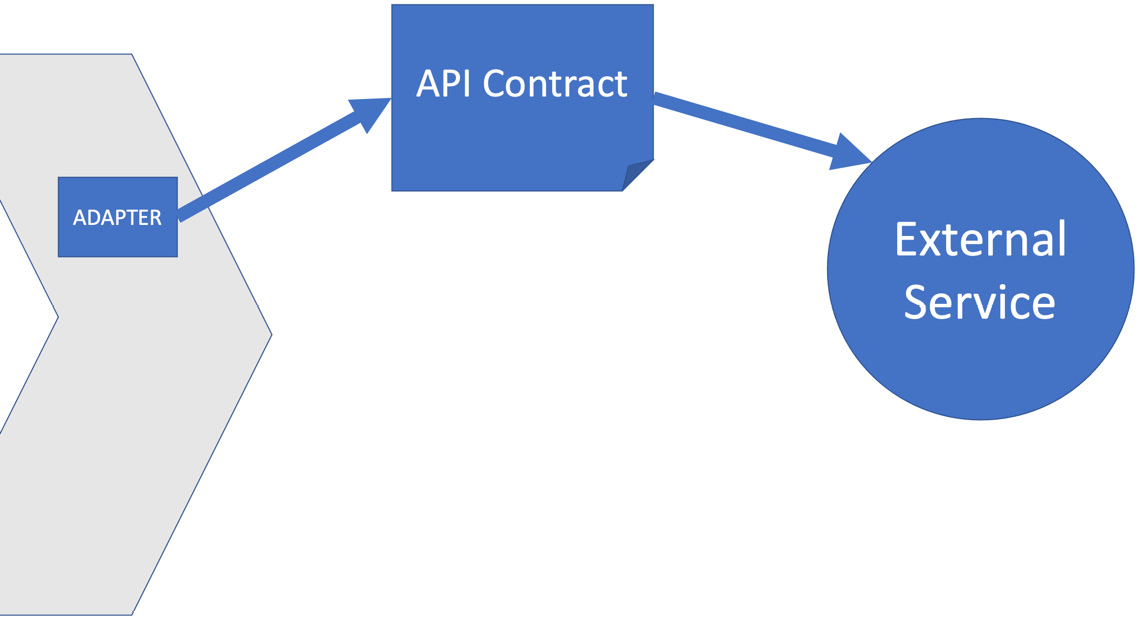
Figure 10.5 – Consumer-driven contract testing
The preceding diagram shows that we’ve captured the expected interactions with an external service as an API contract. Our adapter for that service will be coded to implement that API contract. When using consumer-driven contract testing, we end up with two tests, which test either side of that contract. If we consider a service to be a black box, we have a public interface presented by the black box, and an implementation, whose details are hidden inside that black box. A contract test is two tests. One test confirms that the outside interface is compatible with our code. The other test confirms that the implementation of that interface works and gives the expected results.
A typical contract test will need two pieces of code:
- A stub of the external service: A stub of the external service is generated. If we are calling a payment processor, this stub simulates the payment processor locally. This allows us to use it as a test double for the payment processor service as we write our adapter code. We can write an integration test against our adapter, configuring it to call this stub. This allows us to test our adapter code logic without accessing the external system. We can verify that the adapter sends the correct API calls to that external service and handles the expected responses correctly.
- A replay of a set of calls to the real external service: The contract also allows us to run tests against the real external service – possibly in sandbox mode. We’re not testing the functionality of the external service here – we assume that the service provider has done that. Instead, we are verifying that what we believe about its API is true. Our adapter has been coded to make certain API calls in certain orders. This test verifies that this assumption is correct. If the test passes, we know that our understanding of the external service API was correct and also that it has not changed. If this test was previously working but now fails, that would be an early indication that the external service has changed its API. We would then need to update our adapter code to follow that.
One recommended tool for doing this is called Pact, available at https://docs.pact.io. Read the guides there for more details on this interesting technique.
We’ve seen that integration tests get us one step nearer to production. In the next section, we look at the final level of testing in the test pyramid, which is the most live-like so far: user acceptance tests.
End-to-end and user acceptance tests
In this section, we will progress to the top of the test pyramid. We’ll review what end-to-end and user acceptance tests are and what they add to unit and integration testing.
At the top of the test pyramid lies two similar kinds of tests called end-to-end tests and user acceptance tests. Technically, they are the same kind of test. In each case, we start up the software fully configured to run in its most live-like test environment, or possibly in production. The idea is that the system is tested as a whole from one end to the other.
One specific use of an end-to-end test is for user acceptance testing (UAT). Here, several key end-to-end test scenarios are run. If they all pass, the software is declared fit for purpose and accepted by the users. This is often a contractual stage in commercial development, where the buyer of the software formally agrees that the development contract has been satisfied. It’s still end-to-end testing that is being used to determine that, with cherry-picked test cases.
These tests have advantages and limitations, as summarized in the following table:
|
Advantages |
Limitations |
|
Most comprehensive testing of functionality available. We are testing at the same level that a user of our system – either person or machine – would experience our system. |
Slowest tests to run. |
|
Tests at this level are concerned with pure behavior as observed from outside the system. We could refactor and rearchitect large parts of the system and still have these tests protect us. |
Reliability issues – many problems in the setup and environment of our system can cause false negative test failures. This is termed “brittleness” – our tests are highly dependent on their environment working correctly. Environments can be broken due to circumstances beyond our control. |
|
Contractually important – these tests are the essence of what the end user cares about. |
These are the most challenging of all the tests to write, due to the extensive environment setup requirements. |
Table 10.3 – End-to-end test advantages and disadvantages
Acceptance tests having a spot at the top of the pyramid is a reflection that we don’t need many of them. The majority of our code should now be covered by unit and integration tests, assuring us that our application logic works, as well as our connections to external systems.
The obvious question is what’s left to test? We don’t want to duplicate testing that has already been done at the unit and integration levels. But we do need some way to validate that the software as a whole is going to work as expected. This is the job of end-to-end testing. This is where we configure our software so that it connects to real databases and real external services. Our production code has passed all the unit tests with test doubles. These test passes suggest our code should work when we connect these real external services. But should is a wonderful weasel word in software development. Now, is the time to verify that it does, using an end-to-end test. We can represent the coverage of these tests using the following diagram:
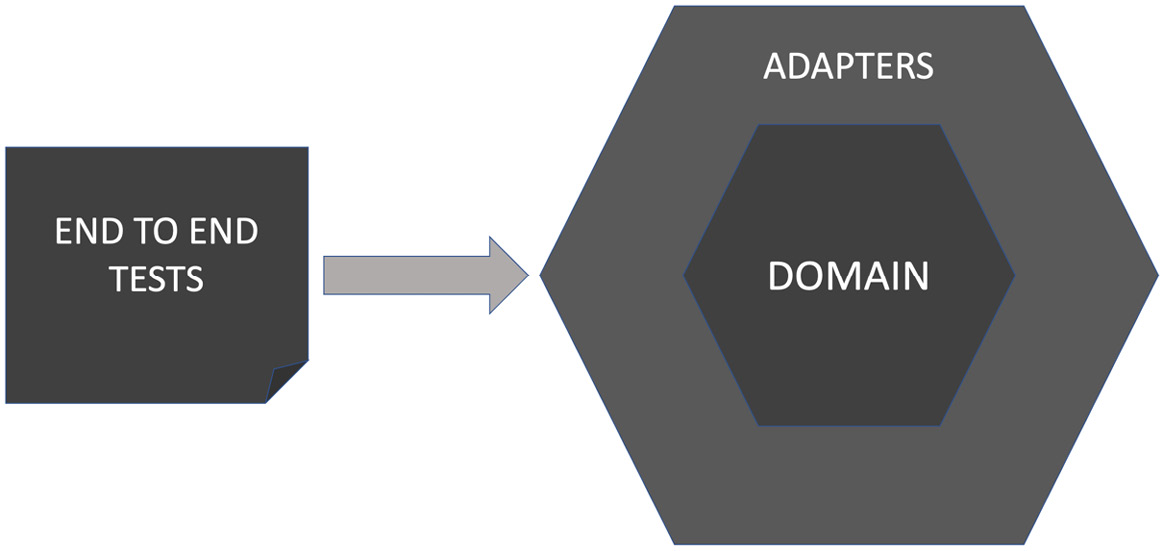
Figure 10.6 – End-to-end/user acceptance tests cover the entire code base
End-to-end tests cover the entire code base, both the domain model and the adapter layer. As such, it repeats testing work already done by unit and integration tests. The main technical aspect we want to test in end-to-end testing is that our software is configured and wired up correctly. Throughout this book, we have used dependency inversion and injection to isolate us from external systems. We’ve created test doubles and injected those. Now, we must create actual production code, the real adapter layer components that connect to the production systems. We inject those into our system during its initialization and configuration. This sets the code up to work for real.
End-to-end tests will then duplicate a small amount of happy path testing already covered by unit and integration tests. The purpose here is not to verify the behaviors that we have already tested. Instead, these tests verify that we have injected the correct production objects, by confirming that the system as a whole behaves correctly when connected to production services.
A user acceptance test builds on this idea by running through key test scenarios considered critical to accepting the software as complete. These will be end-to-end tests at a technical level. But their purpose is broader than the technical goal of ensuring our system is correctly configured. They are more of a legal contractual nature: Have we built what was asked of us? By using the iterative approach in this book together with its technical practices, there’s a higher chance that we will have done so.
Acceptance testing tools
Various testing libraries exist to help us write automated acceptance and end-to-end tests. Tasks such as connecting to a database or calling an HTTP web API are common to this kind of testing. We can leverage libraries for these tasks, instead of writing code ourselves.
The main differentiator among these tools is the way they interact with our software. Some are intended to simulate a user clicking a desktop GUI, or a browser-based web UI. Others will make HTTP calls to our software, exercising a web endpoint.
Here are a few popular acceptance testing tools to consider:
- RestEasy
A popular tool for testing REST APIs: https://resteasy.dev/
- RestAssured
Another popular tool for testing REST APIs that takes a fluent approach to inspecting JSON responses: https://rest-assured.io/
- Selenium
A popular tool for testing web UIs through the browser: https://www.selenium.dev/
- Cucumber
Available from https://cucumber.io/. Cucumber allows English language-like descriptions of tests to be written by domain experts. At least, that’s the theory. I’ve never seen anybody other than a developer write Cucumber tests in any project I’ve been part of.
Acceptance tests form the final piece of the test pyramid and allow our application to be tested under conditions that resemble the production environment. All that is needed is a way to automate running all those layers of testing. That’s where CI/CD pipelines come in, and they are the subject of the next section.
CI/CD pipelines and test environments
CI/CD pipelines and test environments are an important part of software engineering. They are a part of the development workflow that takes us from writing code to having systems in the hands of users. In this section, we’re going to look at what the terms mean and how we can use these ideas in our projects.
What is a CI/CD pipeline?
Let’s start with defining the terms:
- CI stands for continuous integration
Integration is where we take individual software components and join them together to make a whole. CI means we do this all the time as we write new code.
- CD stands for either continuous delivery or continuous deployment
We’ll cover the difference later, but in both cases, the idea is that we are taking the latest and greatest version of our integrated software and delivering it to a stakeholder. The goal of continuous delivery is that we could – if we wanted to – deploy every single code change to production with a single click of a button.
It’s important to note that CI/CD is an engineering discipline – not a set of tools. However we achieve it, CI/CD has the goal of growing a single system that is always in a usable state.
Why do we need continuous integration?
In terms of the test pyramid, the reason we need CI/CD is to pull all the testing together. We need a mechanism to build the whole of our software, using the latest code. We need to run all the tests and ensure they all pass before we can package and deploy the code. If any tests fail, we know the code is not suitable for deployment. To ensure we get fast feedback, we must run the tests in order of fastest to slowest. Our CI pipeline will run unit tests first, followed by integration tests, followed by end-to-end and acceptance tests. If any tests fail, the build will produce a report of test failures for that stage, then stop the build. If all the tests pass, we package our code up ready for deployment.
More generally, the idea of integration is fundamental to building software, whether we work alone or in a development team. When working alone, following the practices in this book, we’re building software out of several building blocks. Some we have made ourselves, while for others, we’ve selected a suitable library component and used that. We’ve also written adapters – components that allow us to access external systems. All of that needs integrating – bringing together as a whole – to turn our lines of code into a working system.
When working in a team, integration is even more important. We need to not only bring together the pieces we have written but also all the other pieces written by the rest of our team. Integrating work in progress from colleagues is urgent. We end up building on what others have already written. As we work outside of the main integrated code base, there is a risk of not including the latest design decisions and pieces of reusable code.
The following figure shows the goal of CI:
Figure 10.7 – Continuous integration
The motivation behind CI was to avoid the classic waterfall development trap, where a team wrote code as isolated individuals while following a plan and only integrated it at the end. Many times, that integration failed to produce working software. There was often some misunderstanding or missing piece that meant components did not fit together. At this late stage of a waterfall project, mistakes are expensive to fix.
It’s not just big teams and big projects that suffer from this. My turning point was while writing a flight simulator game for Britain’s RAF Red Arrows display team. Two of us worked on that game to a common API we had agreed on. When we first attempted to integrate our parts – at 03:00 A.M., in front of the company managing director, of course – the game ran for about three frames and then crashed. Oops! Our lack of CI provided an embarrassing lesson. It would have been good to know that was going to happen a lot earlier, especially without the managing director watching.
Why do we need continuous delivery?
If CI is all about keeping our software components together as an ever-growing whole, then CD is about getting that whole into the hands of people who care about it. The following figure illustrates CD:

Figure 10.8 – Continuous delivery
Delivering a stream of value to end users is a core tenet of agile development. No matter which flavor of agile methodology you use, getting features into the hands of users has always been the goal. We want to deliver usable features at regular, short intervals. Doing this provides three benefits:
- Users get the value they want
End users don’t care about our development process. They only care about getting solutions to their problems. Whether that’s the problem of being entertained while waiting for an Uber ride, or the problem of paying everyone’s wages in a multinational business, our user just wants their problem gone. Getting valuable features to our users becomes a competitive advantage.
- We gain valuable user feedback
Yes, that’s what I asked for – but it isn’t what I meant! That is extremely valuable user feedback that agile approaches deliver. Once an end user sees the feature as we have implemented it, sometimes, it becomes clear that it isn’t quite solving their problem. We can correct this quickly.
- Aligns the code base and development team
To pull off this feat, you do need to have your team and workflows together. You can’t effectively do this unless your workflow results in known working software being continuously available as a single whole.
Continuous delivery or continuous deployment?
Exact definitions of these terms seem to vary, but we can think of them like this:
- Continuous delivery
We deliver software to internal stakeholders, such as product owners and QA engineers
- Continuous deployment
We deliver software into production and to end users
Out of the two, continuous deployment sets a much higher bar. It requires that once we integrate code into our pipeline, that code is ready to go live – into production, to real users. This is, of course, hard. It needs top-class test automation to give us confidence that our code is ready to deploy. It also benefits from having a fast rollback system in production – some means of quickly reverting a deployment if we discover a defect not covered by our tests. Continuous deployment is the ultimate workflow. For all who achieve it, deploying new code last thing on Friday simply holds no fear. Well, maybe a little less fear.
Practical CI/CD pipelines
Most projects use a CI tool to handle the sequencing chores. Popular tools are provided by Jenkins, GitLab, CircleCI, Travis CI, and Azure DevOps. They all work similarly, executing separate build stages sequentially. That’s where the name pipeline comes from – it resembles a pipe being loaded at one end with the next build stage and coming out of the other end of the pipe, as shown in the following diagram:

Figure 10.9 – Stages in a CI pipeline
A CI pipeline comprises the following steps:
- Source control: Having a common location in which to store the code is essential to CI/CD. It is the place where code gets integrated. The pipeline starts here, by pulling down the latest version of the source code and performing a clean build. This prevents errors caused by older versions of code being present on the computer.
- Build: In this step, we run a build script to download all the required libraries, compile all the code, and link it together. The output is something that can be executed, typically a single Java archive .jar file, to run on the JVM.
- Static code analysis: Linters and other analysis tools check the source code for stylistic violations, such as variable length and naming conventions. The development team can choose to fail the build when specific code issues are detected by static analysis.
- Unit tests: All the unit tests are run against the built code. If any fail, the pipeline stops. Test failure messages are reported.
- Integration tests: All integration tests are run against the built code. If any fail, the pipeline is stopped and error messages are reported.
- Acceptance tests: All acceptance tests are run against the built code. If all tests pass, the code is considered to be working and ready for delivery/deployment.
- Delivery packaging: The code is packaged up into a suitable form for delivery. For Java web services, this may well be a single Java archive .jar file containing an embedded web server.
What happens next depends on the needs of the project. The packaged code may be deployed to production automatically or it may simply be placed in some internal repository, for access by product owners and QA engineers. Formal deployment would then happen later, after quality gatekeeping.
Test environments
One obvious problem caused by needing a CI pipeline to run integration tests is having a place to run those tests. Ordinarily, in production, our application integrates with external systems such as databases and payment providers. When we run our CI pipeline, we do not want our code to process payments or write to production databases. Yet we do want to test that the code could integrate with those things, once we configure it to connect to those real systems.
The solution is to create a test environment. These are collections of databases and simulated external systems that lie under our control. If our code needs to integrate with a database of user details, we can create a copy of that user database and run it locally. During testing, we can arrange for our code to connect to this local database, instead of the production version. External payment providers often provide a sandbox API. This is a version of their service that, again, does not connect to any of their real customers. It features simulated behavior for their service. In effect, it is an external test double.
This kind of setup is called a live-like or staging environment. It allows our code to be tested with more realistic integration. Our unit tests use stubs and mocks. Our integration tests can now use these richer test environments.
Advantages and challenges of using test environments
Test environments offer both advantages and disadvantages, as summarized in the following table:
|
Advantages |
Challenges |
|
The environment is self-contained We can create it and destroy it at will. It will not affect production systems. |
Not production environments No matter how live-like we make them, these environments are simulations. The risk is that our fake environments give us false positives – tests that pass only because they are using fake data. This can give us false confidence, leading us to deploy code that will fail in production. The real test happens when we set our code live. Always. |
|
More realistic than stubs The environment gets us one step closer to testing under production loads and conditions. |
Extra effort to create and maintain More development work is needed to set these environments up and keep them in step with the test code. |
|
Check assumptions about external systems Third-party sandbox environments allow us to confirm that our code uses the latest, correct API, as published by the supplier. |
Privacy concerns Simply copying over a chunk of production data isn’t good enough for a test environment. If that data contains personally identifiable information (PII) as defined by GDPR or HIPAA, then we can’t legally use it directly. We have to create an extra step to anonymize that data or generate pseudo-realistic random test data. Neither is trivial. |
Table 10.4 – Test environments advantages and challenges
Testing in production
I can hear the gasps already! Running our tests in production is generally a terrible idea. Our tests might introduce fake orders that our production system treats as real ones. We may have to add test user accounts, which can present a security risk. Worse still, because we are in a testing phase, there is a very good chance that our code does not work yet. This can cause all sorts of problems – all while connected to production systems.
Despite these concerns, sometimes, things must be tested in production. Big data companies such as Google and Meta both have things that can only be tested live due to the sheer scale of their data. There is no way a meaningful live-like test environment can be created; it will simply be too small. What can we do in cases like this?
The approach is to mitigate the risks. Two techniques are valuable here: blue-green deployment and traffic partitioning.
Blue-green deployment
Blue-green deployment is a deployment technique designed for the rapid rollback of failed deployments. It works by dividing the production servers into two groups. They are referred to as blue and green, chosen as they are neutral colors that both denote success. Our production code will be running on one group of servers at any one time. Let’s say we are currently running on the blue group. Our next deployment will then be to the green group. This is shown in the following diagram:
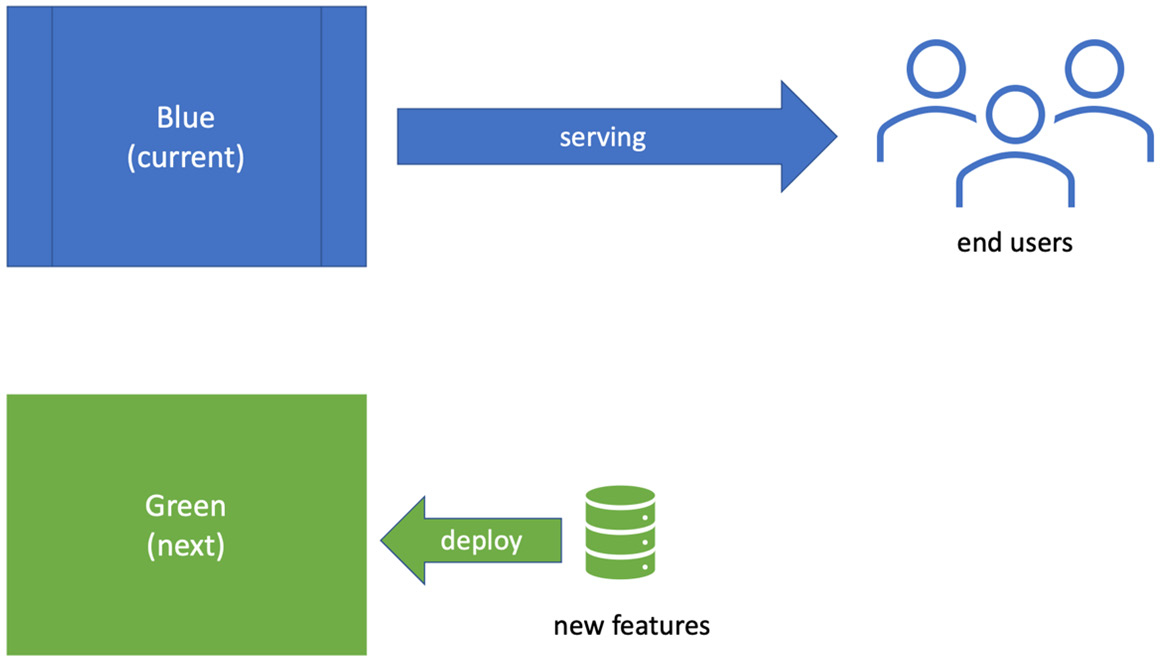
Figure 10.10 – Blue-green deployment
Once the code has been deployed to the green group, we switch over the production configuration to connect to green group servers. We retain the previous working production code on the blue servers. If our testing goes well against the green group, then we’re done. Production is now working with the latest green group code. If the testing fails, we revert that configuration to connect to the blue servers once again. It’s a fast rollback system that enables our experimentation.
Traffic partitioning
In addition to blue-green deployment, we can limit the amount of traffic that we send to our test servers. Instead of flipping production to wholly use the new code under test, we can simply send a small percentage of user traffic there. So, 99% of users might be routed to our blue servers, which we know to work. 1% can be routed to our new code under test in the green servers, as shown in the following diagram:
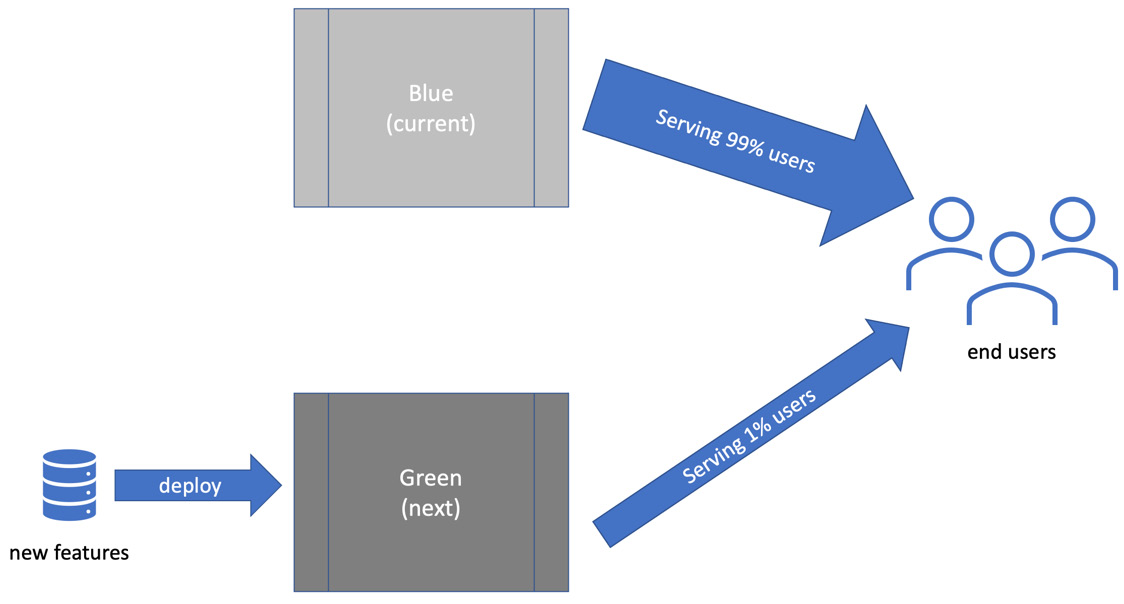
Figure 10.11 – Traffic partitioning
If defects are discovered, only 1% of users will be affected before we revert to 100% blue servers. This gives us a rapid rollback, mitigating problems in production caused by a failed deployment.
We’ve now covered the roles of different kinds of tests and seen how they fit into a coherent system known as the test pyramid. In the next section, we’ll apply some of this knowledge to our Wordz application by writing an integration test.
Wordz – integration test for our database
In this section, we’ll review an integration test for our Wordz application to get a feel for what they look like. We’ll cover the details of writing these tests and setting up the test tools in Chapter 14, Driving the Database Layer, and Chapter 15, Driving the Web Layer.
Fetching a word from the database
As part of our earlier design work, we identified that Wordz would need a place to store the candidate words to be guessed. We defined an interface called WordRepository to isolate us from the details of storage. At that iteration, we had only got as far as defining one method on the interface:
public interface WordRepository {
String fetchWordByNumber( int wordNumber );
}
The implementation of this WordRepository interface will access the database and return a word given its wordNumber. We will defer implementing this to Chapter 14, Driving the Database Layer. For now, let’s take an early look at what the integration test will look like, at a high level. The test uses open source libraries to help write the test, and to provide the database. We’ve chosen the following:
- An open source library called database-rider (available from https://database-rider.github.io/getting-started/) as a test tool
- Postgres, a popular open source relational database, to store our data
Here is the test code:
package com.wordz.adapters.db;
import com.github.database.rider.core.api.connection.ConnectionHolder;
import com.github.database.rider.core.api.dataset.DataSet;
import com.github.database.rider.junit5.api.DBRider;
import org.junit.jupiter.api.BeforeEach;
import org.junit.jupiter.api.Test;
import org.postgresql.ds.PGSimpleDataSource;
import javax.sql.DataSource;
import static org.assertj.core.api.Assertions.assertThat;
@DBRider
public class WordRepositoryPostgresTest {
    private DataSource dataSource;
    @BeforeEach
    void beforeEachTest() {
        var ds = new PGSimpleDataSource();
        ds.setServerNames(new String[]{"localhost"});
        ds.setDatabaseName("wordzdb");
        ds.setUser("ciuser");
        ds.setPassword("cipassword");
        this.dataSource = ds;
    }
    private final ConnectionHolder connectionHolder = () ->
        dataSource.getConnection();
    @Test
    @DataSet("adapters/data/wordTable.json")
    public void fetchesWord()  {
        var adapter = new WordRepositoryPostgres(dataSource);
        String actual = adapter.fetchWordByNumber(27);
        assertThat(actual).isEqualTo("ARISE");
    }
}
The fetchesWord() test method is marked by the @DataSet annotation. This annotation is provided by the database-rider test framework and it forms the Arrange step of our test. It specifies a file of known test data that the framework will load into the database before the test runs. The data file is located underneath the root folder of src/test/resources. The parameter in the annotation gives the rest of the path. In our case, the file will be located at src/test/resources/adapters/data/wordTable.json. Its content looks like this:
{
  "WORD": [
    {
      "id": 1,
      "number": 27,
      "text": "ARISE"
    }
  ]
}
This JSON file tells the database-rider framework that we would like to insert a single row into a database table named WORD, with column values of 1, 27, and ARISE.
We’re not going to write the adapter code to make this test pass just yet. There are several steps we would need to take to get this test to compile, including downloading various libraries and getting the Postgres database up and running. We’ll cover these steps in detail in Chapter 14, Driving the Database Layer.
The overview of this integration test code is that it is testing a new class called WordRepositoryPostgres that we will write. That class will contain the database access code. We can see the tell-tale JDBC object, javax.sql.DataSource, which represents a database instance. This is the clue that we are testing integration with a database. We can see new annotations from the database testing library: @DBRider and @DataSet. Finally, we can see something instantly recognizable – the Arrange, Act, and Assert steps of a test:
- The Arrange step creates a WordRepositoryPostgres object, which will contain our database code. It works with the database-rider library’s @DataSet annotation to put some known data into the database before the test runs.
- The Act step calls the fetchWordByNumber() method, passing in the numeric wordNumber we want to test. This number aligns with the contents of the wordTable.json file.
- The Assert step confirms the expected word, ARISE, is returned from the database.
As we can see, integration tests aren’t so different from unit tests in essence.
Summary
In this chapter, we’ve seen how the test pyramid is a system that organizes our testing efforts, keeping FIRST unit tests firmly as the foundation for all we do, but not neglecting other testing concerns. First, we introduced the ideas of integration and acceptance testing as ways of testing more of our system. Then, we looked at how the techniques of CI and CD keep our software components brought together and ready to release at frequent intervals. We’ve seen how to bring the whole build process together using CI pipelines, possibly going on to CD. We’ve made a little progress on Wordz by writing an integration test for the WordRepositoryPostgres adapter, setting us up to write the database code itself.
In the next chapter, we’ll take a look at the role of manual testing in our projects. It’s clear by now that we automate as much testing as we can, meaning that the role of manual testing no longer means following huge test plans. Yet, manual testing is still very valuable. How has the role changed? We’ll review that next.
Questions and answers
The following are some questions and their answers regarding this chapter’s material:
- Why is the test pyramid represented as a pyramid shape?
The shape depicts a broad foundation of many unit tests. It shows layers of testing above that exercise a closer approximation to the final, integrated system. It also shows that we expect fewer tests at those higher levels of integration.
- What are the trade-offs between unit, integration, and acceptance tests?
- Unit tests: Fast, repeatable. Don’t test connections to external systems.
- Integration tests: Slower, sometimes unrepeatable. They test the connection to the external system.
- Acceptance tests: Slowest of all. They can be flaky but offer the most comprehensive tests of the whole system.
- Does the test pyramid guarantee correctness?
No. Testing can only ever reveal the presence of a defect, never the absence of one. The value of extensive testing is in how many defects we avoid putting into production.
- Does the test pyramid only apply to object-oriented programming?
No. This strategy of test coverage applies to any programming paradigm. We can write code using any paradigm - object-oriented, functional, procedural, or declarative. The various kinds of tests only depend on whether our code accesses external systems or makes up purely internal components.
- Why don’t we prefer end-to-end tests, given they test the whole system?
End-to-end tests run slowly. They depend directly on having either production databases and web services running, or a test environment running containing test versions of those things. The network connections required, and things such as database setup, can result in tests giving us false negative results. They fail because of the environment, not because the code was incorrect. Because of these reasons, we engineer our system to make maximum use of fast, repeatable unit tests.
Further reading
To learn more about the topics that were covered in this chapter, take a look at the following resources:
- Introduction to consumer-driven contract testing
Pact.io produce a popular open source contract testing tool that’s available on their website, https://docs.pact.io. The website features an explanatory video and a useful introduction to the benefits of contract-driven testing.
- Database-rider database testing library
An open source database integration testing library that works with JUnit5. It is available from https://database-rider.github.io/getting-started/.
- Modern Software Engineering, Dave Farley, ISBN 978-0137314911
This book explains in detail the reasons behind CD and various technical practices such as trunk-based development to help us achieve that. Highly recommended.
- Minimum CD
Details on what is needed for CD: https://minimumcd.org/minimumcd/.