
12
Test First, Test Later, Test Never
In this chapter, we are going to review some of the nuances of Test-Driven Development (TDD). We’ve already covered the broad techniques of writing unit tests as part of an overall test strategy. We can use the test pyramid and hexagonal architecture to guide the scope of our tests in terms of what specifically they need to cover.
We have two more dimensions we need to decide on: when and where to start testing. The first question is one of timing. Should we always write our tests before the code? What difference would it make to write tests after the code? In fact, what about not testing at all – does that ever make sense? Where to start testing is another variable to decide. There are two schools of thought when it comes to TDD – testing from the inside out or the outside in. We will review what these terms mean and what impact each has on our work. Finally, we will consider how these approaches work with a hexagonal architecture to form a natural testing boundary.
In this chapter we’re going to cover the following main topics:
- Adding tests first
- We can always test it later, right?
- Tests? They’re for people who can’t write code!
- Testing from the inside out
- Testing from the outside in
- Defining test boundaries with hexagonal architecture
Adding tests first
In this section, we will review the trade-offs of adding a test first before writing the production code to make it pass.
Previous chapters have followed a test-first approach to writing code. We write a test before writing production code to make that test pass. This is a recommended approach, but it is important to understand some of the difficulties associated with it as well as considering its benefits.
Test-first is a design tool
The most important benefit of writing tests first is that a test acts as a design aid. As we decide what to write in our test, we are designing the interface to our code. Each of the test stages helps us consider an aspect of software design, as illustrated by the following diagram:
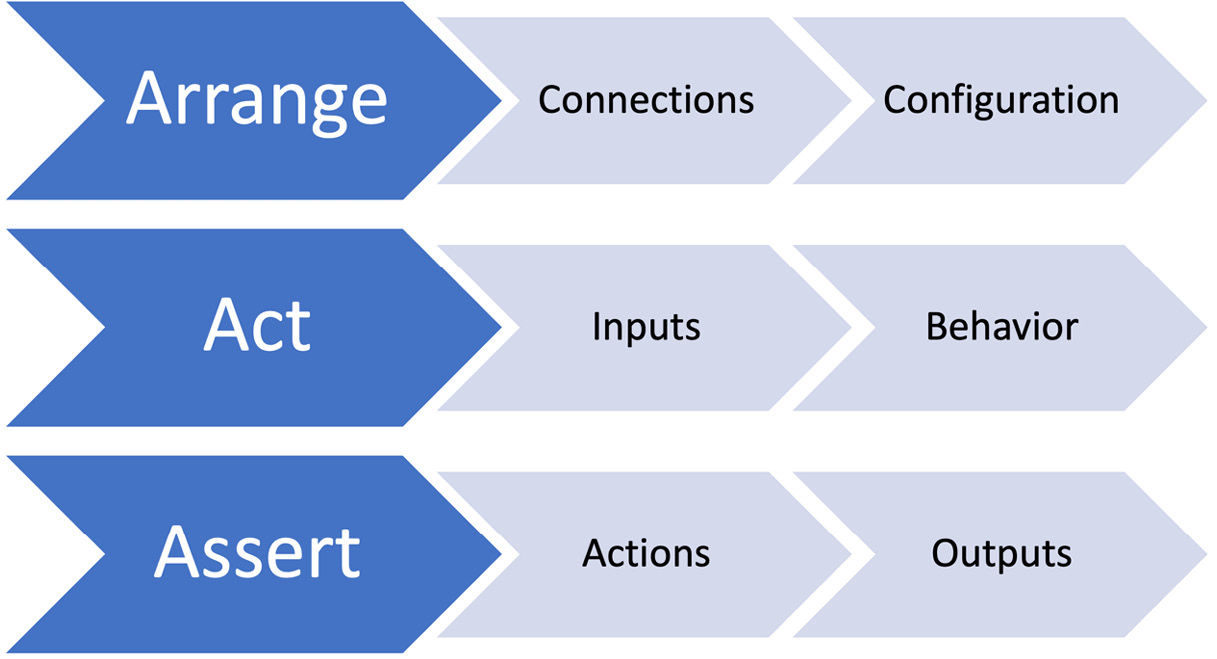
Figure 12.1 – Test-first aids design
The Arrange step helps us think about how the code under test relates to the bigger picture of the whole code base. This step helps us design how the code will fit into the whole code base. It gives us an opportunity to make the following design decisions:
- What configuration data will be needed?
- What connections to other objects or functions will be needed?
- What behavior should this code provide?
- What extra inputs are needed to provide that behavior?
Coding the Act step allows us to think about how easy our code will be to use. We reflect on what we would like the method signature of the code we are designing to be. Ideally, it should be simple and unambiguous. Some general recommendations are the following:
- The method name should describe the outcome of calling the method.
- Pass in as few parameters as possible. Possibly group parameters into their own object.
- Avoid Boolean flags that modify the behavior of the code. Use separate methods with appropriate names.
- Avoid requiring multiple method calls to do one thing. It is too easy to miss out on an important call in the sequence if we are unfamiliar with the code.
Writing the Act step allows us to see what the call to our code will look like everywhere it is used for the first time. This provides the opportunity to simplify and clarify before our code gets widely used.
The code in our Assert step is the first consumer of the results of our code. We can judge from this step whether those results are easy to obtain. If we are unhappy with how the Assert code looks, this is a chance to review how our object provides its output.
Every test we write provides this opportunity for a design review. TDD is all about helping us uncover better designs, even more than it is about testing correctness.
In other industries, such as designing cars, it is common to have dedicated design tools. AutoCAD 3D Studio is used to create 3D models for the chassis of a car on a computer. Before we manufacture the car, we can use the tool to pre-visualize the end result, rotating it through space and viewing it from several angles.
Mainstream commercial software engineering lags far behind in terms of design tool support. We don’t have an equivalent to 3D Studio for designing code. The 1980s to 2000s saw the rise of Computer-Aided Software Engineering (CASE) tools but these appear to have fallen into disuse. CASE tools purported to simplify software engineering by allowing their users to enter various graphical forms of software structures, then generate code that implemented those structures. Today, writing TDD tests prior to writing the production code seems to be the closest thing we have to computer-aided design for software at present.
Tests form executable specifications
Another advantage of test code is that it can form a highly accurate, repeatable form of documentation. Simplicity and clarity in the test code are required to achieve that. Instead of writing a test planning document, we write TDD tests as code, which can be run by a computer. This has the benefit of being more immediate for developers. These executable specifications are captured alongside the production code they test, stored in source control, and made continuously available to the whole team.
Further documentation is useful. Documents such as RAID logs – documenting risks, actions, issues, and decisions – and KDDs – documenting key design decisions – are often required. These are non-executable documents. They serve the purpose of capturing who, when, and critically why an important decision was made. Information of this kind cannot be captured using test code, meaning that these kinds of documents have value.
Test-first provides meaningful code coverage metrics
Writing a test before we write production code gives each test a specific purpose. The test exists to drive out a specific behavior in our code. Once we get this test to pass, we can run the test suite using a code coverage tool, which will output a report similar to the following:
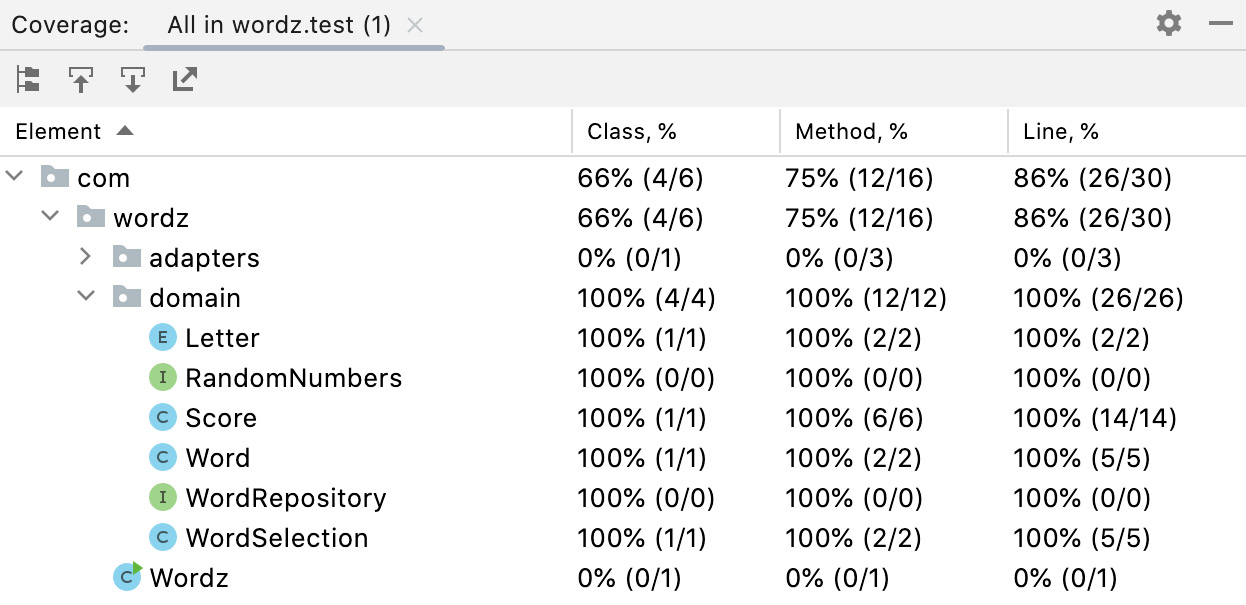
Figure 12.2 – Code coverage report
A code coverage tool instruments our production code as we run the tests. This instrumentation captures which lines of code were executed during running the tests. This report can suggest we have missing tests, by flagging up lines of code that were never executed during the test run.
The code coverage report in the image shows we have executed 100% of the code in the domain model by our test run. Having 100% coverage is entirely down to us writing a TDD test before we write code to make it pass. We do not add untested code with a test-first TDD workflow.
Beware of making a code coverage metric a target
A high code coverage metric doesn’t always indicate high code quality. If we are writing tests for generated code or tests for code we’ve pulled from a library, that coverage does not tell us anything new. We may assume – generally – that our code generators and libraries have already been tested by their developers.
However, a real problem with code coverage numbers happens when we mandate them as a metric. As soon as we impose a minimum coverage target on developers, then Goodhart’s law applies – when a measure becomes a target, it ceases to be a good measure. Humans will sometimes cheat the system to achieve a target when under pressure. When that happens, you see code such as this:
public class WordTest {
    @Test
    public void oneCorrectLetter() {
        var word = new Word("A");
        var score = word.guess("A");
        // assertThat(score).isEqualTo(CORRECT);
    }
}
Notice those comment symbols – // – just before assertThat()? That’s the hallmark of a test case that was failing and could not be made to pass by a certain deadline. By retaining the test, we keep our number of test cases up, and we keep our code coverage percentage up. A test such as this will execute lines of production code, but it will not validate that they work. The code coverage target will be hit – even though the code itself does not work.
Now, I know what you’re thinking – no developer would ever cheat the test code like this. It is, however, an example from a project I worked on for a major international client. The client had engaged both the company I work for and another development team to work on some microservices. Due to a time zone difference, the other team would check in their code changes while our team was asleep.
We came in one morning to see our test results dashboards lit up red. The overnight code change had caused large numbers of our tests to fail. We checked the pipelines of the other team and were astonished to see all their tests passing. This made no sense. Our tests clearly revealed a defect in that nightly code drop. We could even localize it from our test failures. This defect would have shown up in the unit tests around that code, but those unit tests were passing. The reason? Commented-out asserts.
The other team was under pressure to deliver. They obeyed their instructions to get that code change checked in on that day. Those changes, in fact, had broken their unit tests. When they could not fix them in the time available, they chose to cheat the system and defer the problem to another day. I’m not sure I blame them. Sometimes, 100% code coverage and all tests passing mean nothing at all.
Beware of writing all tests upfront
One of the strengths of TDD is that it allows for emergent design. We do a small piece of design work, captured in a test. We then do the next small piece of design, captured in a new test. We perform varying depths of refactoring as we go. In this way, we learn about what is and is not working in our approach. The tests provide fast feedback on our design.
This can only happen if we write tests one at a time. A temptation for those familiar with waterfall project approaches can be to treat the test code as one giant requirements document, to be completed before development starts. While this seems more promising than simply writing a requirements document in a word processor, it also means that developers cannot learn from test feedback. There is no feedback cycle. This approach to testing should be avoided. Better results are obtained by taking an incremental approach. We write one test at a time, together with the production code to make that test pass.
Writing tests first helps with continuous delivery
Perhaps the biggest benefit of writing tests first lies in continuous delivery situations. Continuous delivery relies on a highly automated pipeline. Once a code change is pushed to source control, the build pipeline is started, all tests run, and finally, a deployment occurs.
The only reason for code not to deploy in this system – assuming the code compiles – is if the tests fail. This implies that the automated tests we have in place are necessary and sufficient to create the level of confidence required.
Writing tests first cannot guarantee this – we may still have missing tests – but out of all the ways of working with tests, it is perhaps the most likely to result in one meaningful test for each piece of application behavior that we care about.
This section has presented the case that writing tests first – before production code is written, to make them pass – helps create confidence in our code, as well as useful executable specifications. However, that’s not the only way to code. Indeed, a common approach we will see is to write a chunk of code first and then write tests shortly after.
The next section looks at the advantages and limitations of the test-later approach.
We can always test it later, right?
An alternative approach to writing tests before code is to write code first, then write tests. This section compares and contrasts writing tests after the code with writing tests before the code.
One approach to writing tests involves writing chunks of code and then retrofitting tests to those pieces of code. It’s an approach that is used in commercial programming, and the workflow can be illustrated as follows:

Figure 12.3 – Test-after workflow
Upon selecting a user story to develop, one or more pieces of production code are written. Tests follow! Academic research seems mixed, to say the least, on whether or not test-after differs from test-first. From one 2014 study by the ACM, an extract from the conclusion was this:
(Source: https://dl.acm.org/doi/10.1145/2601248.2601267)
However, a commenter pointed out that in this research, the following applied:
Other research papers seem to show similar lackluster results. Practically then, what should we take away from this? Let’s consider some practical details of test-later development.
Test-later is easier for a beginner to TDD
One finding of the research was that beginners to TDD found test-later to be easier to get started with. This seems reasonable. Before we attempt TDD, we may consider coding and testing as different activities. We write code according to some set of heuristics, and then we figure out how to test that code. Adopting a test-later approach means that the coding phase is essentially unchanged by the demands of testing. We can continue coding as we always did. There is no impact from having to consider the impacts of testing on the design of that code. This seeming advantage is short-lived, as we discover the need to add access points for testing, but we can at least get started easily.
Adding tests later works reasonably well if we keep writing tests in lockstep with the production code: write a little code, and write a few tests for that code – but not having tests for every code path remains a risk.
Test-later makes it harder to test every code path
A plausible argument against using a test-later approach is that it becomes harder to keep track of having all the tests we need. On the face of it, this claim cannot be completely true. We can always find some way to keep track of the tests we need. A test is a test, no matter when it is written.
The problem comes as the time between adding tests increases. We are adding more code, which means adding more execution paths throughout the code. For example, every if statement we write represents two execution paths. Ideally, every execution path through our code will have a test. Every untested execution path we add places us one test below this ideal number. This is illustrated directly in flowcharts:
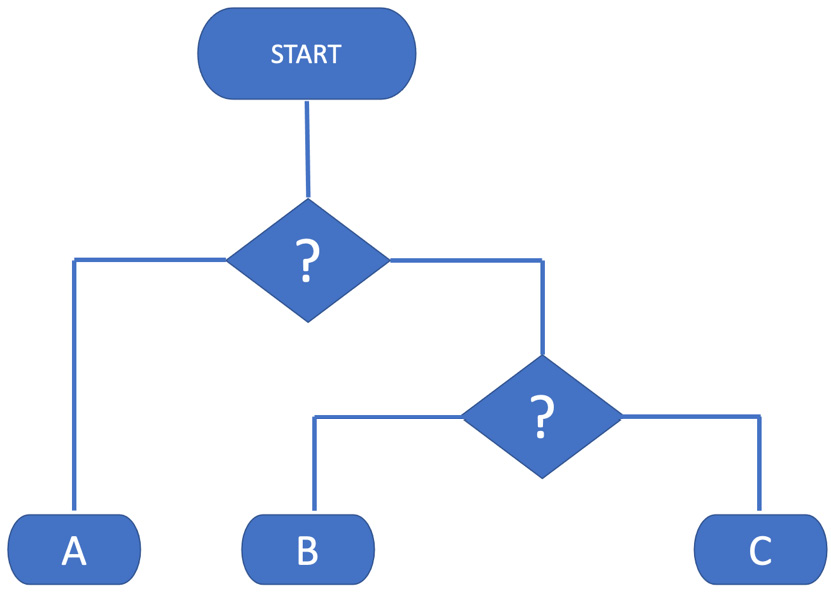
Figure 12.4 – Illustrating execution paths
This flowchart depicts a process with nested decision points – the diamond shapes – which result in three possible execution paths, labeled A, B, and C. The technical measure of the number of execution paths is called cyclomatic complexity. The complexity score is the number calculated on how many linearly independent execution paths exist in a piece of code. The code in the flowchart has a cyclomatic complexity of three.
As we increase the cyclomatic complexity of our code, we increase our cognitive load with the need to remember all those tests that we need to write later. At some point, we might even find ourselves periodically stopping coding and writing down notes for what tests to add later. This sounds like a more arduous version of simply writing the tests as we go.
The issue of keeping track of tests we are yet to write is avoided when using test-first development.
Test-later makes it harder to influence the software design
One of the benefits of test-first development is that the feedback loop is very short. We write one test and then complete a small amount of production code. We then refactor as required. This moves away from a waterfall-style pre-planned design to an emergent design. We change our design in response to learning more about the problem we are solving as we incrementally solve more of it.
When writing tests after a chunk of code has already been written, it gets harder to incorporate feedback. We may find that the code we have created proves difficult to integrate into the rest of the code base. Perhaps this code is confusing to use due to having unclear interfaces. Given all the effort we have spent creating the messy code, it can be tempting to just live with the awkward design and its equally awkward test code.
Test-later may never happen
Development tends to be a busy activity, especially when deadlines are involved. Time pressures may mean that the time we hoped to get to write our tests simply never comes. It’s not uncommon for project managers to be more impressed with new features than with tests. This seems a false economy – as users only care about features that work – but it’s a pressure that developers sometimes face.
This section has shown that writing tests shortly after writing code can work as well as writing tests first if care is exercised. It also seems preferable to some developers at the start of their TDD journey – but what about the ultimate extreme of never testing our code? Let’s quickly review the consequences of that approach.
Tests? They’re for people who can’t write code!
This section discusses another obvious possibility when it comes to automated testing – simply not writing automated tests at all. Perhaps not even testing at all. Is this viable?
Not testing at all is a choice we could make, and this might not be as silly as it sounds. If we define testing as verifying some outcome is achieved in its target environment, then things such as deep-space probes cannot truly be tested on Earth. At best, we are simulating the target environment during our testing. Giant-scale web applications can rarely be tested with realistic load profiles. Take any large web application, launch a hundred million users at it – all doing invalid things – and see how most applications hold up. It’s probably not as well as developer testing suggested.
There are areas of development where we might expect to see fewer automated tests:
- Extract, Transform, and Load (ETL) scripts for data migrations:
ETL scripts are often one-off affairs, written to solve a specific migration problem with some data. It’s not always worth writing automated tests for these, performing manual verification on a similar set of source data instead.
- Front-end user interface work:
Depending on the programming approach, it may be challenging to write unit tests for the frontend code. Whatever approach we take, assessing the visual look and feel cannot currently be automated. As a result, manual testing is often used against a candidate release of a user interface.
- Infrastructure-as-code scripts:
Our applications need to be deployed somewhere for them to run. A recent approach to deployment is to use languages such as Terraform to configure servers using code. This is an area that’s not yet simple to automate tests for.
So what actually happens when we abandon test automation, possibly not even testing at all?
What happens if we do not test during development?
We might think that not testing at all is an option, but in reality, testing will always happen at some point. We can illustrate this with a timeline of the possible points at which testing can occur:
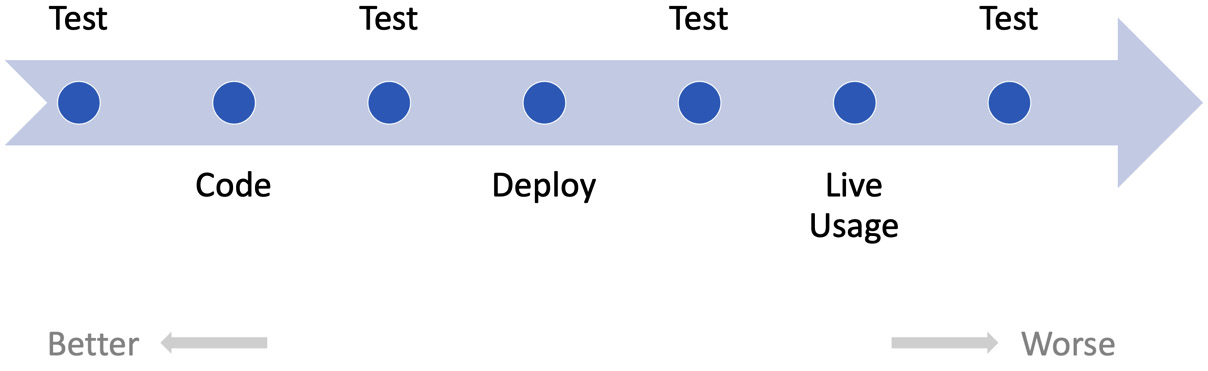
Figure 12.5 – Testing timeline
Test-first approaches shift the testing to be as early as possible – an approach called shift-left – where defects can be corrected cheaply and easily. Thinking that we won’t test merely pushes testing all the way to the right – after users start using features live.
Ultimately, all code that users care about gets tested eventually. Maybe developers don’t test it. Maybe testing will fall to another specialist testing team, who will write defect reports. Maybe defects will be found during the operation of the software. Most commonly of all, we end up outsourcing testing to the users themselves.
Having users test our code for us is generally a bad idea. Users trust us to give them software that solves their problems. Whenever a defect in our code prevents that from happening, we lose that trust. A loss of trust damages the 3 Rs of a business: revenue, reputation, and retention. Users may well switch to another supplier, whose better-tested code actually solves the user’s problem.
If there is any possibility at all to test our work before we ship it, we should take that opportunity. The sooner we build test-driven feedback loops into our work, the easier it will be to improve the quality of that work.
Having looked at when we test our software, let’s turn to where we test it. Given the overall design of a piece of software, where should we start testing? The next section reviews a test approach that starts from the inside of a design and works its way out.
Testing from the inside out
In this section, we’re going to review our choice of starting point for our TDD activities. The first place to look at is inside our software system, starting with details.
When starting to build software, we obviously need some place to start from. One place to start is with some of the details. Software is made up of small interconnecting components, each of which performs a portion of the whole task. Some components come from library code. Many components are custom-made to provide the functionality our application needs.
One place to start building, then, is on the inside of this software system. Starting with an overall user story, we can imagine a small component that is likely to be of use to us. We can begin our TDD efforts around this component and see where that leads us. This is a bottom-up approach to the design, composing the whole from smaller parts.
If we consider a simplified version of our Wordz application structure, we can illustrate the inside-out approach as follows:
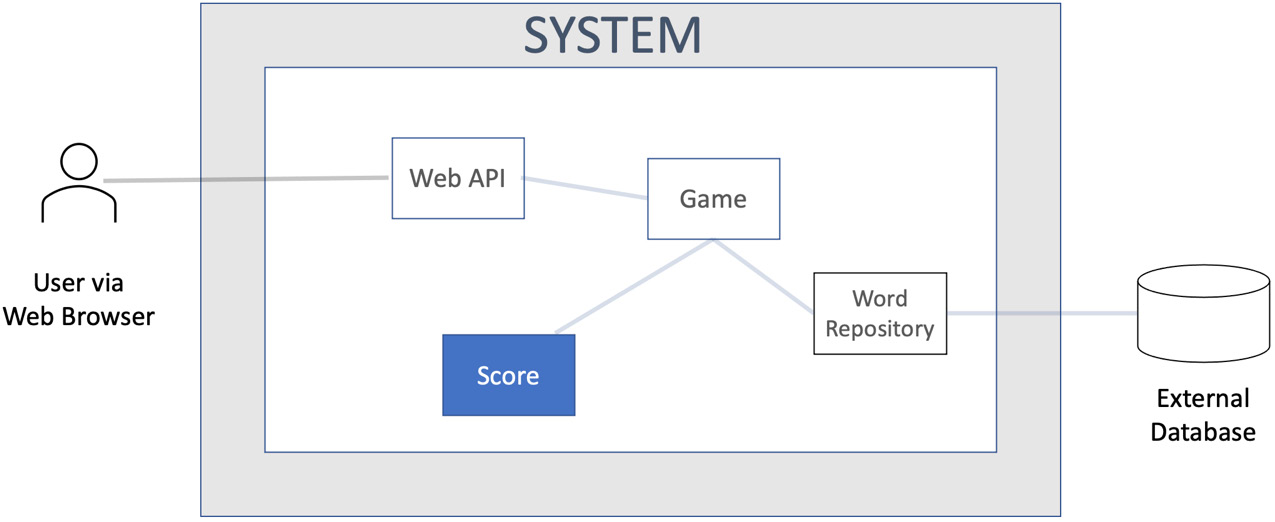
Figure 12.6 – Inside-out development
The diagram shows the Score component highlighted, as that is where we will start development using an inside-out approach. The other software components are grayed-out. We are not designing those pieces yet. We would start with a test for some behavior we wanted the Score component to have. We would work our way outward from that starting point.
This style of inside-out TDD is also known as Classicist TDD or Chicago TDD. It is the approach originally described by Kent Beck in his book Test-Driven Development by Example. The basic idea is to start anywhere to create any useful building block for our code. We then develop a progressively larger unit that incorporates the earlier building blocks.
The inside-out approach has a few advantages:
- Quick start to development: We test pure Java code first in this approach, using the familiar tools of JUnit and AssertJ. There is no setup for user interfaces, web service stubs, or databases. There is no setup of user interface testing tools. We just dive right in and code using Java.
- Good for known designs: As we gain experience, we recognize some problems as having known solutions. Perhaps we have written something similar before. Maybe we know a useful collection of design patterns that will work. In these cases, starting from the interior structure of our code makes sense.
- Works well with hexagonal architecture: Inside-out TDD starts work inside the inner hexagon, the domain model of our application. The adapter layer forms a natural boundary. An inside-out design is a good fit for this design approach.
Naturally, nothing is perfect and inside-out TDD is no exception. Some challenges include the following:
- Possibility of waste: We begin inside-out TDD with our best guess of some components that will be needed. Sometimes, it emerges later that either we don’t need these components, or we should refactor the features somewhere else. Our initial effort is in some sense wasted – although it will have helped us progress to this point.
- Risk of implementation lock-in: Related to the previous point, sometimes we move on from an initial design having learned more about the problem we’re solving, but we don’t always recognize a sunk cost. There is always a temptation to keep using a component we wrote earlier even if it no longer fits as well, just because we invested that time and money into creating it.
Inside-out TDD is a useful approach and was first popularized by Kent Beck’s book. However, if we can start inside-out, what about turning that around? What if we started from the outside of the system and worked our way in? The next section reviews this alternative approach.
Testing from the outside in
Given that inside-out TDD has some challenges as well as strengths, what difference does outside-in TDD make? This section reviews the alternative approach of starting from outside the system.
Outside-in TDD begins with the external users of the system. They may be human users or machines, consuming some API offered by our software. This approach to TDD begins by simulating some external input, such as the submission of a web form.
The test will typically use some kind of test framework – such as Selenium or Cypress for web applications – that allows the test to call up a specific web view, and simulate typing text into fields, then clicking a submit button. We can then make this test pass in the normal way, only we will have written some code that directly deals with the input from a user this time. In our hexagonal architecture model, we will end up writing the user input adapter first.
We can illustrate the outside-in approach as follows:
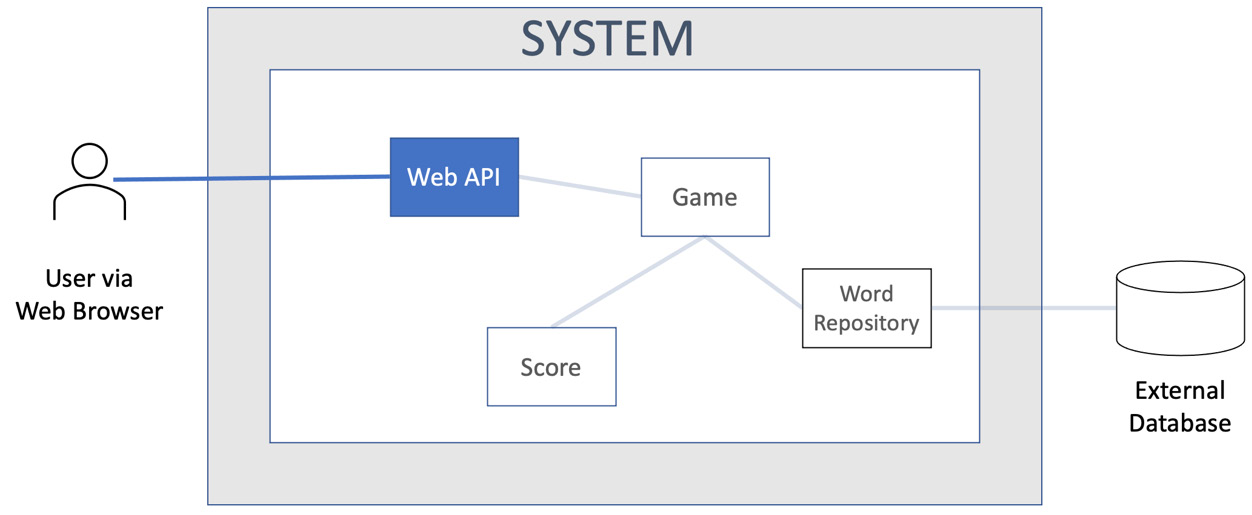
Figure 12.7 – Outside-in view
We can see that a component called Web API is the focus of our attention here. We will write a test that sets up enough of our application to run a component that handles web requests. The test will form a web request, send it to our software, and then assert that the correct web response is sent. The test may also instrument the software itself to verify it takes the expected actions internally. We start testing from the outside, and as development progresses, we move inwards.
This approach to TDD is described in the book, Growing Object-Oriented Software, Guided by Tests, by Steve Freeman and Nat Pryce. The technique is also known as the London or Mockist school of TDD. The reasons for that are the location where it was first popularized and its use of mock objects, respectively. To test drive the user input adapter as the first component we tackle, we need a test double in place of the rest of the software. Mocks and stubs are an inherent part of outside-in TDD.
Outside-in TDD, predictably enough, has some strengths and weaknesses. Let’s take a look at the strengths first:
- Less waste: Outside-in TDD encourages a quite minimal approach to satisfying external behavior. The code produced tends to be highly customized to the application at hand. In contrast, inside-out TDD focuses on building a robust domain model, perhaps providing more functionality than will end up in use by users.
- Delivers user value quickly: Because we start from a test that simulates a user request, the code we write will satisfy a user request. We can deliver value to users almost immediately.
Outside-in TDD also has some weaknesses, or at least limitations:
- Fewest abstractions: On a related note, when writing the minimum code necessary to make a test pass, outside-in TDD may lead to application logic being present in the adapter layer. This can be refactored later but can lead to a less organized code base.
- Inverted test pyramid: If all our TDD test efforts focus on the external responses, they are, in fact, end-to-end tests. This opposes the recommended pattern of the test pyramid, which prefers faster unit tests inside the code base. Having only slower, less repeatable end-to-end tests can slow development.
The two traditional schools of TDD both offer certain advantages in terms of how they affect the software design we will produce. The next section looks at the impact of hexagonal architecture. By starting from the idea that we will use a hexagonal approach, we can combine the advantages of both schools of TDD. We end up defining a natural test boundary between the inside-out and outside-in approaches to TDD.
Defining test boundaries with hexagonal architecture
The topic for this section is how using a hexagonal architecture impacts TDD. Knowing that we are using hexagonal architecture presents useful boundaries for the different kinds of tests in the test pyramid.
In one sense, how we organize our code base does not affect our use of TDD. The internal structure of the code is simply an implementation detail, one of many possibilities that will make our tests pass. That being said, some ways of structuring our code are easier to work with than others. Using hexagonal architecture as a foundational structure does offer TDD some advantages. The reason why lies with the use of ports and adapters.
We’ve learned from previous chapters that it is easier to write tests for code where we can control the environment in which the code runs. We’ve seen how the test pyramid gives a structure to the different kinds of tests we write. Using the ports and adapters approach provides clean boundaries for each kind of test in the code. Better yet, it provides us with an opportunity to bring even more tests to the unit test level.
Let’s review what kinds of tests best fit each layer of software written using hexagonal architecture.
Inside-out works well with the domain model
Classic TDD uses an inside-out development approach, where we choose a certain software component to test-drive. This component may be a single function, a single class, or a small cluster of classes that collaborate with each other. We use TDD to test this component as a whole given the behaviors it offers to its consumers.
This kind of component resides in the domain model – the inner hexagon:
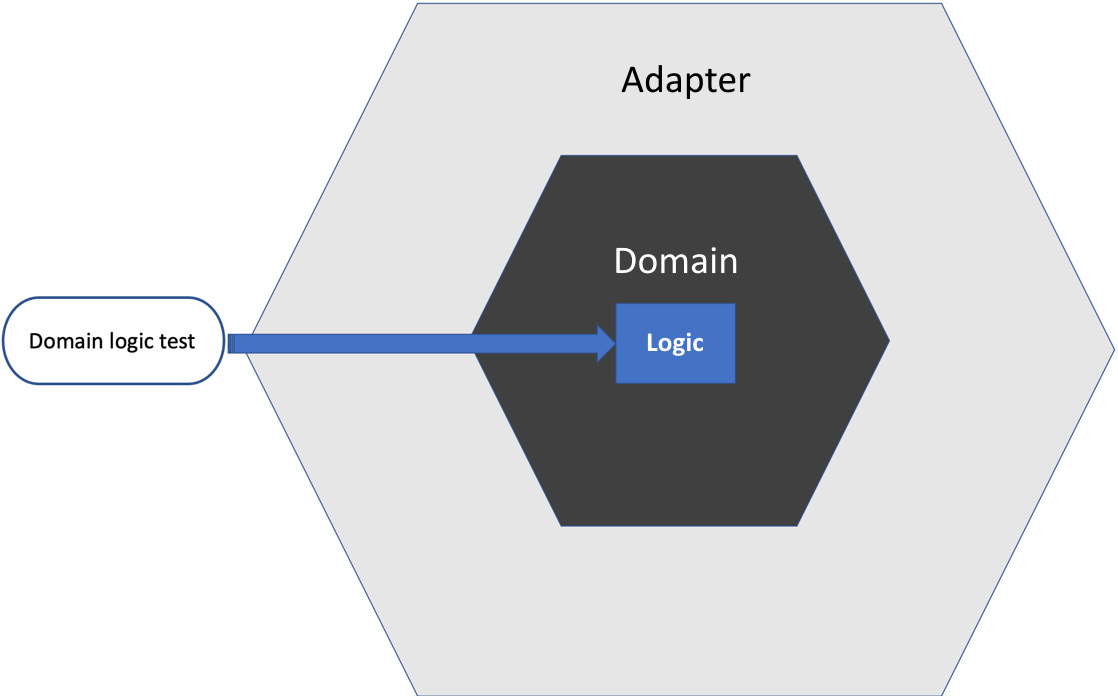
Figure 12.8 – Testing the domain logic
The key advantage is that these components are easy to write tests for and those tests run very quickly. Everything lives in computer memory and there are no external systems to contend with.
A further advantage is that complex behaviors can be unit-tested here at a very fine granularity. An example would be testing all the state transitions within a finite state machine used to control a workflow.
One disadvantage is that these fine-grained domain logic tests can get lost if a larger refactoring takes place. If the component under fine-grained tests gets removed during refactoring, its corresponding test will be lost – but the behavior will still exist somewhere else as a result of that refactoring. One thing refactoring tools cannot do is figure out what test code relates to the production code being refactored, and automatically refactor the test code to fit the new structure.
Outside-in works well with adapters
Mockist-style TDD approaches development from an outside-in perspective. This is a great match for our adapter layer in a hexagonal architecture. We can assume that the core application logic resides in the domain model and has been tested there with fast unit tests. This leaves adapters in the outer hexagon to be tested by integration tests.
These integration tests only need to cover the behavior provided by the adapter. This should be very limited in scope. The adapter code maps from the formats used by the external system only to what is required by the domain model. It has no other function.
This structure naturally follows the test pyramid guidelines. Fewer integration tests are required. Each integration test has only a small scope of behavior to test:
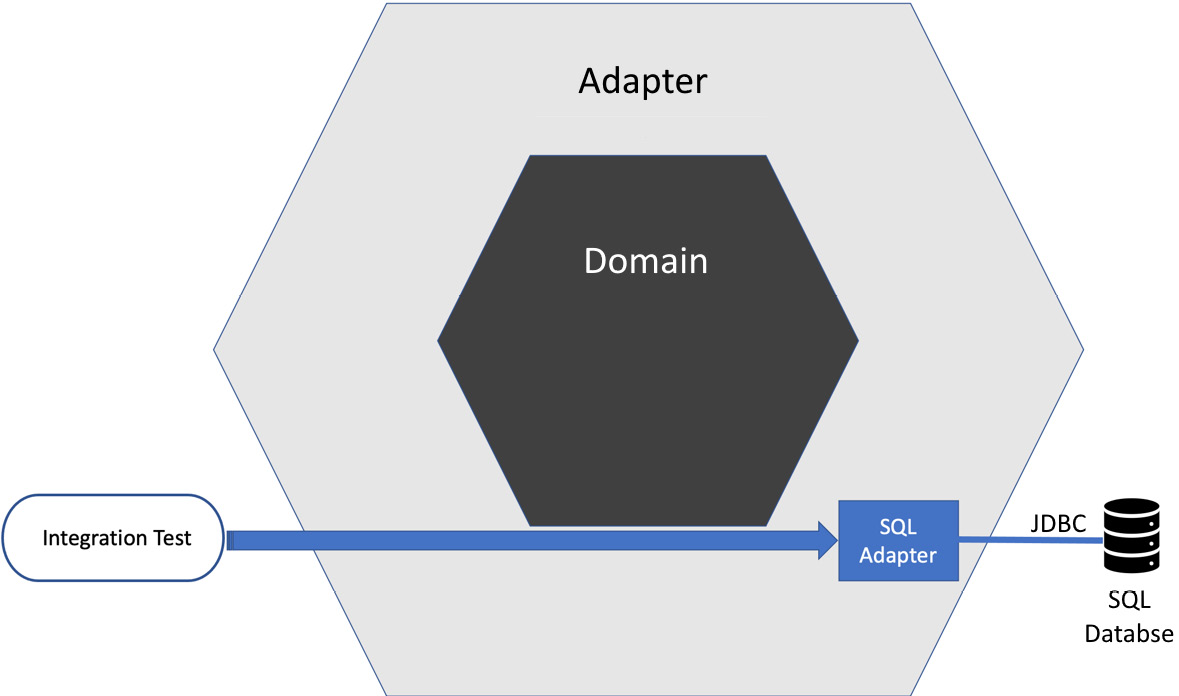
Figure 12.9 – Testing adapters
This style of testing verifies the adapter in isolation. It will require some end-to-end happy-path testing to show that the system as a whole has used the correct adapters.
User stories can be tested across the domain model
One benefit of having a domain model containing all the application logic is that we can test the logic of complete user stories. We can replace the adapters with test doubles to simulate typical responses from the external systems. We can then use FIRST unit tests to exercise complete user stories:
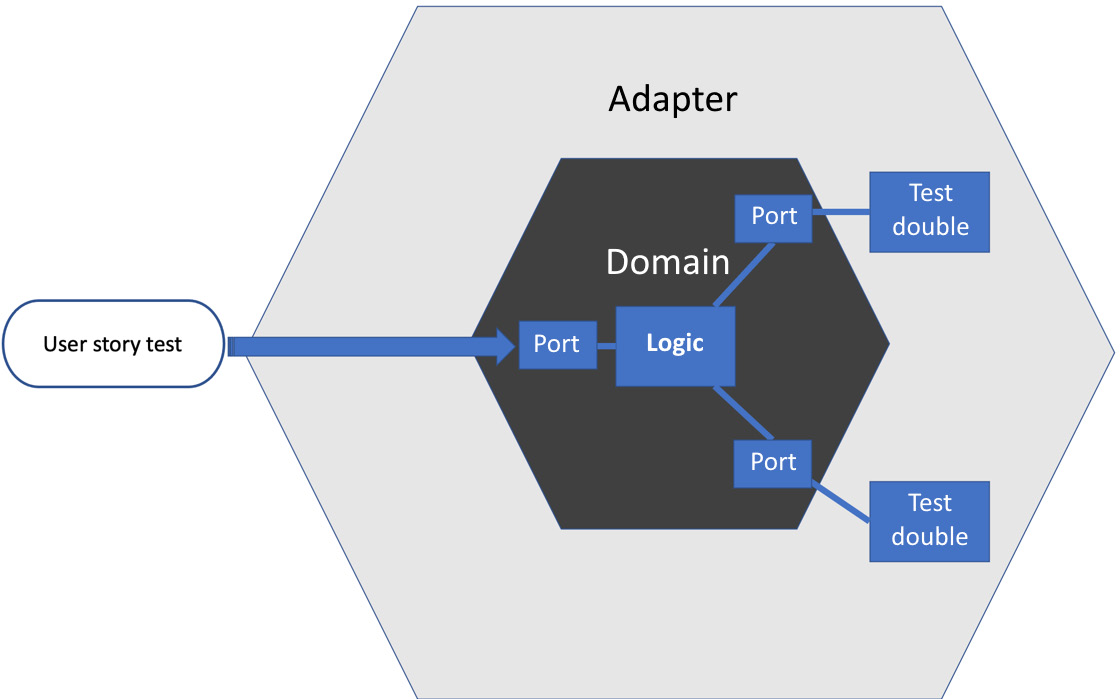
Figure 12.10 – Testing user stories
The advantages are the speed and repeatability of FIRST unit tests. In other approaches to structuring our code, we might only be able to exercise a user story as an end-to-end test in a test environment, with all associated disadvantages. Having the ability to test user story logic at the unit level – across the whole domain model – gives us a high degree of confidence that our application will satisfy the users’ needs.
To ensure this confidence, we need the integration tests of the adapter layer, plus some end-to-end tests across selected user stories, confirming the application is wired and configured correctly as a whole. These higher-level tests do not need to be as detailed as the user story tests performed around the domain model.
Having a good set of user story tests around the domain model also enables large-scale refactoring within the domain model. We can have the confidence to restructure the inner hexagon guided by these broadly scoped user story tests.
This section has shown us how to relate the different kinds of tests in the test pyramid to the different layers in a hexagonal architecture.
Summary
This chapter has discussed the various stages at which we can write tests – before we write code, after we write code, or possibly even never. It has made a case for writing tests before code as providing the most value in terms of valid execution path coverage and developer ease. We went on to review how hexagonal architecture interacts with both TDD and the test pyramid, leading to an opportunity to bring user story testing into the realm of FIRST unit tests. This allows the fast and repeatable validation of the core logic driving our user stories.
In the next chapter – and throughout the third part of the book – we will return to building our Wordz application. We will be making full use of all the techniques we’ve learned so far. We will begin inside-out with Chapter 13, Driving the Domain Layer.
Questions and answers
- Is writing tests shortly after code just as good as writing test-first TDD?
Some research seems to suggest that, although it is very difficult to set up a controlled experiment with statistically significant results in this area. One factor we can consider concerns our own personal discipline. If we write tests later, are we sure we will cover everything necessary? I personally have concluded that I would not remember all I needed to cover and would need to make notes. Those notes are perhaps best captured in the form of test code, leading to a preference for test-first TDD.
- How does hexagonal architecture affect TDD?
Hexagonal architecture provides a clean separation between a pure, inner core of domain logic and the outside world. This allows us to mix and match the two schools of TDD knowing that there is a firm boundary in the design up to which we can code. The inner domain model supports entire use cases being unit-tested, as well as any fine-grained unit tests for detailed behavior we feel are necessary. External adapters naturally suit integration tests, but these tests don’t have to cover much, as the logic relates to our domain lives in the inner domain model.
- What happens if we abandon testing completely?
We export the responsibility to the end user who will test it for us. We risk loss in revenue, reputation, and user retention. Sometimes, we cannot perfectly recreate the final environment in which the system will be used. In this case, making sure we have fully characterized and tested our system as closely as we can seems wise. We can at least minimize the known risks.
Further reading
- An explanation of the Cyclomatic Complexity metric: https://en.wikipedia.org/wiki/Cyclomatic_complexity
- Continuous Delivery, Jez Humble and Dave Farley, ISBN 978-0321601919
- Working Effectively with Legacy Code, Michael Feathers, ISBN 978-0131177055
- Test-Driven Development by Example, Kent Beck, ISBN 978-0321146533
- Growing Object-Oriented Software, Guided by Tests, Steve Freeman and Nat Pryce, ISBN 9780321503626
- https://arxiv.org/pdf/1611.05994.pdf
- Why Research on Test-Driven Development is Inconclusive?, Ghafari, Gucci, Gross, and Felderer: https://arxiv.org/pdf/2007.09863.pdf