
7
Implementing User Authentication and Authorization
Identity management has evolved a long way from basic usernames and passwords, as have those who wish to compromise user accounts. Nowadays, there are so many considerations and complexities to authentication and authorization that creating your own solution tends not to be the best option.
In this chapter, we will explore the features and services that Microsoft offers to help developers handle user authentication and authorization without the need to create their own solutions. We’ll start by exploring the Microsoft identity platform and covering the core features for controlling access to your resources. We’ll then learn how to implement authentication using the Microsoft Authentication Library (MSAL), before moving on to Microsoft Graph and some of the ways it can help enhance your apps. We’ll finish with a look at shared access signatures (SAS) for authorizing access to storage resources.
By the end of this chapter, you will understand which features and services are available to you from Microsoft for handling user authentication and authorization within your apps.
In this chapter, we’ll cover the following main topics:
- Understanding the Microsoft identity platform
- Implementing authentication with the Microsoft Authentication Library
- Discovering Microsoft Graph
- Using shared access signatures
Technical requirements
To follow along with the exercises in this chapter, you will need the following:
- The latest .NET SDK: https://dotnet.microsoft.com/download
- Visual Studio Code: https://code.visualstudio.com/Download
- The code samples for this chapter can be found here: https://github.com/PacktPublishing/Developing-Solutions-for-Microsoft-Azure-AZ-204-Exam-Guide/tree/main/Chapter07
Code in Action videos for this chapter: https://bit.ly/3RWeZcZ
Understanding the Microsoft identity platform
Nowadays, there are open standards such as OAuth 2.0 and OpenID Connect (OIDC) to help with handling user authentication and authorization, but even these have many complexities, especially when considering more than just a username and password – multi-factor authentication and conditional access, for example. The Microsoft identity platform provides several tools to help developers implement user authentication and authorization and does the heavy lifting for you.
We first made use of the Microsoft identity platform when we enabled authentication in Chapter 3, Creating Azure App Service Web Apps. At that point, we mentioned that we would discuss the details later, and here we are. As we saw in that chapter, the Microsoft identity platform helps to create applications that users can sign in to with their Microsoft work or school accounts, personal Microsoft accounts, as well as social or local accounts.
The Microsoft identity platform is built on top of the open standards previously mentioned: OIDC for authentication and OAuth 2.0 for authorization. OIDC is built on top of OAuth 2.0, so there are similarities between the two with regard to terminology and flow. Out of the box, the platform supports advanced security features such as multi-factor authentication, passwordless sign-in, single sign-on, and more, without the need for you to implement the functionality yourself. If your application is integrated with the Microsoft identity platform, you can natively take advantage of all the features on offer.
The platform contains multiple open source libraries (such as the MSAL) for various languages, and because it uses standards-compliant implementations of OAuth 2.0 and OIDC, it supports bringing in your own standards-compliant libraries as well. It also has a registration and configuration experience within the Azure portal, as well as the ability to programmatically configure your applications using the Microsoft Graph API and PowerShell.
Something we deferred discussing in depth until now when we enabled authentication on our web app was the Azure Active Directory (AAD) objects that are required for your applications to delegate identity and access management functions to AAD. Let’s discuss those now.
Service principals
In order to delegate functions to AAD, your application needs to be registered with an AAD tenant, which creates an identity configuration for your application that allows integration with AAD. When we register an application, we control whether it’s intended to be a single tenant app (only accessible within the AAD tenant in which you’re creating the registration, also known as the home tenant) or a multi-tenant app (accessible from other AAD tenants as well).
You may remember from when we previously enabled authentication on the web app that we had an entry in App registrations and an entry in Enterprise applications within the Azure portal. We’ll quickly go over each of these now:
- When you register an application with AAD, an application object is created within the home tenant, within the App registrations blade of AAD. This object contains metadata about your application, how tokens get issued in order to access the app, details of any resources the app might need access to, and which actions the app can perform. Each application will have only one app registration, even if it’s been configured to be accessible from multiple tenants. This information is used as a template for creating one or more service principals.
- For your application to be able to access resources secured by AAD, a service principal needs to exist within the relevant AAD tenant to represent the application. Service principals are each tenant’s representation of an application, located within the Enterprise applications blade of AAD. Key information from the app registration is used to create the service principal representing that application.
Each tenant that uses the application will have a service principal to represent that application, which can be used to define the access policy and permissions within that specific tenant. Only one app registration exists per application and that exists only within the home tenant of the application. So, the app registration is the global application object, and the service principal (enterprise application) is the per-tenant representation of that object, over which you have control of permissions and access policies, and so on. We’ll see these in more detail throughout this chapter.
Before we delve into a practical exercise to look at application objects and service principals, we should also talk about the different permission and consent types, as these will form part of our upcoming exercise.
Permission and consent types
As previously mentioned, the Microsoft identity platform uses OAuth 2.0, which is a method through which an application can access web-hosted resources on a user’s behalf. Web-hosted resources that integrate with the Microsoft identity platform have a resource identifier or application ID URI. For example, the Microsoft Graph resource has a URI of https://graph.microsoft.com. This is a first-party resource, but the same is also true for third-party resources integrated with the Microsoft identity platform.
Any web-hosted resources that integrate with the Microsoft identity platform can also define a set of permissions, allowing for third-party apps to request only the permissions they need to perform their functions. Users and admins can see what type of data the app can access, which we’ll discuss shortly.
In OAuth 2.0, these types of permission sets are known as scopes. You will also see them commonly called permissions. When an application needs a certain permission, it specifies the permission in the scope query parameter, which is indicated by appending the permission value to the web-hosted resource’s identifier or application ID URI. For example, an app that needs to sign you in with your AAD account and read your profile will need the https://graph.microsoft.com/User.Read permission (or scope). If you don’t specify the resource (for example, simply using User.Read), the Microsoft identity platform assumes the resource is Microsoft Graph. Again, although this is a first-party example, the same is true for other web-hosted resources, such as your own web APIs, for example.
There are two types of permissions supported by the Microsoft identity platform that you should be aware of.
Permission types
These are the two permission types supported by the Microsoft identity platform:
- Delegated permissions: These are used when an application needs to act on behalf of the signed-in user when it makes calls to a target resource. Users or admins can consent to delegated permission requests. We saw an example of this with the User.Read delegated permission used when we enabled authentication on our web app previously.
- Application permissions: These are used when an application needs to make calls to a target resource without a signed-in user present, for example, if the application runs a background service. Only admins can consent to application permission requests.
Essentially, if the app is accessing something on behalf of the user, the user delegates permission to the app to act on their behalf. If the app acts on its own behalf without a signed-in user required, application permission is required to access resources. To grant permission to an application, consent is required. There are three types of consent.
Consent types
The three consent types available with the Microsoft identity platform are the following:
- Incremental and dynamic user consent: Using incremental – or dynamic – consent, you can request only minimal permissions upfront, then have the app request additional permissions as and when they’re needed. When your app requests an access token, you can include the new scopes in the scope parameter. If consent hasn’t already been granted for the requested permission(s), the user will be prompted to provide consent only applicable to those new permissions being requested.
One challenge is that this kind of consent only applies to delegated permissions, not application permissions. This means that if the permission(s) being requested require(s) admin consent and the user can’t provide that consent, the permission won’t be granted here.
- Static user consent: This specifies all the permissions your app needs within the app’s configuration in the Azure portal. If consent hasn’t already been granted for the permission(s), the user will be prompted to provide consent.
One challenge with this is that when you’re specifying all permissions upfront, your app needs to know every resource that it would ever need access to in advance. A common use case for this is so that admins can provide consent on behalf of an entire organization.
- Admin consent: When your app needs to request more privileged permissions, an admin will need to provide consent, rather than just a user. This allows admins to have control over authorizing apps to access highly privileged information. Admins can provide consent on behalf of the entire organization, so users won’t get prompted when the scope is requested.
For admins to be able to consent to permissions on behalf of an organization, these permissions need to be static permissions registered within the app registration portal.
When you expose your own APIs, you can define scopes and whether only admins can consent to the scope or both admins and users can consent.
To demonstrate the different consent types, let’s run through a very basic example:
- Create a web app using your preferred method, which you shouldn’t need step-by-step guidance on how to do by now. Create a new App Service plan if needed.
- As we did before, go to the Authentication blade of the newly created web app and click Add identity provider.
- Select Microsoft for Identity provider, leave everything as default, and click Add.
We could have created an app registration beforehand and selected it here, but for the sake of this exercise, we’ll just create a new one and have the default settings applied.
- Within AAD, open the App registrations blade and open the newly created app registration, which will have the same name as your new app by default.
- From within your app registration, go to the API permissions blade. Notice that the Microsoft Graph permission User.Read is there as before (which translates to https://graph.microsoft.com/user.read).
This is an example of a delegated static permission. You can see that no admin consent is required, so each user will need to provide their consent for the first time unless an admin consents on behalf of the organization.
- Using a private browser session, navigate to the URL of your new web app and before logging in, look at the URL (or use the dev tools and select the entry with authorize?), and note that the URL includes the scope parameter, scope=openid+profile+email, which consists of the standard OIDC permissions that the user.read permission uses. Don’t accept yet.
You should see the following permissions being requested:

Figure 7.1 – User.Read permissions requested
Because I’m an admin, I can check the checkbox to consent on behalf of the entire organization.
- Change the URL to add +calendars.read at the end of the scope, like this: scope=openid+profile+email+calendars.read. This will tell your app to request consent dynamically to read the calendar of the user signing in.
When you commit that new URL, you should see the calendar permission being requested in addition to the previous permissions (still don’t accept yet):
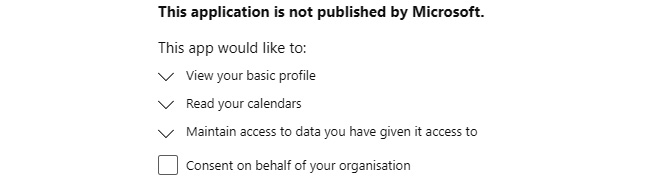
Figure 7.2 – Additional Calendars.Read permissions requested
- Click Cancel on the permissions and close the browser tab. We’ll revisit this process again shortly.
We’ve just seen a very basic example of static consent with user.read and dynamic consent by adding calendars.read to the scope. We’ll use dynamic consent more later when we start coding. Let’s complete this section by showing admin consent. Now that we know our application needs to read the calendar of our users, as well as read their profile to be able to log them in, assuming we’re happy with that, let’s grant admin consent on behalf of the entire organization for both permissions:
- Head back to the Azure portal and open the app registration again.
- Open the API permissions blade and click Add a permission.
- Add the Microsoft Graph delegated permission for Calendars.Read. You can use the search box after selecting Microsoft Graph.
- We now have User.Read and Calendars.Read Microsoft Graph permissions in the app registration.
As previously mentioned, the app registration is the global representation of the application, which is used as a template for the service principal in each tenant. Changes made to the app registration will propagate to each enterprise application/service principal. Let’s go into our enterprise application and grant the admin consent for these static permissions.
- From AAD, open the Enterprise applications blade and open the service principal for your application.
- Open the Permissions blade and click Grant admin consent for <tenant name>.
- Select your admin account and authenticate if needed, and you will see that both permissions have appeared for you to provide admin consent. Click Accept.
- After a few moments, you can refresh the screen and both permissions will show as having admin consent granted.
- Browse to the URL of your web app once more, making sure the calendars.read permission is added to the scope parameter in the URL as before. You shouldn’t be prompted for any consent because it’s already received admin consent.
Having certain permissions requiring admin consent provides some security, but you may also want to only provide access to the application if certain conditions are met from devices, such as multi-factor authentication, if the devices are enrolled within Microsoft Endpoint Manager/Intune, or depending on other conditions such as network location. This can be achieved using conditional access.
Conditional access
To demonstrate conditional access with the web app we have just created, let’s create a conditional access policy that only allows access to the app if the device attempting to access it is of a certain operating system (just for demonstration purposes):
- Within AAD, open the Enterprise applications blade and open the relevant service principal for the newly created app.
Remember, this is our tenant-specific representation of the application, so this is where we set up access and permissions for the application in our tenant.
- Open the Conditional Access blade and select New Policy, then Create new policy.
- Give this policy an appropriate title for what it will do. As a reminder, this will limit access to the app to only devices with an OS of your choice.
- For the Users or workload identities section, select All users from the Include tab.
- For the Conditions section, select Device platforms, and change Configure to Yes. From the Include tab, select Any device, and from the Exclude tab, select the OS from which you want to provide access to your app, then click Done.
- From the Grant section, select Block access, which will block access to all OSs other than the one you excluded, and click Select.
- Select On under Enable policy, followed by Create.
We have just created a conditional access policy blocking access to our app for all but the excluded OS. Feel free to look through the other options available, where you can grant access when certain conditions are met and require things such as multi-factor authentication.
A link to further information can be found in the Further reading section of this chapter.
- Test the access to your app from a private browser session from both an OS that you excluded, which should be able to access the app, and another OS (if available) that you didn’t exclude, which shouldn’t have access. When attempting to access from a blocked OS, you should see something like the following:
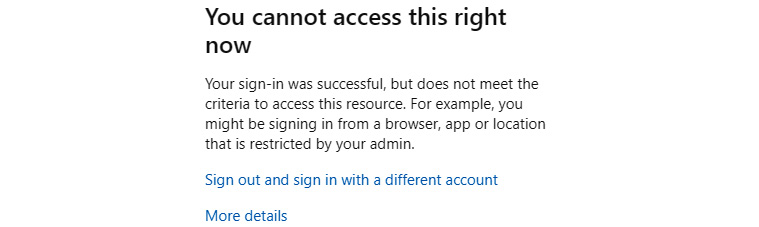
Figure 7.3 – Conditional access denying access to the application
We won’t use this app or the App Service plan again, so feel free to delete those resources if you don’t want to continue exploring and testing.
That was a very quick and simple example to both reinforce what we’ve been through regarding service principals and introduce you to conditional access policies. This is all we’re doing with conditional access in this chapter, so feel free to remove the policy from the app to avoid preventing your own access.
For the most part, as we’ve just seen, conditional access doesn’t require any code changes and there are no changes to the behavior of the app itself either. If the app requests a token indirectly or silently for a service, code changes will be required to handle challenges from conditional access.
Here are some scenarios that would require code changes for handling conditional access challenges:
- Apps that perform the On-Behalf-Of (OBO) flow
- Apps accessing multiple services or resources
- Single-page apps that use MSAL.js
- Web apps calling a resource
We’ve just seen that conditional access can be applied to web apps, but it can also be applied to web APIs that your app might access. Our app didn’t require any code changes to handle conditional access challenges because it was not trying to access any resources or APIs. If our app was accessing an API that had a conditional access policy applied, it would need to comply with that conditional access policy. Implementing challenge handling would be required in this scenario.
With the understanding of the Microsoft identity platform that we now have, let’s look at how we can make use of the libraries available from MSAL, which make authentication and authorization easier within your application code.
Implementing authentication with the Microsoft Authentication Library
MSAL allows you to get tokens from the Microsoft identity platform for authentication and accessing secure web APIs. For example, MSAL can be used for getting secure access to Microsoft Graph and other Microsoft APIs, as well as any other web APIs, including your own. If you’ve heard of Active Directory Authentication Library (ADAL), which integrates with AAD, MSAL is the successor of ADAL and integrates with the Microsoft identity platform, instead of being limited to AAD authentication only.
There are MSAL libraries available to support several languages and frameworks using a consistent API, including Android, Angluar.js, iOS, macOS, Go, Java, JavaScript and TypeScript frameworks, Node.js, Python, React, and – as you might expect – the .NET ecosystem. MSAL can be used to acquire tokens for web apps, web APIs, single-page apps, mobile and native applications, daemons, and server-side apps.
As we mentioned earlier in this chapter, modern authentication can be extremely complex to implement yourself. MSAL handles a lot of the heavy lifting for you. For example, here are some of the things MSAL does for you:
- Uses OAuth and OIDC libraries directly, while you just use MSAL APIs
- Handles the protocol level details so that you don’t have to
- Obtains tokens on behalf of users or an application as applicable
- Caches and refreshes tokens when required so that you don’t have to handle token expiration yourself
- Provides support for any Microsoft identity
- Helps with troubleshooting your app by exposing actionable exceptions, logging, and telemetry
MSAL provides several different authentication flows, which can be used in various application scenarios.
Authentication flows
Here are some of the flows provided by MSAL:
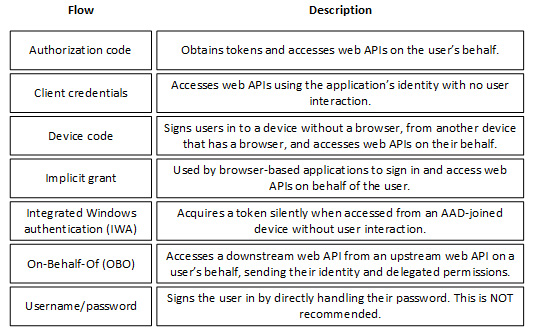
Figure 7.4 – Some of the authentication flows provided by MSAL
A link to further information on the flows and application scenarios can be found in the Further reading section of this chapter.
Before we start creating applications that use MSAL, there are some key pieces of information to cover first with regards to client applications.
Client applications
The first thing to understand about client applications is that there are three categories, which have different libraries and objects available. These categories are as follows:
- Single-page applications (SPAs): Web apps that acquire tokens by a JavaScript or TypeScript app running in a browser. These apps use MSAL.js. Support for these types of applications is more recent than the others and doesn’t form part of the exam content at the time of writing.
- Public client applications: Apps that run on user devices, IoT devices, or browsers. Because these are easily accessible, they aren’t trustworthy for keeping application secrets safe. Due to this, they can only request access to web APIs on behalf of the logged-in user (delegated permissions).
- Confidential client applications: Apps running on servers such as web apps, web APIs, or daemon apps. Because they’re considered more difficult to access than public client apps, they are considered secure enough to be trusted with keeping application secrets safe. These clients can hold configuration time secrets and each instance of the client has its own configuration, which includes the client ID and client secret.
For your application to make use of MSAL, you need to initialize the app with MSAL. The recommendation when instantiating your app is to use the available application builders. For public client apps, we can use the PublicClientApplicationBuilder class, and for confidential client apps, we can use the ConfidentialClientApplicationBuilder class. Both provide the means to configure your app within code, a configuration file, or a combination.
It should be no surprise by now that if we want our application to integrate with the Microsoft identity platform so that we can sign users in, we need to register the application in our AAD tenant.
Let’s take what we’ve learned so far in this chapter and create a new app that integrates with the Microsoft identity platform and uses MSAL to acquire tokens. We’re going to create a top-level C# console app that uses MSAL.NET for this exercise, keeping things relatively simple:
- Within AAD, create a new app registration that will represent our console app. Give it any name you’d like, leave it as a single tenant app, then, under Redirect URI (optional), change the Select a platform dropdown to Public client/native (mobile/desktop). Set the URI to http://localhost, then click Register.
Because our app will be a console app running on our device, that makes it a public app, hence selecting this option.
- Once created, go to the API permissions blade of the new app registration and note that the Microsoft Graph User.Read permission has been added by default. We could grant admin consent so that nobody gets prompted for consent but we won’t.
- From the Overview blade, make a note of the Application (client) ID and the Directory (tenant) ID values, as our app will need this information for the integration.
Notice that we’re not creating any certificates or secrets because our app will be using the user’s tokens and not those of the app/client itself. If we were creating a web app (which would be a confidential client app), we could use the credentials of the app registration instead of the user.
- Create a new folder for this exercise if you wish, then create a new .NET console app with a name of your choice from a terminal session with the following:
dotnet new console -n "<app name>"
- Navigate to the newly created project folder and add the MSAL .NET package by running the following command:
dotnet add package Microsoft.Identity.Client
- Open the Program.cs file within VS Code and remove any prepopulated code so that we’re starting afresh.
- Add the MSAL.NET package to the project by adding the following statement:
using Microsoft.Identity.Client;
- Add variables for the application/client ID and tenant ID, which are on the Overview blade of the newly created app registration:
const string _clientId = "<app/client ID>";
const string _tenantId = "<tenant ID>";
- Use the PublicClientApplicationBuilder class to initialize the app with MSAL as a public client app:
var app = PublicClientApplicationBuilder
.Create(_clientId)
.WithAuthority(AzureCloudInstance.AzurePublic, _tenantId)
.WithRedirectUri("http://localhost")
.Build();
Notice we’re passing in the client ID of our app registration via the _clientId variable, as well as setting the authority to the public Azure cloud, passing in our tenant ID via the _tenantId variable. We’re also setting the app to use the same redirect URI as the app registration. If the redirect URIs don’t match, you will receive an error when trying to sign in.
- Create an array of strings containing the scopes that we want to request. In our case, we’re just going to request User.Read for now (we’ll add more shortly):
string[] scopes = { "User.Read" };
- We can now request the token interactively using the scopes variable:
AuthenticationResult result = await app.AcquireTokenInteractive(scopes).ExecuteAsync();
- Add a couple of lines that print out the ID token (authentication) and access token (authorization) to the console:
Console.WriteLine($"ID: {result.IdToken}");
Console.WriteLine($"Access: {result.AccessToken}");
Your code should now look like this:
using Microsoft.Identity.Client;
const string _clientId = "<app/client ID>";
const string _tenantId = "<tenant ID>";
var app = PublicClientApplicationBuilder
.Create(_clientId)
.WithAuthority(AzureCloudInstance.AzurePublic, _tenantId)
.WithRedirectUri("http://localhost")
.Build();
string[] scopes = { "User.Read" };
AuthenticationResult result = await app.AcquireTokenInteractive(scopes).ExecuteAsync();
Console.WriteLine($"ID: {result.IdToken}");
Console.WriteLine($"Access: {result.AccessToken}");
- Confirm the application builds successfully with the following command:
dotnet build
- Once confirmed, run the application to test it with the following command:
dotnet run
You should get the usual Permissions requested prompt, which you can accept. You should then have both tokens output to the console. If you wish, you can copy each token into https://jwt.ms as before and see what claims are contained within each token.
- Add another scope to the scopes array, for example, Calendars.Read, so that the scopes line looks like this:
string[] scopes = { "User.Read", "Calendars.Read" };
- Accept the permissions after running the app again with the following command:
dotnet run
You’ve just created an app that uses MSAL to request tokens and dynamic consent to request additional permissions through code. Congratulations!
Having to log in interactively every time is not exactly optimal, so you’d want to be able to acquire a token silently from the cache first and, only if that fails, try interactively. If this was a web app, the token cache would be handled for you. If you want to check out the mvc template arguments or the webapp template arguments, including --auth, you can find them here: https://docs.microsoft.com/dotnet/core/tools/dotnet-new-sdk-templates#web-options. As you will see from that page, you can pass in the app registration credentials, which get prepopulated in the app configuration.
With desktop apps such as the one we’ve just created, there’s no built-in user token cache handling, because storing unencrypted (although encoded) tokens locally in a file would not be considered secure.
To see our example expanded to include creating a local user cache (for demonstration purposes only), as well as attempting to obtain the tokens from the cache silently, falling back to interactive if the app can’t acquire a valid token from the cache, check out the example here: https://github.com/PacktPublishing/Developing-Solutions-for-Microsoft-Azure-AZ-204-Exam-Guide/tree/main/Chapter07/02-auth-with-cache.
The main point to note from the example code at the link is within the ObtainTokenAsync() method, where we first try to get the token from the cache with the AcquireTokenSilent() method, then if we get the MsalUiRequiredException exception, we try interactively as we did before. This is a common pattern with MSAL. We won’t be using this example for any upcoming exercises, as it was just intended to demonstrate a common pattern for token acquisition without having to create a new web app.
With that, we’ve reached the end of the MSAL section of this chapter. You can see how the APIs exposed by MSAL make authentication so much easier than if we had to manage all the protocol-level details ourselves.
Now that we’ve got our app integrated with the Microsoft identity platform using MSAL, we can consider expanding our app to make use of the tokens we acquired and start interacting with data in Microsoft 365 using Microsoft Graph.
Discovering Microsoft Graph
At a very high level, Microsoft Graph is a REST API that can be used to interact with the data within Microsoft 365, available through REST APIs and client libraries.
You can use Microsoft Graph to access data on Microsoft 365 core services such as Calendar, Excel, Microsoft Search, OneDrive, Outlook/Exchange, Teams, and more. You also have Enterprise Mobility + Security services such as AAD, Advanced Threat Protection, and so on, Windows services, and Dynamics 365 Business Central services.
Microsoft Graph has three main components to help with the access and flow of data:
- The Microsoft Graph API: Accessible using a single endpoint (https://graph.microsoft.com) to interact with people-centric data and insights across the aforementioned services. You can access the endpoint using REST APIs or the available SDKs (which we will shortly).
- Microsoft Graph connectors: Used to bring data from external sources into Microsoft Graph applications and services to enhance experiences such as Microsoft Search, so that your chosen external data can be displayed alongside Microsoft 365 search results, for example. There are connectors for a lot of the most used data sources such as Salesforce, Jira, Confluence, and ServiceNow.
- Microsoft Graph Data Connect: Used to access data on Microsoft Graph at scale with granular control over data and consent for admins. While the Graph API can be used to access data in real time, Data Connect can access data on a recurring schedule and operates on a cache of the data in your Azure subscription rather than the data master. Because Data Connect uses a cache, data protection is extended to that cache.
The Graph API can provide admin consent for the entire organization and specific resource types, whereas Data Connect can provide admin consent for select groups of users, resource types, and resource properties, and exclude users. Data Connect can also scope to many users or groups, whereas the Graph API can scope to a single user or the entire tenant.
Before we start querying, I’d like to introduce you to a useful tool for exploring Graph, so you can see the information you can get, which permissions are required, and what responses might look like. This tool is aptly named Graph Explorer.
Graph Explorer
We’ll briefly look at Graph Explorer now before we make more use of it later, like so:
- Navigate to https://developer.microsoft.com/graph/graph-explorer and sign in using the Sign in to Graph Explorer button if you’re not already signed in. If you don’t sign in, Graph Explorer will use sample data rather than real data, but you won’t be able to do everything in this exercise, hence signing in would be ideal.
Notice toward the top of the main part of the screen, where we have the method (defaults to GET), the API version (v1.0 at the time of writing this), and the URL. The URL is made up of the API endpoint (https://graph.microsoft.com), the API version (which updates if you change the version dropdown), the resource you want to query (defaults to /me, so will query the context of the logged-in user), and it will also include any optional parameters.
- Click Run query and see the response, which shows some basic profile data.
- Click on the Modify permissions (preview) tab. Here, you can see consented permissions and consent to additional permissions, so that you can test the results when changes are made.
Some of the queries you might test won’t work until you modify the permissions by granting consent to Graph, which can be done here.
- Click on the Access token tab and you’ll be able to see the access token that was used in the query. You can also click on the { } button to open the access token in https://jwt.ms, as we did previously.
- Click on the Code snippets tab above the response and you’ll see some small snippets of code for different languages, which you can use to help build your apps that need to integrate with Graph. Notice that most of them have a reference to /me, which makes sense now that we know that means it’s the context of the logged-in user. The C# code we’re going to see shortly was generated with the help of Graph Explorer.
- Add ?$select=givenName to the end of the URL and click Run query. Adding this query parameter will only return the givenName property.
- Changing the URL to https://graph.microsoft.com/v1.0/users and running the query will return a list of all users in the organization. Filter the results to only show your account by changing the URL to https://graph.microsoft.com/v1.0/users?$filter=userPrincipalName eq '<your full login>', replacing <your full login> with the email address that you use to log in to Azure.
Feel free to explore a little more if you’d like. If we were to do the REST requests ourselves, we would need to acquire an access token, which we would add to an Authorization header with the value of Bearer <access token>. You’ll see this header being referenced in the upcoming C# example as well. You can use the browser developer tools to see what happens behind the scenes when you run a query, and you’ll see the content of the REST call that Graph performs.
A link to the reference for the Microsoft Graph API can be found in the Further reading section of this chapter. With a basic understanding of what makes up a Graph REST API query (method, version, resource, and optional parameters), let’s look at querying using the SDKs.
Graph SDKs
The Graph SDKs consist of two components: a core library and a service library. The core library provides many features for working with Microsoft Graph, with support for retry handling, transparent authentication, payload compression, and more. The service library has models and request builders generated from Microsoft Graph metadata.
Let’s expand the app we created earlier with interactive token acquisition to query Graph. You’re welcome to use the example that uses the local user cache, but as it’s not a good practice to have a local unencrypted cache, the upcoming exercise will be using the app without a local user token cache:
- If not already cloned, clone the repository for this book locally by running this command from within a suitable directory:
git clone https://github.com/PacktPublishing/Developing-Solutions-for-Microsoft-Azure-AZ-204-Exam-Guide
- Open the Chapter07�3-graph directory in VS Code and open a terminal session from that directory.
- Replace the placeholder text for the client ID and tenant ID with those relevant to your app registration.
- Confirm that the project builds successfully, which will also install any required packages:
dotnet build
- Run the app to test it:
dotnet run
You should be prompted for authentication in your browser and once authenticated, you should be greeted with your given name. This queried Microsoft Graph to get your profile and then returned your given name from that profile data.
There are a few points to note in this code:
- We’re using System.Net.Http.Headers to construct the Authorization header and the Microsoft.Graph package, which is a service library and has a dependency on Microsoft.Graph.Core, which, as the name suggests, is a core library and a dependency for all of the Graph service libraries.
- An authentication provider is required for making Graph calls, so we’re creating one using the DelegateAuthenticationProvider class. This sets the request Authorization header and you can see that it uses the same format mentioned earlier ("Bearer <token>"). It gets the token using a method that checks the local cache (if it exists, although this app isn’t creating one) for a valid token and then interactively obtains the token if one can’t be found in the cache.
- We’re then creating a new Graph service client using the GraphServiceClient class, which, as you’ll see, makes making calls to Graph relatively simple. This uses the authentication provider from the previous point.
- This line uses the SDK to perform a GET request to https://graph.microsoft.com/me and stores the result in a user variable:
var user = await graphClient.Me.Request().GetAsync();
- Finally, we use the user variable to greet the logged-in user by their given name with the GivenName property.
If you’d like to see an example of this app being expanded to create a new calendar event, feel free to check out https://github.com/PacktPublishing/Developing-Solutions-for-Microsoft-Azure-AZ-204-Exam-Guide/tree/main/Chapter07/04-graph-calendar-event. As with the local cache example, this is purely for demonstration purposes and I didn’t add any additional exception handling to it, as it’s just intended to show that it is relatively easy to implement features such as these.
Now that we’ve covered how to implement authentication and authorization with MSAL and how to use the acquired tokens to query the Microsoft Graph, we should consider the situations in which you need to provide your app with secure access to resources within a storage account, without trusting your app with the storage account access key. This is where SAS come in.
Using shared access signatures
A SAS is a signed URI that provides defined access rights to specific resources within a storage account for a specified period. To use a SAS for accessing Azure Storage resources, you’ll need to have two components:
- The URI of the resource being accessed, for example, https://myaccount.blob.core.windows.net/container/file.txt
- The SAS token that you would have created and configured
The SAS token itself is comprised of several elements and it’s worth understanding the structure.
The SAS token structure
If we look at an example SAS token, we can inspect each element for our understanding: sp=rd&st=2022-06-04T13:35:54Z&se=2022-06-04T21:35:54Z&spr=https&sv=2020-08-04&sr=b&sig=wX4run5CPuFbQkCezJxGwOEv%2BQ2ODjVEVxn5Yrzo8ug%3D. Let’s take each element and explore its meaning:
- sp=rd: sp stands for signed permission. In this case, we have r and d, which stand for read and delete.
- st=2022-06-04T13:35:54Z: st is the start time of the token’s validity.
- se=2022-06-04T21:35:54Z: se is the end time of the token’s validity.
- spr=https: spr stands for signed protocol. In this case, we’re only allowing HTTPS requests to use the SAS token.
- sv=2020-08-04: sv stands for signed version. This is the version of the Azure Storage API to use.
- sr=b: sr stands for signed resource. In this case, we’re granting access to a Blob resource, hence the b.
- sig=wX4run5CPuFbQkCezJxGwOEv%2BQ2ODjVEVxn5Yrzo8ug%3D is the cryptographic signature with which the token is signed.
Using our example, the full SAS URI would be https://myaccount.blob.core.windows.net/container/file.txt?sp=rd&st=2022-06-04T13:35:54Z&se=2022-06-04T21:35:54Z&spr=https&sv=2020-08-04&sr=b&sig=wX4run5CPuFbQkCezJxGwOEv%2BQ2ODjVEVxn5Yrzo8ug%3D. Providing a request is made using the specified protocol and within the validity period, the SAS could be used to read and delete (in our example) file.txt within the container called container (I’m treating you to my incredibly expansive imagination again) within the myaccount storage account. Using this SAS wouldn’t require any AAD user credentials, as the SAS contains everything needed to provide access.
You might be wondering which key is used to sign the SAS token. This depends on the type of SAS you generate.
SAS types
There are three supported types of SAS available in Azure Storage:
- A user delegation SAS: Secured with AAD credentials and provides access to containers and blobs, so is only supported for the Blob service. Because a user delegation SAS is secured using specific AAD credentials, this is the recommended type of SAS to use where possible, as it’s considered more secure to sign with AAD credentials than to sign with an account key. The URI of a user delegation SAS includes some additional parameters. For example, the user’s AAD object ID, skoid, or the AAD tenant ID, sktid. Other parameters are supported and can be found in the Microsoft documentation.
- A service SAS: Secured with the storage account key and provides access to a resource in one of the following services: Blob Storage, Table Storage, and Azure Files.
- An account SAS: Secured with the storage account key and provides access at the storage account level. This provides access to service-level operations such as getting and setting service properties, which you can’t do with a service SAS. An account SAS can also provide access to more than one service within a storage account at the same time, unlike a service SAS, which is limited to a single service at a time.
Let’s briefly demonstrate a SAS by creating the resources using the CLI, before jumping into the portal to look at the options available. You can generate a SAS using the CLI, but we’ll use the portal because it’s easier to demonstrate:
- Create a resource group if you don’t already have one that you want to use:
az group create -n "<name>" -l "<location>"
- Create a storage account:
az storage account create -n "<name>" -g "<resource group name>" -l "<location>" --sku "Standard_LRS"
- List the account keys for the storage account:
az storage account keys list -n "<name>" -g "<resource group name>"
These are the keys mentioned previously that are used to sign service and account SAS. As you can see from the output, they provide full permissions to your storage account, so you should keep these keys secure and rotate them regularly. The reason for having two keys is so that you can use one of the keys while you rotate the other to avoid access being lost.
- Copy the value of one of the keys and use it in the following command to create a container:
az storage container create -n "<name>" --account-name "<storage account name>" --account-key "<account key>"
- Within the Azure portal, open the newly created storage account and the Shared access signature blade.
- Select Service under the Allowed resource types setting and select either of the access keys for the Signing key setting, then select Generate SAS and connection string.
Notice that the URLs for the different services are populated, including the SAS token that is appended to the URLs. There was no option to use AAD credentials to secure the SAS because that’s only available for the Blob service.
- Open the Containers blade and open your new container.
- Click on Shared access tokens.
This time, we have a Signing method option available, one of which is the account key, which we’ve already used. The other option allows us to generate a user delegation key.
- Select the User delegation key option under the Signing method setting and select Generate SAS token and URL. Check out the Blob SAS token value and notice the additional parameters included, which weren’t there in the account SAS.
If you see a warning displayed about not having permissions, you could go into the Access Control (IAM) blade and assign yourself a role that does have permissions – Storage Blob Data Contributor, for example. This can take some time to apply. You may have to refresh the page after the assignment.
It may have crossed your mind that Azure doesn’t appear to track these generated SAS tokens, so how would you edit or revoke one once generated? That’s where stored access policies come in.
Stored access policies
Stored access policies provide another level of control over service-level SAS on the server side. Within a stored access policy, you specify permissions along with start and end times, which will be applied to any SAS that are assigned to the policy.
What this means is that you can create a SAS that uses a certain stored access policy, and it will inherit the permissions and dates from this policy. Another benefit of using stored access policies is that you can edit permissions and/or dates within the policy, and all SAS assigned to it will have those changes applied to them, so you can revoke all SAS assigned to a policy at once by changing the dates or deleting the policy.
Let’s do a quick demonstration with the storage account and container we’ve just created:
- Create a plain text (.txt) file and save a short message in there, then upload that file to the container created in the last exercise using the Azure portal.
- From within the container in the Azure portal, open the Access policy blade and select Add policy.
- Enter any identifier you’d like, select Read under the Permissions setting, set Start time to a time in the past, and set Expiry time to a time in the future, then click OK.
- Once created, make sure you click Save.
- From the Overview blade, right-click on your uploaded text file and select Generate SAS (clicking on the ellipsis or clicking on it and then selecting the Generate SAS tab also works).
- From the Stored access policy dropdown, select the newly created policy. Notice that the permissions and times are no longer editable.
- Click on Generate SAS token and URL. Notice that the SAS token now includes the policy name in the si parameter.
- Copy the Blob SAS URL value to the clipboard, as we’ll use that in the next step.
- Open a new terminal session and run the following command:
curl "<SAS URL>"
The request should have been successful and displayed the content of your plain text file. You may need to add the -UseBasicParsing switch if this command doesn’t work without it.

Figure 7.5 – A successful GET request using the Blob SAS URL to display content
- Back in the Azure portal, delete the access policy, and click Save.
- After up to 30 seconds, try the same curl command we just used, and you should receive an authentication error.
As you might imagine, associating SAS tokens with stored access policies provides flexibility and additional security, so is a recommended practice where possible.
Although we won’t cover how to do it, generating SAS can also be done programmatically. This is common in situations where you have an app that requires users to read and write data to your storage account. In these scenarios, you might want to have a lightweight service authenticating the client and generating the SAS. Then, the client can use the SAS per the permissions and period defined by the SAS. A link to documentation on SAS can be found in the Further reading section of this chapter.
Summary
In this chapter, we have explored some of the key tools and features available to make building applications with authentication and authorization easier. We started with a detailed introduction to the Microsoft identity platform, which included explanations of app registration and service principals, followed by the different permission types and consent types, finishing with a demonstration of using conditional access to limit access to an application.
Building on this, we have looked at using the Microsoft Authentication Library to handle authentication and handle tokens in code. Once we had the tokens, we used them to query Microsoft Graph using the Graph SDK, after exploring Graph Explorer and the structure of Graph REST API requests. We finished off this chapter looking at how SAS can provide defined access to specific resources within a storage account, including using stored access policies for greater security and flexibility.
In the next chapter, we will stick with the theme of security and look at securing and accessing application secrets in Azure Key Vault. We’ll look at implementing managed identities for resources in Azure and we’ll finish by discussing how to store configuration in App Configuration.
Questions
- Which one of the following can be used to bring external data into Microsoft Graph applications and services?
- Microsoft Graph Data Connect
- Microsoft Graph connectors
- Graph Explorer
- Which types of permissions are required when an application needs to act on behalf of a signed-in user?
- Which MSAL library supports single-page applications?
- Which type of client application runs on user devices, IoT devices, and browsers?
- Which type of SAS is recommended where possible and only available with the Blob service?
Further reading
- The documentation on conditional access can be found here: https://docs.microsoft.com/azure/active-directory/conditional-access/overview
- Further information about MSAL can be found here: https://docs.microsoft.com/azure/active-directory/develop/msal-overview
- Further details on authentication flows and application scenarios can be found here: https://docs.microsoft.com/azure/active-directory/develop/authentication-flows-app-scenarios
- The documentation on Microsoft Graph can be found here: https://docs.microsoft.com/graph/overview
- The reference for the Microsoft Graph API can be found here: https://docs.microsoft.com/graph/api/overview
- Further documentation on SAS can be found here: https://docs.microsoft.com/azure/storage/common/storage-sas-overview